Tools for Jira
 Tools for monday.com



Atlassian’s State of Teams 2025 report found that roughly half of knowledge workers see teams unknowingly doing the same work. Release work has the same visibility problem. Jira release management automation helps by putting the repeating steps of a release where everyone can see them.
Without it, the same chores come back every cycle. Someone creates the next version, updates Fix versions, and moves work items to Released by hand. Quality checks depend on one person remembering them, and stakeholders keep asking what shipped.
In this article, we describe three layers that take over these chores: automation flows, checklists, and Rovo agents. We built each setup on a test site. You will also see what worked and what still needed a person. If you are new to release management in Jira, start with our overview.
TL;DR
- Jira release management automation splits release work into three layers: flows for fixed steps, checklists for human checks, and Rovo agents for writing.
- Four flows cover a sprint-based cycle: create the next sprint and version, add work items to the release, move them to Released, and email stakeholders.
- Calendar releases can use two scheduled flows instead, and connected CI/CD tools can move work items too.
- Smart Checklist templates add general and platform-specific release checks automatically, and mandatory items can block the move to Released.
- Rovo agents can post work item summaries and draft release notes and sprint reviews, but a person should review every draft.
- Agents write confidently from thin tickets, so tell them to use only what’s in the work item.
What is Jira Release Management Automation?
 Definition
Jira release management automation is the practice of handing repeatable release tasks to Jira automation flows, checklist templates, and Rovo agents, so versions, readiness checks, and release notes don’t depend on someone remembering them.
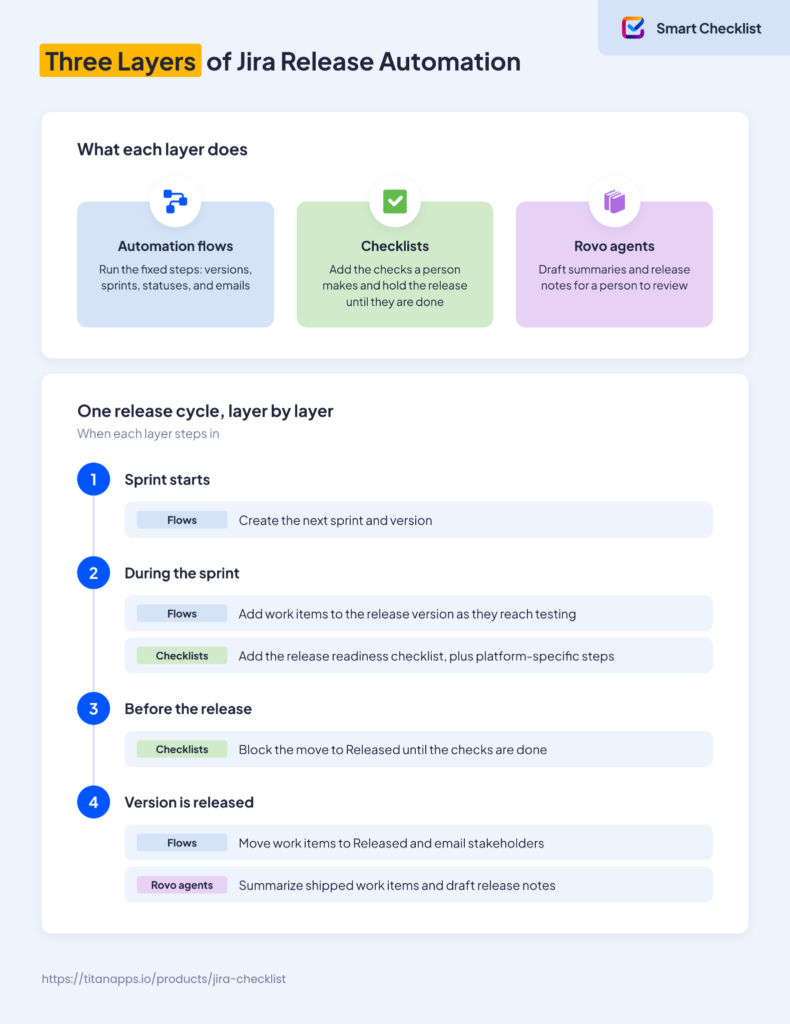
In practice, it works best as three layers, each doing a different job:
- Automation flows. Flows handle steps that follow a fixed pattern, like creating a version or moving work items to Released. They run the same way every cycle, so nobody has to remember the next step. You may know them by their former name, automation rules. For the basics, see these Jira automation examples.
- Checklists. Some checks need a person, like testing on a device or reviewing release notes. Checklist templates add these checks to the right work items automatically and can stop the release work item from moving forward until they are done.
- Rovo agents. Agents handle the writing. They read the work items in a release and draft summaries and release notes for a person to review.
A simple rule of thumb: everything that needs to be done automatically is the job for Jira automation. Everything that starts with the word ‘generate’ is the work for Rovo. However, the flows can’t judge whether a release is ready, and an agent’s draft still needs a human check. Checklists fill the gap between them.

Here is how common release chores map to the three layers:
| Release chore | Layer |
|---|---|
| Create the next sprint and version | Automation flows |
| Add finished work items to the release | Automation flows |
| Release the version and update work item statuses | Automation flows |
| Email stakeholders when a version ships | Automation flows |
| Add release readiness checks, including platform-specific steps | Checklists |
| Block the release work item until the checks are done | Checklists |
| Summarize each shipped work item | Rovo agents |
| Draft release notes and a sprint review | Rovo agents |
 Note
In DevOps, release automation usually means the CI/CD pipeline, which builds, tests, and deploys the code. Jira release management automation works one level up: it tracks, checks, and communicates the release. We cover where the two connect later in this article.
What to Set Up Before You Start
The flows in this article rely on a few things in your Jira setup. Check them before you build anything:
- One version per release cycle. If your team ships once per sprint, that means one version per sprint. Work items join a release through the Fix versions field. In team-managed spaces, the field appears once you add Releases to the space. Our guide to Jira versions covers the basics.
- Release statuses. Our examples use Ready for Testing, Ready for Release, and Released. Your names may differ, but each stage needs its own status. If any are missing, you can add custom statuses.
- Consistent version names. A flow that creates the next version builds its name from a pattern, for example, the sprint number. This works best when every version follows the same pattern.
- Platform labels or components. If releases differ by platform, mark the platform with a label or one of your components. The checklists later in this article use them to add platform-specific steps.
Note
Space admins can create flows for their own space by default. Flows that run across several spaces need a Jira admin. The Rovo part of this article also needs Rovo on your site. It’s available on Standard, Premium, and Enterprise plans, and an organization admin manages access to it.
How to Automate Release Management in Jira With Flows
For sprint-based releases, four flows cover most of the cycle. Each one works the same way: when something happens in Jira, Jira takes the next step. We built all four on a test site and ran them through one full release.
When a Sprint Starts: Create the Next Sprint and Version
The first flow runs when a sprint starts. It creates the next sprint and a version for it, for example, Release Sprint 13. This way, the product manager can plan the next sprint while the current one is still running.
The new names come from the current sprint number, so the flow depends on consistent naming. In our test, starting Sprint 1 created Sprint 2 and Release Sprint 2 in under a second.
During the Sprint: Add Work Items to the Release
The second flow runs when a work item moves to Ready for Testing. It sets the Fix versions field to the next unreleased version. QA sees exactly what goes into the release, and nobody has to update the field by hand.
You don’t need to name the version in the flow. The Edit work item step offers Next unreleased version as a ready-made value. The same flow then works in every cycle.
On Release Day: Move Work Items to Released
The third flow runs when you release the version. Releasing a version doesn’t change the status of its work items, so they would keep their old status. The flow goes through the work items fixed in the version and moves each of them to Released.
Tell Stakeholders What Shipped
The same trigger can also send a release email. A Lookup work items step finds everything in the version with a short JQL query. A Send customized email step then lists those work items for stakeholders who don’t follow the board.
Here is the release-day flow with both parts:
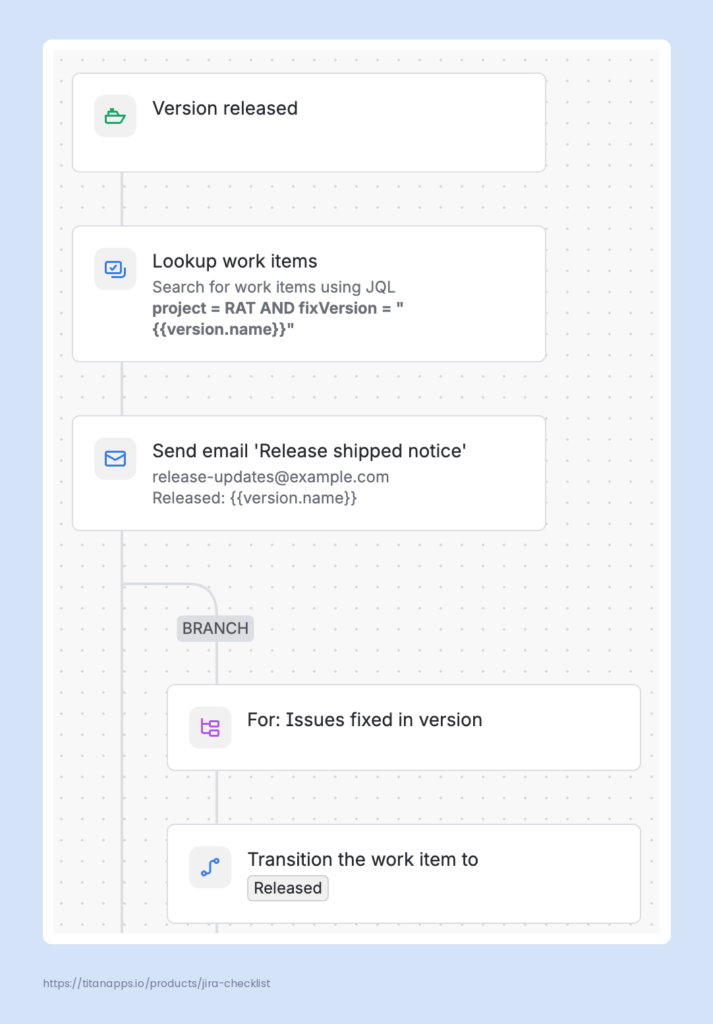
When we released the test version, the email went out and both work items moved to Released. The whole run took about three seconds.
Pro Tip
If you’d rather not build flows step by step, open Create flow and pick Create with Rovo. Describe the flow in plain words, and Rovo drafts the steps for you to review. It handles simple flows well, but steps that calculate names or call other systems often need a manual fix.
What If You Release on a Schedule?
Not every team ships once per sprint. For calendar-based releases, two scheduled flows can do the same job. The first runs on a set day and adds finished work items to the upcoming version. The second runs on release day, releases the version, and creates the next one.
The Release version step picks the next unreleased version by default, so neither flow needs a version name.
Where CI/CD Comes In
If your code or build tool is connected to Jira, its events can move work items too. For example, Pull request merged can send a work item to Ready for Testing. Deployment successful can then move it to Released. Our guide to Git and Jira integration explains how to connect the tools.
Add Release Readiness Checklists Automatically
Every release needs the same core checks, like regression tests and a rollback plan. Some releases also need steps for one platform. An iOS release, for example, has to pass App Store review first. If someone adds these checks by hand, the release depends on that person remembering them.
You could build a flow that creates a subtask for each check. This may work for a few checks. With a dozen, subtasks crowd the board, and each one is another work item to move.
The Smart Checklist app keeps these checks inside the release work item instead. You save each set of checks as a checklist template and give it conditions. The app then adds the template automatically when a work item matches them. In our test, we used two templates:
- General release readiness. Regression tests, release notes review, rollback plan, and support briefing. It’s added to every work item with the release label.
- iOS release steps. The TestFlight build, testing on supported iOS versions, and App Store review. It’s added when the work item also has the iOS component.
Both templates stack on the same work item, each under its own header. Our iOS release work item got both checklists when it was created. The Android one got only the general template. Adding the iOS component to an existing work item worked too.
Here is the iOS release work item with both templates:
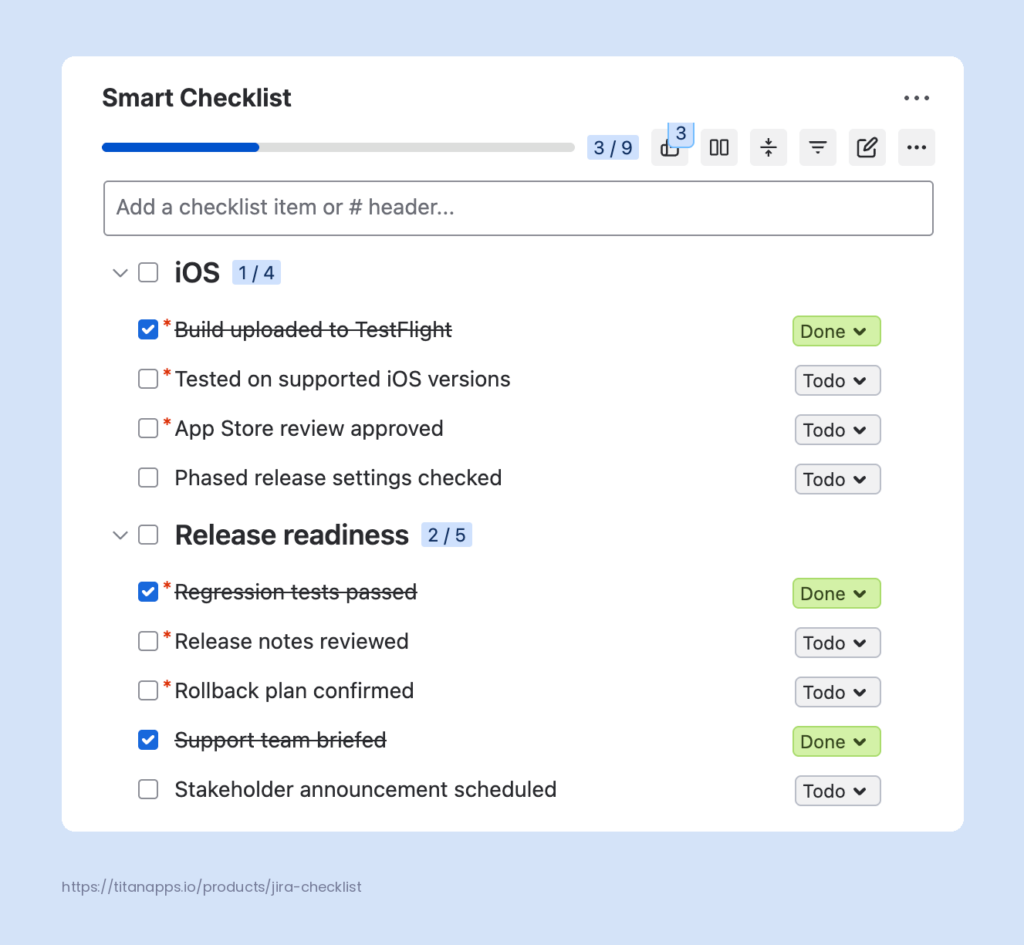
The red asterisks mark mandatory items. These are the checks a release can’t skip.
To turn the checklist into a gate, add a validator to the transition to Released. In our test, moving the work item to Released failed with the message “Complete all mandatory checklist items.” Once the mandatory items were done, the move went through, even with optional items still open.
One mandatory item worth adding is Release notes reviewed. It makes sure a person checks the Rovo draft we cover in the next section before the release ships.
Note
Template conditions, mandatory items, and validators are part of the app. Validators work both in company-managed and team-managed spaces.
For step-by-step setup, see how to add templates automatically with conditions. If you need a starting point, our free release readiness checklist includes two templates you can adapt.

Let Rovo Agents Write the Release Paperwork
Flows move the release forward, but they can’t write. Rovo agents fill that gap. They read your work items and draft text for a person to review. A flow can call Rovo in two ways:
- Use Rovo. A one-off prompt written inside the flow. It suits a quick task, but the prompt lives only in that flow. The step is still marked Beta.
- Use agent. Calls a reusable agent with its own instructions. You write the instructions once and reuse the agent in other flows, in Rovo Chat, or on a work item.
Oleksandra Sokol, our Product Lead, started with Use Rovo and a long prompt. She later moved the instructions into an agent, so the flow stayed short. Note that both steps need a second step, such as a comment, to put the response somewhere. The first time you add one, Jira asks you to connect automation to Rovo.
By default, an agent in a flow can only read and respond. It can’t create, change, or delete anything unless you turn on Let this agent take actions.
Post a Summary When a Work Item Ships
Long comment threads hide what actually changed. A flow can ask an agent for a short summary when a work item moves to Released. The Comment on work item step then posts the response with {{agentResponse}}. Set Add comment as to your agent, and the comment appears under the agent’s name. Prevent duplicates is on by default, so each work item gets the summary only once.
In our test, the agent summarized a released work item in three short points. It also explained why the change mattered to users. For a work item with only a title, it said there wasn’t enough information instead of guessing.
How to Get Automated Release Notes in Jira
Start with what Jira already has. On the release page, Jira can generate release notes from the work items in a version, grouped by work type. It can also send a draft to Confluence. With Rovo and Confluence on your site, Rovo can also write the draft for you.
To get a draft on every release, extend the release-day flow from earlier. After Lookup work items, add a Use agent step and pass it the work items. The draft can then go into the stakeholder email. If you want the notes on the version itself, note that no flow step edits the version description. That takes a REST API call, so ask your Jira admin.
Atlassian also offers a ready-made Release Notes Drafter agent. It groups up to 20 work items into themes. We ran it in a flow on a test release, and the draft wasn’t ready to send. It opened with a greeting, ended with follow-up questions, and linked work items to a placeholder site address. It also described a one-line work item as making payments more secure, which the work item never said.
For flows, a custom agent with instructions to return only the notes may work better. Either way, keep a person in the loop. The mandatory Release notes reviewed item from the previous section makes sure that review happens.
Prepare a Sprint Review on Demand
A sprint review doesn’t need a flow. Ask Rovo Chat when you need one, for example:
Prepare a short sprint review for Sprint 14: what was completed, what is still open, and what slipped. Use only the work items in that sprint.
In our test, Rovo listed the finished and open work items. It also noticed that one work item had moved to the next release. It took about three minutes and suggested follow-ups, such as a Confluence page. If you want a review after every sprint, a flow with the Sprint completed trigger can call an agent instead.
Write Instructions for Your Own Agent
You build agents in Rovo Studio, and our guide covers the Rovo Studio basics. The instructions matter most. Here are the ones we used in our tests:
You are a release notes assistant for a software team. When given a Jira work item, write a short summary of what changed and why it matters to users. Base the summary only on the work item’s summary, description, and comments. If there isn’t enough information, say so in one sentence instead of guessing.
The last two sentences matter most. An agent writes confidently even when a work item has only a title. Keeping it within the work item, and letting it admit gaps, keeps made-up details out of your release notes. For a fuller example, see how Oleksandra built her Sprint & Release Manager agent.
Common Pitfalls in Jira Release Automation
Most problems we hit in testing came from a few predictable places. Check these before you rely on your flows for a real release:
- Flows don’t trigger each other by default. If one flow’s action should start another flow, allow it in the second flow’s settings. Otherwise, a work item moved by one flow can skip the next step.
- Lookup work items stops at 100. The step finds up to 100 work items. For a large release, narrow the JQL query or split the email into several parts.
- Thin tickets produce confident drafts. An agent fills gaps with guesses that sound right. In our test, a one-line work item turned into a claim about more secure payments. Keep a person in the review step.
- Every step counts. Starting December 3, 2026, Atlassian counts automation usage in steps rather than flow runs. Every trigger, condition, action, and branch counts, even when there is nothing to act on. Agent steps also use Rovo credits.
Our guide to automation steps and Rovo credits explains the new usage model. For general advice, see our Jira automation best practices.
Conclusion: What to Automate in Your Jira Releases
Jira release management automation works best when each layer does one job. Flows handle the fixed steps of every cycle. Checklists keep the human checks in place and hold the release until they are done. Rovo agents draft summaries, release notes, and sprint reviews for a person to approve.
It doesn’t replace judgment. Flows can’t tell whether a release is ready, and agents can’t fill the gaps in a thin ticket. Start with one flow and watch it for a few sprints. Add the next layer once the first one runs reliably. The best place to start is the chore your team repeats most often today.
FAQ
How can I automate release management in Jira?
Use Jira automation flows for the fixed steps. A typical setup creates the next sprint and version when a sprint starts. It adds work items to the release when they reach Ready for Testing. Another flow moves them to Released when the version is released. Checklist templates add the human checks, and Rovo agents draft the release notes.
Why automate release management in Jira?
So the release doesn’t depend on one person’s memory. Chores like updating Fix versions or moving work items to Released happen the same way every cycle. Stakeholders also get release updates without having to ask.
Is Jira release automation the same as CI/CD?
No. A CI/CD pipeline builds, tests, and deploys the code. Jira release management automation tracks, checks, and communicates the release. The two connect when a code or build tool is linked to Jira. Then events like Pull request merged can move work items.
Can Jira generate release notes automatically?
Yes, with some setup. Jira can generate release notes from a version’s work items on the release page, grouped by work type. For a draft on every release, a Jira automation flow can pass the work items to a Rovo agent.
Can I use Rovo to draft release notes in Jira?
Yes, but review every draft. Rovo is available on Jira Standard, Premium, and Enterprise plans. You can use Atlassian’s Release Notes Drafter agent or your own agent in a flow. In our test, the ready-made agent added claims that weren’t in the work items.
How do I release a Jira version on a schedule?
Use two scheduled flows. The first adds finished work items to the upcoming version on a set day. The second runs on release day, releases the version with the Release version step, and creates the next version.
Can Jira automation email stakeholders when a version is released?
Yes. Start with the Version released trigger. A Lookup work items step finds the work items in the version, and a Send customized email step lists them. In our test, the whole flow ran in about three seconds.