Jira
Jira monday.com


Managing projects in Jira often involves many repetitive actions. Creating work items for recurring tasks, reassigning them for reviews, and syncing statuses with dev tools – these are just a few examples. With Jira automation, you can handle such routine actions more efficiently and reduce manual work. If you set up automation rules that work together as a whole, you will create a well-functioning system. This will help you streamline processes and optimize resources.
In this article, we explore hands-on Jira automation best practices that actually save time. You’ll learn how to set up effective rules, avoid common mistakes, and make automation work seamlessly for your team’s unique processes.
What Types of Automation Can You Use in Jira?
To better understand how to utilize best practices, it’s helpful to first examine the types of automation you can set up.
These range from Jira’s native automation rules to data integration and custom automation solutions built using the API. Here’s a brief overview to provide you with the necessary context.
| Automation Type | Summary | Description | Use Case Examples |
|---|---|---|---|
| Automation for Jira | Core native automation functionality | Automation for Jira enables you to create complex custom rules that support a wide variety of triggers, multiple conditions, and multiple actions. It also supports using JQL for advanced filtering. | Automatic ticket cloning; auto-assigning tasks; escalating high-priority tickets; scheduled actions |
| Workflow Automation | Built-in automation within workflows | This enables you to tie automated actions to various workflow status changes. This type of automation can be set up via Jira’s Workflow Editor | Limiting who can change statuses, reassigning tasks on status change, validating compliance before changing the issue status |
| Data Integration | Connecting Jira to external applications | By linking Jira to other apps, you can benefit from syncing data between apps, extracting data for processing on other platforms, and connecting your apps into a single system | Exporting data for analysis; syncing with developer tools; external reporting |
| Third-party Solutions | Add-ons and plugins from the Marketplace | Various solutions can extend Jira’s native automation capabilities. They allow you to save limits and set up automations in Jira without using its native rules | Auto-adding checklists; auto-generating work items from a template, bypassing native Jira automation to save run limits |
| Advanced API Automation | Programmatic control via Jira’s API | For advanced cases, you can build custom automation solutions using Jira’s API. This is helpful when you need cross-system integration or have needs that can’t be addressed with Jira’s native functionality | Custom integrations; enterprise-level automation; niche use cases |

The Top 10 Jira Automation Best Practices
1. Optimize Usage to Save Jira Automation Limits
When working with automation in Jira, it’s important to keep in mind the limits you have in your plan. If you don’t pay attention to this, your automation rules can stop working.
What are automation limits?
Depending on your Jira plan, your team has a specific limit for automation rules. The limits range from 100 runs/month for the Free plan to 1,000 runs/month per user for the Premium plan. The Enterprise plan offers unlimited runs – if that’s your case, you don’t have to worry about saving the limits.
For all others, it makes sense to optimize usage. Limits, even if they are high, can get used up rather quickly. If this happens, all Jira automation rules will be paused until next month, when the limits reset.
What counts as a rule run?
Every time your rule runs successfully and performs at least one action, this counts as a run. If your rule is triggered, but the conditions are not met and the target action is not performed, this doesn’t count as a run.
You have a rule “When a work item is created and it has “Onboarding” in its summary, assign it to the HR specialist”. Once a new work item is created, the rule is triggered and checks whether the summary includes “Onboarding”. If it doesn’t, the rule doesn’t perform the specified action (assigning the work item). This doesn’t count as a run, even though the rule was triggered.
This approach was introduced not so long ago. Previously, every time a rule was triggered, it counted as a run. For more details on the new approach, check out How Jira automation limits are calculated.
How to save Jira automation limits?
Here are some practical tips that will help you use your limits efficiently and do more with less:
- Disable rules you don’t need. Regularly review your rules to ensure there are no “empty” runs, where a rule performs an action that isn’t truly necessary.
- Use specific triggers that are not too broad. Avoid triggers that will fire more often than you actually need. For example, instead of a broad “Work item updated”, select “Comment added” or “Description edited”.
- Narrow down the criteria as early as possible. If you have conditions that will narrow down your results, include them closer to the beginning of the rule. This way, work items that don’t fit your conditions will be filtered out early. This prevents excessive actions and also helps you improve Jira performance.
- Add multiple actions to one rule. Regardless of whether a rule performs just one successful action or several, it still counts as one run. So, it makes sense to include several actions in one rule, if possible. For example, you can group similar actions, such as editing multiple issue fields in a single “Edit work item” action.
- Use add-ons with automation capabilities. On the Atlassian marketplace, there are solutions that can extend the native Jira automation functionality. They offer extra features and allow you to surpass the limits. Depending on your usage, it may be more reasonable to pay for such an add-on rather than for a more expensive Jira plan with higher limits.
If you need to use automations frequently to standardize processes (auto-create work items, pre-fill fields, or auto-add task descriptions), I recommend trying Smart Tools for Jira. These solutions are not designed to mimic the Jira automation functionality, but they allow you to automate specific actions.
For example, Smart Checklist can automatically add checklists to your work items, and Smart Templates can generate work items on a schedule. These actions don’t consume your limits and make the setup easier for end users.
Optimizing your automation rule usage allows you to stay within limits and prevent disabling your automations.
2. Integrate Jira With External Applications
Jira automation can extend beyond Jira. To maximize benefits for your team, consider integrating it with other tools. For example, you can connect Jira to various business apps, such as Microsoft Teams, Miro, Slack, or Google Sheets. You can also integrate it with various HR applications, data analytics tools, embedded analytics solutions, BI platforms, and more.
This allows you to automate a variety of actions, from setting up custom notifications to syncing data between apps and configuring custom workflows.
A common use case is to integrate Jira with developer tools. For example, you can connect Jira to GitHub or another Git platform. This enables you to view commit history, branch, and pull request details in Jira. Work item statuses will also be updated automatically based on Git activity. Here’s an example of an automation rule for this:
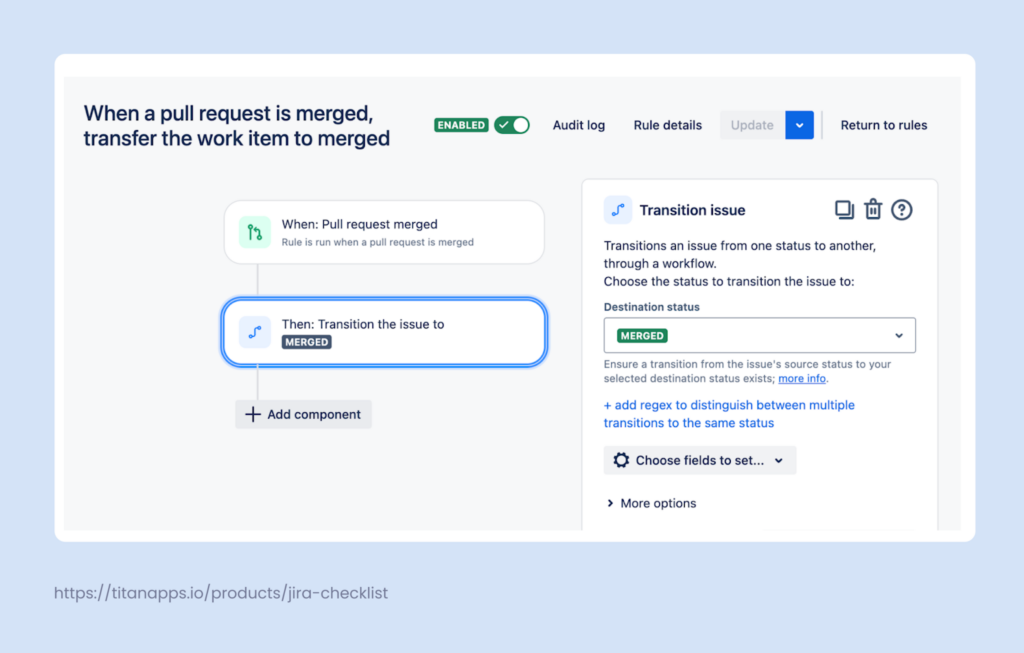
Please note that for this rule to work, you need to set up a Git and Jira integration first. Data between the two apps will sync automatically. Once Jira receives the information about merging the pull request, the rule will be triggered.
Overall, Jira can be integrated with a wide variety of applications. This enables you to connect your tools into a single system and set up cross-app automations.
3. Use Global Rules Sparingly
In Jira, you can set up rules that apply only to one project, to several selected projects, or to all projects in your Jira instance. The latter are called global rules. They are very effective for instances with hundreds or even thousands of projects. If you need the same automation rules for each project, thanks to global rules, you won’t have to set them up separately.
However, for instances with just a few projects, poorly scoped global rules can consume thousands of runs unnecessarily. If a rule is primarily needed for a single project, make it project-specific, not global.
If you need the same automations for two or three Jira projects, it can still be better to configure them separately. This saves your limits, improves visibility, and prevents conflicts between project rules and global rules.
When you do need to use global rules, keep in mind these tips:
- Use narrowing conditions and filters. In particular, you can filter by project – this will help you avoid spending rule runs on projects where it’s not necessary.
- Adopt unified labels and components. This will allow you to apply filters that work across projects.
- Watch out for conflicts with local rules. Check if a similar or connected rule already exists in a project. It’s important to prevent duplication, infinite loops, or conflicting actions. An example of a conflict is when a project-level and a global rule prescribe assigning the work item to different people or transitioning it to different statuses.
- Monitor the performance impact. Check the audit log for high-frequency executions and ensure that all rules consuming a large number of runs are essential and bring tangible value to your team.
4. Name Rules Consistently and Use Labels
As the number of rules increases, it can become challenging to find a specific rule on the list. To make this easier, implement clear naming and add consistent labels to the rules. This will help you avoid confusion, increase visibility, and manage your rules effectively.
Jira allows you to search and filter rules by keywords in their names, by labels, owner, and trigger and action. This can be done on the automation tab of your project:

So, having descriptive names and labels is rather important. It helps you find what you need and understand what each rule does without needing to open it and review the steps it includes.
Here are some hands-on tips:
- Avoid vague names, such as “New Rule” or “Scheduled automation”. They are not helpful for your team and can create confusion.
- Be specific and descriptive. After reading a rule name, you should have a good idea of what its trigger, condition, and main action are. For example, “When a pull request is merged, transfer the work item to Merged”.
- Adopt a standardized approach. Some teams use the “When… then…” format, while others opt for more complex naming conventions. For instance, [Event type] + [Category] + [Department] + [Trigger type] + [Condition] + [Description]. For best results, discuss the approach with your team members and adjust it to your processes.
- Group rules with labels. Related or similar Jira automation rules can be assigned the same label. For example, in the screenshot above, two rules rely on data synced from dev tools, so they have the “Dev” label. When you filter by this label, you can quickly find all rules involving dev events. To improve searchability, add several labels to each rule, if applicable.
5. Avoid Hardcoding and Keep Your Jira Automation Rules Flexible
While it’s good to make your rules specific, it’s also important to leave room for flexibility. This makes your automations more adjustable and resilient to change.
Let’s say you have a rule: “When a work item is created and its description contains “Marketing”, assign the work item to @Maria.Smith”. This rule can work well – up to the point when Maria Smith leaves the company and admins delete her Jira account. In this case, the automation will break.
With dozens and hundreds of rules, it can be difficult to keep track of all the automations where this person is mentioned and edit them on time.
Here’s what you can do to avoid such complications:
Reference roles rather than specific people
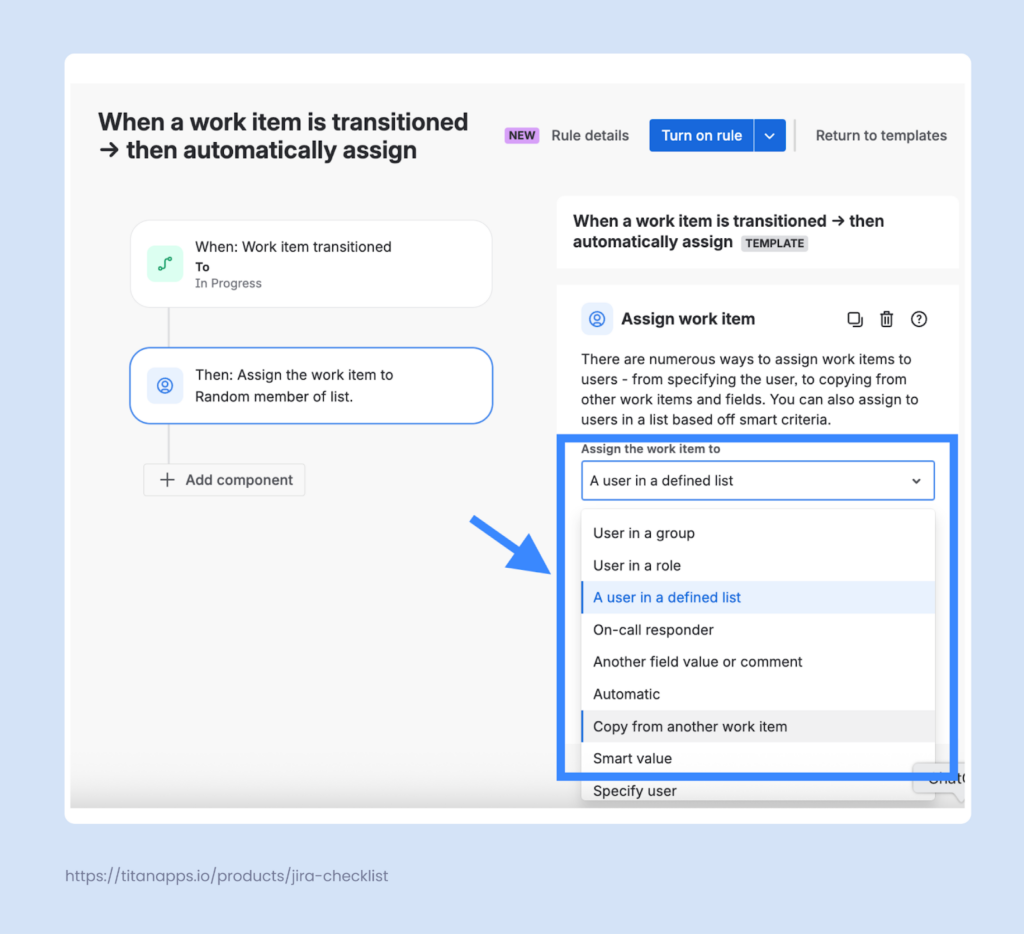
For instance, select “Work item reporter” or “User who triggered the event” as an assignee instead of “Maria Smith”. You can also set a “User in a group”, “User in a defined list”, or “Copy from another work item”.
Apart from people and their positions, there are many other parameters that can vary. Whenever possible, include a broader group rather than a specific hard-coded parameter.
Use Smart Values to account for possible changes
Smart Values are dynamic placeholders that allow you to reference changing information in Jira automation rules. For example, use {{issue.key}} instead of an actual key like “AB-123”. This will make your rule applicable to a wide range of work items. When it runs, {{issue.key}} will be replaced with the key of the active work item.
There are many other Smart Values you can use, such as {{project.id}}, {{reporter}}, {{initiator.emailAddress}}, and so on. For more about this topic, please see Jira’s Smart Value Guide.
Utilizing Smart Values and referencing broader groups instead of a narrow parameter makes your rules more reliable and adaptable.
6. Use Automation to Standardize Processes
Automation is not just about setting up simple actions like auto-assigning tasks or auto-adding watchers. It can be leveraged to standardize processes and scale best practices.
For example, you can automatically generate standard work items for recurring tasks, such as:
- A task for employee onboarding with a list of sub-tasks
- A Definition of Done checklist that is added to each work item where it’s applicable
- Scheduled tasks for quarterly roadmap reviews and budget planning
- Auto-generated tasks for project kick-offs
Such automations allow you to reuse work item layouts and content so that your team members don’t have to start from scratch. Documented once, process descriptions can “live” in Jira as actionable step-by-step instructions. This saves time, improves consistency, and enhances the reliability of your processes.
Let’s take a closer look at some of the examples I mentioned earlier.
Example 1. Generate work items automatically
Employee onboarding is one of the most common recurring processes for any large organization. It typically involves standard steps and requires collaboration from different teams: IT security, legal, HR, and the new hire’s main department.
To make this process more consistent and save time, you can create a standard onboarding task with subtasks in Jira and reuse it multiple times.
While this can be achieved using native Jira Automation, for such cases, it’s more convenient to use the solution designed for process management, Smart Templates for Jira. It allows you to save any work item(s) as a reusable template and generate tasks from that template.
Using this app is a better option because Jira does not allow you to create and manage work item templates. Jira rules can be used as a workaround, but they would be more complex and wouldn’t provide the same features as a full-fledged template management tool.
At the same time, creating a Jira issue template with Smart Templates is simple and doesn’t require any previous experience. In addition, unlike Jira’s native automation, it isn’t limited to those with Jira administrator rights – anyone on your team can create and use these templates whenever they need.
In our example, a template of an onboarding task with subtasks might look like this:
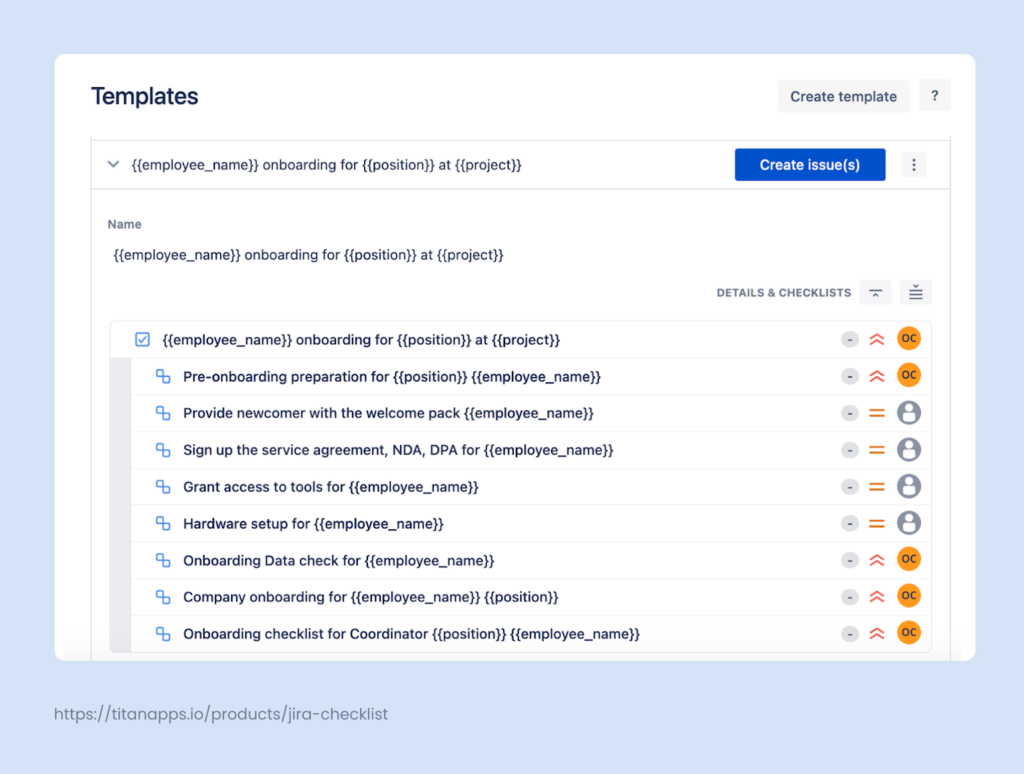
You can pre-assign subtasks to responsible people, add reporters, fill out descriptions and other fields, add checklists, and so on. All this information will be preserved in the template. As a result, when you need to onboard a new team member, the entire set of work items can be generated with a single press of a button.
Smart Templates also allow you to use variables for dynamic values such as employee name, position, project, assignee, etc. When generating work items from this template, you will be prompted to provide specific values for the variables (for instance, “Maria Smith” instead of {{employee_name}}). This information will be updated across all the work items in that set. This makes your template easily adjustable and saves you time.
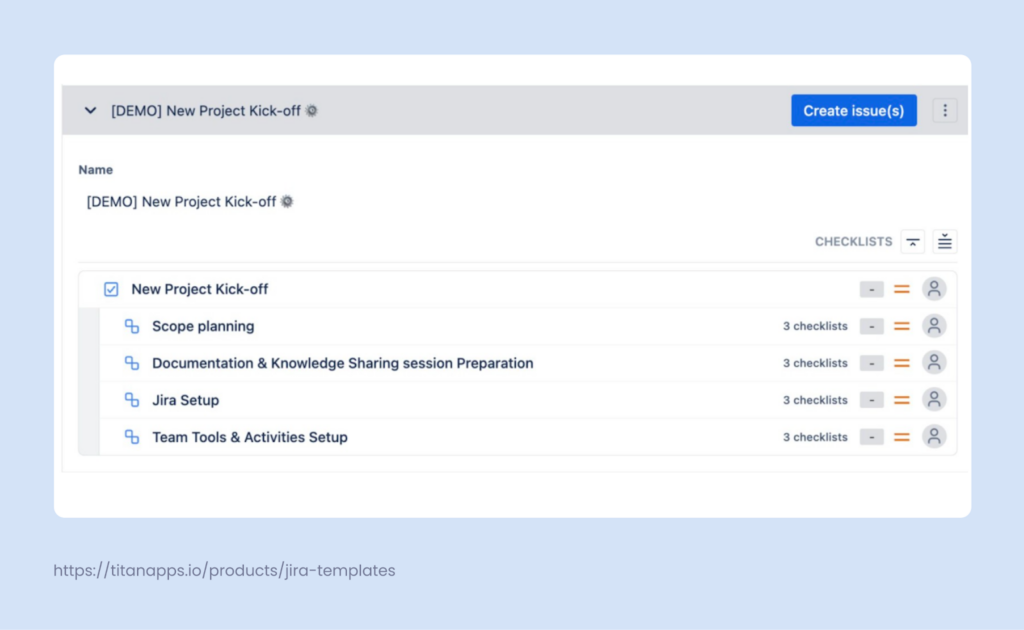
Let’s have a look at another example, a new project kick-off template.
Here, we also have a task with a set of standard subtasks, but in this case, the subtasks also include checklists. Using such a template speeds up project kick-off preparation and helps you follow a consistent process.
Smart Templates allows you to share this template across multiple projects so that you can use it everywhere in your Jira instance. Alternatively, you can set up an automation rule: when a new project is created, work items from the project kick-off template are created automatically.
You can also use Smart Templates’ in-app Scheduler to generate work items automatically according to your schedule preferences. This is useful for recurring tasks, such as quarterly roadmap reviews, regular budget reviews, monthly feedback meetings, and so on.
Here’s an example of schedule settings for monthly task creation:
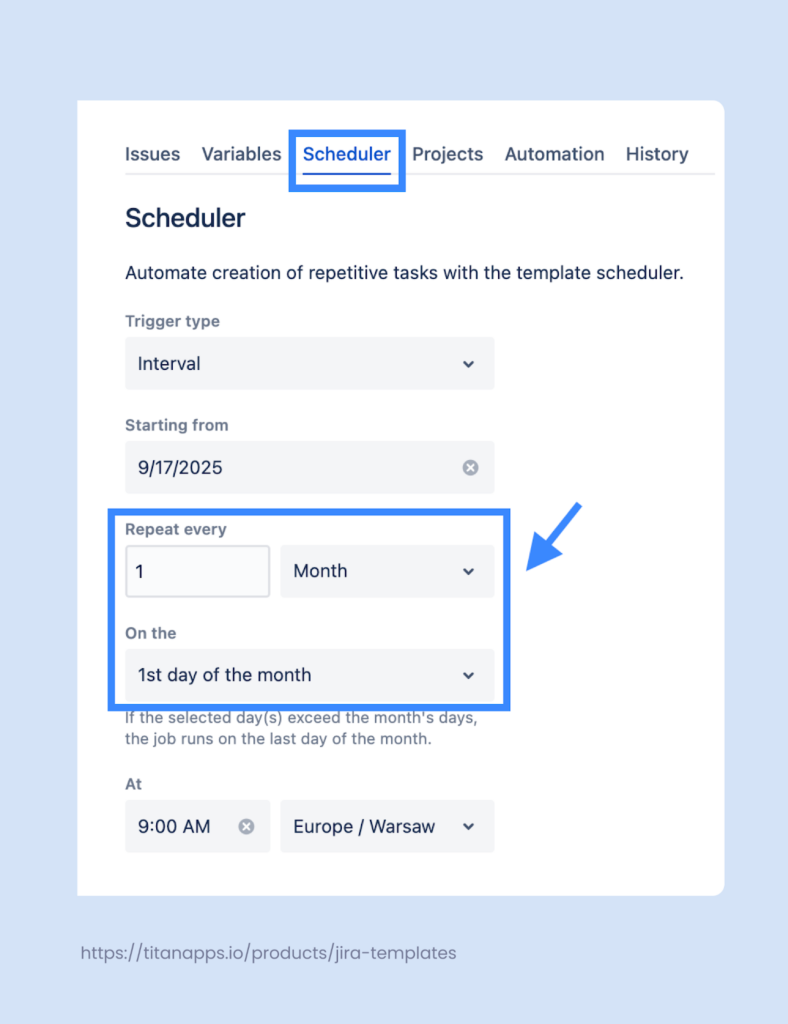
This approach can be applied to any repetitive tasks and recurring processes.
To set up automation with templates, first install Smart Templates for Jira. Then, create a work item or set of work items you want to reuse and click Save structure as a template. To configure a custom schedule, please see this Scheduler Guide.

Example 2. Automatically add checklists to work items
Checklists are extremely helpful for implementing process standardization. They document repetitive processes as a sequence of simple, easy-to-follow steps.
You can use Smart Checklist for Jira to create feature-rich checklists, save them as reusable templates, and add them to Jira work items automatically.
One of the most common use cases for agile teams is assigning the Definition of Done checklist to dev tickets. Having the DoD criteria in every task helps developers check their work before passing it on further. This enforces a unified approach and allows your team to maintain high-quality standards.
Here’s the Definition of Done checklist created with the help of Smart Checklist for Jira:
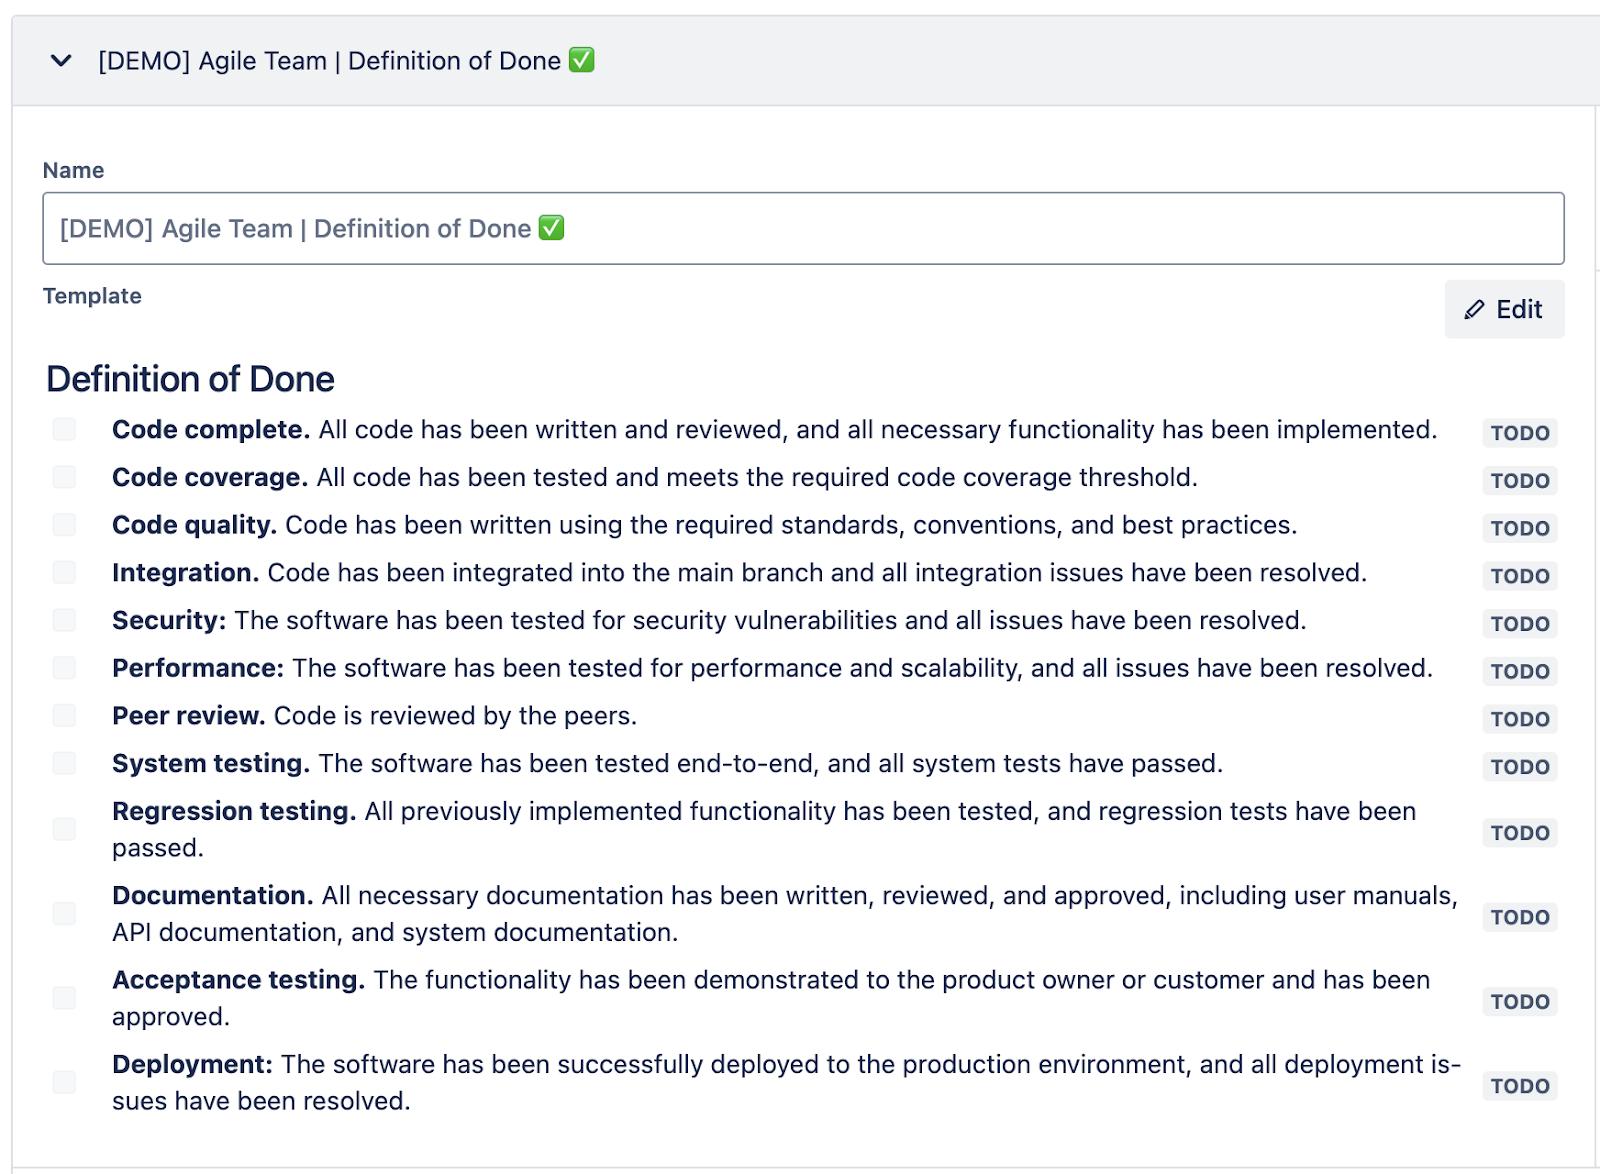
## Definition of Done
- **Code complete.** All code has been written and reviewed, and all necessary functionality has been implemented.
- **Code coverage.** All code has been tested and meets the required code coverage threshold.
- **Code quality.** Code has been written using the required standards, conventions, and best practices.
- **Integration.** Code has been integrated into the main branch, and all integration issues have been resolved.
- **Security:** The software has been tested for security vulnerabilities, and all issues have been resolved.
- **Performance:** The software has been tested for performance and scalability, and all issues have been resolved.
- **Peer review.** The code is reviewed by the peers.
- **System testing.** The software has been tested end-to-end, and all system tests have passed.
- **Regression testing.** All previously implemented functionality has been tested, and regression tests have been passed.
- **Documentation.** All necessary documentation has been written, reviewed, and approved, including user manuals, API documentation, and system documentation.
- **Acceptance testing.** The functionality has been demonstrated to the product owner or customer and has been approved.
- **Deployment:** The software has been successfully deployed to the production environment, and all deployment issues have been resolved.
You can structure your checklist with headers, tag people, add due dates, set custom statuses for checklist items, and more.
Other common examples include:
Overall, checklists can be used for any repeatable processes or recurring checks.
With Smart Checklist, you can assign a checklist to all new work items of a selected type. In this example, we assigned the Definition of Done checklist to all Tasks:

Depending on your needs, it can be helpful to create a dedicated work type (issue type) for this. For instance, a work type called “Test Case” for assigning test case checklists, or a work type “Hardware Request” for hardware purchase checklists.
To set up this automation, you will need to first install Smart Checklist for Jira by TitanApps and save your checklist as a template.
Once completed, all new work items of that type will include the checklist you pre-assigned to them. Existing Jira tasks won’t be affected. To add checklists based on more complex criteria, please see this guide on Confluence: Using Smart Checklist with Jira Automation.
Note: This is a no-code solution that works with any Jira instances: Jira Cloud (including Jira Service Management) and Jira Data Center.
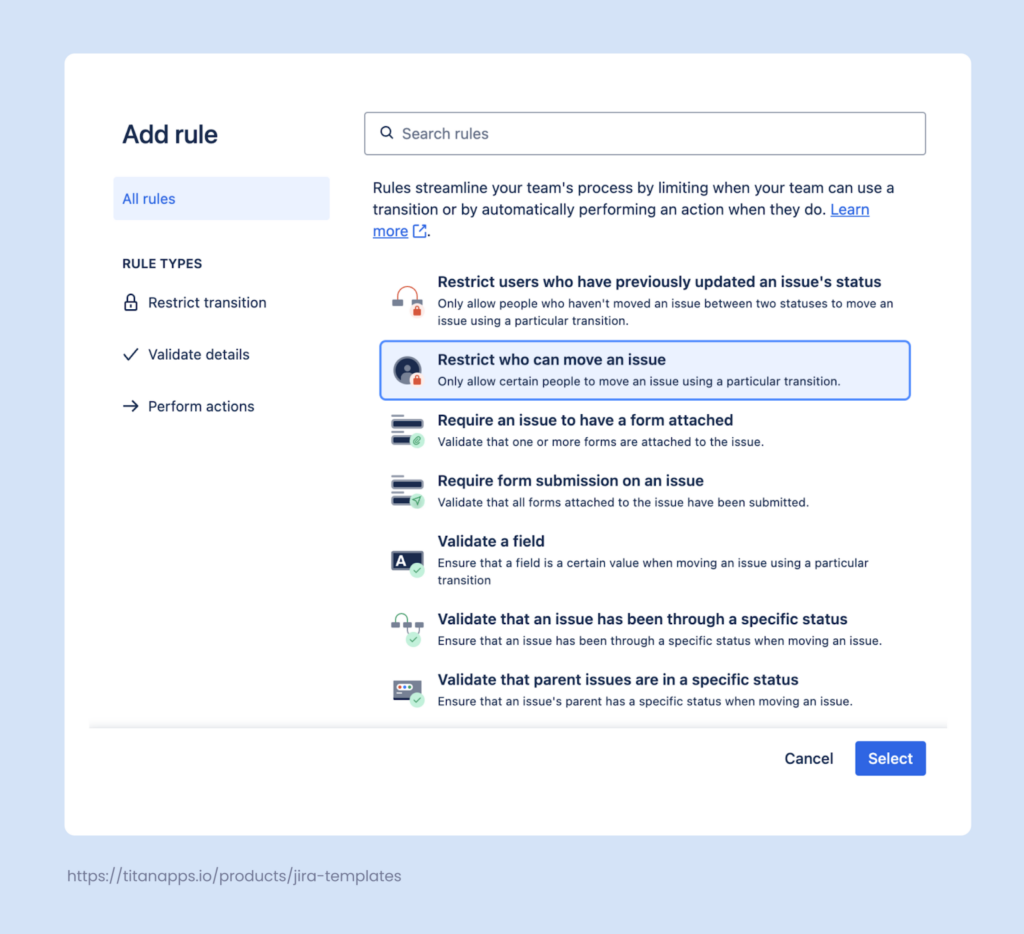
7. Implement Workflow Automation
In Jira, a workflow is a sequence of stages a work item goes through: To Do, In Progress, In Review, Done, and so on. Depending on your processes, you can have different custom workflows adjusted to the needs of your team (or multiple teams).
??Jira allows you to integrate automation directly into your workflows. For example, you can set up various actions that are triggered when a work item changes its status. When a work item moves to In Review, workflow automation can assign a reviewer.
Another use case is when you disable moving a task to Done if the In Review stage wasn’t completed, or limit who has the permissions to mark a task as Completed. Additionally, a workflow automation rule can validate whether certain conditions are met – for instance, if the required form is attached or a checklist is completed before moving a work item to In Review.
You can find all the available options on the workflow automation tab.
For more details, see the instructions on How to set up workflow automation.
Using workflow automation in Jira reduces manual work, saves time on repetitive actions, and improves team alignment. It also allows you to enforce the processes you have in place. With automation, people can follow them more consistently, especially if you automate frequent actions and disable moves that go against the adopted guidelines.
8. Monitor Jira Automation Rules Performance and Usage
Once your automation rules are set up, it’s important to keep an eye on how they perform. This allows you to prevent unnecessary limit usage, keep your rules relevant, and spot potential issues early on.
Check performance in the Automation audit logs
The logs show you in real time when each rule ran and whether it performed the intended action. The results can be filtered by individual rules, actions, triggers, and time frame:
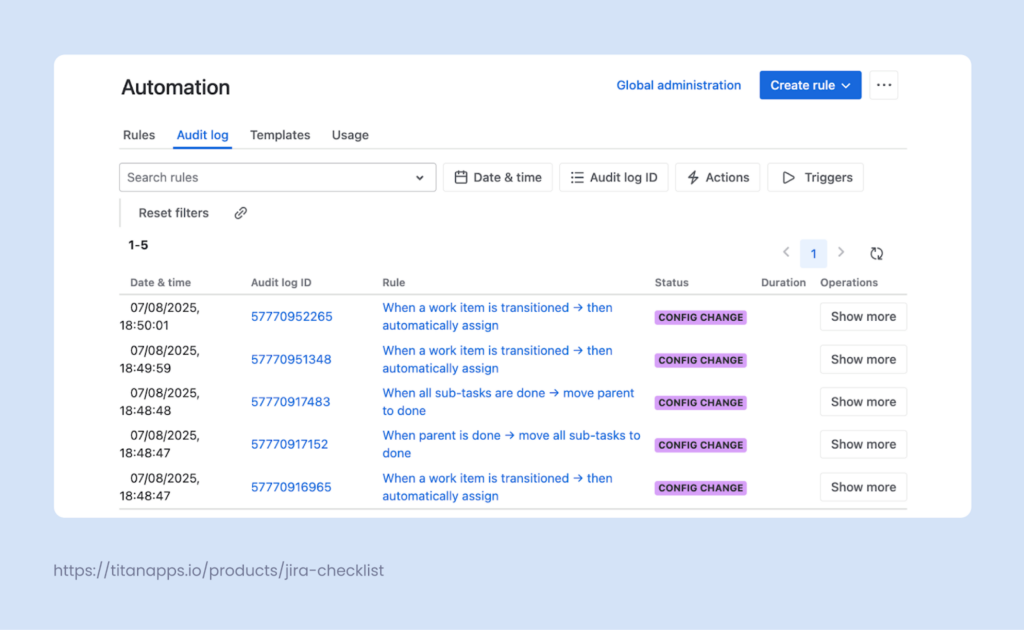
The most important part of the audit log is the rule execution statuses. They show you details of how your rules work. Here are the statuses you can encounter:

Review audit logs regularly to determine if your Jira automation rules are configured correctly and running smoothly. If some rules are looped, failed, or have errors, you will be able to see them and take action. This helps you to prevent silent failures or unexpected behavior.
Watch for rules that are triggered too often
But issues are not the only thing you should be looking at. Check which rules are fired the most often and consume a lot of run limits. Ensure that these rules are really useful and give you a good value for the spent runs.
If a rule is triggered too often, it may indicate performance issues. Consider editing it and adding narrower conditions to reduce system load and improve efficiency.
Set up alerts for failed rules
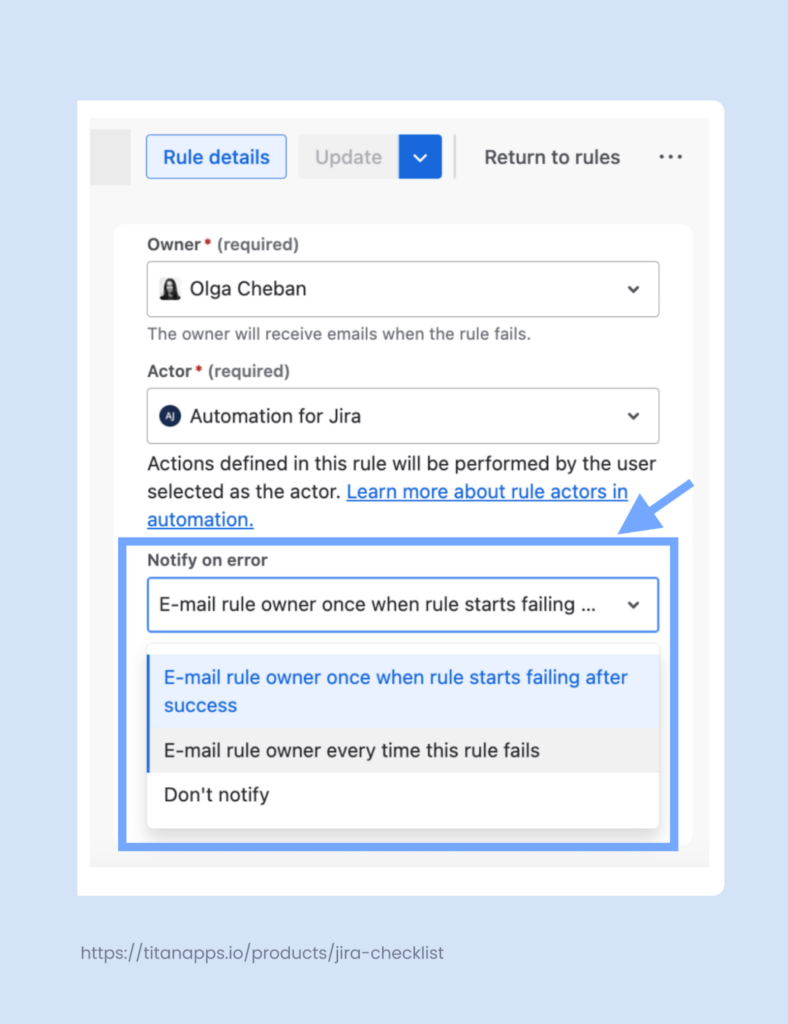
For the most important automations, set up email notifications for rule failures. This ensures that problems don’t go unnoticed and you can troubleshoot them before they disrupt team operations.
To set up alerts for failed automation rules in Jira, open the Rule details tab. There, you can specify the rule owner that needs to be notified and select email notification preferences:
9. Use the Jira Automation Template Library
Whether you are just starting out or already have a lot of experience, the Jira automation template library can be a valuable resource. It contains dozens of pre-built automation rules for common workflow scenarios.
The rules are grouped under different categories: Jira automation for business, software teams, JSM, and so on. It’s a great place to review examples and discover relevant use cases that you haven’t yet considered.
The rule templates are customizable, so it’s convenient to use them as a base and add steps and conditions that fit your team’s processes. This allows you to save time and discover new options for process optimization.
10. Test Jira Automation Rules Before Rolling Out
Last but not least: before enabling your rule, validate it to check for potential issues. You can do this in the rule details view. Additionally, test your most important automations before rolling them out to everyone.
Here are some tips to help you with that:
- Use a sandbox project for automations that can affect work items at scale. Once you have tested how the rules work on dummy work items, you can use them in your real project.
- Limit scope during testing. If you want to test on a real project, it’s useful to narrow down the rule conditions. For example, make it applicable to a single work type (issue type) or user group before scaling it up.
- Check the audit log. After enabling new rules, monitor their performance closely. Make sure you set up notifications to receive emails if a rule fails.
Testing your Jira automation rules before the rollout is a simple step that ensures everything works as intended.
Set Up Jira Automation for the Most Common Use Cases and Beyond
In this article, we explored Jira’s most important automation features, as well as other automation options available on this project management platform. Hopefully, this will help you make your work in Jira more streamlined and efficient.
To maximize the impact, consider setting up automations for the most common use cases among software development teams. Some examples include:
- Linking related issues when they are mentioned in comments
- Moving a parent issue to Done when all its subtasks are Done
- Summing up story points from child tasks in the parent task
For more information on this topic, please refer to our article, “The top 10 most common use cases for Jira Automation.”