Jira
Jira monday.com


While cloning in Jira can be done in just a few clicks, it becomes less straightforward when you have special requirements. What if you need to clone an issue to a different project, clone tasks in bulk, or do this automatically on a schedule? In this article, we explore all these scenarios and provide you with examples and step-by-step instructions.
The Basics of Cloning in JIRA: What is it and Why is it Useful?
The term refers to the process of duplicating an existing Jira issue (or work item), resulting in the creation of a new issue with identical details.
Typically, information such as the issue description, summary, and type is copied to the new issue. Other elements, such as comments or history, are not transferred. The most common reasons for cloning include reusing typical tasks, creating similar issues, or assigning a task to multiple teams.
Benefits of Issue Cloning in Jira:
- Time optimization – instead of filling in issue details manually, you can re-use the structure from a similar issue. With recurring tasks, cloning significantly boosts efficiency.
- Linking issues automatically – related or similar issues are linked automatically with the Clones/Cloned by link type. This helps you keep your work in Jira organized.
- Issue standardization – when copying, you preserve the issue structure and can use it as a basis for new work items. You will only need to change the details that are different for the new issue.
How to Clone an Issue Within the Same Project
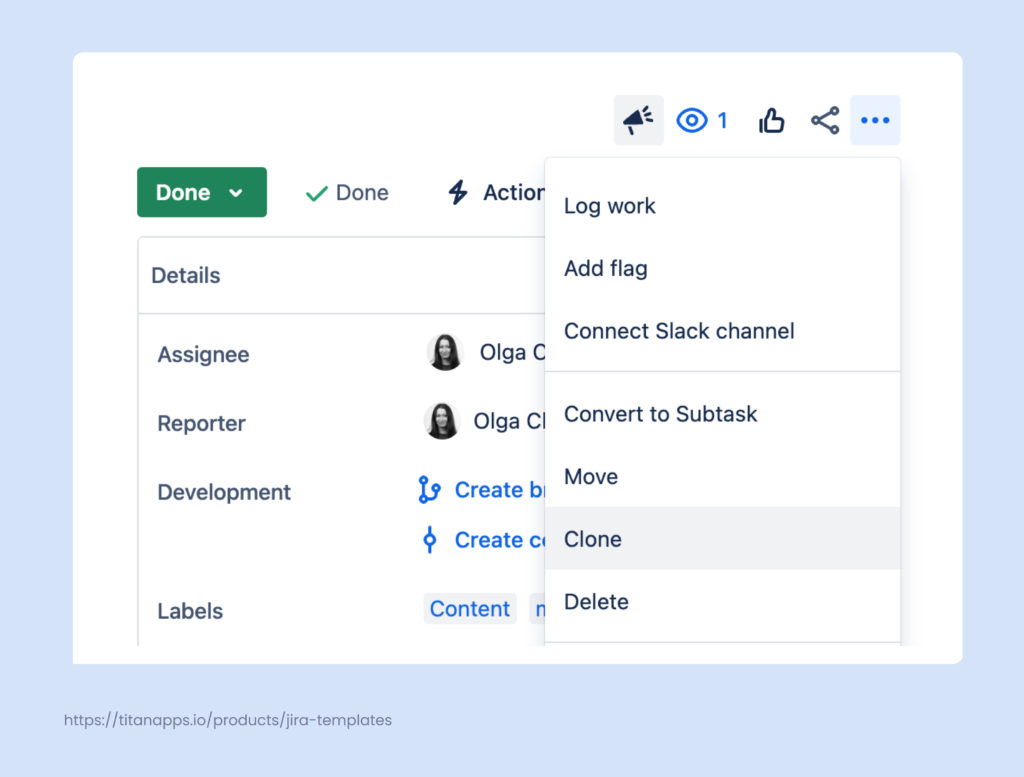
This type of cloning in Jira is quite straightforward. Open the issue you want to clone, click the three dots in the upper right corner, and select Clone.
In the pop-up window, you will see a list of additional items to include in the cloned issue (if any). In particular, these can be:
- Attachments
- Child issues
- Links
- Sprint value
- Custom fields
Depending on your settings, you can also clone an issue directly from your Jira board. To do so, find the card of the issue you want to clone, click the three dots menu, and select Clone.
The cloned issue will be linked to the original task and added to the same project. It will also have the “Cloned” prefix in the summary, unless you edit it out when cloning.
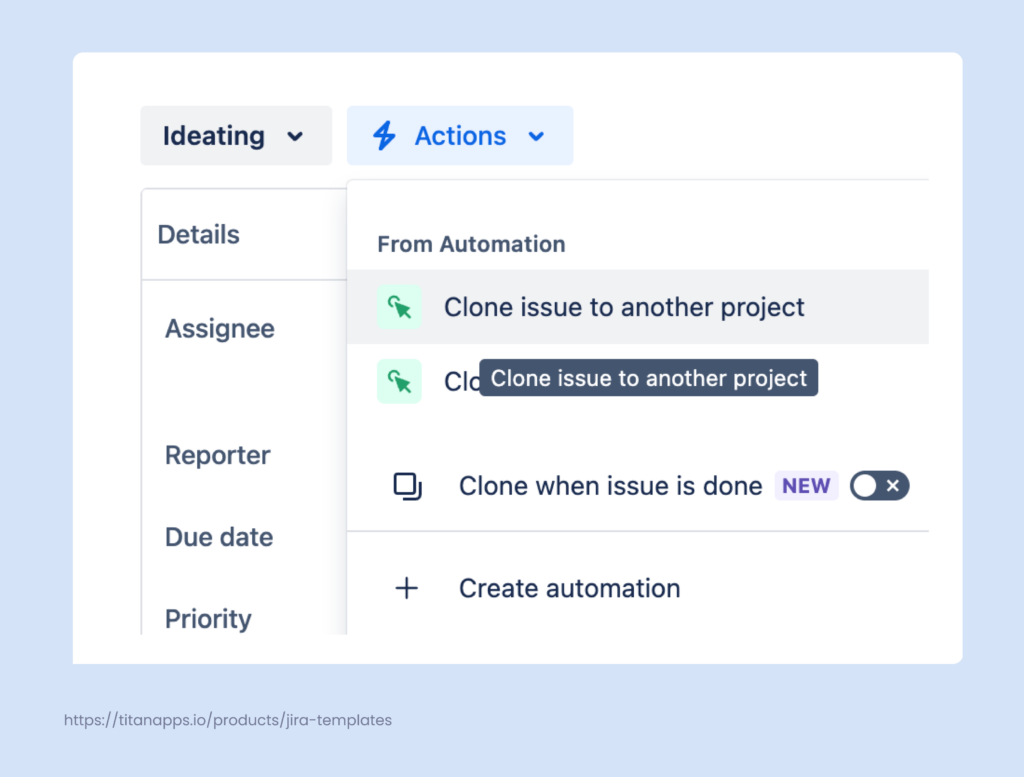
How to Clone a Jira Issue to Another Project
Let’s say, you have a task in one project but need to do similar work in a second project. Another example is when you want to reuse information from a task in a different project. For instance, you have a regression ticket with a QA checklist and linked bugs and you want to clone it to another project as a report for the product manager.
Jira allows you to clone an issue to a different project with the help of a simple automation rule. If such cloning is not needed regularly, it’s best to set up a Jira automation that can be triggered manually. The cloning then occurs automatically. Let’s see how to do this in practice.
- First, go to Project Settings -> Automation. Click Create Rule.
- Select Manual trigger from issue as a trigger. Here, you can also specify which user groups can utilize this manual trigger and for which issue types it should be shown.
- Choose Clone issue as an action.
- Next, specify the project for the cloned issue and select the issue type. It can be the same as that of the original issue or a different one (task, subtask, asset, etc.). At this step, you can also remove the “Clone” prefix from the issue summary.
- Select the fields you want to include in the cloned issue. For example, Assignee, Attachment, Reporter, Description, Linked issues, and so on.
- Once ready, enable the rule.
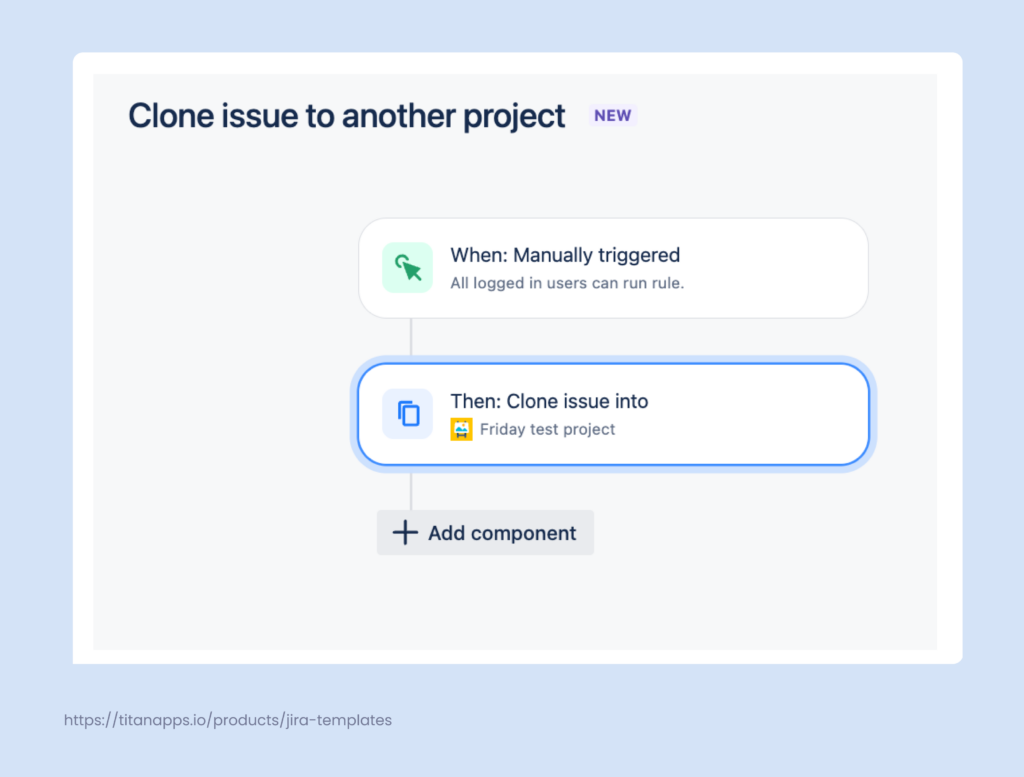
- Then, go to the issue you want to clone, click Actions, and select Clone issue to another project.
The issue will be cloned to the selected project according to your settings.
How to Clone a Jira Issue Automatically Based on Conditions
In our previous example, cloning was triggered manually. Now, we’ll see how to set up a flow that is triggered by a specific event instead of a user action.
Let’s say you have a Jira board where your team adds their inputs for your software product. These can be improvement suggestions, ideas for new features, and so on. Later, your product team reviews these suggestions and decides what to implement and what not to implement. When an input is approved, it can be automatically cloned as a task for the development team.
Here’s an automation scheme for this:
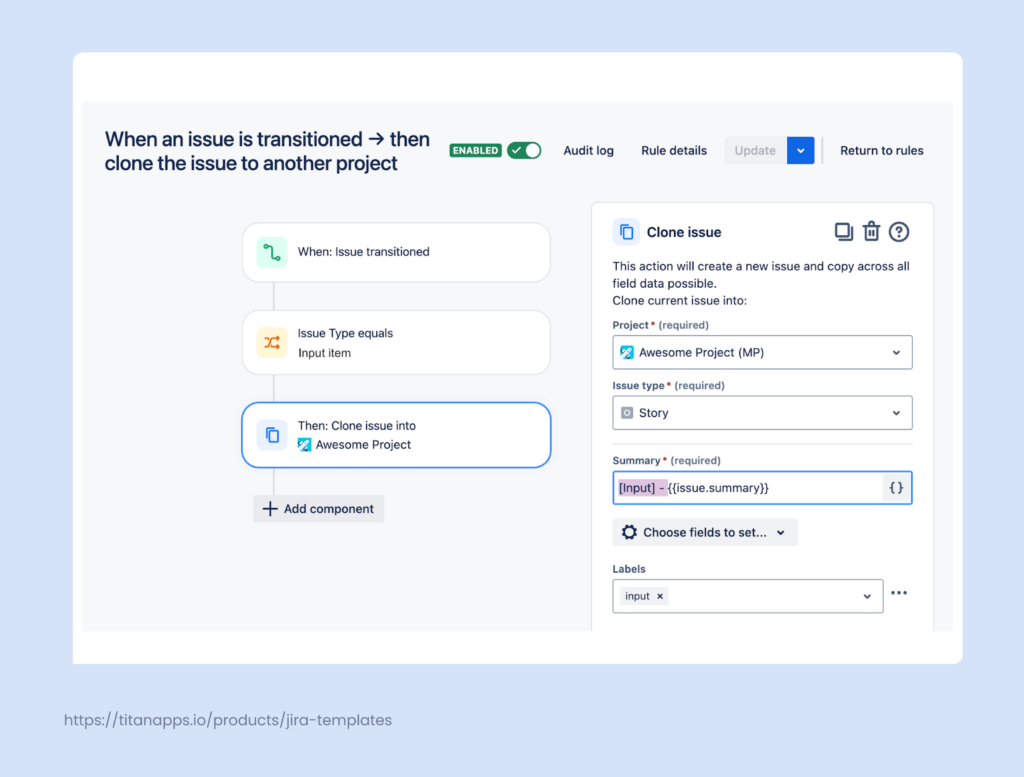
When an issue is transitioned to Approved and the issue type is an Input item, it gets cloned into the specified project as a Story. In this example, we also added the prefix “Input” to the issue summary and a corresponding label for easier tracking.
You can add different triggers and conditions to the automation rule, depending on your specific situation and requirements. To set it up, go to Project Settings -> Automation -> Create Rule. Once ready, validate and enable your rule.
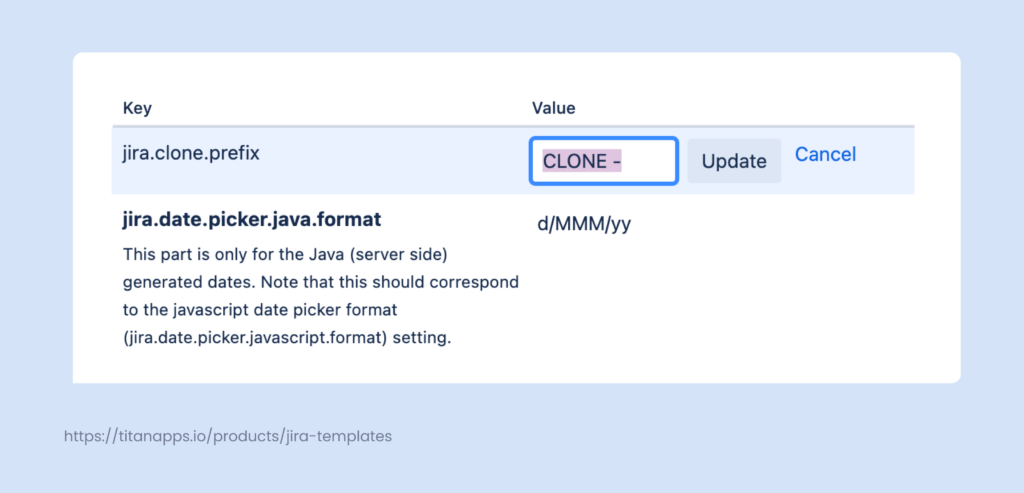
How to Remove the “CLONE” Prefix From Cloned Issues in Jira
This can be useful when you frequently clone issues automatically and the prefix is not really needed. Go to JIRA Administration -> System -> Advanced Settings. The first entry on the list should be jira.clone.prefix, and the specified value will be “CLONE—.” Click the value text to change or remove it.
Please note that you need to have Administrator permissions to do this. If that is not the case, you can adjust the prefix directly in the automation rules you use by editing the issue summary field.
How to Clone a Jira Epic With All Its Tasks and Subtasks
Currently, Jira does not offer an out-of-the-box option to clone the whole hierarchy of issues within an epic. Here are the alternatives you can consider:
Use Smart Templates for Jira to clone the whole hierarchy
With the help of this app, you can save an epic and all its issues, subtasks, and checklists as a reusable template. From that template, you can create an exact duplicate of the original epic. This allows you to clone an epic both to the same project or to another one.
Clone an epic manually from the issue view page
In this case, an epic and its issues will be cloned into the same project, but subtasks and checklists will not be copied.
Use Automation for Jira to clone an epic with its issues
You can set up a rule that will clone an epic and the issues it includes to the same or to another project. However, subtasks and checklists will not be transferred. The available workarounds for including subtasks often don’t work reliably due to Jira’s limitations.
As you can see, currently, the only way to clone a Jira epic with all its issues and subtasks is to use a third-party solution.
Let’s explore these options in more detail.
Option 1. Clone an Epic with Smart Templates
Although teams often use cloning for recurring issues and repetitive processes, issue templates can be a better solution for this purpose.
First of all, the native cloning options don’t preserve an entire epic hierarchy. Secondly, cloning an issue repeatedly is inefficient. You would have to find the needed issue, make a copy, and then edit out details left from the previous task that are irrelevant for the new issue. Additionally, you would have to prevent your team from making changes to the “exemplary” issue designated for cloning. If you need to clone multiple issues over and over again, things can get confusing.
Using Smart Templates is significantly more convenient for creating copies of a Jira issue. You can save a whole epic as a template with all its hierarchy. Just add the generalized structure, descriptions, and fields, and use variables for information that changes from one issue to another. All your smart templates will be stored in one place as a list. Anyone on your team will know where to find them and will be able to access them easily.
Smart Templates allow you to save an epic or another issue as a template and then create new issues from it whenever you need to. The new epic will include all the tasks, subtasks, and checklists from the original epic. Fields, issue descriptions, assignees, and other information will be preserved as well.
In the example below, we cloned an epic for the recruitment process. The original epic with its tasks, subtasks, and checklists was saved as a template. Now, we make a copy of it every time we need to launch the recruitment process for a new position.
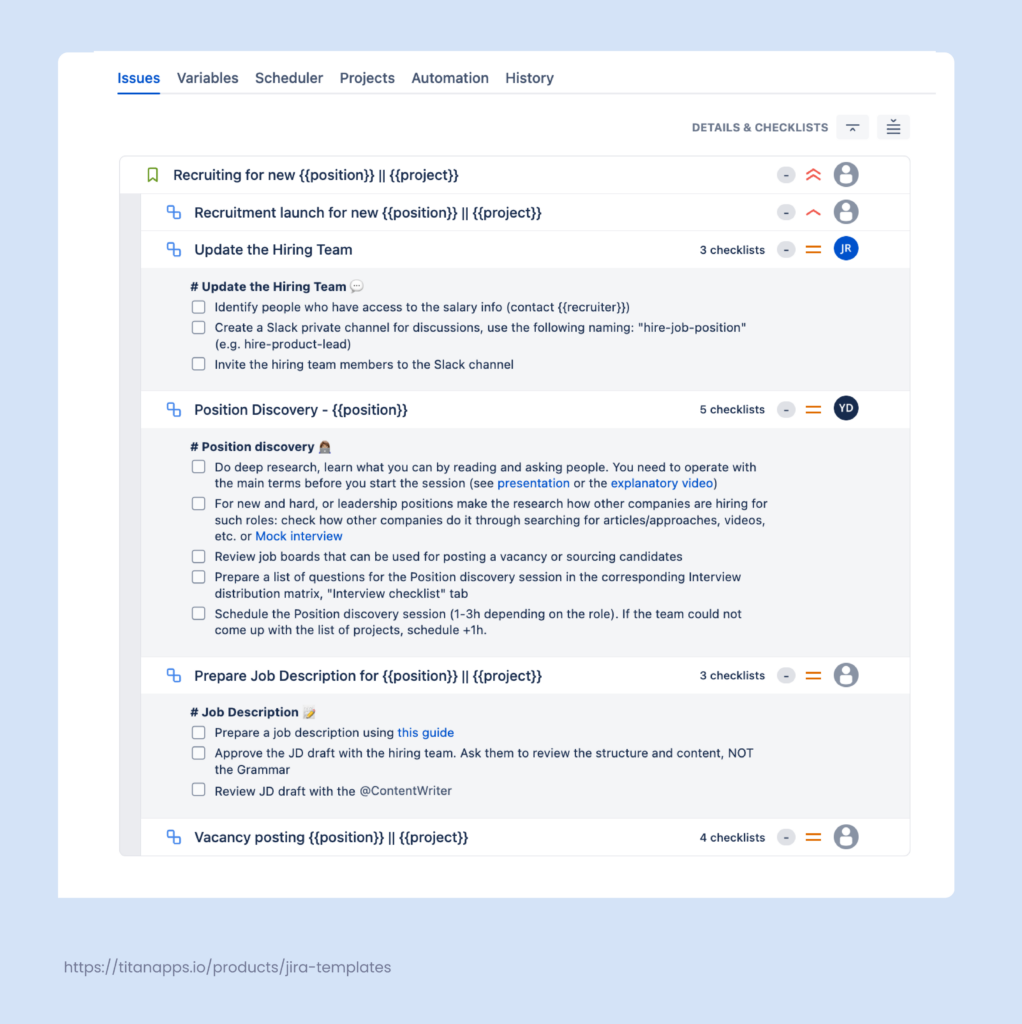
To prepare this reusable issue template, we used Smart Templates and Smart Checklist for Jira by Titan Apps.
If you want to recreate issues regularly at set intervals, use the built-in scheduling feature in Smart Templates.
Additionally, you can enhance your templates with variables of different types. This allows you to include values that change from one task to another:
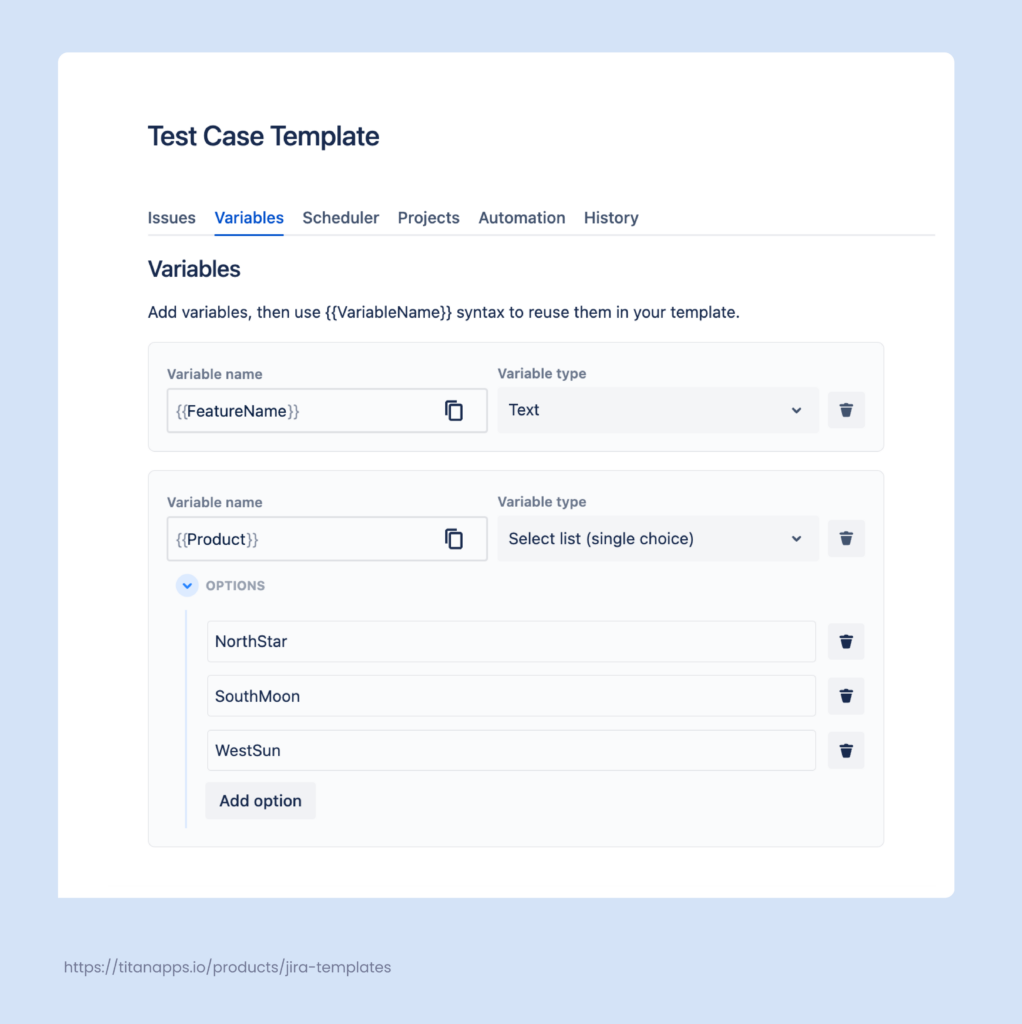
When creating a new issue, you will see a pop-up asking you to provide information for the variables. Here’s what the result looks like:

Another advantage of utilizing Smart Templates to reuse issues is the app’s History feature. It shows you the list of all issues created from a specific template. You will see their progress status, assignees, and other details.
By default, a new epic created from a template will be added to the same project as the original issue. However, a template can easily be shared between different projects from the Smart Templates’ Projects tab.
As you can see, Smart Templates allow you to easily clone a Jira epic along with all its dependencies. This process is simple, straightforward, and time-efficient. The tool works with both Jira Cloud and Jira Data Center.

Option 2. Clone an Epic Manually From the Issue View Page
Like all other issue types, epics can also be cloned from the issue view page. Although this won’t help you clone the entire hierarchy, you can use this method to clone a parent issue with child issues of the first level of the hierarchy. This means you’ll get a clone of your epic and its issues, but not the subtasks and checklists included in those issues.
To do so, open the view page of the epic you want to clone and click the three dots in the upper right corner. Select Clone from the dropdown menu.

In the popup that appears, you can select additional items you want to clone such as attachments, links, and child issues. Tick the latter and click Clone.
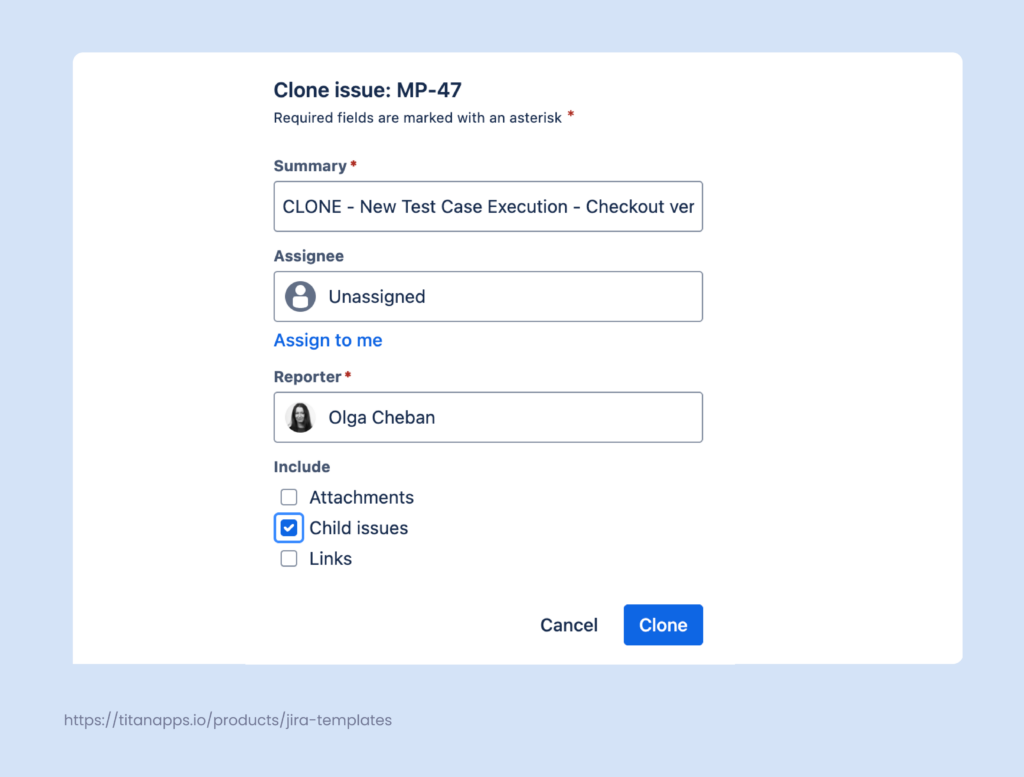
Your epic and its issues will be cloned to the same project. However, the subtasks from those issues will not be transferred.
Option 3. Clone an Epic Using Automation For Jira
Another native option, Automation for Jira, also doesn’t offer you a clear and straightforward way to clone an epic with all its dependencies. There are many different workarounds posted in the Atlassian community, but not all of them work reliably.
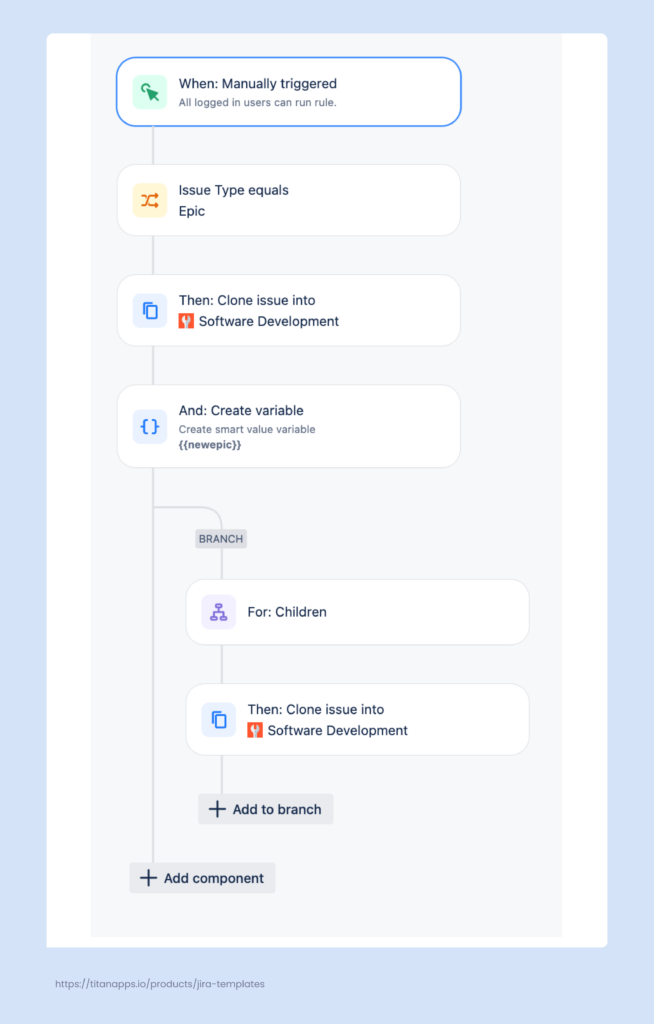
As of now, the most feasible option is to configure a rule that clones a parent issue with its child issues of the first level of hierarchy:
This means the rule doesn’t clone work items at deeper hierarchy levels, such as subtasks or checklists. Since Automation for Jira doesn’t support branches within branches, there’s no straightforward way to include subtasks in the rule. Some users set up two different rules, one for cloning an epic and its issues, and another for cloning subtasks. However, this cumbersome method doesn’t always run smoothly, so we can’t recommend it as a reliable solution.
Here’s how to configure the automation shown in the screenshot above.
- As a trigger, select Manually Triggered.
- For the condition, set Issue type equals Epic.
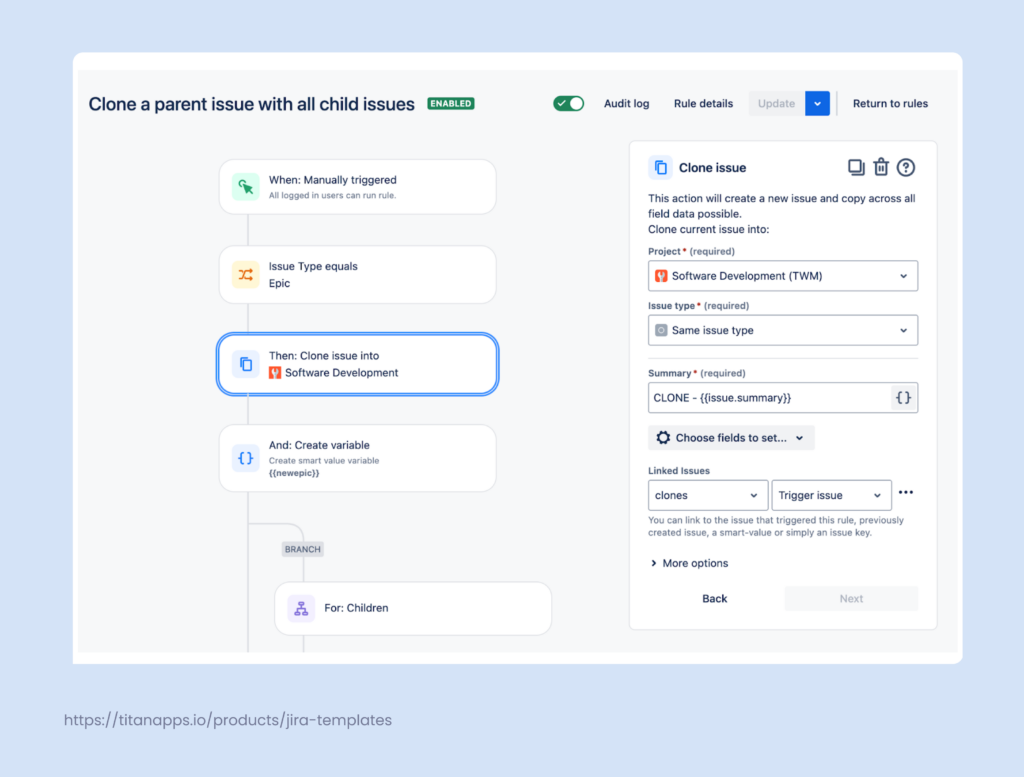
- The action will be Clone issue into. Specify the project where you want to clone your epic to. Then click Choose field and select Parent. You can also add any other fields you want to copy. In the Linked issues, select Clones and Trigger issue, as shown in the screenshot below. This will add the link to the original issue to the cloned version.
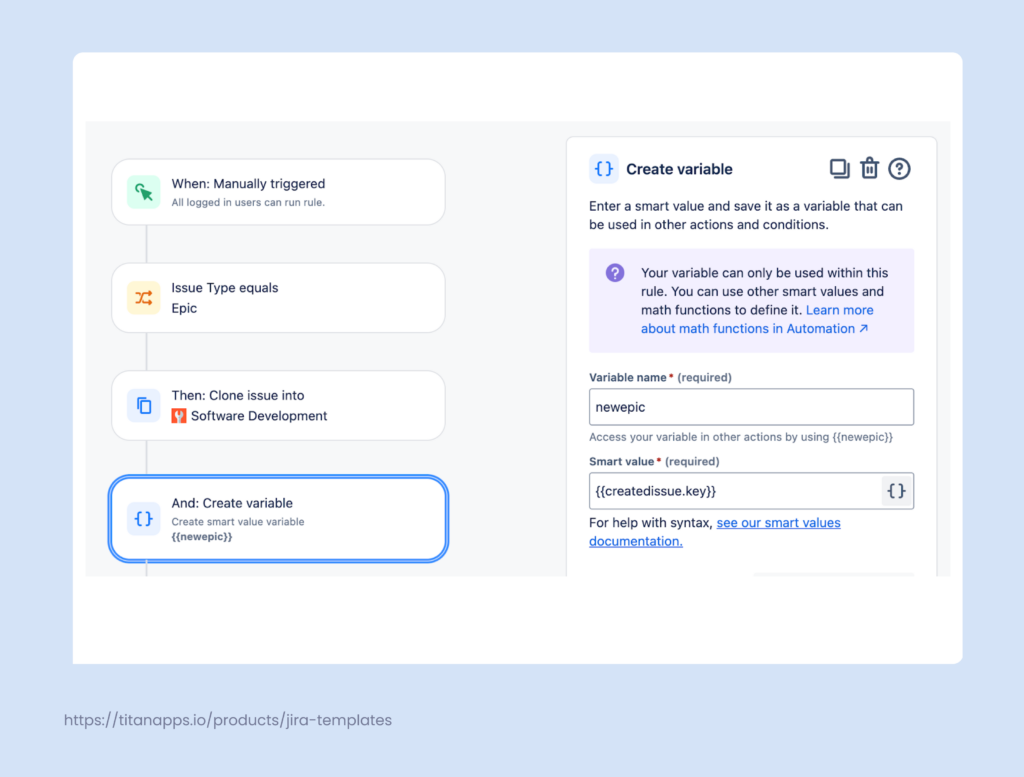
- Add a Create variable step and specify the variable name and its smart value as shown below:
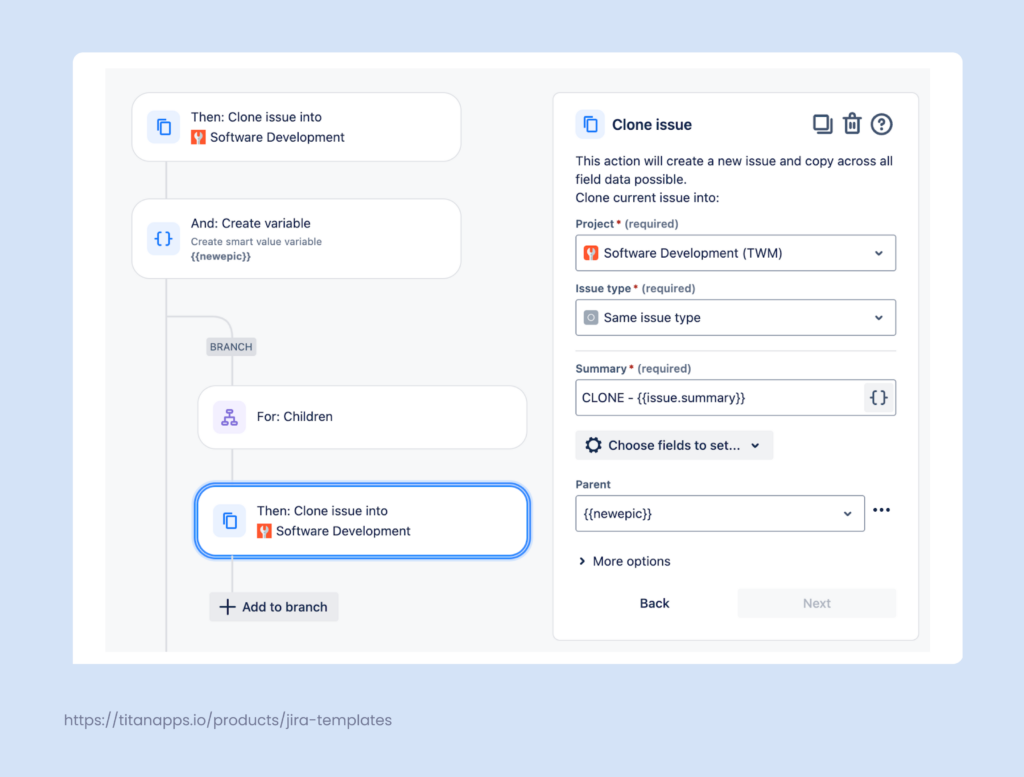
- Next, create a branch For: Children and add Clone issue into as the action. Select the same project you chose for the parent issue. From the Choose fields list, select Parent and enter the variable name from the previous step.
Finally, validate and enable your rule. Then, go to the epic you want to clone, open it, click Actions, and select this rule from the dropdown. This will trigger your automation, and the epic with its issues will be cloned according to your settings. However, the subtasks and checklists won’t be cloned. The new epic will contain a link to the original issue it clones.
How to Clone Jira Issues in Bulk
As of now, Jira doesn’t offer a native feature for cloning multiple issues in one go. This is a popular request from users, as you can see from this ticket dating back to 2014. The Jira team announced they have included the bulk-clone feature in their roadmap for this year. However, shipping a ready solution can take significant time.
The alternatives you have are:
- Automation for Jira – for recurring tasks, you can set up a rule that automatically creates similar tasks based on triggers. However, this is not feasible for issues you need to duplicate in bulk once or twice. Likewise, this won’t help if you want to clone a different batch of issues each time.
- Third-party apps – some tools allow you to overcome Jira’s limitations and offer more variety in terms of cloning options. One of the most popular solutions is Deep Clone. For some cases, you can also use Smart Templates by Titan Apps to clone issues in bulk. This can be done if multiple issues you need to clone are a part of the same epic. Let’s take a closer look at this example.
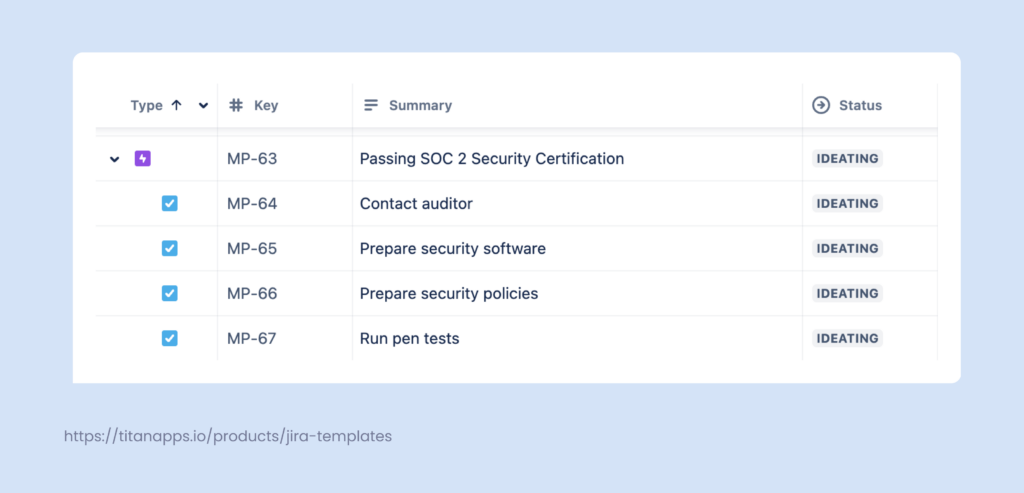
Let’s say you have several products managed in separate Jira projects, and you need to prepare them for a security compliance audit. This means you have to complete the same sequence of tasks for each product. To do so, you create an epic with multiple tasks:
Since all your audit-related tasks are in the same epic, you can bulk-clone them into another project with the help of Smart Templates for Jira.
Install Smart Templates and save your epic with multiple tasks as a template. Then, create a new epic from this template and make it accessible across your projects. We have already described how to do this in more detail in the previous section of this article. As a result, the multiple issues included in the initial epic will be bulk-cloned and can be used in a different project.
What Are the Limitations of Native Cloning in JIRA?
To sum up, Jira’s native functionality is a reliable choice when you need to clone an individual issue/Jira work item. In this case, you can easily configure an automation rule or trigger cloning manually.
However, Jira doesn’t offer out-of-the-box tools to clone multiple issues in bulk or the ability to clone an epic with the hierarchy of issues and sub-issues it contains. Sometimes, using automation for Jira can be a viable choice here, even though it’s not the most straightforward and bulletproof solution. Creating a rule that fulfills your requirements for cloning and runs without any surprises can prove to be a tricky task.
As an alternative, we recommend you consider third-party solutions for your custom cloning use cases. Smart Templates for Jira by Titan Apps can be helpful for cloning issues in bulk and cloning a Jira epic along with all its dependencies. Due to its ease of use, this is a rather cost-efficient solution that will help you streamline the cloning process and better organize your work in Jira.