


 Jira
Jira monday.com


From the Release Hub and backlog management to automated release notes, Jira has plenty of tools to help you plan your next release. In this blog post, we explain how to use these tools effectively for different release types. You will also get practical tips for extending the native Jira release planning capabilities with additional apps. Let’s dive in!
What is a Product Release and Why Plan it in Jira?
A product release is the process of deploying new or updated code to the production environment, making new functionality available for end users. A release results from multiple related processes, such as research, design, development, testing, documenting new features, and so on. In the context of Jia, a release, or fix version, represents a scope of functionality that will be deployed and is organized as a set of work items. As teams typically follow an incremental approach to software development, product releases often combine multiple updates and serve as clear milestones.
Jira is a popular choice for managing the product release cycle. It offers many tools for planning, allowing you to organize work at multiple levels and from various angles. A backlog, epics, sprints, and releases (also called versions) are all examples of such tools. Each of them addresses different needs and serves different goals.
Jira release planning, in particular, is crucial for understanding when something will be ready and when it will be deployed to production. Utilizing it effectively helps you plan delivery, manage resources, and communicate with stakeholders transparently.
The Main Approaches to Jira Release Planning
There are different ways to organize releases in Jira, depending on your team’s approach to software development. Here are the main release models:
- Feature-based: Releases are tied to completing work on specific features rather than a pre-defined time frame. A release is shipped when the planned features are ready.
- Continuous: As soon as a portion of work is completed, it’s deployed without delay. With this approach, there’s no need to wait for the rest of the scope to be ready. So, instead of one large release, there are continuous smaller updates.
- Agile/Scrum: This implies a sprint-based approach, where a team has a specific scope planned for the sprint. Typically, a sprint is a two-week period, but the duration can vary depending on the specific process. At the end of each sprint, this scope should be completed and deployed to production. As a result, in this model, releases occur bi-weekly.
These approaches don’t always exist separately. In practice, many teams blend them, flexibly adapting different formats to their needs. For example, you can plan a feature release but deliver it partially in sprints. Another example is when you work with the Agile/Scrum model, but deliver continuously.
Planning a Feature-Based Product Release in Jira Step-By-Step
As I mentioned earlier, this type of release focuses on shipping a specific feature or features. Such a release demonstrates more obvious value to users and stakeholders compared to releases that don’t roll out a complete feature. One of the advantages of this approach is improved prioritization and flexibility in deadlines.
Another important benefit is enhanced cross-department alignment. When a product team plans to release a specific feature all at once, rather than in increments, the support and marketing teams can better prepare for the launch.
Please note that, in terms of release management tools, Jira is optimized to work best with company-managed software projects. Team-managed projects don’t have a Releases page or another dedicated space for creating and managing fix versions.
They also don’t have the Release Notes feature. The automation options are limited as well, as the number of available triggers is smaller compared to a company-managed project. For more details on selecting a project type, please refer to our Jira Setup Guide.
1. Decide How to Structure Your Release
To plan a feature-based release, product managers can use epics and fix versions in Jira. For example, our team is currently developing a new feature, multiple checklists, for our app Smart Checklist for Jira. This work is organized into multiple epics, which are included in the same release in Jira. When bugs are discovered during the testing stage, it’s important to add them to the release as well.
The estimated timeframe for completing all tasks is 3 months. Once all the work items within this scope are finished, everything will be shipped at once. For smaller features, there might only be 2-3 stories added to a Jira release, with a tentative due date set in advance.
Sometimes, it’s convenient to split a release into several fix versions to deliver the feature incrementally. Then, you can decide in advance which tasks will be included into fix version 1, 2, or 3 and assign them accordingly.
Once you have decided on the structure of your release, it’s time to start organizing it in Jira.
2. Create a Release in Your Jira Project
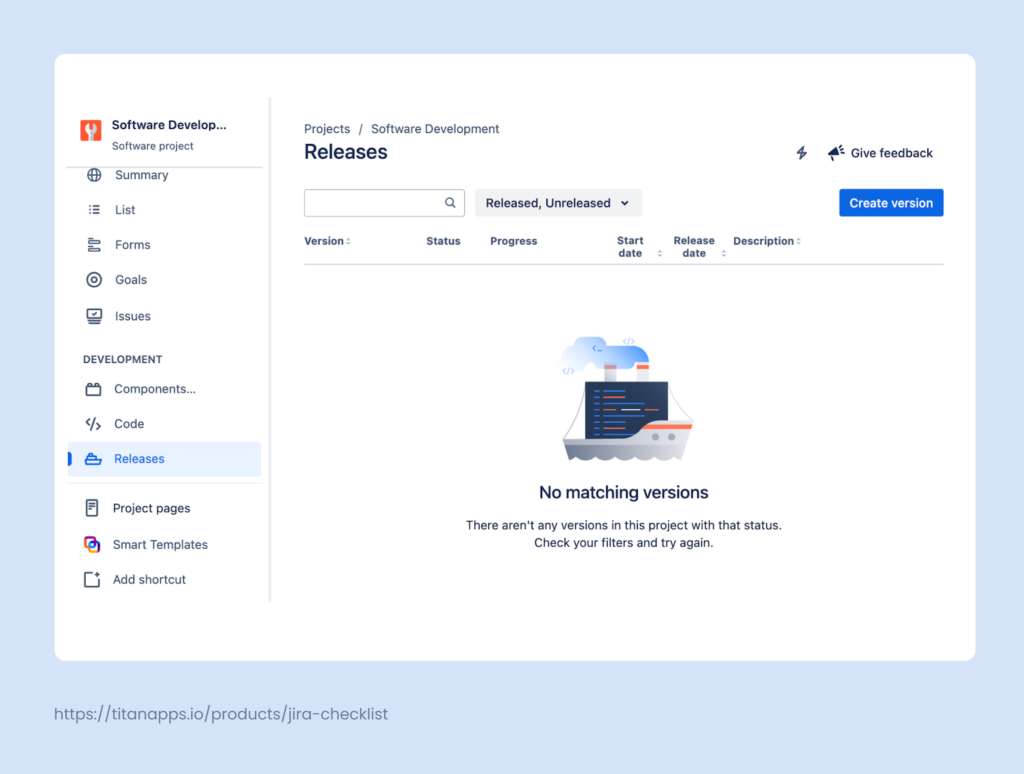
Let’s add a release to your company-managed Jira project. In the project menu on the left pane, you will find Releases. In Jira, Releases are also called versions or fix versions. Click Create version to add one.
Then, name the version and specify the start date and release date, if you have a clear timeframe. When naming the release, decide on a clear naming convention to avoid confusion. For a feature-based release, it makes sense to include both the feature name and the release number. For example: “Smart Checklist – Multiple checklists – V1”.
After creating a release, fill out the necessary information following the tips in the placeholders:
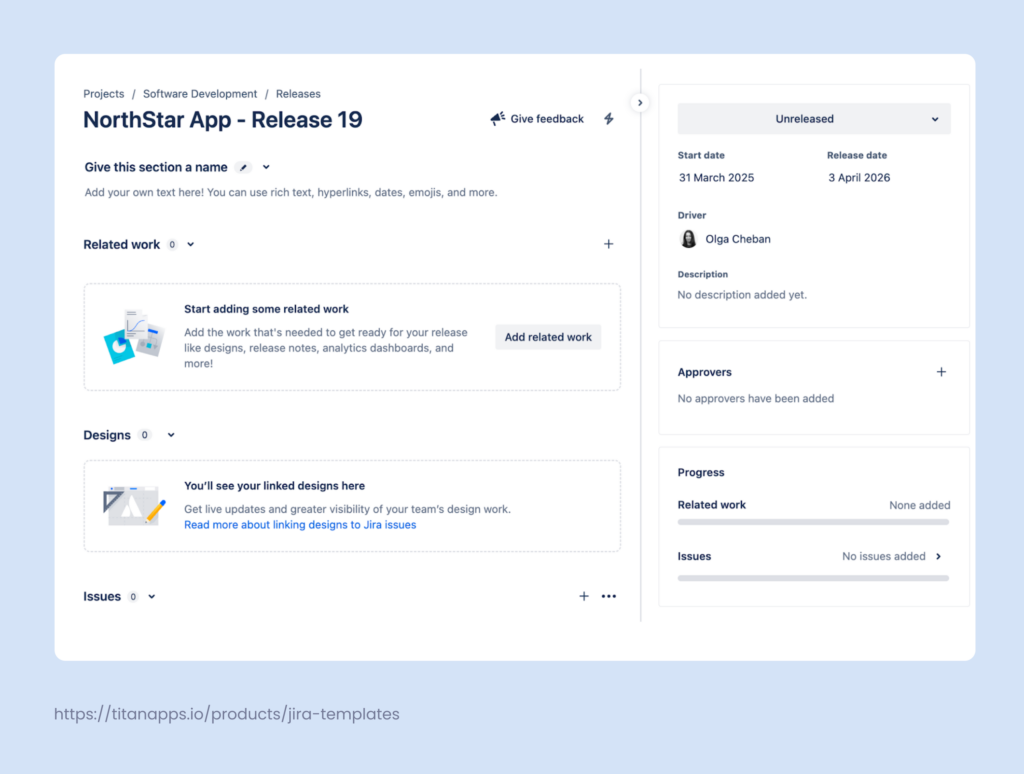
On this page, you can add a release description and any related materials that can be useful for the team when working on the release. In particular, consider including such items as:

Basically, the added assets can be anything you need. It’s enough to provide the URL and description for the item you want to include.
Apart from that, Jira allows you to link designs from Figma and preview them in the release hub and in work items. You will need to install the Figma for Jira app to enable this integration. The app is free, but you are required to have a paid Figma plan to connect your designs to Jira.
There’s also a dedicated section where you can add approvers for the release. This is especially convenient when you need a “green light” from multiple stakeholders. The section will list all your approvers along with the approval status from each person (Approved, Declined, or Pending):

All this information can be edited by anyone who has the Administer projects permission. This page is called the release hub. Here, you can see how much work has been completed in your fix version and check the status of Jira work items.
The release we’ve just created is called a single-project release. If you are a user of Jira Premium, Enterprise, or Jira Data Center, you can also create a cross-project release. The latter allows you to monitor and manage multiple releases from different teams and projects in one place as a single release.
Pro tip: Fix versions can also be created with Automation for Jira. For example, every month or when a previous version has been released. You can specify the start and end dates for the release, the version name, and the project where you want to create it.

3. Add Work Items to Your Release
The next step is to add Jira work items (also known as Jira issues) to the release. These can be epics, stories, tasks, bugs, and any other work items in your backlog.
This can be done in different ways:
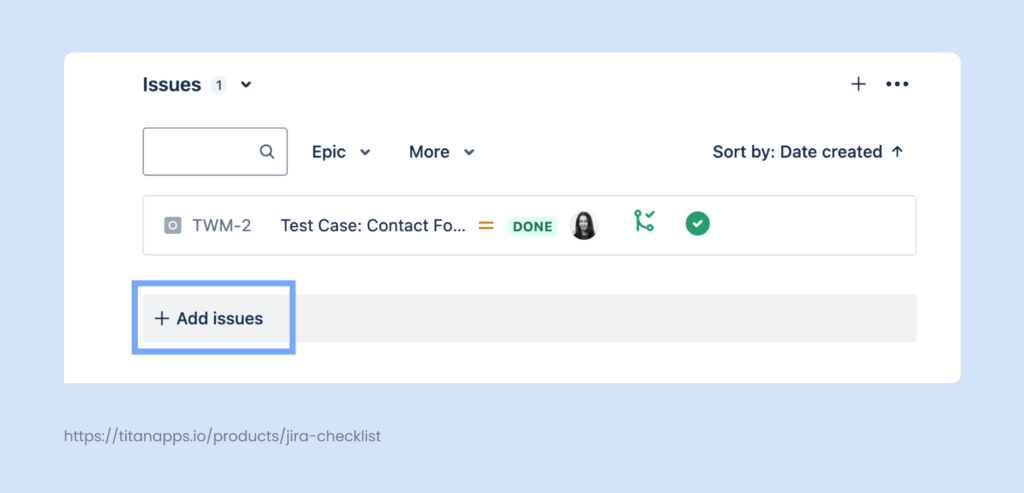
- Adding work items from the Release page. To do this, open your release view and click +Add issues in the Issues section at the bottom:
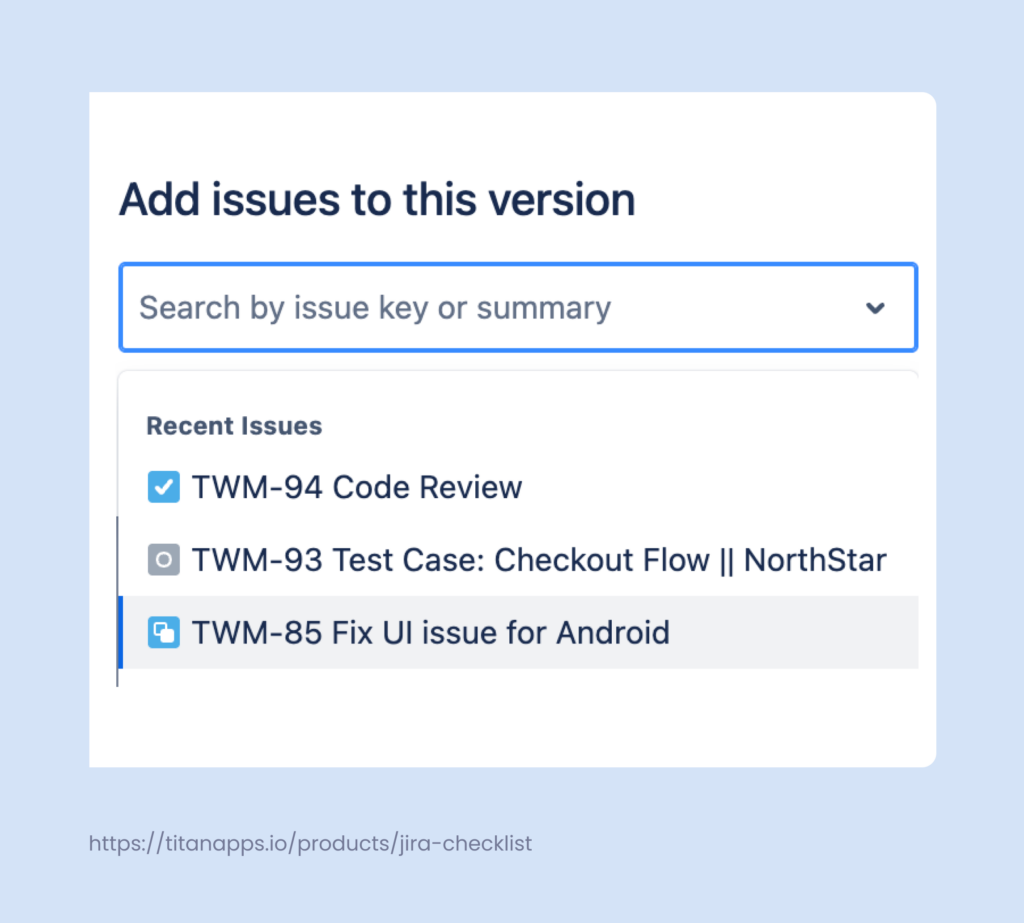
Then, you will see a pop-up window with the search bar. Search for the work items you need by keywords in their summary or by their work item key (the number at the beginning of the work item name). You can also simply select work items from the dropdown menu:
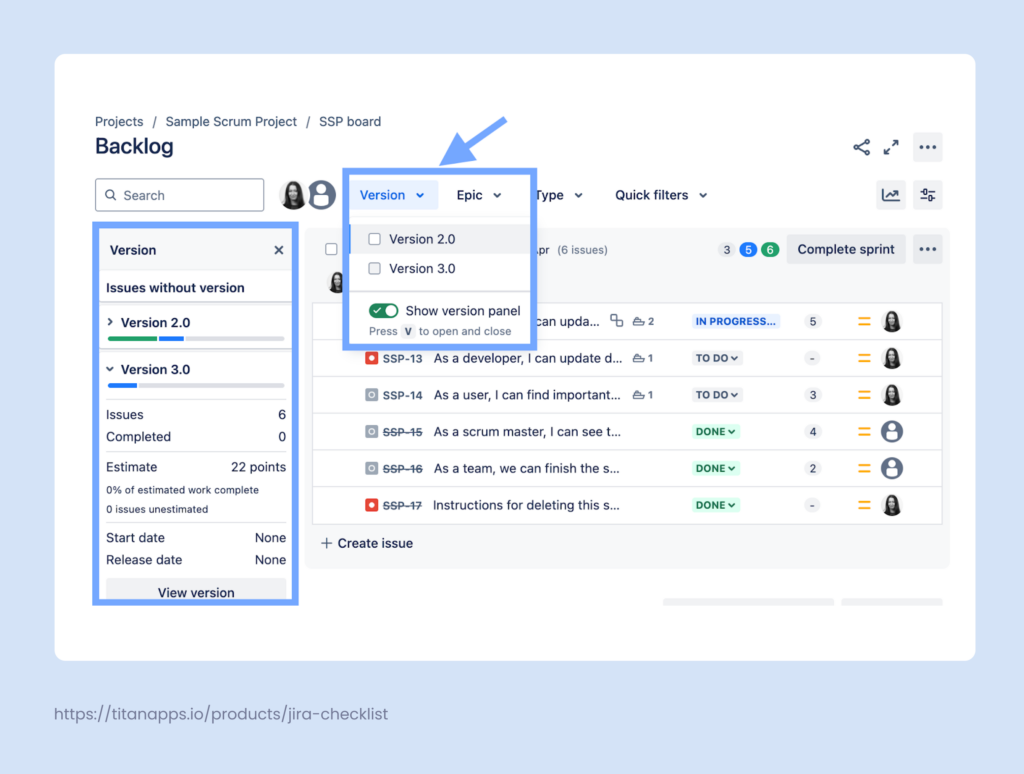
- Dragging work items from the backlog. This is helpful when you have many tasks to add and searching for them all would be inconvenient. Open your backlog and click Version -> Show version panel. Your versions, or releases, will appear in the panel on the left. Then, simply drag a work item to the area on the panel corresponding to the selected version, and it will be added to that version/release.
- Using the Fix Versions field is another way to add work items to a release. Open a Jira work item and simply assign it to a specific release in the Fix Versions field. If you have a company-managed project, you can bulk edit fields for multiple work items in the backlog. To do so, open your backlog and then press and hold Ctrl (Windows) or Cmd (Mac). Select several work items, and you will see a menu for bulk editing at the bottom of the page. Select the release you need for the Fix Versions field and save the changes.
For advanced scenarios, use Automation for Jira or bulk change from JQL.
Later, it’s important to add the discovered bugs to the release. It’s essential to see them in the scope and ensure they are fixed before shipping the release.
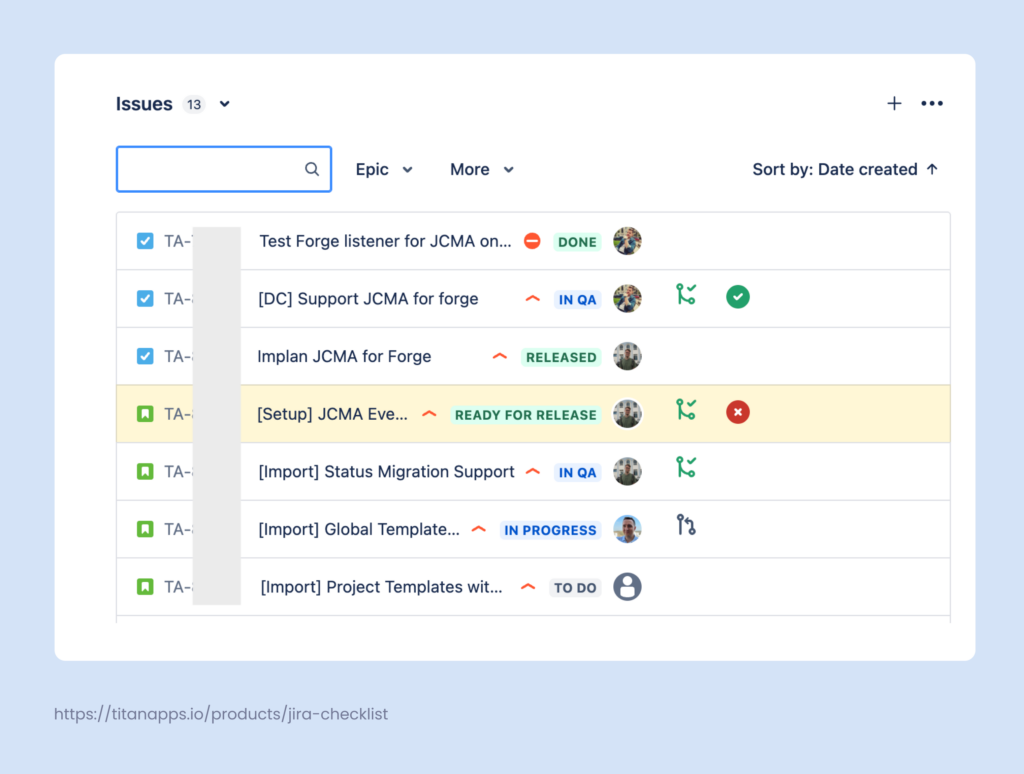
When the work items are added, you can view them from the release page:
4. Track Release Progress with the Release Hub and Jira Timeline
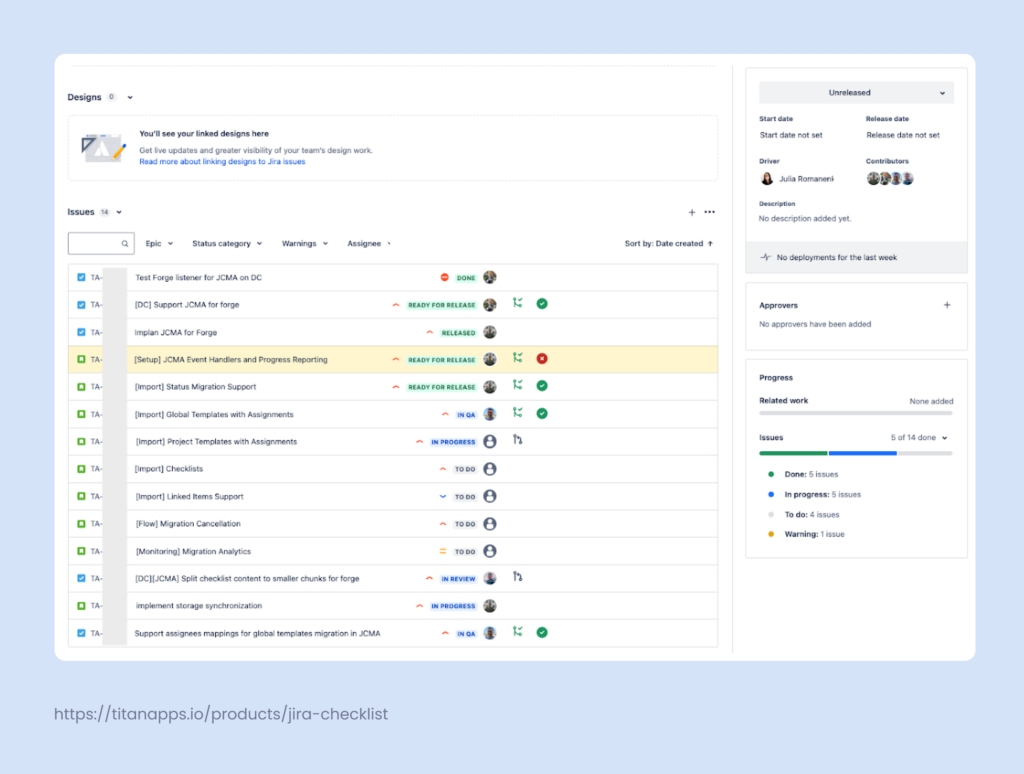
To access the release hub, navigate to Project menu -> Releases. This is the page where you created your first fix version. When you have more of them, you’ll be able to monitor their status here.
This page provides a breakdown of how many work items have the Done status and how many are In progress or To do. This allows you to estimate the delivery pace, identify blockers on time, and, if necessary, make an informed decision about altering the release scope.
If you connected your development tools to Jira, you will be able to see additional information related to your work items: commits, builds, deployments, and so on.
To track the progress of several releases, you can use the Timeline view. If they are not shown in this view by default, go to Timeline -> View settings -> toggle on Releases.
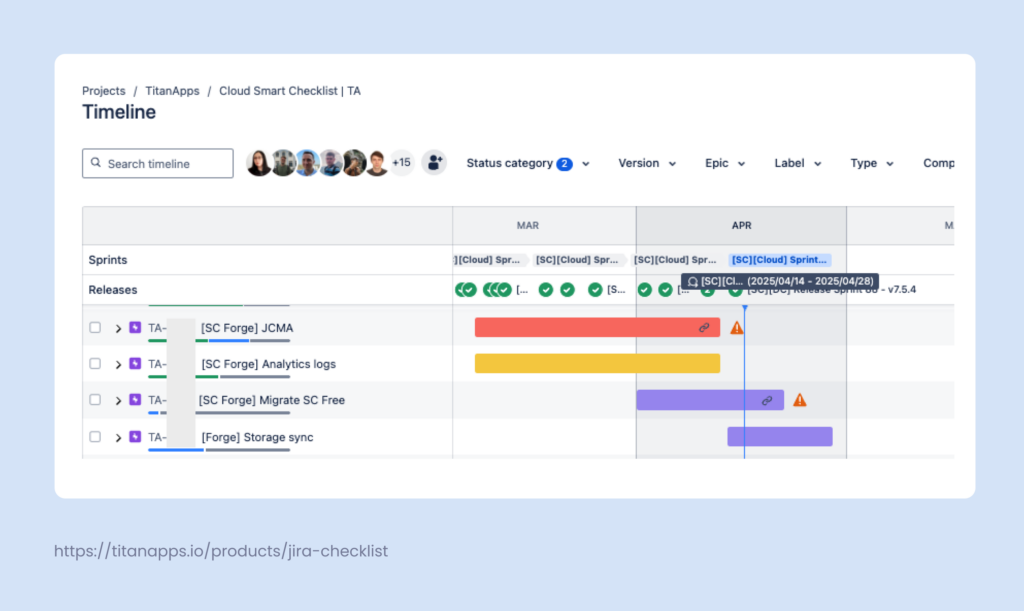
Jira has color-coding that allows you to see the status of your releases on the timeline at a glance. A green circle next to the release name means the release has already been shipped. A blue dot indicates it’s in progress, and a red dot signals that the release is behind schedule.
Organizing a Continuous (CI/CD) Product Release in Jira
With this type of release, you ship an update each time a chunk of work is completed. As a result, you have many small releases that are deployed continuously. An important part of this process is automation. With the help of CI/CD tools, once the code passes all tests, it’s automatically prepared for deployment. This allows you to speed up delivery and minimize the probability of human error.
There are two approaches to organizing product releases of this type in Jira: working with rolling releases and using Jira fix versions.
Relying on Rolling Releases in Jira
If everything is deployed as soon as it’s ready, it may be unnecessary to plan such releases in advance. You can simply close the task once it’s completed and the update is shipped. In this case, you don’t have to spend your time on additional Jira release planning.
This approach is sometimes called true continuous deployment, and it focuses on rolling releases: updates are continuously deployed as soon as they pass the tests. In this scenario, there’s no need to group work items into Jira versions. When Jira is integrated with CI/CD tools, it pulls data from them and uses it to automatically label deployments. You can check this information in the development section of a work item view.
Here are some tips to help you organize rolling releases in Jira:
Track deployment statuses with Jira workflows
To further optimize the process, it’s helpful to automatically update work item statuses when a deployment occurs. For example, if you integrated Jira with tools such as Bitbucket, GitHub, or GitLab, your team can use smart commits to change work item statuses directly from commit messages. Your CI/CD tools can also trigger a status update by calling the Jira API once a change has been deployed. Then, a Jira work item can be automatically transferred from the “Ready for Deploy” to the “Deployed” status, and so on.
Use feature flags to hide a work-in-progress from a release
When working with rolling releases, it may be necessary to hide some parts of functionality under a feature flag. Typically, this happens when something is not ready yet, but you want to release what you already have. You can then flag the part that requires more work. The users won’t have access to it, although the code for this work-in-progress feature will already be present in the release. Once that feature is ready, remove the flag, and the users will be able to access it.
Setting Up Jira Versions for Visibility
Some teams practicing continuous deployment still prefer to utilize Jira releases for visibility. In this case, you can group multiple work items under one release if they are logically connected. For example, if they are related to the same feature or were released in the same month.
However, this doesn’t mean that everything within a release should be shipped together. Updates still happen continuously once they are ready, and the versions in Jira merely provide better visibility into this process. They allow stakeholders to see the progress and are helpful for reporting purposes, retrospective analysis, or ensuring compliance. This can be especially useful for teams working in highly regulated industries, such as finance or healthcare.
Jira versions for continuous product releases can be set up in the same way as for feature-based releases. Please refer to the previous section of this article, where we described this process in detail. The only difference is that the features within a release are not deployed simultaneously, instead, they go live as soon as they are ready.
Planning Sprint-Based Releases in Jira for Agile Teams
With this approach, the scope is divided into regular two-week sprints, and a release occurs at the end of each sprint. In this case, you release a “product increment,” not a complete feature.
The advantages of this model include a steady delivery pace, strong focus and motivation, and transparency. For stakeholders, it’s often important that the delivery process is predictable and that progress is easy to see.
Here are the main steps to organize sprint-based releases in Jira:
Select work items for the sprint
Jira release planning for Agile teams starts with backlog grooming and prioritizing features and fixes for the next sprint. Once this is done, you can add the selected Jira work items to the sprint. To do this, simply drag and drop work items into the sprint in the Backlog view.
Create a release in Jira
In Project settings, go to Releases -> Create version. We covered this process in more detail earlier when we discussed adding a fix version for the feature-based release. The difference is that for the Scrum approach, you will need to create a corresponding Jira fix version for every sprint. As an alternative to adding a release manually, you can create a new version with Automation for Jira each time a new sprint begins.
Assign the sprint work items to the release
Once you have prepared the scope for your sprint and created a release, you need to fill out the Fix Version field in the work items selected for this sprint. This can be done manually: simply open the work item view and select the release you need in the Fix Version field. You can also edit this field for multiple work items at once from the backlog page. However, it’s more efficient to assign work items to a release with the help of automation.
Automation options to consider:
- When you start a new sprint, an empty release with a corresponding name can be created automatically.
- When you close a sprint (mark it complete), all the tasks in that sprint that are in a Done status category, such as QA passed, are automatically assigned to this release version.
- Another example: When a new release is created, automatically assign all In Progress work items without a fix version to this new release.
All this can be done with the help of Automation for Jira. Here’s the flow for the latter example:
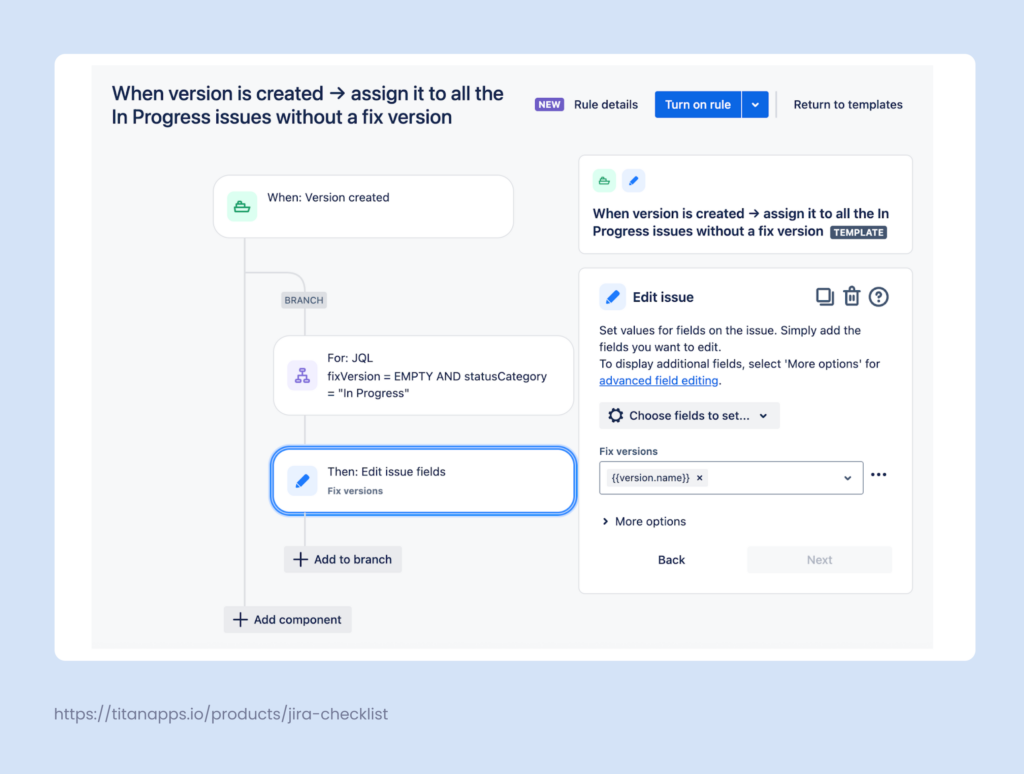
Apart from assigning work items to a release, automation can be used to streamline other parts of the process.
For instance, connecting Jira with your Git or CI/CD tools allows you to set up workflow automation. When you receive a status update from a repository app (e.g., a pull request is Merged), the status of the corresponding Jira ticket will be updated automatically (e.g., Ready for Release). There can also be an automation that, when a sprint ends, sends a signal to the repository app to prepare the release cut.
Creating Release Notes in Jira
Compiling release notes is an important part of the process. They serve as a basis for release documentation and help teams communicate with stakeholders.
There are different approaches to creating release notes in Jira. You can use native functionality, which allows you to generate the basic structure for release notes manually or automatically. Alternatively, you can consider third-party solutions, which offer additional features and can create more meaningful notes with the help of AI tools. Let’s explore these options.
Adding Release Notes Structure Manually
Jira has native functionality for creating the basic structure for release notes. It provides a list of the main tasks in the fix version. Information about the epics, stories, bugs, and other work items is pulled automatically. What you receive is not ready-to-use notes, so you will need to further edit this structure to turn the list of tasks into an informative summary.
Here’s how to use this feature: Go to the project settings and select Releases. Then, open the fix version you need and click the Release notes button in the upper-right corner, next to the release name. Select which work item type and fields to include. Once you save your release notes, they will be added to the fix version description as a related work item.
If you have connected Jira to Confluence, you can save your release notes structure as a Confluence page and edit it later. In this case, the related work section will include a link to Confluence.
Leveraging Automation for Jira
To save time, it’s often helpful to create the release notes structure automatically. Here’s an example scheme that can be used with Automation for Jira. When an epic is transitioned to the Done status, the rule automatically generates release notes on Confluence and sends a notification about this to the dedicated Slack channel:

Depending on your process, you can set up similar automation with a different trigger. For example, it can run when a new version is released.
Using Smart AI Release Notes
With Jira’s native release notes, you basically only get a list of the completed work items and their descriptions, if you choose to include the latter. Usually, that’s not enough, and you have to put in more work before you turn this into a meaningful update for the stakeholders.
This process can be optimized with Smart AI Release Notes for Jira. This app analyzes the work items of the selected type and generates release notes with the help of the AI. Apart from specifying the work item type and fix version ID, work items can be filtered by other parameters using JQL:
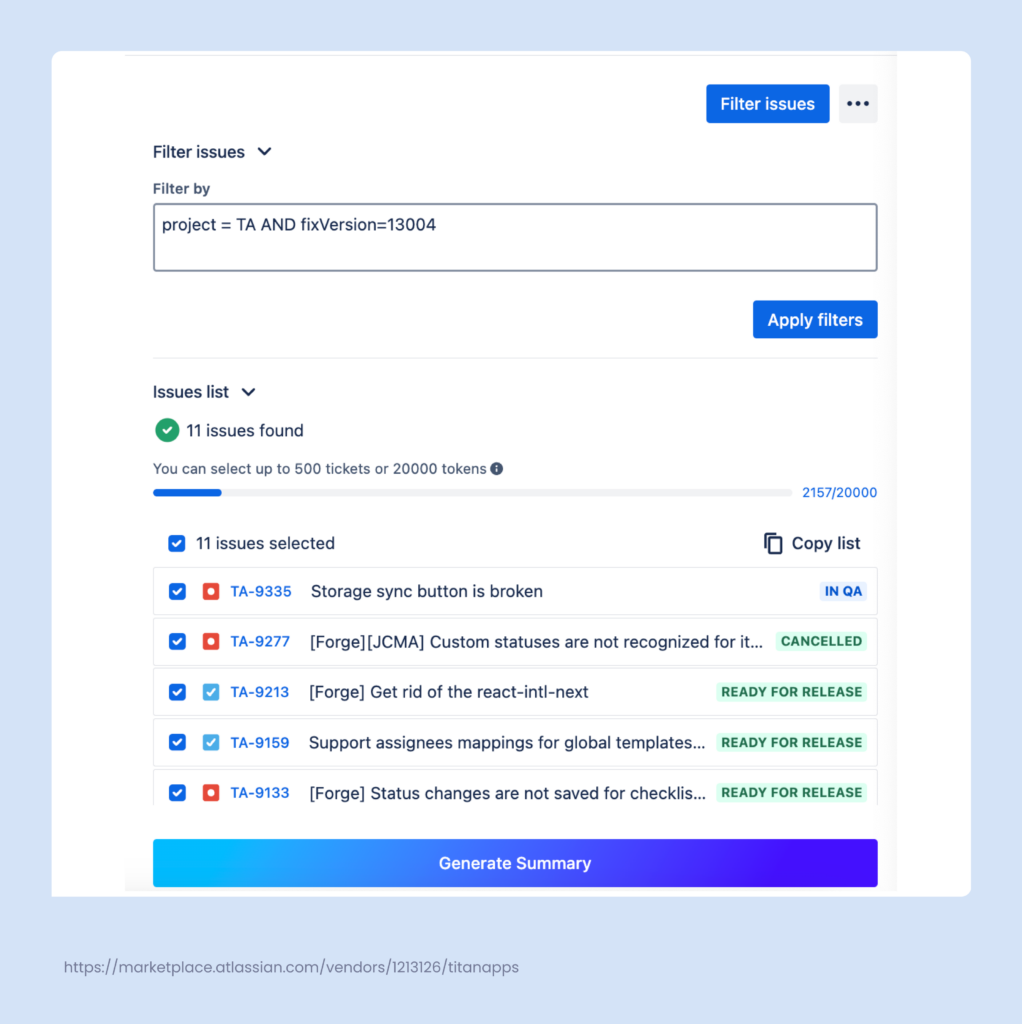
In addition to information from Jira work items, you can provide various prompts, such as specifying what you want to focus on or adding more context.
As a result, you get well-structured, meaningful, and reader-friendly release notes that are ready to be distributed:
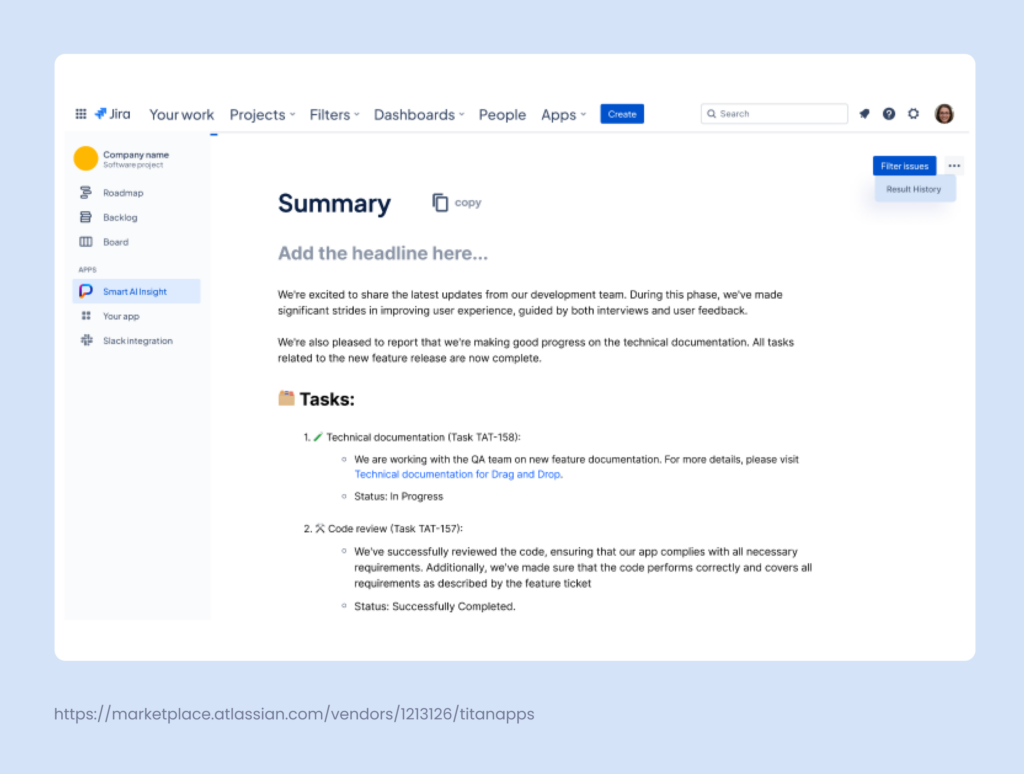
To start using Smart AI Release Notes for Jira, install the app from the Atlassian marketplace.
Save Time on Jira Release Planning With Other Smart Tools
The release management process in Jira can be optimized further with the help of various tools. In particular, you can use Smart Templates and Smart Checklist by TitanApps. They allow you to create reusable work item templates and checklist templates, which can be applied automatically. This enables you to save significant time on planning and executing repetitive tasks and recurring processes.
The main benefit is that you only need to outline the process in detail once. When it’s ready and you save it as a template, your team can reuse it multiple times. This is a powerful way to optimize resources and make the team more efficient.
Smart Checklist Example: A Free Regression Testing Template
Depending on your processes, each sprint or feature release can include recurring tasks. For example, regression testing – updates cannot be deployed before they pass the tests, making this a mandatory recurring component of any release. Therefore, it can and should be optimized to save time and effort.
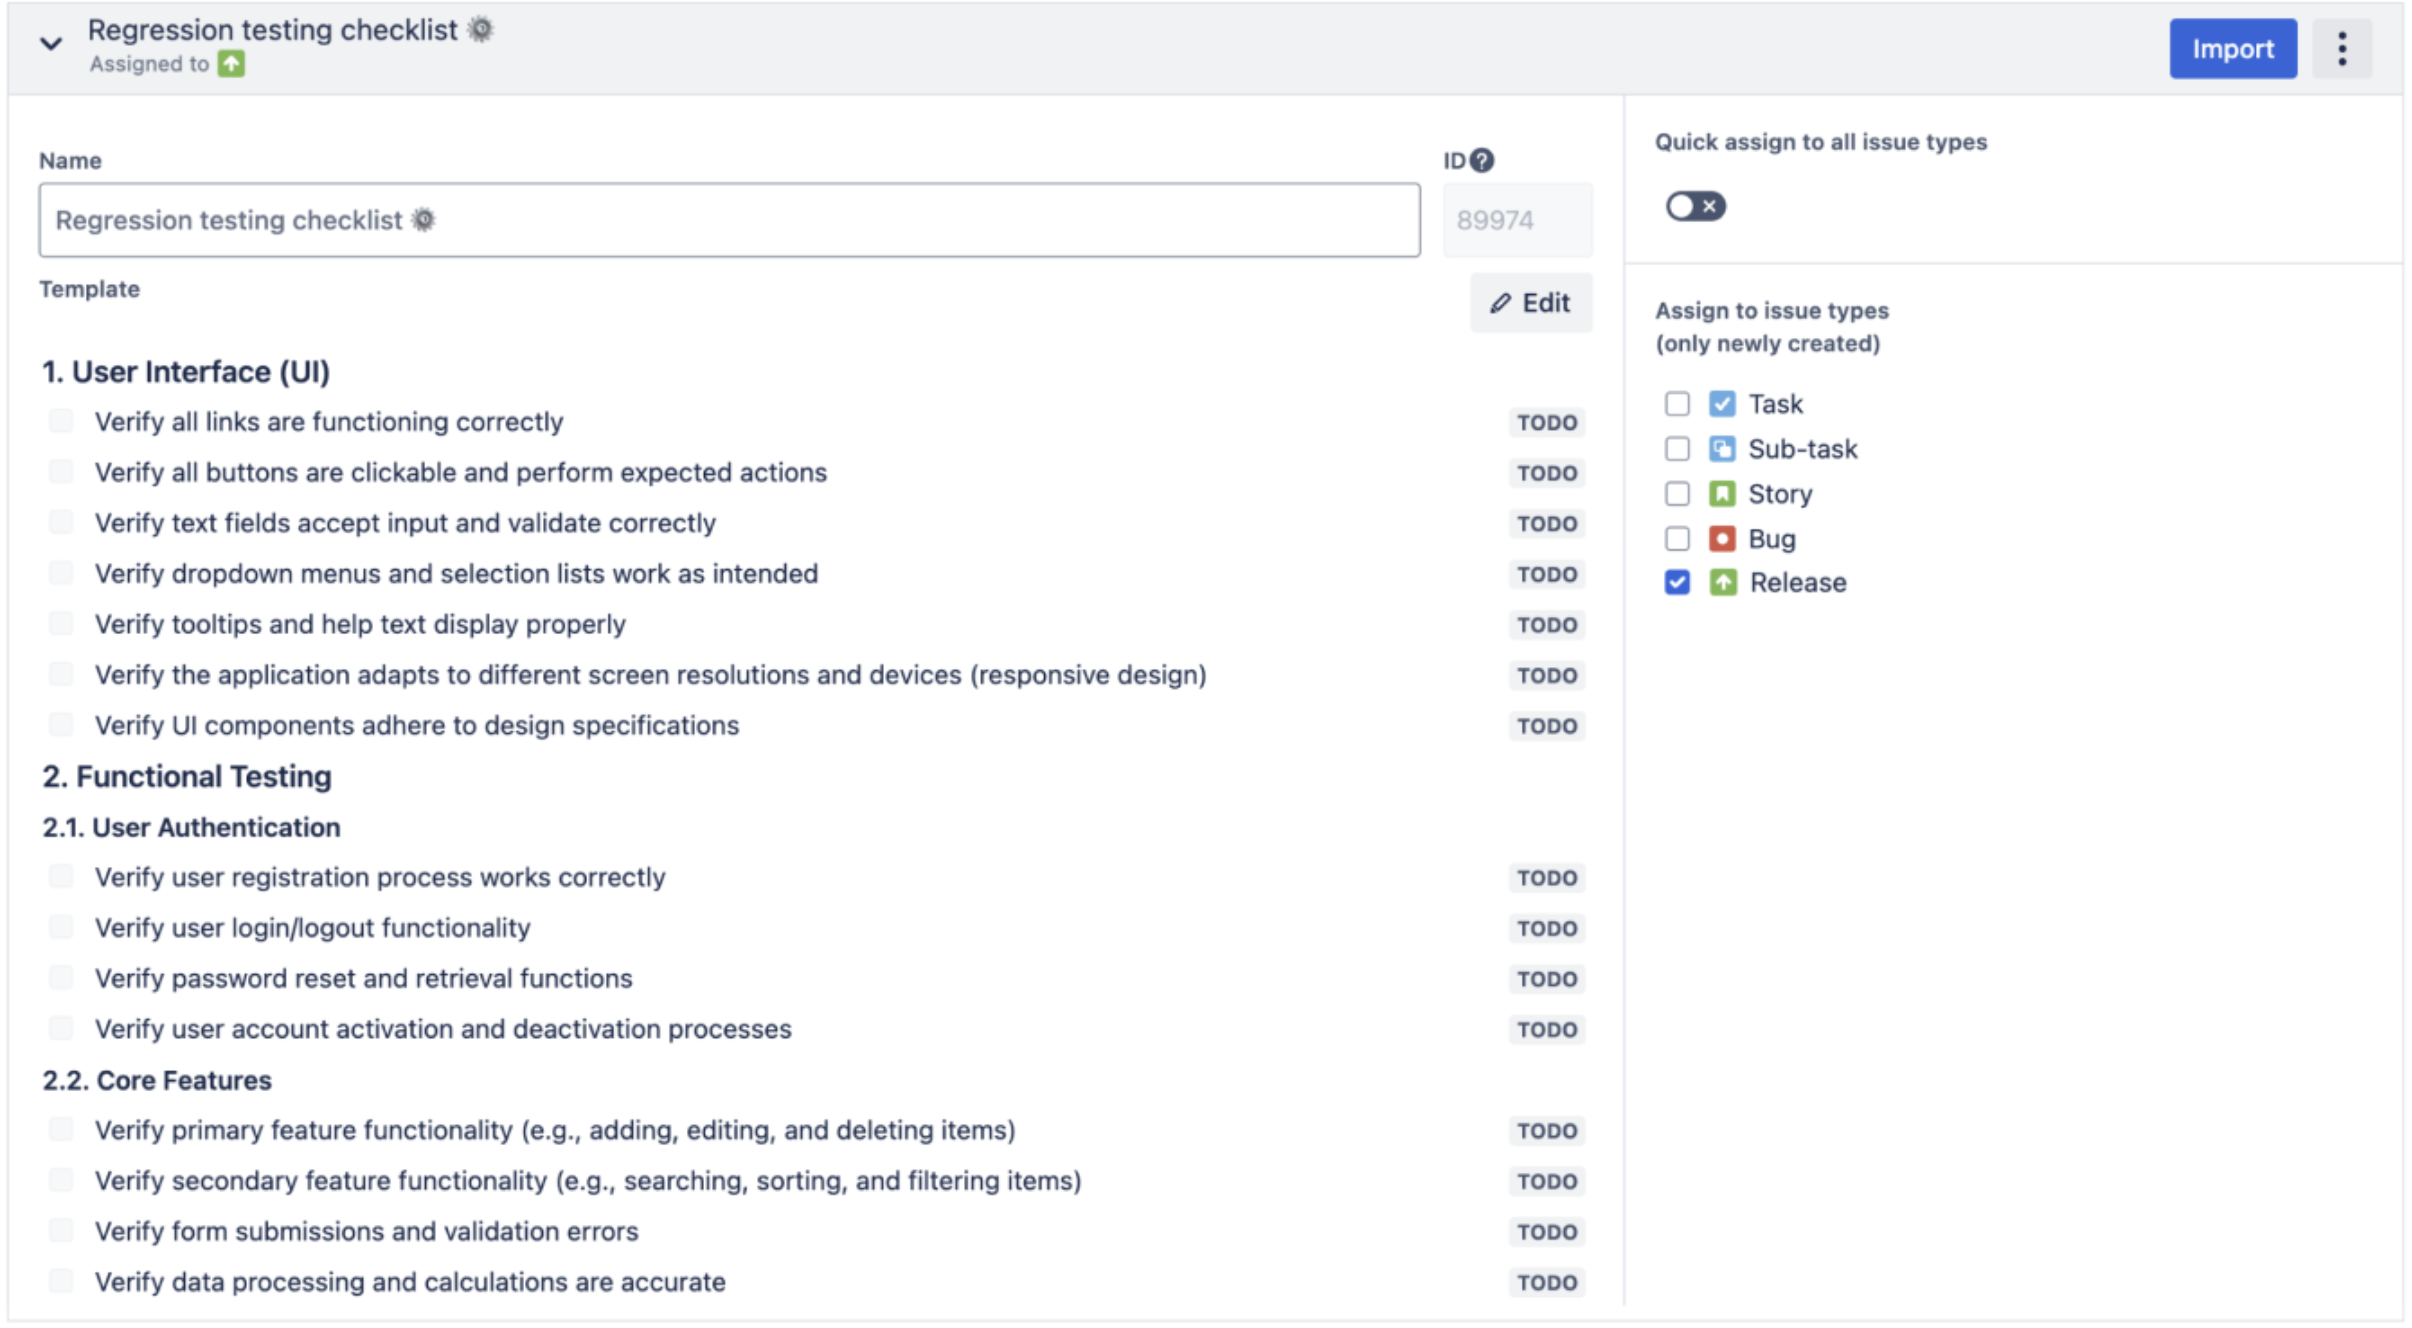
This can be done with Smart Checklist for Jira. It can automatically add a structured checklist for regression testing (or any other process) to your Jira work items of a specified type. To make this more convenient, in this example, we added a new work item type to our project: Release. It can be used to track all the activities related to a release.
Here’s what it looks like in practice. We’ve prepared a reusable Smart Checklist template for regression testing (see the image below). It’s a structured action plan listing all the steps that need to be completed. As you can see in the settings on the right, this checklist template will be automatically added to all new work items with the Release issue type:
# Regression testing
### 1. User Interface (UI)
- Verify all links are functioning correctly
- Verify all buttons are clickable and perform expected actions
- Verify text fields accept input and validate correctly
- Verify that dropdown menus and selection lists work as intended
- Verify tooltips and help text display properly
- Verify the application adapts to different screen resolutions and devices (responsive design)
- Verify UI components adhere to design specifications
### 2. Functional Testing
#### 2.1. User Authentication
- Verify the user registration process works correctly
- Verify user login/logout functionality
- Verify password reset and retrieval functions
- Verify user account activation and deactivation processes
#### 2.2. Core Features
- Verify primary feature functionality (e.g., adding, editing, and deleting items)
- Verify secondary feature functionality (e.g., searching, sorting, and filtering items)
- Verify form submissions and validation errors
- Verify data processing and calculations are accurate
#### 2.3. User Roles and Permissions
- Verify that role-based access control works correctly
- Verify permissions for creating, editing, and deleting resources
### 3. Integration Testing
- Verify integration with third-party services
- Verify API calls and responses are correct and handle errors gracefully
- Verify data synchronization between different modules or systems
### 4. Performance Testing
- Verify the application loads within acceptable time frames
- Verify the application can handle the expected concurrent user load
- Verify the application remains stable under peak load conditions
### 5. Security Testing
- Verify data is encrypted during transmission
- Verify that proper authentication and authorization mechanisms are in place
- Verify input fields
Using such a template provides two important benefits. First, you save time on planning this part of the release process. Second, you ensure consistency and precision. With a clear, tried-and-tested action plan, it’s easier to stick to best practices and reduce human errors. As a result, this makes it easier to track how your team works on a release and manage the process better.
Install Smart Checklist for Jira and simply copy and paste this template into the Smart Checklist window of your work item. Then, use the built-in markdown editor to adjust it to your processes or create a new template from scratch.
Smart Checklist allows you to:
- Structure your checklist with headers
- Tag collaborators
- Include deadlines
- Format text in the markdown editor
- Set custom statuses for each action item (“Next Up,” “Ready For Review,” etc.)
- Add links to action items
- Include mandatory steps
- Save checklists as templates (as shown below)
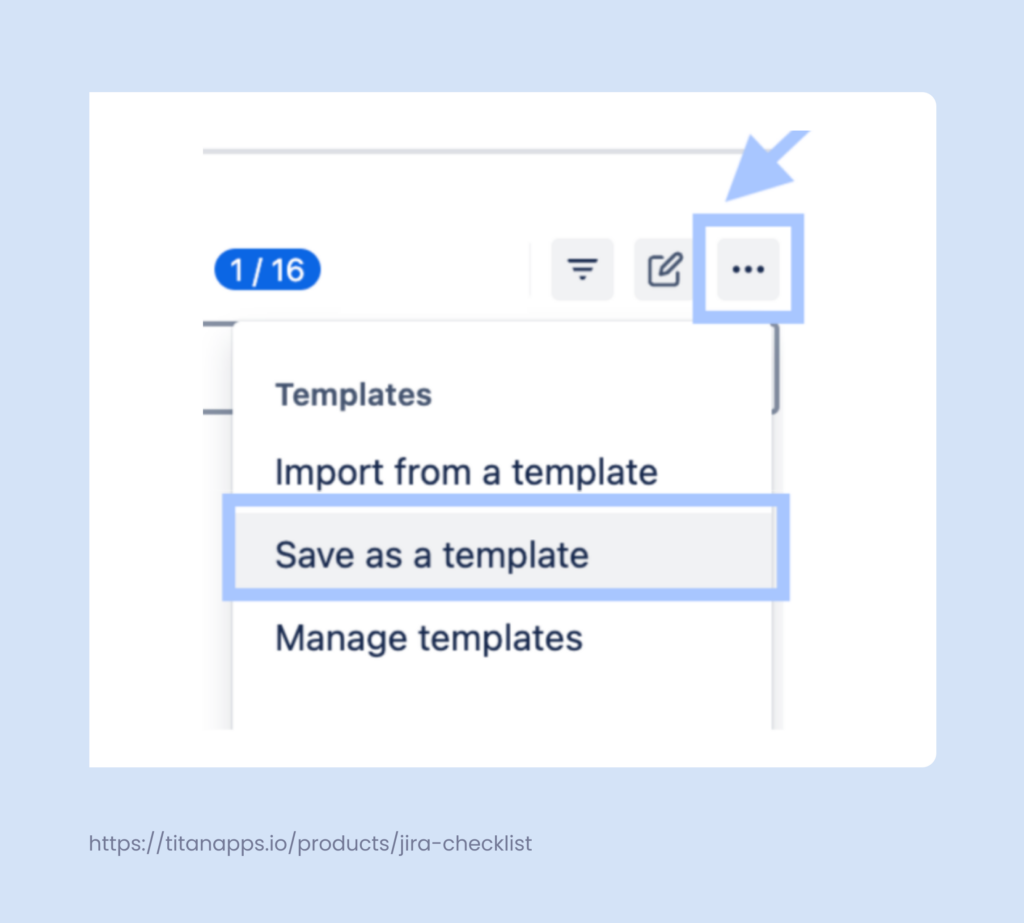
After this, you will be able to add this checklist to Jira work items in every release. For more details, refer to the Smart Checklist documentation.
Smart Templates Example: An Epic Template For a Marketplace Release
With Smart Templates, you can save any Jira work item as a reusable template, preserving the entire hierarchy. For example, prepare a compliance audit template and then use it to quickly create an epic with pre-set work items, subtasks, checklists, assignees, descriptions, and even pre-filled custom fields.
Another example is creating a reusable marketplace release template. It helps you organize everything that needs to be done in the form of an epic with multiple tasks and checklists:
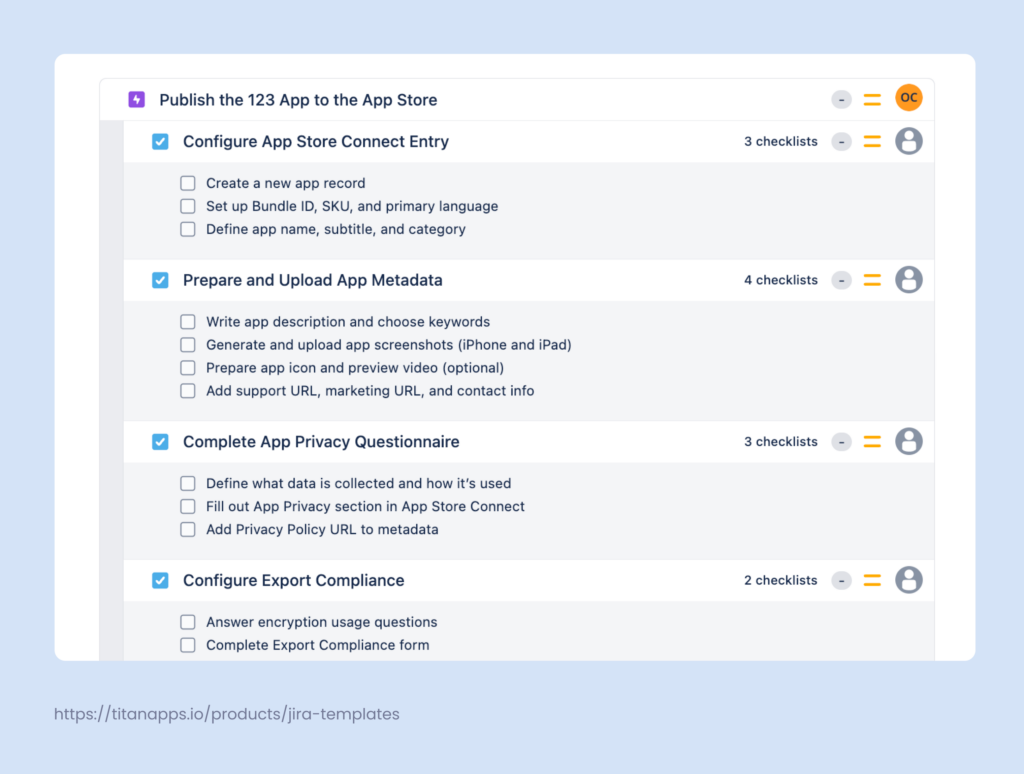
It’s convenient to reuse such a template since you need to follow the same steps with each new release of your app. When you need to publish an update to the App Store, you won’t have to plan this activity from scratch. Instead, a ready-to-use epic with pre-set tasks can be created from a template in just seconds.
Smart Templates and Smart Checklist for Jira enable you to capture complex processes in the form of epics with multiple tasks and checklist items. This, in turn, helps you streamline your team’s work and achieve better results faster.
What You Need to Know: Jira Release Planning FAQs
What Are the Common Mistakes to Avoid?
It’s crucial to use Jira releases consistently and follow established practices. Here are some of the possible mistakes you should be aware of:
- Inconsistent version naming. Unclear naming can cause confusion, especially if multiple teams are involved. Make sure the release name states clearly what the main focus of the release is. It’s also crucial that the names of all your releases are created according to the same principle.
- Not assigning all the work items to a release. It’s important to ensure that every work item is linked to a corresponding fix version. If some tasks aren’t linked, they won’t appear in the release scope or in reports. This can lead to inaccuracies and miscommunication. The best way to solve this challenge is by using automation.
- Adding unrelated work items to the release. It’s better to only include work items that are clearly within the scope for a current release and are a part of it. If you add work that is not relevant to the fix version, it reduces clarity and makes it harder to understand the release’s focus.
- Not marking old versions as released. If you ship a release but forget to reflect this in Jira, it creates confusion and negatively impacts transparency.
- Assigning all work items to “Unscheduled” or no version. If your work items are not grouped under a specific fix version with a defined release date, this can create confusion. Such lack of clarity makes it difficult to track what scope is scheduled for release, so it’s better to keep your work items organized.
What Are The Benefits of Jira Release Planning?
Apart from the obvious benefits like transparency, versatility, and more structured processes, Jira offers you some additional value:
- You can work better with release blockers. Planning in Jira helps you keep track of release blockers and prioritize them effectively. For example, you can identify which bugs are release blockers so that you do not deploy changes until these critical bugs are fixed.
- QAs gain better visibility and clarity. After testing the scope task by task, they can use Jira releases to test the release as a whole. This gives them the context of what to focus on during their smoke or regression testing.
- It’s easier to manage hotfixes. Sometimes you have several hotfixes and need to gather them into an extra release. Although they are not scheduled as a regular release, it’s still convenient to group them for visibility.
To sum up, many software development teams worldwide use Jira to manage releases. It provides various tools for planning, tracking progress, and automating different parts of the process. Another important feature is Jira’s ability to integrate with other apps. Connecting it with your Git tool or CI/CD platform gives you additional means to automate workflows and improve efficiency.
Many thanks for reading, and good luck with your releases!


