Jira
Jira monday.com


Jira issue statuses shape how work moves across your Jira board. They affect what your team sees in Scrum and Kanban boards, how Jira reports calculate progress, and how automation rules trigger notifications or transitions.
Default Jira projects usually work fine at the start. Custom statuses become useful once your workflow needs extra control, clearer handoffs, or better visibility across stakeholders.
This guide shows how to add new statuses and adjust existing ones, then use statuses for reporting and process analysis.
What are the statuses of Jira work items (issues)?
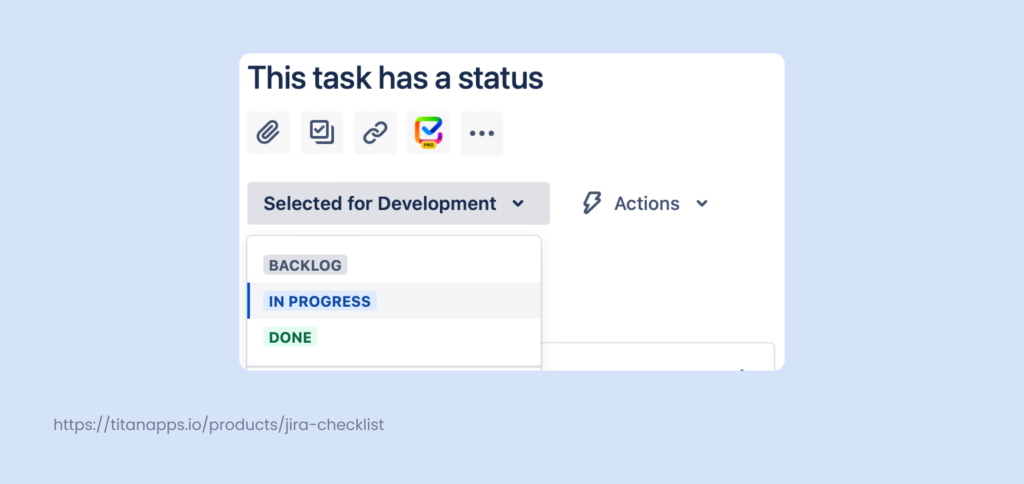
A Jira issue status is a label that shows where a work item is in the process right now.
That process is defined by a Jira workflow. A workflow is the path your team uses to move work from start to finish. It’s a set of statuses (the stages) connected by transitions (the rules/buttons that move an issue from one status to another).
So when you look at an issue status, you’re really answering a simple question: which workflow stage is this Jira issue in right now?
Project templates, workflows, statuses, and board columns are connected, but they sit at different levels.
A Jira project is where your team tracks work. When you create a project, Jira offers templates (Scrum, Kanban, service, business, and others). A template gives you a starting setup, including a default board and a default workflow that matches the use case.
A workflow defines how a work item moves from start to finish. It contains:
- Statuses (the stages your work item can be in)
- Transitions (the steps that move it between statuses)
A board is the visual view of that workflow. Board columns map to statuses. One column can include multiple statuses, which lets you keep the board simple without losing detail for filtering, JQL, reports, and automation.
Generally speaking, Jira offers a nice selection of default statuses that fit within the workflow designed for a specific project template. But, as projects grow in complexity or teams scale to meet the challenges, you’ll need to adjust and add more steps to the process.
How do you create and add more statuses to the defaults?
Teams usually add statuses when the “default” workflow doesn’t reflect a real handoff or decision point they need to track. The best statuses represent a change in ownership, a new type of work, or a clear gate (for example, review or testing).
Here are common, consistent additions for software teams:
- In Review
Use it when a work item is waiting for a code review (peer review, PR review) before it can move forward. This makes review queues visible and helps teams spot bottlenecks. - Ready for QA (or Ready for Testing)
Use it when development is done and the work item is ready for the testing phase. It’s a clean handoff from engineering to QA. - In QA (or Testing)
Use it when QA is actively validating the change. This is helpful if testing takes time and you want to track test execution separately from “done.” - Blocked (optional, but often useful)
Use it when progress is impossible due to dependency, environment issues, missing access, or external approvals. This prevents “stuck work” from hiding inside generic statuses like “In Progress.”
If you want a pass/fail signal, it’s usually clearer to capture it as:
- a resolution (for failed vs fixed outcomes),
- a custom field (test result),
- or a short checklist / test step log,
rather than splitting the workflow into QA Passed / QA Failed statuses—unless your process truly branches differently based on that outcome.
In these and many similar cases, there’s an obvious need to add the new status to your Jira project.
Technically, there are a few ways to add statuses in Jira, and the right one depends on your project type.
If you use a team-managed project
You can add statuses directly from board settings. This approach is convenient because it lets you:
- create new statuses, and
- adjust board columns at the same time (including mapping multiple statuses to one column).
This is the easiest option when the team owns the workflow and wants to iterate quickly.
If you use a company-managed project
You usually add statuses by updating the workflow in the project’s workflow scheme (via Jira settings). In this model:
- statuses are part of the workflow design,
- changes often require Jira admin permissions (or coordination with an admin),
- the board reflects whatever the workflow allows.
This approach is best when workflows are standardized across multiple projects or teams.
Quick rule of thumb
- Need speed and flexibility for one team? Team-managed + board settings works well.
- Need consistency and governance across many projects? Company-managed + workflow editing is the right path.
Let’s deep dive into the flow of adding statuses to the team-managed projects.
Step 1: Go to your board and click on the button with three dots to open the Board settings. The button is located at the top right corner of the screen.
Step 2: Select columns in the Settings menu and click the “Add status” button. This is where you’ll see your board columns as well as the statuses that are associated with them. One column can have multiple statuses. This can be quite useful if you want to keep your board minimalistic while still having the flexibility to sort work items (issues) by their status or gain certain specific insights from reports (more on that later).
Note: These steps apply to team-managed projects. In company-managed projects, statuses are added by updating the project workflow (usually by a Jira admin). If you don’t see Add status, check your project type or ask an admin to update the workflow for you.
Please keep in mind that if you don’t see the “Add status” button, ask your Jira admin for help or the appropriate permissions.

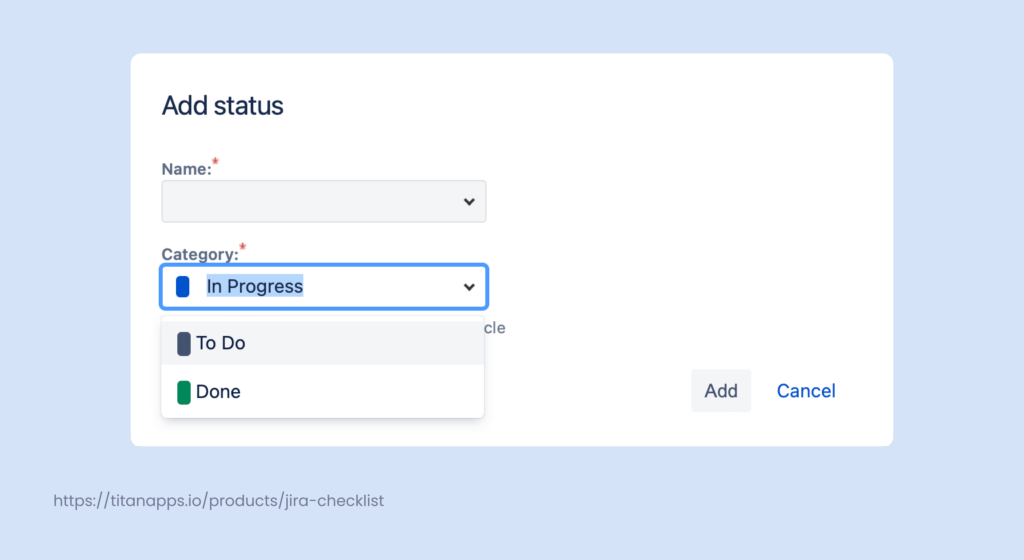
Step 3: Type in the name for your new status or select one of the existing statuses from the drop-down menu.
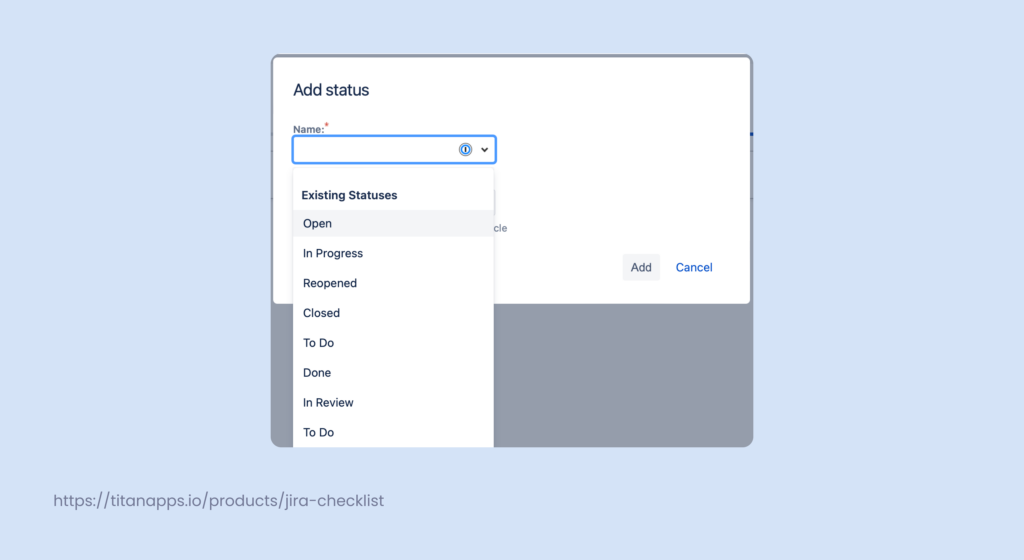
Step 4: Select a category for your status. Do remember that this step is important. Some teams prefer to set up their Jira boards in a way where the To Do items are kept in the backlog tab rather than having a dedicated column on the board. So, if you choose a To Do category for a new status, like Ready for Review (because the review has technically not happened yet), an work item with this status will also not appear on the board.
Step 5: The status you’ve created will appear in the Unmapped Status column. Simply drag it to the column you’d like to associate it with. This way, when a user changes the status of a work item from the work item (issue) view, the ticket will automatically move to the corresponding column.
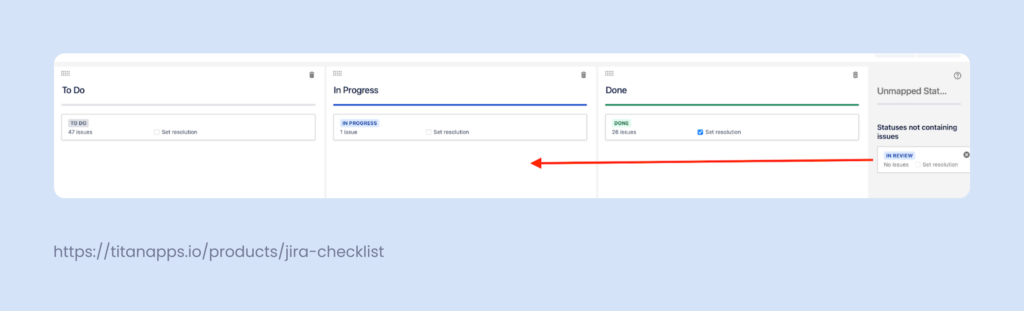
You can also remove statuses from the Columns tab. Hover over the status you’d want to remove, and click on the button with the x at the top right corner of the status.
Add custom statuses in workflows
If you’re using a company-managed project, you can add, remove, and modify statuses by editing the workflow directly. This option typically requires Jira admin permissions (or a project admin with access to workflow configuration), so some team members won’t see these settings.
Team-managed projects work differently: you usually add statuses from Board settings – Columns instead of editing a workflow scheme
This method is a bit trickier, but it also offers more functionality. For instance, you’ll be able to set up transitions between your statuses making sure that the new tasks with a certain status can only flow in a specific way. For instance, you can set up your workflow so that a new task must always go through a review or QA check before being moved to done. You can learn more about managing a workflow in Jira from this guide.
Step 1: On the right side of the dashboard, click on the ‘Cog’ icon and choose the “work items” option.

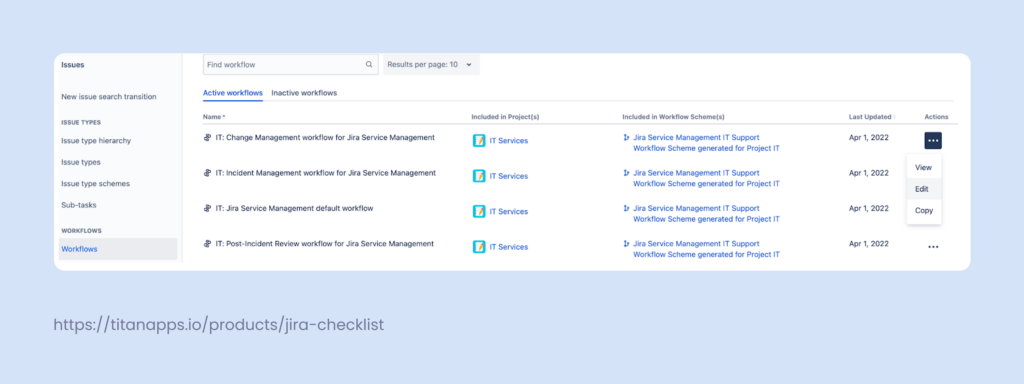
Step 2: Select the “Workflows” menu, find the workflow for the project you’d like to modify, and click on the menu with three dots to edit.
Step 3: I’d suggest selecting the Diagram view. This will make editing the workflow a bit simpler and more intuitive. Click the “Add status” button and either type in the name of your new status or select one from the drop-down menu. Don’t forget to click on the checkbox to allow other statuses to transition to your new one (if that’s something you need).
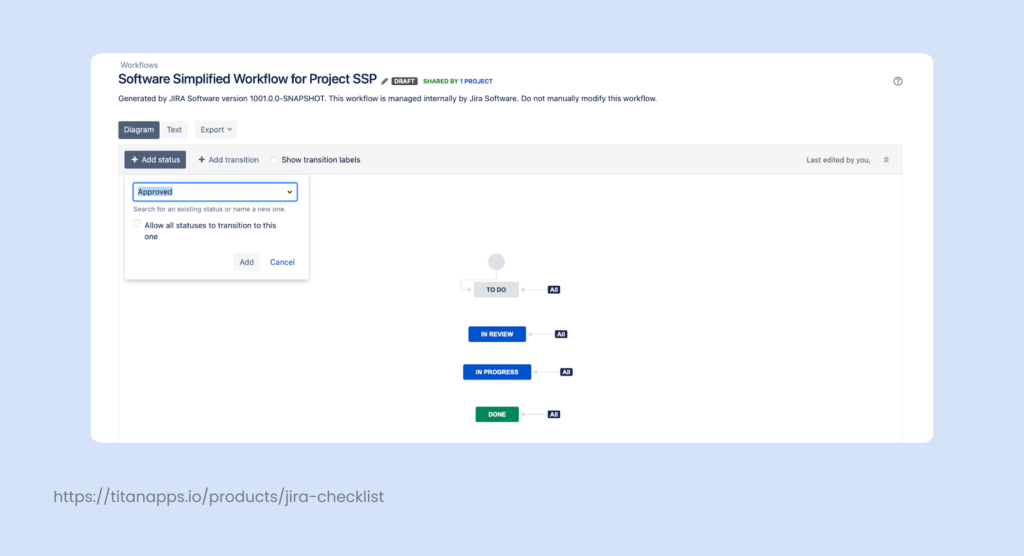
Step 4: Once the status is on the diagram, drag it into the place you’d like it to be. The dragging itself doesn’t serve a functional purpose, but it makes the workflow much more readable. Then, click on the status to edit it. Select the category you’d like to associate the status with, just like I did in the previous example.

Step 5: Finally, you can adjust the transitions. Click on the arrow to edit the transitions. You can also set up additional functionality from this screen. For example, you can set up triggers that will automatically update the status of a ticket based on a certain event, like the creation of a pull request or rejection of code review.
Using statuses in reports
Jira statuses are more than labels. They directly shape what Jira shows about sprint health, progress, and bottlenecks. The fastest way to see status distribution during a sprint is Sprint insights.
Use Sprint insights to see sprint progress by status category
- Open your Scrum board and go to the Active sprint view.
- Click Sprint insights (next to Complete sprint).
In the Sprint insights panel, start with Sprint progress. It groups work into three status categories:
- Done (work items in the Done category)
- In progress (work items in the In Progress category)
- Not started / To Do (work items in the To Do category)
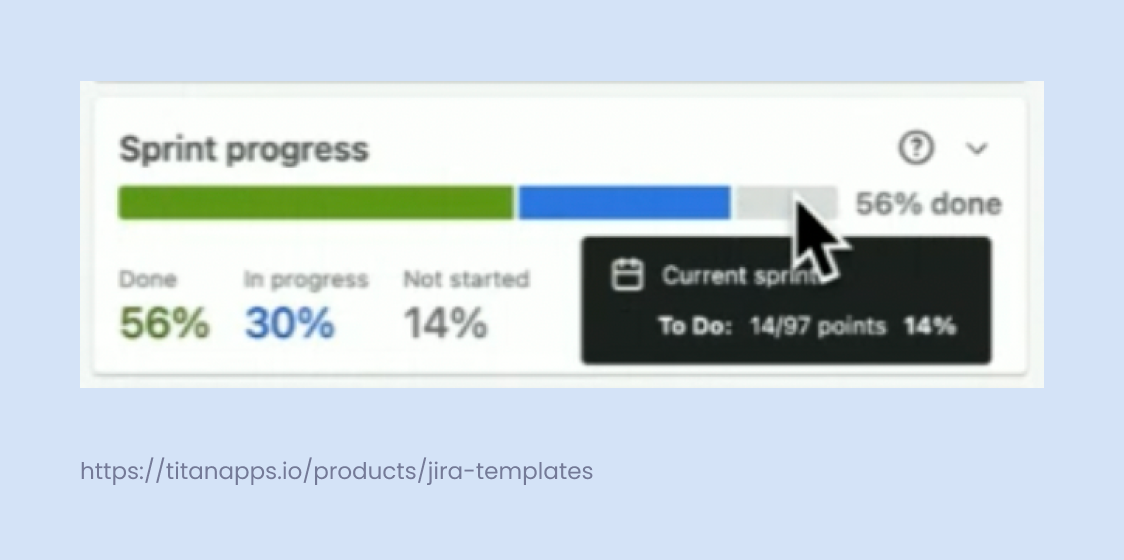
Hover over the progress bar to see the exact split in story points and percentage. For example, Jira can show details like In progress: 29/97 points (30%) or To Do: 14/97 points (14%). This helps you spot “hidden” work when custom statuses exist (like In Review or In QA) but still roll up into To Do / In Progress / Done.
Use “Work items for attention” to catch blockers tied to statuses
In the same Sprint insights panel, check Work items for attention. It highlights items that are stuck, blocked, or flagged, and it also shows their current status (for example, In Review or In QA). That’s often the quickest way to confirm where work piles up and which workflow step needs fixing.
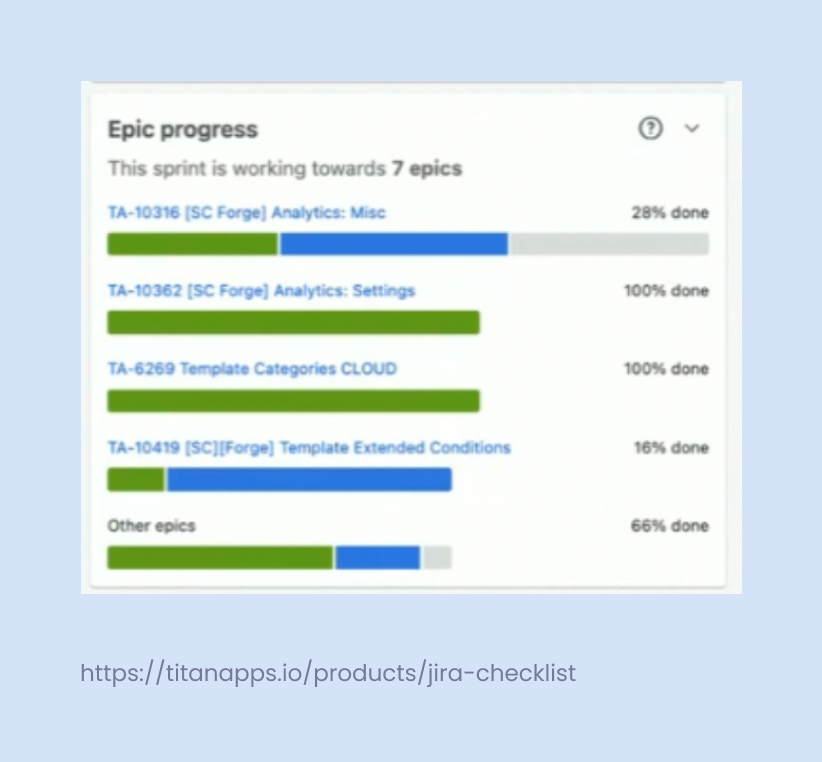
Use Epic progress for status-based rollups
If your sprint is linked to several epics, Epic progress shows progress per epic in a compact view. This is useful when stakeholders ask, “Which epic is actually moving?” even when the sprint overall looks “green.”
Benchmark sprint capacity using the velocity report
Sprint progress tells you what’s happening now. Velocity tells you what “normal” looks like for your team.
Check the Velocity report to understand your average completed story points per sprint. Then compare it to Sprint progress:
- If velocity is stable but Not started stays high mid-sprint, the issue is often workflow friction (statuses not moving) or too much WIP.
- If velocity drops and In progress stays high, the team may be stuck in review or QA statuses, or blocked by dependencies.
Use statuses to measure cycle time and spot bottlenecks
Sprint Insights shows distribution. It won’t tell you where work gets stuck across the workflow.
Cycle time analysis does. It answers questions like:
- How long a Jira issue stays In Progress on average
- Which custom status takes the most time (for example, In QA or In Review)
- Whether slowdowns come from development, testing, approvals, or handoffs
A practical approach many consulting teams use is exporting issues into a spreadsheet and calculating time-in-status.
- Pick the scope (project, date range, issue types). Use a saved filter or a simple JQL query.
- Export issues to Google Sheets using the Jira Cloud for Sheets extension. Start with issue key, summary, assignee, story points, created date, resolved date, and current status.
- Add status transition history (the “from status ? to status” timestamps). That’s the part that lets you calculate how long each ticket spent in each workflow step.
- Calculate time-in-status in Sheets, then group results by status. A simple pivot table can show:
- average time spent in each status
- median time (often more realistic than average)
- the “top 10 slowest” issues by total cycle time
- average time spent in each status
This is where custom statuses become very valuable. If you see that tickets spend the longest time in QA, you get a clear signal to check staffing, test scope, or handoff rules before you change the workflow again.
Use Atlassian Home Dashboards to track status-based metrics (Jira Cloud, open beta)
If you work in Jira Cloud, you can now build status-focused reporting directly in Atlassian Home using the new Home Dashboards (open beta). Instead of relying only on classic Jira dashboards and individual project reports, Home Dashboards are designed for a unified view across projects, teams, and goals, with optional AI-powered insights.
How to enable Home Dashboards (admin steps)
To access Home Dashboards, an org admin needs to opt in via Atlassian Administration. Please note that Home Dashboards is in beta, subject to rollout limitations, and UI/steps may change.:
- Go to Atlassian Administration
- Open Settings – Platform experiences
- Find your site and toggle Beta features (note: this may change or be unavailable on some sites).
- Confirm the terms and enable
If you want AI features in dashboards, admins can also enable Atlassian Intelligence for dashboards during activation.
What to track there (examples tied to Jira statuses)
Home Dashboards are useful when you want a real-time view of how work moves through To Do – In Progress – Done, or when you need a dashboard that’s easy to share with stakeholders:
- Work in progress by status (for Scrum or Kanban boards): see where items concentrate, and spot bottlenecks when “In Progress” keeps growing.
- Time-based metrics by status: build a chart around total time spent in each work item status to understand where issues slow down (for example, “In Review” or “QA Failed”).
- Service Management views: visualize ticket volume and progress states to keep an eye on request flow and responsiveness.
With AI (Rovo) enabled for Home Dashboards, you can:
- Generate charts from natural language prompts
- Get chart insights and dashboard insights that summarize trends and anomalies (helpful for exec-ready updates without manual analysis)
Home Dashboards are meant to be editable and reusable: you can create dashboards from templates, customize layouts, and share them for collaboration. There’s also an in-product Give feedback option during the beta, which is worth using if you hit limitations around metrics or custom fields.
Automate status changes and reduce manual follow-ups
Custom statuses only help if work items move through them consistently. That’s where Jira automation and workflow rules can take pressure off the team.
Many Jira teams automate common status actions, for example:
- Move a Jira issue to In Progress when an assignee is added, or when a pull request is created in GitHub.
- Transition work items to In Review when code review starts, then to Done after merge and deployment steps complete.
- Auto-assign issues when they enter a status like QA Failed or Blocked, so the right person gets the ticket immediately.
- Send notifications when a high priority item changes status, including Slack or Microsoft Teams messages for faster response.
Automation can also support stronger workflow discipline. You can add validations so an issue can’t move to the next status unless required fields are filled in, or a checklist step is completed. That reduces “half-done” tickets and keeps your Jira workflow clean.
If you want practical automation examples and patterns (without turning your Jira project into a rules maze), here’s the comprehensive guide on jira automation use cases.
Final thoughts
Custom Jira statuses help you reflect how work really moves through your workflow. Once you align statuses with To Do, In Progress, and Done, you can track sprint progress in real-time, spot bottlenecks through cycle time analysis, and communicate clearly with stakeholders using dashboards. Add automation rules where it makes sense, and your Jira project becomes easier to manage, easier to report on, and easier to scale.

FAQ on Jira statuses
What is a Jira issue status?
A Jira issue status is the current step of a Jira issue in your workflow. It shows where work stands right now, such as To Do, In Progress, or Done, and it updates as the issue moves across the Jira board in a Scrum or Kanban project.
What status categories exist in Jira?
Jira groups statuses into three categories: To Do, In Progress, and Done. These categories power sprint insights, dashboards, and most project management reporting in Jira Cloud.
Can I create a new status in Jira?
Yes. You can add a new status either from board settings (quick setup) or by editing Jira workflows (more control over transitions, validations, and automation).
This usually comes down to permissions. Ask your Jira admin or check Jira administration settings and project permissions. Some teams restrict workflow edits to prevent unexpected downtime or disruption.
How do custom statuses affect Scrum and Kanban boards?
Custom statuses can be mapped to columns on your Jira board. One column can include multiple statuses, which helps teams keep boards readable while still tracking detail through reports and filters.
How can I see sprint progress by status in Jira?
In Jira Cloud, use Sprint insights in the Active sprint view. It shows sprint progress by category (To Do, In Progress, Done) and highlights work items that need attention in real time.
Can I build dashboards around statuses?
Yes. In Jira Cloud you can use classic Jira dashboards, and you can also opt into Atlassian’s Home Dashboards (open beta) for cross-project reporting. Dashboards help stakeholders track real-time flow and see where issues are stuck.
Can I measure how long issues stay in each status?
Yes. Many teams do this by exporting Jira issues into a spreadsheet and calculating time in status. This is useful in consultancy work to identify bottlenecks, such as issues staying too long in QA or review.
Can Jira automation move issues across statuses automatically?
Yes. Jira automation rules can transition issues when conditions are met, such as field value changes, issue type rules, or related issues updates. You can also automate notifications and assignments when an issue transitions.
What are common automation examples connected to statuses?
Typical automations include auto-assigning issues when they move into In Progress, setting due dates, sending Slack notifications, and triggering Microsoft Teams pings when high priority issues change status.
How do statuses relate to Jira Service Management?
Jira Service Management (JSM) uses workflows and statuses to track requests, approvals, and progress. Status-based dashboards and notifications help support teams reduce response time and manage uptime-related incidents efficiently.
Can I filter issues by status with JQL?
Yes. You can use JQL to query status and build filters for dashboards, reports, and automation rules. This is useful for monitoring backlog health and tracking work across multiple Jira projects.
Do plugins affect statuses?
Apps and plugins can extend workflow functionality, but the status model still relies on Jira workflows. Many teams use plugins for automation, reporting, templates, and structured work management without changing their core Jira statuses.
What’s the best practice for naming statuses?
Keep names action-based and consistent across teams, especially for shared workflows. Avoid creating many near-duplicate statuses, and map them clearly to To Do, In Progress, and Done so sprint insights and dashboards stay accurate.
Can statuses be used for outage or downtime reporting?
Yes, indirectly. Teams often track incidents via a dedicated Jira project and use statuses plus dashboards to monitor progress and communication. For a public-facing status page, teams typically use Atlassian Statuspage, but Jira statuses still power internal incident workflows.