Jira
Jira monday.com


Definition: What is a Jira Version?
In Jira Software, a version is a set of features, fixes, and improvements that you plan to deliver in a single release. In practice, it serves as a bucket that groups all work items needed to ship a release.
Jira versions are also called “fix versions” or “releases”. All three terms refer to the same thing, and Jira uses them interchangeably across different parts of the interface.
People sometimes confuse Jira versions with sprints, but they are not the same. A sprint is a time-boxed period for executing work, typically lasting 2-4 weeks. A version is the scope that you deliver to customers as a result of that work. A single version often covers the scope completed over several sprints.
Why Do Teams Use Fix Versions in Agile Development?
Fix versions, or Jira versions, bring structure to the delivery process. They give your team a clear view of what’s been shipped, what’s still in progress, and what’s planned next.
Here are the main reasons agile teams rely on fix versions:
- Release planning and scope management. Jira versions let you define the scope of each release upfront. Product managers can group feature updates and bug fixes into a single version and see the full picture. All work included in versions can be viewed in a single tab – without chasing updates from individual team members.
- Built-in reporting. Once work items are assigned to a version, you can track progress in the Release Hub. Additionally, Jira enables you to analyze the results and estimate velocity with burndown charts and version reports.
- Stakeholder communication. Fix versions give you a clear way to communicate what’s coming and what’s been delivered. Instead of listing individual tickets, you can share a version summary with stakeholders, support teams, or customers. This is also the foundation for generating release notes.
- Cross-team alignment. When multiple teams contribute to the same release, a shared fix version keeps everyone focused on the same goal. It’s easier to coordinate dependencies and identify blockers when all related work items are grouped into a single version.
Beyond day-to-day project management, Jira versions also create a historical record of your product’s evolution. Each released version documents what was delivered and when. Over time, this becomes a valuable reference for audits, retrospectives, and onboarding new team members.
What is the Value of Organizing Work With Jira Versions?
The main benefits of this approach include:
- Better handling of release blockers. When a critical work item is stuck, you can check the version scope to see what’s at risk. This allows you to reassign priorities before the release date slips.
- Improved visibility for QA teams. QA engineers can see exactly which work items are included in a version and plan their testing scope accordingly. They can track release readiness without relying on verbal updates from developers.
- Easier hotfix management. You can create a separate fix version for urgent patches and ship it independently from your main release. This keeps your planned release scope clean and unaffected.
- Faster onboarding for new team members. Released versions serve as a documented timeline of product changes. A new engineer or PM can review past versions to understand what was shipped, when, and in what order.
- Simplified release notes generation. Since all delivered work is already grouped by version, compiling release notes is simply a matter of summarizing what’s in each version.
In short, Jira versions help your team stay organized and keep everyone on the same page.
How to Run a Release with Jira Versions: a Step-by-Step Guide
Step 1: Define the Scope and Create a Version
Before you begin, you should already have an idea of which epics and work items should be included in the new fix version. Typically, work is organized into multiple epics that become part of the same release. Keep in mind that bugs discovered during testing should also be added to the version. This ensures your release scope reflects the actual state of work.
For larger features, consider splitting the scope into several fix versions to deliver incrementally. Decide in advance which work items go into version 1, 2, or 3 and assign them accordingly. This approach gives you more control over what gets shipped and when.
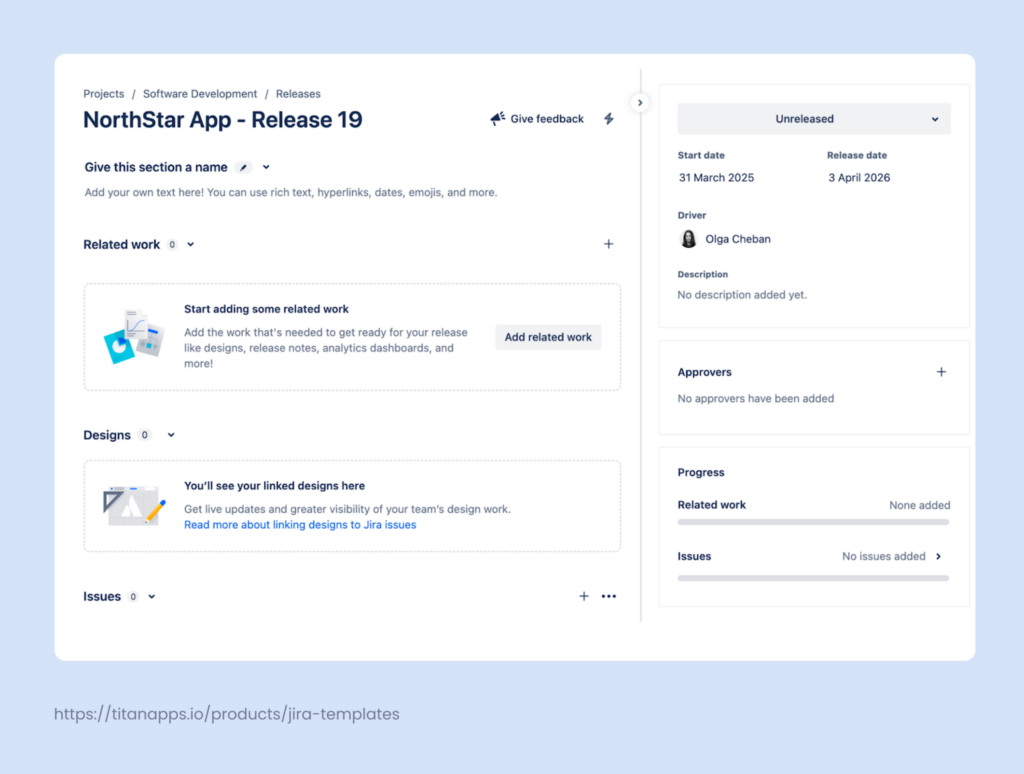
To create a version, go to your software project. In the project menu, select Releases. This tab provides a dedicated place to work on your fix version and is called the Release Hub. There, click the Create release (create version) button.
Step 2: Set Dates and Add Other Information
Name the version and specify the start date and release date, if you have a clear timeframe. When naming releases, adopt a consistent convention to avoid confusion. For a feature-based release, include both the feature name and the release number – for example, “Smart Checklist – Multiple checklists – V1.”
After creating a version, fill out the remaining details. Add a description outlining the release goals and any relevant context. The Release Hub also lets you attach designs, link to Figma files, add documentation, and include other assets your team will need during development and testing.
Setting dates is especially important for reporting. Without a start and release date, Jira can’t generate accurate burndown charts or flag overdue versions on the timeline.
Step 3: Assign Work Items to the Version
Once your version is ready, it’s time to populate it with work items. Jira offers several ways to do this.
- From the Release page. Navigate to your release and scroll down to the Work Items section. Click +Add work items to search and attach specific work items from the drop-down list. This is the most straightforward option when you already know what to include.
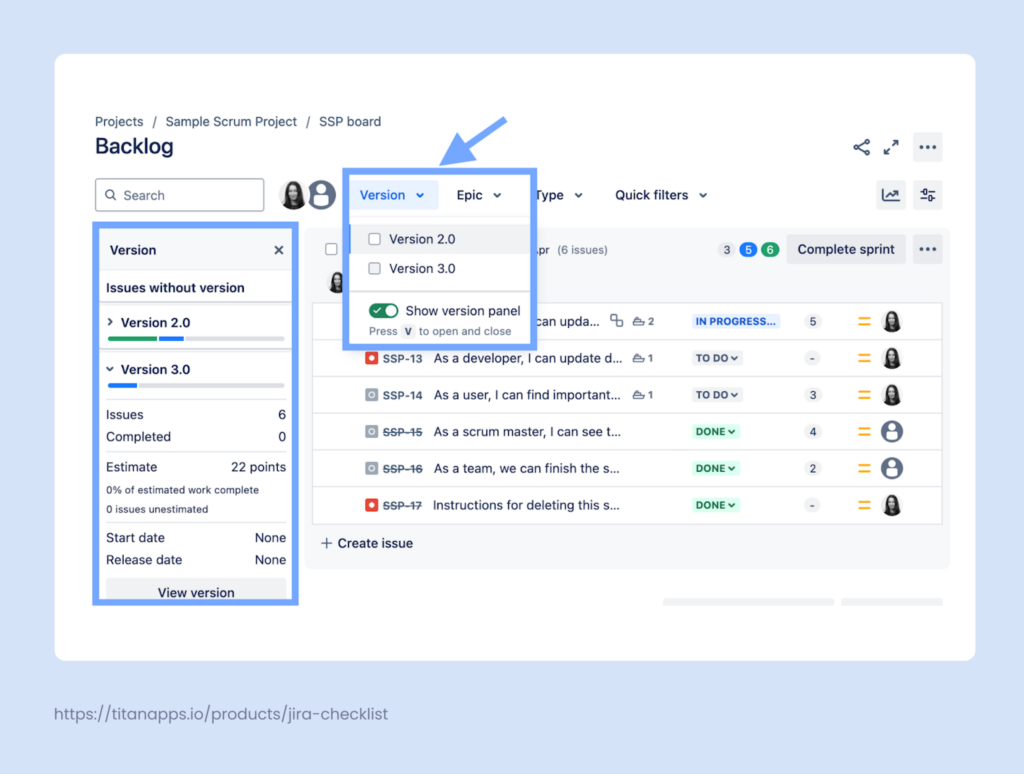
- From the backlog using drag-and-drop. When you need to assign many work items at once, this method saves time. Go to your backlog and enable the version panel by clicking Version -> Show version panel. Your releases will appear on the left side. Drag any work item into the relevant version area to assign it.
- Via the Fix Versions field. Open an individual work item and select the target release in the Fix Versions field. For company-managed projects, you can speed this up with bulk editing. Hold Ctrl (Windows) or Cmd (Mac) in your backlog, select multiple work items, and use the editing menu at the bottom to set the Fix Versions value for all of them in one go.
- Through automation or JQL. For more advanced scenarios, set up Automation for Jira rules to assign work items to a version based on specific triggers or conditions.
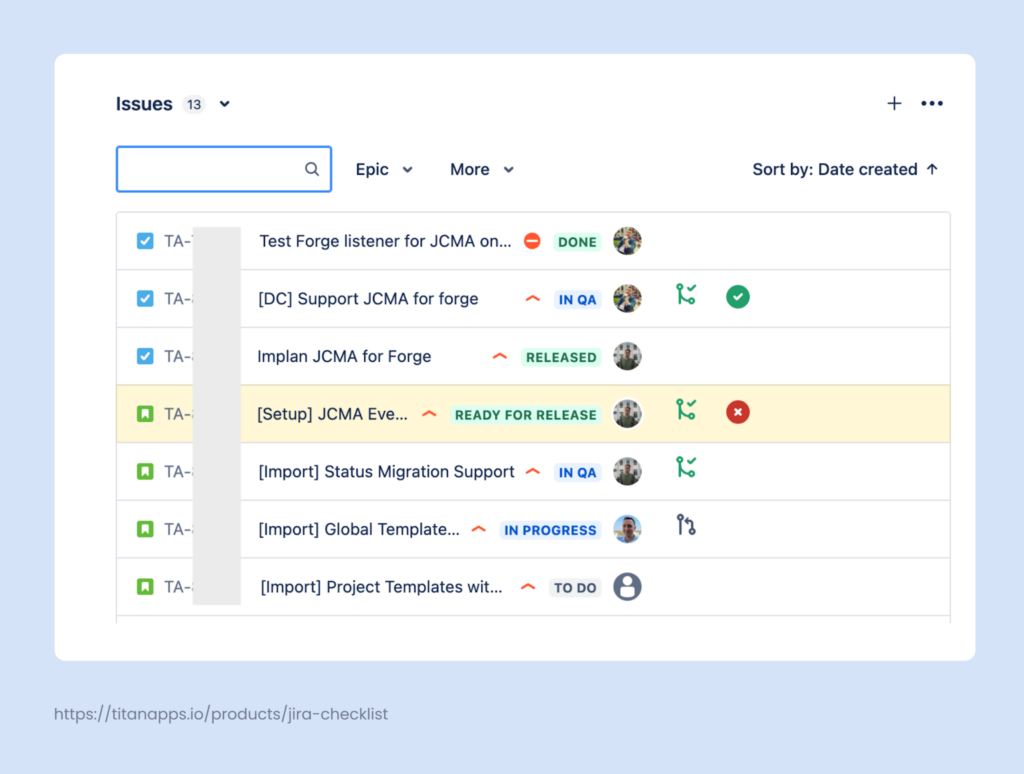
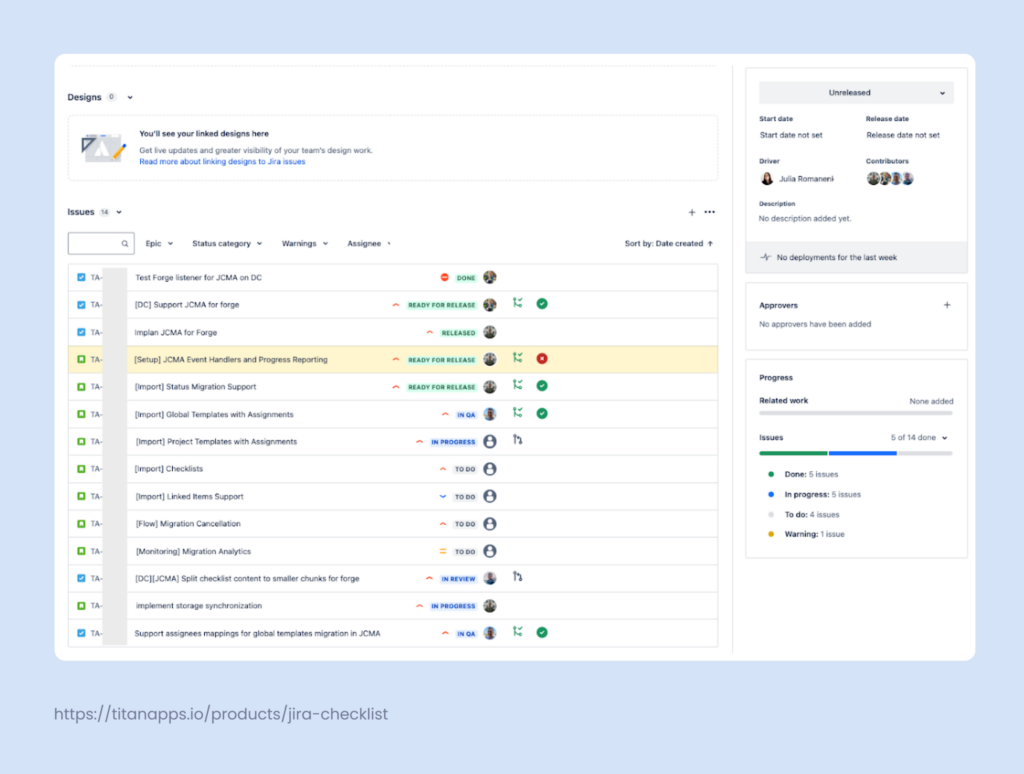
When the work items are added, you can view them from the release page:
Step 4: Track Release Progress
Once work items are assigned to a version, you can monitor the release progress using two key views: Release Hub and Timeline.
The Release Hub is your central dashboard for managing a version. It shows the total number of work items and breaks them down by status: to do, in progress, and done. You can see at a glance how much work remains and whether the team is keeping up with the planned timeline.
The Hub also displays the release description, linked assets, and approvers, so all release-related context lives in one place. If a version has passed its target release date and still has unresolved work items, Jira will flag it as overdue.
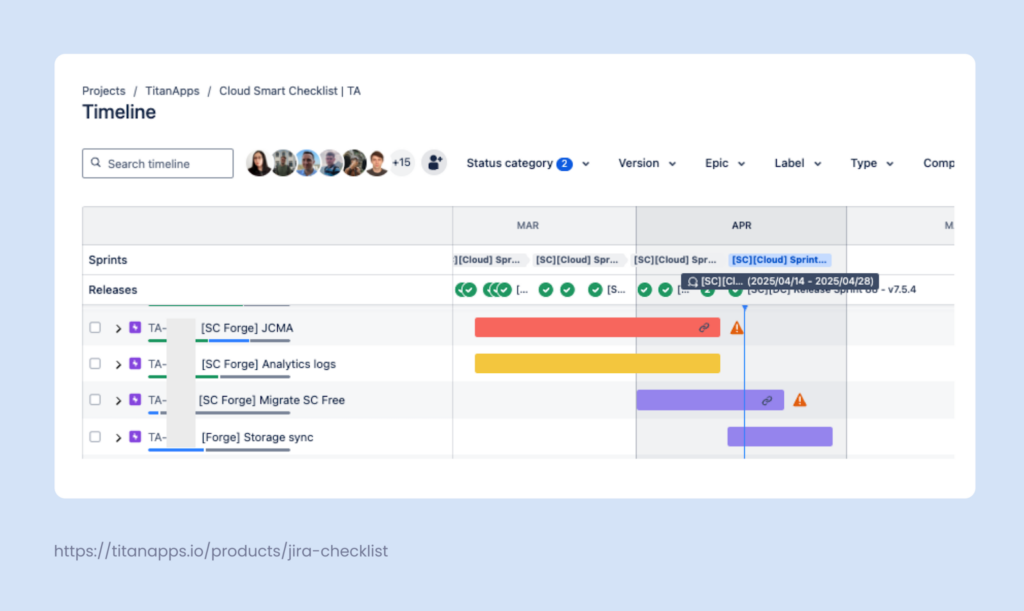
The Timeline view brings work items and releases together on a single visual canvas. Each version appears as a vertical marker alongside your epics and tasks, making it easy to see how individual pieces of work relate to the overall release schedule.
This view is especially useful for spotting gaps – for example, an epic that extends beyond the planned release date or a dependency that hasn’t been accounted for. It’s also a convenient format for sharing progress updates with stakeholders who prefer a high-level overview.
Step 5: Release the Version
When all planned work is complete and tested, it’s time to ship. Navigate to the Releases page, find your version, and select Release from the actions menu. Jira will ask you to confirm the release date.
If there are still unresolved work items in the version, Jira will prompt you to decide how to handle them. You can move them to the next version, remove the fix version association, or leave them as they are. In most cases, transferring incomplete work items to the next planned version is the cleanest approach. This keeps your backlog organized and ensures nothing gets lost between releases.
Once released, the version status changes to Released, and it no longer appears in active Fix Version dropdowns. This prevents team members from accidentally assigning new work items to a release that has already been shipped. The version remains visible on the Releases page as a historical record of what was delivered.
Automation Rules for Jira Versions
If your team uses versions consistently, the next step is to automate the repetitive parts. Automation for Jira can easily handle routine version management. It can change the Fix Version/s field based on rules, update work items when a version is released, and even create the next version on a schedule.
How to Add Work Items to Jira Versions Automatically
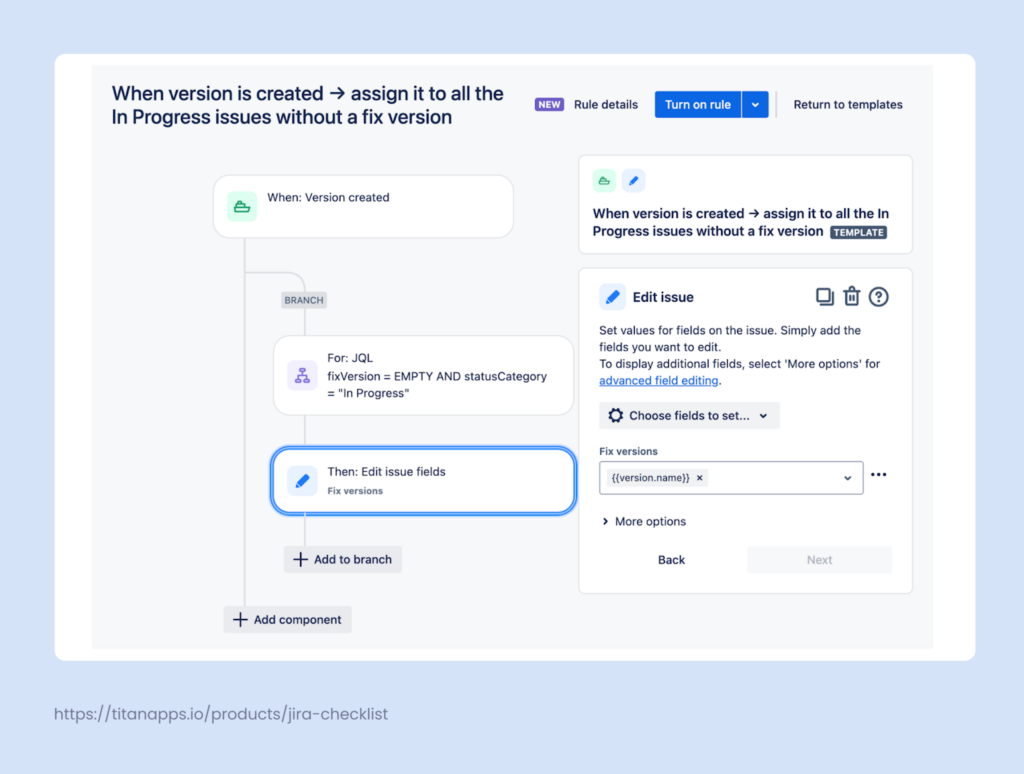
Use this rule when you create a new version and want it to become the default target for current in-progress work that has no fix version assigned yet.
First of all, use the trigger Version created. Once this is done, branch through the work items in the project and filter to those that are already in progress and have an empty Fix Version value. The next step is to edit the Fix Version field and set it to the version that was just created.
This gives you a clean baseline: anything already moving forward is now tied to the newest version, without manual edits.
How to Auto-Complete All Work Items When a Jira Version is Released
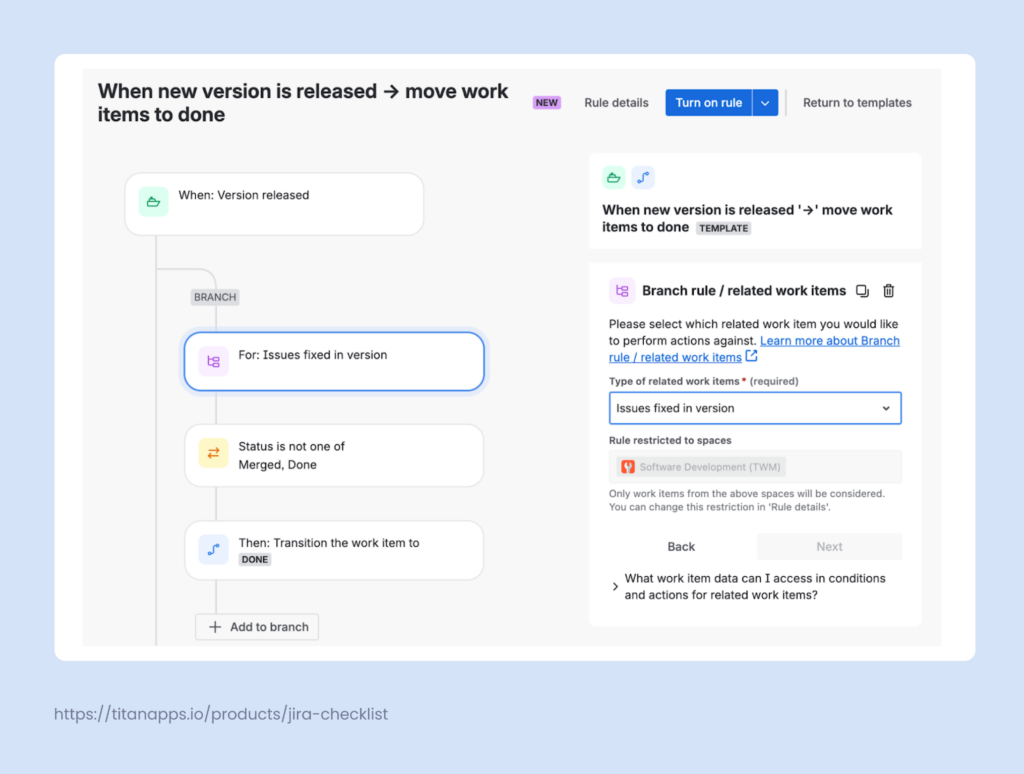
Set up this rule when “version released” is your final sign-off point, and anything in that version should end in Done.
Start with the Version released trigger. Next, branch over the work items linked to that version. Inside the branch, add a condition to skip items that are already Done or Merged. Then, transition the remaining work items to Done.
This keeps your release scope tidy and reduces the “half-closed” backlog that often appears after shipping.
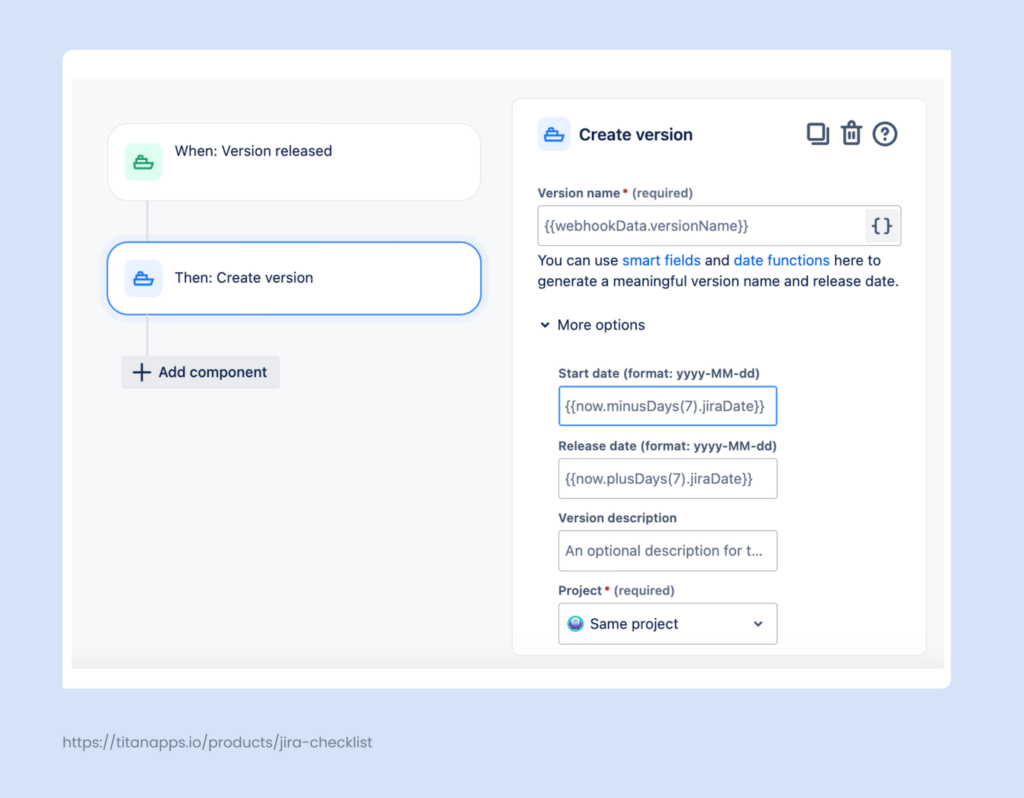
How to Create Jira Versions Automatically
Apply this rule when you want the next version to appear as soon as the previous one is released, so planning can continue without having to create versions manually.
Set Version released as a trigger and add an action to create a new version in the same project. You can specify the start and end dates for the release and the version name. To make them dynamic, use smart values.
Pro Tip: How to Organize Releases More Efficiently With Smart Checklist
The release management process in Jira can be optimized further with the help of various third-party tools. You can use Smart Checklist by TitanApps to better organize the delivery process.
This solution allows you to create reusable checklist templates that can be applied to work items automatically. This saves you significant time on planning and executing recurring tasks.
Let’s see how it looks in practice.
Example 1: A Release Readiness Checklist Template
Release work repeats. The same checks, handoffs, and “did we do this?” questions come up before every rollout. Smart Checklist helps you optimize this routine coordination. It allows you to document this recurring process as a clear step-by-step checklist. You can structure the list with headers, tag responsible people, and track the status of each preparation step in a single view.
Moreover, Smart Checklist enables you to save this (or any other) checklist as a reusable template – directly in Jira. As a result, you don’t have to start from scratch every time. It also offers built-in automation features, so the saved checklists can be added to Jira work items automatically based on your custom conditions.
Here is an example of such a template, the Release Readiness Checklist. This template is free and reusable. You can copy it, adjust it to your process, and keep using it as your standard release checklist in Jira.
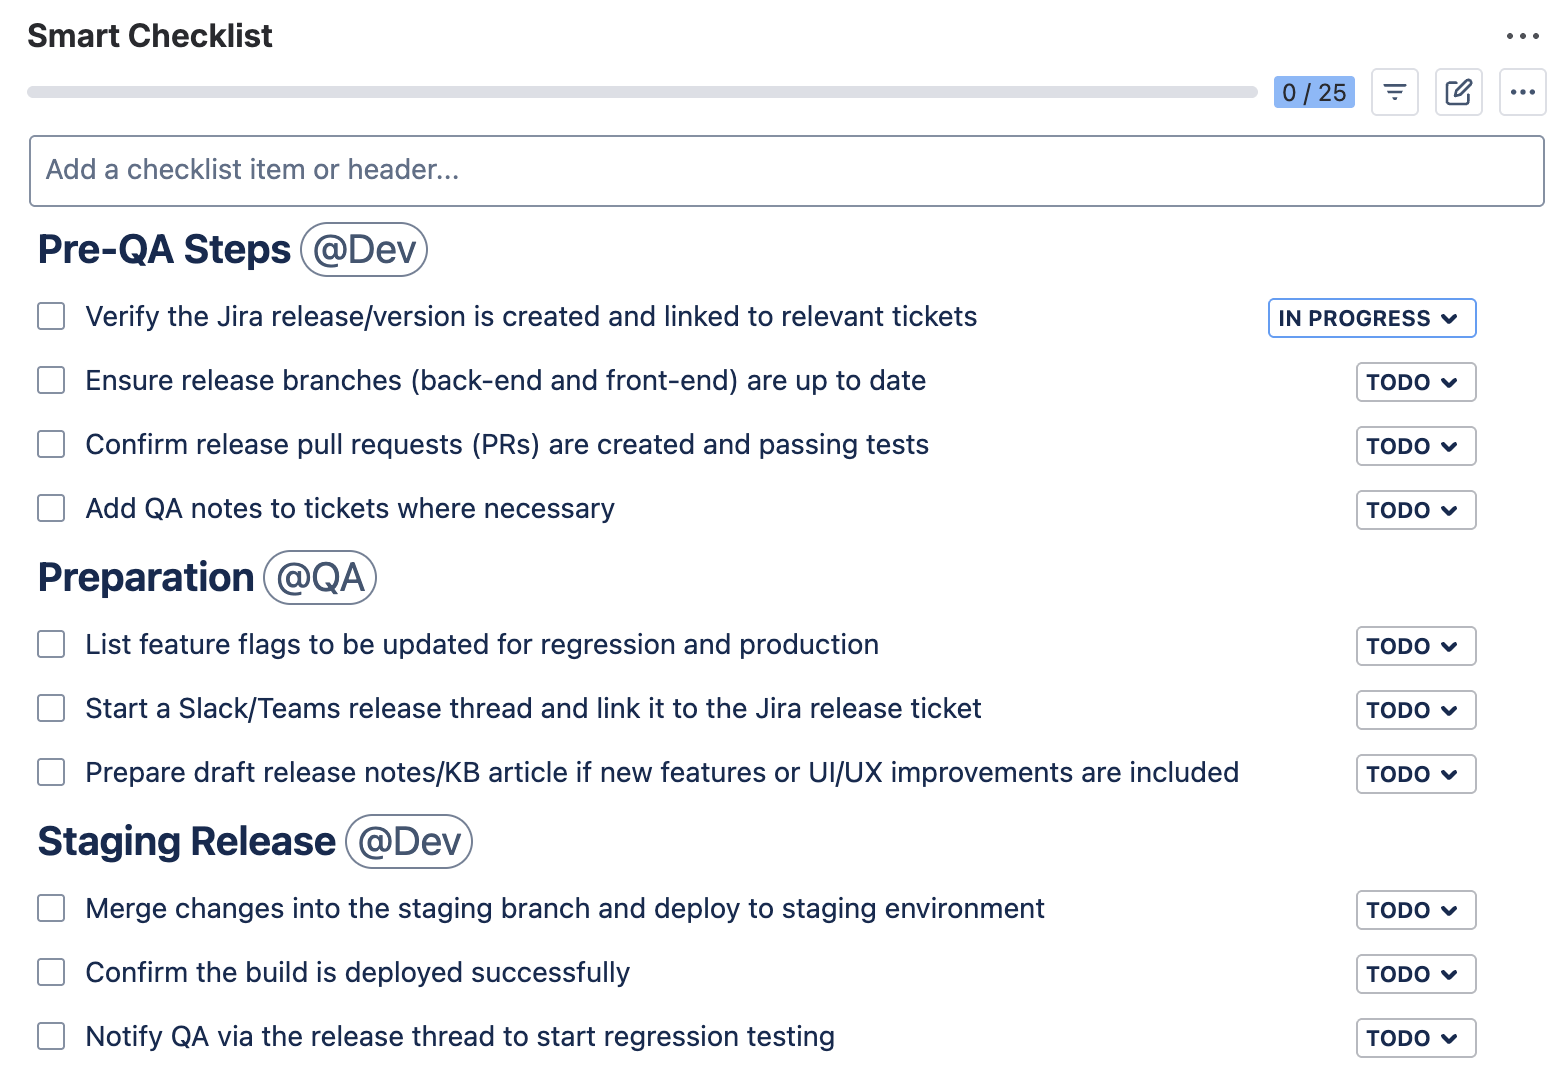
# Pre-QA Steps @Dev
- Verify the Jira release/version is created and linked to relevant tickets
- Ensure release branches (back-end and front-end) are up to date
- Confirm release pull requests (PRs) are created and passing tests
- Add QA notes to tickets where necessary
# Preparation @QA
- List feature flags to be updated for regression and production
- Start a Slack/Teams release thread and link it to the Jira release ticket
- Prepare draft release notes/KB article if new features or UI/UX improvements are included
# Staging Release @Dev
- Merge changes into the staging branch and deploy to the staging environment
- Confirm the build is deployed successfully
- Notify QA via the release thread in Slack to start regression testing
# Regression Testing @QA
- Run regression tests based on defined test cases
- Log any release blockers in Jira and link them to the release ticket
- On success, notify the team and hand back to @Dev for production release
# Production Release @Dev
- Update version numbers and create a PR from staging -> production
- Merge to production and create a Git tag for the release
- Announce the release in the Slack/Teams thread
- Update environment variables (if needed)
# Marketplace Release @QA/@Dev
- Publish the new version on the Atlassian Marketplace
- Finalize and publish release notes and the Knowledge Base article
- Conduct quick smoke testing post-release
- Notify the team and support about the release, highlighting fixes and new features
# Post-Release Actions
- Back-merge production -> @Dev to keep branches in sync
- Mark release and related Jira tickets as “Released”
- Monitor key metrics and logs for the first 24–48 hours
- Celebrate 🙂
To start using this template, first install Smart Checklist for Jira from the Atlassian Marketplace. Then, paste the copied template into the Smart Checklist section of your work item.
After this, you will be able to save the checklist as a template and set up automation, if needed. For example, this can be a rule that applies this checklist template automatically based on work type or keywords in the work item summary.
For more details, please see our Checklist Automation Guide on Confluence.
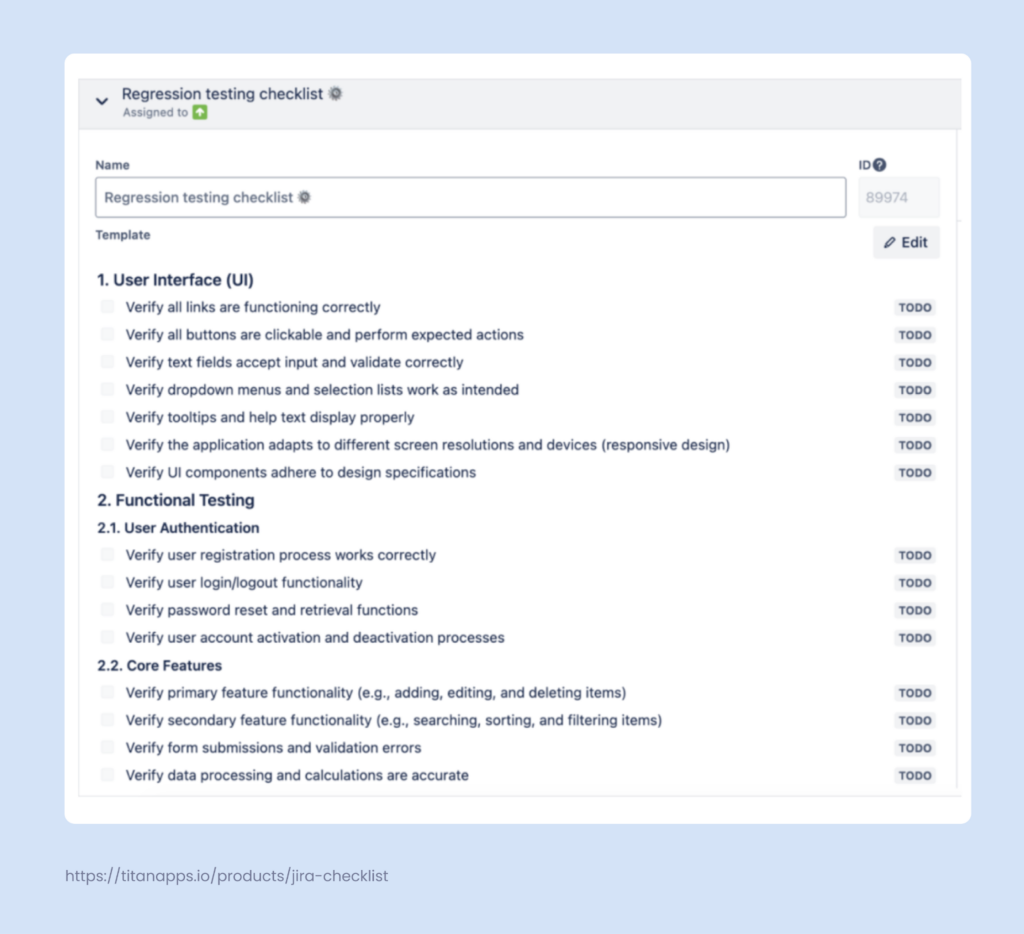
Example 2: A Regression Testing Checklist Template
Another asset worth preparing in advance is a regression testing checklist. It covers the test cases your QA team needs to run before each release. The checklist can be extended with additional tests depending on the scope of a specific release.
To organize the process better, you can mark the most important steps as mandatory. With workflow automation, you can prevent the work item from transitioning to “Done” until every mandatory checklist step is checked off.
This way, incomplete testing can’t slip through unnoticed – the checklist acts as a quality gate before every release.
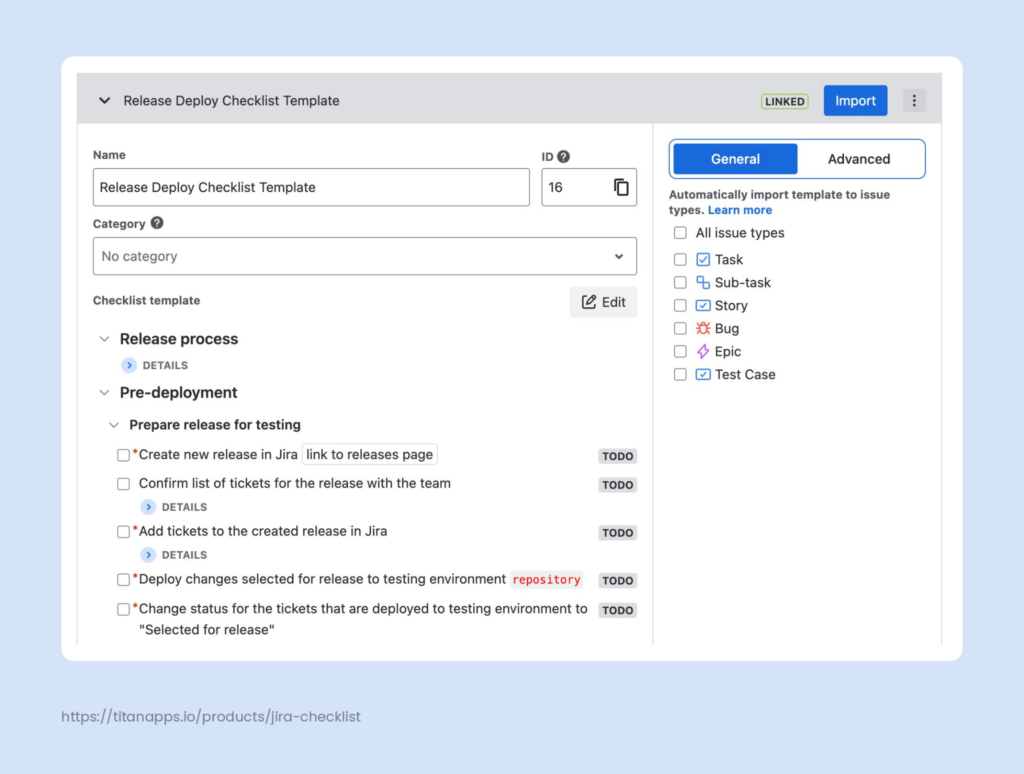
Example 3: A Deploy Checklist Template
The final checklist in this set focuses on the deployment stage. It provides your team with a step-by-step guide for each rollout.
Additionally, this checklist uses the Linked Templates format. This means it stays connected to every work item that includes this deploy checklist. Any update to the template is automatically applied to all linked work items. Developers can only change the status of individual checklist items, but they cannot modify the linked template itself. This keeps the deployment process consistent across all releases.
To learn more, please refer to our Case Study: How to Set Up a Reliable Release Process with Smart Checklist.

Why Use Smart Checklist in Release Management
Managing software releases includes many repeatable checks and coordination steps. Smart Checklist allows you to optimize this process and increase day-to-day efficiency.
Here are the key benefits for your team:
- Standardize release preparation: Save your checklist as a template and reuse it to prepare for multiple releases.
- Run quality checks without subtask overheads: Manage QA activities in a step-by-step checklist instead of a dozen subtasks. This improves transparency and keeps your work items lightweight and focused.
- Track readiness in detail: See which steps are done, in progress, or still pending, not just the overall status.
- Make ownership clear: Tag responsible people directly in checklist items, so each step has a clear owner.
- Apply checklists automatically: Add the right checklist when a work item is created or reaches a certain stage.
How to Use Jira Versions with Different Delivery Models
The flow described earlier works for any delivery model. You create a fix version, add work items for the planned release scope, and track progress in the Release Hub. What varies from model to model is how you define that scope, because each approach bundles work differently.
Jira Versions with Sprint-Based Releases
Teams that follow Scrum can align versions with their sprint cadence. If you release at the end of every sprint, create one version per sprint. If your release cycle is longer, you can group several sprints under a single version. For example, your team might complete three two-week sprints before shipping everything together as version 3.0.
In this agile project management model, Jira versions help when priorities change mid-sprint. For example, the product manager decides that a feature isn’t ready for version 3.0 and should ship in version 3.1 instead. In this case, you simply edit the Fix Version field of that work item, changing it from 3.0 to 3.1. The task itself stays in the current sprint because software developers are still working on it – it just won’t be part of the upcoming release.
This way, the sprint backlog stays untouched while the release scope is updated.
Using Fix Versions With Continuous (CI/CD) Releases
With continuous delivery, you may ship small changes daily or even multiple times a day. In that setup, you don’t need a separate Jira version for every deployment. Here, a version should represent a stakeholder-facing release slice. For example, a weekly release, a monthly release bundle, or a “major + minor” milestone that you want to communicate and track.
Use Jira versions with CI/CD when you need:
- a clear view of what’s included in a release package
- a stable scope for customer communication, support readiness, or internal announcements
- a way to coordinate work across teams where deployments happen independently, but the release message should be unified
In other words, deployments can be continuous, while fix versions group work for traceability, communication, and reporting purposes.
Jira Versions with Feature-Based Product Releases
In this delivery approach, a “release” is defined by shipping a specific feature, not by a sprint end date or a monthly release window. The idea is to treat a feature as a single unit of work with a clear scope, even if the work spans multiple teams, projects, or sprints.
Jira versions work well here because they give you a single place to collect everything that must ship for that feature.
When using this approach, it’s best to name each release after the feature. As work progresses, Jira versions serve as your shared reference for feature scope and progress. All the stakeholders will be able to easily track what is included – without stitching together separate boards or sprint plans.
What are the Most Common Mistakes in Managing Fix Versions in Jira?
- No clear naming convention. Sometimes teams create versions like “Release 1”, “Release-2”, “R3”, and “4.0” in parallel. That makes search, dashboards, and release reporting inconsistent. A simple naming pattern makes versions easy to read at a glance.
- Not defining ownership for version management. If nobody owns version hygiene, versions drift. You get duplicates, outdated deadlines, and inconsistent usage across teams.
- Not archiving old versions after release. Released versions that aren’t archived keep appearing in fix version dropdowns, making it easy for team members to accidentally assign new tasks to the wrong version. This can lead to compliance issues and inaccurate reports.
- Using Fix Version for team planning, not for the delivery scope. Fix Version works best when it answers one question: “In which release will this ship?” If you use it like a sprint tag or a team bucket, your release view no longer reflects the real scope.
Jira Versions FAQ: What You Need to Know
1. What are versions in Jira used for?
Jira versions are used to plan and track what ships together in a product update or release milestone. In practice, versions help you:
- Group work items for one release using the Fix Version field, so it’s clear what belongs to that delivery.
- Plan rollout timing by adding start and release dates, so the release has a target window.
- Track progress for that release scope on the Release tab, based on the statuses of the work items assigned to the version.
- Increase visibility and transparency by giving everyone a shared view of scope, progress, and dates.
- Communicate the scope to stakeholders by showing a single, consistent list of what is planned for that release, even while the work is still in progress.
2. What is the difference between a Jira version and a Jira release?
In Jira, “version” (or “fix version”) and “release” are essentially the same thing. Jira uses these terms interchangeably: for example, the Releases tab in your project navigation is where you manage versions.
Strictly speaking, a version becomes a release once you mark it as “Released,” meaning all planned work is complete and shipped. Before that point, it exists as an unreleased version with a set of assigned issues. So while the word “version” emphasizes the planning stage and “release” emphasizes the delivery stage, both terms refer to the same Jira object.
3. How do Jira versions work in practice?
You create a version with a name (e.g., v2.1), an optional start date, and a target release date. Then, you assign work items to that Jira version. As your team works, you can track progress in the Release Hub and in native reports. Once all work is complete, mark the version as Released to create a clear record for stakeholders and future planning.
4. How do I create a version in Jira?
In your company-managed project, select the Releases tab and click “Create version.” Use a clear naming convention — for example, “Smart Checklist – Multiple checklists – V1.” Optionally, add a start date, release date, description, and any relevant assets for your team.
5. How do I assign issues to a version in Jira?
Open any issue and set the Fix Version field to the desired version. Jira also has an Affects Version field, but it serves a different purpose — it indicates where a bug was found, not where it will be fixed. For release planning, always use the Fix Version field.
Alternatively, in the Backlog view, open the Versions panel on the left and drag issues directly into a version.
6. What does it mean to release a version in Jira?
Releasing a version means marking it as complete and shipped. Go to the Releases page and select Release from the actions menu. Jira will ask how to handle any unresolved issues. You can move them to another version or leave them as is. Once released, the version is recorded with a release date and removed from active Fix Version dropdowns.
7. Can I use Jira versions with continuous delivery or CI/CD?
Yes. Even with continuous delivery, versions are still useful as logical release groupings (for example, “February 2026 release” or “Mobile 3.12”). If you ship many times a day, versions work best as higher-level bundles, while your CI/CD system tracks each deployment. This improves visibility and allows you to communicate the released scope more effectively to stakeholders.
8. How are Jira versions different from sprints?
A sprint is a short, fixed time period for doing work, usually 1-4 weeks. A version is a delivery milestone that groups what you plan to ship. In practice, a version can contain work done over several sprints. For example, you might complete three sprints, then ship everything as one release / fix version. If your team ships a release every sprint, then you can have one version per sprint. Versions can be used in both Scrum and Kanban projects, while sprints are used only in Scrum.
Ship Better Products with Jira Versions
Every team ships differently, but the need for structure stays the same. Jira versions are among the most practical Jira features for organizing delivery, whether your team follows Scrum, Kanban, or continuous deployment. They give you a reliable way to plan releases, track what’s been shipped, and communicate progress to stakeholders.
The concepts covered in this guide apply across Atlassian’s ecosystem. Jira versions work alongside other development tools, such as Bitbucket, for code integration, and Jira Service Management for tracking customer-facing changes. DevOps teams can trigger builds automatically when a version is released. Teams that estimate in story points can use release burndown charts to predict delivery timelines. And with the right permissions set up, you can control who can create, edit, and release versions without granting full project admin access.
If you’re looking to extend your release workflows further, explore apps on the Atlassian Marketplace. Smart Checklist and Smart Templates by TitanApps help you standardize release processes and add actionable checklists to your work items. This allows you to automate recurring tasks so your team spends less time on coordination and more time on high-value tasks.
For more on this topic, please see our other articles:
- How to Plan a Product Release in Jira
- Release Readiness Checklist Template
- Jira Feature Release Template for Delivery Managers