Jira
Jira monday.com


Support requests have a way of getting lost. They come in through email, Slack messages, and hallway conversations – and without a system to catch them, things fall through the cracks. Someone’s laptop issue goes unresolved for a week. A new employee waits three days for the right access. Nobody knows whose job it is to follow up.
A ticketing system solves this by giving every request a home. It captures the issue, routes it to the right person, tracks its progress, and closes the loop with the person who raised it. Jira Service Management (JSM) is Atlassian’s purpose-built product for this. It extends Jira with a customer portal, service-level agreements, queues, and workflows designed specifically for support and service operations.
This article explains what a Jira ticketing system is, how JSM works on both sides – the agent view and the customer portal – what makes a well-configured system, and how teams can use Smart Checklist to make every ticket follow a consistent process.
Key Takeaways
- A Jira ticketing system is a structured way to capture, route, and resolve incoming requests – Jira Service Management is the Atlassian product built specifically for this.
- JSM operates on two sides: a customer portal for submitting requests and an agent interface for processing them.
- Request types translate plain-language customer problems into structured Jira work items, without exposing end users to Jira’s internal terminology.
- SLAs, queues, and automation rules keep tickets moving and prevent requests from going stale.
- Smart Checklist adds process structure to JSM: default templates auto-apply to request types, and mandatory items block premature ticket closure.

What is a Jira ticketing system?
A Jira ticketing system is a structured workflow for capturing, tracking, and resolving service requests inside Jira. Each request becomes a work item with a unique identifier, a status, an assigned owner, and a full activity history. Nothing relies on memory or informal follow-up.
In practice, most teams build their Jira ticketing system inside Jira Service Management. JSM adds the service desk layer that standard Jira doesn’t include: a customer-facing portal, SLA tracking, agent queues, and request types that make sense to people who have never opened Jira before.
The term “Jira ticketing” is sometimes used loosely to mean any issue tracking in Jira. The distinction matters. Jira Software tracks work items for development teams. Jira Service Management tracks service requests from customers, employees, or other stakeholders – and it’s built to handle the intake, routing, and resolution process from end to end.
Jira Software vs. Jira Service Management: which one is the ticketing system?
Both products use Jira’s underlying infrastructure, but they serve different purposes.
Jira Software is designed for development teams. Its issues represent features, bugs, and tasks that move through engineering workflows. The people working in it are the same people creating the work. There’s no external intake layer.
JSM adds that layer. It separates the people who submit requests from the team that handles them. Customers or employees use a simplified portal to describe what they need. Agents see those requests as structured Jira issues on the other side and work through them using queues, SLAs, and configurable workflows.
The decision is straightforward:
- Use Jira Service Management when you need a front door for incoming requests from people outside your team.
- Use Jira Software when your team is managing its own engineering backlog.
| Jira Software | Jira Service Management | |
|---|---|---|
| Primary users | Engineering and development teams | Support agents, IT, HR, and Ops |
| Work items | Stories, bugs, tasks, and Epics | Service requests, incidents, and approvals |
| Source of work | Internal team members | External customers or other departments |
| Intake layer | No separate intake door | Portal and email-to-ticket |
| Core tools | Agile boards and backlogs | Queues, SLAs, and portals |
| Best for | Engineering backlog execution | Service request management |
Many organizations use both. JSM handles the service intake. Jira Software handles the engineering execution. When a support ticket requires a code fix, an agent can create a linked Jira Software issue – and for teams using Bitbucket or other CI/CD tools, JSM also connects to deployment pipelines to support change management workflows.
How JSM works – the two sides of the system
Jira Service Management runs on two separate interfaces. One is for the people submitting requests. The other is for the team resolving them. They’re connected, but they look completely different – and that’s intentional.
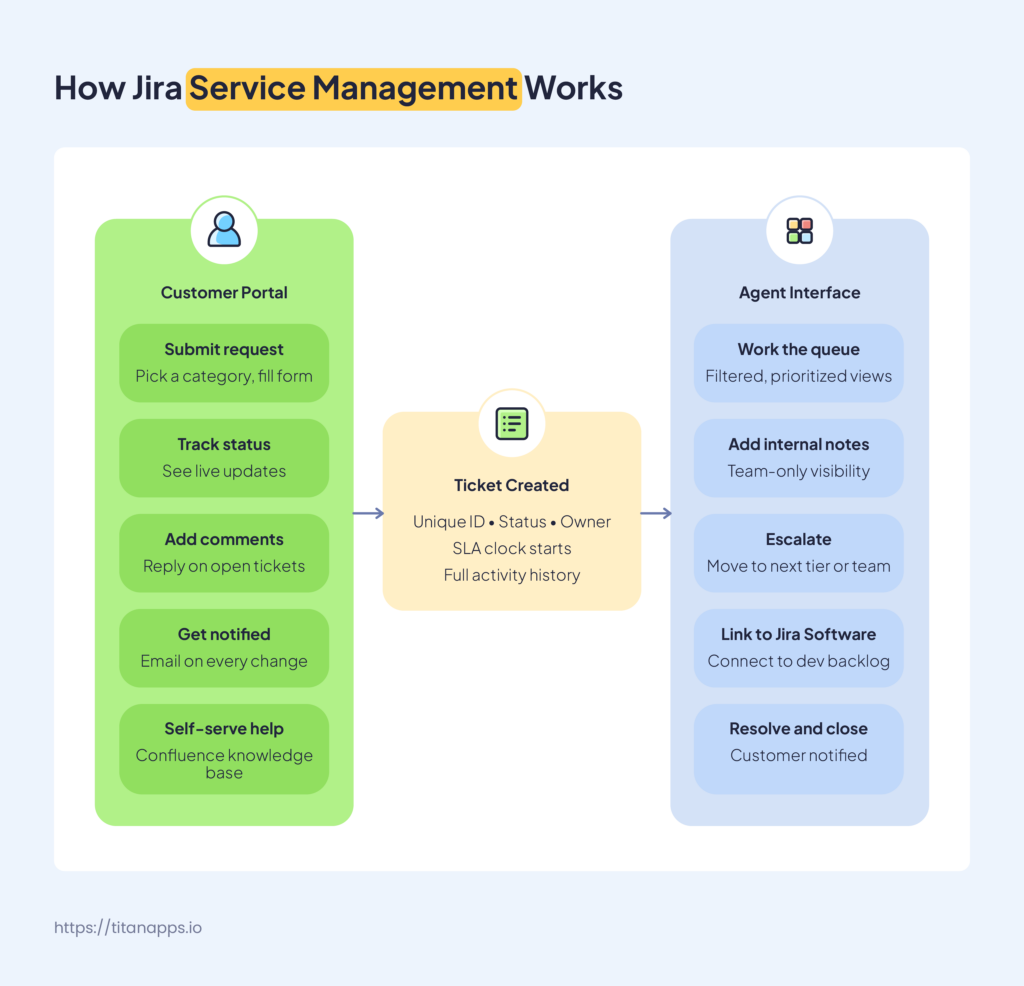
The customer portal
The customer portal is what end users see when they need help. It’s a simplified, external-facing interface with no Jira terminology, no boards, and no project settings. Customers see a clean form that asks: what do you need help with?
From the portal, customers can:
- Browse request categories and pick the one that fits their issue
- Fill out a submission form with the relevant details
- Track the status of their open requests
- Add comments to an existing ticket
- Receive email notifications when the status changes
The portal is intentionally stripped down. Customers don’t need to know what a work type is or how Jira workflows function. They come in with a problem and submit it in plain language. The system handles the translation.
Email-to-ticket is a common alternative entry point. When you configure a specific email address for your JSM project, any incoming message is automatically converted into a request. The email subject becomes the ticket summary. The body becomes the description. Large organizations often set this up so customer emails, call center logs, or forwarded support queries all land in JSM without manual data entry.
Agents can also create tickets on behalf of customers – useful when a request comes in by phone or through an informal channel.
JSM also integrates with Confluence to power a self-service knowledge base. When customers search for help before submitting a ticket, they can find relevant articles and resolve common issues without involving an agent. Teams using the knowledge base see meaningful reductions in ticket volume for routine requests.
Portal design matters more than most teams expect. If the request categories are vague or overlapping, customers file tickets in the wrong place. The support team then spends time re-routing instead of resolving. Keeping categories clear, specific, and minimal reduces misfiled tickets significantly.
The agent side
Agents work inside the standard Jira interface. When a customer submits a request through the portal or by email, it becomes a Jira work item visible to the support team. From there, agents manage the full resolution process.
The core of the agent workflow is the queue. Queues are filtered lists of tickets that match specific criteria – by request type, priority, status, or assignment. An agent opens their queue, picks the next ticket, and works through it. Everything that needs attention is surfaced automatically.
Key things agents can do that customers cannot:
- Add internal notes visible only to the team
- Move tickets between statuses and queues
- Escalate to a more senior team member or a different department
- Link a ticket to a Jira Software issue in the engineering backlog
- Close the ticket and notify the customer
Escalation is one of JSM’s more practical features. Not every agent can resolve every type of request. When a ticket requires deeper expertise, it moves up – to a senior specialist, a different team, or another JSM project entirely. The transition is permission-based, so only the right people can move tickets to specific statuses.
Status changes on the agent side are reflected on the customer portal in near real time. When an agent moves a ticket from “In Progress” to “Pending,” the customer sees that update and receives an email notification. JSM also integrates with Slack and Microsoft Teams – agents can receive alerts, respond to incidents, and update ticket statuses directly from their chat tool without switching to Jira.
Ticket visibility is configurable. By default, a customer can only see their own tickets. Admins can broaden this so tickets are shared within an organization, or even made fully public – useful for teams that want customers to see whether a known issue is already being tracked.
Core components of a Jira ticketing system
A JSM project has several moving parts. Understanding what each one does – and how they connect – is what separates a system that works from one that creates more confusion than it solves.
Request types and work types
This is the concept that makes JSM different from standard Jira, and it’s worth understanding clearly.
In Jira Software, teams work with issue types: Tasks, Stories, Bugs, Epics. These are developer-facing labels that make sense to people who live in Jira every day.
JSM adds a second layer on top. Work types are the agent-side equivalent of issue types. Request types are what customers see on the portal. A single work type can have multiple request types mapped to it, each written in plain language.
For example, an IT team might have a work type called “Service Request.” On the customer portal, that same work type appears as separate options: “Request laptop setup,” “Reset my password,” or “Get software access.” The customer picks what they need. The system routes it to the right queue as the correct work type. No Jira knowledge required.
This separation is what makes JSM accessible to people outside the technical team. HR staff, finance teams, and new employees can submit requests without ever learning Jira’s internal structure.
Queues
Queues are how agents organize their work. Each queue is a filtered view of tickets that match a set of conditions – by request type, priority, status, assignee, or SLA breach risk.
A well-designed queue structure means agents never have to search for what to work on next. They open their queue and see exactly the tickets that need attention, sorted by priority or time remaining on the SLA.
Common queue configurations include:
- Unassigned tickets – new requests that haven’t been picked up yet
- My open tickets – everything currently assigned to the logged-in agent
- Escalated – tickets that have moved up from first-line support
- SLA breach risk – tickets approaching their resolution deadline
Teams with multiple departments or support tiers typically maintain separate queues per team. A ticket can move between queues as it escalates or changes hands.
SLAs
SLA stands for service level agreement. In JSM, an SLA is a time target attached to a ticket – how quickly the team must respond, and how quickly they must resolve the issue.
SLAs in JSM work by tracking time against conditions. You define the start event (when the ticket is created, or when it moves to a specific status), the pause conditions (when the ticket is waiting on the customer), and the goal (respond within 4 hours, resolve within 2 business days).
Priority drives SLA targets. A critical incident gets a tighter window than a routine access request. This makes the system fair and consistent – agents don’t apply SLAs based on judgment. The rules are set in advance.
Breach visibility is built in. Tickets approaching their SLA deadline are flagged in the queue. Agents and team leads can see which tickets are at risk before they miss the target, not after.
Automation
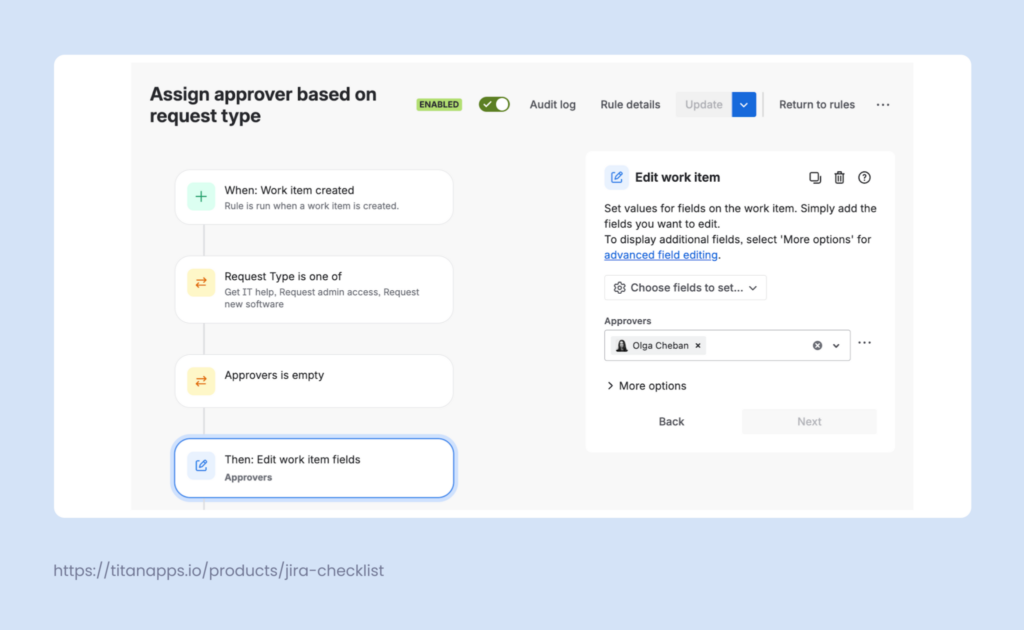
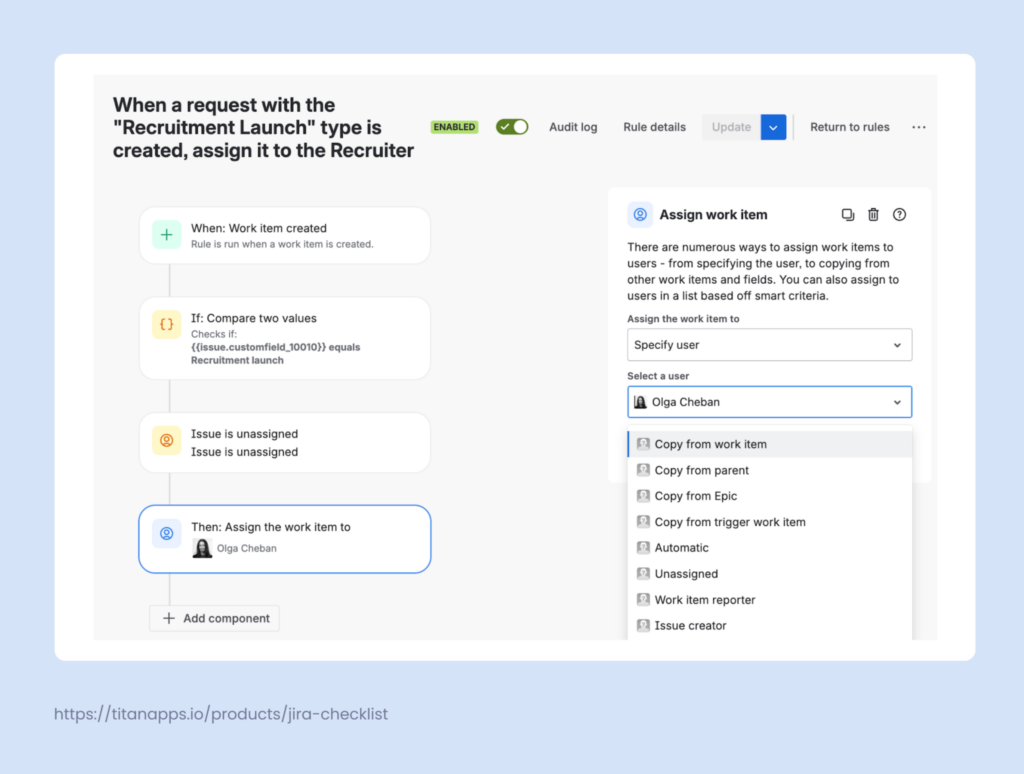
Automation in JSM handles the repetitive decisions that would otherwise slow agents down. When a new ticket arrives, Automation for Jira can assign it to the right team, set its priority, and notify the relevant people – without anyone touching it manually.
As an example of Jira Service Management automation, let’s take a look at this rule for ITSM. It checks the request type of each new ticket and adds an approver if this field value is not specified yet:
Useful automation patterns for ticketing systems include:
- Auto-assignment – route tickets to specific agents or queues based on request type
- Priority setting – automatically mark tickets as high priority when specific keywords appear in the description
- Status updates – move a ticket to “Waiting for customer” when an agent adds a comment
- Escalation triggers – notify a team lead when a ticket hasn’t been updated in 24 hours
- SLA breach alerts – send a notification before a ticket misses its resolution target
Automation rules are built using Jira’s native Automation for Jira tool. No coding required for most standard patterns.
Workflows and statuses
Every JSM project has a workflow – the set of statuses a ticket can move through, and the rules governing those transitions.
A basic IT support workflow might look like this: Open – In Progress – Accepted – Done
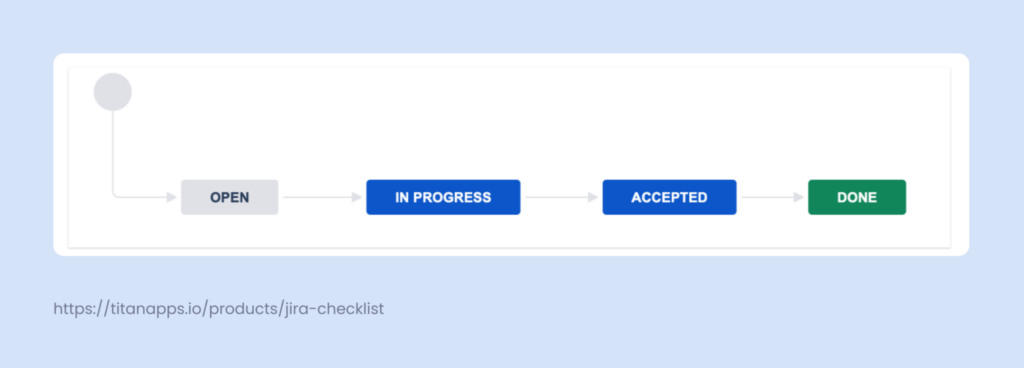
More complex workflows add statuses for escalation, approval steps, or cross-team handoffs. “Escalated” might route the ticket to a senior specialist. “Pending” might pause the SLA clock while waiting for a customer response. “Awaiting approval” might require a manager sign-off before the request is fulfilled.
Workflow transitions are permission-based. You configure which roles or team members can move a ticket to which status. This prevents agents from skipping steps or closing tickets prematurely.
The workflow is entirely customizable. The structure you build should reflect the actual process your team follows – not a generic template you retrofit your operations into.
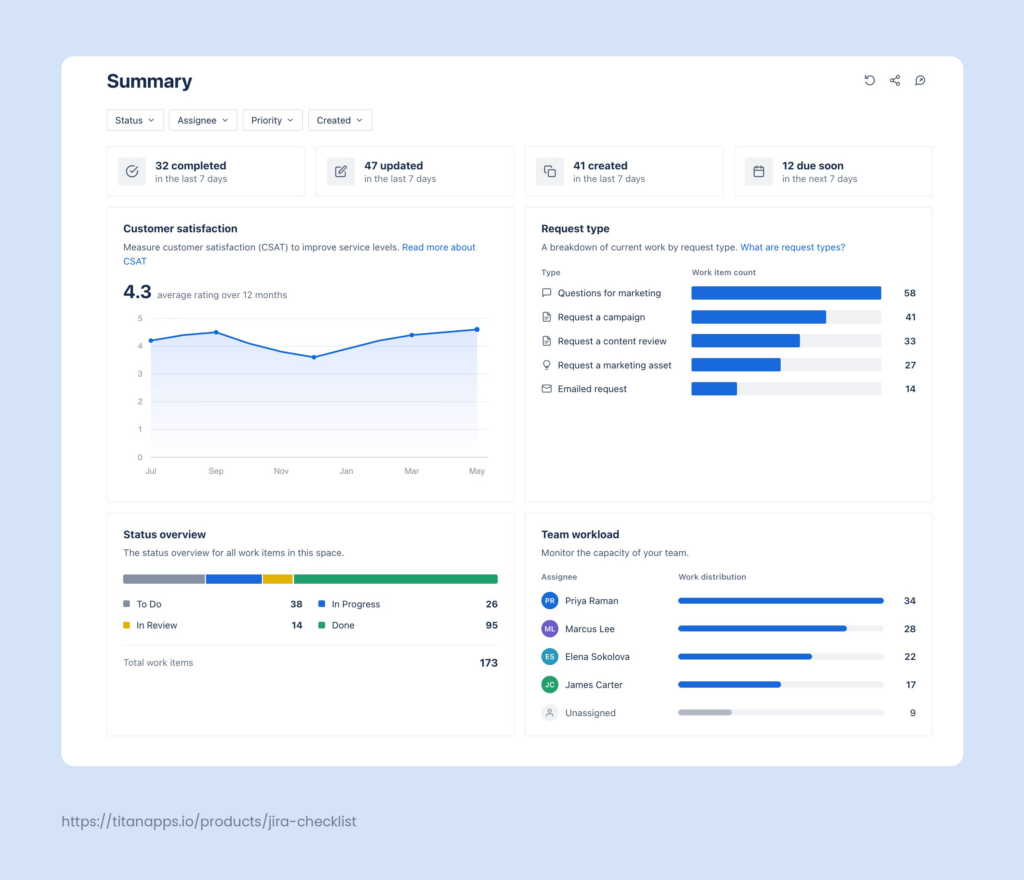
Dashboards and metrics
JSM includes reporting tools that give team leads and managers visibility into how the system is performing. Dashboards surface key metrics across all active tickets.
Metrics worth tracking in a Jira ticketing system:
- Volume – how many tickets are coming in, by request type and channel
- SLA compliance rate – what percentage of tickets are resolved within target
- Average resolution time – how long tickets take to close, by request type or priority
- Queue backlog – how many open tickets are waiting at any given time
- Escalation rate – how often tickets move beyond first-line support
These metrics tell you whether the system is working. High escalation rates on a specific request type suggest the first-line team needs more training or better documentation. A growing backlog on one queue signals a staffing or routing problem. Dashboards make these patterns visible before they become crises.
A practical review cadence: check queue health and SLA breach risk daily, review backlog trends weekly, and audit request type categories monthly to remove or consolidate anything generating misfiled tickets.
How to create a ticketing system in Jira Service Management
Setting up JSM for the first time takes less time than most teams expect. The core configuration – a working portal, basic queues, and an SLA structure – can be in place within a day. The steps below cover the essential setup path.
Step 1: Create a JSM project
Go to your Jira instance and create a new project. Select Jira Service Management as the project type.
From the template library, choose IT Service Management. This template pre-configures common request types, statuses, and workflows based on ITIL principles. It’s a solid starting point for IT support, and it’s easier to trim down a template than to build everything from scratch.
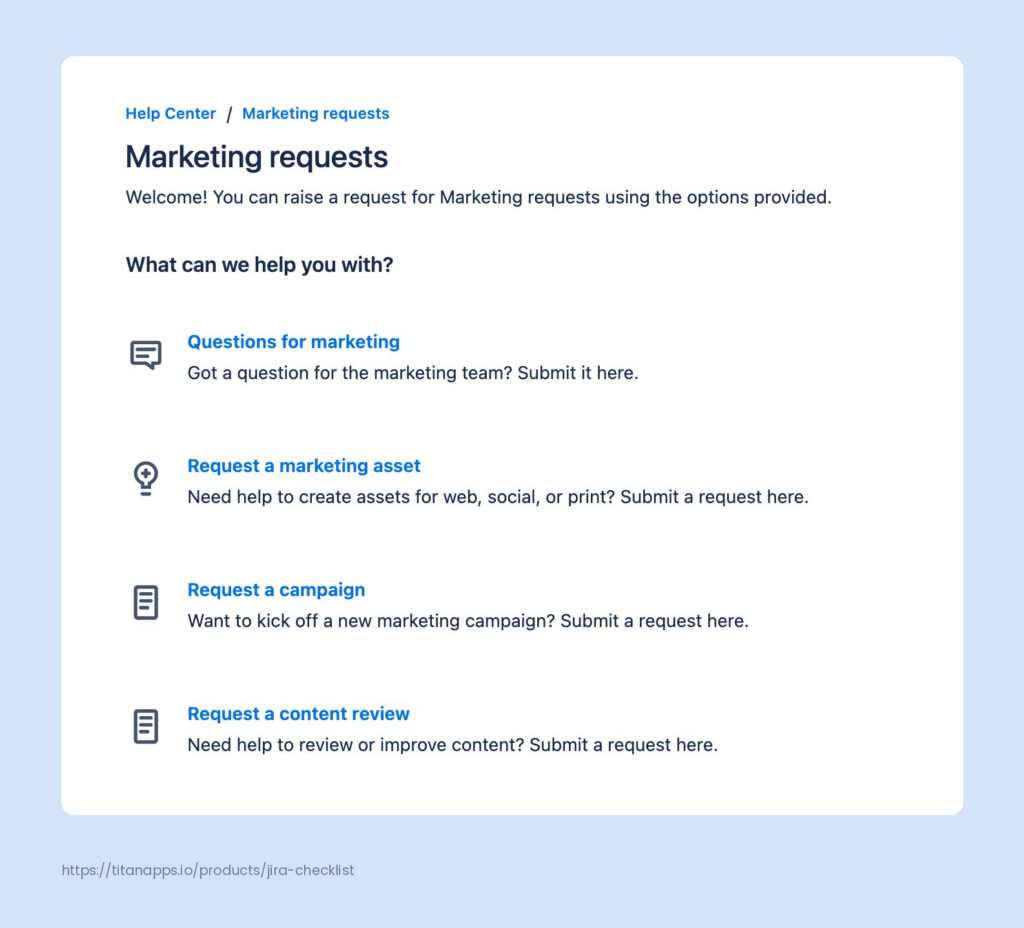
Give the project a clear, descriptive name – something like “IT Support” or “Marketing requests” Set the project lead and review the permission scheme before saving. These two settings control who can access the project and who can administer it, so getting them right at the start saves headaches later.
Step 2: Define your request types
Navigate to Project Settings – Request types. This is where you build the customer-facing catalog.
Review the default request types that came with your template and edit them to match your team’s actual service categories. Rename anything that uses internal jargon. Delete request types your team won’t use. Add new ones for processes specific to your organization.
Keep the portal catalog focused. Five to eight well-named request types are more effective than twenty that overlap. The more choices a customer faces, the more likely they are to pick the wrong one.
For each request type, configure the intake form – the fields a customer fills out when submitting that specific request. Only include fields that agents actually need to start working on the ticket. Every unnecessary field is friction that reduces portal adoption.
Step 3: Set up queues and routing
Go to Queues in your JSM project and configure the views your agents will use daily.
Start with three to four core queues:
- All unassigned tickets
- My open tickets
- Tickets approaching SLA breach
- Escalated tickets
Add queue-level filters to surface the right tickets automatically. For teams with multiple support tiers, create separate queues per tier so agents only see the work relevant to them.
Step 4: Configure SLAs by priority
Go to Project Settings – SLAs and set up time targets for your two core SLA metrics: time to first response and time to resolution.
Tie targets to priority levels. A common starting structure:
| Priority | First response | Resolution |
|---|---|---|
| Critical | 1 hour | 4 hours |
| High | 4 hours | 1 business day |
| Medium | 8 hours | 3 business days |
| Low | 1 business day | 5 business days |
Configure pause conditions for each SLA. When a ticket is waiting on the customer – status “Pending” or similar – the SLA clock should pause. This keeps your compliance metrics accurate and prevents agents from being penalized for delays outside their control.
Step 5: Enable email-to-ticket
Go to Project Settings – Email requests. Add a dedicated email address for the project.
Once configured, any email sent to that address is automatically converted into a JSM request. The email subject becomes the ticket summary. The body becomes the description. Attachments carry over as well.
This is especially useful for organizations transitioning from email-based support. Customers keep their existing habit of sending an email. The support team gains all the structure and visibility of JSM without asking customers to change their behavior.
Test the integration before going live. Send a test email and verify the ticket appears in the correct queue with the correct request type.
Step 6: Set up automation rules
Go to Project Settings – Automation and create your first rules.
Start with the highest-value automations before building anything complex:
- Auto-assign on creation – assign incoming tickets to a specific agent or team based on request type
- Priority from keywords – set priority to High automatically when the ticket description contains words like “urgent” or “down”
- Notify on SLA breach risk – send an alert to the assignee and team lead when a ticket is two hours from breaching its resolution SLA
- Auto-close resolved tickets – move tickets from Resolved to Closed automatically after five business days with no customer response
Each rule has a trigger, a condition, and an action. Keep early automation simple. Add complexity once the team is comfortable with the baseline system. Explore more practical examples of Jira Services Management automation in our blog.
Jira ticketing system use cases
JSM is most commonly associated with IT support, but the same structure works across any team that receives and resolves requests on a recurring basis. The portal, queues, SLAs, and workflows adapt equally well to HR operations, facilities management, finance approvals, and external customer support.
IT service desk
This is the most established JSM use case. IT teams handle a high volume of recurring requests – password resets, hardware setup, software access, VPN issues, network problems – alongside less predictable incidents that require faster response.
A typical IT support configuration in JSM separates requests into two tracks.
Service requests are routine and predictable, usually fulfilled following a standard checklist: new laptop setup, software installation, access provisioning. They move through a straightforward workflow and are resolved by first-line agents without escalation.
Incidents are unplanned disruptions – a system goes down, a security alert fires, a critical integration breaks. These require faster response times, tighter SLAs, and often escalation to a more senior specialist or a different team.
JSM handles both tracks in the same project. Separate request types, queues, and SLA targets keep the two streams distinct without splitting them into separate systems.
For larger IT organizations, support tiers add another layer. Tier 1 handles initial contact and standard requests. Tier 2 covers deeper technical issues. Tier 3 brings in engineers or architects for root-cause analysis and complex fixes. Tickets escalate between tiers through permission-controlled workflow transitions, with each tier operating in its own queue.
HR service management
HR teams in mid-sized and enterprise organizations manage a large volume of repeatable, process-heavy requests. Employee onboarding, offboarding, role changes, leave approvals, and confidential HR cases all follow defined steps. When those steps live only in someone’s head or a shared spreadsheet, things get missed.
Jira offers a dedicated HR Service Management project template. Request types in that template include Employee Onboarding, Employee Offboarding, Confidential HR Case, and HR Request with Approval. Each maps to a structured workflow with the right approval gates and visibility settings.
The key advantage for HR is privacy control. Confidential requests – a grievance, a performance case, a sensitive inquiry – can be configured so only specific people see them.
For complex onboarding processes, JSM alone covers the workflow stages. Smart Checklist adds a further layer on top: each onboarding ticket can have a default checklist template applied automatically, with mandatory items that block the ticket from moving to “Completed” until every step – equipment ordered, accounts created, day-one schedule sent – is confirmed done.
The result is an auditable, repeatable process that HR managers can monitor across all active onboarding tickets at once, without chasing individual agents for status updates.
External customer support
JSM works as an external-facing support system too. Customers submit bug reports, feature requests, or account issues through a public portal. The support team processes them through the same agent interface used for internal requests.
A real example of what this enables: a customer emails a dedicated support address. JSM converts that email into a ticket automatically. The agent works through the request, updates the status, and the customer receives notifications at each stage. The customer can log back into the portal at any time to see exactly where their request stands.
Ticket visibility for external portals is configurable. The default is private – only the person who submitted the ticket can see it. For known issues affecting multiple customers, visibility can be broadened so customers see that a bug is already tracked and being worked on. This reduces duplicate submissions and repeat follow-up messages.
What makes a good Jira ticketing system?
A ticketing system is only as good as the discipline it enforces. Technology is the easy part. The hard part is designing a system that keeps requests organized, routes them reliably, and prevents steps from being skipped – at scale, across teams that didn’t configure it themselves.
In JSM, the workflow is more complex, the panels look a bit different – but at the end of the day it’s still a Jira issue

Clear request types that don’t overlap
The customer portal is only useful if customers land in the right queue. When request categories are vague, generic, or internally named, customers guess – and agents spend time re-routing tickets that should never have been misfiled.
The test for a well-named request type: a new employee on their first day, with no Jira knowledge, should be able to find the right category without help. If that’s not possible, the category needs renaming or splitting.
Keep the portal catalog focused. Five to eight well-defined request types outperform twenty overlapping ones. Every extra category is a decision the customer has to make – and a new way for a ticket to land in the wrong place.
Clean linkage between projects
Most enterprise organizations don’t run a single JSM project. IT support, HR services, security, and facilities each have their own project with their own queues and workflows. This is sensible until a ticket needs to cross a boundary.
Oleksandr described his own experience with Atlassian’s support structure: “There’s no proper linkage between their own support projects. That’s a big pain for me right now.” A ticket filed with cloud support gets redirected to the marketplace vendor team. The vendor opens a ticket on the other side. Cloud support says the customer needs to file separately. The loop continues – not because either team is unresponsive, but because the projects aren’t connected.
The lesson applies to any multi-team JSM setup. If your organization runs several JSM projects, define the handoff rules explicitly. Which team receives escalations from which queue? How does a ticket move between projects without losing its history? Solving this at configuration time prevents it from becoming a customer experience problem later.
Mandatory steps that can’t be skipped
A checklist on a ticket is a suggestion. A mandatory checklist item is a requirement. The difference matters when you’re managing a process that has compliance implications, legal steps, or quality gates.
Smart Checklist adds this layer to JSM tickets. When an item is marked as mandatory in Smart Checklist Pro, it blocks the ticket from transitioning to the next workflow status until that item is completed. The agent sees an error message if they attempt to close or transition the ticket with mandatory items still open.
This is confirmed in Smart Checklist’s official product documentation: mandatory items “prevent a Jira issue from transitioning to the next status if mandatory items are incomplete.” The workflow validator enforces it at the transition level – it’s not a visual reminder. The system won’t move the ticket.
For IT service desks, this means a hardware request can’t be marked resolved until the equipment has been confirmed dispatched. For HR, an offboarding ticket can’t close until access revocation and asset return are both checked off. The process becomes auditable by default.
Simpler is better for the customer portal
Portal complexity correlates with misfiled tickets and portal abandonment. The more choices a customer faces before they can describe their problem, the more likely they are to either pick the wrong option or fall back to email.
The customer portal is intentionally simple. Users come in with a problem, not a request type
Good portal design means removing decisions, not adding them. Fewer categories, shorter forms, plain language labels. The intake process should feel closer to sending a message than filling out a form. The structure exists on the agent side. The customer just needs a frictionless way to get their request in.
An honest limitation: JSM can be overengineered
JSM gives teams enormous flexibility – custom workflows, complex routing rules, multi-tier escalation structures. That flexibility is a genuine strength for organizations with mature service operations.
For smaller teams or those new to service management, the same flexibility can become a liability. A system with too many queues, too many request types, and automation rules that interact in unexpected ways is harder to maintain than a simple one. Agents spend time navigating the system instead of resolving tickets.
Start with the minimum viable configuration. Add queues, SLAs, and automation rules only when a clear operational need exists. A well-maintained simple system consistently outperforms an overbuilt one that nobody fully understands.
How Smart Checklist makes Jira ticketing more structured
Standard JSM workflows control how a ticket moves between statuses. What they don’t control is what happens inside each status – the specific steps an agent needs to complete before moving on. That gap is where tickets get closed too early, steps get skipped under pressure, and process consistency breaks down across a team.
Smart Checklist adds a structured task layer directly inside JSM tickets. From Smart Checklist’s perspective, a JSM service request is a Jira issue like any other. The same checklist functionality that works on a development task or an Epic works on a support ticket – with one addition that matters specifically for service management: customer portal visibility.
For marketing campaign request checklist can look like in the example below.
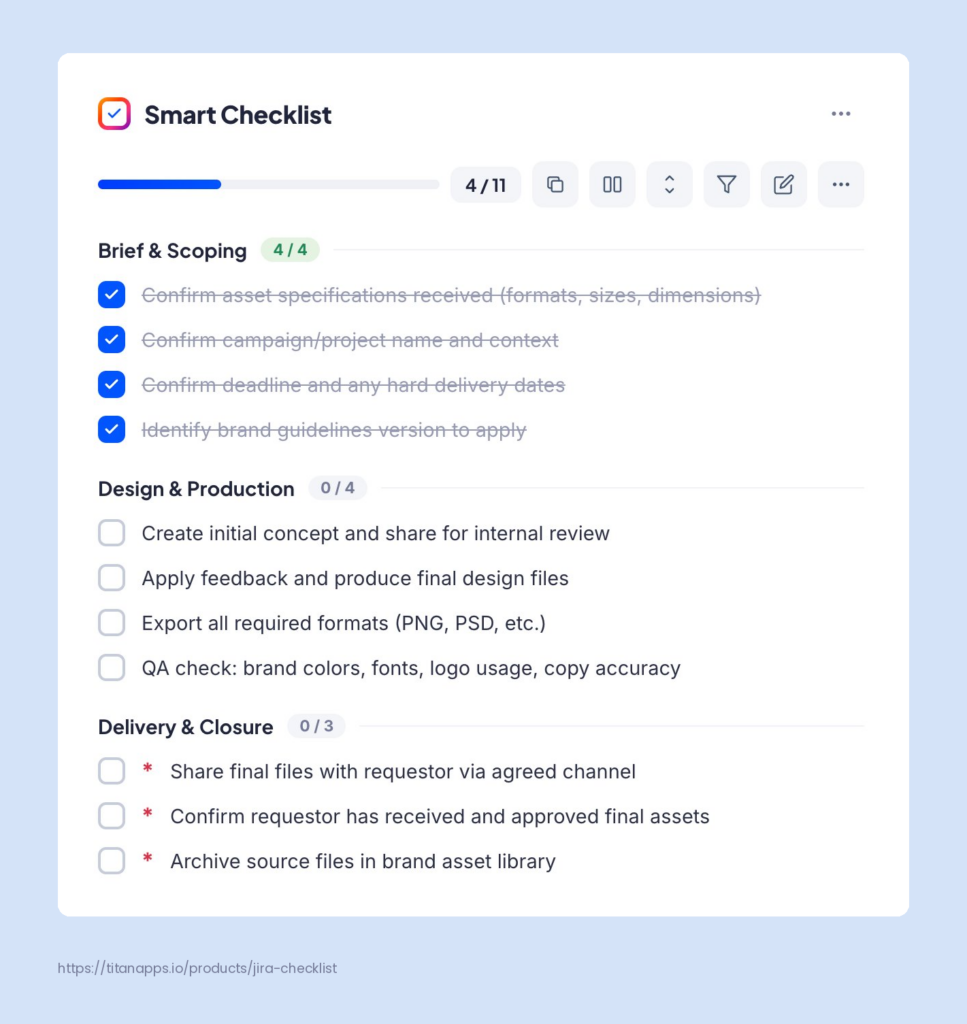
Default templates per request type
The most practical setup for a JSM team is a default checklist template applied automatically to each request type. When an agent opens a new “Employee Onboarding” ticket, the checklist is already there. They don’t build it from scratch. They follow it.
Smart Checklist supports this through Default Templates. A project admin sets a template as the default for a specific issue type – or for all issue types in a project. Every newly created issue of that type gets the template applied automatically.
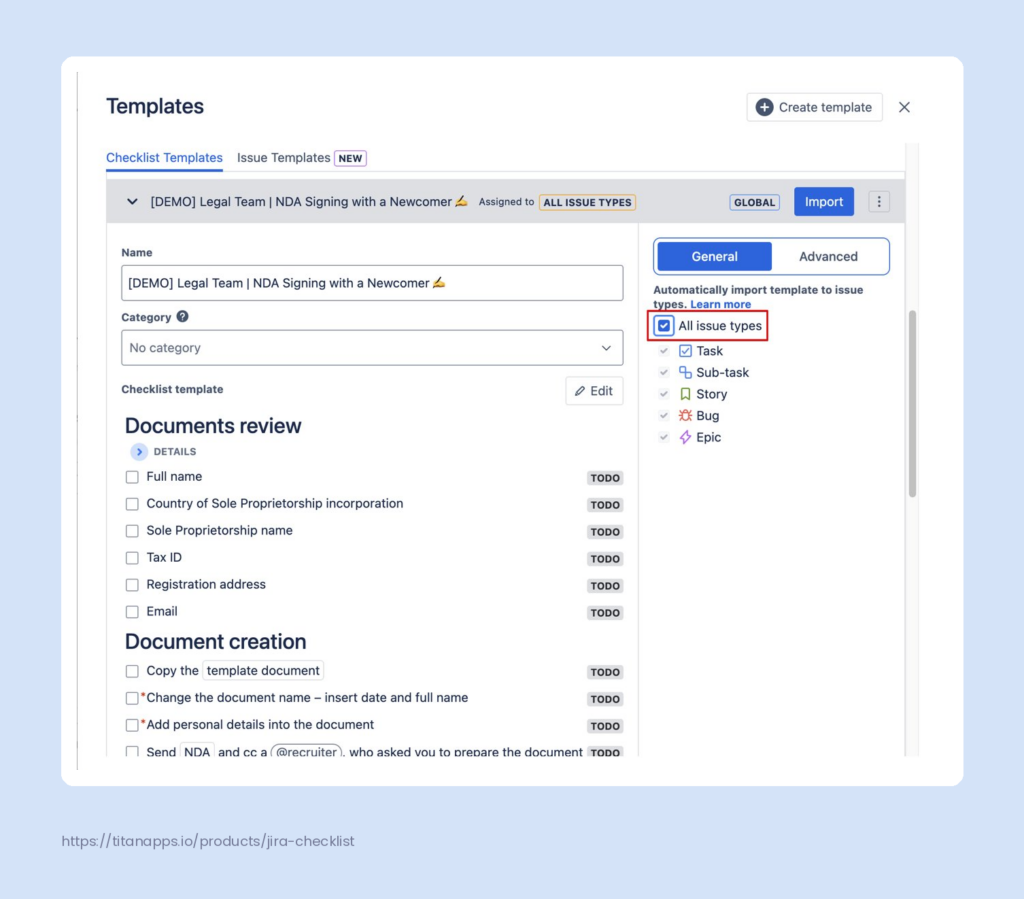
For JSM, this maps cleanly to request types. A “New Hardware Request” gets a hardware provisioning checklist. A “Software Access” request gets an access verification checklist. Each request type follows its own defined process without the agent needing to remember which template to apply.
This is confirmed in Smart Checklist’s product documentation: default templates can be set “for all issue types or specific issue types within a project,” and “the template will be automatically imported to all newly created issues.”
Note: Automation rules allow for the dynamic injection of checklist items based on specific triggers – such as a workflow transition or a field update. In these scenarios, Smart Checklist can automatically append new tasks to an existing list, ensuring that as an issue evolves, the required process steps remain current and aligned with the ticket’s new status.
Mandatory items that block premature closure
Default templates define the process. Mandatory items enforce it.
Any checklist item in Smart Checklist Pro can be marked as mandatory. When an agent attempts to transition a ticket – moving it to “Resolved” or “Closed,” for example – the workflow validator checks whether all mandatory items are complete. If any remain open, the transition is blocked. The agent sees an error: complete the required items before moving forward.
You can use the built-in workflow stages, and you can also add checklist items on top of those – make them mandatory so the agent literally cannot move the ticket to the next stage until they’ve checked off those items.
A typical internal checklist for an IT access request might look like this:
- * Verify requestor identity confirmed
- Check asset availability in the database
- Contact requestor for confirmation if needed
- Receive requestor sign-off
- *Provision access and confirm
- *Notify requestor and close
Items 1, 5, and 6 could be marked mandatory – the steps that can’t be skipped under any circumstances. The others remain visible guidance that agents can check off as they go.
Mandatory items work with any default or custom statuses configured on the Jira instance. They can also be set directly inside a template, so every issue created from that template inherits the mandatory configuration automatically.
Customer portal visibility
Most Smart Checklist usage in JSM is internal – checklist items are for agents only. But for teams that want to give customers transparency into the resolution process, Smart Checklist can display the checklist on the customer portal in read-only mode.
When enabled, customers can view checklist progress, expand or collapse item details, and filter between completed and open items. They cannot edit the checklist, change item statuses, or add items. The checklist remains fully under agent control.
Enabling portal visibility requires two steps, both confirmed in Smart Checklist’s official documentation:
1. Enable “Show on customer portal” in Global Settings (Settings – Apps – Smart Checklist Settings – Global Settings tab)
2. Enable “Show on customer portal” in the Project Settings of the specific JSM project
If either setting is off, the checklist remains invisible to the customer. Project settings override global settings – so a project can opt out even when the feature is enabled globally.
Whether to turn this on depends on the type of service and the relationship with the customer. For external bug reports or infrastructure requests, showing resolution steps builds trust. For internal HR or confidential cases, keeping the checklist agent-only is the right call.
What this looks like end to end
A well-configured Smart Checklist setup inside JSM works like this: a customer submits a request through the portal. The ticket is created and the default checklist template applies automatically. The agent opens the ticket, sees the checklist, and works through it step by step. Mandatory items prevent the ticket from closing until the critical steps are confirmed done. If portal visibility is enabled, the customer can log in at any point and see how far along the resolution process is.
The process is the same every time, for every agent, on every ticket of that type.
Frequently asked question on Jira ticketing system
What is the difference between Jira Software and Jira Service Management?
Jira Software is built for development teams managing their own engineering work – bugs, features, and tasks that move through Agile workflows. Jira Service Management is built for teams that receive and resolve requests from other people – customers, employees, or other departments. JSM adds a customer portal, SLA tracking, agent queues, and request types on top of Jira’s core infrastructure. If you need a front door for incoming service requests, JSM is the right product. If you’re managing an engineering backlog, Jira Software is.
What is a request type in Jira Service Management?
A request type is the customer-facing label for a service category on the JSM portal. It translates a plain-language problem – “I need a new laptop” or “Reset my password” – into a structured Jira work item on the agent side. Request types use language that non-technical users understand, without exposing them to Jira’s internal issue type terminology. A single work type can have multiple request types mapped to it, each with its own intake form.
How do SLAs work in a Jira ticketing system?
SLAs in JSM are time targets attached to tickets – how quickly the team must respond and how quickly they must resolve the issue. You define the start event, the pause conditions (such as when a ticket is waiting on a customer response), and the resolution goal. Targets are typically tied to priority levels so critical incidents get tighter windows than routine requests. JSM surfaces breach risk in agent queues before a deadline is missed, giving teams time to act.
Can customers track their own tickets in JSM?
Yes. Customers can log into the portal to see the current status of any ticket they submitted, add comments, and receive email notifications when the status changes. By default, ticket visibility is private – only the person who submitted the ticket can see it. Admins can broaden this so tickets are shared within an organization or made fully public. If Smart Checklist’s portal visibility is enabled, customers can also see the checklist progress on their ticket in read-only mode.
Is Jira a good ticketing system for non-IT teams?
JSM works well beyond IT. HR teams use it for onboarding, offboarding, and confidential case management. Operations teams use it for procurement approvals and facilities requests. Any team that handles recurring, process-driven requests from other people can build a functional service desk in JSM. The customer portal, request types, and configurable workflows adapt to most service contexts without requiring custom development.
What is ITSM and how does Jira support it?
ITSM stands for IT service management – the set of practices for delivering and managing IT services to end users. JSM is Atlassian’s ITSM product, based on ITIL practices that focus on aligning IT services with business needs. It supports core ITSM disciplines including incident management, service request fulfillment, change management, and problem management. JSM comes with an IT Service Management project template that pre-configures common request types and workflows based on ITIL principles, giving IT teams a structured starting point without building everything from scratch.
What does a Jira ticketing system cost?
Jira Service Management is available on Free, Standard, Premium, and Enterprise plans. For current pricing, refer to Atlassian’s official pricing page.
How does a Jira ticketing system fit into Agile project management?
JSM and Jira Software are both built on Jira’s Agile foundations, but they serve different parts of the workflow. Jira Software supports Scrum sprints and Kanban boards for engineering teams managing their development backlog. JSM handles the service intake side – capturing and resolving requests from customers, employees, and other stakeholders.
For DevOps and software development teams, the two products work together. An IT operations team receives an incident in JSM. The agent links it to a Jira Software issue in the engineering backlog. Developers pick it up, fix the code, and push it through their Kanban or Scrum workflow. The JSM ticket updates when the linked issue is resolved. The full lifecycle – from customer report to code fix – stays visible without manual status updates between systems.
Can Jira replace a dedicated help desk tool?
For many teams, yes. JSM covers the core help desk requirements: a customer portal for self-service request submission, email-to-ticket intake, agent queues, SLA tracking, and automated notifications. It also integrates with Confluence to build a knowledge base that deflects common questions before they become tickets.
Where dedicated help desk tools like Trello-based setups or lightweight alternatives fall short is at scale. JSM is built for teams managing high ticket volumes across multiple request types, support tiers, and departments. It handles the routing, escalation, and reporting that simpler tools can’t. For teams already using Atlassian products, JSM removes the need for a separate system entirely.
How do you optimize a Jira ticketing system over time?
The setup is only the beginning. The teams that get the most from JSM treat it as an ongoing system rather than a one-time configuration. A few patterns that consistently reduce bottlenecks and streamline ticket management:
Audit request types monthly. Remove or merge categories that generate misfiled tickets. Consolidate ones that look different but route to the same queue. Review SLA compliance by request type each week – a pattern of near-misses on one category usually points to under-resourcing or a routing problem, not just slow agents.
Use custom fields to capture the data agents actually need at intake. Repetitive tasks that require agents to ask follow-up questions are a sign the intake form is missing a field. Add it to the request type form and cut the back-and-forth.
Review automation rules quarterly. Rules built for one team size or workflow often outlive their usefulness. An auto-assignment rule that made sense for a five-person team creates wrong routings when the team doubles. Trim what no longer fits.
What are the key Jira ticket fields and how do they support teamwork?
Each Jira ticket is a self-contained record designed to give anyone on the team full context without asking the reporter. The core fields that matter most for effective ticket management:
Summary – the plain-language description of the issue or request. Should be specific enough that an agent unfamiliar with the ticket understands it from the queue view alone.
Assignee – the person currently responsible for moving the ticket forward. Clear assignee ownership eliminates the “I thought you were handling it” problem.
Status – where the ticket sits in the workflow. In Progress, Pending, Escalated, Resolved. Status drives queue membership, SLA tracking, and customer notifications simultaneously.
Priority – determines which SLA target applies and how the ticket ranks in the queue. Critical, High, Medium, Low.
Custom fields – request-type-specific data that agents need to start working. For an access request: which system, which role, who is approving. Custom fields capture this at intake so agents don’t have to track it down later.
Dependencies – linked issues connecting this ticket to related work in Jira Software or other JSM projects. Useful for tracking issues in IT operations where a fix requires both a service request and a development task to be completed.
Together, these fields give the whole support team shared visibility into every open request – which is the foundation of effective teamwork at the service desk level.
Conclusion
A Jira ticketing system is only as effective as the process behind it. JSM gives teams the structure – a customer portal for clean intake, queues for organized agent work, SLAs for accountability, and configurable workflows that reflect how the team actually operates. Getting those foundations right matters more than feature depth.
The teams that get the most out of JSM tend to follow a similar pattern. They keep the portal simple. They define request types that customers understand without guidance. They build routing rules that match their actual escalation structure. And they add automation only where it solves a real problem – not because the option is there.
Where standard JSM ends, process discipline has to begin. Smart Checklist closes that gap by bringing checklist-level structure inside each ticket. Default templates ensure every agent follows the same process for every request type. Mandatory items enforce the steps that can’t be skipped. And for teams that want to go further, portal visibility gives customers a transparent view of the resolution process in real time.
The result is a ticketing system that doesn’t just track requests – it guides the people resolving them.
To add checklists to your JSM tickets, install Smart Checklist for Jira from the Atlassian Marketplace and set your first default template in under ten minutes.