





 Tools for Jira
 Tools for monday.com




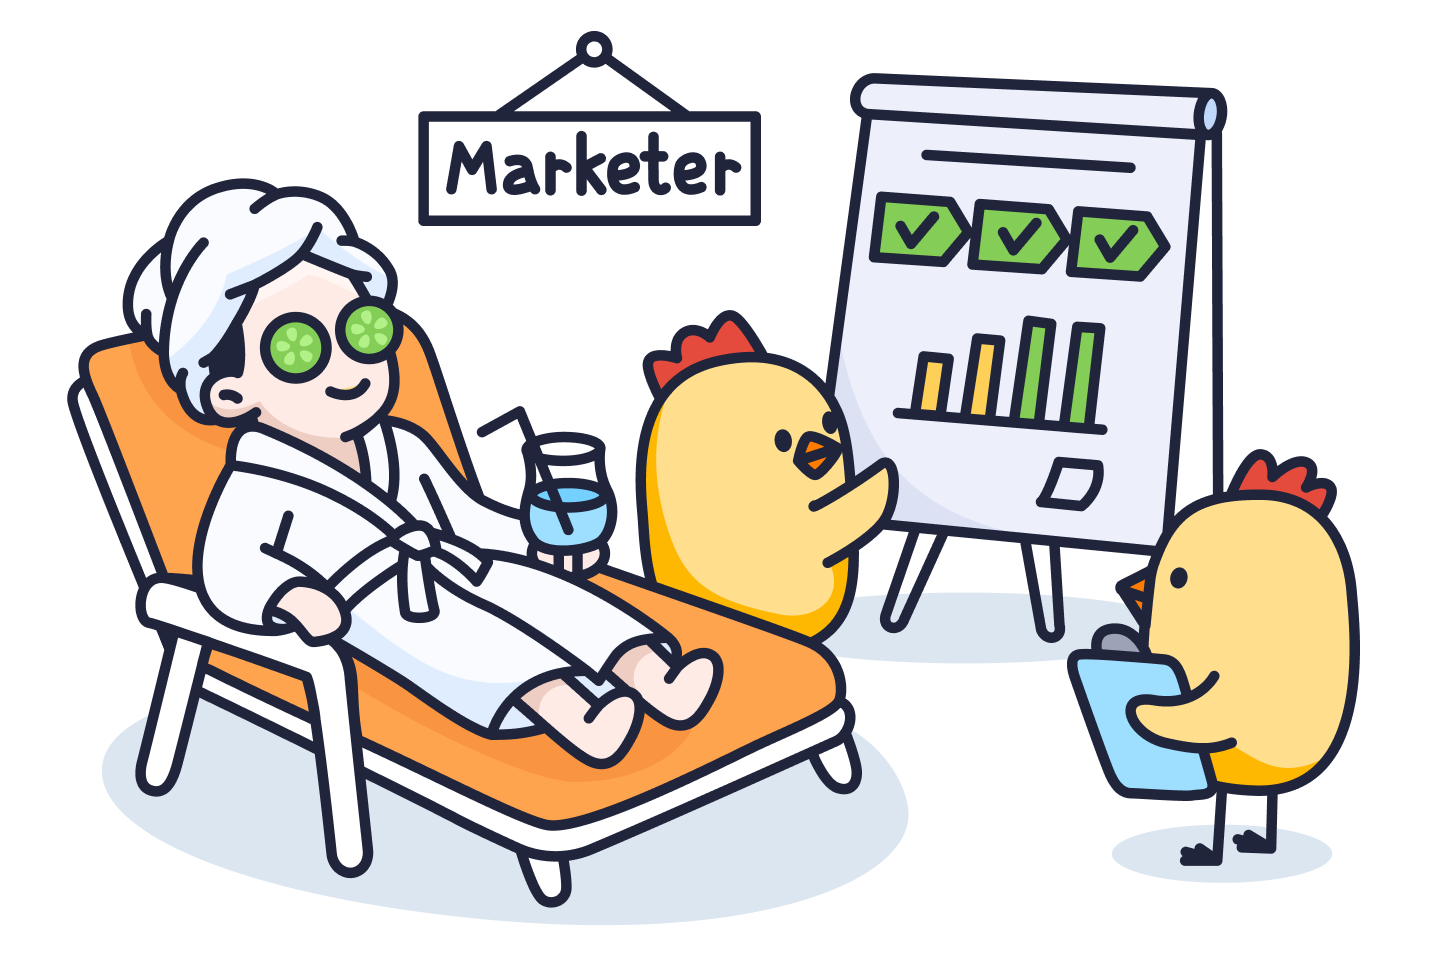
Imagine having to assemble your bike every time you want to ride it. You have done it before, all the tools and parts are in place, and you even have a manual and some notes. While this task may bring joy if done once in a while, it becomes tiresome on a regular basis. That’s exactly how many marketers feel about the campaign planning process.
Most likely, you rebuild the flow in a project management tool based on previous experience and notes, or dig up old campaign tasks to copy and customize. Both options are frustratingly slow and time-consuming. Moreover, you have to gather all the useful resources again and remember to implement all the changes you wanted to make after the previous campaign retrospective meeting.
If that challenge sounds familiar, a reusable marketing campaign planning template may be what you need. In this article, we will describe how to create it in Jira and provide an example you can build your own template on.
What Is a Marketing Campaign Template?
 Definition
A marketing campaign template is a reusable framework for managing the whole marketing campaign life cycle.
It includes a set of to-do items to cover each phase:
- Shaping: defining campaign objectives, KPIs, duration, channels, messaging
- Planning: calculating budget distribution, setting timeline, allocating tasks, notifying other teams
- Preparation: creating, reviewing, and refining assets, scheduling their go-live, and setting up campaign tracking
- Launch: making sure the campaign starts on time and progresses as planned
- Post-launch: monitoring and adjusting the campaign flow if required
- Analysis: after the wrap-up, assessing campaign performance and suggesting improvements.
How to Create a Marketing Campaign Template in Jira?
Atlassian offers the “Campaign management template”, which is a pre-configured space setup with work types, views, and workflow stages tailored to campaign management needs. For instance, it comes with statuses Not started, Planning, In progress, Ready for review, In review, Approved, Done, and Performance. That is quite different from the Kanban template’s default list: Backlog, Selected for development, In progress, and Done, which is better suited for software creation.
However, this is just a starting configuration, not a set of actual work items required to run a marketing campaign. We will discuss how to create the latter using TitanApps tools: Smart Templates for Jira and Smart Checklist for Jira. There are two ways to go about it:
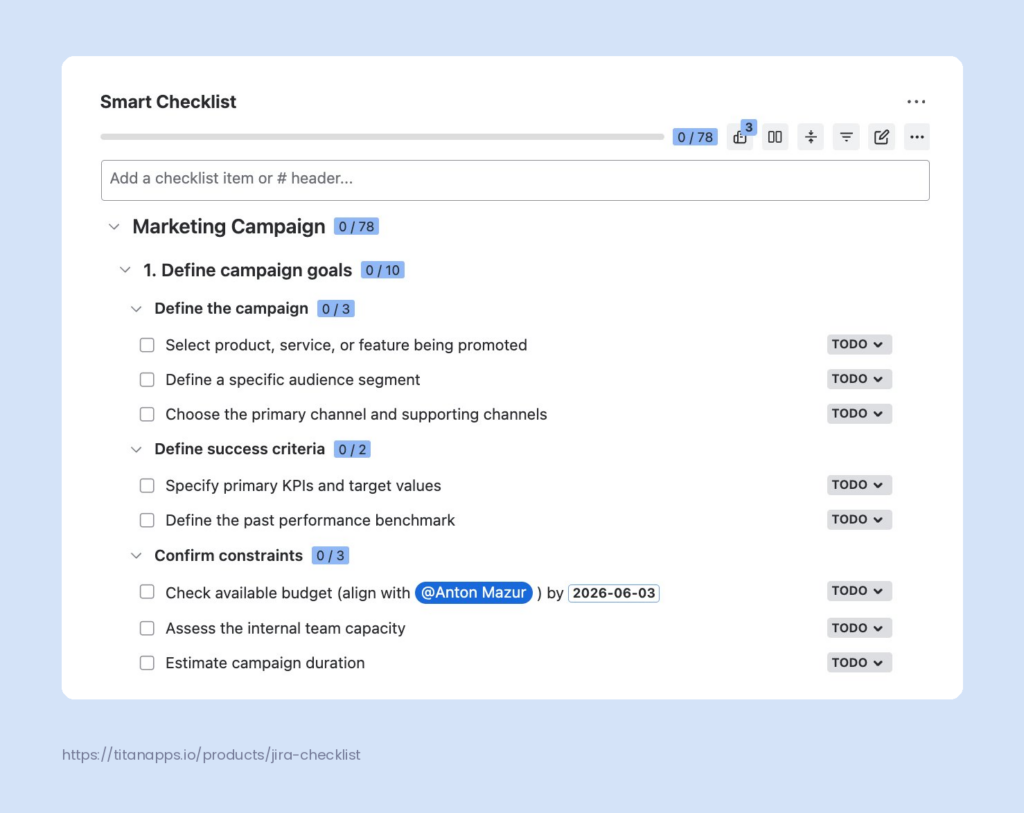
- A checklist template — a list of steps inside a work item that can be saved and reused. Jira allows users to create checklist-like action items in a work item description, but their functionality is limited. With the Smart Checklist app, you can assign different statuses to each checklist item, monitor progress, and even limit transitions by making some or all items mandatory.
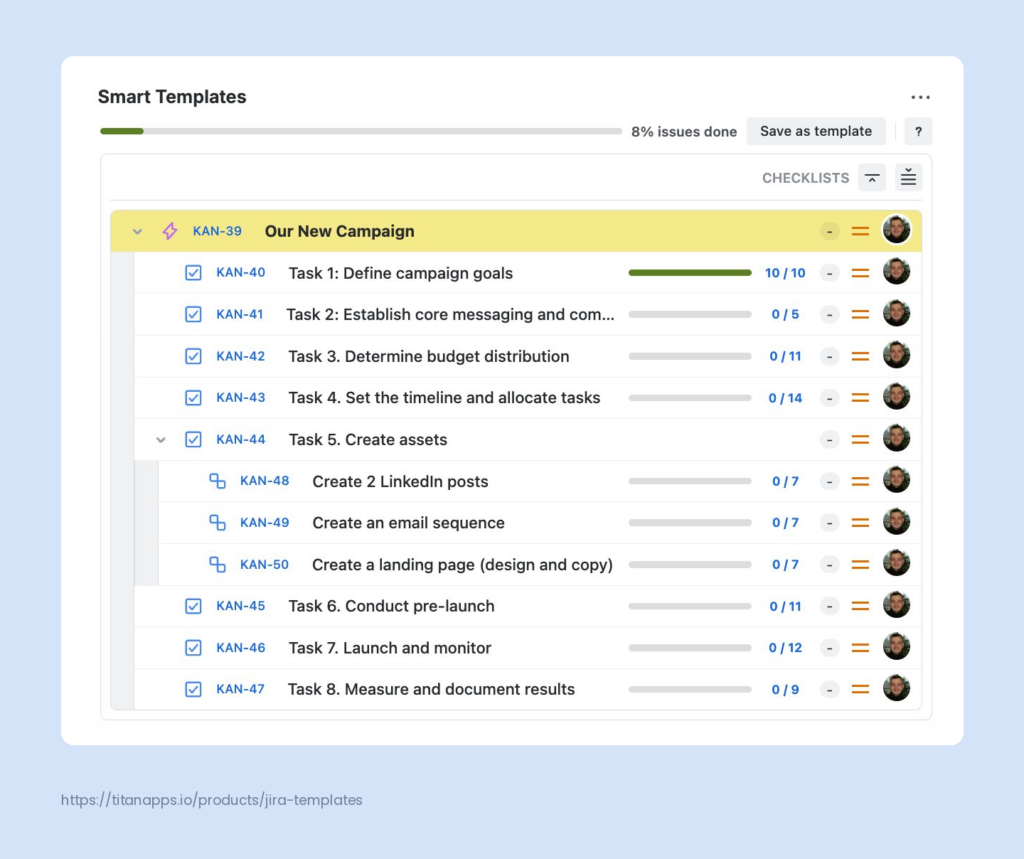
- A work item template — a set of Jira work items, possibly with child items, that you can recreate in one click. For example, an Epic for a campaign with the tasks for each stage and subtasks for specific actions. The Smart Templates app lets you save and reuse work items with all their child items. What’s more, you can use variables to manage dynamic values of the templates.
Which one should you choose?
A checklist template may work well for a relatively simple process, such as a single-channel or single-asset campaign or a content marketing campaign. See our previous article on an email campaign checklist to find an example. A work item template is better suited for complex endeavors: product launches, integrated multi-channel campaigns, large seasonal campaigns, webinar series, or large offline events — have a look at our event planning template.
Here is a sum-up table to help you make the choice.
| Criteria | Checklist template | Work item template |
|---|---|---|
| Channels | 1-2 | Multiple |
| Campaign assets | Few and/or of the same type | Numerous, of different types |
| Task ownership | Single owners | Multiple owners |
| Team dependencies | Limited | Multiple teams involved |
However, that shouldn’t be an either-or question. A checklist template can add granularity to a work item template. While the three-level hierarchy (Epic – Task – Subtask) may be sufficient to capture all the intricacies of the process, multiple Subtasks usually crowd the board. A checklist within a single Task, on the other hand, is a more practical alternative to cover the details.
Why Do You Need a Campaign Template?
A campaign template makes running regular campaigns in Jira easier, more consistent, and more effective. Let’s have a closer look at those benefits.
Less Manual Work
Building your campaign Epic with all its tasks and subtasks from the ground up is worth it when each of your campaigns is one of a kind. If the campaigns are repeatable, it becomes a drag.
Surely, you can clone the old Epic in seconds. However, there are a few caveats. Firstly, you need to find the right one, and with a crowded board and inconsistent naming, that may be a challenge. Secondly, the old Epic contains details that need updating. That will most likely take you far more time than making a copy.
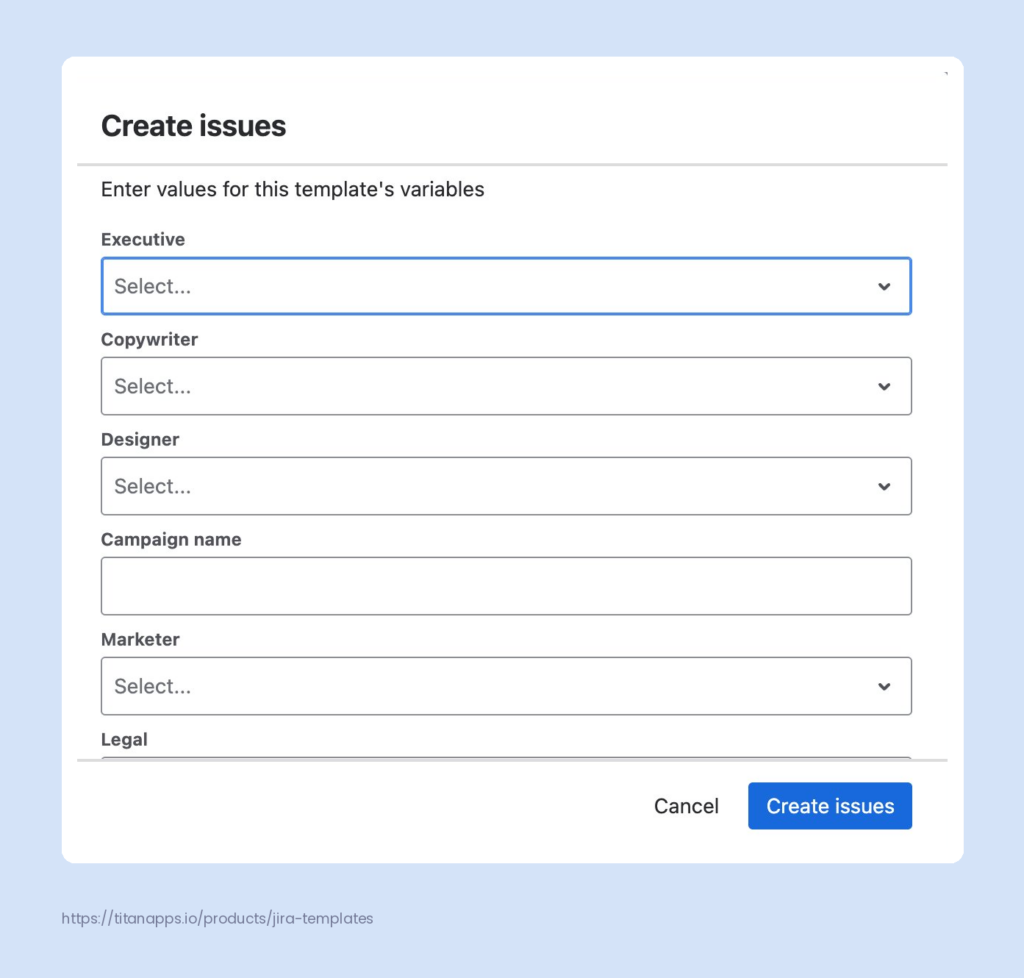
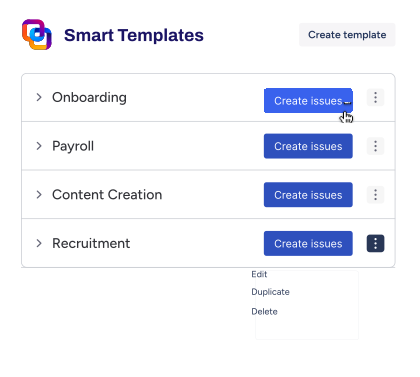
Creating a new campaign Epic with a template is easy. Just choose a suitable option from the Template list, and click the Create Issues button. But the real time-saver is variables — placeholders for variable details you fill in when applying the template. For instance, these may be campaign types, channels, audience segments, product names, roles (copywriter, designer, approver), or dates (launch, end), etc. This makes a single template applicable to all new campaigns.
You might still want to make some changes manually. However, with a well-thought-out template in place, you devote less effort to minutiae and more to improving your campaign strategy and flow.
Consistent Execution and Compliance
Reconstructing the flow each time you run a campaign increases the risk of confusion and some tasks falling between the cracks. For one thing, this may be detrimental to campaign performance. For another, it may become a threat to compliance. Imagine forgetting to update the do-not-call lists or skipping the check of social platform disclosure rules for sponsored content. Instead of improving the KPIs, you may be forced to deal with the fallout.
Templates offer the same tried-and-true sequence of steps as a baseline for campaign flow. Smart Checklists also add the safeguard of mandatory items. A user can’t move the task to Done (or other status) unless all such items on the checklist inside are marked as completed. All that results in a lower chance of missing something important.
Clear Ownership, Smoother Collaboration
With a reusable template, there is no need to redraw the map of who-does-what-when each time you run a campaign. You have it recorded, just make a few tweaks here and there — and you are good to go.
For instance, with Smart Templates, you can hardcode the people responsible for particular tasks in your template.
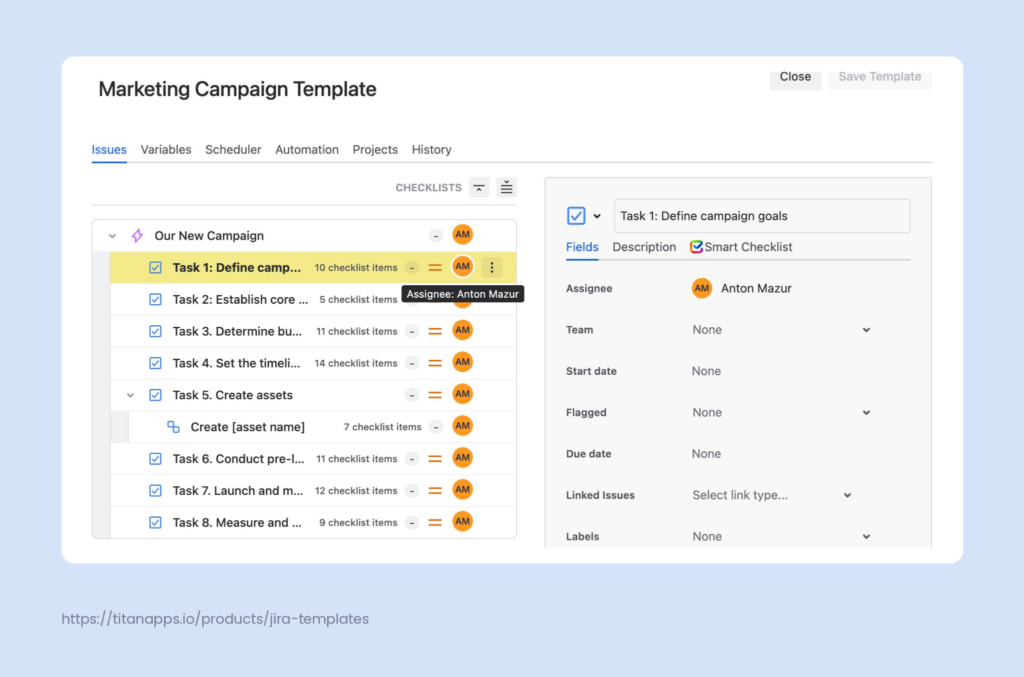
Or, if those filling in specific roles vary, consider adding variables (e.g., copywriter, designer, legal approval). They will allow you to specify the responsible party when you create a new work item with the template.
Easier Onboarding
Without a documented process, the campaign flow is in the head of the person who runs it regularly. Hence, it takes some time to explain to a new team member or someone on your team who hasn’t run a campaign before. You may use documents and diagrams, but the template has the advantage of “living” in Jira, where the work actually happens. In addition to teaching the campaign workflow, these templates provide a great opportunity to bake in essential online safety tips, ensuring that new team members maintain high security standards when handling sensitive campaign assets and shared project boards. The newbie doesn’t have to recreate the task sequence from a colleague’s description or past examples — it is already in the project management tool.
Clear Reference Point for Further Improvement
After the campaign is finished, you may have ideas for how to improve next time. With a template you can change, save, and reuse, those ideas don’t get buried in the retro meeting notes, but are acted on. This way, your campaign flow gets refined each time you run it.
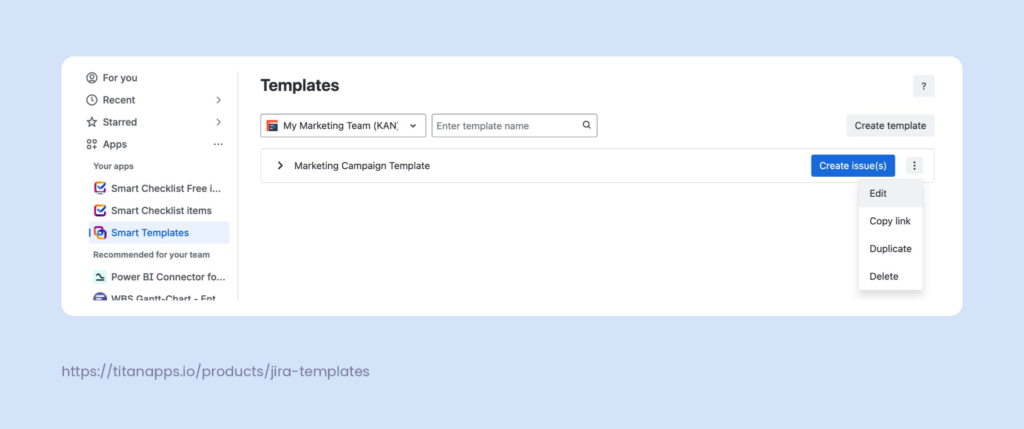
Smart Templates make it easy to keep your templates up to date. Just click on the app’s name in the Apps menu to open the template list, find the template you need, click the 3-dots menu next to it, and select Edit. Note that you don’t have to be a Jira admin to do that.
How to Create a Campaign Template with Smart Templates
1. Installation
You can install the Smart Templates app right from the Atlassian Marketplace. Or click Apps on the sidebar in your Jira, then Explore more apps, and enter “Smart templates: issue templates for Jira” in the search field, and choose the app.
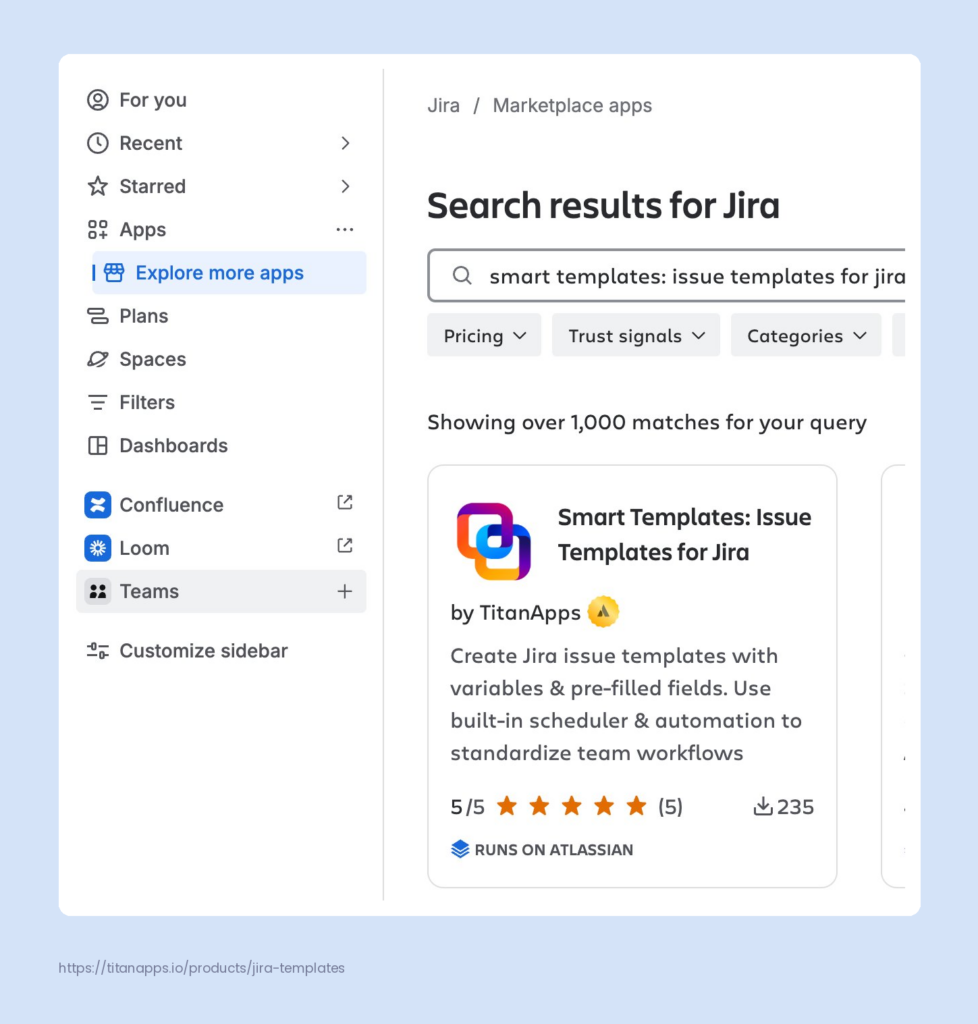
The app is free for teams with fewer than 10 users on Jira Cloud. Look for more pricing details here. Regardless of deployment option or team size, it has a 30-day free trial. Click the “Try it free” button, select the site (your team’s dedicated cloud workspace) where to install the app, review the provided app details, and hit Start free trial. Once the app is installed, you will get the notification.
2. Creating and Saving a Template
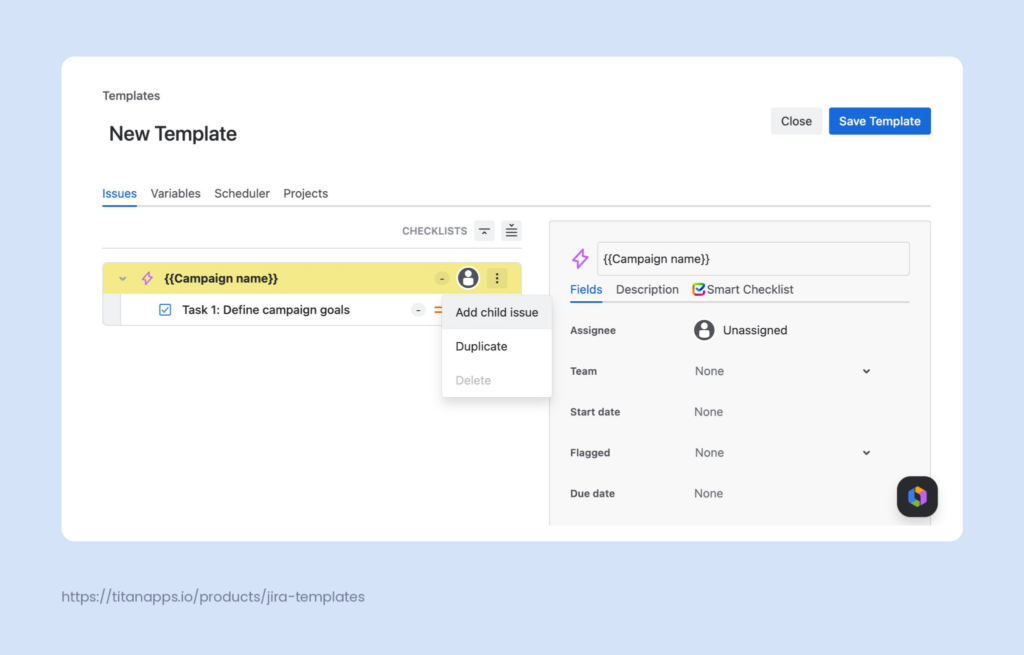
Open the Template list via Apps or Project Navigation bar, click on Create Template, and name your template. Then you can start actually building your template: create a hierarchy of work items, pre-fill field values, add variables, schedule or automate work item creation. Once you’re done, click Save template. See more details on how exactly that works here.
Another way is to build your work-item hierarchy in Jira and then save it as a template. Just navigate to the work item you want to save, find Smart Templates, click Save as template, and enter a name.
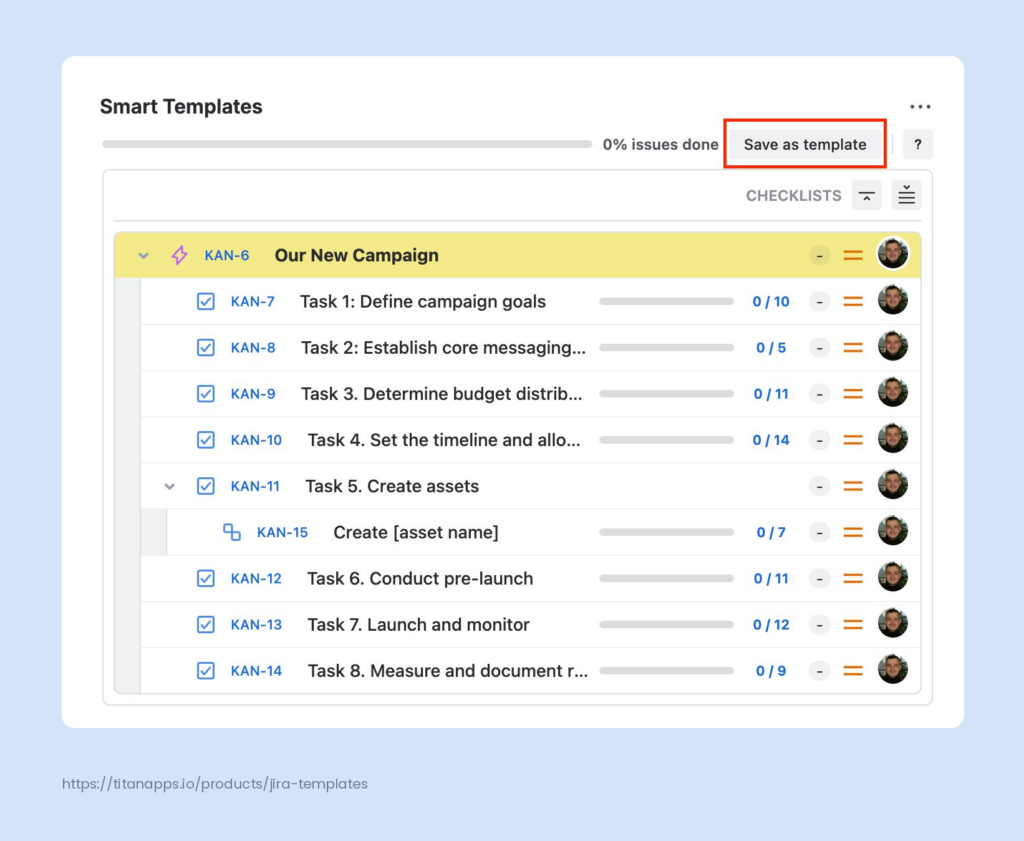
Pro tip: if you decide to save the old campaign work item this way, your template will inherit many of the details specified there (description, start and due dates, assignee, priority, etc.), including the outdated ones. You will have to edit the template, introducing variables for changeable details.
How to Create a Campaign Template with Smart Checklists
1. Installation
Find Smart Checklists for Jira in the Atlassian Marketplace and install the app from there. Another way is to go to Apps > Explore more apps, then type “Smart Checklist” in the search field, and choose the app. After that, the process is the same as for Smart Templates.
Note that there are free and paid Smart Checklist apps. The free app caps the number of checklist items at 20, limits the number of templates you can create, and lacks some features. Most likely, for a campaign planning template, you will need the paid app, which doesn’t have those limitations. It is actually free for teams of fewer than 10 in the Cloud. Read about the differences between the two here.
2. Creating a Checklist
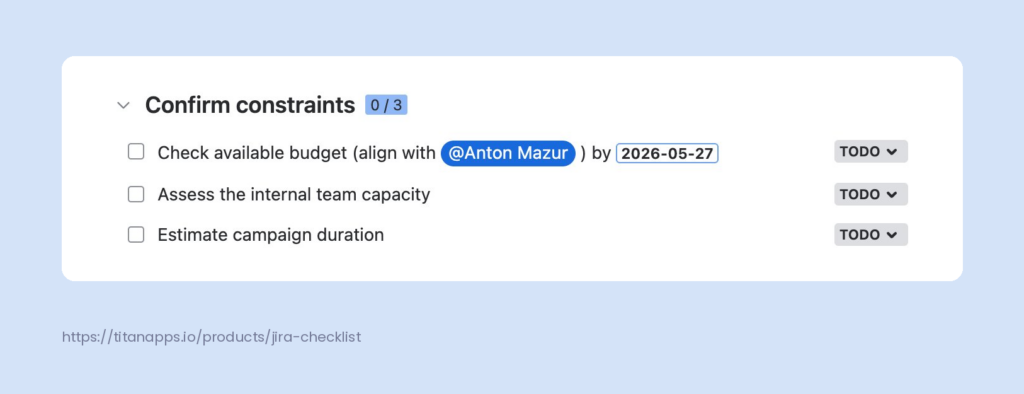
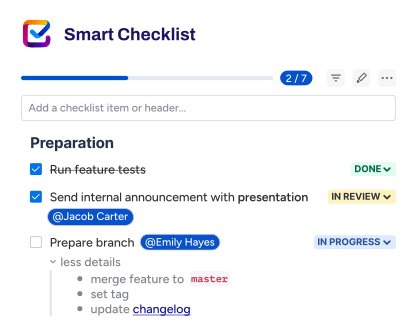
Find the Smart Checklist in your Jira work item details, then click it. Type text in the “Add checklist item or # header…” text box and hit the tick sign or press Enter, and your first checklist item appears. Or hit the “pen” icon near the Smart Checklist progress bar and create your checklist with markdown in a Full screen editor. You can change checklist items’ statuses, add headers, mention other users, add dates, URLs, and link Jira issues. Read about that in our Checklist formatting guide.
3. Saving Checklist as Template
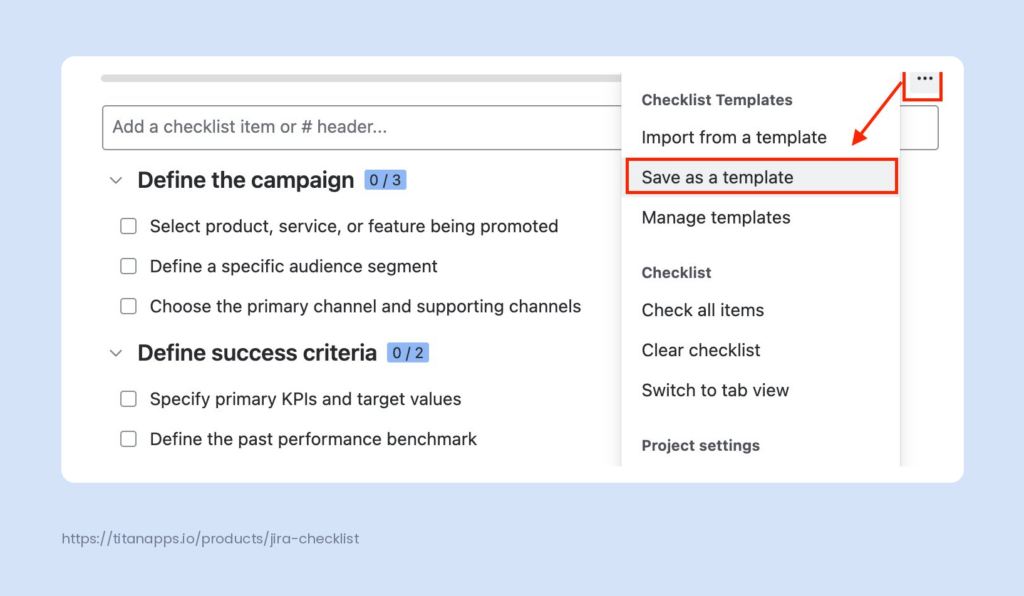
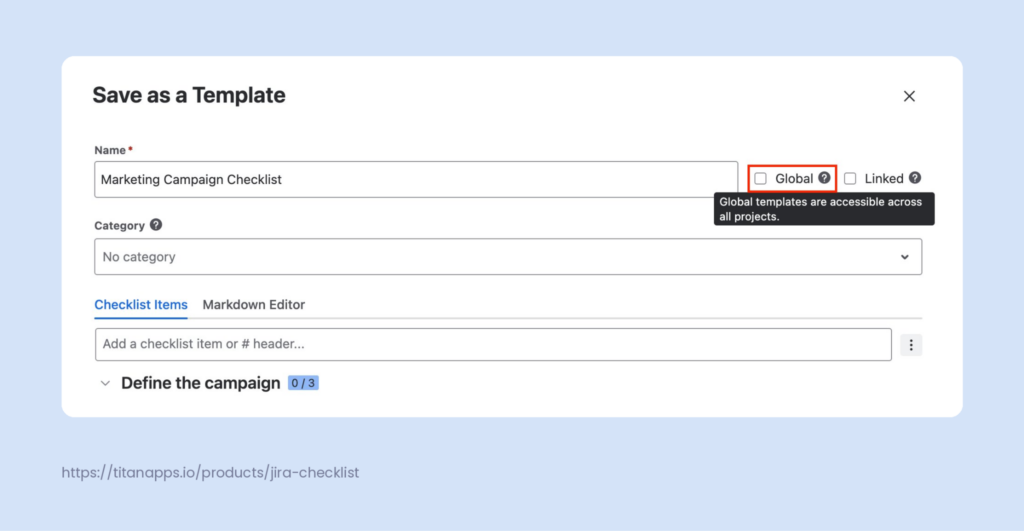
Once you’ve created a checklist, go to the Smart Checklist menu (the three-dots icon) and click the “Save as a Template” menu item. Note that the new template is set as a Project Template by default. That means that you can use it only within the project where it was created. If you need it across all projects in your instance, set it to global.
4. Creating a Template from Scratch
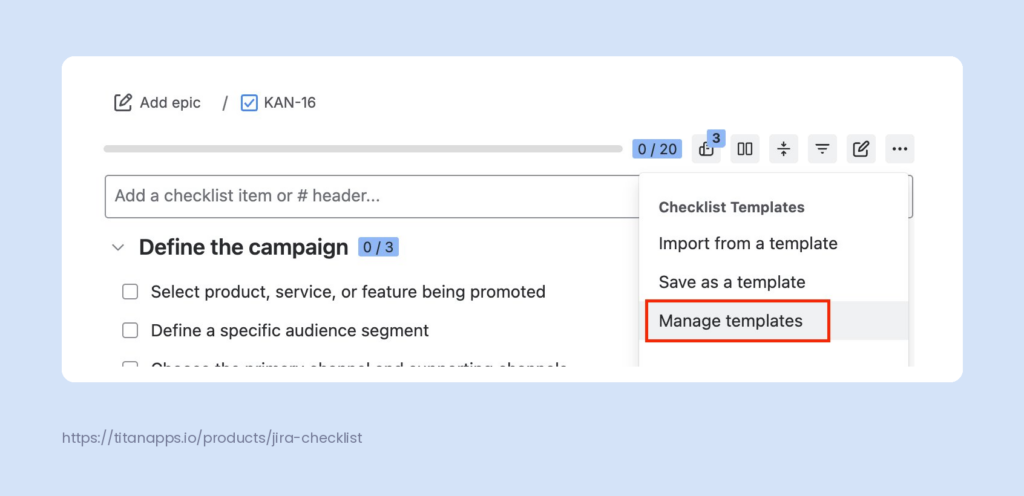
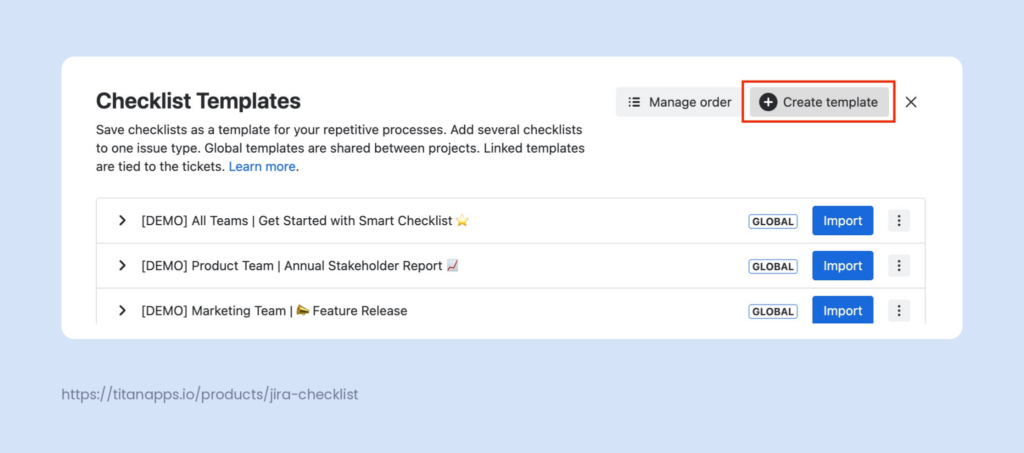
You can also create a template from the ground up. One way is to click the Smart Checklist menu, then find Manage Templates, click the “Create Template” button, and finally add checklist items. Or you can go to Space Settings, choose Apps, find Smart Checklist, and then click “Create Template.“ Note that you need appropriate permission to manage templates.
5. Importing the Checklist
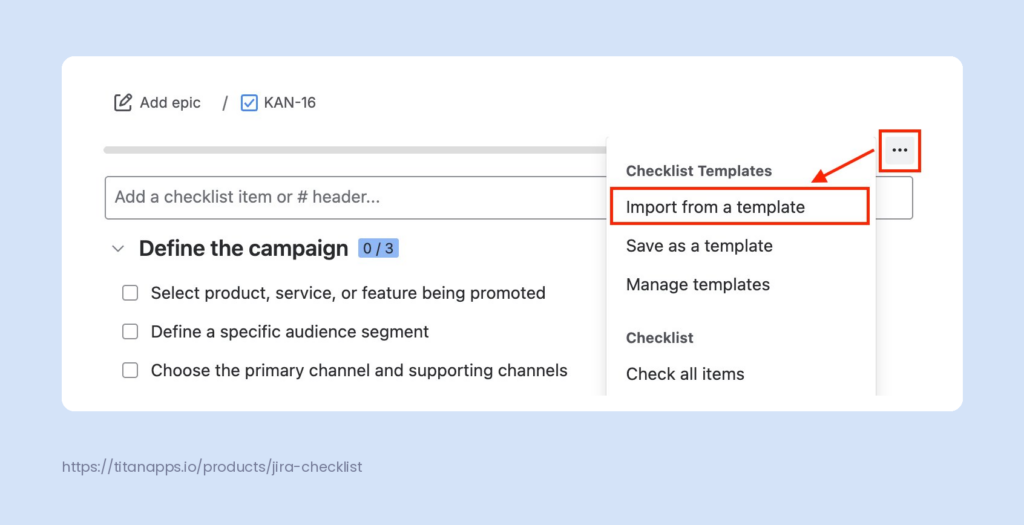
To reuse the saved checklist, go to the Smart Checklist menu and choose “Import from a template”. Select the one you need and click “Import”. Note that you can preview the template, just click on its name and expand the template’s contents. Once you confirm you want to append a template to your current issue checklist, it will be imported.
How May Your Marketing Campaign Planning Template Look in Practice?
Before the Planning Starts
Any campaign is a part of a broader business context and marketing strategy. While they don’t have to be redefined before each launch, it is prudent to check:
- The business goal that a new campaign will help to accomplish. Are such marketing activities still viable?
- Competitive landscape. What are competitors doing? Which marketing channels do they use, which messages do they broadcast? If you want to update this and other relevant information regularly, consider our marketing research template.
- Target audience. Chances are, you already have it defined, but if not, this article includes a target audience research checklist to get you started.
How to Use this Template
The example below covers a broad range of marketing campaigns with a focus on digital marketing. While creating your own template in the Smart Templates app, adjust it to your particular flow: add and remove checklist items, insert links to the necessary materials, add or remove variables. In Task 5, create subtasks for the assets you use in your campaign and add a checklist for each.
The first setup may take some time, but it will save you much more in the long run. Just follow the instructions above, create a parent work item and child work items, then fill them with checklists.
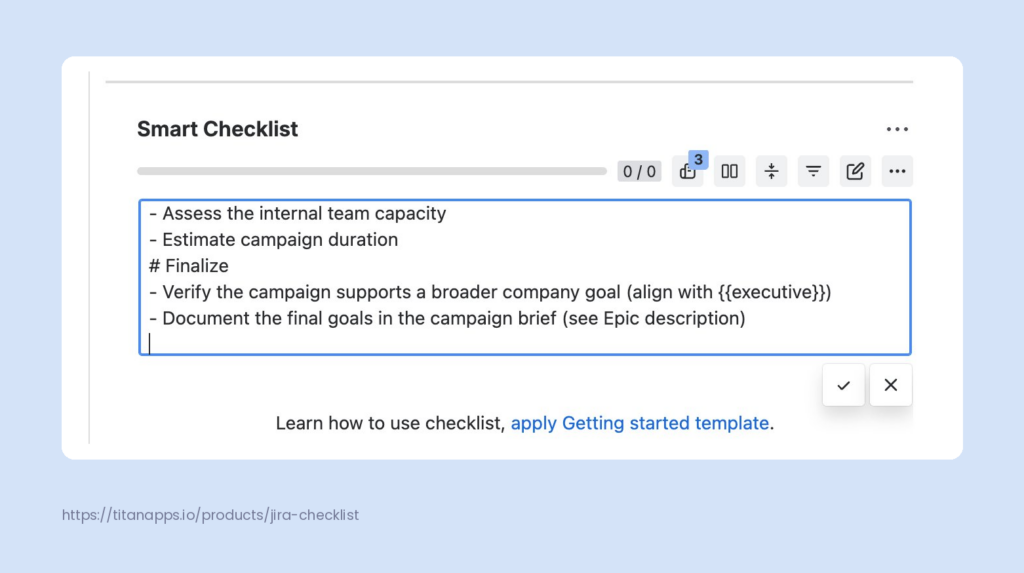
Pro tip: You don’t have to insert checklist items one by one. Copy the entire checklist and paste it into the relevant Task’s Smart Checklist in one go.
Marketing Campaign Template Example
Suggested variables:
- {{Campaign name}}
- {{Executive}}
- {{Copywriter}}
- {{Designer}}
- {{Marketer}}
- {{Legal}}
Epic: {{Campaign name}}
Description:
Campaign brief
- Goals
- Campaign goals:
- Primary KPI:
- Campaign duration:
- Audience
- Segment/ICP:
- Key pain points:
- Messaging
- Core message:
- CVP for this campaign:
- Proof points:
- Brand Voice guide:
- Channels
- Primary channel:
- Supporting channels:
- Budget
- Total budget:
- Budget tracker:
Task 1: Define campaign goals
# Define the campaign
- Select product, service, or feature being promoted
- Define a specific audience segment
- Choose the primary channel and supporting channels
# Define success criteria
- Specify primary KPIs and target values
- Define the past performance benchmark
# Confirm constraints
- Check available budget (align with {{Executive}})
- Assess the internal team capacity
- Estimate campaign duration
# Finalize
- Verify the campaign supports a broader company goal (align with {{Executive}})
- Document the goals in the campaign brief (see Epic description)
Task 2: Establish core messaging and communication
- State the campaign’s core messaging in one sentence
- Adapt the Core Value Proposition for this campaign
- Select proof points (customer evidence, third-party sources)
- Add core messaging, CVP, proof points, and brand voice guide to the campaign brief (in the Epic description)
Task 3. Determine budget distribution
# Calculate paid media spending
- Search ads
- Social media advertising
- Display and retargeting
- Influencer marketing
# Calculate external production costs
- Copywriting
- Design
- Photography
- Video production
# Sum up
- Prepare the budget tracking table
- Add a contingency buffer (10-20%)
- Confirm total is within the max available budget
Task 4. Set the timeline and allocate tasks
# Set the timeline
- Set the launch date
- Schedule the campaign wrap date
> Should be in line with the earlier campaign duration estimate
# Plan the work
- Add/modify tasks if necessary (review subsequent Tasks)
- Prepare task-specific briefs and instructions
- Assign owners to each task
- Set task due dates relative to the campaign launch date
- Define UTM parameters for the campaign
# Inform the teams about the upcoming campaign
- Legal
- Sales
- Support
- Hold a campaign kickoff sync to confirm alignment (optional)
# Outreach (if applicable)
- Build the outreach list
- Send pitches and briefs to partners, PR contacts, and influencers
- Confirm participation and timing
Task 5. Create assets
Instruction: Create a subtask for each asset (e.g., landing pages, emails, social media posts, ad creatives). Apply this checklist to each subtask.
Assignee: {{Copywriter}}/{{Designer}}
Reporter: {{Marketer}}
Subtask 1. Create [asset name]
# Draft
- Draft the first version by YYYY-MM-DD {{Copywriter}}/{{Designer}}
> Align it with the core message, audience, CVP, proof points, and brand voice guide, specified in the campaign brief (Epic description)
# Review
- Review against the campaign brief (audience, message, CVP, proof points, brand voice) {{Marketer}}
- Conduct legal/compliance review (if applicable) {{Legal}}
# Refine and finalize
- Share feedback with {{Copywriter}}/{{Designer}}
- Implement changes by YYYY-MM-DD {{Copywriter}}/{{Designer}}
- Embed UTMs (for trackable assets)
- Sign off the final version {{Marketer}}
Task 6. Conduct pre-launch
# Conduct pre-launch alignment
- Confirm launch timing with partners, PR agencies, influencers (if applicable)
# Conduct tracking verification
- Verify UTMs on all campaign links
- Verify tracking pixels and tags are firing
# Conduct asset QA
- Test all links
- Submit test entries through campaign forms
- Check how assets look on different platforms and browsers
# Schedule assets for launch
- Social media posts
- Emails
- Paid ads
- Landing pages
- Blog posts
Task 7. Launch and monitor
# Confirm launch or launch manually:
- Social media posts
- Emails
- Paid ads
- Landing pages
- Blog posts
# Monitor
- Monitor live dashboards across analytics, ad, and email platforms
- Check pacing on paid campaigns
- Respond to social comments, DMs, and brand mentions
- Check email open rates and deliverability
- Monitor sales and support inbound for campaign signals
# Adjust
- Optimize underperforming elements (pause ads, swap copy, adjust targeting)
- Log mid-campaign changes in the campaign brief (Epic description)
Task 8. Measure and document results
# Measure
- Pull performance data from all channels
- Review channel performance
- Compare actual performance against target KPIs
- Compare actual spend against budget
- Write and share the post-campaign report with stakeholders
# Improve
- Run a post-campaign retro with the team
- Document key learnings (what worked, what didn’t, audience insights)
- Update the campaign template based on retro findings
- Close all related Jira work items and mark the campaign Epic as Done
Next Step: Advanced Features
If you intend to run the campaigns on a regular schedule and with a standard timeline, consider using these features:
| Feature | What does this feature do? | Use cases |
|---|---|---|
| Scheduler (Smart Templates app) | Creates work items with a template at predefined intervals. | Campaigns with a precisely specified schedule |
| Date and Time Smart Variables (Smart Templates app) | Automate date insertion into your Jira work items. For example, when an item with a template is created, now.plusDays(x) and now.minusDays(x) generates a date by adding or subtracting calendar days from the current date. | Campaigns with standardized timelines, such as a seasonal promotional campaign. Insert Smart Variables to automatically calculate the start and end dates for each phase. |
| Reporter Smart Variable (Smart Templates app) | The {{reporter}} variable inserts the name of the user who created the work item. | A campaign issue creator typically takes on several roles (e.g., Assignee, Reporter) in different tasks. |
| Automation for Jira (native Jira feature) | Automate repetitive tasks and workflows based on events in your spaces. | A work item with a specific field value (e.g., labeled “Marketing campaign”) needs a marketing campaign template (achievable with the help of Webhook links) |
Work Smarter, Not Harder
If you run a campaign regularly, you already know all the ins and outs of the workflow. Make your life easier by creating a template for it in Jira. It will help you mitigate risks and rely on the refined flow to run a successful campaign. By combining the Smart Templates and Smart Checklist apps, you can capture the full complexity of your workflow without overloading your Jira board. We hope that the example and instructions above will serve as a solid foundation for your own template and streamline the setup process.
FAQ
What is a marketing campaign?
A marketing campaign is a set of marketing initiatives with a specific goal, performance metrics, and duration, centered on a newsworthy event. Those restrictions is what distinguishes it from the ongoing work. Campaigns come in various shapes and sizes, depending on:
- channels they encompass: email, social media, paid ads, etc.
- business context and goals: product launch, feature release, brand awareness boost, etc.
- repeatability: build around one-time, custom events like rebranding, major anniversary, or crisis management, vs. regular activities like seasonal, Black Friday, Easter, or Christmas campaigns.
How do I track marketing campaign progress in Jira?
To see how your campaign is doing, combine the board view, the timeline view, and the checklist progress bars. The Board view segments the tasks according to their statuses, so you can clearly see what’s done and what’s not. The Timeline view provides a general picture of how a campaign is expected to progress in time. If the child items and their child items include checklists, you can track progress on their progress bars in Smart Templates in the parent Epic.
There is no straightforward way to see the entire campaign progress across all checklists and work items yet. As a workaround, you can try using Rovo digital assistant and ask it to “Calculate the overall progress across all checklists in [Epic name] child items and their child items as if they were one checklist”. Note, however, that Rovo uses AI, and you need to verify its answers.
Can I use this marketing campaign template in a team-managed Jira space?
Yes, but with a caveat — you won’t be able to use mandatory checklist items to restrict task status changes. Unlike company-manager spaces, team-managed ones don’t include Workflows that you should configure to make mandatory items work.