


 Jira
Jira monday.com


TL;DR: The Main Ways to Create Jira Tickets Automatically
Depending on what exactly you want to do, you can take different approaches to auto-creating Jira work items.
For instance, you might need to automatically turn email requests from customers into Jira tickets. Another example is when you chat with your team on Slack and discuss next steps: Jira tasks for these action points can be created automatically.
A popular use case is generating Jira work items in bulk on a scheduled basis. This is helpful for recurring tasks, such as monthly budget reviews. All these automations require a different setup.
Here are the main ways to automate Jira ticket creation:
- Native automation for Jira: This allows you to configure detailed rules using trigger-action logic. These rules can include multiple conditions and target actions, enabling you to create Jira tickets based on various triggers (including webhooks) or on a set schedule.
- Cloning tasks: If you want to reuse an existing work item, you can make an exact copy of it in the same or a different project. As a result, you get a new work item with all the fields and other details filled out automatically. The cloning itself can be triggered manually or occur as part of an automation rule.
- Third-party Jira add-ons: These are various solutions that allow you to expand Jira’s native automation capabilities. They can be used for scheduled and trigger-based Jira ticket creation, as well as integrated with Automation for Jira. For example, Smart Templates by TitanApps enable you to generate entire sets of work items from a pre-saved template, a functionality not available in Jira natively.
- Integrations with other apps: Allows you to automate Jira ticket creation based on external events. You can connect Jira to other tools you use, such as GitHub, Figma, Outlook, and Microsoft Teams. These can be natively offered integrations (for example, with Slack) or connections set up via workflow automation platforms such as Zapier.
- Email-to-work-item automation: This is a native feature available in Jira. It enables you to automatically convert incoming emails into Jira tickets without any manual effort. It’s helpful if you receive support requests or internal alerts via email.
- CSV-to-work-item automation: Useful if you need to bulk-generate Jira tickets from a CSV file. For example, if you prepared a list of tasks with descriptions during the meeting and don’t want to create these tickets manually. This is also helpful if you need to generate Jira work items from information exported from another app, as most platforms support the CSV format.
Additionally, for advanced cases, you can work with Jira’s REST API to set up custom automations. This allows you to create complex workflows, integrate Jira with your internal systems, and more. The downside is that this requires a high level of technical expertise.
Now, let’s explore the main ways to automate Jira ticket creation in more detail. In this article, I provide step-by-step instructions along with practical examples and tips.
All this will help you select the automation type that best suits your needs and configure it in just a few minutes.
1. Auto-Create Tickets With Native Automation for Jira
This type of automation can include a wide range of triggers and conditions. For example, a new work item can be generated when:
- Sprint started/completed
- Version released
- Work item transitioned to another status
- A comment is added to another work item
- Field value changed
- Build status changed
- Rule triggered manually
- Incoming webhook triggered the rule
- Pre-set schedule triggered the rule
…and many others.
This provides you with the flexibility to adapt automation rules even to complex workflows and layered scenarios. When set up correctly, Automation for Jira can save you a significant amount of time and effort. It also reduces context switching and helps your team stay focused on high-value tasks.
For instance, when a QA adds a comment containing “bug,” – a new linked work item with the type “Bug” can be created automatically. Or, when a sprint is ended, a task for preparing release notes can be generated. For the best results, map out your team’s processes and configure a set of rules that work together as a cohesive system.
Here’s a simple rule that automates Jira ticket creation: When a work item with the word “Article” in the summary is created, the rule generates a linked Jira task for the proofreader:
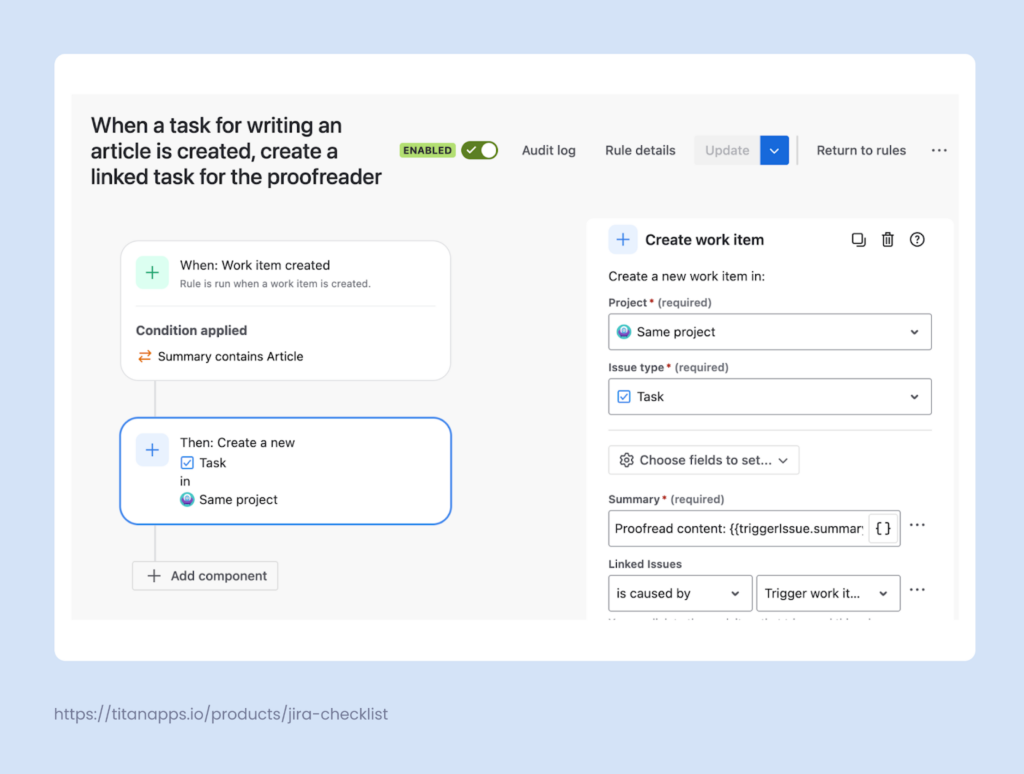
In this case, “Work item created” is the event that triggers rule execution. “Summary contains Article” is the condition that should be met to perform the target action, which involves creating a new task. If the condition is not met, no action will be performed.
You can pre-select various field values for the new work item. In our example, we pre-set the project, work item type, summary, and linked issues (work items). It’s also useful to select the assignee, priority level, approvers, environment, epic link, and so on. As a result, the new work item will include all the necessary information.
How to set up a Jira Automation rule
- Go to Project Settings -> Automation. Click Create Rule. To use this feature, you must have administrator rights for your project.
- Select the trigger and add conditions to your rule (optional). For scheduled ticket creation, select Schedule as a trigger.
- Specify the action (create work item) and provide the required details, such as field values. Once you are ready, save and turn on your rule.
Pros and cons of native Automaton for Jira
Pros:
- A wide variety of triggers and conditions
- No-code functionality, suitable for business users
- Template library for the most common use cases
- Works with JQL (Jira Query Language)
- Supports Smart Values to work with dynamic variables
- Supports branching to work with parent and child Jira issues (work items)
- Provides audit logs
Cons:
- Limits on the number of rule executions (depend on your Jira plan)
- Access limitations – only a Jira administrator can create and edit rules, which can cause bottlenecks
- Lack of transparency – automations run ”under the hood” and the team doesn’t have visibility into this process
- Hard to trace – if you have multiple rules and something is not set up correctly, misconfigurations can cause issues to appear “out of nowhere,” making it difficult to identify which rule created them
- Hard to use when working with complex hierarchies, such as Epic -> Task -> Subtask. Branching is supported only for the first level of child work items
To sum up, Jira’s native automation functionality is a valuable and helpful tool, although it has certain downsides. It can help you streamline processes and noticeably boost efficiency.
For optimal results, consider using it in conjunction with other automation options, such as third-party tools. This will provide you with more flexibility and enable you to overcome the limitations of native rules.
2. Use Cloning to Automate Jira Ticket Creation
Strictly speaking, cloning isn’t an automation method, but it can still be useful for generating a work item that is identical to another. If you have several similar tasks, you don’t have to fill out all the details for each of them from scratch, as they can be copied automatically. Cloning enables you to create a duplicate of an existing work item within the same project or another one, depending on your specific needs.
Cloning can be performed manually or as part of an automation rule.
To do this manually, open the work item you want to clone, click the three dots in the upper right corner, and select Clone:
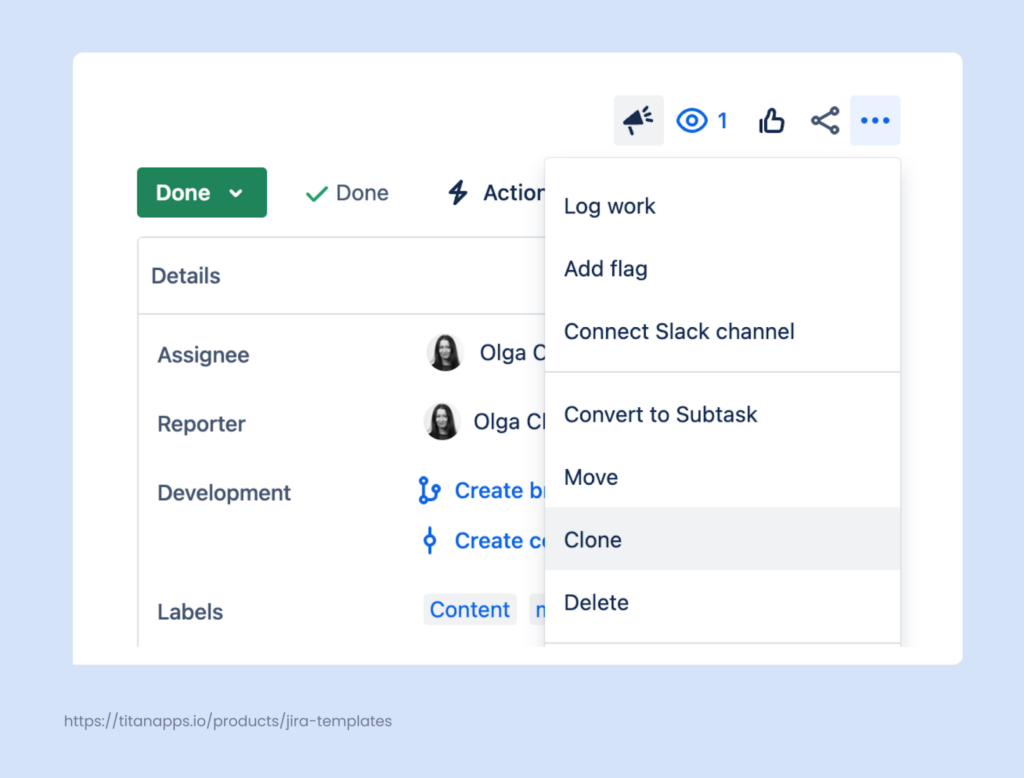
Then, you will see a pop-up window where you can select the elements that should be included in the new work item, such as attachments, links, custom fields, and child issues.
Follow these steps to clone a stand-alone work item or a parent task with a set of child tasks. However, this only works for one layer of hierarchy. For example, you can clone an epic with all its tasks, but the subtasks will be lost.
Another example is using cloning along with Automation for Jira.
Let’s say you have a Jira Service Management instance where you collect user requests. When you receive a new request, you need to create a ticket for it in your regular Jira project. As a result, the request itself will be tracked and handled in JSM, whereas the development team will have this task in their scope in Jira.
Creating such tickets can be done automatically. Here’s what the basic rule looks like:
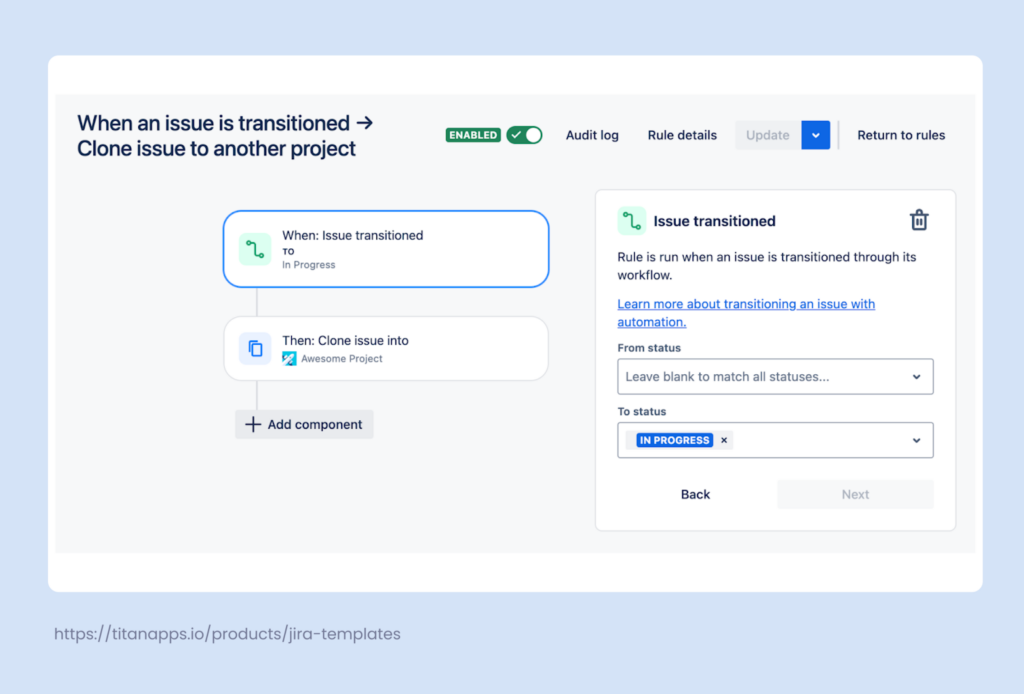
When a new customer request is reviewed and transferred to In Progress, this work item will be cloned to a different project as a ticket for the developers. You can include additional conditions that reflect your processes and established workflows.
This automation can be set up in the Project Settings -> Automation view.
Pros and cons of cloning
Pros:
- Easy to use and straightforward
- Allows you to reuse work item structure
- Links the original work item automatically
- Helps you promote standardization
Cons:
- No native functionality for cloning tasks in bulk
- Doesn’t clone all levels of child work items (first level only)
- Requires editing out irrelevant details from the cloned tasks
- No way to manage “model” tasks that you clone often, as they can be scattered across different boards and projects
All this makes cloning a convenient method for creating one-off work item duplicates, but it’s not the most efficient solution for managing recurring tasks systematically.
For more information on this topic, please refer to the Guide to Cloning in JIRA.
3. Leverage Third-Party Add-Ons to Automate Jira Ticket Creation
You don’t have to limit yourself to Jira’s native functionality. The Atlassian Marketplace offers many add-ons that expand the platform’s capabilities and provide you with additional features. They range from solutions developed specifically for automation to tools that address custom use cases involving Jira ticket creation automation.
Let’s see how to auto-generate tasks with Smart Templates by Titan Apps. This solution allows you to automate recurring processes and manage repetitive tasks efficiently.
Example 1. How to Create Jira Tickets in Bulk with Smart Templates
Some tasks come up only once, while others land on your Jira board again and again. One such example is onboarding new employees, which needs to be done every time a new hire joins the team. This process typically consists of multiple activities handled by various departments, including legal, financial, IT security, and others. Repeatedly creating the same set of tickets from scratch would be an inefficient process.
You can use Smart Templates for Jira – a solution that allows you to save any work item or a set of work items as a reusable template. Once this is done, you can automatically generate tickets from this template whenever needed.
This option overcomes the limitations of cloning and Jira’s native automation. Smart Templates can generate work items in bulk and preserve work item hierarchies, regardless of their complexity.
This can be an epic with tasks, subtasks, and checklists, or even an initiative with multiple epics, each including tasks and subtasks. This functionality allows you to reuse any work item structures. All the details of individual tasks will be preserved, including summaries, descriptions, assignees, and other fields, including custom ones.
In this example, we have a template for onboarding that consists of a parent task with multiple subtasks. As you can see, the template uses variables for dynamic values, such as {{employee_name}} and {{position}}.
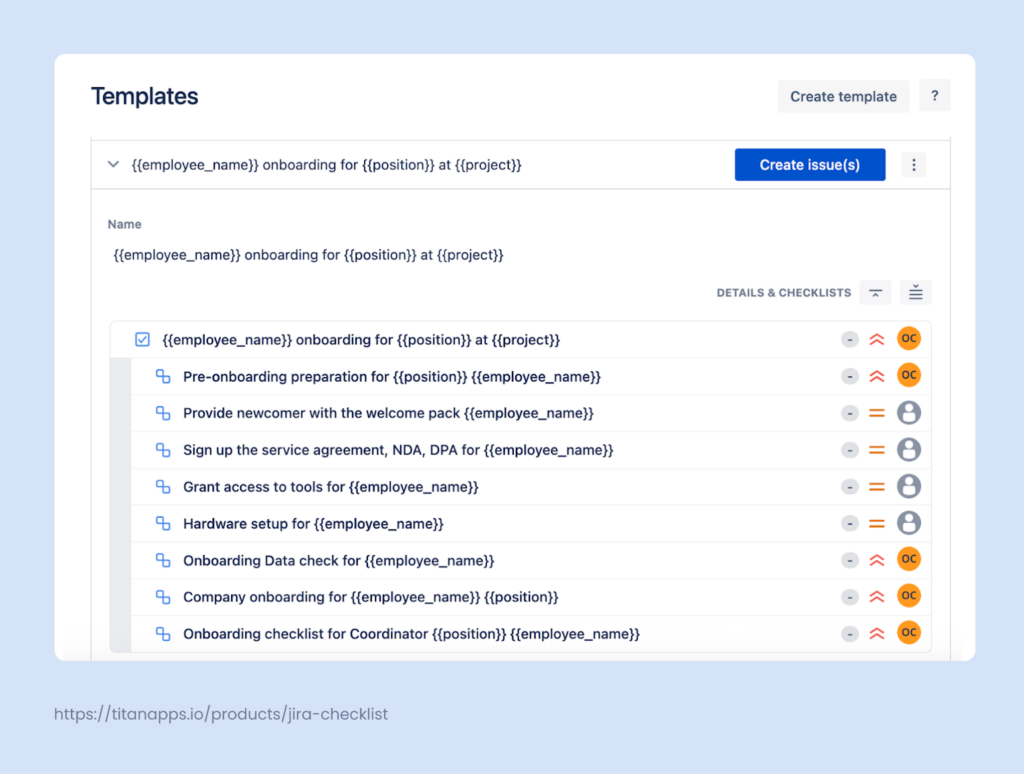
When you generate this set of work items from the template, you will be prompted to provide specific values for these variables (for instance, “Maria Smith” instead of {{employee_name}}). This information will be updated across all the work items in that set.
This makes your template easily adjustable and saves you time. Using variables is much more convenient than cloning tasks, as you won’t have to edit out the irrelevant details left from before. Moreover, all templates can be viewed and managed from a single tab, which helps you organize your work and promote transparency.
To automate Jira ticket creation from a template, first install Smart Templates for Jira. Then, prepare a work item or set of work items that you want to reuse and click Save structure as a template.
Additionally, this solution can be used to create Jira tickets on a schedule.
Example 2. How to Generate Jira Work Items on a Schedule With Smart Templates
For tasks that occur regularly with fixed intervals, you can utilize Smart Templates’ native scheduling feature. This can be useful for generating work items for activities such as quarterly budget reviews, roadmap reviews, and so on.
Smart Templates enable you to schedule the auto-generation of both standalone tasks and complex work item hierarchies. In the screenshot below, you can see the settings for automated Jira ticket generation that occurs every month:
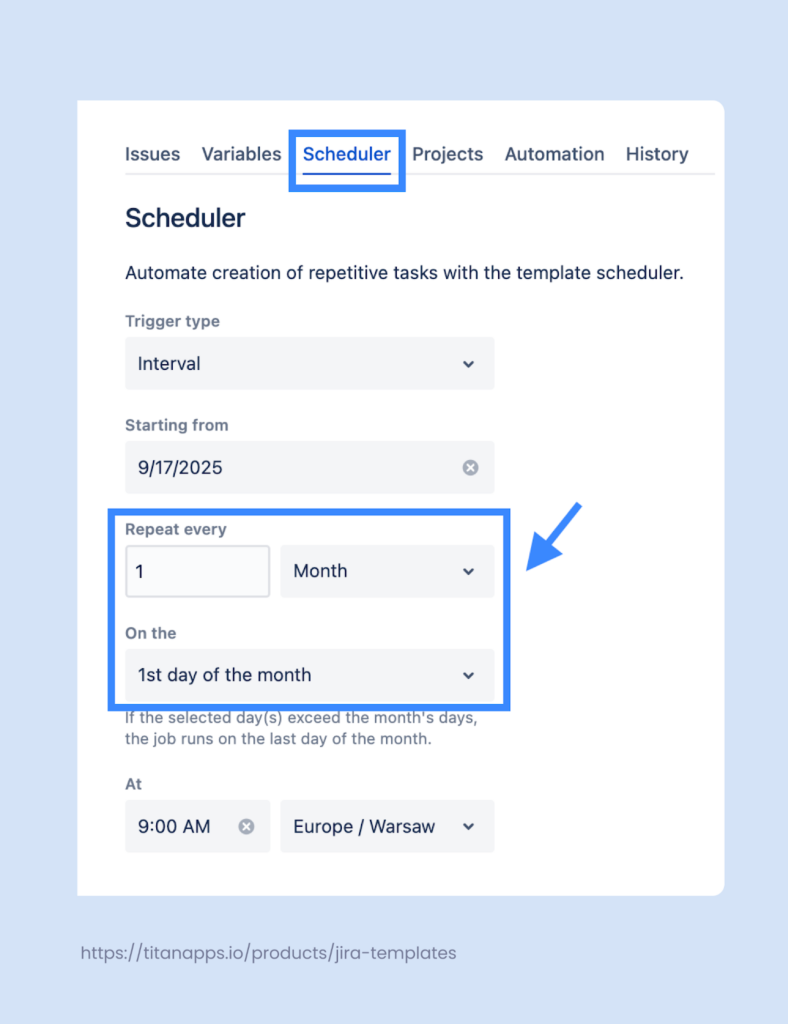
This allows you to streamline processes and save time on repetitive actions.
To configure a custom schedule, you first need to install Smart Templates for Jira and save a work item that you will use as a template. Then, please follow the instructions in this Scheduler Guide.
Pros and cons of auto-creating work items with Smart Templates
Pros:
- Easy to use with an intuitive interface
- Allows you to reuse the work item structure
- Supports the generation of work items in bulk
- Preserves complex hierarchies, including subtasks and checklists
- Allows you to manage all your templates from one view
- Doesn’t require admin rights for creating and editing templates
- Can share templates across multiple projects
- Has a native scheduling feature
- Preserves the information from work item fields, including custom fields
- Has a history tab listing all work items created from a template, along with their status and other details
Cons:
- A third party app, requires Jira administrator rights to install

4. Automate Jira Ticket Creation by Integrating Jira with Other Apps
Typically, an agile team works with dozens of tools. Connecting them to Jira allows you to create tickets automatically based on events on other platforms or directly from another app. Some connectors are available natively – for example, for Slack or Bitbucket. Others can be set up via workflow automation platforms, such as Zapier or Integromat.
Such automations reduce context switching and tie all your tools together into a single ecosystem.
For example, imagine you are discussing a new project with your team on Slack and someone comes up with a great idea. If you have installed Jira Cloud for Slack (native connector), you can automatically turn that Slack message into a Jira ticket. This can be done by selecting this option in the More actions menu for the message you need. In addition, you will be able to specify your preferences, such as the project and work item type:
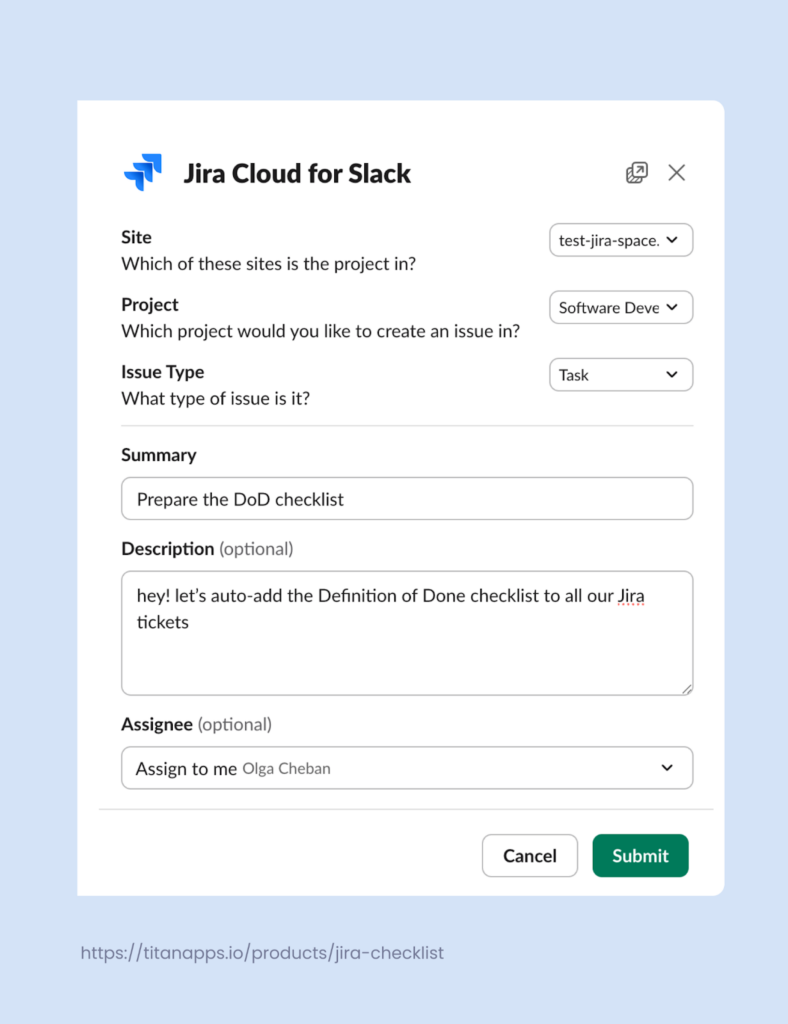
Here’s what the result looks like:

Let’s take a look at another example.
With the help of workflow automation platforms, you can connect Jira to dozens of other applications, even if there are no native connectors available. Tickets in Jira can be created automatically when an event occurs in another application.
In the screenshot below, you can see an integration between Jira and Bamboo HR. It was set up using Zapier. When a new employee is added to the Bamboo HR system, a work item for onboarding is automatically created in Jira:
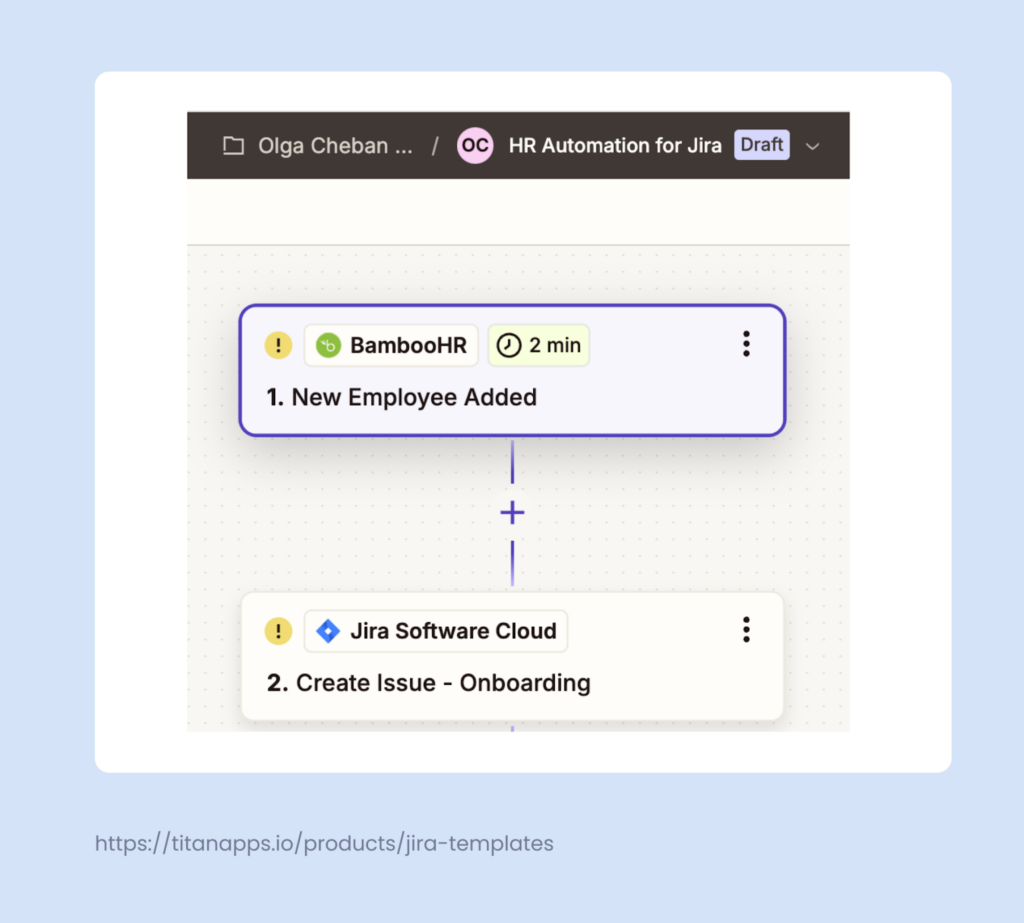
This can apply to a wide range of use cases. A new Jira work item can be created automatically based on events in tools such as HubSpot, Salesforce, Google Sheets, Pipedrive, Airtable, and others. The specific setup instructions depend on the integration you need.
Pros and cons
Pros:
- Using external events as triggers
- Native connectors available
- Reduced context switching
- Workflow automation
Cons:
- Can be somewhat complex to set up (depending on the integration)
5. Auto-Create Jira Tasks From Emails
Many users are unaware that Jira has native functionality for automatically creating tasks from emails. This automation is relatively simple and limited to just a few use cases, but it can still be effective.
For example, you set up a separate mailbox for support requests or internal alerts. You can connect this mailbox to Jira via its native Mail Handler. It will synchronize mailbox information with Jira and automatically generate tickets from incoming requests.
Here’s how to set up this automation:
- Go to Settings -> System -> Incoming Mail (Under Mail) -> Add incoming mail server
- There, name your mail server, add a description, and then connect your email. For Gmail and Microsoft emails, your settings will be automatically filled in.
- Under the Mail Handlers section, you’ll see a default mail handler. Click Edit. Alternatively, you can add a new one.
- In the Incoming Mail Server dropdown, select the mail server you’ve added in the previous step. In the Delay field, specify the frequency at which the mail handler should run.
- In the Mail Handler Type dropdown, select Create a new issue or add a comment to an existing issue and click Next.
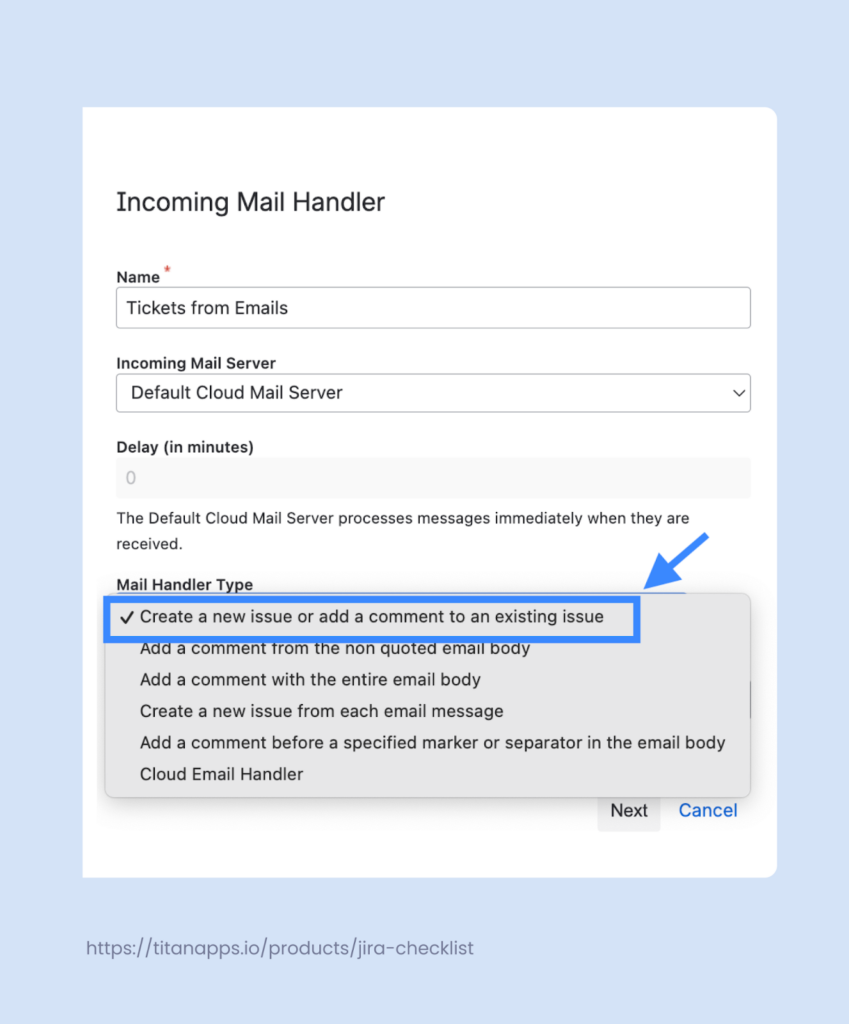
Then, provide your preferences for the automation. Select the project where you want to place your auto-generated tickets and specify the preferred work item type. You can also set up additional email processing rules, for example, to filter out automated emails. Once ready, click Save.
Please note that you will require administrator permissions to set up this Jira ticket creation automation. For more details, please refer to the official documentation on How to Integrate Jira With Your Mailbox.
To summarize, it’s a straightforward solution for automatically generating Jira tickets from external communications. It enables you to efficiently manage requests that arrive in a designated mailbox.
Pros and cons
Pros:
- Native solution within the Atlassian ecosystem
- Can be a convenient workaround for managing customer requests if you are not using JSM
Cons:
- Limited functionality and settings
6. Create Jira Work Items in Bulk From CSV
While it may not be full automation, this option can be useful in some cases. CSV (Comma-Separated Value) is a common format supported by a wide range of applications. This means you can easily export data in this format from most systems. Then, this information can be used to generate Jira work items in bulk.
For example, we have a table in Google Sheets that lists summaries, descriptions, and other field values for Jira work items. We can export this data from Google Sheets as a CSV file and then import it into Jira to automatically create tasks. As a result, we won’t have to manually fill out the details for every work item.
| Summary | Description | Label |
|---|---|---|
| Implement user login functionality | Develop a secure login system with email and password authentication, including validation and error handling. | backend, authentication |
| Create responsive homepage layout | Design and code the homepage UI to be fully responsive across desktop, tablet, and mobile devices. | frontend, UI |
| Set up automated test pipeline | Configure CI/CD pipeline to run unit and integration tests automatically on each pull request. | devops, testing |
Please note that for this to work, your data must be structured so that you can easily match the columns in the CSV file with the corresponding fields in Jira.
Here’s how to automate Jira ticket creation from a CSV file:
- Open your Jira project. In the sidebar, select Filters -> Search work items -> More actions (•••) -> Import work items from CSV.
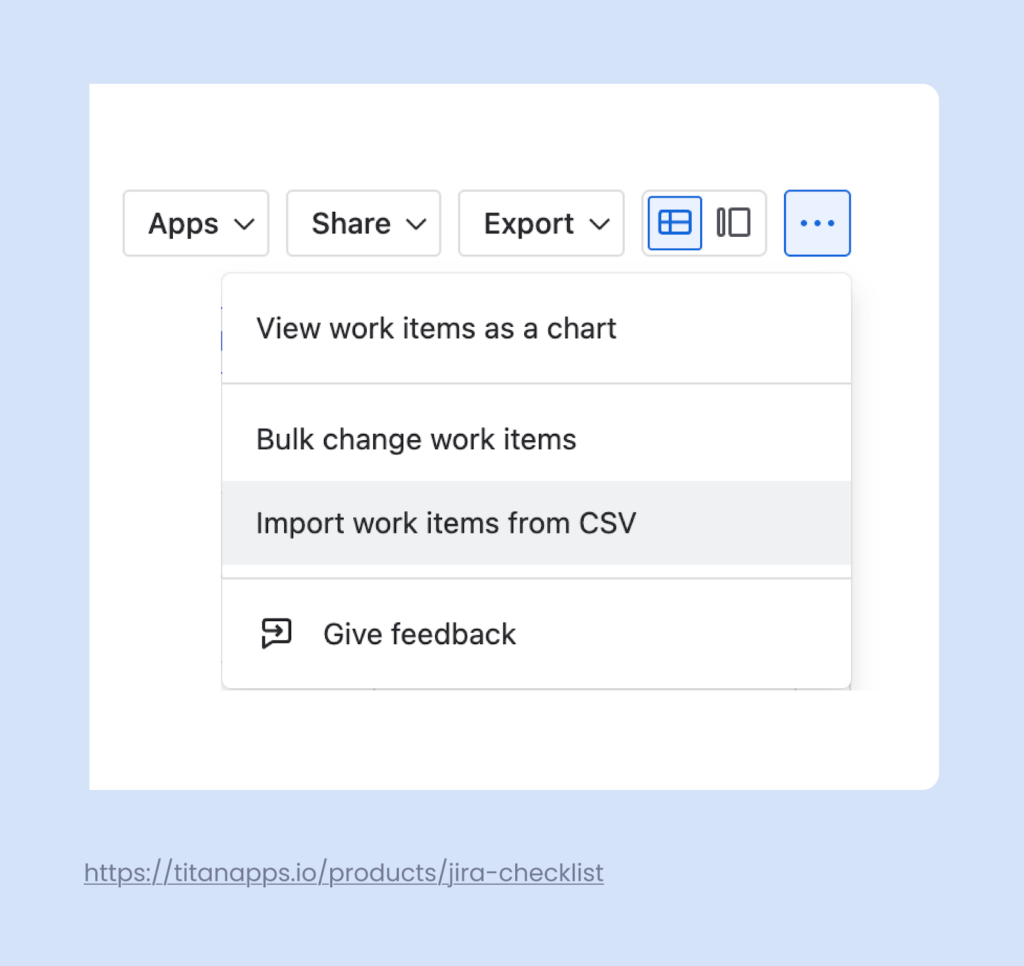
- Then, follow the instructions in the setup wizard: select the CSV file to upload and specify the required settings.
- The next important step is mapping fields: specify a corresponding Jira work item field for each column/field in your CSV file. This is needed to import the data from your CSV file correctly.
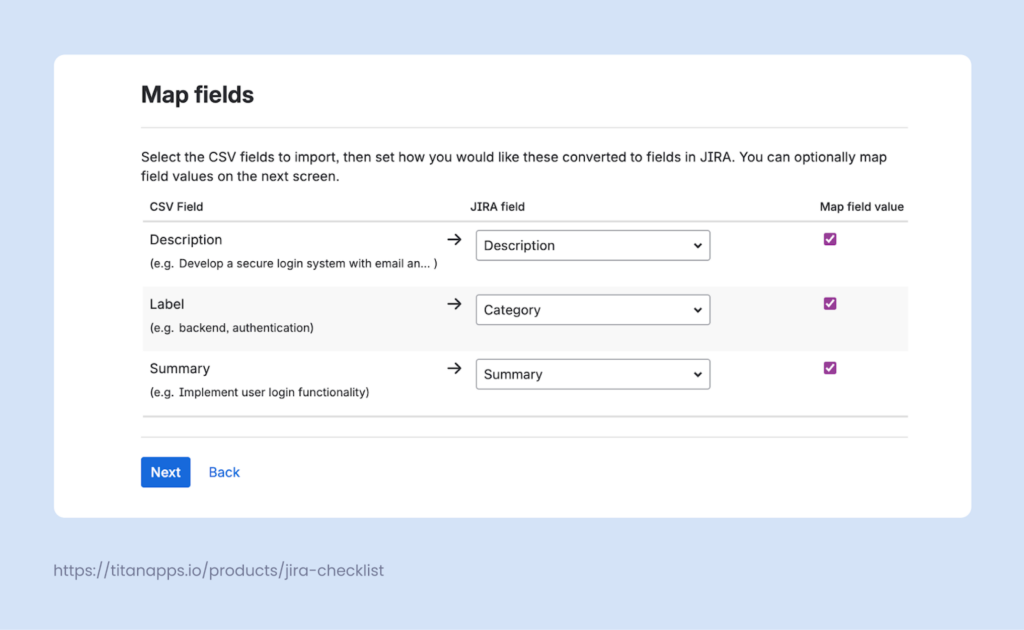
You will also be able to check field value mapping and test it for possible errors before finalizing the importing process. Once completed, the Jira work items from the CSV will be generated automatically.
This option is helpful if you only want to create Jira tickets automatically occasionally. However, if you need to do this regularly, it’s better to consider other methods, such as integrating Jira with the app where you collect task-related information.
For more details, please see the official documentation on How to automate Jira ticket creation from CSV.
Pros and cons
Pros:
- Out-of-the-box functionality
- Allows you to work with data from dozens of apps
Cons:
- Still requires manual effort, not fully automated
- Mapping fields correctly can be tricky
Pro Tip: How to Auto-Create Jira Tickets With Checklists
When you create tasks automatically, the description, summary, and other parameters can be pre-configured. To take this one step further, you can also include checklists.
They are very helpful for managing recurring tasks that involve multiple steps, such as employee onboarding or compliance reviews. Another application is when you need to list standard criteria or requirements.
A classic example for agile teams is the Definition of Done checklist. It allows developers to verify that their work is complete and ready for review. This helps maintain quality and minimize the back-and-forth, saving time.
Here’s an example of such a DoD checklist created with the help of Smart Checklist for Jira:
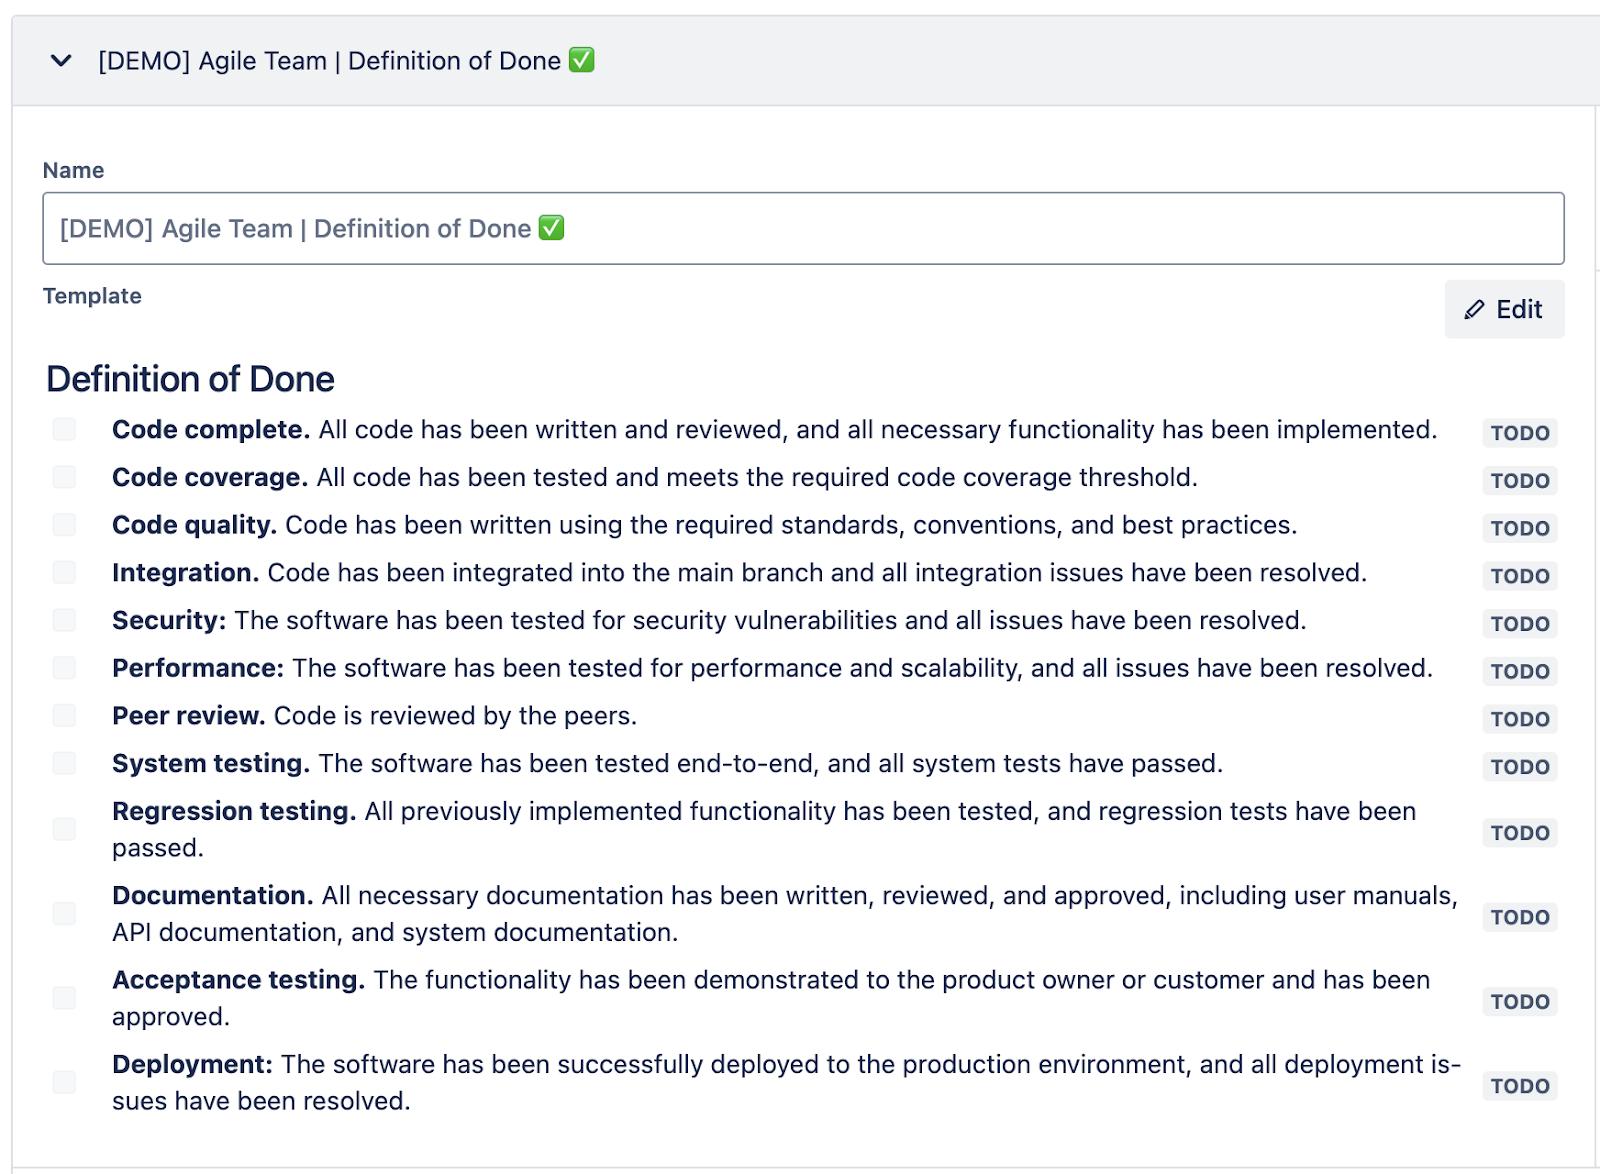
## Definition of Done
- **Code complete.** All code has been written and reviewed, and all necessary functionality has been implemented.
- **Code coverage.** All code has been tested and meets the required code coverage threshold.
- **Code quality.** Code has been written using the required standards, conventions, and best practices.
- **Integration.** Code has been integrated into the main branch, and all integration issues have been resolved.
- **Security:** The software has been tested for security vulnerabilities, and all issues have been resolved.
- **Performance:** The software has been tested for performance and scalability, and all issues have been resolved.
- **Peer review.** The code is reviewed by the peers.
- **System testing.** The software has been tested end-to-end, and all system tests have passed.
- **Regression testing.** All previously implemented functionality has been tested, and regression tests have been passed.
- **Documentation.** All necessary documentation has been written, reviewed, and approved, including user manuals, API documentation, and system documentation.
- **Acceptance testing.** The functionality has been demonstrated to the product owner or customer and has been approved.
- **Deployment:** The software has been successfully deployed to the production environment, and all deployment issues have been resolved.
You can structure your checklist with headers, tag people, add due dates, set custom statuses for checklist items, and more. This approach can be applied to many other use cases, including the Definition of Ready and Code Review checklists.
To set up this automation, you will need to first install Smart Checklist for Jira by TitanApps and save your checklist as a template. Then, you can select the type of work items (issue type) that should include it.
In this example, we assign the Definition of Done checklist template to all tasks:
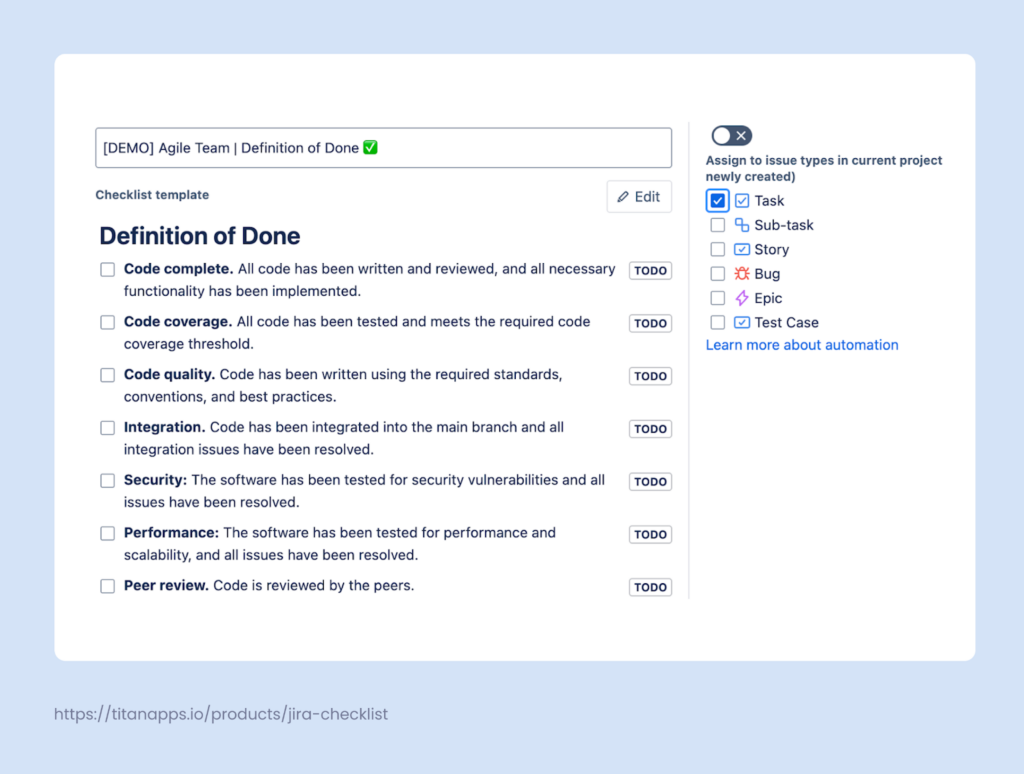
Once this is ready, all new work items of the selected type will include the checklist you pre-assigned to them. Existing Jira tasks won’t be affected.
Additionally, you can use Advanced settings to add checklists based on more complex conditions.
If you often need to create multiple subtasks for Jira work items, you can use checklists instead of subtasks. This allows you to simplify hierarchies, benefit from additional valuable features, and easily track progress at a glance.

FAQs: How to Automate Jira Ticket Creation?
What Kinds of Jira Tickets Can You Create Automatically?
These can be any type of Jira tickets: epics, tasks, subtasks, stories, bugs, and custom work types. However, there may be some limitations depending on the method used. For example, native automation for Jira and cloning don’t work well with work item hierarchies consisting of more than two levels.
Can You Auto-create Jira Tickets From Other Sources Like an Excel Sheet?
Yes. You can prepare a list of tasks in Excel or Google Sheets and then save it as a CSV file. After this, you will be able to automatically create Jira tickets from CSV. Additionally, many apps allow you to export data in the CSV format. This allows you to automate Jira ticket creation using information from different platforms. For step-by-step instructions, please refer to the guide on How to Create Jira Work Items in Bulk From CSV.
What’s the Best Way to Automate Jira Ticket Creation?
This depends on your goals. For one-off ticket creation, cloning, or auto-generation from a CSV file can be viable options. For complex scenarios with multiple conditions, it may be better to request that your Jira administrator configure a set of native rules.
For fast-paced agile teams, using Smart Templates is a great way to automate Jira ticket creation without being bottlenecked by your Jira admin. This user-friendly solution allows you to automatically create work items from pre-saved templates. Tasks can be generated as stand-alone tickets, in bulk, and on a custom schedule. Such templates can be created, edited, and used by anyone. This doesn’t require Jira admin rights or previous experience.
How to Automatically Create Tickets in Jira Triggered By External Events?
This can be done by either integrating Jira with another platform or by using webhooks. To configure an automation with webhooks, go to Project Settings -> Automation -> Create Rule and select Incoming Webhook as a trigger.
What are the Benefits of Jira Ticket Creation Automation?
The main benefits for agile teams are:
- Saving time on repetitive actions
- Enforcing process standardization
- Reducing the chances of human errors
- Improving scalability
- Reducing context-switching
- Enhancing efficiency
How to Automatically Create Jira Tickets in Bulk?
Jira doesn’t have native functionality to do this. As a workaround, you can use cloning, but it doesn’t preserve all child issues (work items). For example, if you clone an epic with tasks and subtasks, the latter will be lost. However, you can generate Jira tickets in bulk with the help of Smart Templates. Simply save a set of work items as a template, and you can create these tasks automatically with one click or on a schedule.
What are the Best Practices For Jira Ticket Creation Automation?
Here are some of the best practices to help you automate Jira ticket creation:
- Combine different automation methods
- Name rules consistently and use labels
- Use Smart Values to account for possible changes
- Automatically add checklists to work items
- Implement workflow automation
- Set up alerts for failed rules
For more on this topic, please read my article Jira automation best practices.


