Jira
Jira monday.com


Imagine it’s Monday morning, and you open your JSM queue. New tickets keep coming in, a few SLAs are about to be breached, and someone forgot to re-open a “resolved” ticket after the customer replied. Before you even start solving problems, you have to spend time assigning requests, changing statuses, and sending reminders.
This is where automation starts to pay off. With a few well-chosen rules, it can move tickets between statuses, assign them to the right people, add checklists, send reminders, and much more.
In this guide, we’ll walk you through the basics of how JSM automation works. Then, we’ll explore a set of practical examples that cover the most common scenarios. You can apply them to your workflows to streamline the process and make it more efficient.
Is it Difficult to Set Up Jira Service Management Automation Without Prior Experience?
Automation for Jira is beginner-friendly, and you can successfully set up new rules even if you’ve never done this before. It uses a visual, no-code interface where you combine different rule elements – triggers, conditions, and actions. Generally, rules follow a simple logic: “when this happens, do that.” It’s a rather intuitive approach, so you don’t need a technical background to start.
At the same time, when you are ready to explore more advanced features, such as using smart values or JQL queries, this can involve a steeper learning curve.
Different types of automation can be used in Jira Service Management:
- Automation for Jira – a core native feature that lets you build custom rules.
- Workflow automation – a feature that allows you to create rules linked to changes in work item statuses.
- Data integration – syncing Jira with external tools, such as GitHub.
- Automating with third-party tools – using marketplace apps that add their own automation logic on top of Jira.
- Advanced automation with the Jira API – code-based automation for programmatically creating and updating work items, and more.
These types vary in complexity, but overall, you can configure a set of useful rules without any prior knowledge. Depending on your needs, you can combine different types of automation.
Whatever mix you choose, the impact is similar: faster ticket processing, less manual work for agents, and more consistent processes across your service desk.
When to Use Automation in JSM
Here are some of the common use cases:
- Repetitive actions: Creating and assigning tickets, sending notifications
- Standard processes: Onboarding, approvals, escalations
- Dependencies and SLAs: Setting breach alerts and progress reminders
- Ticket hygiene: Auto-closing stale requests, re-opening after a customer comments
- Workflow automation: Transferring tickets to a new status automatically
- Managing forms: Passing tickets to the assignee after the customer submits a form
How Jira Automation Works
In practice, JSM automation runs as a background “observer” for your projects. It listens for events in the system, checks which rules apply to them, and then carries out the configured updates to your tickets.
Automation rules are built from several key components:
- Trigger: When a trigger event happens, the automation rule runs. For example, “Work item created” or “Comment added.”
- Condition: Once the rule runs, it checks whether the conditions specified in the rule are met. If yes, the prescribed action is performed.
- Branch: This element lets you set separate conditions for a subgroup of work items (e.g., subtasks).
- Action: Defines what the automation does when the rule is triggered and all conditions are met.
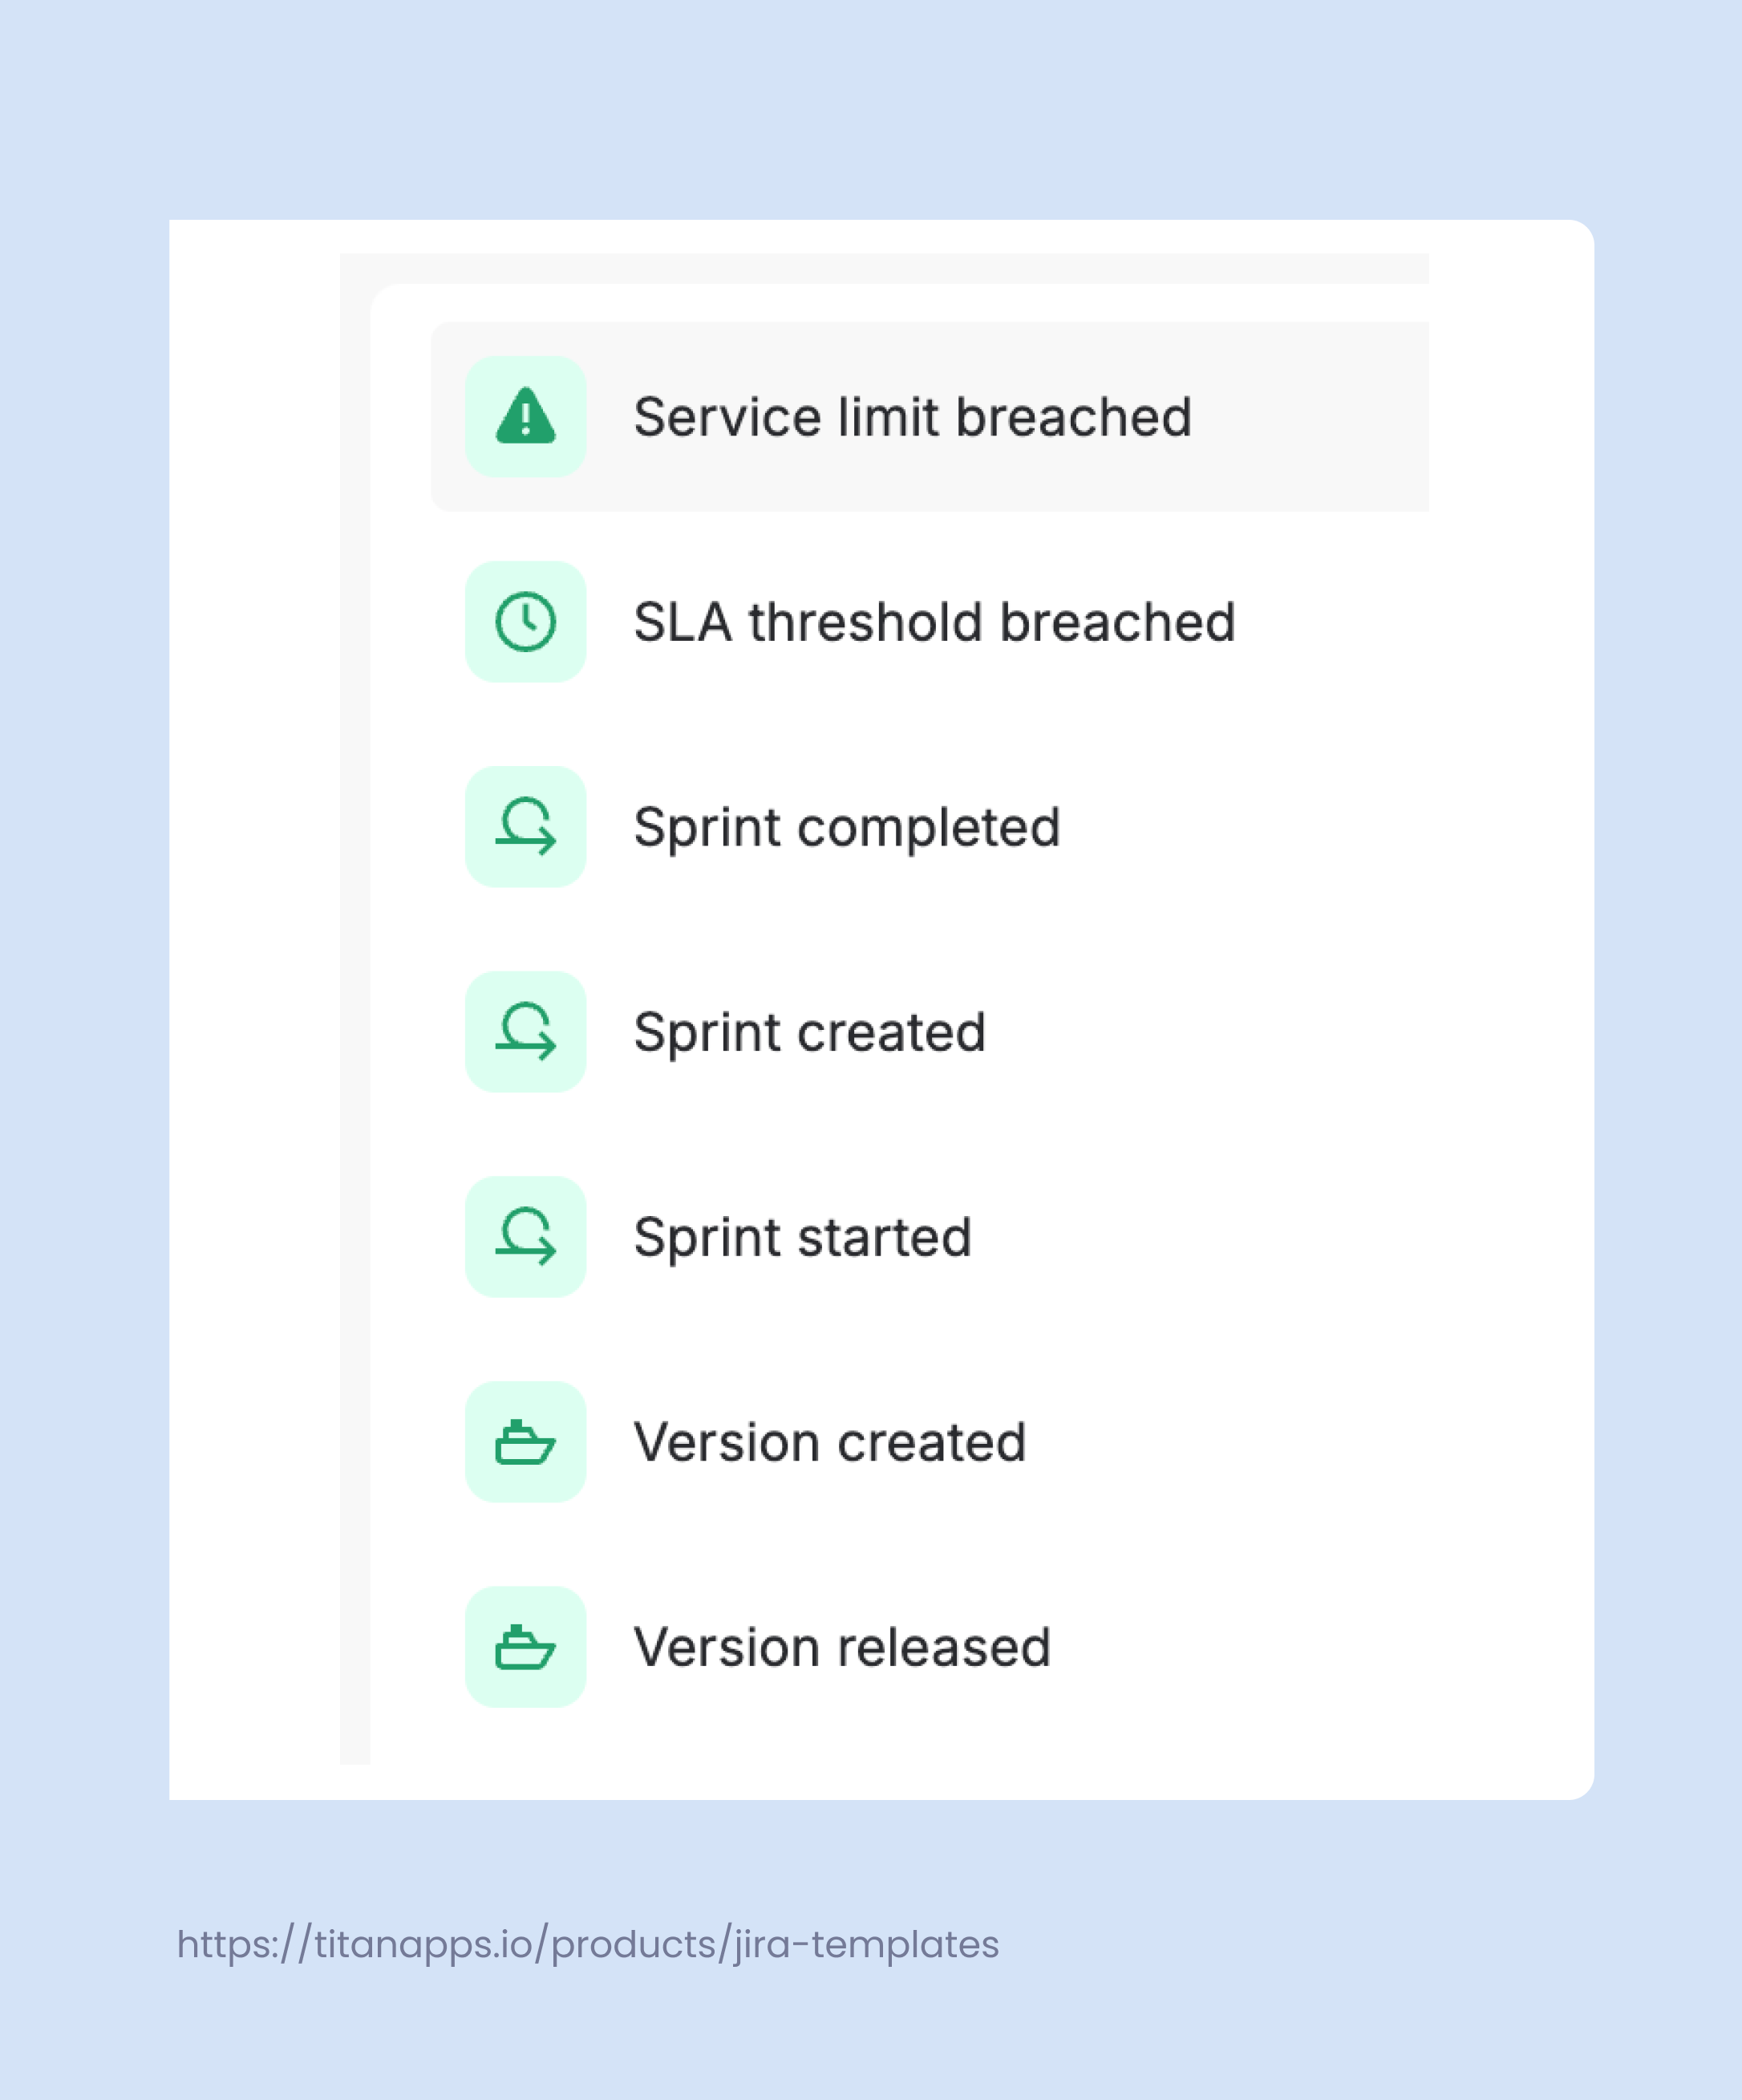
In addition to regular Jira Automation triggers, JSM includes service-specific ones. For example, it can be “Service limit breached,” “SLA threshold breached,” “Form attached,” or “Form submitted.”
As an example of Jira Service Management automation, let’s take a look at this rule for ITSM. It checks the request type of each new ticket and adds an approver if this field value is not specified yet:
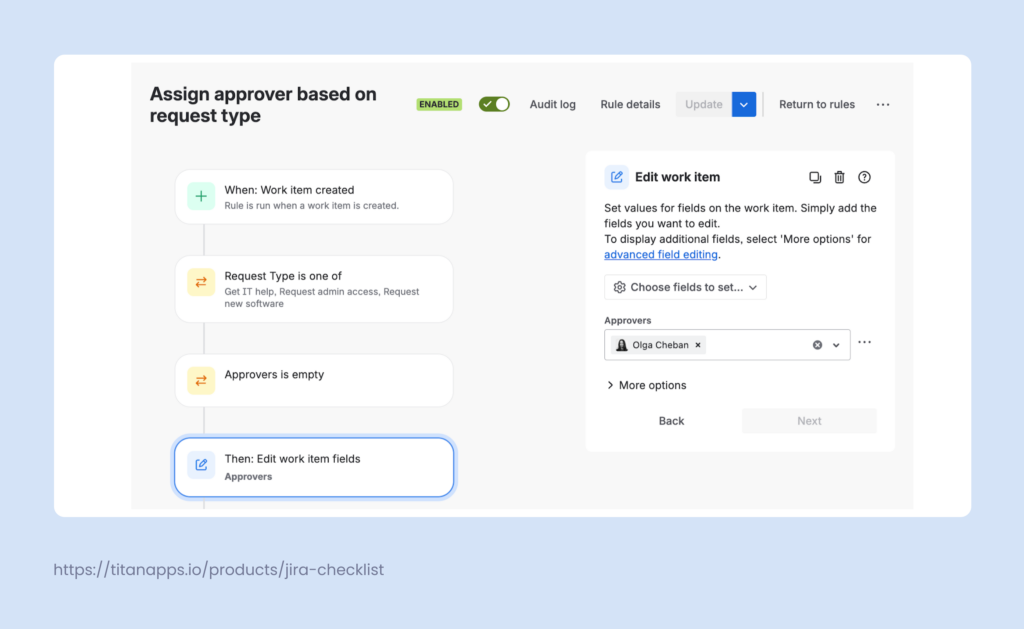
Here, we can see such elements:
- Trigger – Work item created
- Condition 1 – Request type is one of the specified options
- Condition 2 – The Approvers field is empty
- Action – Edit the Approvers filed / add approvers to the ticket
This eliminates the need to manually sort tickets and add approvers, saving you time and effort.
How to set up a Jira automation rule?
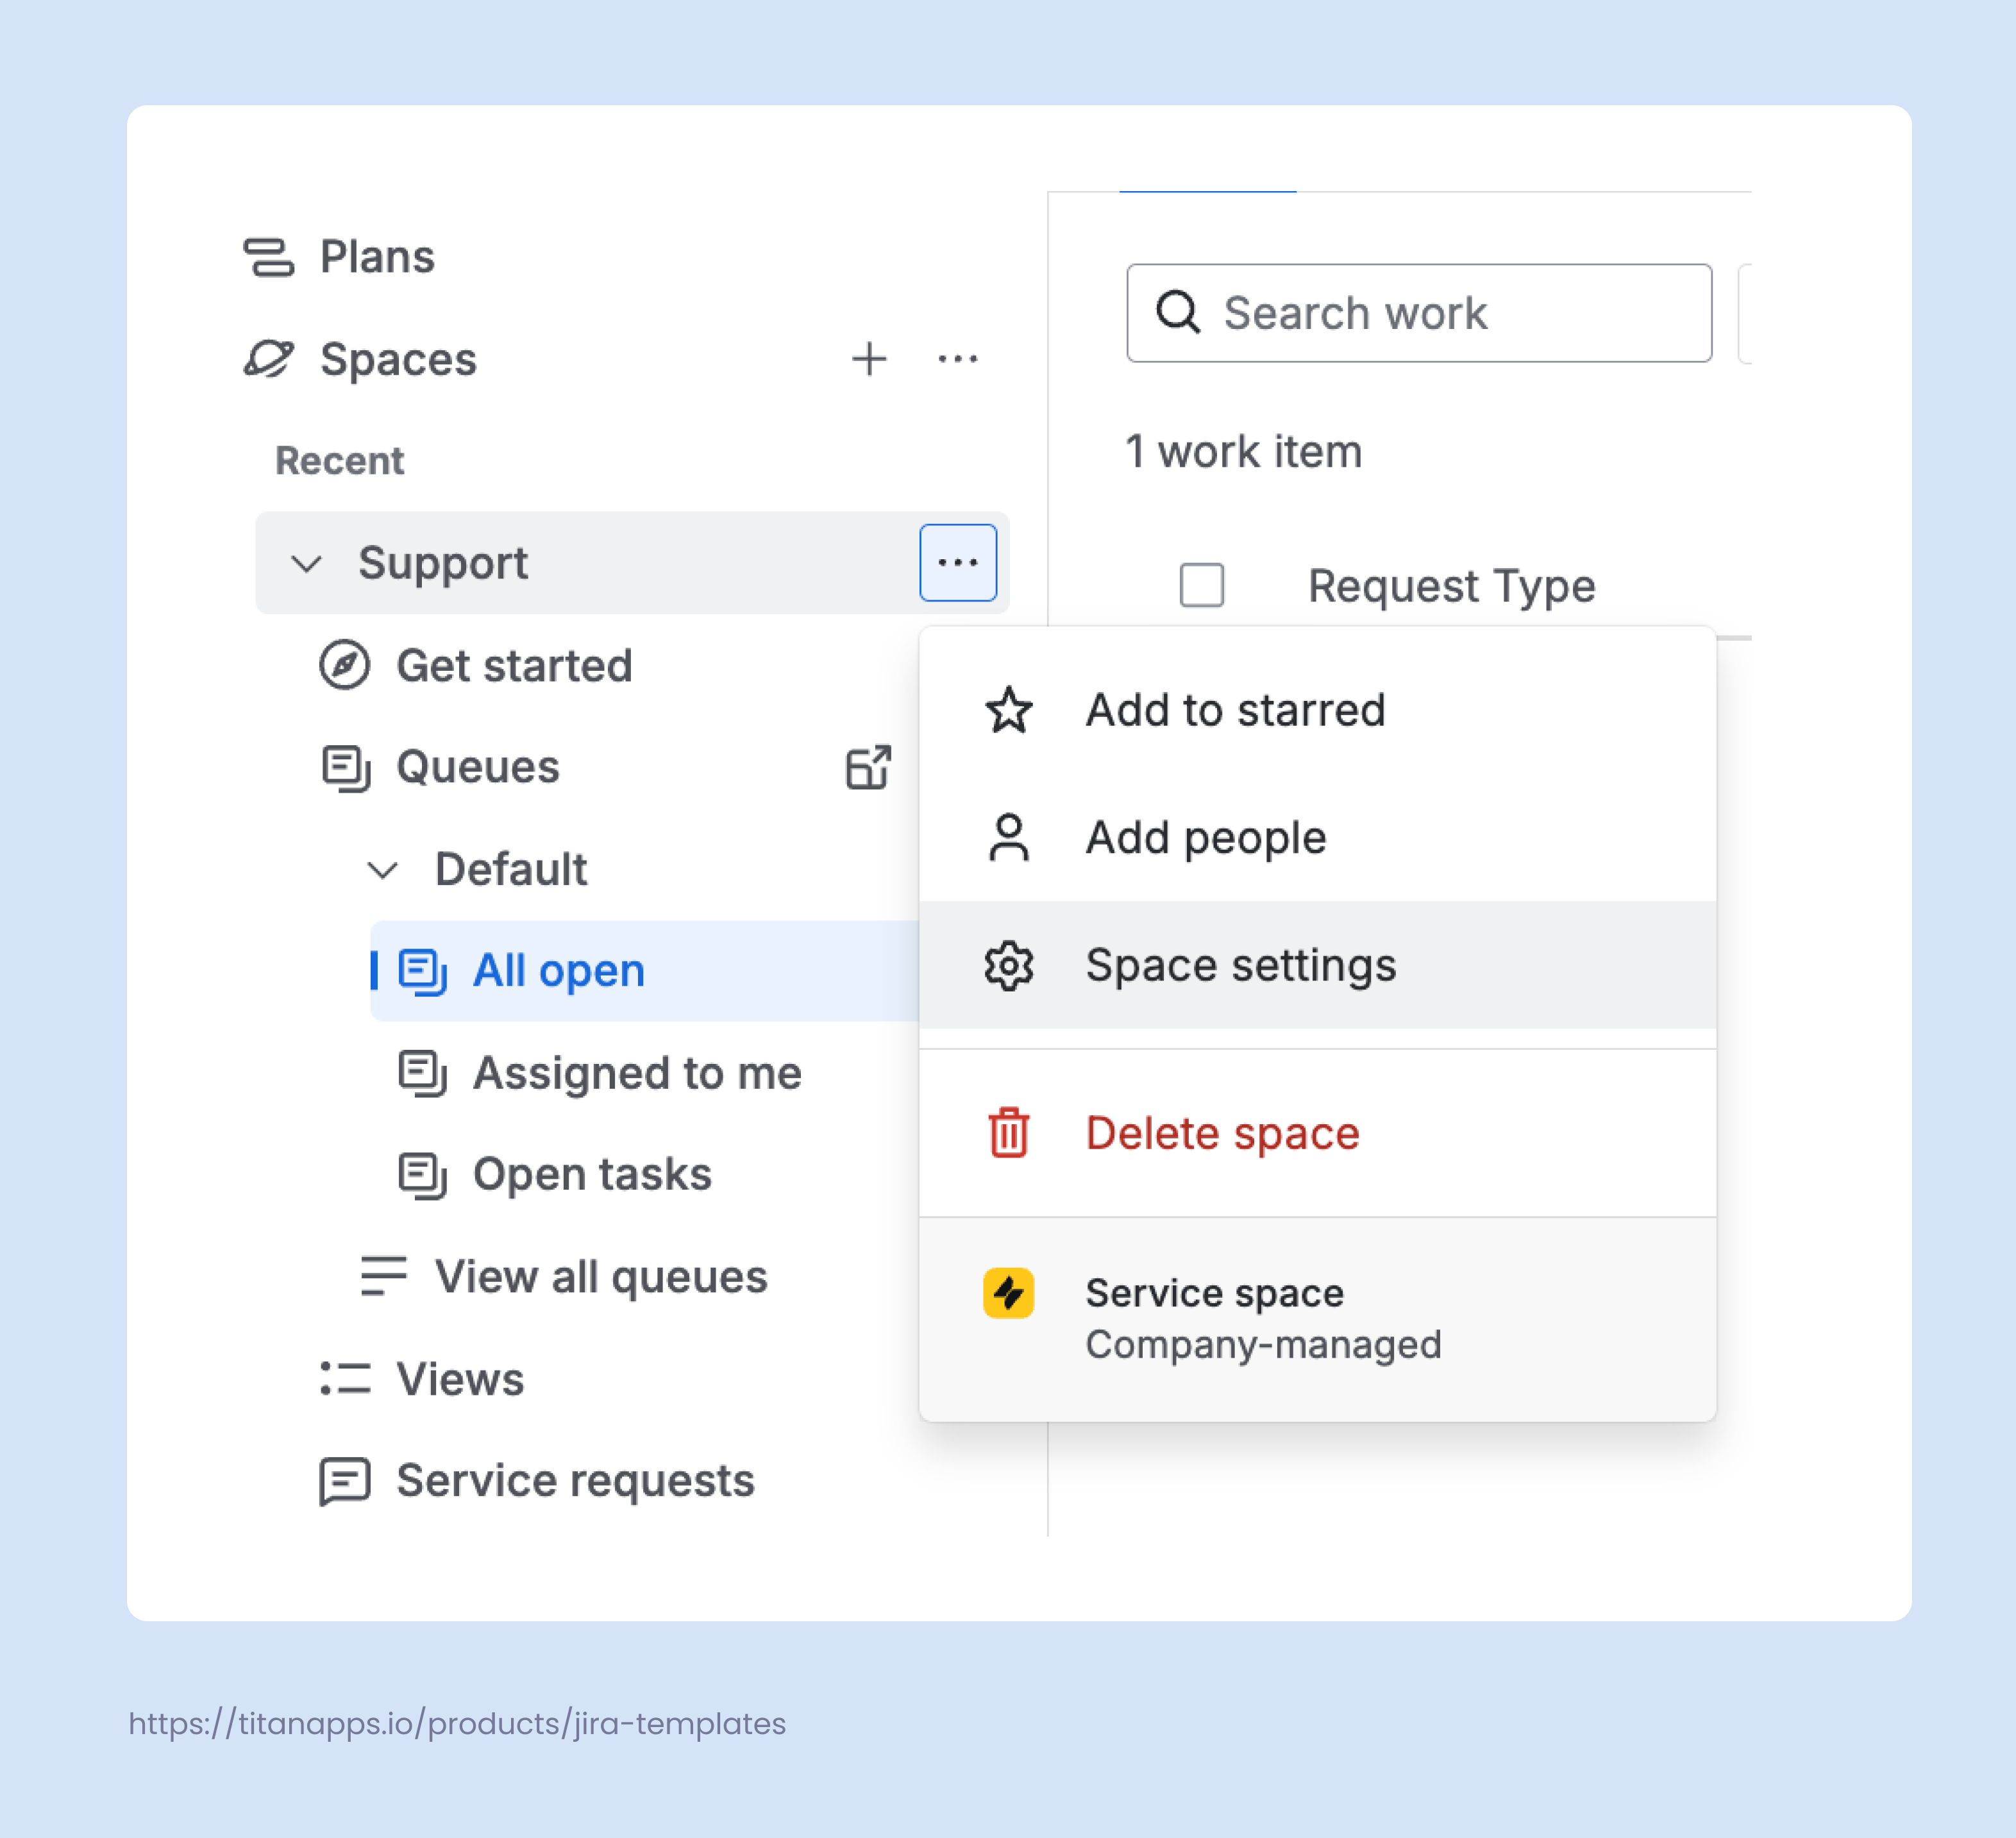
Please note that you must have Administrator permissions for your project/space to be able to create Jira Service Management automation rules.
- Navigate to your JSM space in the Jira menu on the left. Click the three dots -> Space Settings (Project Settings) -> Automation -> Create Rule -> Create From Scratch (see the screenshot below).
- Select the trigger. Type in the action or event you’d like to add as a trigger into the search bar and find it on the list. For example, Work item created (Issue created) or Work item commented.
- Add conditions to your rule and specify the required details (optional). For example, Request Type is Procurement, or the Reporter field is empty.
- Select the action that should be performed and provide the details related to that action.
- Save and turn on your rule. You can also validate it before enabling it.
Practical Examples of Jira Service Management Automation
1. Auto-Assign JSM Tickets Based on Request Type
Typically, organizations have dozens of request types to categorize user submissions. It’s recommended to set up a rule that checks the request type and automatically assigns the ticket to the responsible person. So, instead of agents checking each new ticket and deciding who should pick it up, the system will route it to the right person from the start. This reduces manual triage and helps you respond more quickly to new requests.
Here’s an example of such a rule for HR tickets. When a new ticket with the request type Recruitment launch is created, it is automatically assigned to the recruiter responsible for hiring:

In general, auto-assigning tickets is a typical use case for Jira Service Management automation. Depending on your needs, you can add more conditions or select other triggers – for instance, assigning based on keywords in the ticket description.
This allows you to handle more complex scenarios and ensure that tickets don’t wait too long without an owner.
2. Create Clones of JSM Tickets in Another Project in Jira
In many teams, the service desk is just the front door, while the actual work on requests happens in a separate Jira project. For example, a software user raises a ticket requesting a new feature. While the request itself needs to be tracked and handled in JSM, the dev team will need to include this task in their Jira scope.
You can add a rule that automatically clones the service request into the delivery project once its status moves from To Do to In Progress. This way, agents keep tracking the original ticket in JSM, and the dev team gets a regular Jira work item with the same summary, description, and key fields. Additionally, such tickets can be linked, so the service team can easily track the progress of the delivery ticket.
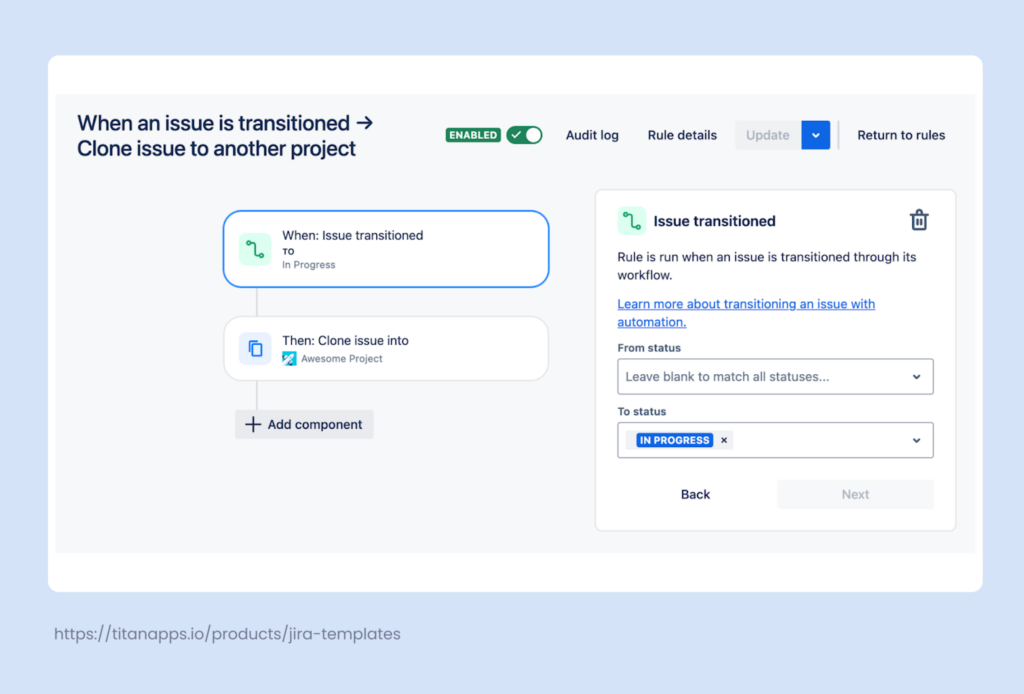
If you need more control, add conditions to the rule so it only runs for certain request types or for summaries that contain specific keywords.
3. Auto-add Checklists to JSM Tickets Based on Request Type
Another useful case for Jira Service Management automation is adding checklists. In this example, we’ll show you how to set up a rule that automatically adds a Smart Checklist to tickets of a specific request type.
For instance, when an employee submits a ticket with the request type Business Trip, the rule adds a ready-made business trip planning checklist to that ticket. The assignee receives a processing-ready request with a clear list of steps to follow.
As a result, your team doesn’t have to start from scratch every time. This will save you time and ensure consistent handling of repetitive requests.
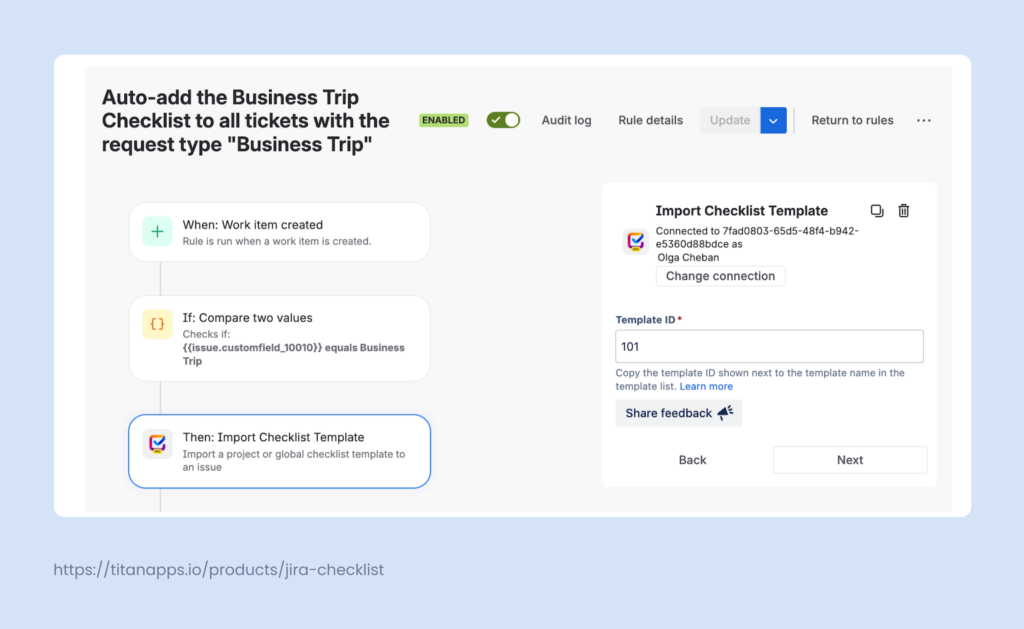
To use checklists in your Jira work items, you first need to install Smart Checklist by Titan Apps and create a template. After this, start setting up your rule and select Import Checklist Template as an action. Then, click Connect and provide the Template ID.
Once you enable your rule, it will automatically add the selected checklist to your JSM tickets according to the selected parameters:
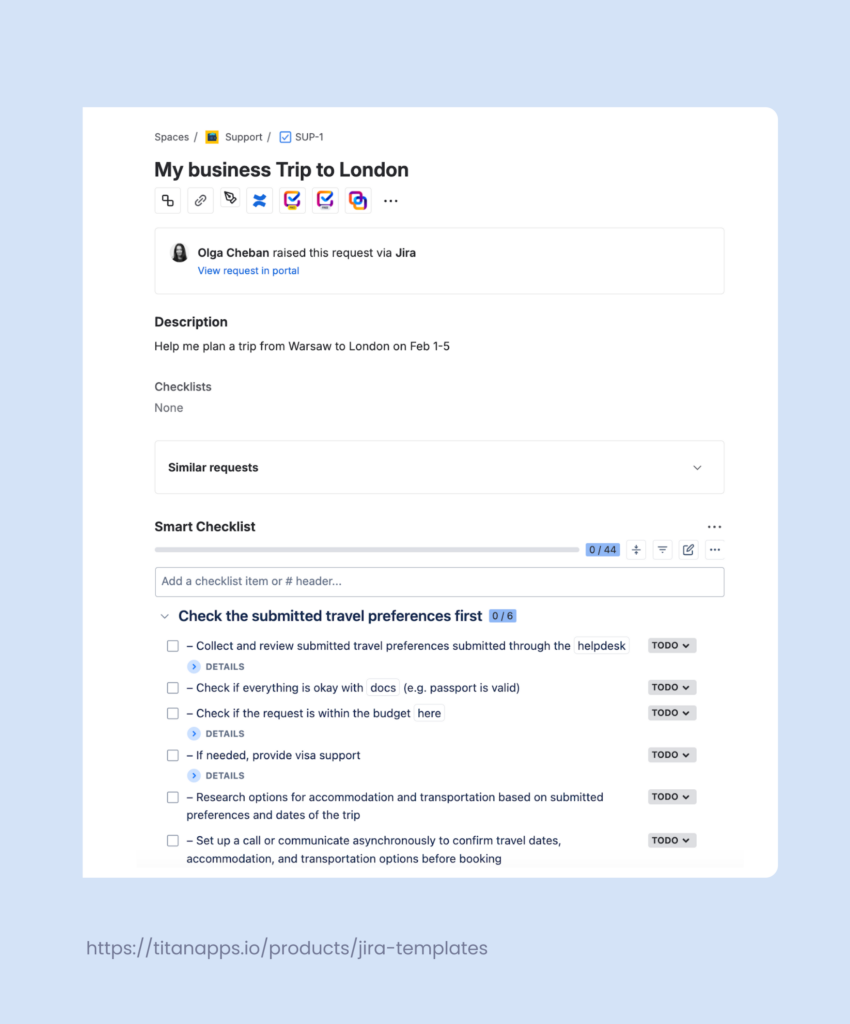
Additionally, you can choose to Show Smart Checklists on the Customer Portal. In this case, your customer (or other stakeholders) can view the checklist and see the progress on their request. The checklist will be shown in the view-only mode, so the customer won’t be able to change it.
Obviously, the same logic applies not only to Business Trip requests but also to many other use cases.
Checklist templates you can use with JSM automation:
- Business Travel Template
- Hardware Procurement Template
- Procurement Checklist Template
- Payroll Template for Jira
- Invoice Approval Template
- Ticket Triage and Prioritization Checklist
- Vendor Due Diligence Checklist

4. Re-open a JSM Ticket When a Customer Adds a Comment
Sometimes, customers reply to tickets that agents have already marked as resolved. To more easily track those updates, you can set up an automation rule: when a customer adds a comment, the ticket is moved from Done back to In Progress.
Here’s what the rule looks like. It’s triggered when a comment is added to a JSM ticket; it then checks whether the ticket’s status is Done and whether the initiator is a customer. If yes, the ticket is transitioned to an active status:
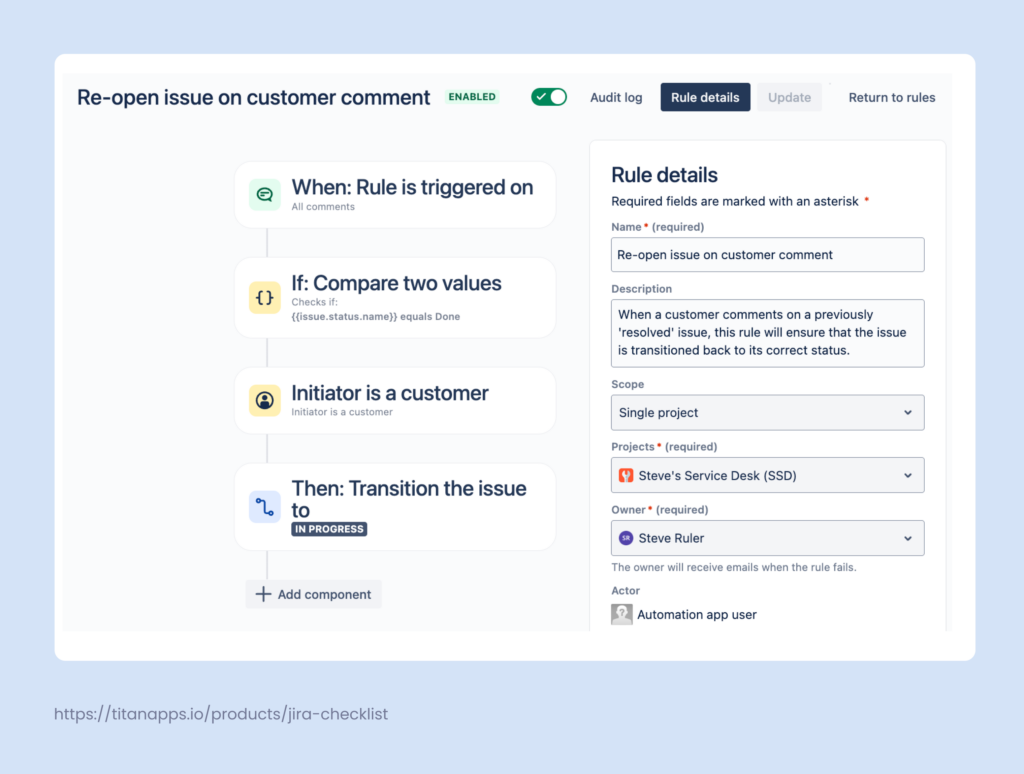
This way, follow-up questions and extra details won’t be missed and can be addressed in time.
You can use this example to also set up other rules that change a ticket’s status based on the last added comment. For open tickets, if a customer comments providing you with new information, the ticket can be automatically moved to Waiting for Review. If your agent adds a comment, the status can change to Waiting for Customer.
This Jira Service Management automation can save you significant time on repetitive tasks, especially if your team handles many tickets daily. It also helps you maintain consistency and minimize the probability of human errors.
5. Auto-Close Tickets if the Customer Doesn’t Respond
Sometimes, tickets stay in the Waiting for Customer status for days because no one has time to follow up. This makes queues look busy even when many requests are no longer active. To clean this up, you can add a rule that closes tickets after a period of inactivity and leaves a final comment for the customer.
In this example, the rule checks for tickets that have been waiting for a customer reply for 5 days. If there are no new comments from the customer during that time, the ticket is moved to Done. Also, the rule auto-adds a comment explaining that the request is being closed for now. The message tells the customer that they can come back and reopen the request if they still need help.
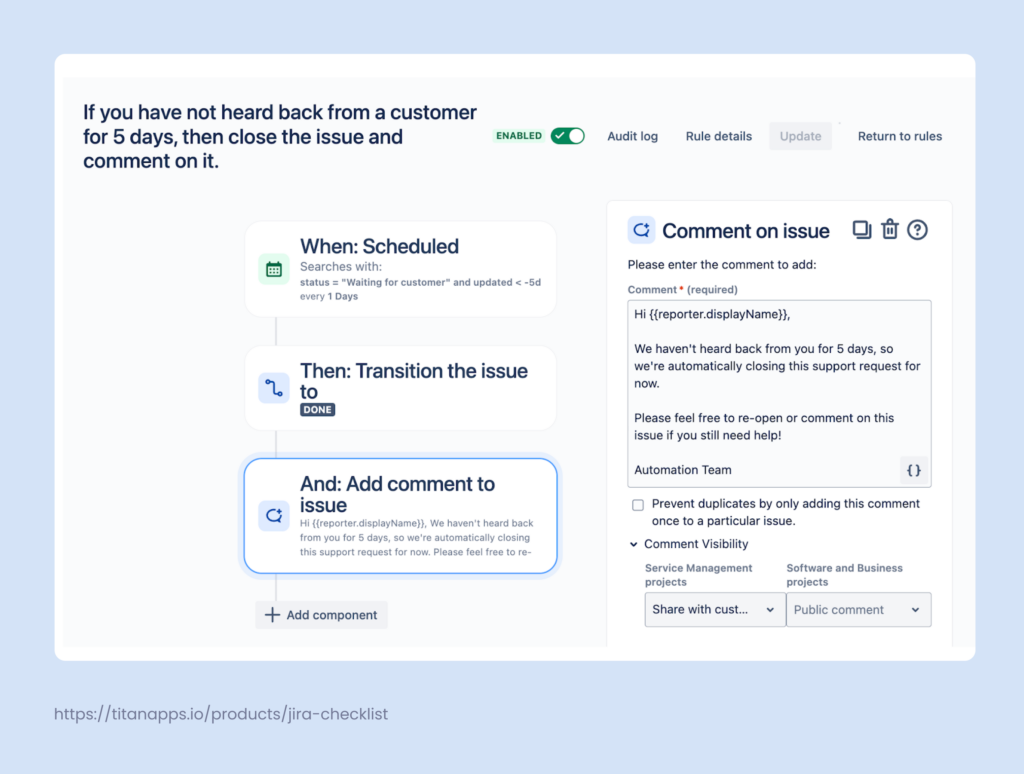
This rule can be reused with different time frames for different queues or priorities. High-priority incidents can stay open longer, while simple questions can close sooner. If needed, you can also add an extra step to notify the customer in advance before closing the ticket.
Combined with the “re-open on comment” rule from the previous example, this Jira Service Management automation creates a clear loop. Tickets close automatically when there’s no response and instantly return to an active status if the customer replies again.
6. Auto-create work items from Smart Templates
Some JSM tickets require a standard set of tasks in another Jira project. For instance, an HR team receives a hiring request via the self-service JSM helpdesk, but it needs to create a batch of tasks in a regular Jira Cloud instance to work on that request.
As recruitment is a recurring process, it makes sense to reuse the same set of pre-configured work items rather than create them from scratch every time. This can be done using Smart Templates for Jira alongside native Jira Service Management automation.
Smart Templates allow you to save any set of work items as a reusable template. Then, Jira automation can trigger the generation of tasks from that template based on your conditions.
Here’s an example of a template for recruitment. It consists of a task with several subtasks and checklists. It also contains variables for dynamic values, such as {{position}} and {{project}}. This allows you to easily adjust one template for multiple uses.
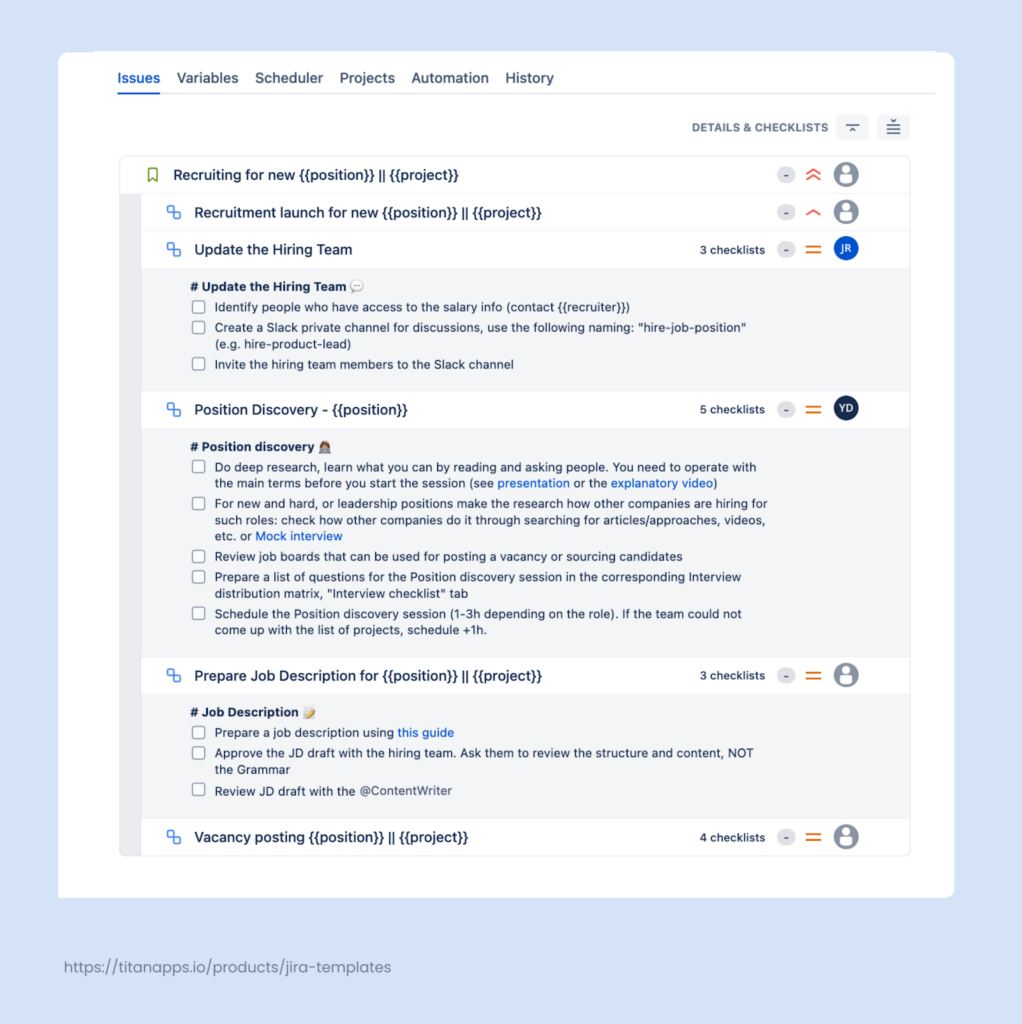
First, you will need to prepare your template in the Jira project where you need to generate new fork items from that template.
Once done, you can configure the automation rule. When a new ticket with the “Recruitment launch” request type is created, the automation will generate the set of tasks from your template:
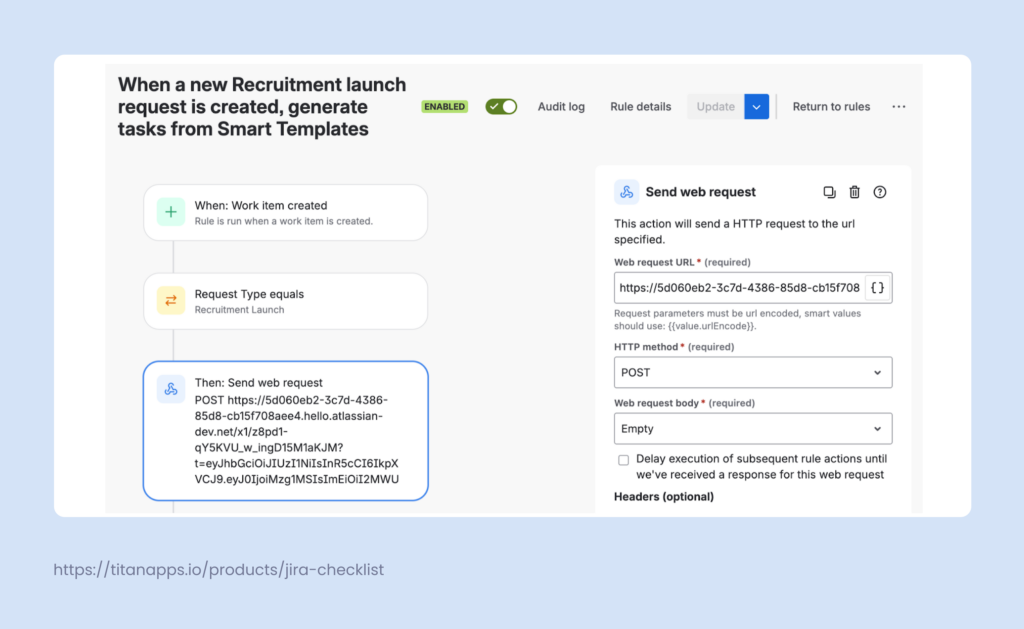
For more details on configuring this rule, please see our knowledge base on Confluence: Using Smart Templates with Automation.
This Jira Service Management automation helps you maintain consistency across multi-step processes. It saves you time on manual ticket creation and gives teams a ready-to-use plan as soon as a new request arrives.

7. Auto-send Slack Notifications When an SLA Threshold is Breached
When your team handles many JSM tickets, it’s easy to miss the moment when an SLA is about to fail. To prevent this, you can add an automation rule that sends a Slack message shortly before the breach time.
For example, when the Time to resolution SLA on a high-priority ticket has 1 hour left, the rule posts a message in your #support-incidents channel and tags the assignee. The message can include the ticket key, summary, priority, and a direct link, so the team can react right away.
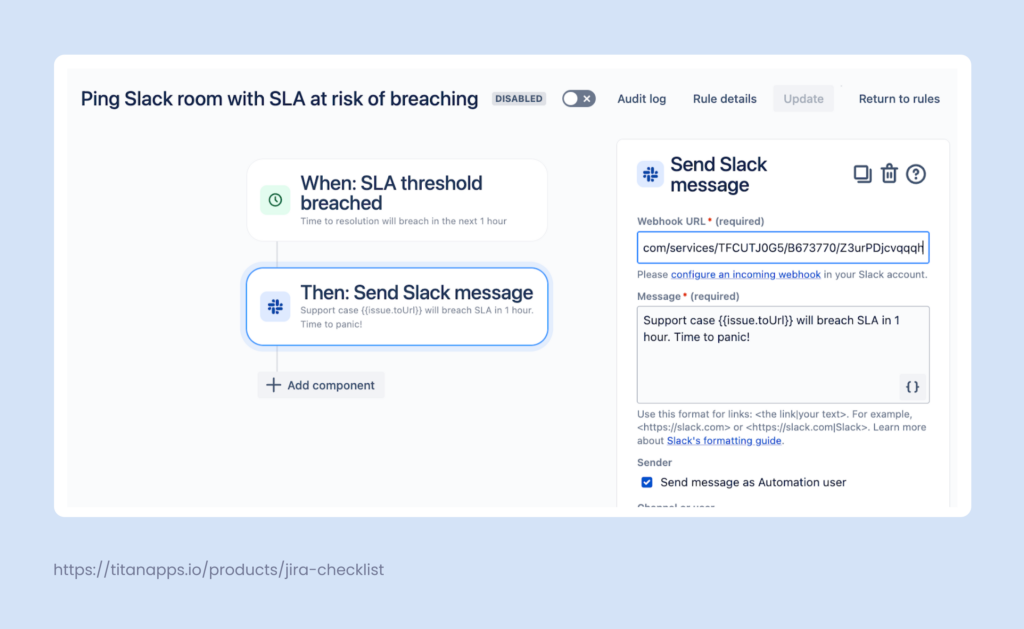
To set up this integration, you will first need to connect Jira to Slack using Jira’s native connector. You can find it on the Atlassian Marketplace.
Here are some other examples of using this Jira Service Management automation:
- Sending alerts for the Time to first response on VIP customers
- Routing warnings for security incidents to a separate Slack channel
- Sending a direct message to the on-call engineer when a P1 ticket is at risk
This automation rule helps your team handle critical Jira tickets in time, protect SLAs, and reduce the need to manually monitor the queues.
8. Change Ticket Status When a Form is Submitted
In Jira Service Management, forms help you collect all the necessary customer details in a structured way. Instead of long email threads, customers fill in the required fields and answer preset questions. Then, your team receives a clearer picture of what needs to be done and saves time on the back-and-forth.
You can add an automation rule on top of that: when a customer submits a form, the ticket is moved to an active status, such as Waiting for support. This shows that the request is ready for an agent to pick up.
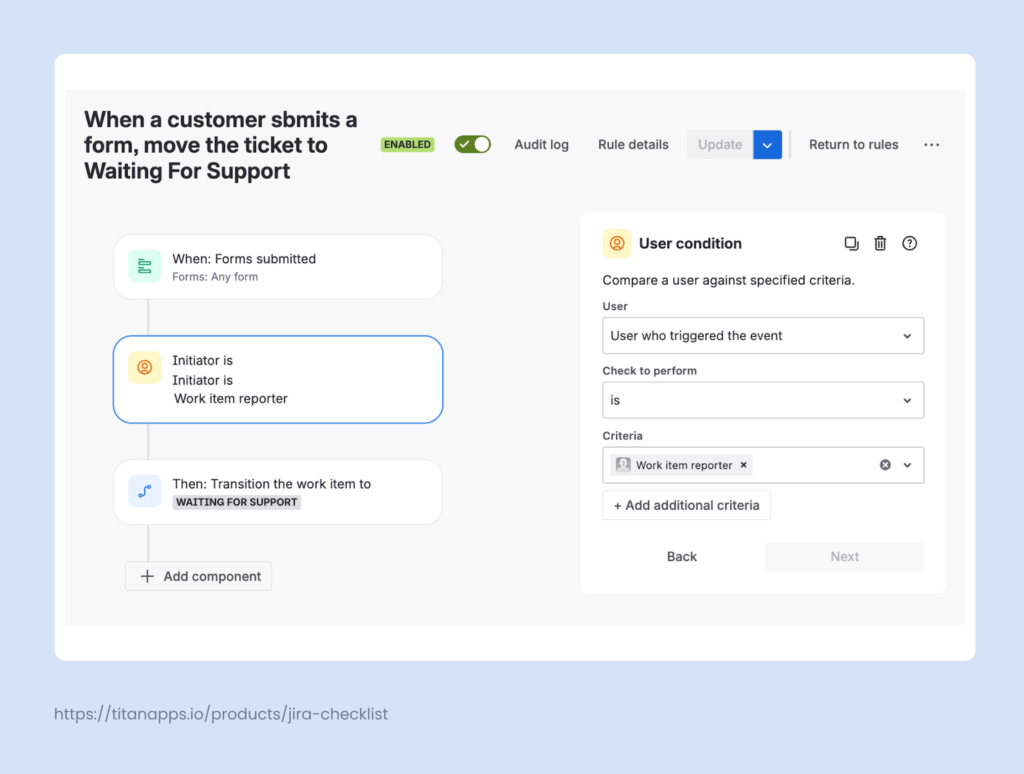
This rule helps you react faster to completed forms. It keeps ticket statuses in sync with their real state and reduces the need to manually check which requests are ready for review.
What’s the Difference Between Jira Service Management Automation and Regular Jira Automation?
The automation feature in both versions of Jira Cloud works largely the same. You set up rules using familiar building blocks: triggers, conditions, and actions. The main difference is the context.
Jira Service Management automation is mainly used to manage customer support or internal requests. This includes handling queues, auto-routing tickets, and organizing communication with customers. JSM rules also have service-desk-specific triggers and custom fields, such as SLAs or request types.
At the same time, regular Jira automation focuses more on development work, such as managing sprints, coordinating releases across projects, and syncing Jira with dev tools (e.g., Bitbucket or GitHub).
You can also create global rules that connect events in JSM and another Jira project. For example, this can be needed to sync support tickets with development projects.
Here’s a quick summary of the main differences:
| Feature | Jira Software / Work Management | Jira Service Management |
|---|---|---|
| Project Type | Software / Business | Service Management |
| Main Use Case | Agile dev & general task tracking | Request handling, SLAs, customer service |
| Automation Audience | Internal teams | Both internal agents & external customers |
| Extra Context | Boards, Sprints, Dev tools | SLAs, Request types, Approval steps |
The Key Benefits of Jira Service Management Automation for You and Your Customers
Jira Service Management automation helps your team handle more requests with less manual work.
Instead of updating statuses, pinging teammates, or creating follow-up tasks by hand, you can let rules take care of these routine steps. This gives agents more time for actual problem-solving and providing great service to your customers. Some of the main advantages include:
Benefits for you and your team
- Save time by automating repetitive tasks like assigning, tagging, and commenting.
- Keep every request consistent with pre-defined rules, checklists, and templates.
- Catch service level agreements risks early with automated alerts and reminders.
- Reduce errors by standardizing key steps in your process.
- Focus on solving real problems instead of dealing with manual updates.
Benefits for your customers
- Provide them with faster responses thanks to automatic routing.
- Reduce customer-facing mistakes and make handling requests smoother.
- Deliver a consistent experience across agents and departments.
- Let customers see the checklist progress directly in the Customer Portal.
Match Your Jira Service Management Automation to Your Daily Needs
Automation doesn’t have to be complex to be useful. Start with a few simple rules that address your team’s daily pain points, such as auto-assigning new tickets, re-opening requests on customer comments, or adding ready-made checklists to common request types.
Once these basics are in place and you’ve checked that they work as expected in the automation audit log, you can extend them to hiring, onboarding, approvals, and other recurring processes. Over time, your Jira service desk will become more organized. Tickets will move through the stages faster, and support will feel more predictable for both your team and your customers.To further optimize your processes, consider using Smart Checklist templates for recurring tasks that require a consistent approach. As an example, take a look at our article Ticket Triage and Prioritization: Checklist Template for Jira Support Teams.