





 Tools for Jira
 Tools for monday.com




Atlassian set all existing API tokens created before December 15, 2024 to expire by May 2026 and is actively replacing classic unscoped tokens with scoped ones (Atlassian’s API token migration notice). If your scripts stopped working, your integrations are throwing 401 errors, or you are setting up a new connection to Jira for the first time, you are dealing with the current token system – which works differently depending on whether you are on Cloud or Data Center.
A Jira API token is the credential that lets external tools and scripts authenticate with the Jira REST API without using your actual password. Get it right and your integrations are secure and stable. Get it wrong and you are either locked out or handing over more access than necessary.
This article covers how to create and manage API tokens for both Jira Cloud and Jira Data Center, explains the difference between classic and scoped tokens, compares authentication methods, and shares practical security rules. Code examples are included for curl, Python, and Jira Automation webhooks.
Key Takeaways
- A Jira API token authenticates scripts and integrations with Jira without exposing your Atlassian account password.
- Scoped tokens (Cloud) let you restrict exactly what the token can do – read, write, or delete – within specific products.
- Classic (unscoped) API tokens give full account-level access and are being phased out in favour of scoped tokens.
- Jira Data Center uses Personal Access Tokens (PATs), which are always full-access and authenticate via Bearer token instead of basic auth.
What is a Jira API token?
 Definition
Jira API token: A generated credential string that external tools and scripts use to authenticate with the Jira REST API. It replaces your Atlassian account password in API calls, so third-party tools can act on your behalf in Jira without ever seeing your login credentials.
When you log into Jira, you authenticate with a username and password. Now imagine you want to connect an external script, a CRM system, or a testing tool like Postman to Jira. That tool needs to authenticate somehow.
You could give it your password – but that creates a serious problem. If that tool is ever compromised, your entire Atlassian account is exposed. And if you change your password, every integration using it breaks at once.
API tokens solve this. A token is a generated string – a long sequence of random characters – that acts as a credential substitute. You tell Jira: any tool presenting this token is acting as me. The tool gets access to Jira, but your password stays private. You can revoke any token at any time without changing your password.
There are two distinct token systems depending on your deployment:
- Jira Cloud uses API tokens generated from your Atlassian account. Since late 2024, these tokens support scopes – meaning you can limit what each token is allowed to do. Classic unscoped tokens are being deprecated.
- Jira Data Center uses Personal Access Tokens (PATs), generated from your Jira profile. PATs are always full-access – there is no scope selection on Data Center.
“API token” vs “API key” – is there a difference?
No. In the Atlassian context, “Jira API key” and “Jira API token” refer to the same thing. “API key” is an older informal term that circulates in third-party documentation and integrations. Atlassian’s own interface and documentation use “API token.” When a tool asks for a “Jira API key,” it wants your API token.
Where API tokens are used
- Scripts making REST API calls to Jira (Python, curl, Postman)
- CI/CD pipelines – GitHub Actions, Jenkins, and similar tools (see Git and Jira integration for related setup)
- Third-party integrations – CRM platforms, reporting tools, monitoring systems
- Jira Automation webhook triggers in DC, including Smart Templates for Jira automations
- App marketplace integrations calling the Jira REST API on your behalf
For a broader overview of the Jira REST API and what it enables, see how to use the Jira REST API.
How to create an API token in Jira Cloud
All Cloud API tokens are generated from your Atlassian account settings – not from within Jira itself (Atlassian account API tokens page). The token is tied to your Atlassian account, not to a specific Jira site.
Creating a classic (unscoped) token
Classic tokens give full access to everything your Atlassian account can reach. Atlassian is deprecating these in favour of scoped tokens, so only use them for legacy integrations that do not yet support scoped authentication.
- In your Jira click on Account settings (profile icon in top right corner -> Account setting – security
- Select Manage account – Security – API tokens.
- Select Create API token.
- Give the token a descriptive name – for example, “Postman – QA environment” or “GitHub Actions pipeline”.
- Set an expiry date. Atlassian enforces a maximum of one year.
- Select Create and copy the token immediately from the dialog.
Important: Once you close the dialog, you cannot view the token again. Copy it to your clipboard and paste it directly into your tool’s configuration. Atlassian recommends saving the token in a password manager (Atlassian password manager recommendation).
Creating a scoped token (recommended)
Scoped tokens let you restrict what the token can do. Instead of handing over full account access, you select which products and actions the token covers (Atlassian scoped API tokens guide).
- Follow steps 1-4 above.
- Before selecting Create, choose Add scopes.
- Select the product – Jira, Confluence, or both.
- Within the selected product, choose the permission level: read, write, delete, or specific granular actions.
- Set an expiry date, then select Create and copy the token.
The critical URL difference for scoped tokens
This is where most integrations break after switching to scoped tokens.
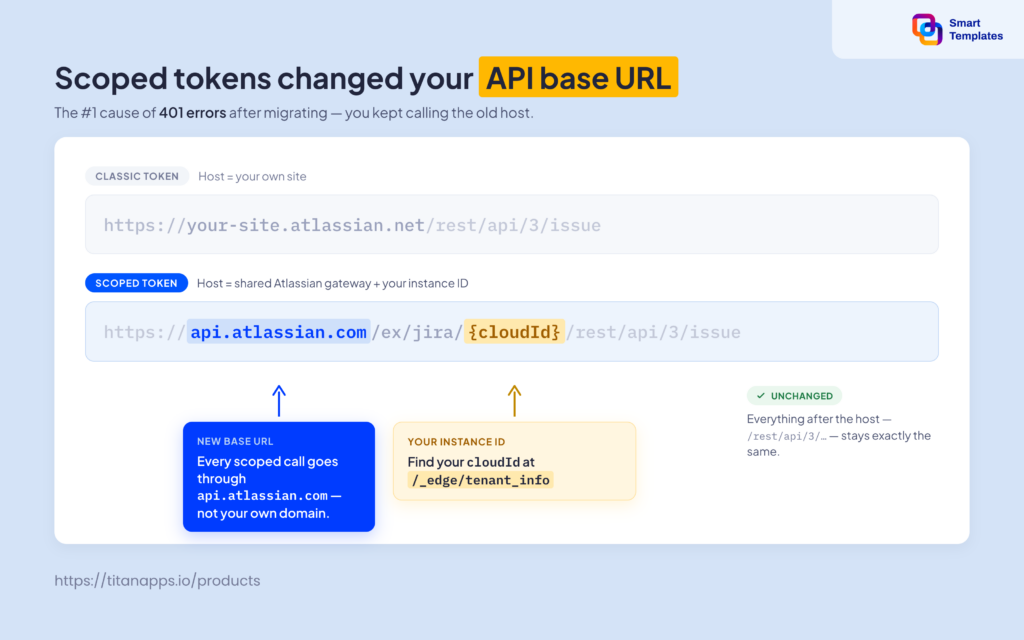
Your cloudId is a unique identifier for your Jira Cloud instance. To find it, navigate to https://your-site.atlassian.net/_edge/tenant_info in a browser. The cloudId value in the JSON response is what you need.
If you switch from a classic token to a scoped token and your script returns 401 errors, the URL format is almost always the cause.
Creating tokens for service accounts
For shared automations or CI/CD pipelines, use a dedicated service account rather than a personal token. A service account is a separate Jira user created specifically for integrations – it has its own email address, its own API tokens, and only the permissions the integration needs (Atlassian service accounts documentation).
If the person who created a personal API token leaves the team, their token is revoked with their account and every integration using it breaks. A service account token is independent of any individual.
Each organisation can create up to five service accounts for free. For more, an Atlassian Guard subscription is required (Atlassian Guard subscription details). Atlassian supports both API tokens and OAuth 2.0 credentials for service accounts, managed from Admin Hub – Service Accounts.
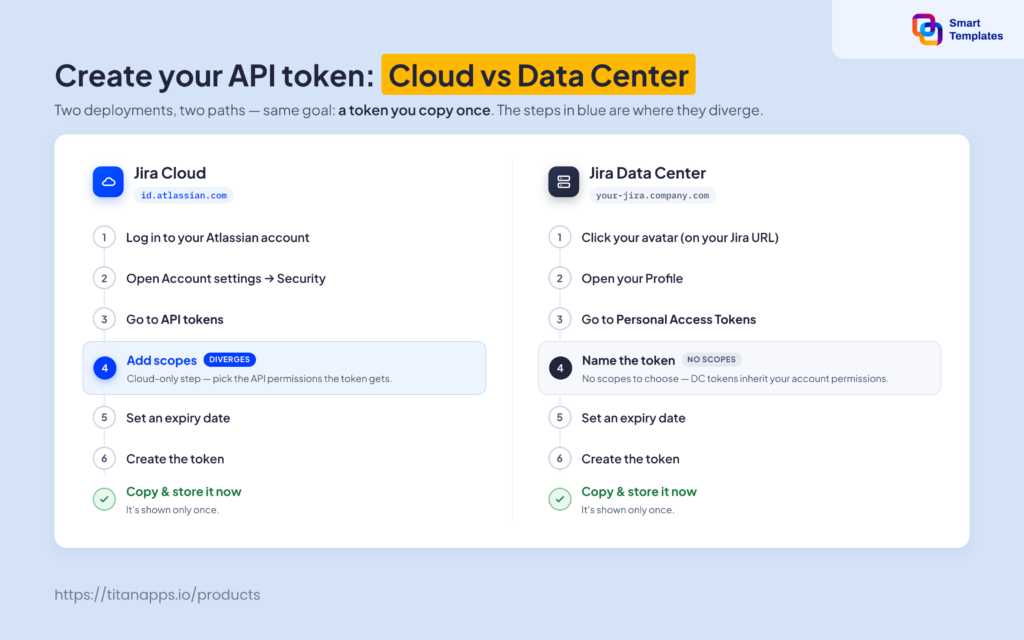
How to create a personal access token in Jira Data Center
Jira Data Center uses a separate token system called Personal Access Tokens (PATs) – relevant if you are staying on DC rather than migrating from Server to Cloud. PATs are not generated from the Atlassian account page – they live inside the Jira DC application itself (Jira Data Center Personal Access Tokens documentation). PATs are available in Jira Software 8.14 and later, and Jira Service Management 4.15 and later.
- In Jira Data Center, select your avatar at the top right.
- Select Profile – Personal Access Tokens in the left menu.
- Select Create token.
- Give the token a name.
- Optionally, set an expiry date. If you skip this, the token has no expiry – a security risk. Setting one is strongly recommended.
- Select Create and copy the token value immediately.
Key differences from Cloud API tokens: PATs always match your current Jira permission level – there are no scopes to configure (Jira Data Center PAT documentation). If your account can access a project, the PAT can access it too.
PATs use Bearer token authentication instead of the Base64-encoded basic auth format used by Cloud tokens:
Authorization: Bearer your-personal-access-token
Admins can view and revoke all PATs across the instance from the Jira admin panel, which is useful for security audits and offboarding.
For context on how automation rules in Jira interact with PATs, see Jira automation.
Jira API token vs PAT vs OAuth 2.0 – which to use?
| Cloud token (scoped) | Cloud token (classic/unscoped) | OAuth 2.0 | Service account + token | |
|---|---|---|---|---|
| Deployment | Cloud | Cloud | Cloud | Cloud |
| Auth method | Basic auth (email:token, Base64) | Basic auth (email:token, Base64) | OAuth flow | Basic auth or OAuth |
| Permission model | Scoped - granular per product/action | Full account access | App-level, user-delegated | Scoped or full, per token |
| Expiry | Max 1 year (enforced) | Max 1 year (enforced) | Per app config | Max 1 year |
| Best for | New scripts, integrations, CI/CD | Legacy integrations only | Apps acting on behalf of users | Shared team automations |
When to use each
Use a scoped Cloud API token when setting up a new integration on Jira Cloud. This is Atlassian’s current recommended approach for scripts, CI/CD pipelines, and third-party tools (Atlassian’s scoped token recommendation).
Use a classic Cloud token only if your existing integration does not yet support the scoped token URL format – and plan to migrate.
Use OAuth 2.0 when building an application that needs to act on behalf of different users, rather than a single account. OAuth handles the authentication flow per user – it is not suited for server-to-server scripts.
Use a service account + token for shared automations where the token must survive individual team members leaving. Production CI/CD integrations and pipelines should always use service accounts.
How to use a Jira API token in practice
Basic authentication with curl
These commands work on macOS and Linux terminals.
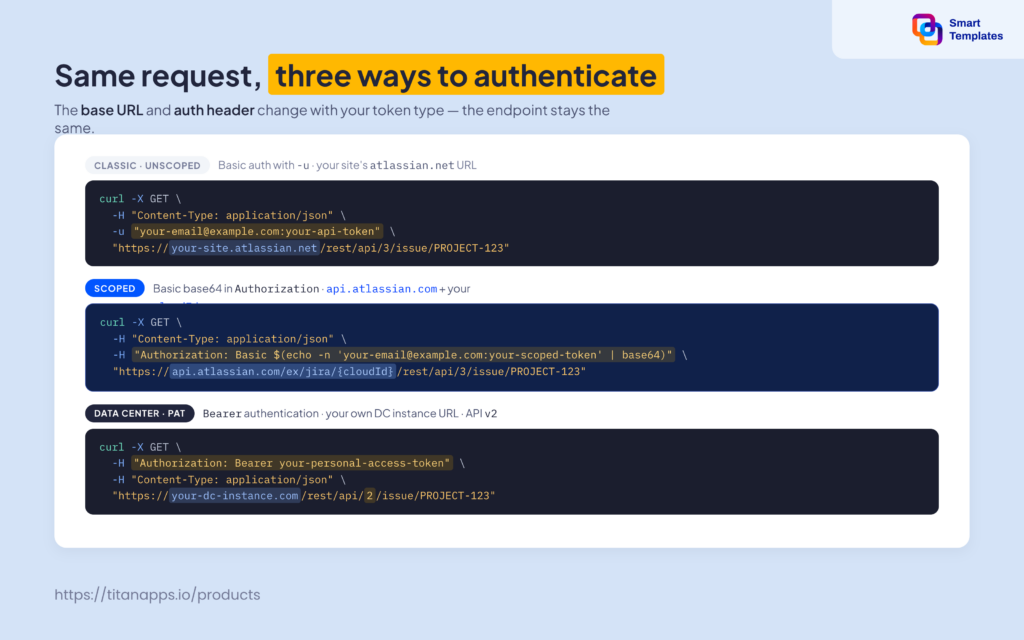
The Content-Type: application/json header is required for all POST and PUT requests. For GET requests it is optional but good practice (Jira REST API reference).
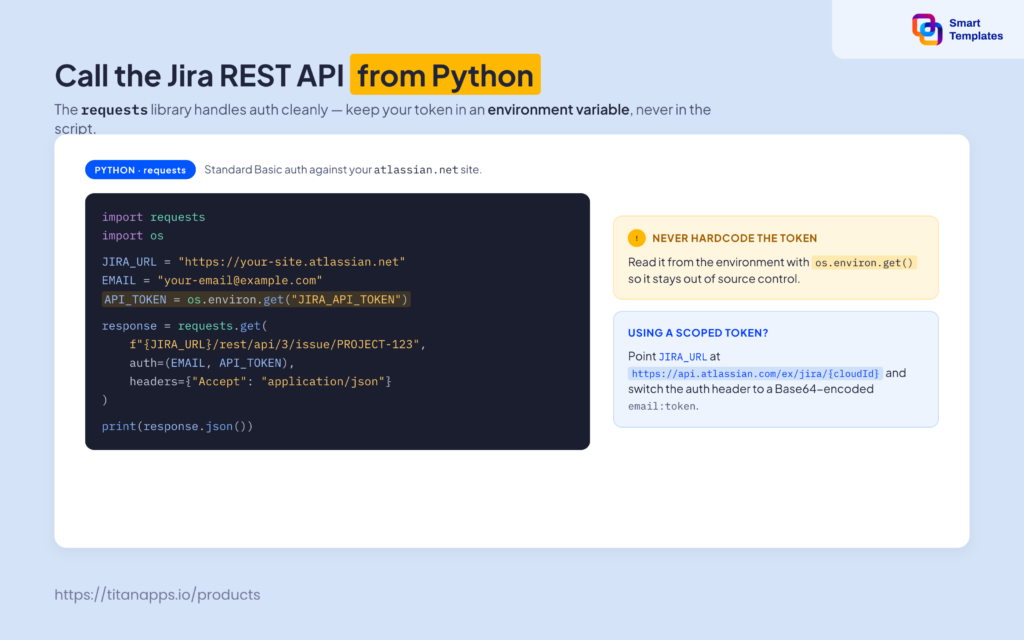
Using API tokens in Python
Using API tokens in Jira Automation webhooks
When you automate Jira processes with tools like Smart Templates, webhook links become the trigger point for external systems. Smart Templates for Jira uses webhook links to trigger issue creation from external systems. When an external tool – a CI/CD pipeline, a monitoring system, or a custom script – sends a POST request to the webhook URL, Smart Templates creates the configured issue hierarchy automatically. For a full walkthrough of Jira’s ticket creation automation capabilities, see Jira ticket creation automation.
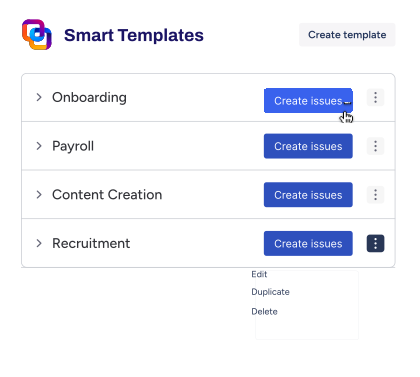
The Smart Templates webhook URL handles authentication for issue creation. However, if your automation script needs to interact with the Jira REST API before or after triggering the webhook – for example, to add a comment or update a field on the created issue – it will need a separate API token.
In Jira Automation rules, add an API token to the webhook action header:
Authorization: Basic [Base64-encoded email:token]
Using API tokens with third-party tools
Most integrations store the token as a secret or environment variable. The correct approach per tool:
- GitHub Actions: Store as a repository secret (JIRA_API_TOKEN), reference in the workflow YAML as ${{ secrets.JIRA_API_TOKEN }}
- Jenkins: Store in Jenkins Credentials Manager as a Secret Text credential
- Postman: Store as an environment variable in the active environment – never in the collection itself
- Microsoft Azure DevOps / Slack integrations: Use the integration’s built-in credentials manager or a dedicated secrets vault
Choosing scopes and keeping tokens secure
How scopes work
When you create a scoped token on Jira Cloud, you choose which products and actions it covers. The scope list runs to around 375 individual permission options across Jira and Confluence (full Jira and Confluence scope reference). In practice, most integrations need only a handful.
Common scope combinations by use case:
| Use case | Scopes needed |
|---|---|
| Read-only reporting | read:jira-work |
| Issue creation (CI/CD pipeline) | read:jira-work, write:jira-work |
| Full issue management | read:jira-work, write:jira-work, manage:jira-project |
| Confluence read access | read:confluence-content.all |
| Smart Templates webhook pre/post calls | read:jira-work, write:jira-work |
The security principle behind scopes: give the minimum access necessary for the job. If a token is compromised, the blast radius is limited to what those scopes allow. A leaked classic (unscoped) token gives full account access – every project, every issue, every setting your account can reach.
You cannot modify scopes after creation. If you need different permissions, revoke the token and create a new one.
Common scope errors and fixes
- “scope does not match”: Your token’s scopes do not cover the endpoint you are calling. Check which scope the endpoint requires in the Jira Cloud REST API documentation and create a new token with that scope added.
- 401 Unauthorized with a scoped token: Almost always a URL format problem. Verify you are using api.atlassian.com/ex/jira/{cloudId}/ and not your-site.atlassian.net/.
- “Issue does not exist” despite correct issue key: Verify your cloudId and confirm the token’s scopes include read:jira-work.
Security rules for API tokens
Never store tokens in code. Use environment variables in scripts, secrets managers in CI/CD pipelines (GitHub Actions secrets, Jenkins Credentials Manager, AWS Secrets Manager), and a password manager for personal tokens.
Set expiry dates on every token. Atlassian now enforces a one-year maximum (Atlassian’s token expiry policy), but shorter is better for tokens with write or delete access. Quarterly rotation is a reasonable policy for production integrations.
Use scoped tokens instead of classic tokens. The blast radius of a leaked scoped token is limited to what those scopes allow. A leaked classic token gives full account access.
Use service accounts for shared automations. Personal tokens are tied to their creator’s account. Service accounts are independent – the token survives personnel changes and carries only the permissions the automation actually needs (Atlassian service accounts guide).
Monitor token usage. Atlassian Guard provides token usage monitoring for managed accounts. You can also view token activity from admin.atlassian.com ? Security ? User API tokens. Atlassian has announced that basic token monitoring will be available without a Guard subscription (Atlassian’s token monitoring announcement). For more on Jira security and access controls, see Jira security and Atlassian Cloud data protection.
Revoke compromised tokens immediately. Go to your Atlassian account – Security – API tokens, select the token, and revoke it. For DC, admins can revoke PATs from the admin panel. The token is invalidated immediately.
Troubleshooting common API token issues
Token not working immediately after creation
Check Base64 encoding. Basic auth requires a Base64-encoded string in the format email:token. Encoding errors – spaces, missing colons, incorrect padding – cause immediate authentication failures. Use echo -n ’email@example.com:yourtoken’ | base64 in the terminal to generate the correct string.
CAPTCHA triggered
Too many failed authentication attempts trigger a CAPTCHA challenge. This is common when testing with incorrect tokens repeatedly. Wait a few minutes and try again with a verified token.
Scoped token returning 401 or 403
Two causes: wrong URL format (you are using your-site.atlassian.net instead of api.atlassian.com/ex/jira/{cloudId}/), or missing scopes. Check both. If the URL is correct, review which scopes the specific endpoint requires in the Atlassian developer docs.
Token expired: the 2025-2026 migration wave
Atlassian set all tokens created before December 2024 without an expiry date to expire one year from March 2025. This means tokens from that window expired between March and May 2026 (Atlassian’s token expiry migration notice). If an integration stopped working with no code changes, a silently expired token is the most likely cause. Generate a new token and update it in your integration config.
Permission denied at the project level
A token inherits the Atlassian account’s Jira roles and permissions – it cannot grant access the account does not already have. If the token works for some projects but not others, the issue is project-level permissions, not the token itself. Check that the account or service account has been added to the relevant projects.
FAQ
How do I find my Jira API token after creating it?
You cannot. Atlassian shows the token value only once – in the creation dialog. Once you close it, the token is no longer retrievable. This is by design: storing tokens in the UI would create a security risk. If you lose a token, revoke it and create a new one, then update it in the tool that was using it. The correct approach is to paste the token directly into your tool’s credentials field or secrets manager at creation time (Atlassian’s API token documentation).
Do Jira API tokens expire?
Yes. Since December 2024, all new Atlassian Cloud API tokens expire after a maximum of one year. You set the expiry date at creation, from one day up to one year (Atlassian’s token expiry policy). Tokens created before December 2024 without expiry dates were retroactively set to expire in March 2025. Jira Data Center PATs have an optional expiry date you set manually; if you skip it, the token does not expire.
What is the difference between a Jira API key and an API token?
Nothing – they are the same thing with different names. “API key” is an informal term that appears in third-party documentation and integration setup guides. Atlassian’s official interface and documentation use “API token.” When a tool asks for your “Jira API key,” enter your API token.
Can I use the same API token for Jira and Confluence?
With scoped tokens, you can include both Jira and Confluence scopes in a single token. With classic unscoped tokens, one token gives access to everything your Atlassian account can reach – including Confluence. Whether to use one token for both or separate tokens depends on your security policy. For integrations that only need Jira, scoping the token to Jira only reduces risk.
How do I revoke a Jira API token?
On Cloud: go to id.atlassian.com ? Manage account ? Security ? API tokens. Find the token by name and select Revoke. The token is invalidated immediately – any integration using it will fail from that point. On Data Center: go to your Jira profile ? Personal Access Tokens and delete the relevant token. Jira DC admins can also revoke any user’s PATs from the admin panel, which is useful for offboarding or security incidents (Jira Data Center PAT documentation).