


 Jira
Jira monday.com


Jira REST API lets users interact with Jira remotely. You can use API calls to interact with common features like work items (issues) and workflows, or you can interact with application-specific features like customer requests that are only available in JSM.
In simpler words, Jira REST API lets you either get information from or update Jira without actually touching Jira. Some of the more prominent use cases include creating new work items (issues) in bulk, setting permissions, or developing new Jira apps that need to interact with Jira’s functionality like custom fields, etc.
What do you need to work with Jira REST API?
Technically, you don’t need much to start working with Jira REST API. Having an API token and an API client should be more than enough to cover a wide variety of cases.
- You will need project admin permissions to generate a token.
- You can use any API client that suits your needs. I will be using the downloadable version of Postman for this article, but you are free to use any other alternative to it or just stick with good old curl, if that is your cup of tea.
Is there a difference between Jira Cloud REST API and REST API for Jira Data Center?
You should pay attention to the differences if you are an Atlassian App developer as there may be certain rate limits. Please refer to this documentation for Jira Cloud or to this documentation for Jira Data Center.
There’s one more thing you may need to consider. Atlassian rolls out changes to the Cloud API directly. This functions similarly to functionality updates and changes they introduce in Jira Cloud.
There are also certain differences in terms of authentication and authorization. Other than that, Jira REST API for Cloud and Data Center versions of the software has similar functionality. And you’ll need to add a special permission for API tokens in Jira Cloud.
Just remember to refer to the correct version of documentation when there’s a question.
And just so we are on the same page, I’ll be using a Jira Data Center project for the examples in this article.
How to create an API Token in Atlassian Jira?
First thing’s first. You will need to generate a Token to use API calls. These tokens are needed for secure authentication.
- Click on your avatar
- Click on profile
- Select Personal Access Tokens
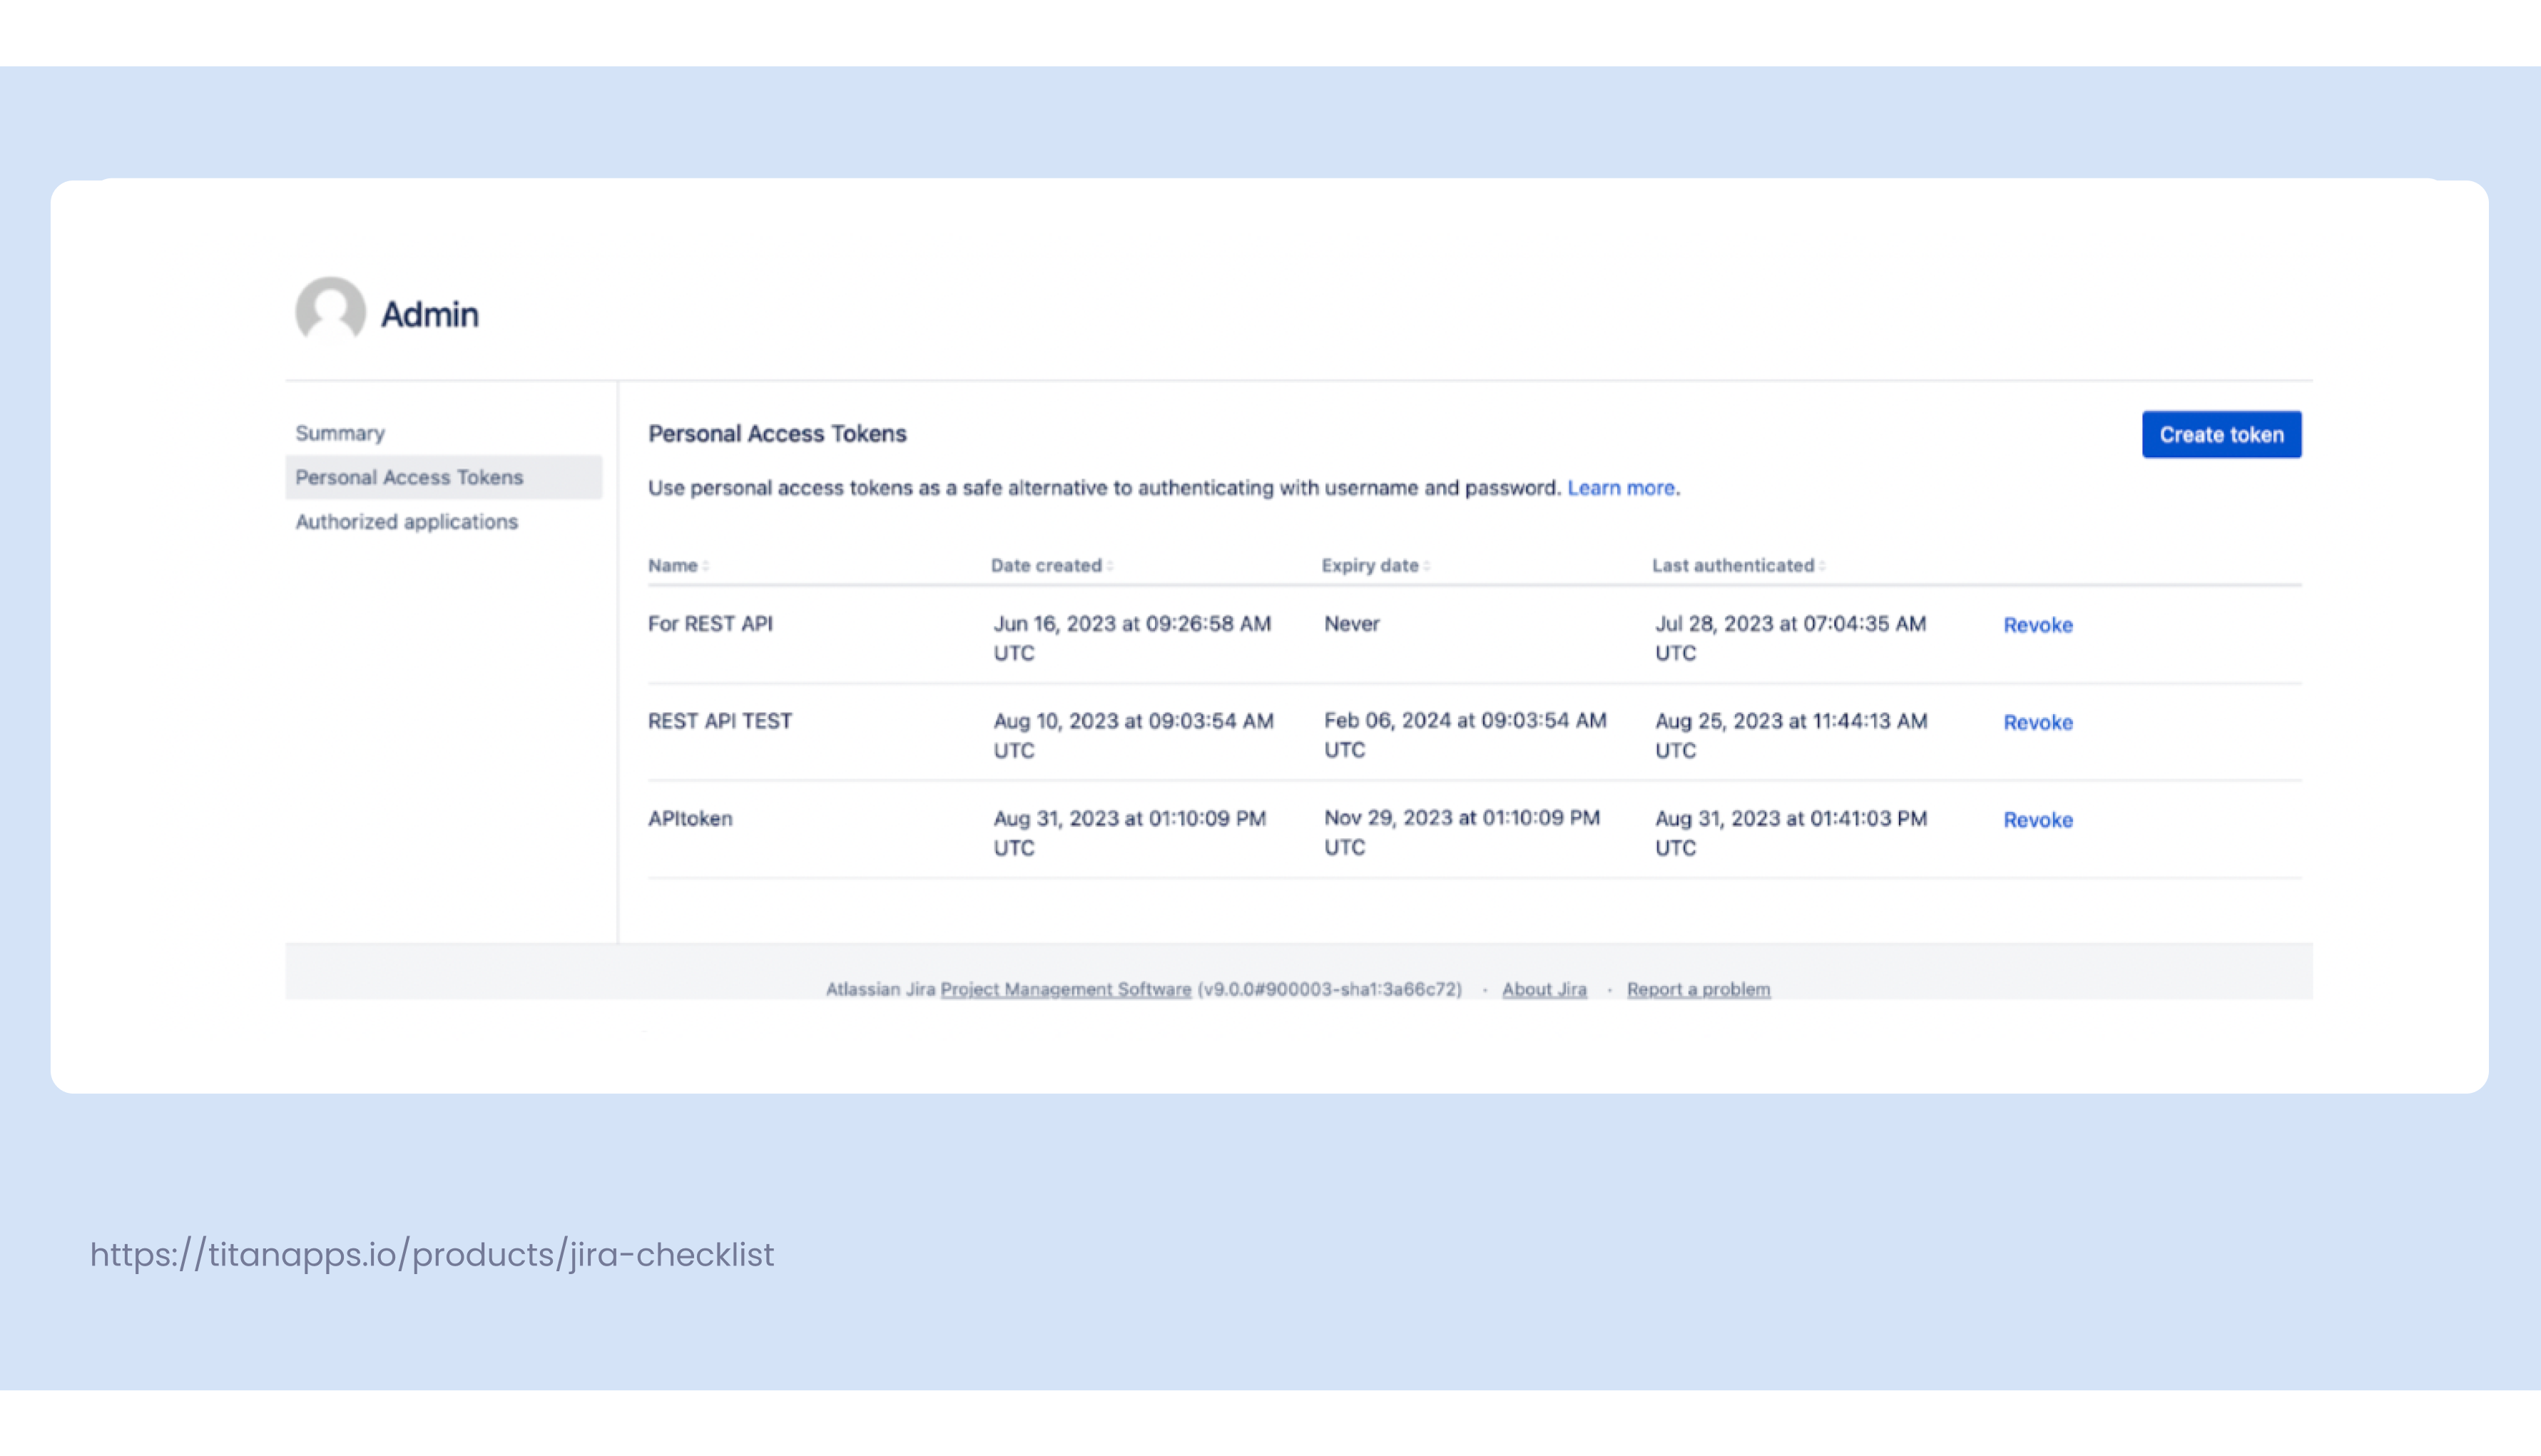
- Create a new token
- Type the name of your token
- Select the automatic expiry date
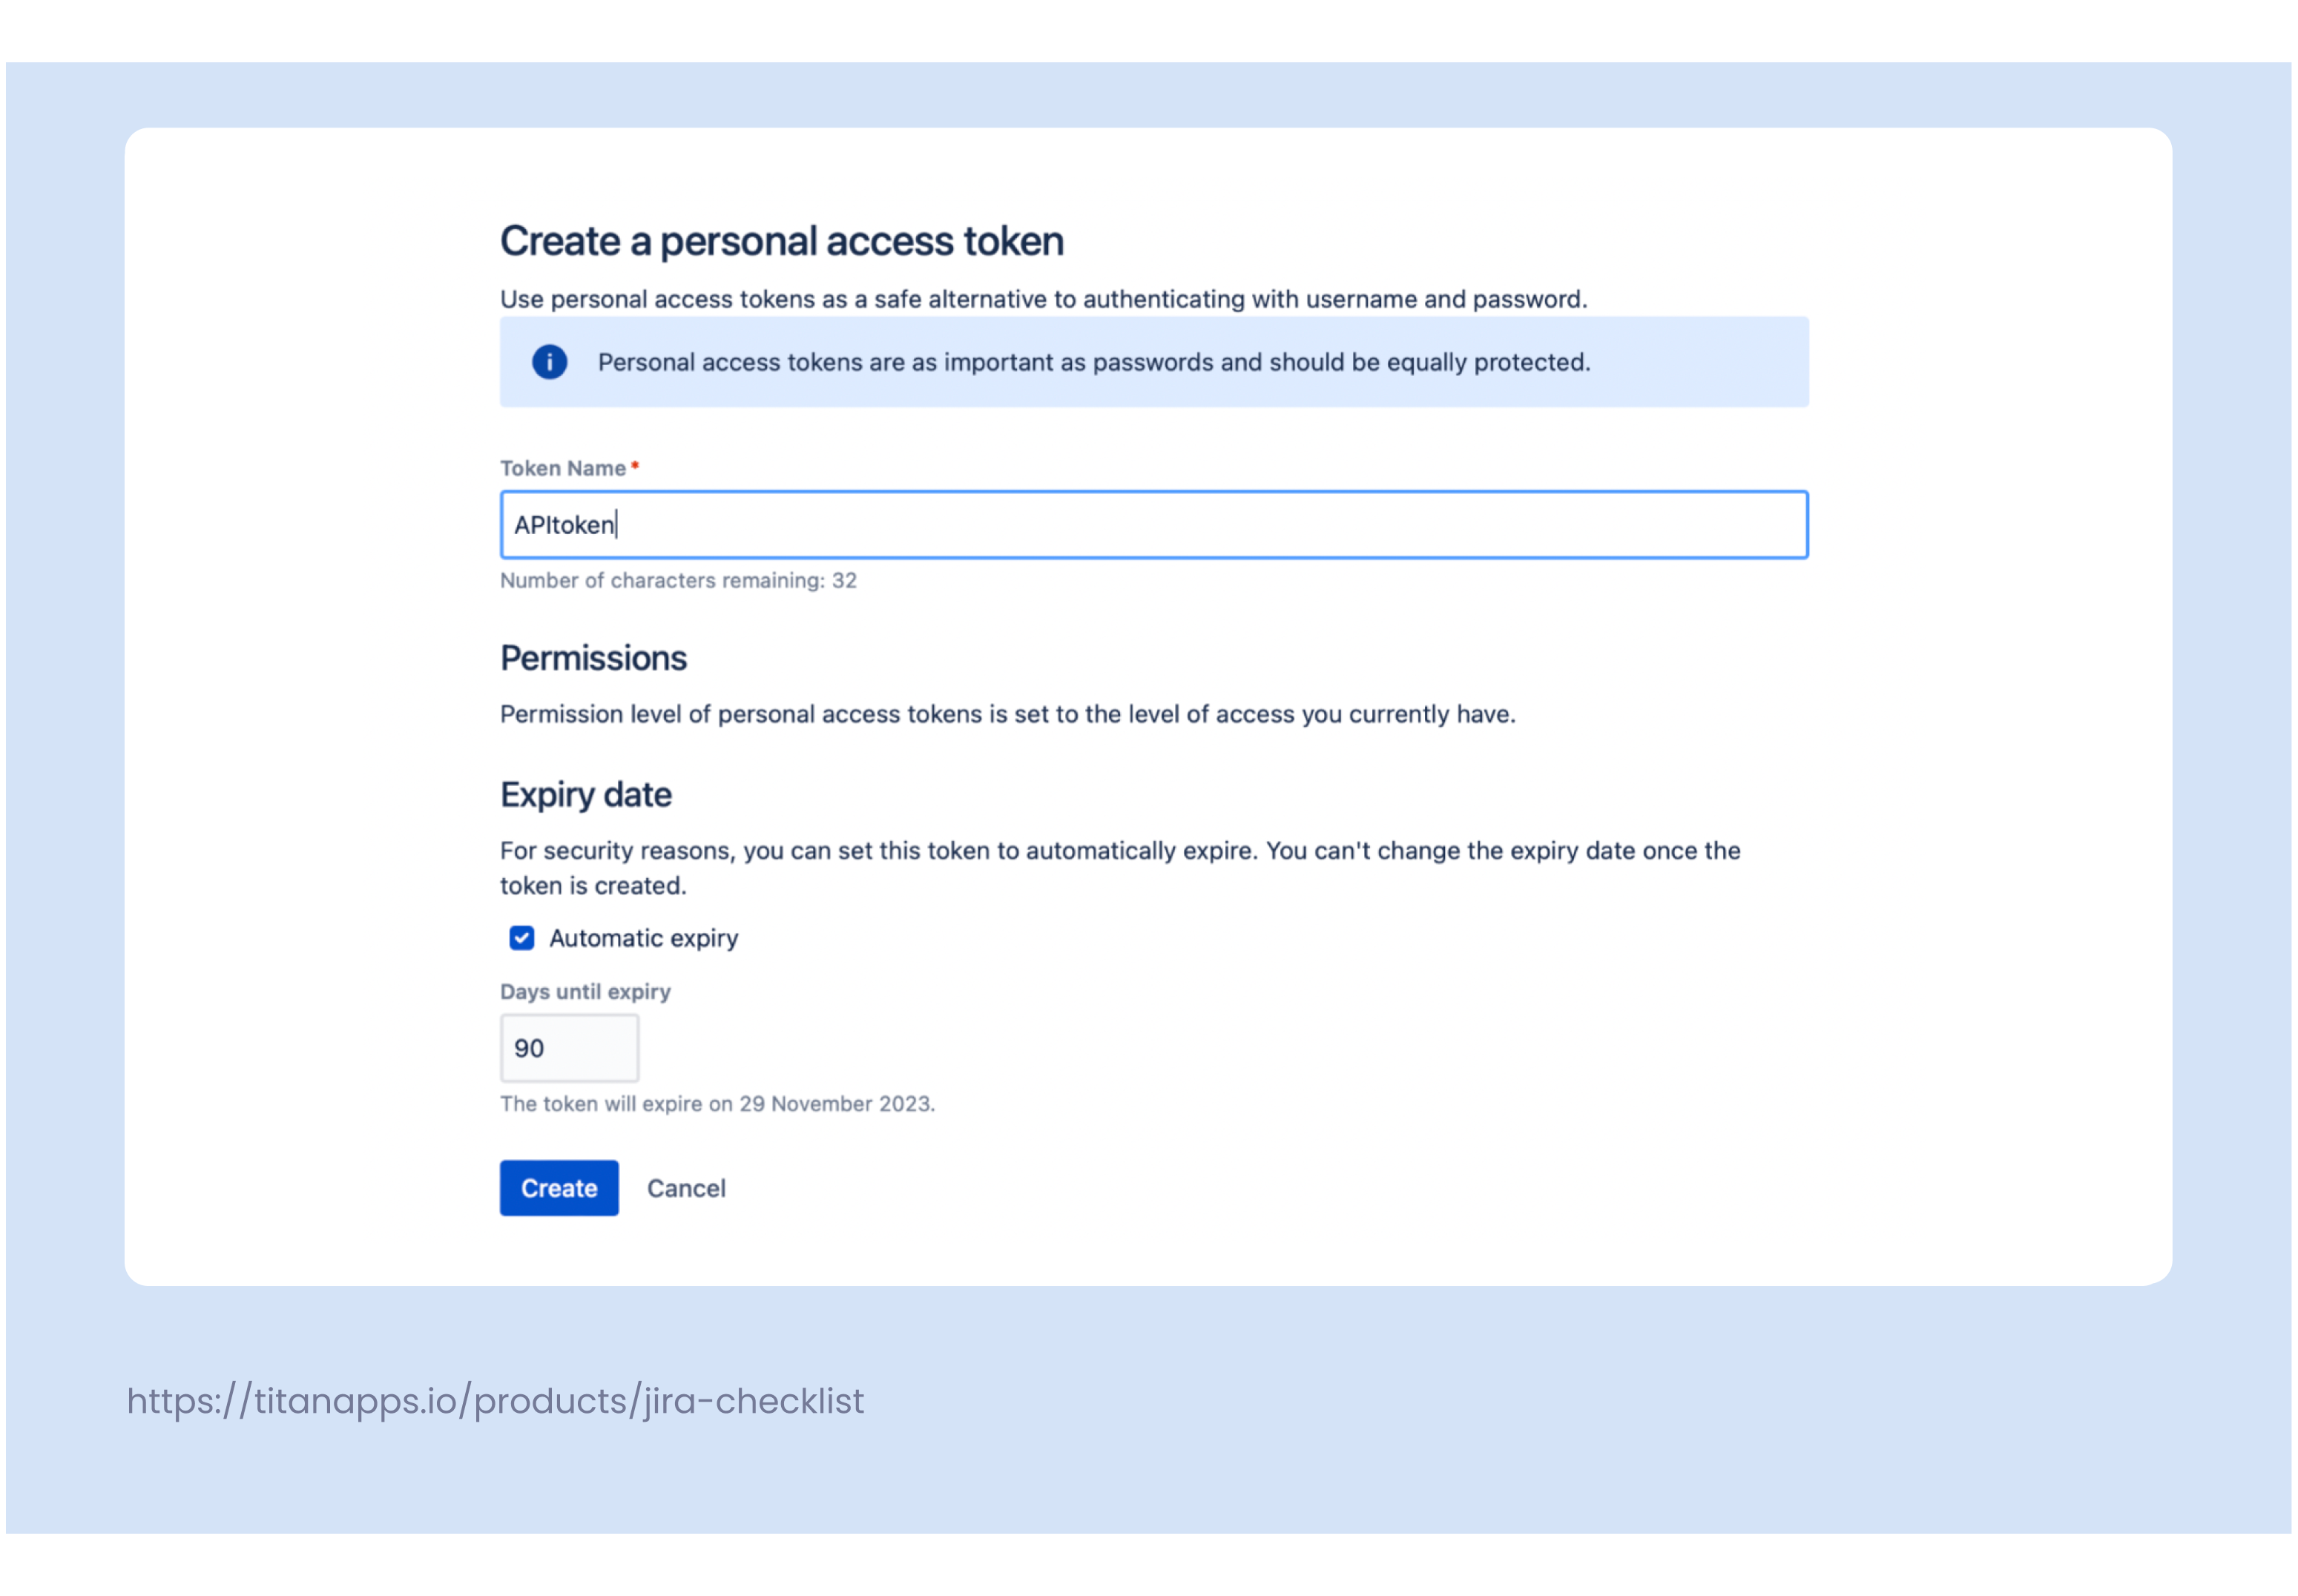
- Generate your Token
- Copy the token you see on the screen. You will not be able to see this token after you close the token screen. You can also save it somewhere, though this option isn’t recommended since saving a token isn’t what I’d call secure. Therefore, I highly suggest you copy the token straight into Postman (or whichever app you’ll be using to interact with Jira).
Now that we have our token, let‘s use it for authorization in Postman.
- Open a new tab in Postman
- Go to authorization (Auth)
- Select the Bearer Token as Type and paste your Token
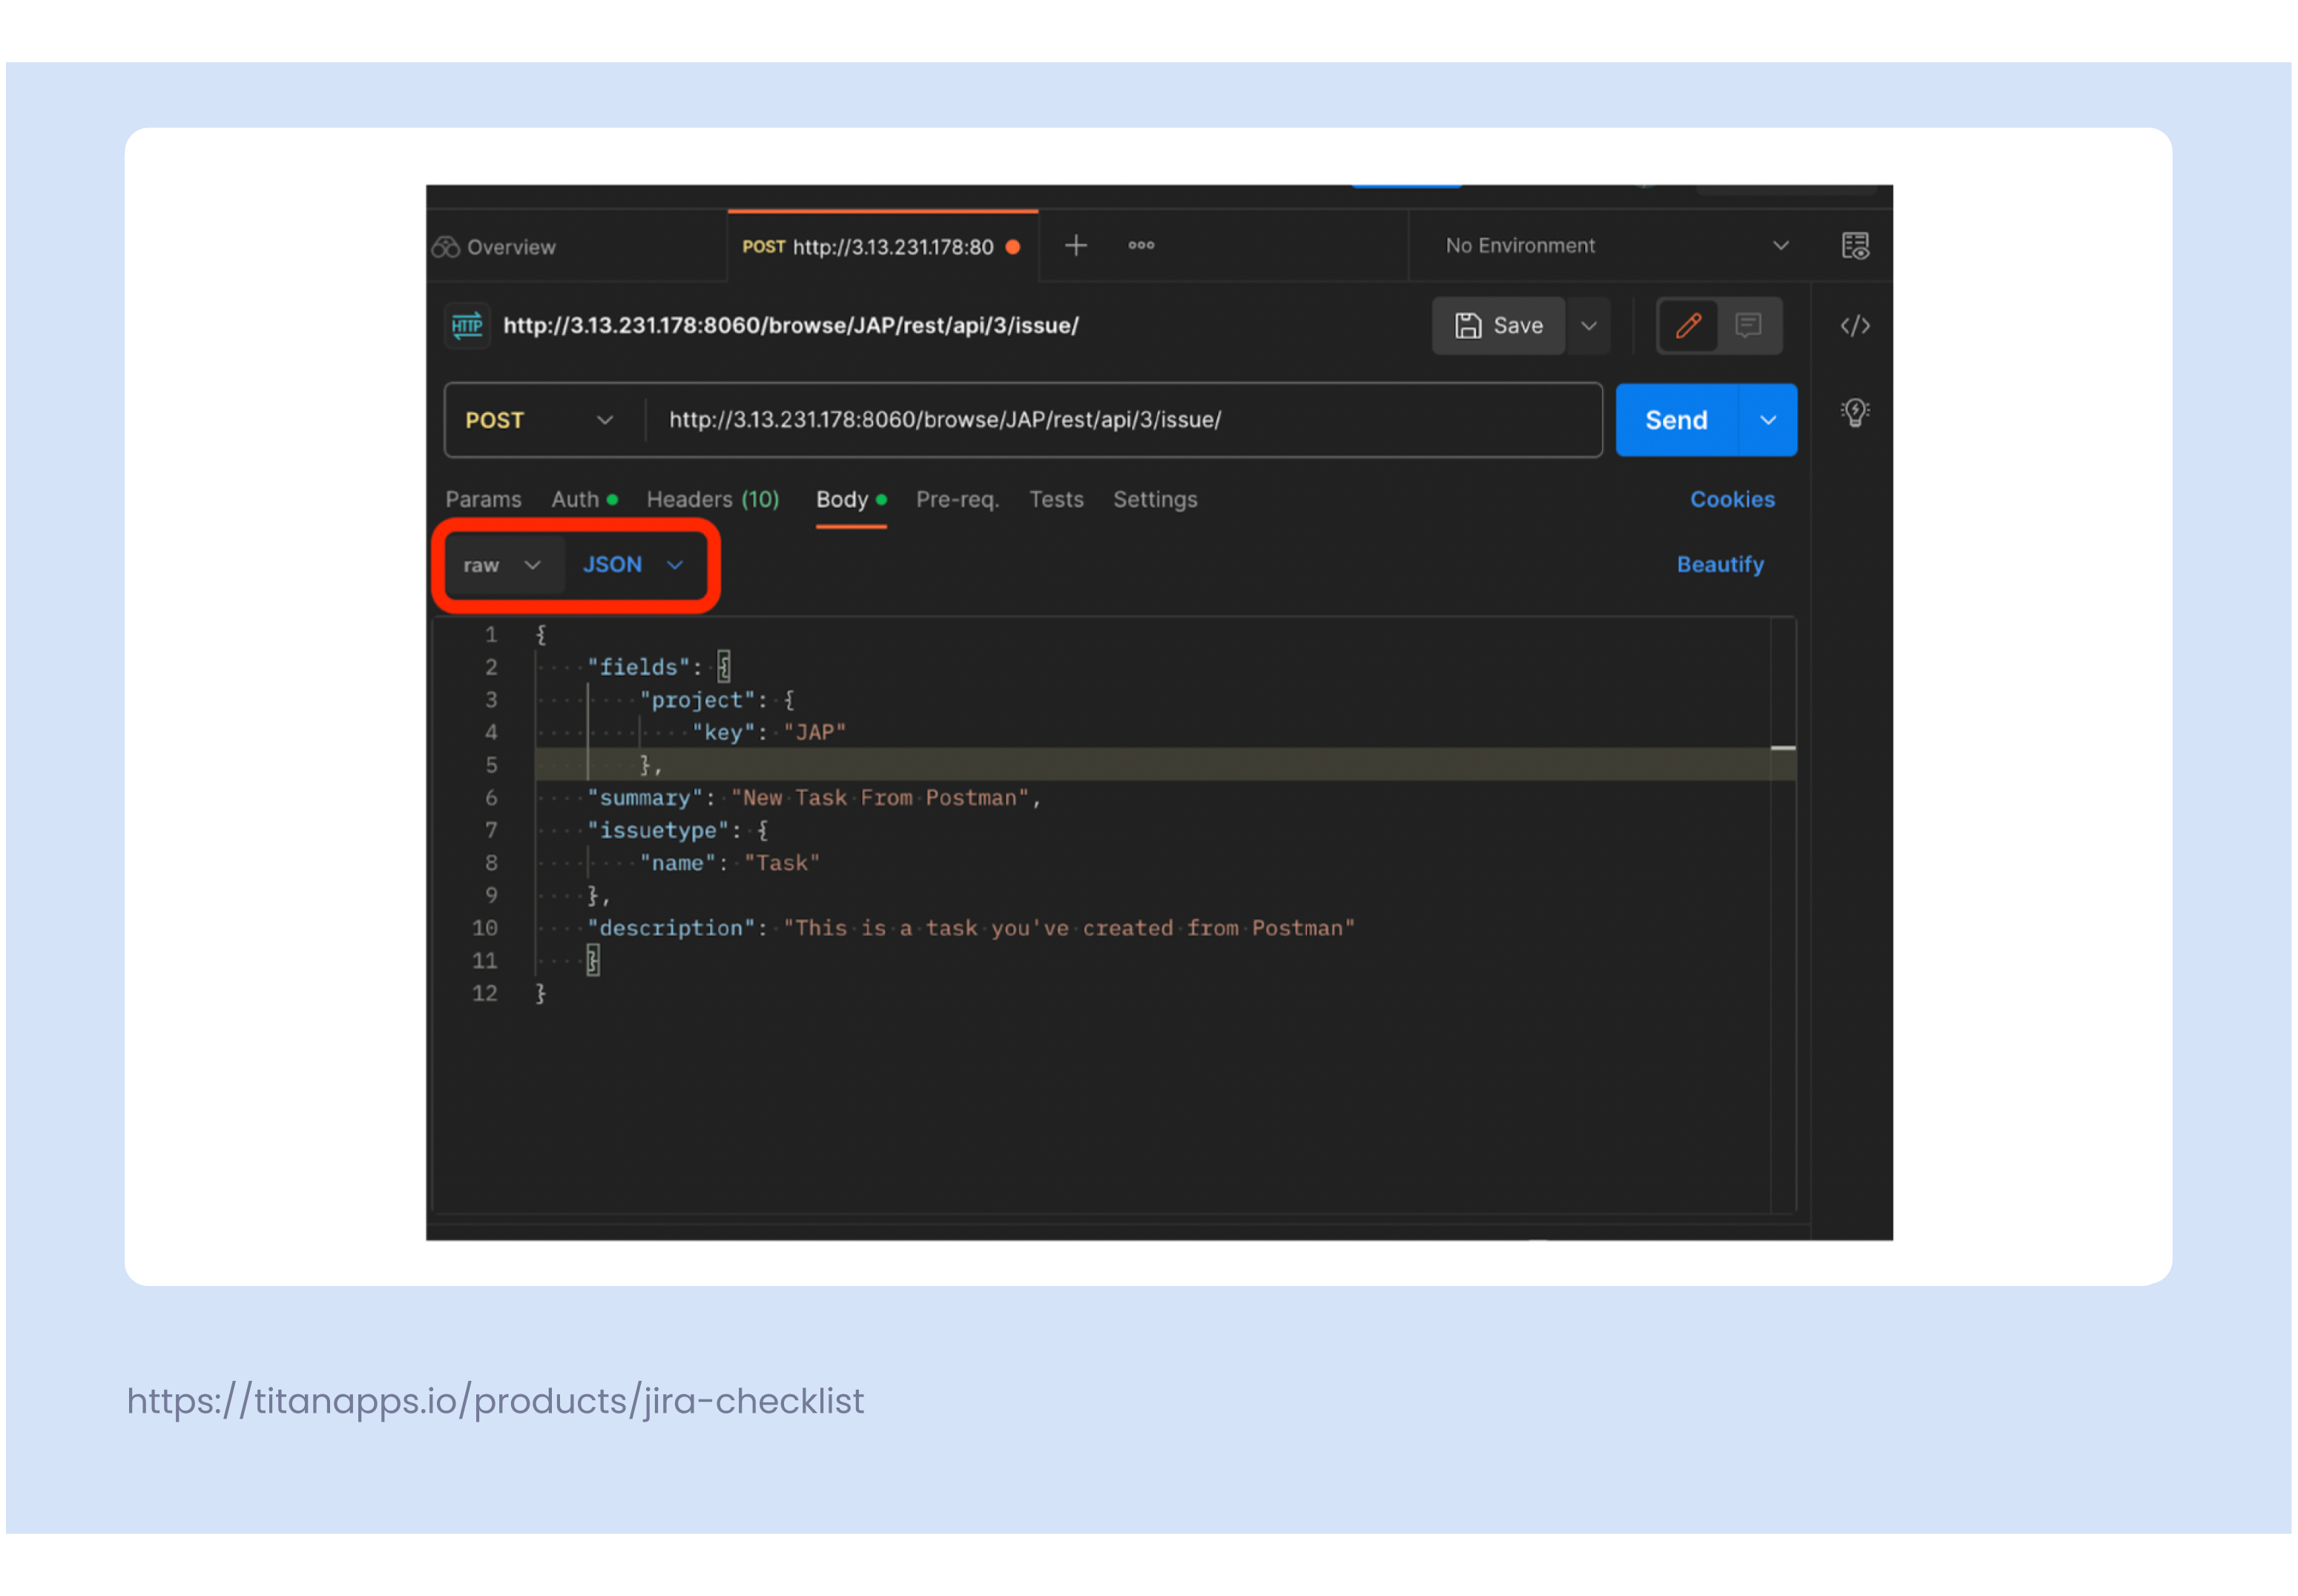
- Go to body and select raw and JSON from the drop-down menus
- Type in your URL and select the HTTP request like
POSTorGET, depending on your needs. You can rely on Atlassian Documentation to generate a correct URL.
That’s pretty much the whole setup. You have everything you need to work with Jira without Jira ?.
Creating and editing work items (issues) with API calls: examples
Let’s start with something simple. We will create a new work item in your Jira project. The following code will create a task work type inside a project you’ve specified using the project key. As you can see, I’ve also specified the summary and description in this example.
{
“fields”: {
“project”: {
“key”: “JAP”
},
“summary”: “New task from Postman”,
“issuetype”: {
“name”: “Task”
},
“description”: “This is a new task you’ve created from Postman”
}
}
You can be much more descriptive when creating work items. For example, the following code will add an assignee and a label to your newly created ticket.
{
“fields”: {
“project”: {
“key”: “JAP”
},
“summary”: “Another Task From Postman”,
“issuetype”: {
“name”: “Task”
},
“description”: “This is a task you’ve created from Postman”,
“assignee”: {
“name”: “admin”
},
“labels”: [
“demo”
]
}
}
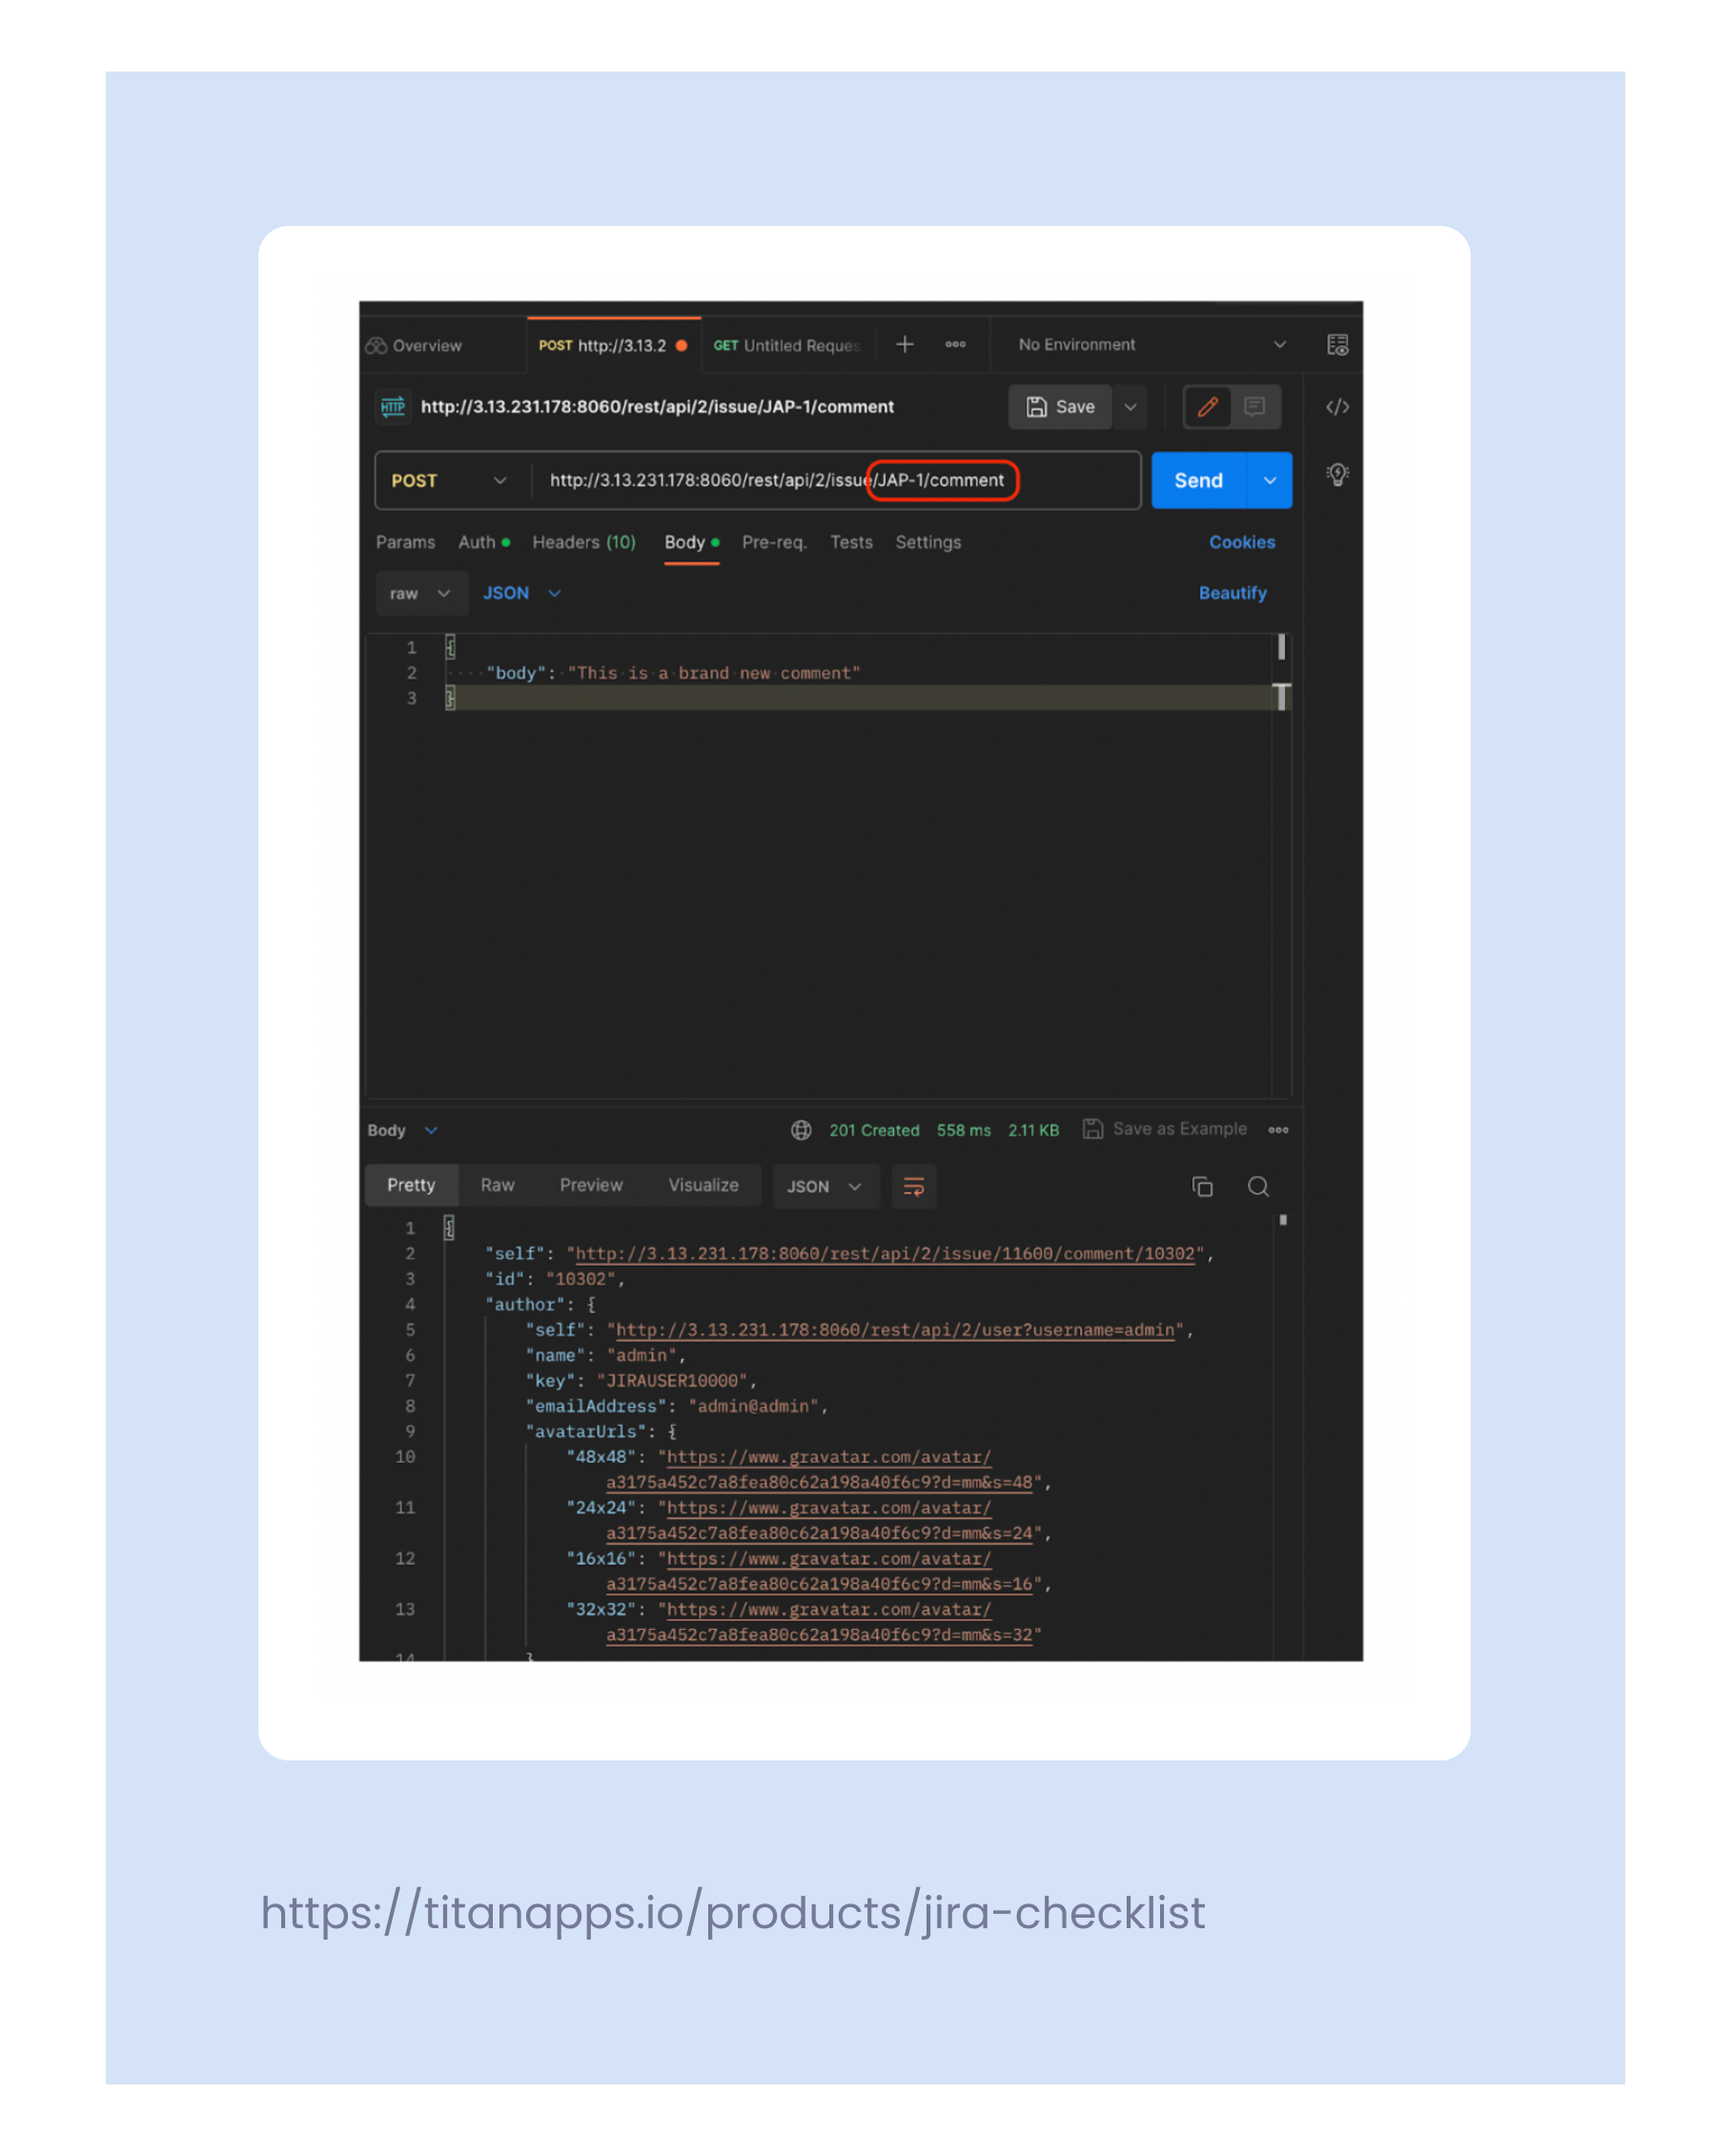
Alternatively, you can post updates to your tickets from the Postman interface. For example, this code will create a new comment inside a specific ticket.
{
“body”: “This is a brand new comment”
}
That being said, you need to specify the work item you want to update inside Postman’s URL field. For example, I used “JAP-1” because it is the work item ID I wanted to update, and I also used comment to specify what I wanted to do.
Working with Jira API simplified
Modifying work items one by one through API is barely faster than doing the same directly in Jira. Modifying several dozens of work items at once – now that’s where the fun begins.
Let’s look at two examples of creating work items in bulk using Jira API. The first example is importing work items from a CSV file.
Bulk update from CSV
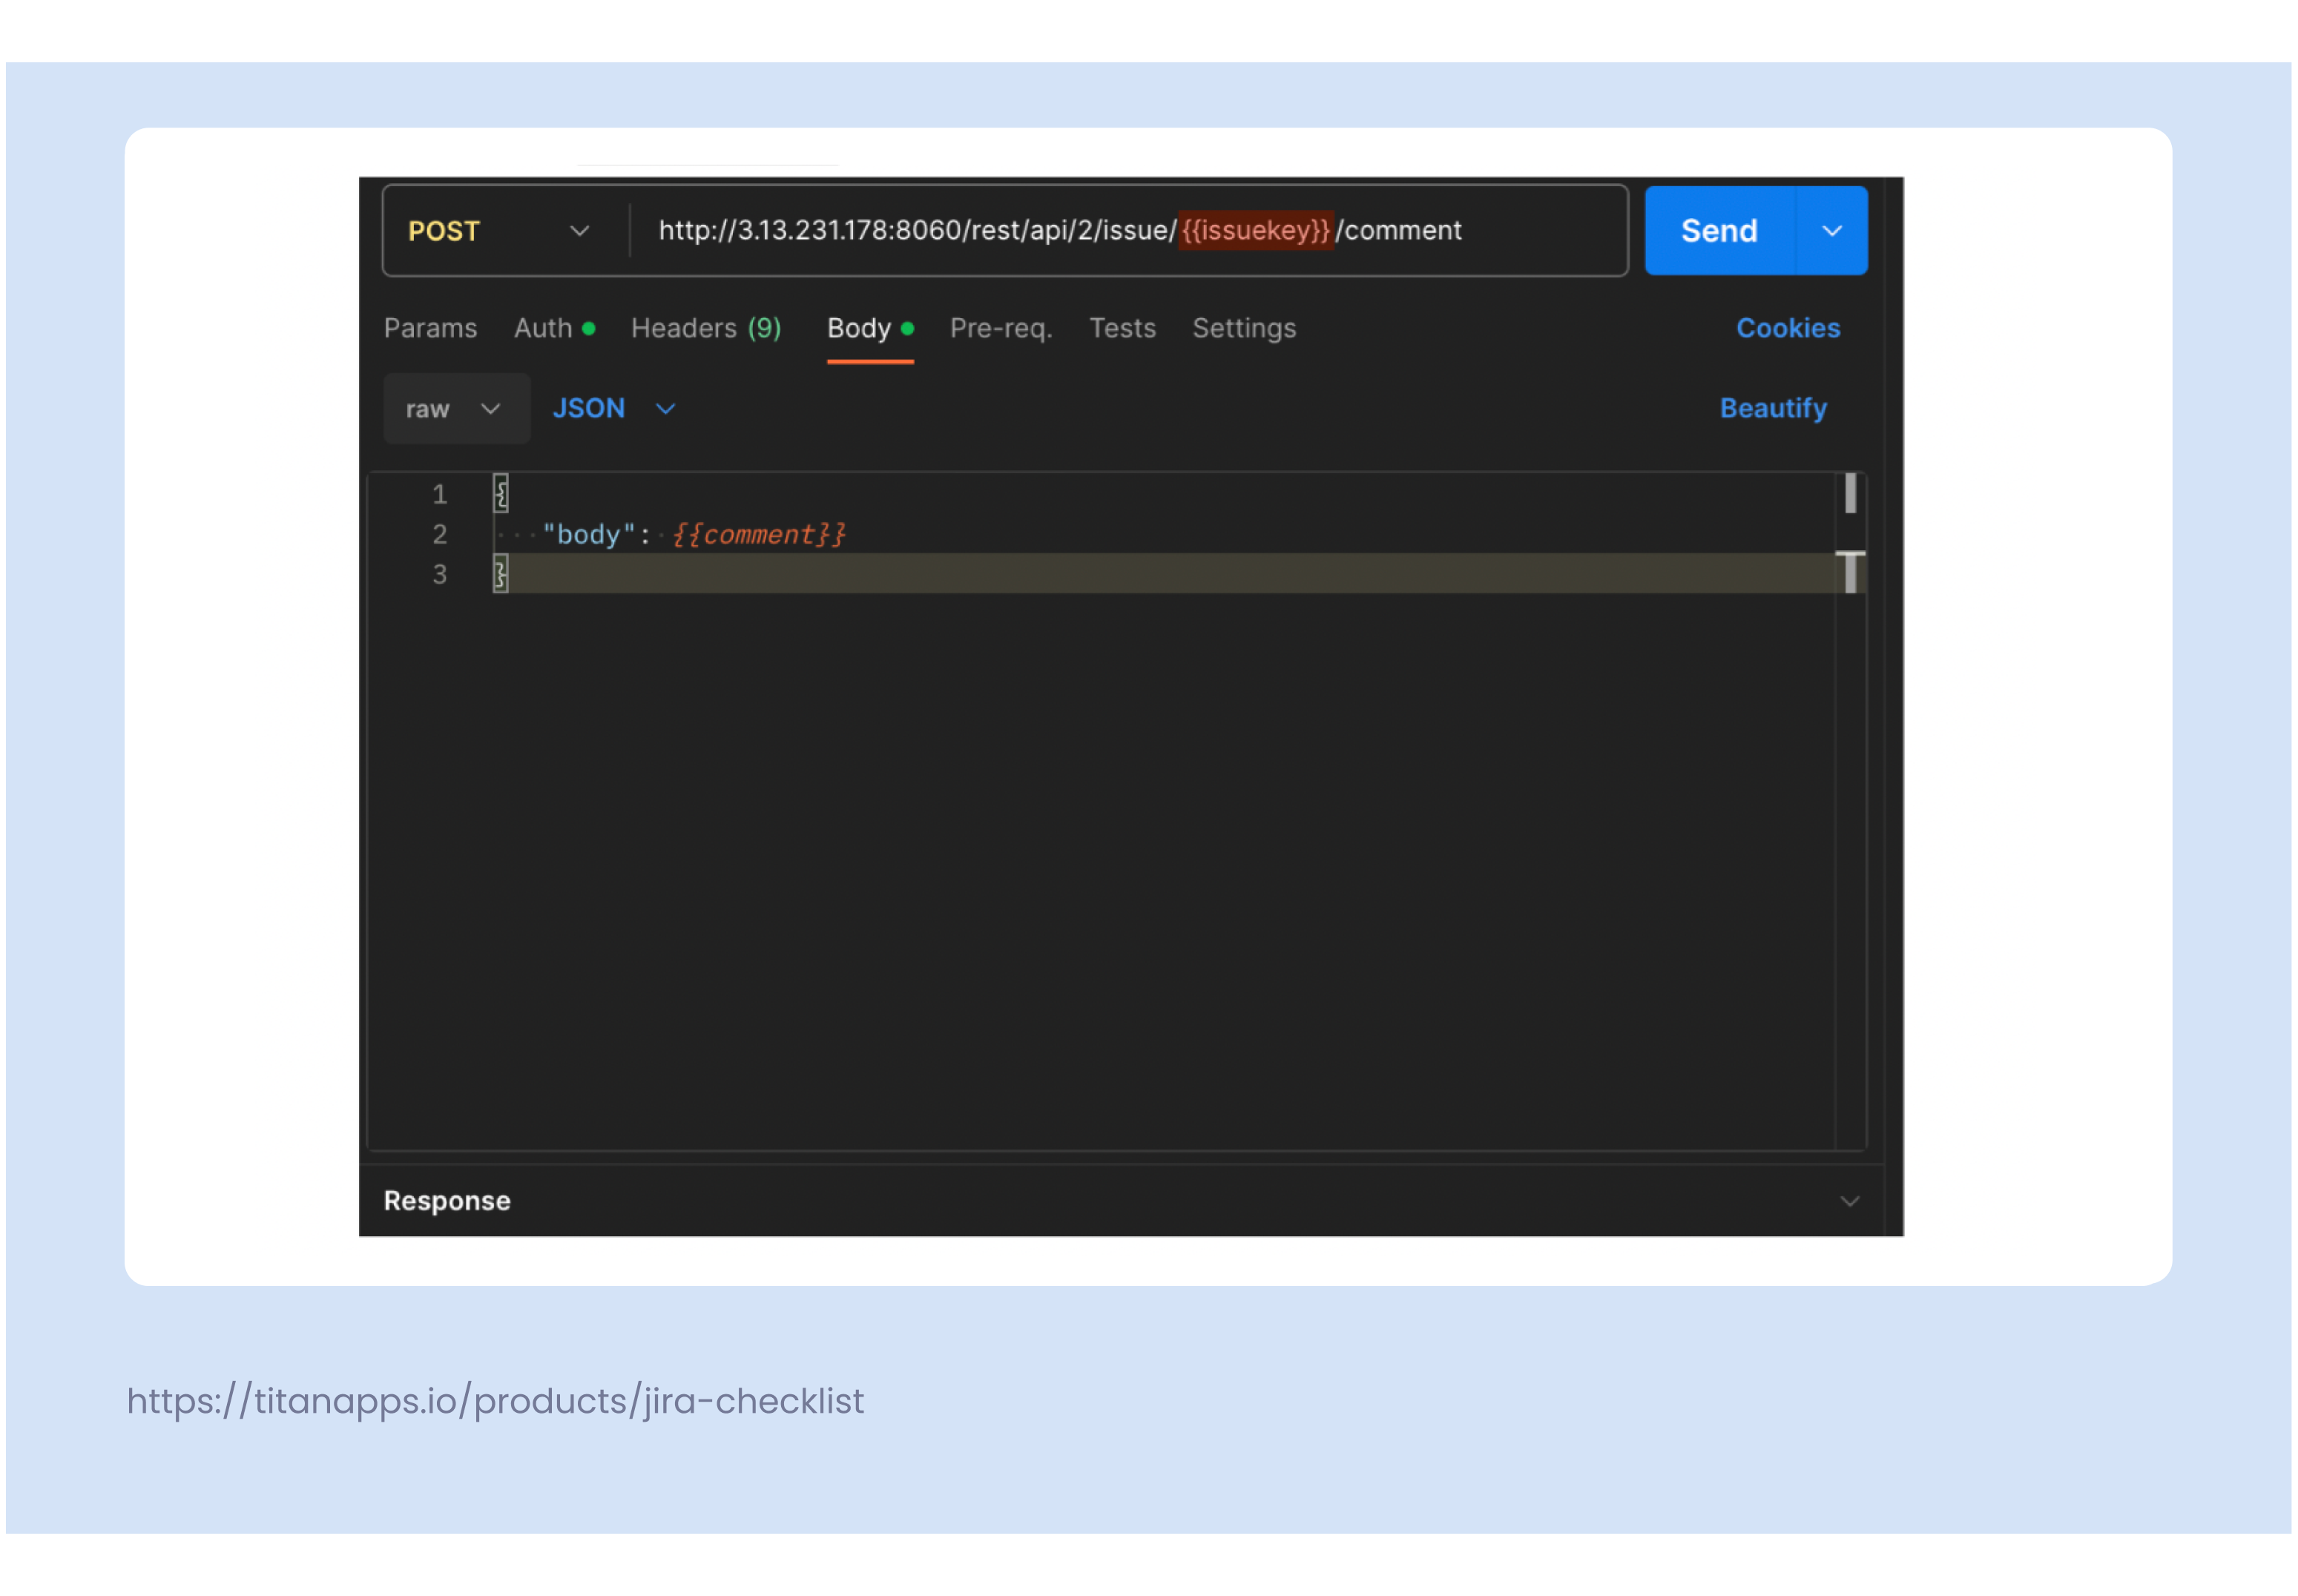
For starters, you need to transform your work item key and the comment body into variables. Replace the actual work item key in the URL field for {{issuekey}} and the body of the comment to {{comment}}.
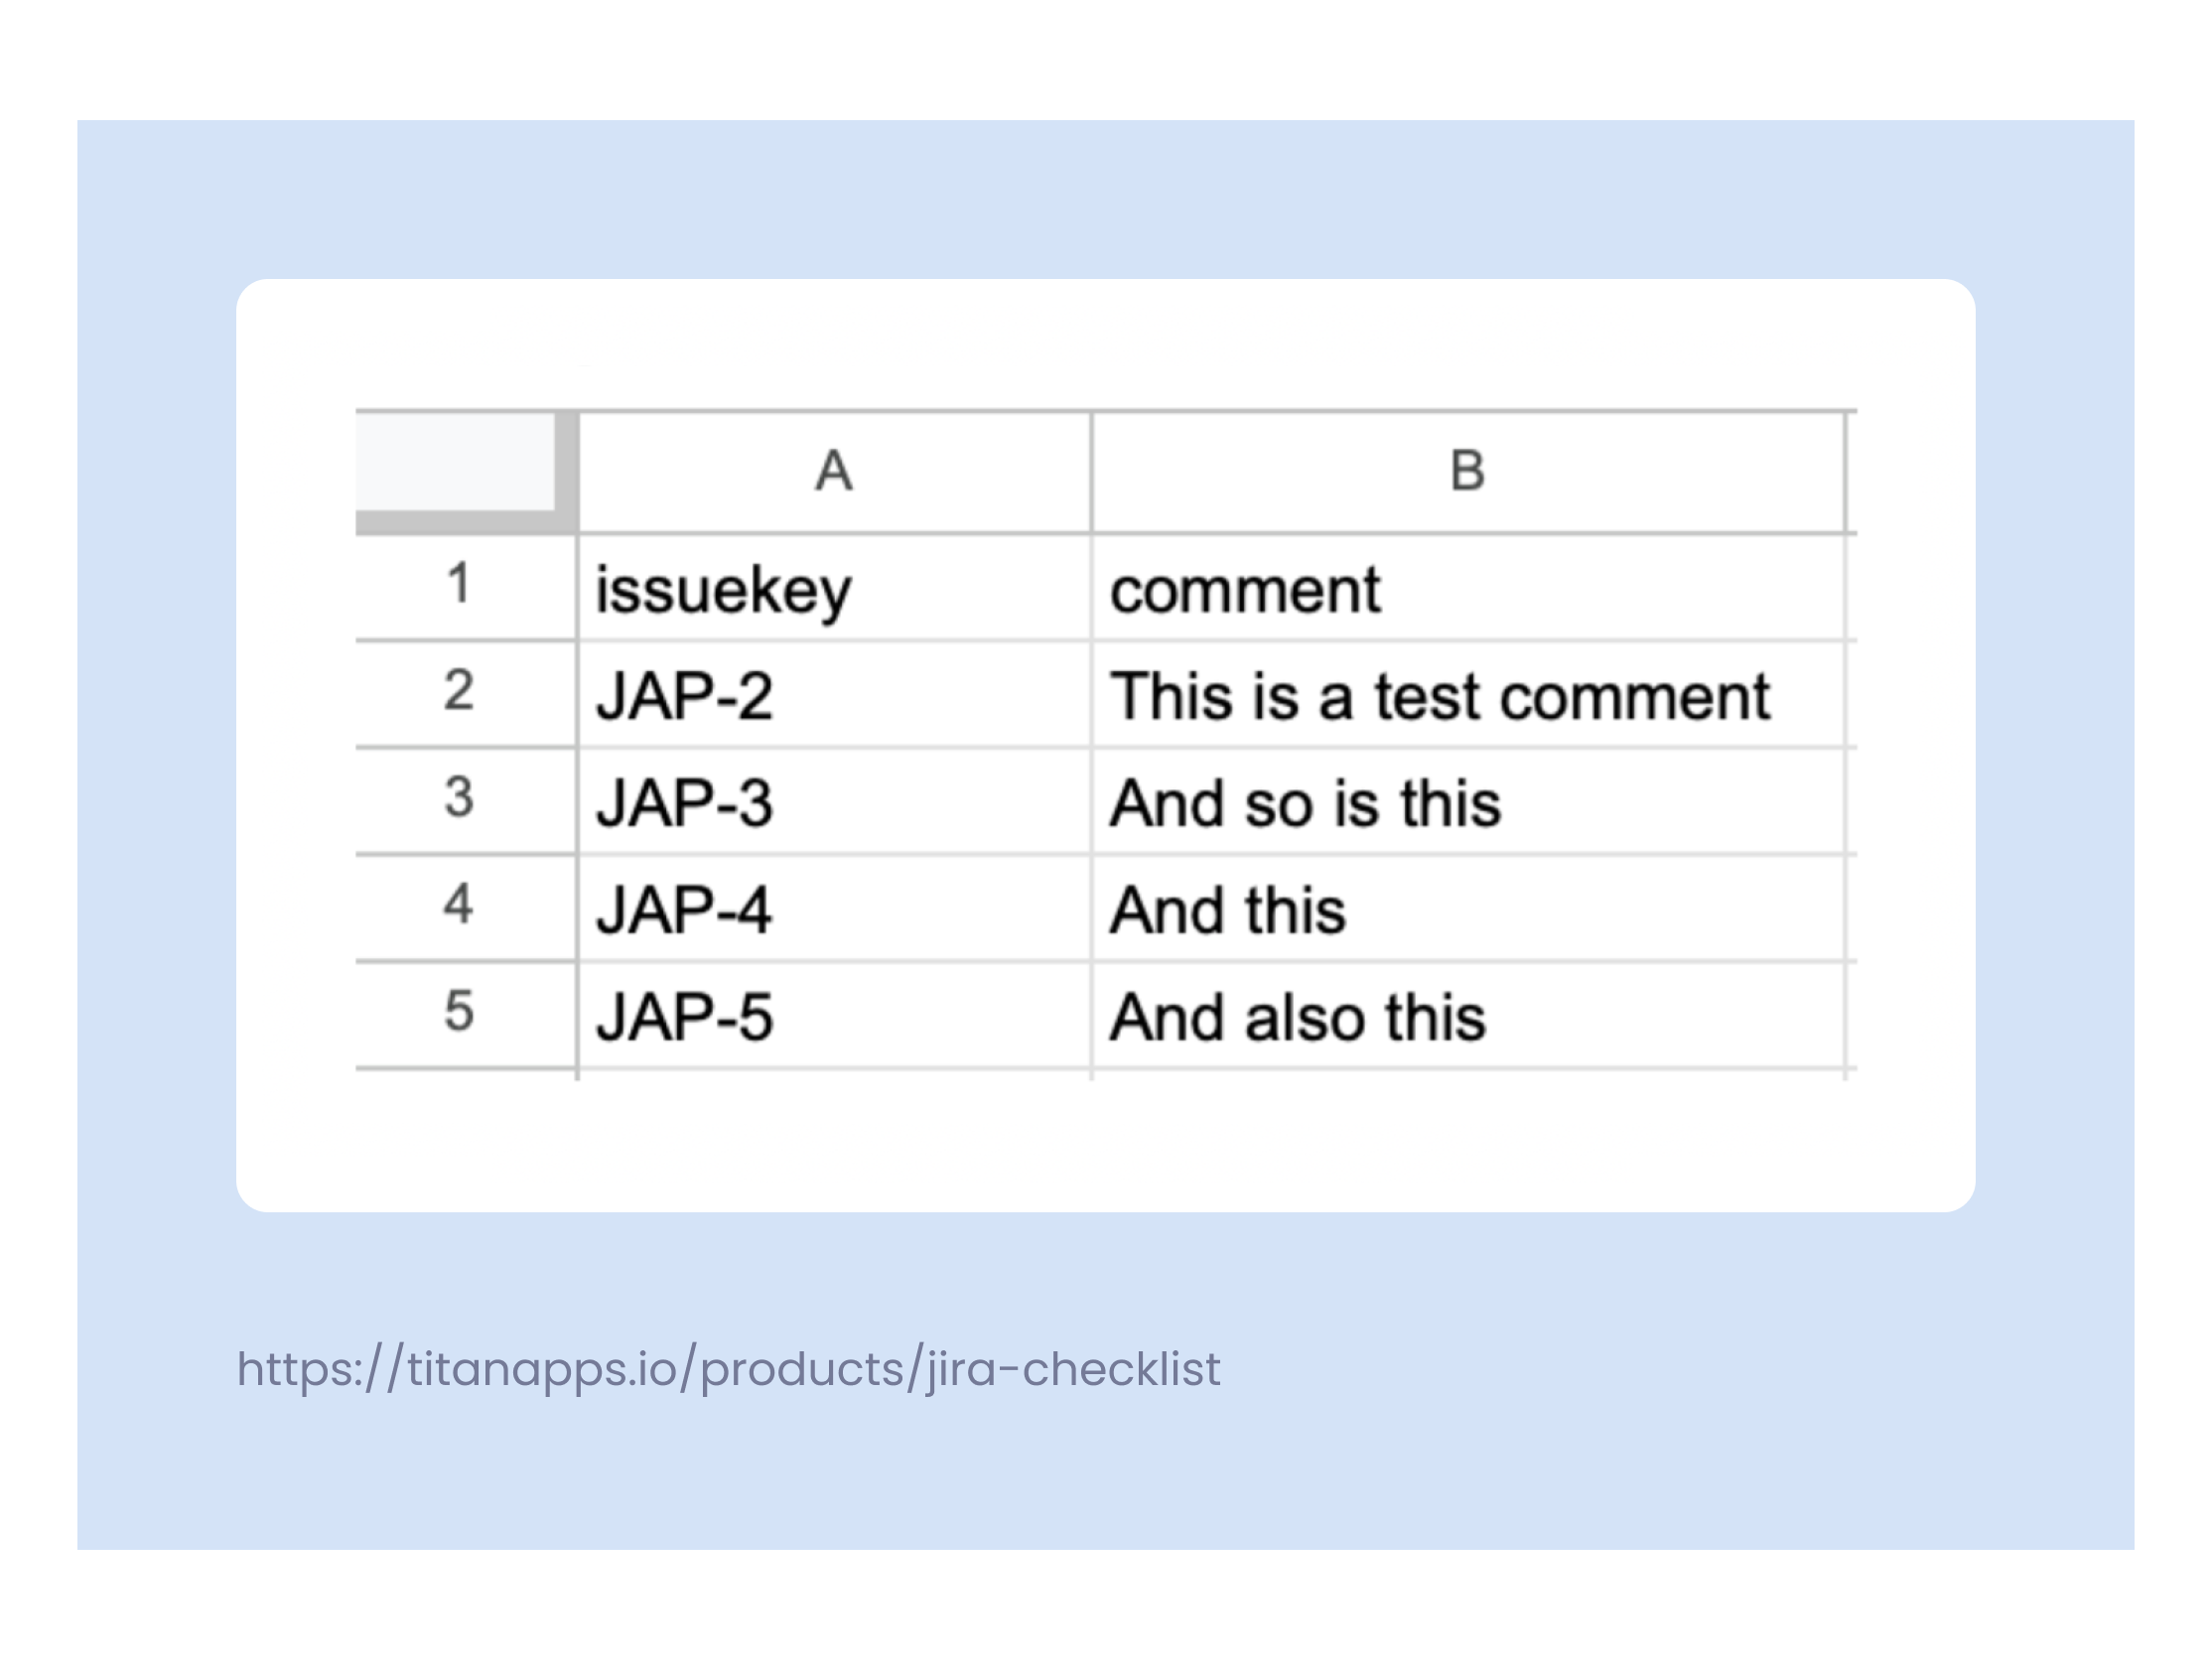
Next, create a CSV file and populate it with work item keys and comments. Make sure to name your columns the same way as the variables. Save your CSV file.
Go back to Postman. We will be using the Runner feature. You can access it by clicking on the Runner button at the bottom of the app’s interface.
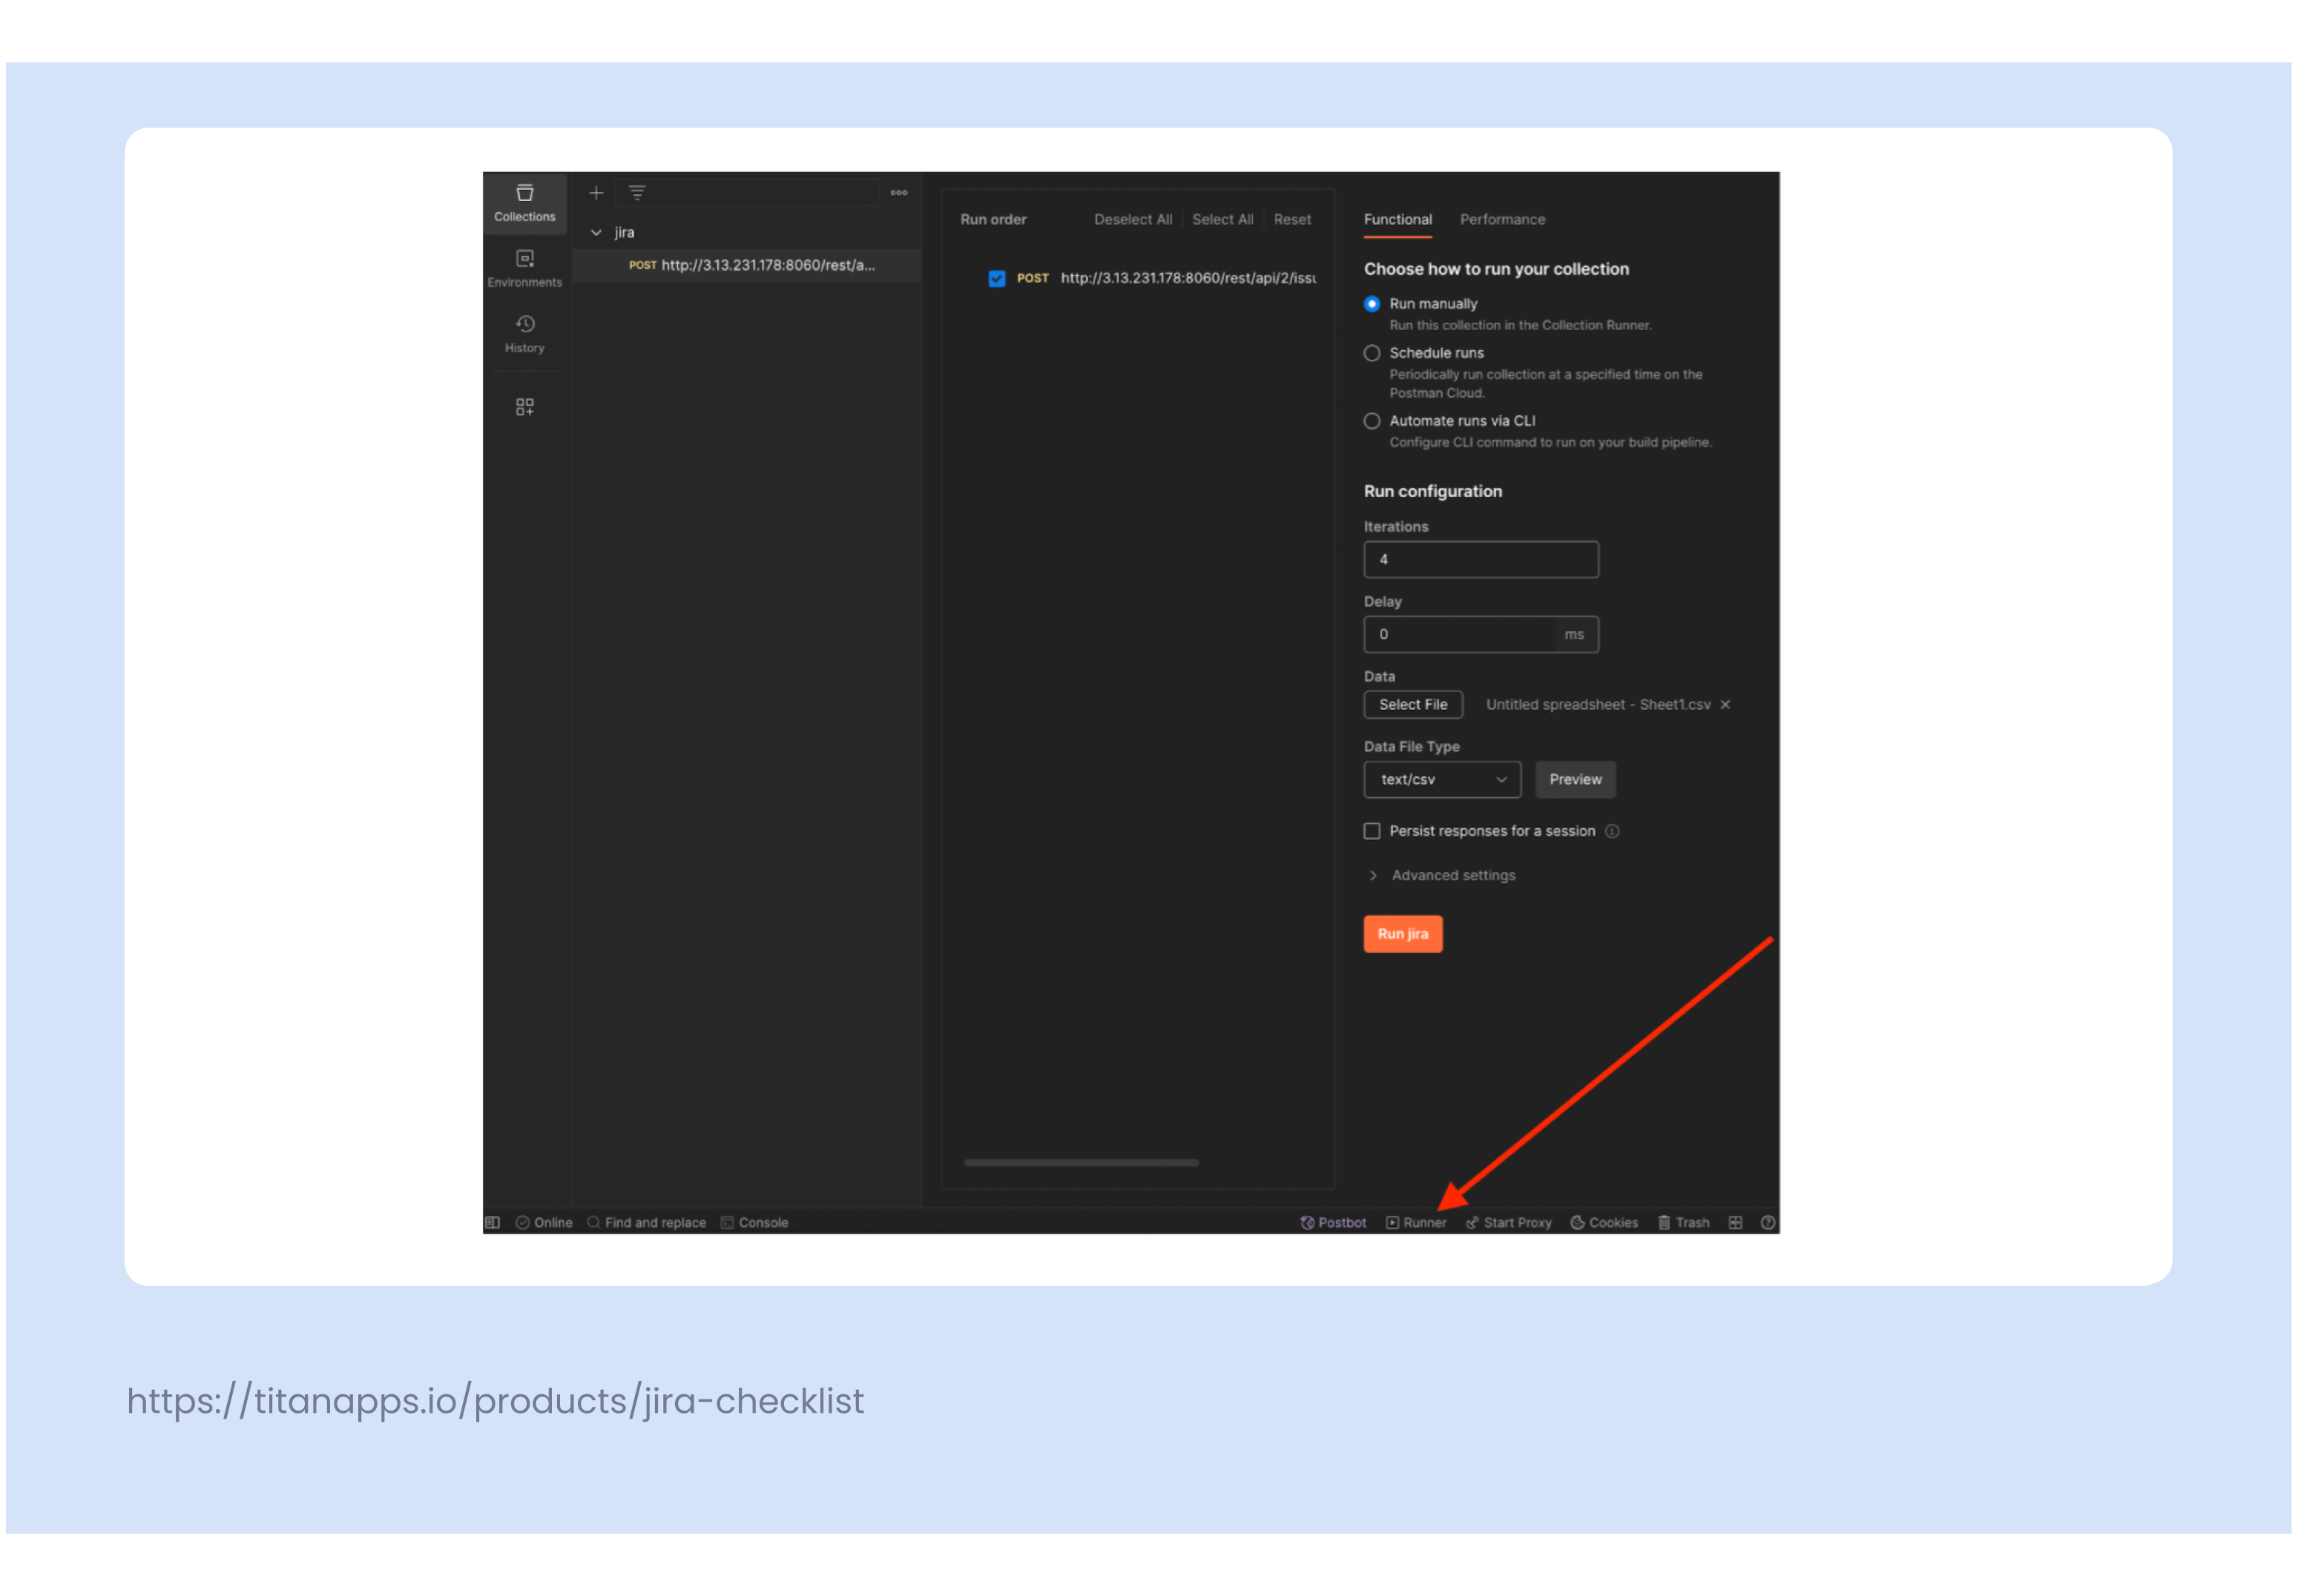
- Select the option you’d like to proceed with. In our case, I’ll go with Running manually.
- Click on the Select file button to upload your CSV. You’ll see that the number in the Iterations field has changed. This number corresponds to the number of rows you have in your Excel sheet.
- Drag the POST function you’d like to run into the Run order column from the Collections folder.
- You can use the history tab to find the POST function if you haven’t created a collection yet. Hover over the function, click on the + button, and add it to your collection.
- Click on the now brightly orange Run Jira button.
Bulk update from JSON representation
The second example is the creation of multiple work items or sub-tasks from a JSON representation. The method you will be using is POST /rest/api/2/issue/bulk
Here is an example of a request provided by Atlassian documentation:
{
“issueUpdates”: [
{
“update”: {
“worklog”: [
{
“add”: {
“timeSpent”: “60m”,
“started”: “2011-07-05T11:05:00.000+0000”
}
}
]
},
“fields”: {
“project”: {
“id”: “10000”
},
“summary”: “something’s wrong”,
“issuetype”: {
“id”: “10000”
},
“assignee”: {
“name”: “homer”
},
“reporter”: {
“name”: “smithers”
},
“priority”: {
“id”: “20000”
},
“labels”: [
“bugfix”,
“blitz_test”
],
“timetracking”: {
“originalEstimate”: “10”,
“remainingEstimate”: “5”
},
“security”: {
“id”: “10000”
},
“versions”: [
{
“id”: “10000”
}
],
“environment”: “environment”,
“description”: “description”,
“duedate”: “2011-03-11”,
“fixVersions”: [
{
“id”: “10001”
}
],
“components”: [
{
“id”: “10000”
}
],
“customfield_30000”: [
“10000”,
“10002”
],
“customfield_80000”: {
“value”: “red”
},
“customfield_20000”: “06/Jul/11 3:25 PM”,
“customfield_40000”: “this is a text field”,
“customfield_70000”: [
“jira-administrators”,
“jira-software-users”
],
“customfield_60000”: “jira-software-users”,
“customfield_50000”: “this is a text area. big text.”,
“customfield_10000”: “09/Jun/81”
}
},
{
“update”: {},
“fields”: {
“project”: {
“id”: “1000”
},
“summary”: “something’s very wrong”,
“issuetype”: {
“id”: “10000”
},
“assignee”: {
“name”: “jerry”
},
“reporter”: {
“name”: “kosecki”
},
“priority”: {
“id”: “20000”
},
“labels”: [
“new_release”
],
“timetracking”: {
“originalEstimate”: “15”,
“remainingEstimate”: “5”
},
“security”: {
“id”: “10000”
},
“versions”: [
{
“id”: “10000”
}
],
“environment”: “environment”,
“description”: “description”,
“duedate”: “2011-04-16”,
“fixVersions”: [
{
“id”: “10001”
}
],
“components”: [
{
“id”: “10000”
}
],
“customfield_30000”: [
“10000”,
“10002”
],
“customfield_80000”: {
“value”: “red”
},
“customfield_20000”: “06/Jul/11 3:25 PM”,
“customfield_40000”: “this is a text field”,
“customfield_70000”: [
“jira-administrators”,
“jira-software-users”
],
“customfield_60000”: “jira-software-users”,
“customfield_50000”: “this is a text area. big text.”,
“customfield_10000”: “09/Jun/81”
}
}
]
}
Some other examples of operations with work items using API include:
- Editing and deleting work items;
- Notifying users;
- Getting, updating, and deleting comments;
- Getting the work item work log, and much more.
That said, you are not limited to operations with work items with Jira REST API. You can work with fields, dashboards, components, filters, groups, and so much more. Please refer to Atlassian documentation for a full list of API references.
It is also worth mentioning that Jira API is not limited to Jira itself. You can use API calls to interact with the apps you’ve installed from the Atlassian Marketplace. For instance, you can read, update, and delete checklists with Smart Checklist REST API. This is interesting for cases when you need to get Smart Checklist history in a specific work item.


