Jira
Jira monday.com


Even if you start small, at some point, your team’s work will eventually outgrow a flat list. It is impractical to have dozens of tasks that are loosely related but not grouped logically. Epics help you organize work into larger chunks, which is crucial for running efficient processes.
In this tutorial, I’ll guide you through everything you need to know about how to use epics in Jira. This includes creating your first epic, using epics for planning, setting up helpful automation rules, and more. We’ll focus on Jira Cloud, covering both company-managed and team-managed projects.
What Is an Epic in Jira? The Definition
In Jira, an epic is one of the default issue types / work types. It represents a large body of work that groups smaller work items – stories, tasks, bugs – under a common goal. Epics often span multiple sprints, involve several team members, and sometimes even multiple teams.
For product managers, epics serve as the bridge between strategy and execution. Each epic typically corresponds to a product goal – one epic per feature or initiative. This makes it easy to communicate what the team is working on and why.
For example, a software development team can create an epic for a new feature, such as “Implement In-App Notifications.” This epic would group tasks for designing the notification center, building the backend delivery service, creating user preference settings, and testing across devices.
For a marketing team, an example could be a “Summer Marketing Campaign” epic with tasks for landing page design, ad creatives, email sequences, and press outreach.
In short, epics help teams organize and manage complex work.
Here are some key benefits of using epics in Jira:
- Logical grouping of related tasks under a common objective
- Better visibility for high-level planning
- Clear stakeholder communication at the appropriate level of detail
- Improved team alignment around shared goals
- Structured progress tracking across sprints
What Is the Right Size for a Jira Epic?
Epics typically take from one to several months to complete, sometimes up to a year. The “correct” size is whatever your team agrees upon; the important thing is consistency. If the scope of work is so large that no one can estimate it confidently, split it. But if it fits within one sprint, it’s probably a story, not an epic.
What Is the Epic’s Position in the Jira Work Item Hierarchy?
An epic occupies a position at the top of Jira’s default hierarchy. Within an epic, you can add stories, tasks, and bugs as direct children. These children can have their own subtasks. This gives you three levels of granularity within a single epic.
Here’s how the work item types inside an epic compare:
| Epic | Story | Task | Bug | Sub-task | |
|---|---|---|---|---|---|
| Purpose | Groups work under a shared goal | Describes a user-facing need | A specific piece of work | Something that requires fixing | A smaller chunk of work within a parent work item |
| Scope | Multiple sprints | One sprint or less | One or several sprints | One or several sprints | Less than one sprint |
| Level | Highest (in the default hierarchy) | Under an epic | Under an epic | Under an epic | Under a story, task, or bug |
| Child Items | Yes | Yes | Yes | Yes | No |
For a deeper comparison of these work item types, see our guide Epic vs Story vs Task.
But What About Levels Above Epics?
By default, Jira doesn’t offer anything higher. For smaller teams and straightforward projects, that’s enough. However, as projects scale across teams, you may need additional hierarchy levels. You can configure them with Jira Plans – advanced planning functionality available on Premium and Enterprise tiers (formerly Advanced Roadmaps).
With Plans, you can add such a custom hierarchy level as initiative, which groups multiple epics under a broader business goal. And above initiatives, you can add themes, which categorize work by strategic focus area. There can also be other custom levels that reflect your processes.
At the same time, adding custom hierarchy levels below an epic is not possible even with Jira Plans. If you need an extra level, you can use checklists as an additional layer of structure. They can be easily added to any work item (including an epic) with Smart Checklist for Jira. Adding a checklist to a subtask creates an extra level of hierarchy in the task group below an epic.
You can learn more about hierarchy levels in our guides Themes & Initiatives in Jira and Jira Issue Hierarchy Explained.
How to Create Epics in Jira
There are several ways to do this:
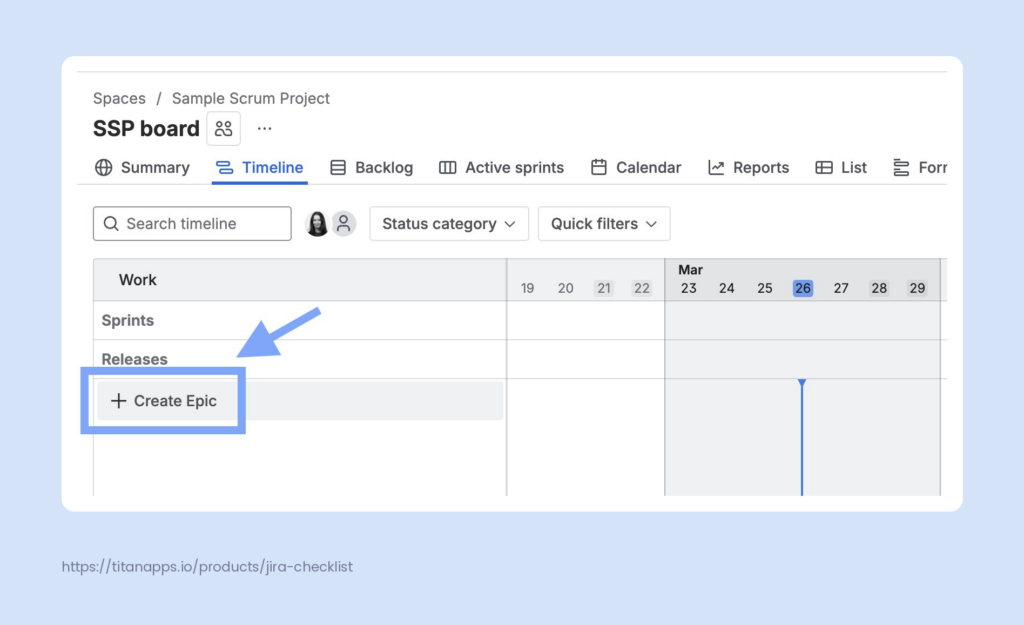
- From the Timeline view. Open your Jira project and select Timeline from the top navigation menu. Click “+ Create epic” or start typing directly. If your timeline already has epics, the “+ Create epic” button will be at the bottom of the list. You can drag the edges of the epic bar to set start and end dates. This is the most visual method and works best when you’re planning several epics at once.
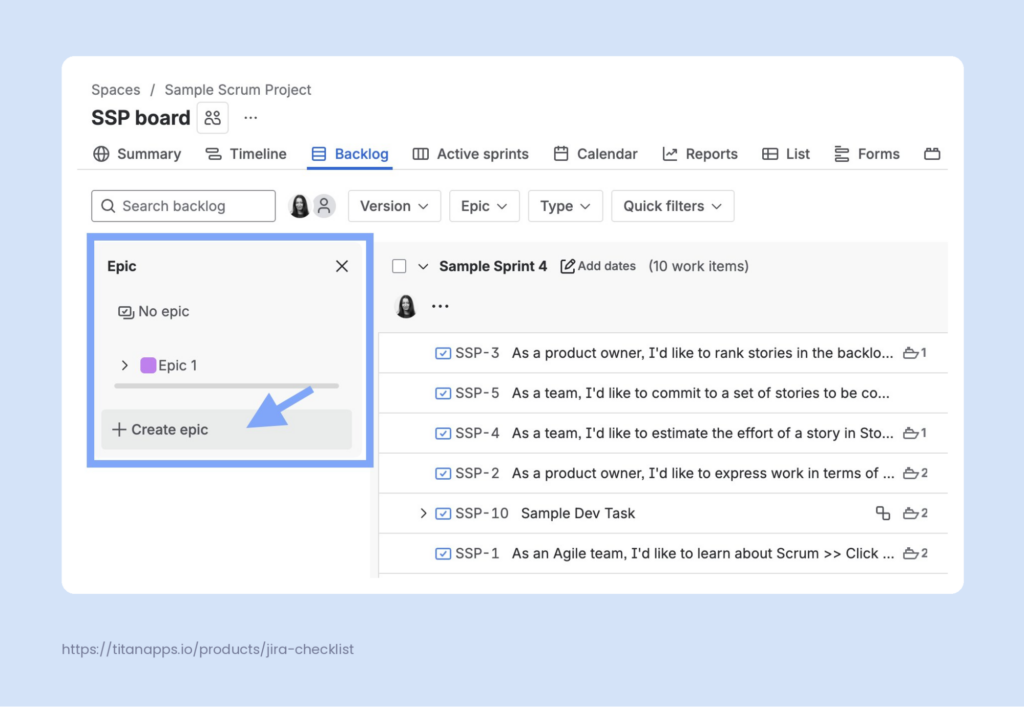
- From the Backlog. Navigate to the Backlog view and look for the Epic panel on the left side. If it’s not showing, click Epic in the filters at the top and toggle on “Show epic panel.” Then, click “Create epic” or the “+” sign. Enter the epic name and summary, then hit Create. This is handy when you’re already working in the backlog and want to set up an epic without switching views.
- Using the Global Create button. Click “Create” in the top navigation bar from anywhere in Jira. Select your project, choose “Epic” from the work type drop-down, and fill in the details. This is the fastest option when you need to create a new epic on the fly.
Whichever method you choose, be sure to fill in these key fields:
- Epic summary – a concise title that makes the goal immediately clear
- Description – outline the expected outcome and provide any relevant context
- Assignee – the person responsible for completing the work on this epic
- Priority, labels, and start/end dates – additional information that is useful for roadmap planning and filtering
How to Add and Manage Work Items in an Epic
Once you have created a new epic, you need to populate it. There are several ways to add work items:
- From the epic view. Open the epic and click “+ Add a child work item.” This automatically links the new item to the epic.
- From the Backlog. Expand the Epic panel in the backlog and click “Create work item.” You can also drag existing work items from the backlog into the epic.
- With the Parent field. When creating any work item via the global Create button, find the Parent field and select the target epic for the new work item from the dropdown list.
- From the Timeline. Click the “+” icon next to an epic on the timeline view to add a child work item inline.
How to Bulk-Edit Work Items in an Epic
Bulk editing saves time when you need to update multiple work items in an epic simultaneously. This includes reassigning, changing priorities, or moving items to a different epic.
From the Backlog view, select multiple work items using checkboxes. After that, the bulk-editing menu will appear at the bottom of the page. From there, you can update work item status, change the Watching options, or edit fields in bulk. This enables you to update fields such as assignee, priority, labels, or epic link / parent all at once.
How to Structure an Epic and Manage it Efficiently
Creating an epic is the easy part; structuring it well is where the real work happens.
For the best results, start with the outcome. Before adding any child work items, define what “done” means for the epic. What does the finished product or result look like?
From there, break the epic into stories and tasks. There are several approaches you can take:
- Split work by user role or persona. Create a separate story for each type of user affected by the epic. For example, an “Implement In-App Notifications” epic could have one story for end users receiving notifications, another for admins configuring notification rules, and a third for API users subscribing to events.
- Organize tasks by workflow steps. If the epic follows a clear sequence, break it into tasks that reflect each stage. A “Launch Landing Page” epic might include work items for wireframing, copywriting, design, development, QA review, and go-live. Each of these represents a concrete step the team can complete independently.
- Structure work by feature area. This approach works well when several specialists contribute to the same epic. A “User Authentication” epic could include separate tasks for the frontend (login form, error handling), the backend (API endpoints, token management), and QA (test cases, security checks). This makes it easy to assign work to the right people.
In practice, these approaches overlap. You might start by splitting an epic by feature area, then further breaking each area into workflow steps. The key is to keep every story or task small enough to complete within one sprint. If a story feels too large to estimate, it probably needs further splitting.
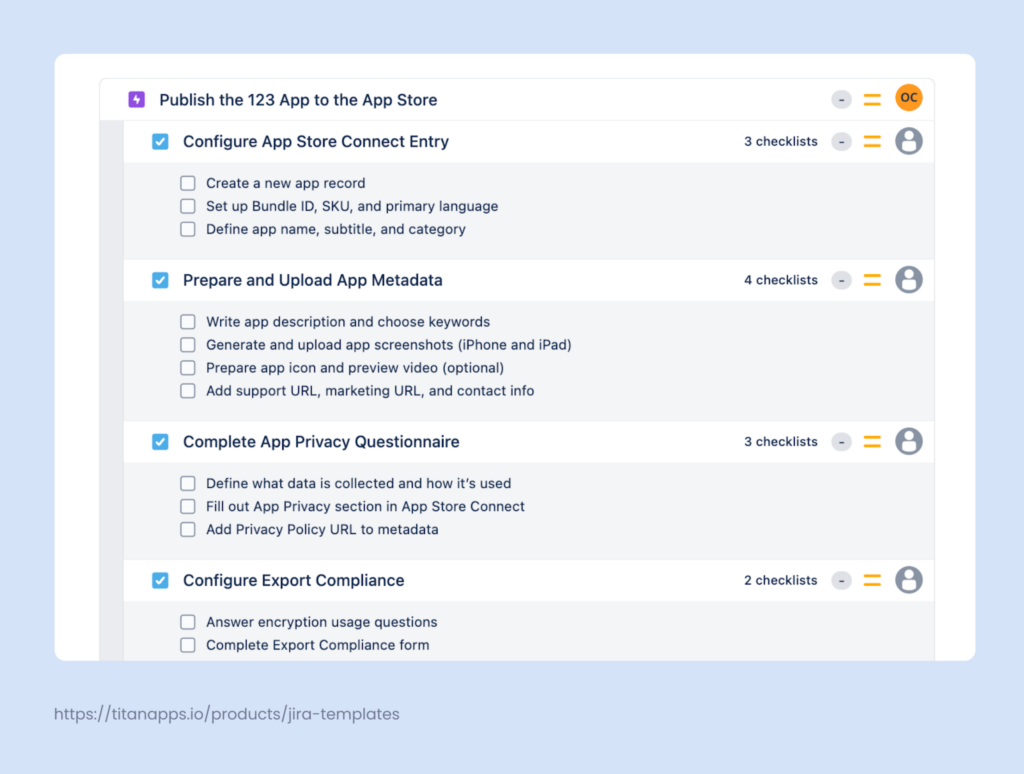
Add More Granular Structure With Smart Checklist
Once your epic is broken into stories and tasks, there’s still a level below that. Each work item often contains multiple steps, quality criteria, or process instructions. Creating a subtask for each of them would clutter your board and introduce unnecessary complexity. For such cases, you can use checklists instead of subtasks.
This can easily be done with Smart Checklist for Jira – a solution that lets you add feature-rich checklists to work items. Here are a few examples.
This is a checklist for vendor risk assessment. It documents step-by-step instructions that the assignee needs to follow. This checklist section is located directly inside a work item, below the description section.
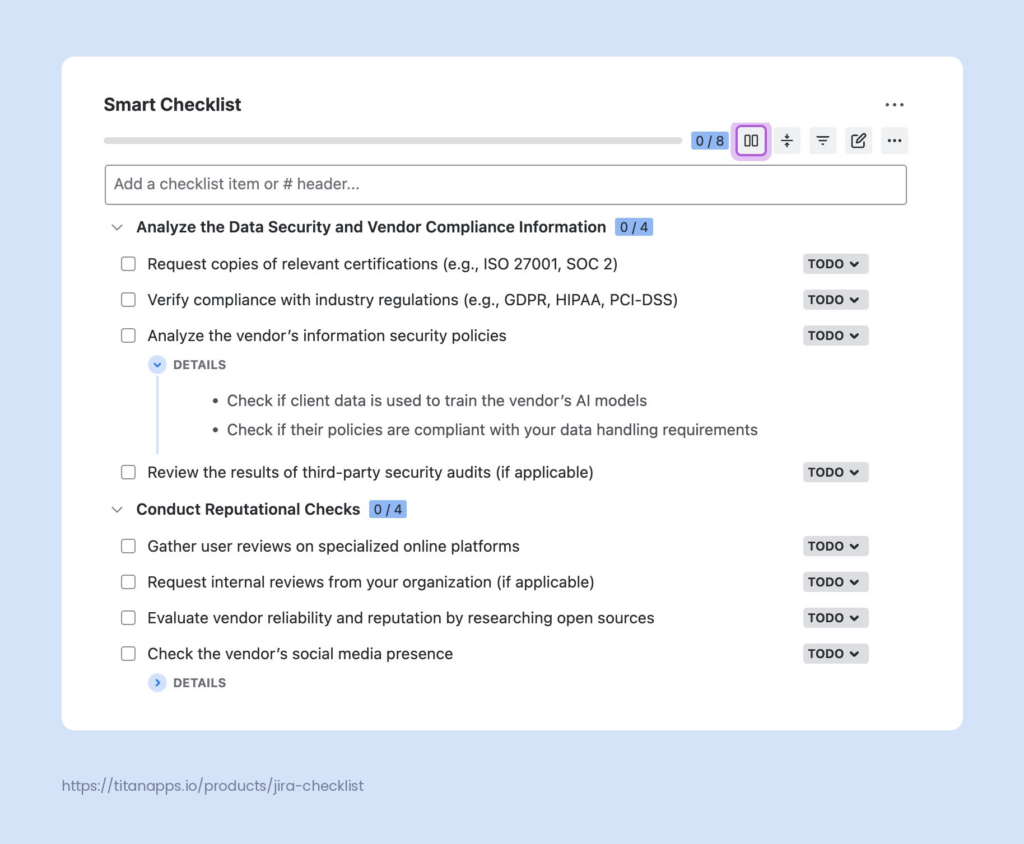
As you can see, each step has its own status, and steps that need additional context have expandable Details sections. Additionally, you can tag responsible people, set deadlines, create custom statuses, and structure your checklist with headers. It’s also possible to add multiple checklists to one work item; each checklist will be placed on its own tab. All this allows you to easily track progress and organize work efficiently, without the overhead of subtasks.
This approach can be applied to many processes, especially if they are recurring, such as regression testing, employee onboarding, and SEO audits.
Another common use case for checklists is managing various criteria, such as Acceptance Criteria and the Definition of Done. Adding subtasks for each step would be impractical. At the same time, it’s very helpful to have these criteria listed directly inside a Jira ticket, where your team works. Smart Checklist allows you to save checklists as reusable templates and automatically add them to work items. As a result, when an engineer starts working on a task, the quality criteria are already there.
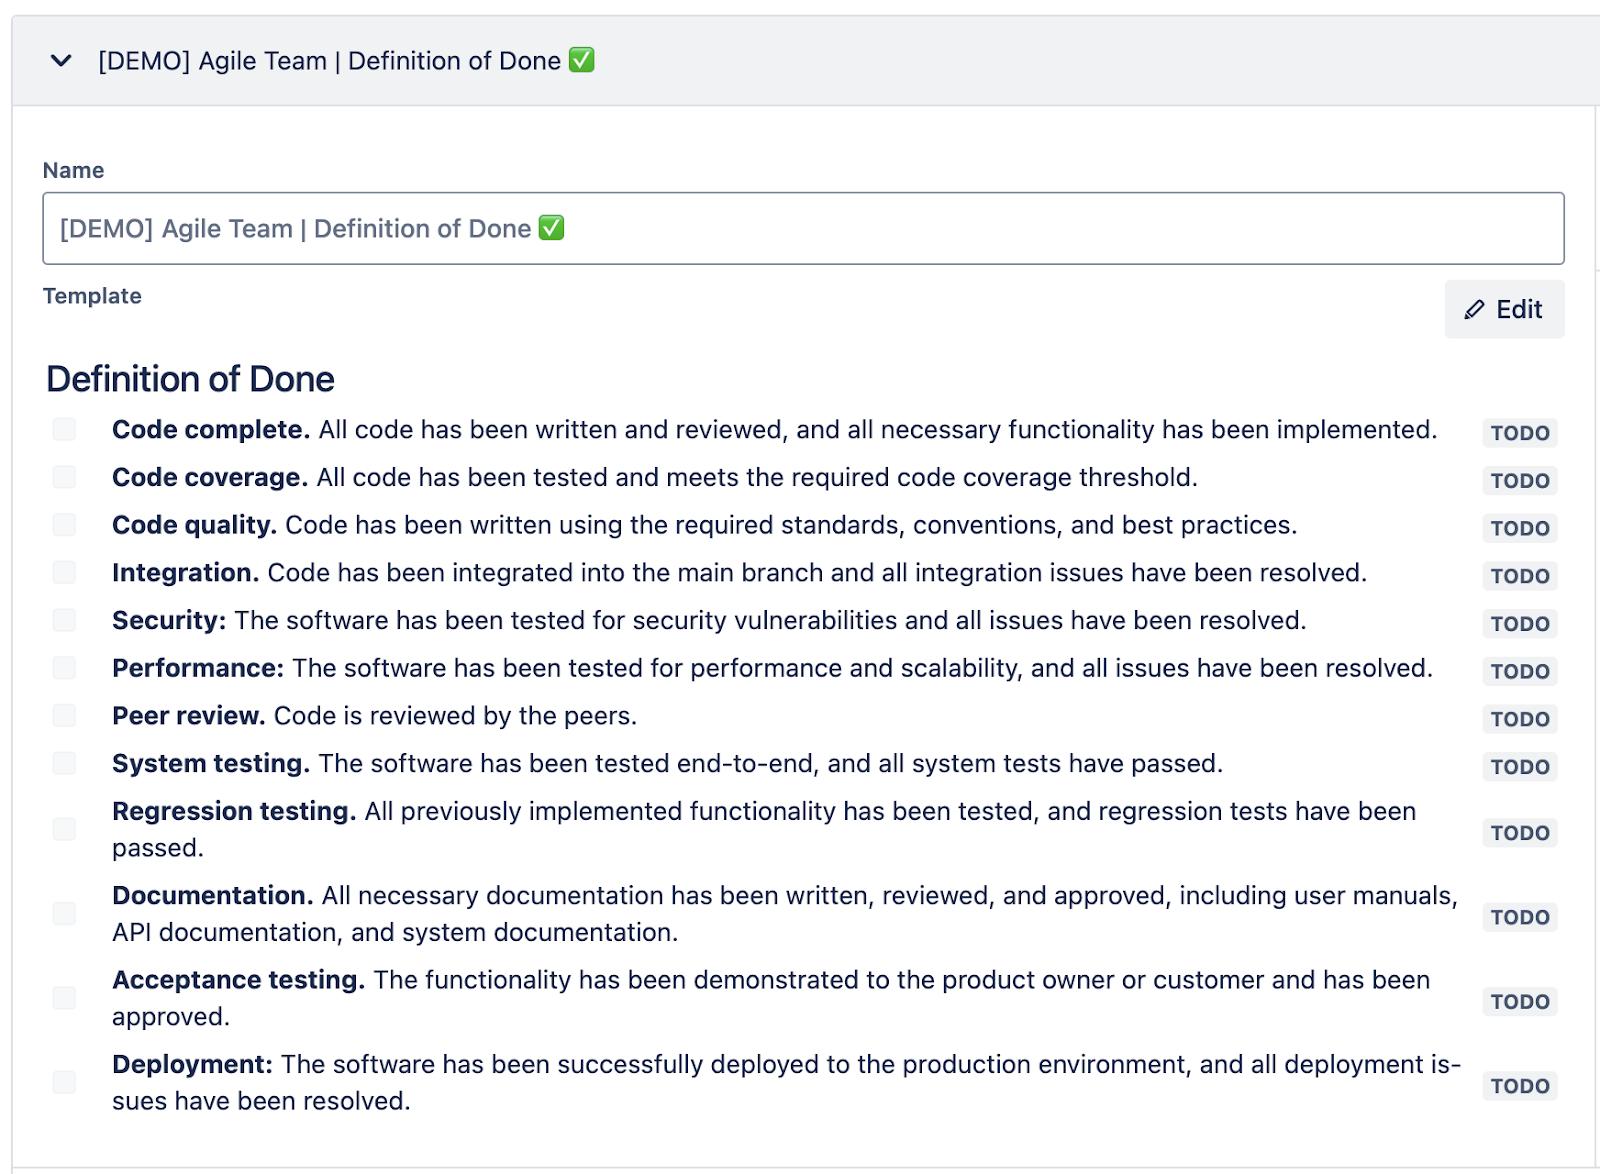
## Definition of Done
- **Code complete.** All code has been written and reviewed, and all necessary functionality has been implemented.
- **Code coverage.** All code has been tested and meets the required code coverage threshold.
- **Code quality.** Code has been written using the required standards, conventions, and best practices.
- **Integration.** Code has been integrated into the main branch, and all integration issues have been resolved.
- **Security:** The software has been tested for security vulnerabilities, and all issues have been resolved.
- **Performance:** The software has been tested for performance and scalability, and all issues have been resolved.
- **Peer review.** The code is reviewed by the peers.
- **System testing.** The software has been tested end-to-end, and all system tests have passed.
- **Regression testing.** All previously implemented functionality has been tested, and regression tests have been passed.
- **Documentation.** All necessary documentation has been written, reviewed, and approved, including user manuals, API documentation, and system documentation.
- **Acceptance testing.** The functionality has been demonstrated to the product owner or customer and has been approved.
- **Deployment:** The software has been successfully deployed to the production environment, and all deployment issues have been resolved.
Each checklist features a progress bar, allowing you to quickly gauge your progress on a task without opening it. When you combine this with the epic’s overall breakdown, you get visibility at every level: epic progress at the top, story and task completion in the middle, and checklist-level detail at the bottom.

Save Recurring Epics and Reuse Them Later With Smart Templates
Some epics follow the same pattern every time – monthly reporting, quarterly planning, employee onboarding, product release cycles. Recreating them from scratch would waste your team’s time and effort.
With Smart Templates, you can save an entire epic structure as a reusable template. It will preserve the epic itself along with all its child work items, sub-tasks, and checklists. Pre-filled fields will also carry on: assignee, reporter, priority, labels, descriptions of the epic and all child work items, and more. When you need to start a new cycle, you can generate the entire set of tasks with a single click or even automatically on a schedule. As a result, you get an epic that is fully ready for work.
Smart Templates also support dynamic variables, which allow you to adapt one template for multiple uses. For example, a monthly payroll epic template can use a {{month}} variable so that the same template works for any period. Other variables, like {{ClientName}} or {{Project}}, work the same way and are filled in when the template is applied. The actual value you provide will be applied everywhere in the template where the corresponding placeholder is present.
You can also schedule automatic epic creation for recurring workflows. For instance, if your team runs the same reporting process every month, Smart Templates can generate the epic on a set cadence – weekly, monthly, or quarterly – without anyone having to trigger it manually.
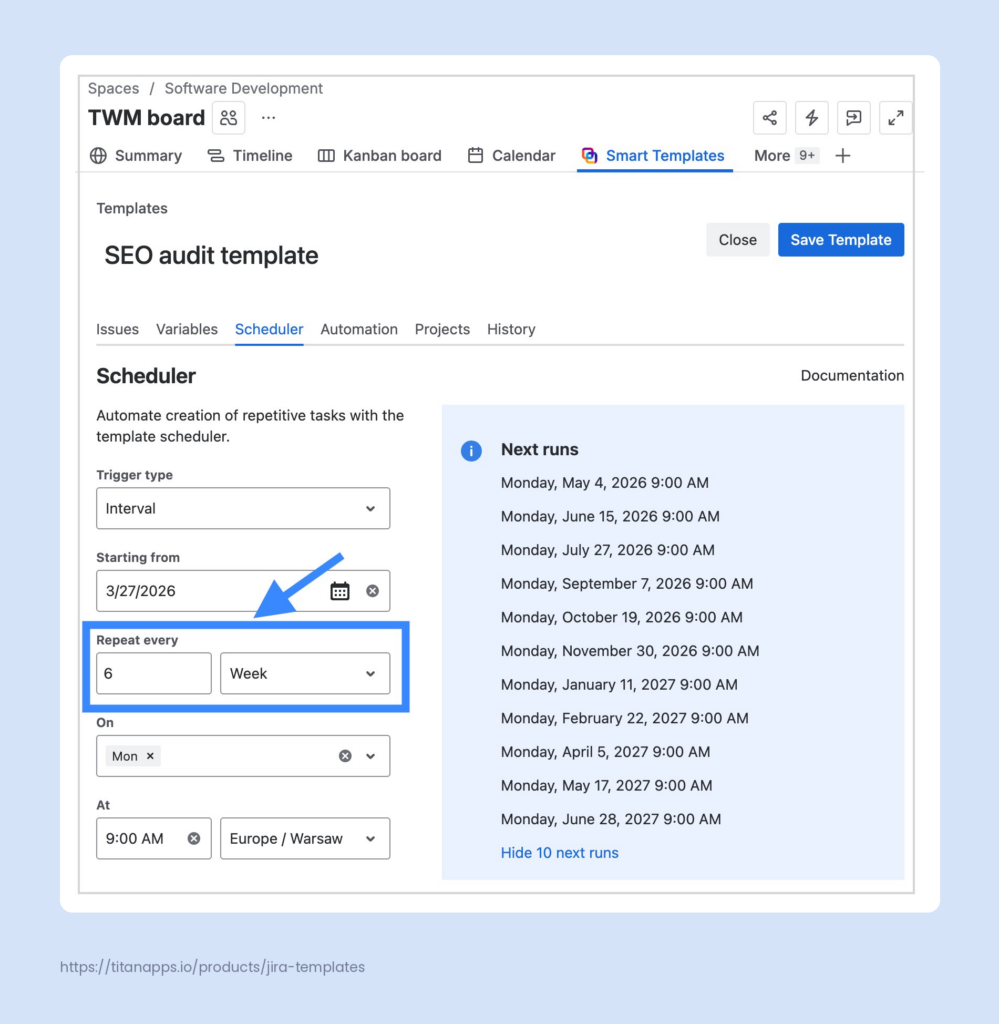
For a complete walkthrough, please see the Epic Template article.

How Smart Tools Help You With Epic Management: Key Benefits
- Improved consistency. You can save checklists and epic templates for recurring processes to reuse them later. Then, every new epic starts from a proven structure, not a blank page.
- Faster onboarding and scaling. Saved templates show new team members exactly what to do, in what order, and who to reach out to at each stage.
- Granular tracking without board clutter. Smart Checklist lets you break tasks into detailed steps without creating subtasks for each. Your board stays clean, and every checklist step is tracked within the work item.
- Built-in quality gates. Document your Definition of Done or acceptance criteria as checklist items directly in the ticket. As a result, nothing gets overlooked as the epic progresses.
- Clear ownership at every level. You can tag responsible team members on checklist items and add due dates. Everyone will know what they are handling and when it’s due.
- Cross-team visibility. Checklist progress bars let team leads and stakeholders check task status at a glance, without interrupting anyone.
How to Track Epic Progress
Jira offers several reports and views for monitoring epic progress. Here’s a quick reference:
| Report / View | What it shows | Best for |
|---|---|---|
| Timeline / Roadmap | All epics on a time-based view with start/end dates and dependencies | High-level planning and spotting schedule conflicts |
| Epic Report | Completed vs. remaining work items in an epic | Estimating when an epic will be done |
| Epic Burndown | Sprint-by-sprint progress, including scope changes | Spotting if scope grows faster than delivery |
| Cumulative flow diagram | Work items by workflow status over time | Identifying bottlenecks |
| Checklist progress (Smart Checklist) | Progress of smaller steps inside the epic or its child work items | Tracking progress at a granular level |
Please note that some of these reports are only available for Scrum projects.
For a deeper look at tracking methods, please see our articles Jira Issue Tracking: 9 Options and Project Planning in Jira.
How to Use Epics in Jira With Native Automation Rules
Automation helps you reduce manual upkeep as the number of epics grows. There can be rules for making changes based on workflow transitions, for auto-assigning epics, cloning epics to other projects, and so on. Let’s take a closer look at a couple of hands-on examples.
Auto-Transition Epic to Done When All Child Work Items Are Done
Instead of manually checking whether all child work items are complete, you can set up a rule that transitions the epic to “Done” automatically once the last child item closes.
Here’s what this rule looks like. It’s triggered when a work item is transitioned to Done; then it checks whether the work item’s parent is not Done. If this condition is met, the rule further checks the statuses of other children in that parent. If they are all Done, the parent is moved to the same status.

It’s simple, but this eliminates a common gap where completed epics remain open for days because nobody remembered to close them. Additionally, when you see an Epic marked Done, you will know that all its child work items have been completed.
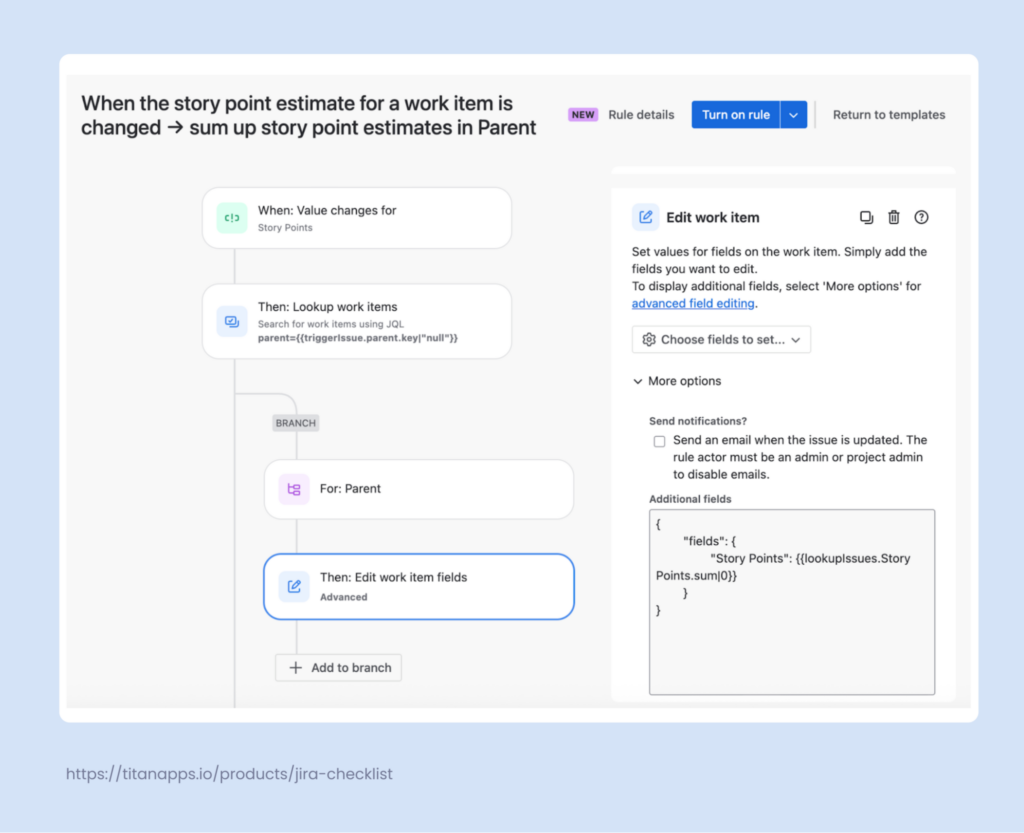
Roll Up Story Points to the Parent Work Item / Epic
This is another practical application of Jira Automation. When a team member changes the story point estimate on a child work item, the parent should reflect the new total. You can configure an automation rule that calculates the sum of all child estimates and updates the parent’s Story Points field.
The rule shown below is triggered when the Story Points field value changes. It then looks for the parent issue using JQL: parent={{triggerIssue.parent.key|”null”}}. The action is Edit work item fields. You will need to paste the following text in the Additional fields box under the More options menu:
{
“fields”: {
“Story Points”: {{lookupIssues.Story Points.sum|0}}
}
}
For more on this topic, please see the related articles:
- Jira Automation Best Practices That Will Save You Time
- Jira Automation Guide With the Top 10 Most Common Use Cases
Best Practices for Using Epics in Jira
Over the years, our team has worked with many Jira setups across different industries and team sizes. Based on this experience, here are practical tips that consistently help teams use epics effectively.
- Keep scope realistic. Overloading an epic leads to burnout and a roadmap that’s permanently behind schedule. Be honest about capacity.
- Use consistent naming conventions. A pattern like “[Team] – [Objective] – [Quarter]” makes filtering and reporting easier across the Jira project.
- Use labels and components for filtering. Epic-level labels (team name, product area, strategic pillar) make it easy to filter on Scrum and Kanban boards, dashboards, and in JQL queries.
- Don’t treat an epic as a project. Large projects should span multiple epics. If an epic represents an entire project, it’s almost certainly too big.
- Close epics when the goal is achieved. It’s fine to leave a few low-priority child work items open if they’ve been deprioritized. Completion should reflect the goal, not a work item count.
- Groom orphaned work items during backlog refinement. Review work items without an epic in every sprint planning session. They either need a home or should be removed.
- Use checklists to enforce quality gates. Smart Checklist’s Mandatory Items feature can prevent an epic from transitioning to Done until all key items are checked off.
- Visualize the bigger picture. Smart Hierarchy helps you see how epics connect to higher-level goals and helps you see progress without switching tabs.
Now You Know How to Use Epics in Jira!
Epics are one of the most practical tools Atlassian offers for organizing work in Jira at scale. In this guide, we covered how to create and structure Jira epics, break them into user stories and tasks, and manage progress across active sprints. We also explored how Smart Checklist and Smart Templates can add granular structure and consistency to your epics without cluttering the board.
Now it’s time to put this into practice. Start with one epic for your current project. Define a clear goal, break it into manageable work items, and apply the prioritization and structuring techniques from this guide. If your team has a Scrum project, track your progress with the Scrum board and burndown charts, and adjust the scope during each iteration. For Kanban setups, use swimlanes and board settings to keep the workflow visible and organized.
As your process matures, document your best practices in Confluence so the whole team can stay aligned. Whether you manage software projects, DevOps workflows, or cross-team initiatives, well-structured epics will help you deliver results and track the right metrics along the way.
How to Use Epics in Jira? FAQ
How Many Epics Should a Jira Project Have?
There’s no hard limit. A small team might have 3-5 active epics, while a larger team might have 15-20. If you find yourself with 50+ active epics, consider introducing initiative-level grouping via Jira Plans.
What Happens to Child Work Items When I Delete an Epic?
The child work items remain in the Jira project. They lose their epic association and become “work items without an epic,” but they’re not deleted. You can reassign them to another epic or leave them as standalone items.
How to Use Epics in Jira for Non-Software Teams?
Epics work the same way regardless of the team. Marketing teams use them to manage campaigns from planning to launch. HR teams rely on them for onboarding flows and compliance processes. Finance teams can use recurring epics for quarterly audits.
The main difference is that non-software teams tend to use tasks rather than stories since the user story format isn’t always relevant outside product development. The mechanics of how to use epics in Jira – creating them, adding child work items, and tracking progress on the roadmap – are exactly the same. For more details, please see Atlassian’s tutorial on epics.
How to Use Epics With Jira Versions and Releases
Epics and releases (also known as fix versions) serve different purposes and operate independently. An epic groups work items by goal, while a release groups work items by what ships together.
This means work items from the same epic can land in different releases. Your “User Authentication” epic might have some stories in Release 2.1 and others in Release 2.2, depending on what’s ready. Conversely, a single release often includes work items from several epics.
This separation is useful because it allows you to plan work around goals using epics while independently controlling what ships together using releases. When assigning a fix version, do it at the individual work item level rather than at the epic level. You can find more information about this in our tutorial Jira Versions Explained.
Can I Assign an Epic to a Sprint?
Epics are typically not assigned to sprints because one epic often takes more than one sprint to complete. Instead, their child work items go into sprints, while epics themselves are tracked on the timeline or roadmap.
In company-managed projects, you can make epics visible in the Active Sprint view by adding the Sprint field to the epic’s screen configuration. However, technically, that is still not the same as adding the epic to a sprint.
How do I move work items between epics?
Open the work item and change its Parent field to the target epic. You can also drag work items between epics in the Backlog view when the Epic panel is open.
Can I use epics in both Scrum and Kanban projects?
Yes. Epics work in both project types. In Scrum projects, you manage them via the Backlog and Timeline views. In Kanban projects, enable the Kanban backlog first, then use the Epic panel to organize epics. The key difference is that Kanban epics are not tied to sprints. For more information, please see Atlassian’s documentation on epics.
What is the difference between an epic and a Jira project?
A Jira project is the top-level container for all your work. It holds workflows, permissions, and board configurations. An epic is a work type that lives inside a project and groups related tasks around a specific goal. Large projects typically contain multiple epics, each representing a distinct deliverable or initiative.
How do I filter the board to show only one epic?
On the Scrum or Kanban board, use the Epic filter dropdown at the top. Select the epic you want to focus on, and the board will display only the work items that belong to it. You can also create a quick filter using JQL, for example: parent = PROJ-123.