





 Tools for Jira
 Tools for monday.com





 Definition
A Git and Jira integration is a connection between Jira and a Git-based platform such as GitHub, GitLab, or Bitbucket. It allows you to sync code activity (including commits, branches, and pull requests) to corresponding work items in Jira.
If you ask a developer, product manager, and QA “why integrate your Git repository with Jira,” they will all give different answers. Some like it for reducing context switching and providing automation options, while others value the transparency and improved traceability. But no matter who you ask, everyone is unanimous: this integration is immensely useful for the teams.
In this article, we focus on the most popular Git applications: GitHub, GitLab, and Bitbucket. We explain how to connect them to Jira Cloud and provide you with practical tips on making the most out of this integration. You will learn how to use smart commits, leverage automation, and gain extra value from third-party apps.
TL;DR: a Quick Summary
- You can connect Jira to various Git-based platforms, including GitHub, GitLab, and Bitbucket. Once integrated, code activity such as commits, branches, pull requests, builds, and deployments syncs to the right work items automatically.
- Add the Jira work item key to branch names, commit messages, and pull request titles. This is what links every code change back to the ticket it belongs to.
- Use smart commits to add comments, log time, and transition work item statuses straight from your Git app, without switching to Jira.
- Set up Jira Automation rules on DevOps triggers to move tickets, add checklists, or notify teammates when a pull request is created or merged.
- Add third-party apps like Smart Checklist for Jira to optimize recurring dev processes, such as Code Review or managing the Definition of Done in Jira.
The Basics: What Can You Do With The Help Of a Git and Jira Integration?
Jira and the top Git-based platforms are all among the most-used developer tools worldwide. In the 2025 Stack Overflow Developer Survey, 80.5% of professional developers reported working with GitHub, 52.1% with Jira, and 36.7% with GitLab. The overlap is significant: most dev teams already have both a Jira project and a Git repository. These numbers clearly demonstrate that setting up a Git and Jira integration is relevant for the majority of dev teams.
In particular, you will be able to:
- View commit history, branch, and pull request details in Jira
- Check pull request statuses directly from your Jira board
- Quickly access a pull request or branch from the ticket details
- Automatically update work statuses based on Git activity
- Add comments and log work in Jira directly from your Git app
- Get more context for code changes with business details from Jira
- Assign Jira tickets to agents (such as GitHub Copilot) to create draft PRs
The key benefits of setting up a Git and Jira integration include:
- Less context switching: You can seamlessly move from Jira to your Git app if needed, or you can just manage your Jira work items without leaving your Git platform. This is much more efficient and improves focus.
Note
Harvard Business Review research found that digital workers toggle between apps and websites roughly 1,200 times a day, spending nearly 9% of their work time just reorienting after each switch. Having a Git and Jira integration in place helps you reduce that switching for your dev team.
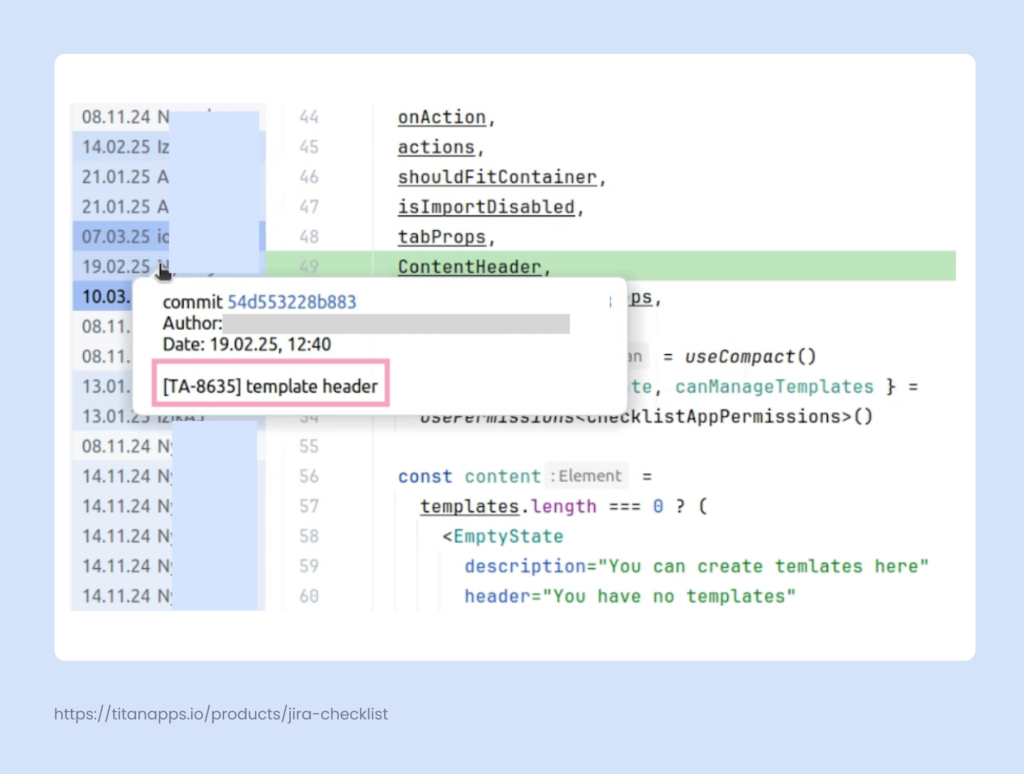
- Transparency: This integration helps keep everything organized and transparent. A product manager can see what was done for each work item without leaving Jira. In turn, developers can gain more context for old code changes by checking which Jira tasks they are related to:
- Better communication: Transparency facilitates more effective collaboration, especially for cross-functional processes. Getting necessary information is easier, leading to better alignment and organization among teams.
- Time optimization: As routine updates become automated, teams spend less time manually syncing statuses or adding links between Jira and a Git platform.
These and other benefits are why this integration is so widely used. The value it delivers results in streamlined processes and increased productivity.
How to Set Up a Git and Jira Integration for a Cloud Instance?
There are two main options:
- Connect Git and Jira natively: Jira has a built-in Git connector, but it’s only available for Bitbucket.
- Use a Git app from the marketplace: Available for various platforms, including GitHub and GitLab.
The process itself is straightforward. First, you need to install the integration app (except for Bitbucket) and connect your repositories. Then, link Git activity to Jira work items by using issue keys. After this, you will be able to view dev information in Jira tickets, use smart commits, and set up automation to further optimize your work. Let’s explore this in detail.
Install the Integration App and Connect Your Repositories
- Bitbucket – For a native integration with Bitbucket, open your Jira project and navigate to Settings -> Jira Apps -> Integrations block, where you can find DVCS accounts. Then, connect your account and grant the requested permissions to connect the selected Bitbucket workspace. Your repositories will be automatically integrated with Jira.
- GitHub – Install the official GitHub for Atlassian app and connect your GitHub account. Then, select your organization and connect it. In the next step, you can choose to show GitHub data in Rovo – this will make it accessible for Rovo Search, Chat, and Rovo Agents. Please note that GitHub for Atlassian will integrate your GitHub development activity not only with Jira, but also with Atlassian Teamwork Graph. This makes your dev data available across all your Atlassian apps.
- GitLab – Once you have installed GitLab for Jira, follow the wizard’s prompts to complete the setup. Specify which version of GitLab you are using: for the cloud-hosted version, select GitLab.com. Then, sign in to GitLab and authorize GitLab for Jira. Once done, link your GitLab groups.
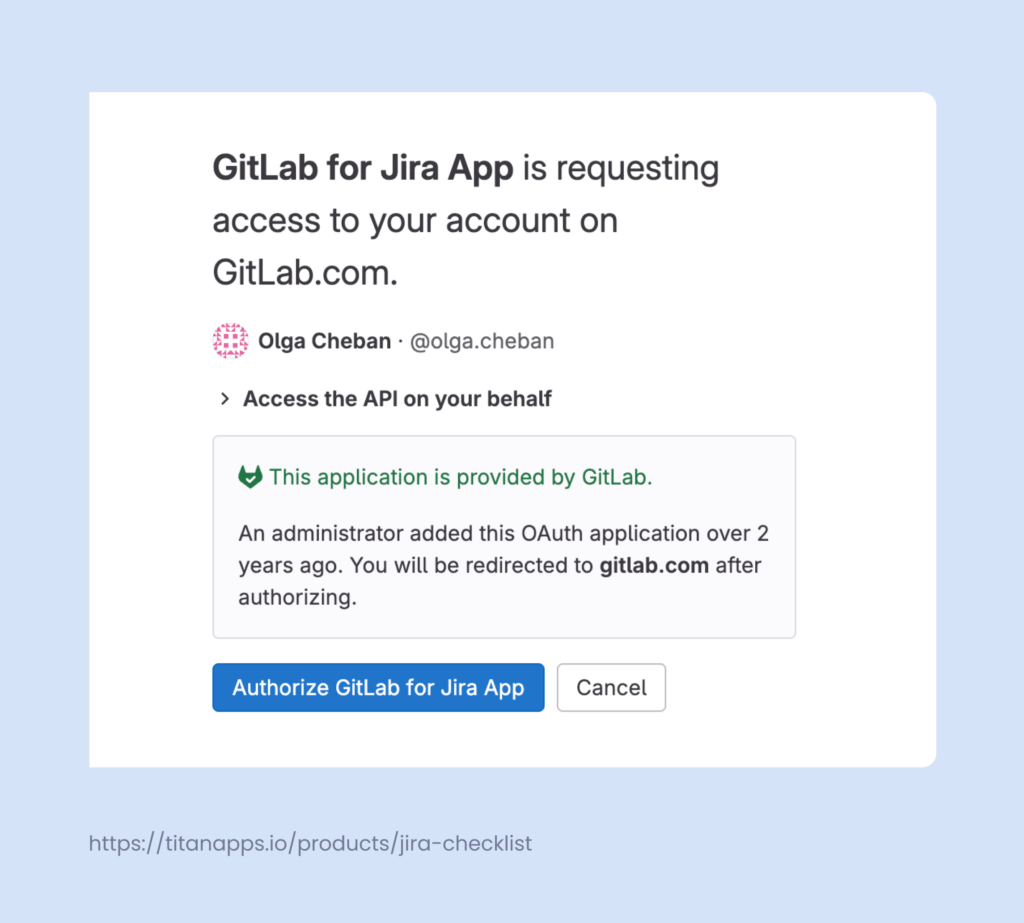
To complete the integration process, you will need administrator permissions, as well as the relevant permissions on your version control platform. For the most up-to-date information on the required permissions, it’s best to review the requirements provided by your Git platform during the integration setup.
If you need to connect several Git applications, it can be more convenient to do this from one place. Open a Jira work item and find the Development section on the right panel. There, you will have a menu allowing you to connect the most popular Git platforms to Jira.
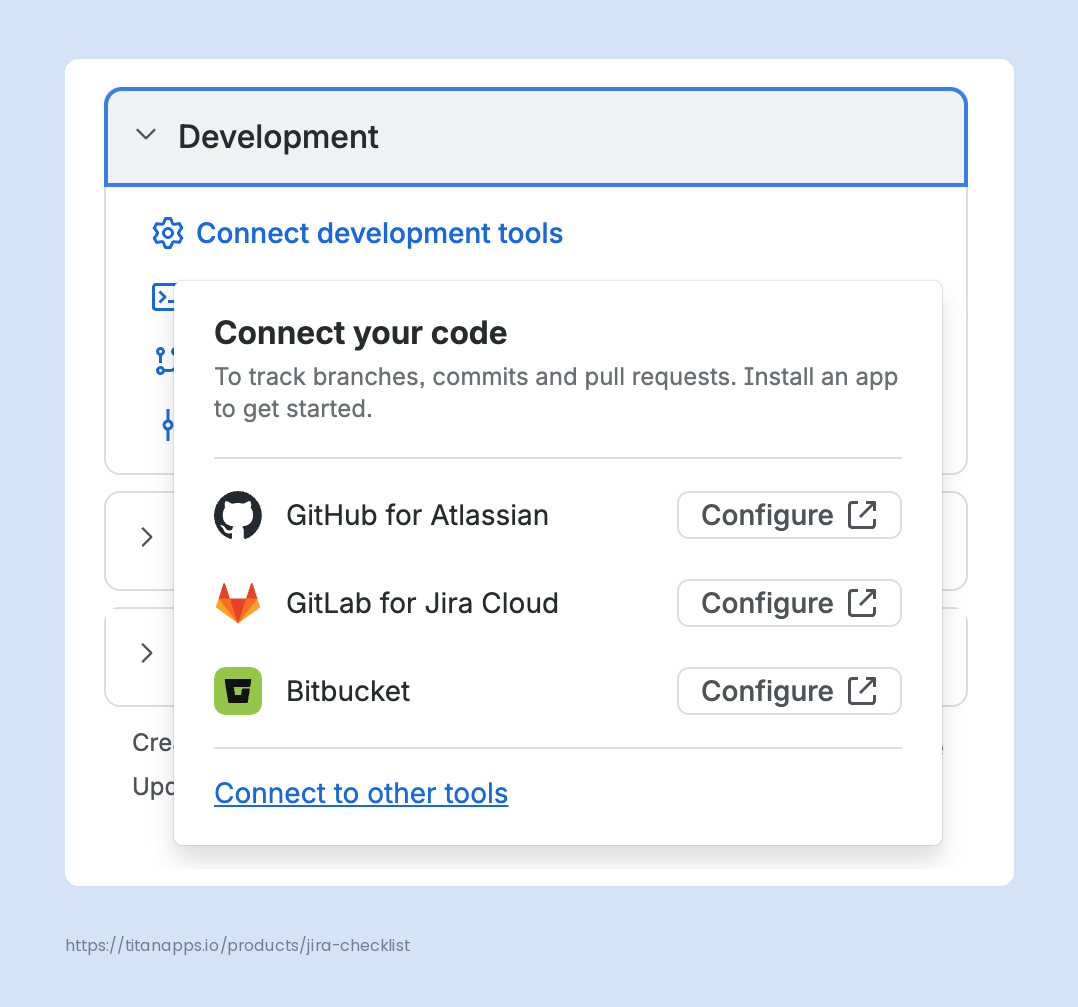
Please note that this article focuses on the integration with the cloud versions of Git platforms. If you need to connect Jira to GitHub Enterprise Server, Self-managed GitLab, or Bitbucket Data Center, please refer to the official documentation.
Link Your Git Activity to Jira Work Items
Even though your repositories are already connected, the synchronization with Jira may not be complete yet. To finalize this process, you need to link your Git activity to specific Jira issues (work items). This can be done by simply including Jira work item keys in your Git messages:
- Commits
- Branch names
- Pull request titles and descriptions
A work item key (or Jira issue key) is a combination of letters and numbers that serves as a work item identifier in Jira – for instance, TA-9082 or PROJ-123. You can find it at the top of a work item view. On your Jira board, it’s at the bottom of the card.
When you mention a work item key in your Git message, the system recognizes it, and the message is then associated with the work item it mentioned.
For example, this can be a commit message like this one:
git commit -m “TWM-93 <Fixed all bugs>”
Information about this commit will be available in the Development section of the mentioned work item’s view. You can link branches and pull/merge requests to specific Jira work items in the same way.
It’s enough to use one work item key and push changes to the connected repository to complete the synchronization with Jira. After several minutes, it should be fully connected to your version control application. Needless to say, you can still use work item keys in your Git messages whenever you need to link an action to a Jira work item.
View Development Information and Create Branches in Jira
You can monitor Git actions in Jira in several ways, each providing a different perspective. Let’s have a look at these options.
Check Your Repositories and Pull Requests From the Development Tab
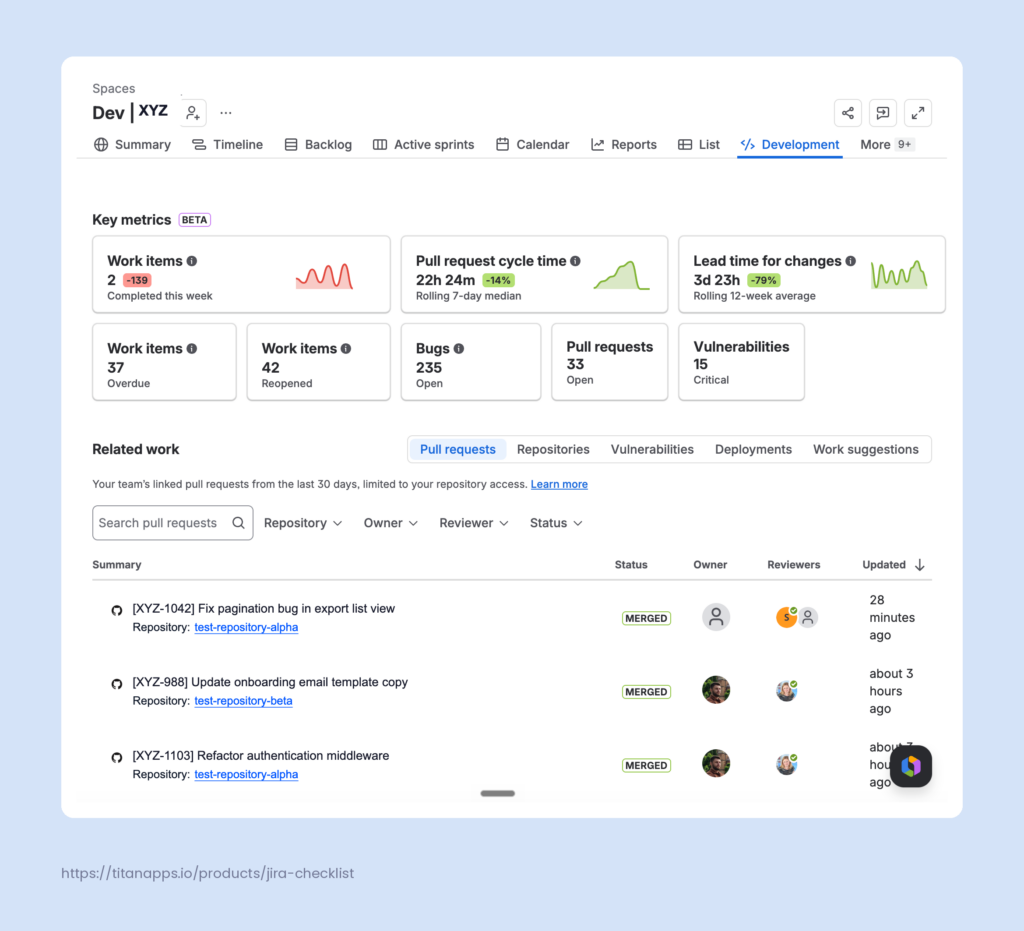
Once your Git and Jira integration is set up, the two apps will be fully synced. As a result, you will be able to see the connected repositories and the latest activity on the Development tab of your Jira project/space:
Get Granular Details on Development From a Work Item View
In addition, you can view development information directly from your Jira work items. Open a work item view, which is an individual page for the selected Jira task, story, bug, etc. Then, find the Development section in the menu on the right. It will display the development activity for this work item (if you or your teammates provided this information earlier):
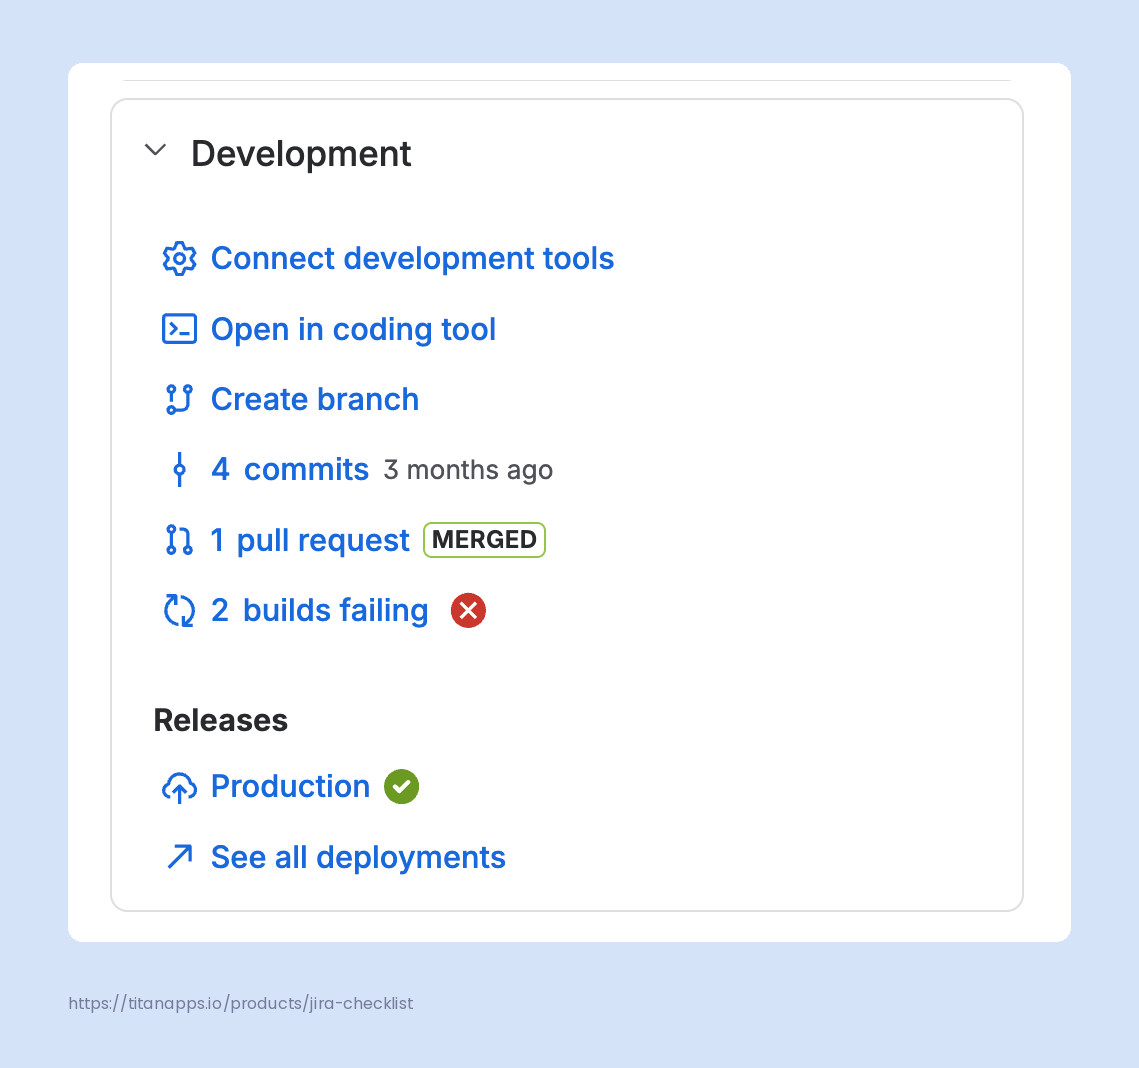
To expand, click on any branch or commit message. In the pop-up window that appears, you will see the detailed development information:
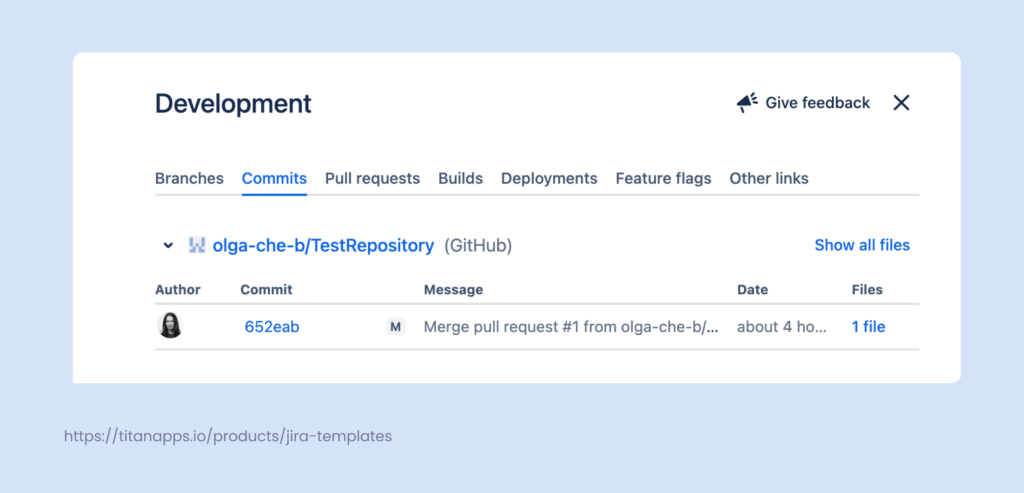
This includes a list of commits with various details and a link to the repository. Additionally, there is information about the associated branches and pull requests. This is especially valuable for product managers, as they can easily see all the dev events linked to a specific work item.
View Builds and Deployments in Jira
The Development panel can also show builds and deployments linked to a work item. GitHub, GitLab, and Bitbucket all include built-in CI/CD tools, so this data can flow into Jira through the same integration.
To find this information, open a work item view and check the Development section on the right. Alongside branches, commits, and pull requests, you’ll see builds and deployments. Each entry shows its status: successful, failed, or in progress. You can click an entry to view more details in your CI/CD tool.
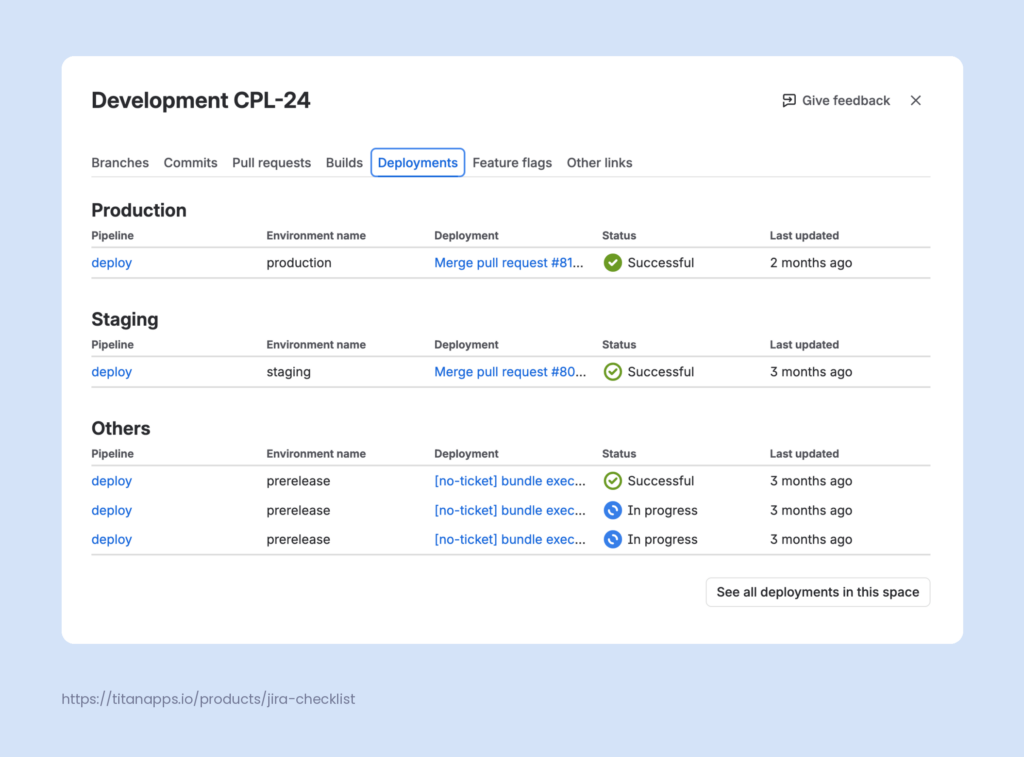
As a result, you get a complete picture of each work item’s progress, from the first commit to the final deployment.
Monitor the Overall Progress From the Release Hub
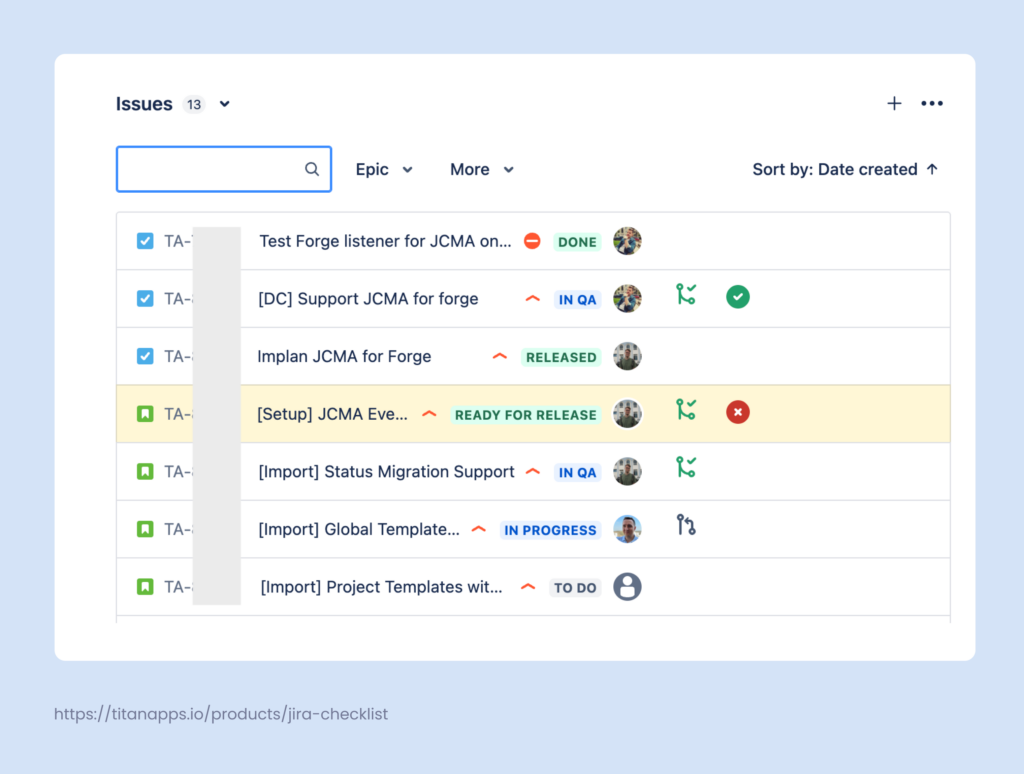
If you work with fix versions in Jira, you can also track ticket statuses from the Release hub. In the Jira project menu at the top (above your board), find Releases. If you don’t see this option, click More. Then, select the release you need and scroll down to Work Items. (Please note that, in team-managed projects, you will need to enable the Releases feature under Project Settings first.)
You will see Git statuses for each work item, if relevant. The status icons have different colors:
- Green – there is a merged pull request for this ticket
- Black (dark-gray) – there is a pull request that is still waiting for review or approval
- Blue – a branch has been created, but there is no pull request yet
- Red – the pull request was declined
- No icon – there’s no development activity for this work item
Create Branches, Commits, and Pull Requests From the Work Item View
In addition to monitoring Git information, you can also perform various actions directly from Jira. Open a work item view and navigate to the Development section. From there, you can create branches, commits, and pull requests.
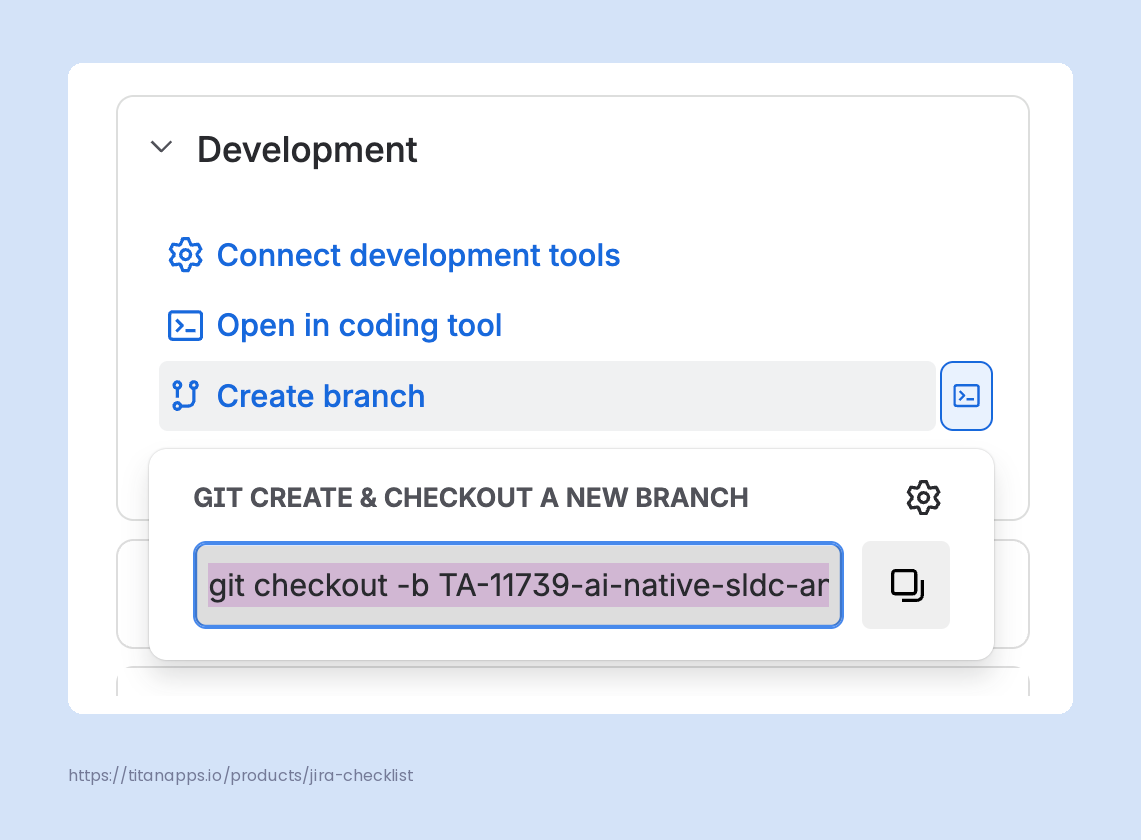
For example, to create a branch, select your source code integration from the dropdown and provide the required details: repository, branch from, and branch name. These steps are the same for both GitLab and GitHub integration.
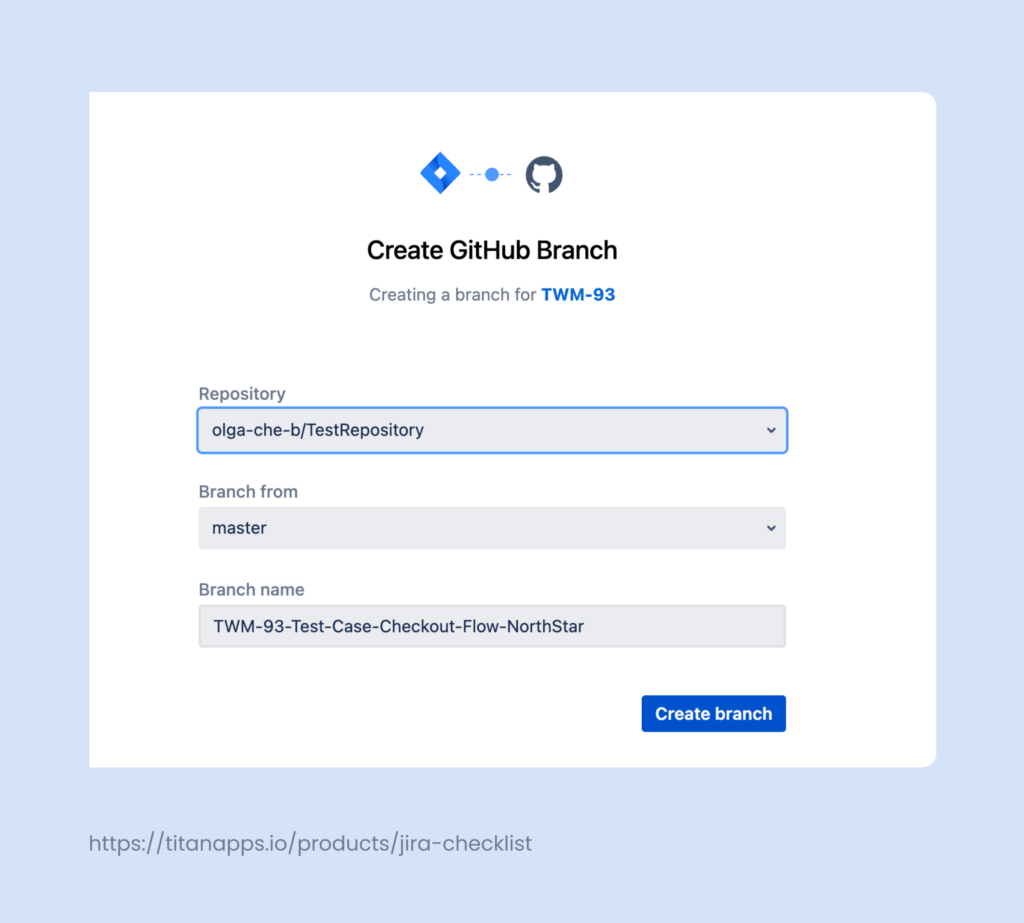
Alternatively, you can simply copy the text from the box, as shown below, and run this command in the terminal in your Git project. In this case, you don’t need to specify any additional information, and the branch will be created more quickly.
Use Smart Commits to Manage Jira Work from Your Git App
It’s possible to make changes to Jira work items directly from a Git platform. This is done with the help of smart commits, which are commands included in commit messages. They enable you to perform actions such as:
- Adding comments to the specified Jira work items
- Recording time-tracking information
- Changing an issue’s workflow status / work item status
This allows you, for example, to move Jira tickets from In progress to In review or Done without leaving your Git app, and so on. Once Jira is integrated with GitHub, GitLab, or Bitbucket, smart commits should be enabled by default.
A smart commit message has the following syntax:
<ignored text> <ISSUE_KEY> <ignored text> #<COMMAND> <optional COMMAND_ARGUMENTS>
The system won’t consider parts of the message marked as ignored. In its simplest form, such a message can only consist of an issue key and a command, such as “TA-095 #close” or “RW-123 #comment fixed.”
Here are the syntax formulas for each of the available commands:
- #comment <comment_string>
- #time <value>w <value>d <value>h <value>m <comment_string>
- #<transition_name> #comment <comment_string>
The <comment string> is an optional element for all commands except for the first one, #comment. When specifying the transition name, you need to provide a Jira issue status that is included in your team’s Jira workflow (such as Ready for QA or Completed). If the status name has more than one word, replace spaces with hyphens, for example: #ready-for-qa.
For more information, please refer to the official documentation.
Using smart commits helps developers reduce context switching and enhances transparency.
How to Name Branches, Commits, and Pull Requests for a Git and Jira Integration
Consistent naming keeps your Git activity linked to the right Jira work items and makes it easy to trace changes months later. Here are the main conventions to follow:
- Include the work item key everywhere. Add it to branch names, commit messages, and pull request titles. This is what triggers the sync with Jira.
- Use a type prefix in branch names. Common prefixes are feature, bugfix, hotfix, refactor, and chore. A typical branch looks like feature/TA-123-user-authentication.
- Use lowercase letters and hyphens. Separate words with hyphens, not spaces or underscores. For example: user-authentication, not User_Authentication or userAuthentication.
- Keep branch names under 60-80 characters. Some CI systems and older Git versions have issues with long names.
- Place the work item key at the start of commit messages. For example: TA-123 fix: correct login validation error.
- Repeat the work item key in the pull request title, even if the branch name already has it. This creates a clear link visible at a glance.
- Pick a pattern and stick with it. Consistency across the team matters more than the specific format you choose.
Monitor Git Activity on a Dashboard in Jira
For product managers, it’s important to see the team’s overall progress and analyze productivity. This allows them to identify bottlenecks, assess delivery speed, and spot potential problems in a timely manner.
This can be achieved with the help of a productivity dashboard. Let’s examine some of your options.
Track Dev Progress With Jira’s Native Development Dashboard
Note
Google’s 2024 State of DevOps report, drawing on more than 39,000 responses, found that only about 19% of teams reach the elite tier of software delivery performance, with another 22% reaching the high tier. Tracking the right metrics is the first step toward closing that gap and improving your team’s performance.
Jira now offers a built-in dashboard that helps you track various productivity metrics. It combines data from Jira and your version control platform. This is convenient as a product manager can see development activity directly from Jira.
The dashboard includes a bar chart showing the number of work items completed per week. It also has scorecards with various metrics, such as overdue work, pull request cycle time, and vulnerabilities from the linked security containers. You can click the scorecards to open detailed graphs.
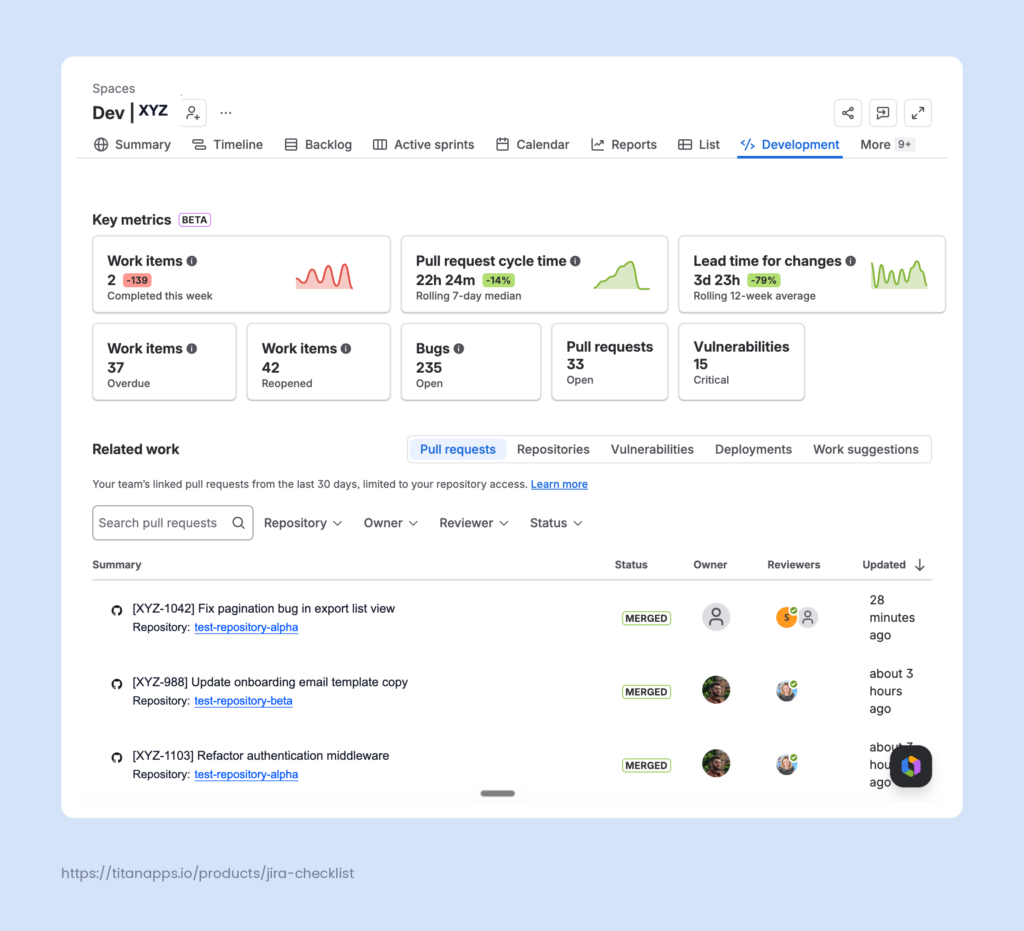
In addition, the dashboard lists the latest Git activity and suggests recommendations for the next work items to focus on.
To access this dashboard, navigate to the Development tab in the horizontal menu above your Jira board. If this tab is not visible, click More.
Go Deeper With the Smart Productivity & Team Activity Dashboard
While the native dashboard provides a general overview, it lacks flexibility and detail. In particular, it doesn’t help you analyze team performance in depth or track individual productivity.
However, you can do this with a third-party plugin, Smart Productivity & Team Activity Dashboard for Jira. It includes more metrics and can provide significant value to product managers.
The Smart Productivity Dashboard gathers data from Jira, Confluence, and GitHub, allowing you to:
- Track key productivity metrics: The number of work items created and closed by assignees, the number of commits and PR data, productivity median by team, % of median for individual contributions, and more.
- Analyze individual performance using the Team filter on the Metrics breakdown tab. Select the person you need and specify other parameters to see their weekly performance by project, sprint, epic, and issue type / work item type.
- Define role-based benchmarks and analyze individual contributions in comparison to the median for the person’s role. For example, you will have different productivity criteria for a Developer and a Product Designer. A performance of less than 100% means it’s below the guild median, and vice versa.

The charts can be configured to show performance insights by platform. This dashboard creates full transparency for product managers. It enables them to see how the team is performing at the project, epic, work, and sprint levels. This understanding is crucial for spotting bottlenecks, adjusting workloads, and improving efficiency.
To start using it, install the Smart Productivity & Team Activity Dashboard from the Atlassian Marketplace. For the dashboard to collect data correctly, you will also need to have a Git and Jira integration set up. For more details on creating and using your Smart Dashboard, see our article How to calculate productivity in Jira.
Add Third-Party Apps to Enhance Your Git And Jira Integration
Once you have integrated your version control platform with Jira, you can advance to the next level. To maximize the impact of this integration, consider using additional third-party solutions. They can be utilized in many different ways, expanding Jira’s functionality where you need it, depending on your use case. Let’s take a look at some examples.
Install a Feature Flag Management App to Improve Transparency
Sometimes, you need to deploy a release even though some features you’re working on are not ready yet. In such cases, you can hide those features under a feature flag. The code that requires further work will be included in the release, but users won’t have access to that functionality. Once it’s completed, remove the flag, making it visible to users.
Feature flags can be tracked from Jira with the help of a feature flag management app, such as LaunchDarkly or Split. Many other similar apps are available in the Atlassian marketplace. When you use one, the information about the feature flags related to a work item will be displayed in the development section of the work item view:
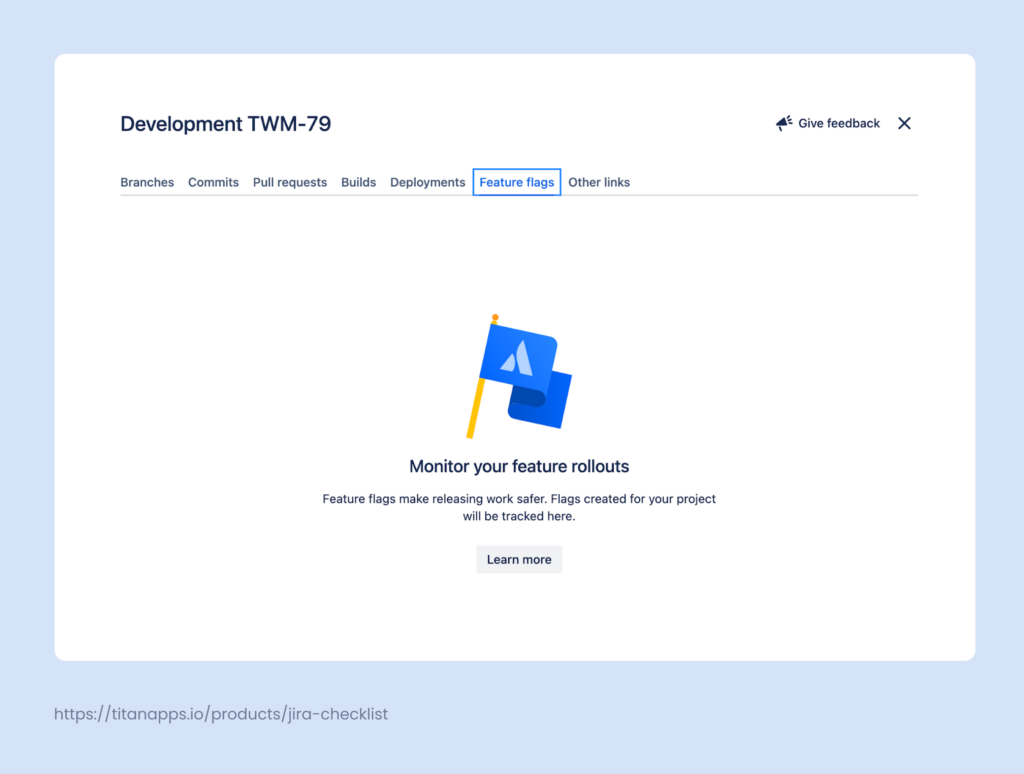
These details will then appear in Jira Release Hub. Using such tools increases transparency and enhances collaboration. A product manager and their teammates can easily see which feature flags are applied to work related to a specific Jira ticket. This ensures that no important details are overlooked and that everyone remains on the same page.
Add Actionable Checklists to Your Dev Tickets
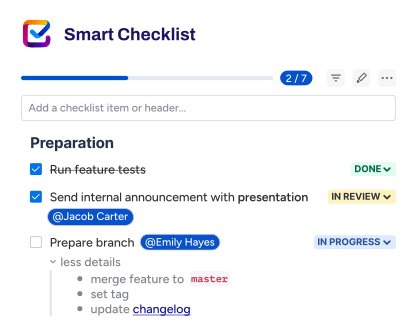
Another helpful app to try is Smart Checklist for Jira by TitanApps. It allows you to add structured checklists with rich formatting to your Jira issues. These checklists can be saved as templates and applied automatically to Jira work items. As a result, you will save time on recurring tasks and processes as you won’t have to enter all the details manually.
Another significant benefit is that this integrates your company’s best practices into your team’s daily work. With Smart Checklist, you can codify a process in the form of actionable ToDo items. This ensures that everyone follows the same sequence of steps and doesn’t miss anything important. Such process standardization makes teamwork smoother and faster-paced.
Example: a Free Code Review Template
Here’s what it looks like in practice. We’ve prepared a reusable Smart Checklist template for code review. It lists the main steps to complete and provides additional details in the expandable section next to each checklist item:
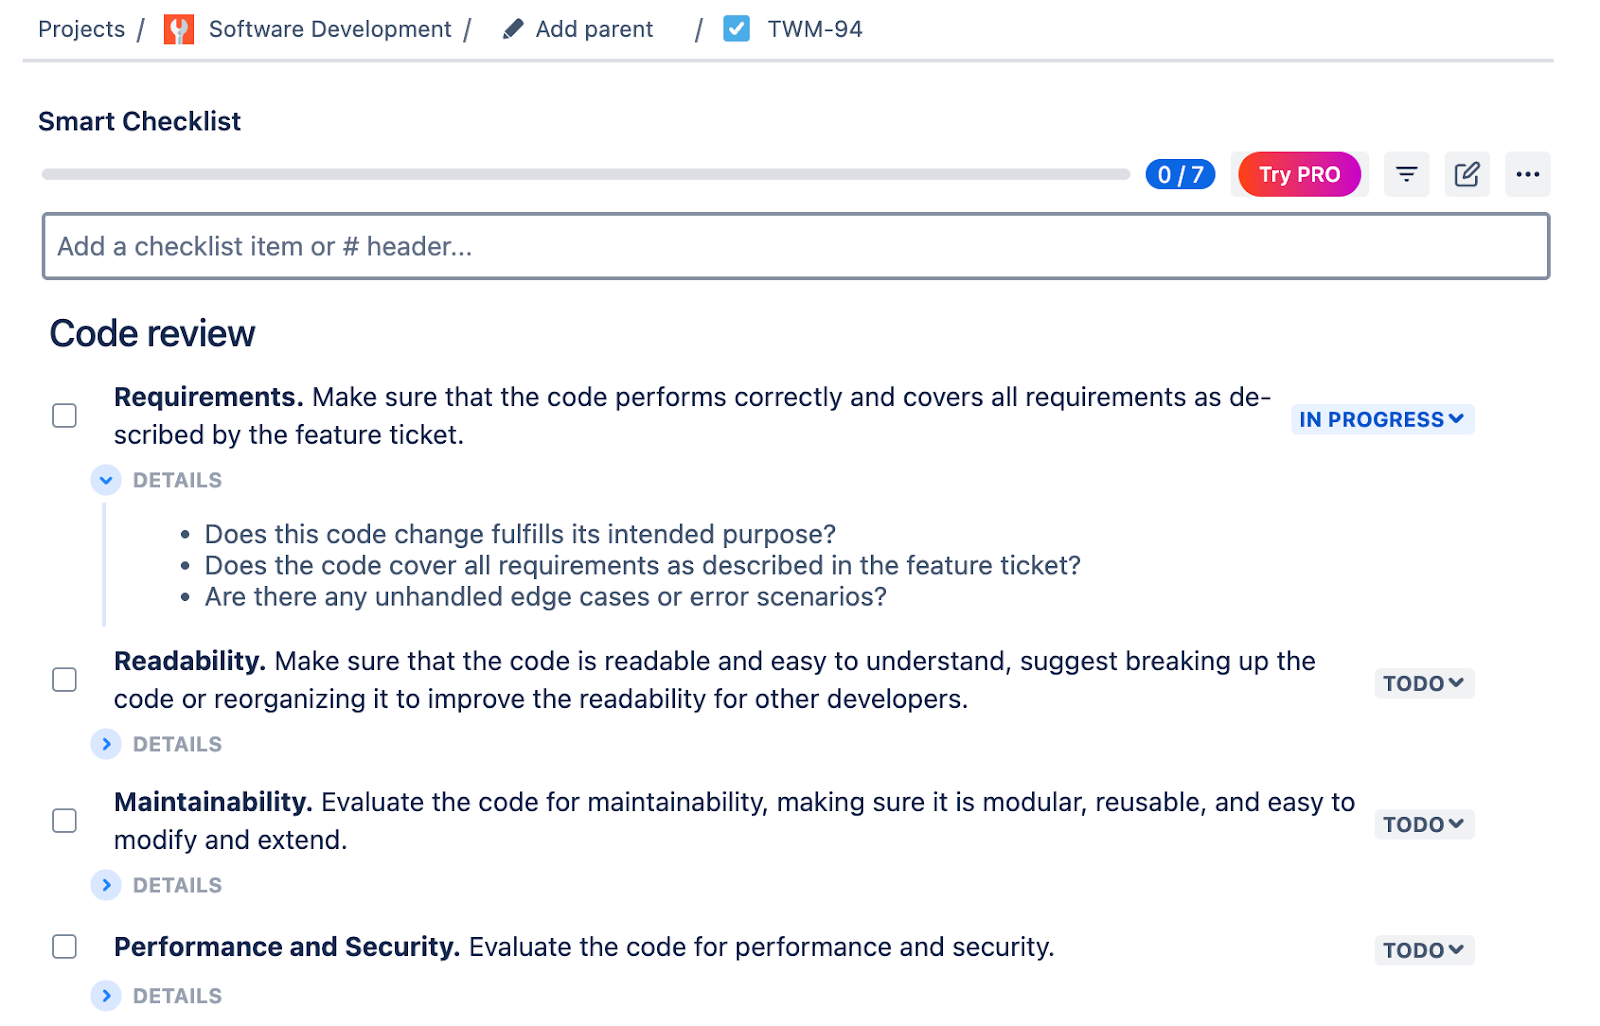
## Code review
- **Requirements.** Make sure that the code performs correctly and covers all requirements as described in the feature ticket.
> * Does this code change fulfill its intended purpose?
> * Does the code cover all requirements as described in the feature ticket?
> * Are there any unhandled edge cases or error scenarios?
- **Readability.** Make sure that the code is readable and easy to understand. Suggest breaking up the code or reorganizing it to improve the readability for other developers.
> * Is the code easy to understand?
> * Are variable names and function names clear and descriptive?
- **Maintainability.** Evaluate the code for maintainability, making sure it is modular, reusable, and easy to modify and extend.
> * [DRY principle.](https://en.wikipedia.org/wiki/Don%27t_repeat_yourself) Are there any duplicated sections of code that could be consolidated into reusable functions or classes?
> * Will this change add undesirable compile-time or run-time dependencies?
> * Are there any best practices, design patterns, or language-specific patterns that could enhance the code significantly?
> * Does this code follow the single responsibility principle?
- **Performance and Security.** Evaluate the code for performance and security.
> * Will this code change negatively impact system performance?
> * Is there a way to significantly improve the code’s performance?
> * Are sensitive data such as user data and credit card information being securely handled and stored?
- **Testability.** Evaluate the code for testability, ensuring it can be easily tested and that any necessary unit tests or integration tests have been written.
> * Is the code testable?
> * Do the existing tests reasonably cover the code change?
> * Are there any other essential unit, integration, or system tests that should be added?
- **Documentation.** Verify that the code includes appropriate documentation, ensuring that it is clear, concise, and up to date.
> * Does the code include appropriate documentation?
> * Is the documentation clear, concise, and up-to-date?
- **DevOps**. Verify that all the steps needed to be done after the PR deploy are described.
> * Are there any risks related to the deployment of this PR in terms of production operation?
This template is free and easy to use. Install Smart Checklist for Jira and simply copy and paste this template into the Smart Checklist window of your work item. Alternatively, create a new template from scratch for other tasks or processes. Use the built-in markdown editor to customize the template to your specific process. You can also:
- Add headers
- Tag teammates and assign checklist items.
- Include deadlines and priorities
- Set custom statuses for each action item
- Add links to action items
- Mark steps as mandatory
- Save checklists as templates (see the screenshot below)
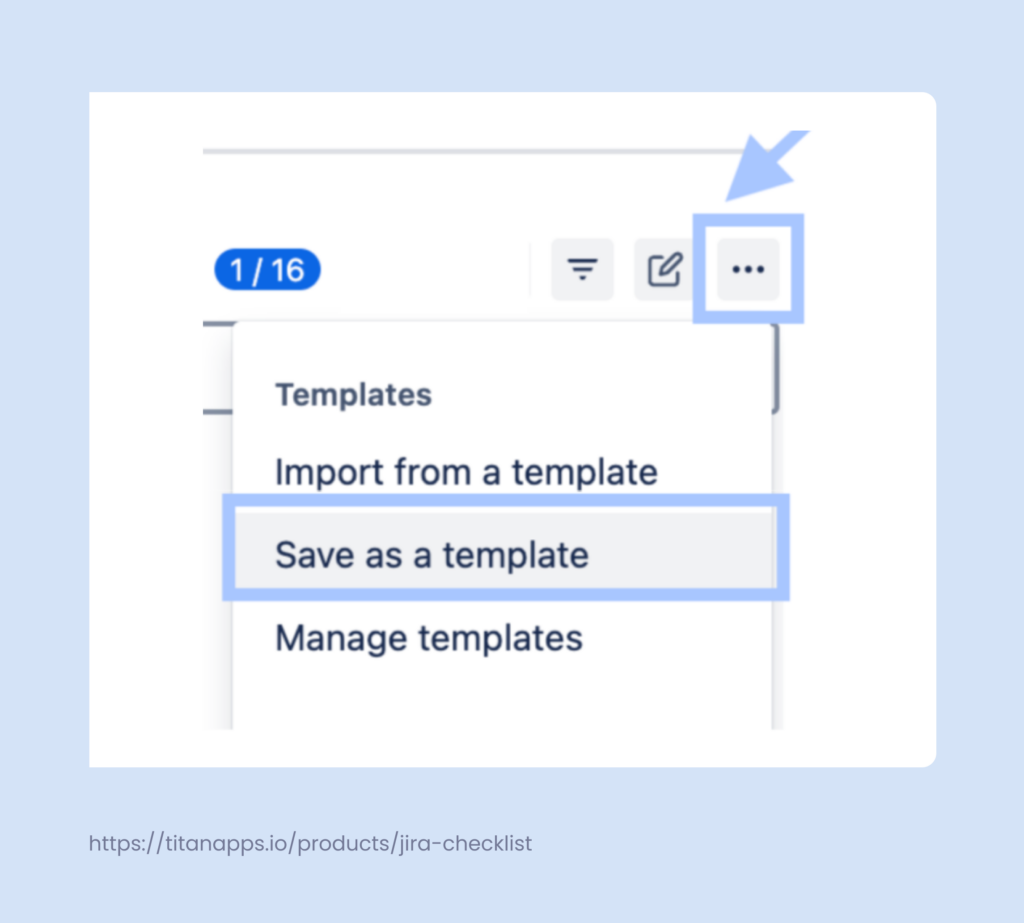
If a checklist is saved as a template, it can be easily added to any new task, either manually or with the help of automation. For more details, please see the Smart Checklist documentation.
Automate Work Item Updates Based on Git Activity
Automation for Jira is a powerful instrument that is often used to enhance the impact of a Git and Jira integration. One of the most common use cases is automatically updating Jira work item statuses based on Git activity.
For example, when a pull request is merged, a corresponding ticket can be transferred from In Progress to Merged. This saves time and reduces context switching. A developer can keep their Jira issues / work up to date without leaving their Git app.
In Automation for Jira, there is a dedicated DevOps section featuring a set of triggers you can use for this and other purposes:
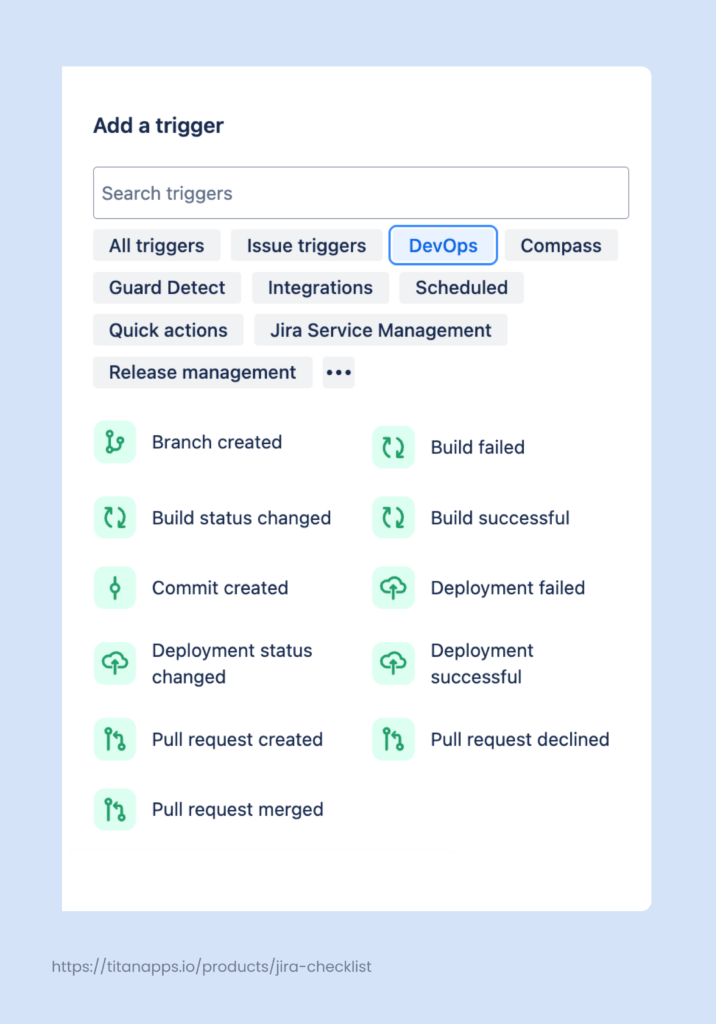
Automation Example 1. When a Pull Request is Merged, Transition the Jira Work Item to the Merged Status
Below is a scheme with the rule for the use case we mentioned earlier. When a pull request is merged in your Git app, this information will be synced with Jira (thanks to the Git and Jira integration you set up earlier). Once Jira registers this new information, the rule will be triggered, and the work item status will change to Merged:
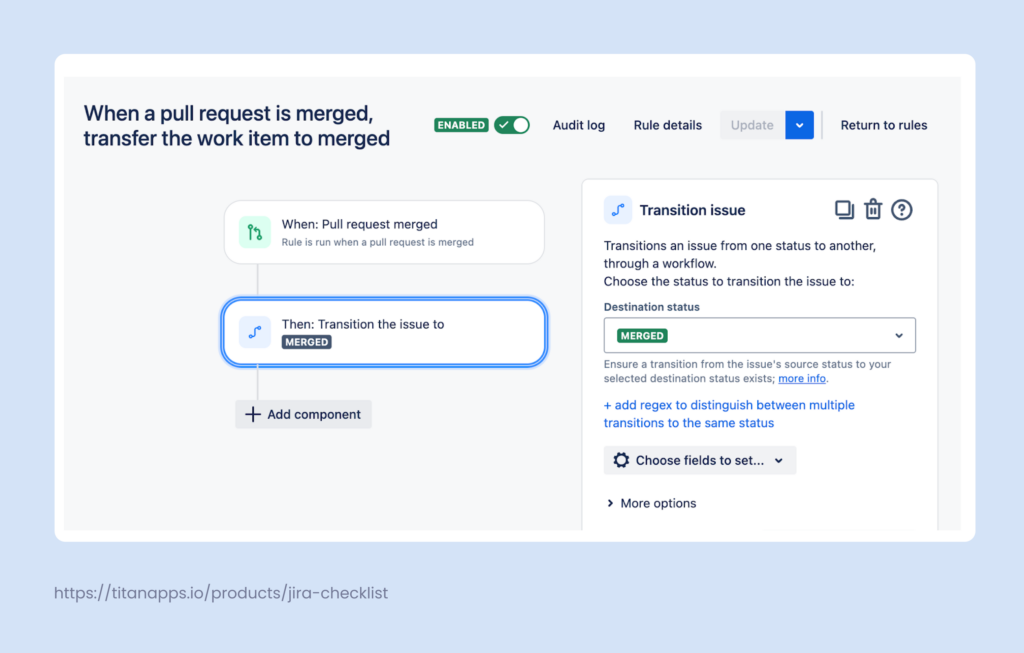
This option can be more or less useful depending on your team’s workflow. If you typically have several pull requests per work item, it would make sense to change the status only when the last one is merged. In this case, you can add a regex to the rule: for example, to change the work status only if the pull request title matches a regex: ^Final merge.*
Automation Example 2. When a Pull Request is Created, Add a Code Review Checklist to the Jira Work Item
As we mentioned in the previous section, Smart Checklist for Jira offers a free Code Review template. It helps the reviewer to check the code quality without missing any essential parameters. We can set up Automation for Jira that will add this checklist to your work item when a pull request is created for this work item.
In the Jira Automation section, add a new rule and select Pull request created as a trigger. For the action, pick Add checklist Items and connect Smart Checklist (it should already be installed for your Jira project).
Then, insert the Code Review checklist in the markdown formatting. You can copy it here:
## Code review
- **Requirements.** Make sure that the code performs correctly and covers all requirements as described in the feature ticket.
> * Does this code change fulfill its intended purpose?
> * Does the code cover all requirements as described in the feature ticket?
> * Are there any unhandled edge cases or error scenarios?
- **Readability.** Make sure that the code is readable and easy to understand. Suggest breaking up the code or reorganizing it to improve the readability for other developers.
> * Is the code easy to understand?
> * Are variable names and function names clear and descriptive?
- **Maintainability.** Evaluate the code for maintainability, making sure it is modular, reusable, and easy to modify and extend.
> * [DRY principle.](https://en.wikipedia.org/wiki/Don%27t_repeat_yourself) Are there any duplicated sections of code that could be consolidated into reusable functions or classes?
> * Will this change add undesirable compile-time or run-time dependencies?
> * Are there any best practices, design patterns, or language-specific patterns that could enhance the code significantly?
> * Does this code follow the single responsibility principle?
- **Performance and Security.** Evaluate the code for performance and security.
> * Will this code change negatively impact system performance?
> * Is there a way to significantly improve the code’s performance?
> * Are sensitive data such as user data and credit card information being securely handled and stored?
- **Testability.** Evaluate the code for testability, ensuring it can be easily tested and that any necessary unit tests or integration tests have been written.
> * Is the code testable?
> * Do the existing tests reasonably cover the code change?
> * Are there any other essential unit, integration, or system tests that should be added?
- **Documentation.** Verify that the code includes appropriate documentation, ensuring that it is clear, concise, and up to date.
> * Does the code include appropriate documentation?
> * Is the documentation clear, concise, and up-to-date?
- **DevOps**. Verify that all the steps needed to be done after the PR deploy are described.
> * Are there any risks related to the deployment of this PR in terms of production operation?
Save and turn on the rule. Here’s what the automation scheme looks like:
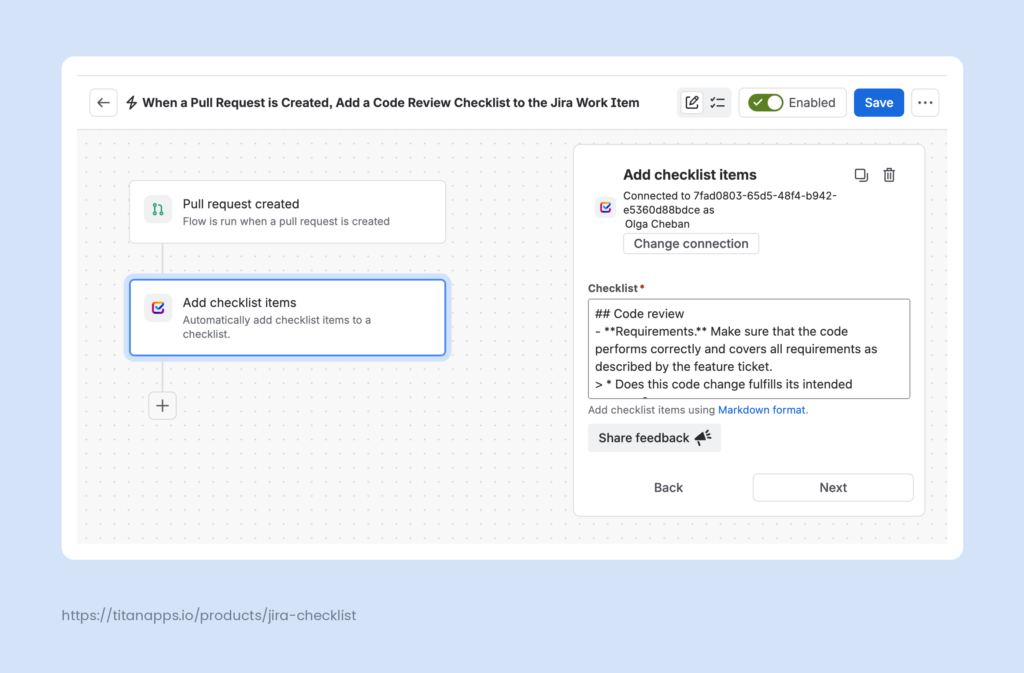
Now, opening a pull request in your Git app will trigger this automation, and the Code Review checklist will be added to the corresponding work item.
Similarly, you can set up automation for other events using the available DevOps triggers.
Note
Additionally, Smart Checklist also has its own built-in automation capabilities. They let you add checklist templates to work items automatically, based on custom conditions – for example, to all new work items of a specific type or to work items with summaries containing certain keywords, and so on.
How to Set up a GitHub Copilot for Jira Integration
The leading Git-based platforms also enable you to use their AI agents with Jira. The exact setup depends on the platform you use, but typically, a classic Git and Jira integration alone isn’t enough. For instance, to connect GitLab Duo Agent to Jira, you need to integrate it with the Atlassian MCP. For GitHub Copilot, the logic is entirely different, as you will need to install a dedicated app.
Let’s take GitHub as an example and explore in more detail how to connect GitHub Copilot to Jira. Here are the key steps:
- Go to the GitHub Copilot for Jira page on the Atlassian Marketplace and click Get it now.
- Select the Atlassian site where you want to install the app and confirm.
- You will be prompted to log in to your GitHub account and install the GitHub Copilot for Jira app on GitHub’s side (click Install app). At this step, you will also be able to select the repositories you want Copilot to work with.
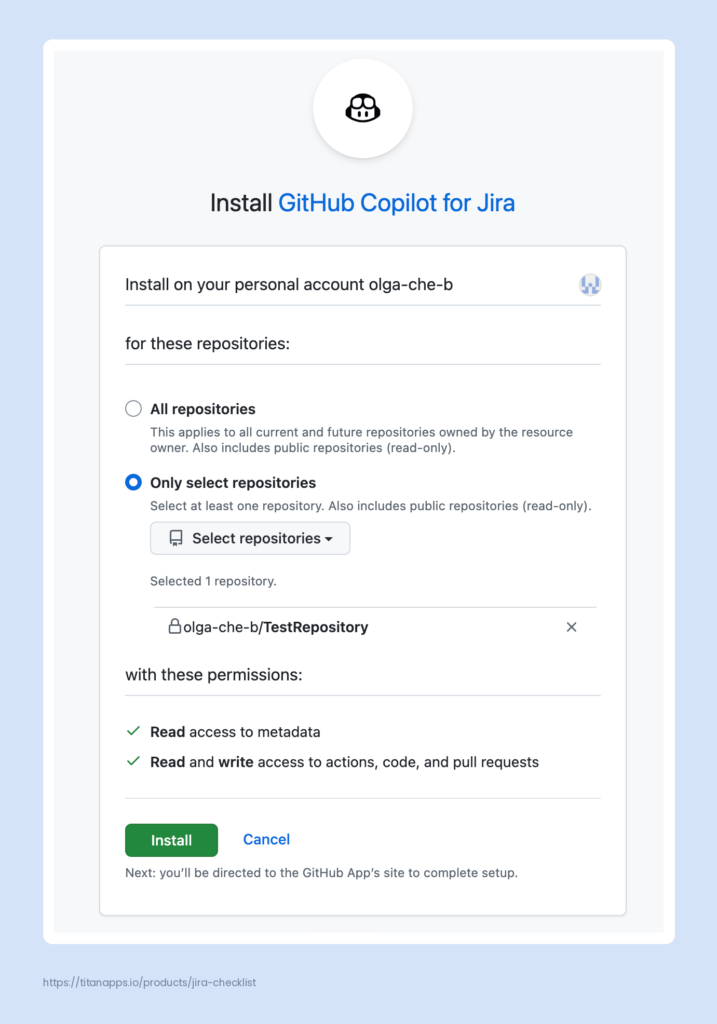
After the setup, you can assign a work item to GitHub Copilot in the assignee field, or just mention @GitHub Copilot in a comment. Copilot will read the work item context, including the title, description, and comments, to understand what needs to be done. Then, it can make the code changes and open a draft pull request in your GitHub repository for your team to review.
For the best results, include the target repository and clear requirements in the work item description. If Copilot needs more information, it can ask clarifying questions right in the work item. Its progress and activity stream into the chat panel on the work item. You can post follow-up instructions there to keep improving the result.
How to Troubleshoot Common Git and Jira Integration Issues
If your Git and Jira integration is not working as expected, the fix is usually simpler than it looks. Below are the most common issues teams run into, each with the likely cause and how to resolve it.
- Jira is not showing GitHub commits or branches. -> The work item key is likely missing from your Git message, or your Git and Jira account emails don’t match. If the emails are different, the system won’t recognize the changes as made by the same user. Add the key to the branch name, commit message, or pull request title, and make sure both accounts use the same email address.
- Smart commits are not working. -> The syntax is probably off, or you don’t have the right Jira permissions for the action. For example, a smart commit with #comment will fail if you don’t have comment rights on the Jira project. Double-check the format against the official documentation and pay special attention to multi-word transition names (#ready-for-qa, not #ready for qa).
- Jira cannot see a branch you already created. -> The initial sync may not have picked it up. Push a small change with the work item key in the commit message to force a sync. The branch should appear within a few minutes.
- Sync is delayed or stuck. -> Repositories typically update every 8-15 minutes, so short delays are normal. If nothing changes after that window, trigger a manual reindex from your integration settings, or set up webhooks for faster syncing.
- You can’t create branches from a Jira work item. -> You’re probably missing the View Development Tools permission, or the Git integration app isn’t fully authorized. Ask your Jira admin to grant the permission and confirm the app setup.
For deeper Git and Jira integration troubleshooting, your Git platform’s support docs usually have provider-specific guidance for edge cases.
For more tips on organizing your process in Jira efficiently, please take a look at our other articles:
- Jira productivity metrics to track
- Jira automation best practices
- Top 10 Jira automation use cases
- Jira release management guide
- Jira code review process
- Jira workflow guide
Frequently Asked Questions About the Git and Jira Integration
The questions in this section come from three places. Some are pulled straight from Google’s People Also Ask block for “git and jira integration” – the questions real users see when they search. Others come from recurring threads on Reddit’s r/jira community, where developers share the setup issues and edge cases they hit in practice. The rest reflect the questions our team gets asked most often about connecting Git platforms to Jira. Together they cover the practical concerns that trip teams up during and after the setup.
Do I need admin permissions to integrate GitHub or GitLab with Jira?
Yes. Both platforms need administrator access to install the marketplace Jira app and grant repository permissions. You also need matching permissions on the version control side to complete the setup.
What happens if I forget to include a work item key in my commit message?
The commit still lands in your repo, but it will not appear in the Development section of any Jira work item. You can add the work item key to a later commit, branch name, or pull request to reconnect the code change to the ticket.
Can I use one Jira account with multiple Git platforms at the same time?
Yes. Jira Cloud supports parallel integrations with GitHub, GitLab, Bitbucket, and Azure DevOps. Each platform connects through its own app or DVCS account, and all linked activity shows up in the same Development section on your work items. This helps development teams that work across multiple git hosts stay aligned in Jira.
Why do smart commits sometimes fail silently?
The most common reason is an authentication mismatch: your Git email address does not match your Jira account email. Smart commits also fail if your command syntax is wrong or if you lack permissions for the requested action in Jira.
Does the integration work with GitHub Enterprise Server or self-managed GitLab?
Yes, but the setup steps differ from the cloud editions. Configuration for GitHub Enterprise Server or self-managed GitLab is not the same as for GitHub Cloud or GitLab.com. Refer to the official documentation for your Git platform to configure a connection with Jira Cloud or Jira Data Center.
What is Git? How is Git different from GitLab and GitHub?
Definition: Git is a distributed version control system that tracks changes to your code and lets multiple developers work on the same project in parallel. Git is the near-universal choice for version control among development teams. In the 2022 Stack Overflow Developer Survey, which polled 73,268 developers across 180 countries, 96.65% of professional developers reported using Git-based tools.
GitHub (owned by Microsoft), GitLab, Bitbucket, and Azure DevOps are hosting platforms built on top of Git. They store your Git repos in the cloud and add collaboration features like pull requests, code review, and access management. All this supports project management workflows around the code. In short, Git is the underlying tool, while these services host and extend it.
Do I need to include a Jira work item key in every commit?
If you want that commit to be linked to Jira, then yes. Without the key, the commit lives only in your Git repo and stays disconnected from any work item. If you forget, you can attach the key later through a branch name or pull request title, and the activity should backfill in the Development section of the linked work item.
How do I link a Git branch to a Jira work item?
Include the Jira work item key in the branch name when you create the branch. A common pattern is feature/PROJ-123-short-description. Once you push the branch, it appears automatically in the Development panel of the linked work item.
Why isn’t my GitHub activity showing up in Jira’s Development panel?
A few common causes: the work item key is missing or mistyped in the commit, branch, or pull request; the repo isn’t linked in the GitHub for Atlassian Jira app configuration; the account lacks the right authentication or permissions on either side; or the sync is delayed. Webhooks usually deliver updates within a minute, but backlogs or outages can push that longer.
What data does the GitHub for Atlassian app access in my repositories?
The Jira app connects to your repos through the GitHub API to read metadata about commits, branches, pull requests, and deployments. It scans commit messages, branch names, and pull request titles for Jira work item keys to link activity back to your tickets. Full permissions details are listed on the app’s Marketplace page and in GitHub’s app settings.
Can Git be integrated with Jira?
Yes. Git integration for Jira is available for GitHub, GitLab, Bitbucket, Azure DevOps, and more. Bitbucket has a native connector in Jira, while the others are set up through dedicated marketplace apps. Once connected, code activity syncs to the Development section of your Jira work items, so engineers can move from ticket to code and back without switching context.
How do you integrate Jira with GitHub?
To integrate Jira with GitHub, install the GitHub for Atlassian Jira app (formerly known as GitHub for Jira) from the Atlassian Marketplace. Then connect your GitHub organization and choose whether to link “All repositories” or “Only select repositories.” Once permissions are granted, you can start including Jira work item keys in your commits, branches, and pull requests to sync activity between the two apps. You need site administrator permission in Jira Software and organization owner permission in GitHub to complete the setup.
How do you integrate Jira with Bitbucket?
Jira has a native connector for Bitbucket, so no marketplace app is needed. In Jira, go to Settings ? Jira Apps, and find DVCS accounts under the Integrations heading. Connect your Bitbucket workspace, then grant access. Your repos will start syncing automatically, and smart commits are enabled by default to streamline the developer flow. From there, mention Jira work item keys in your commits, branches, and pull requests to link Git activity to the corresponding work items. You need Jira admin permissions to see the DVCS accounts page.
How do you connect Jira to GitLab?
To connect Jira to GitLab, install the GitLab for Jira Cloud app from the Atlassian Marketplace. Follow the setup wizard and keep GitLab.com selected if you use the cloud-hosted version. Sign in to authorize the app, then link your GitLab groups. Once linked, include Jira work item keys in your commits, branch names, and merge request titles to sync activity to the corresponding work items. You need the Maintainer or Owner role on the GitLab group to link it.
How do you integrate GitHub Actions with Jira?
GitHub Actions integrates with Jira through the same GitHub for Atlassian app used for the standard GitHub and Jira integration. Once the app is installed and your repository is connected, build and deployment data from your GitHub Actions workflows appears in Jira automatically, as long as the associated commits include a Jira work item key. The information shows up in the Development panel of the work item, on the Jira board, in the Releases hub, and on the Deployments timeline. Alternatively, you can use Exalate to connect GitHub and Jira when you need more flexibility, bidirectional or control over how data is synchronized between the two systems.