Jira
Jira monday.com


When your Jira work items (issues) are too big or too complex, you can break them into smaller pieces. By default, Jira solves this challenge with subtasks. However, subtasks are not always the best choice – sometimes, it’s better to use a simple, lightweight checklist in a work item instead.
In this article, we give you a detailed comparison of Jira subtasks and checklists. You’ll learn about their pros and cons and the most common use cases. We’ll also talk about ways to use Jira Subtasks vs Checklists for your daily tasks. In addition, we’ll see some hands-on examples. Let’s start exploring!
TL;DR: Key Takeaways About Jira Subtasks vs Checklists
- Subtasks and checklists are two ways to break down a Jira work item, but they solve different problems
- Jira offers subtasks natively and supports simple checklists with action items using square-bracket syntax in text fields. For richer checklists with assignees, deadlines, custom statuses, and reusable templates, you can use Smart Checklist for Jira
- Common subtask use cases include: developing features with work split across frontend, backend, and QA; marketing campaigns with separate deliverables per channel, or research tasks broken into distinct investigation streams. Each subtask is a work item that you can track independently
- Checklists are commonly used for multi-step tasks and processes, as well as for verification tasks and lists of criteria, where the individual steps are too granular to warrant their own work item. Examples include the Definition of Done checklist, Code Review criteria, managing the hiring and onboarding process in Jira, or coordinating the dev and QA teams to ensure release readiness
- Both formats can show progress on the Jira board. Subtasks appear as separate cards, while Smart Checklist progress can be displayed on the parent work item’s card without adding new cards
- The decision rule: if a step is substantial enough to hand off as its own unit of work, make it a subtask. If it’s part of a multi-step process or a verification list inside a larger unit of work, make it a checklist item.
Revisiting the Basics: What is a Jira Subtask?
A subtask is a part of a larger work item in Jira: a task, story, or bug. It can also be a part of a custom work type, if it’s located on the same hierarchy level as a task. This means you can’t add a subtask to another Jira subtask or an epic.
A parent work item can consist of multiple subtasks – a great way to divide work into smaller chunks. Each subtask can have its own description, assignee, reporter, deadline, and other fields. So it’s a common choice when you want to assign different parts of a task to different people.
Two Real-World Examples of Jira Subtasks
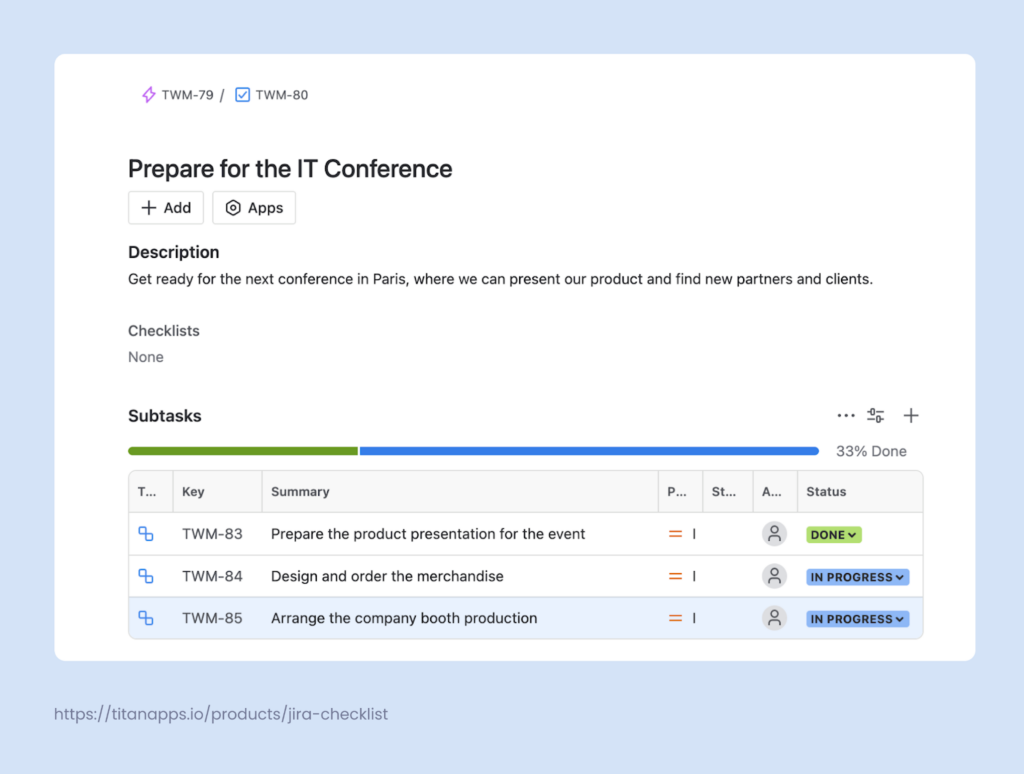
Example 1. Subtasks for an IT Conference Preparation Task
Here’s what a typical Jira subtask looks like. In this case, the parent work item is a task, “Prepare for the IT conference”. The three subtasks address different things that should be done. Drafting the product presentation, ordering merchandize, and arranging booth production – these are all examples of Jira subtasks.
Example 2. Subtasks for the Landing Page Preparation Task
Here, we have a parent task for creating a set of landing pages. Each of the pages compares a brand to a different competitor. So, for each of them, there’s a separate subtask sitting within a larger task.
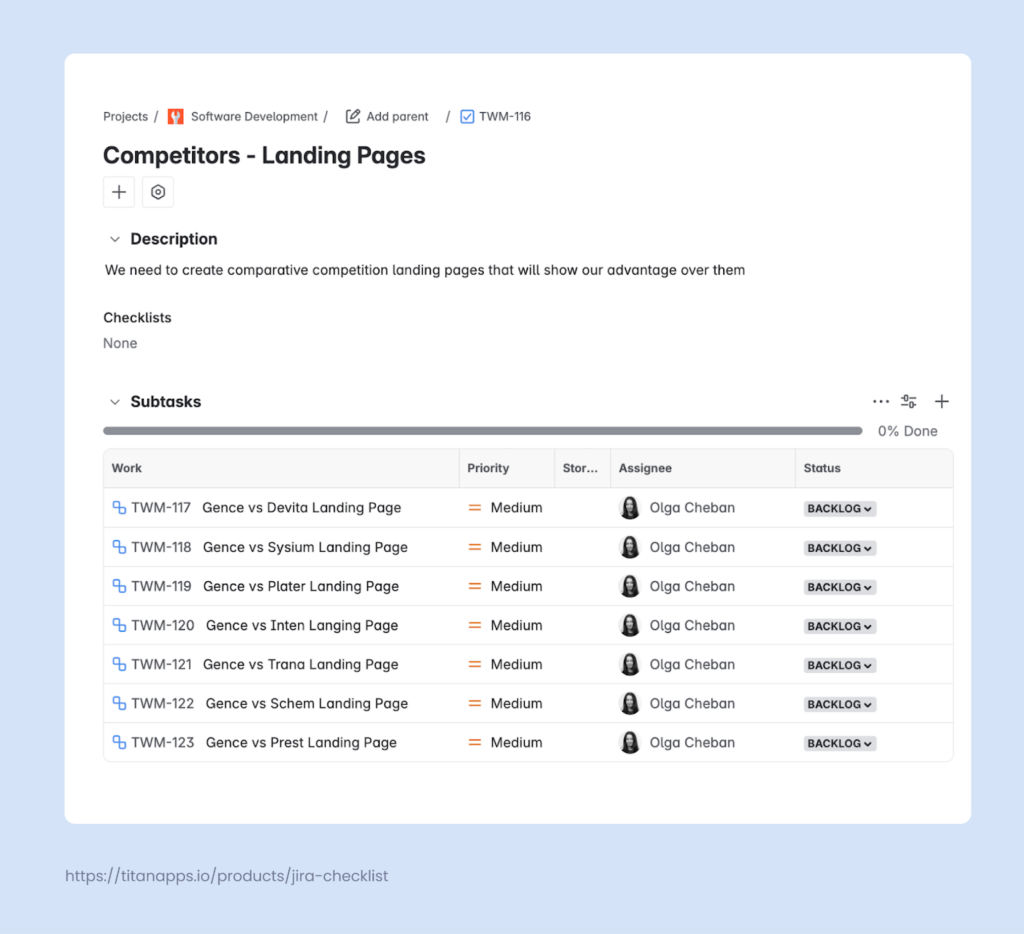
As you can see, subtasks are used for distinctive chunks of work. In this example, each of them has its own deliverable (a separate landing page). This is a common way to use subtasks.
If you compare Jira subtasks vs checklists, you’ll see that checklists have a slightly different purpose and features.
A Lesser-Known Element: What is a Jira Checklist?
In Jira, a checklist is a structured list of steps within a parent work item. A checklist can be a part of an epic, task, story, or any other work type. You can even add a checklist to a subtask. Although a checklist is not created as a standalone unit, you can convert it into a work item later, if needed.
A checklist can contain deadlines, tags for responsible teammates, external links, and more. You can also set custom statuses for each step/checklist item. This gives you all the elements you need in a lightweight structure – without extra overhead (such as issue fields, description, etc.). One more benefit of checklists is that they can be saved as templates and then easily reused. That’s why they are a great choice for recurring tasks and multi-step processes.
Checklists can be added natively with the help of Jira action items, but their functionality is very limited. To add a simple checklist with the help of Jira action items, type [] – square brackets in any rich text field (such as a work item description or comments). The brackets will be automatically turned into a checkbox.
To access more features, it’s better to use a checklist app from the Atlassian Marketplace.
Two Practical Examples of a Jira Checklist
Example 1. A checklist for the recruitment process
Here’s a reusable template created with Smart Checklist for Jira. This checklist documents the standard steps for the recruitment process. It includes all the relevant details, links to helpful resources, and internal policies. You can also tag users, assign checklist items, add deadlines, and write step descriptions in the expandable detail fields.
The responsible person can simply follow this pre-defined plan step by step, checking off completed items. When they need to recruit another employee, they can easily reuse the same Position Opening template – without the need to prepare a new Jira ticket from scratch.
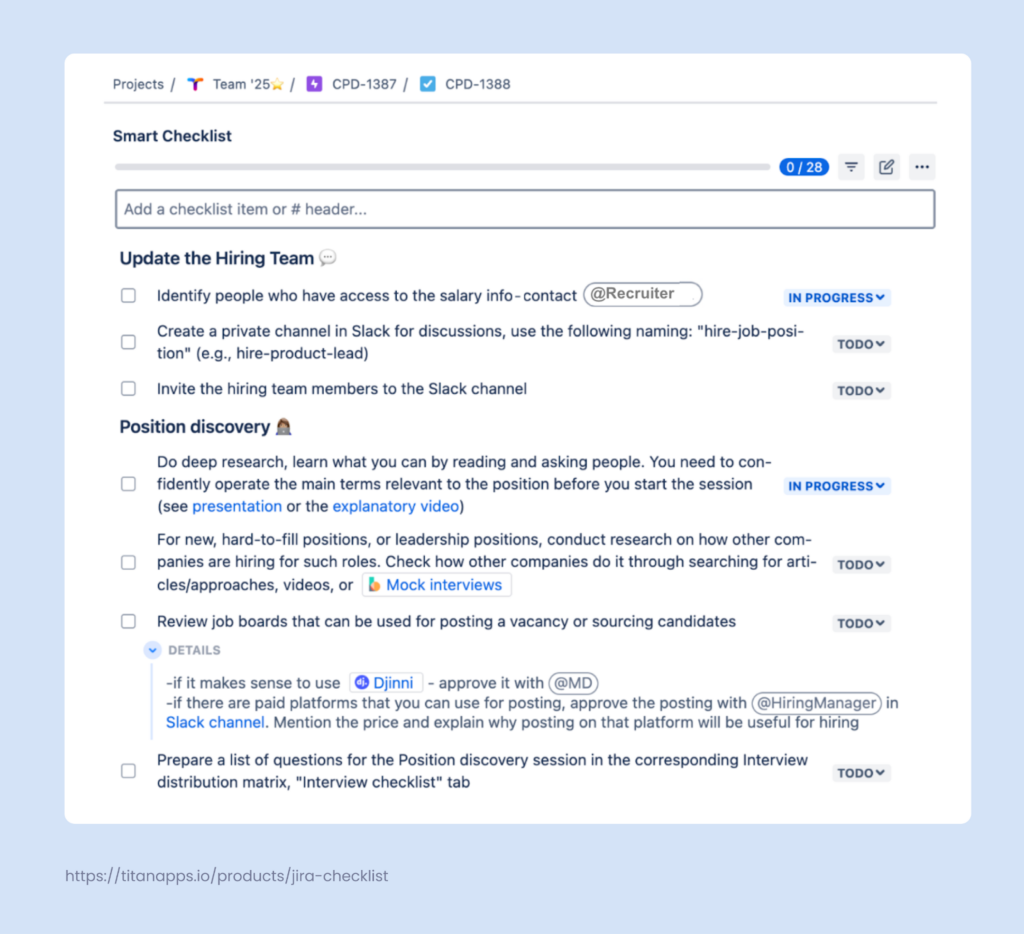
You can track progress on completing the checklist with the help of a special bar on the top. If it’s more convenient, view progress directly on your Jira board – it shows checklist statuses too. Smart Checklist also offers several gadgets for Jira dashboards, allowing for custom reporting.
As you can see, a checklist can contain anything you need. At the same time, you don’t have to fill out multiple issue fields for each step.
In this case, the Jira subtask vs Jira checklist battle is clearly won by the checklist. Since there are dozens of steps grouped under multiple sections, creating a separate subtask for each one wouldn’t be practical. Adding a multi-step checklist is much simpler, easier, and doesn’t require much time. This is a good example of how checklists make it easy to document complex processes in a clear, structured way.
However, checklists can also be simple and include only several items, depending on your needs and the specific task.
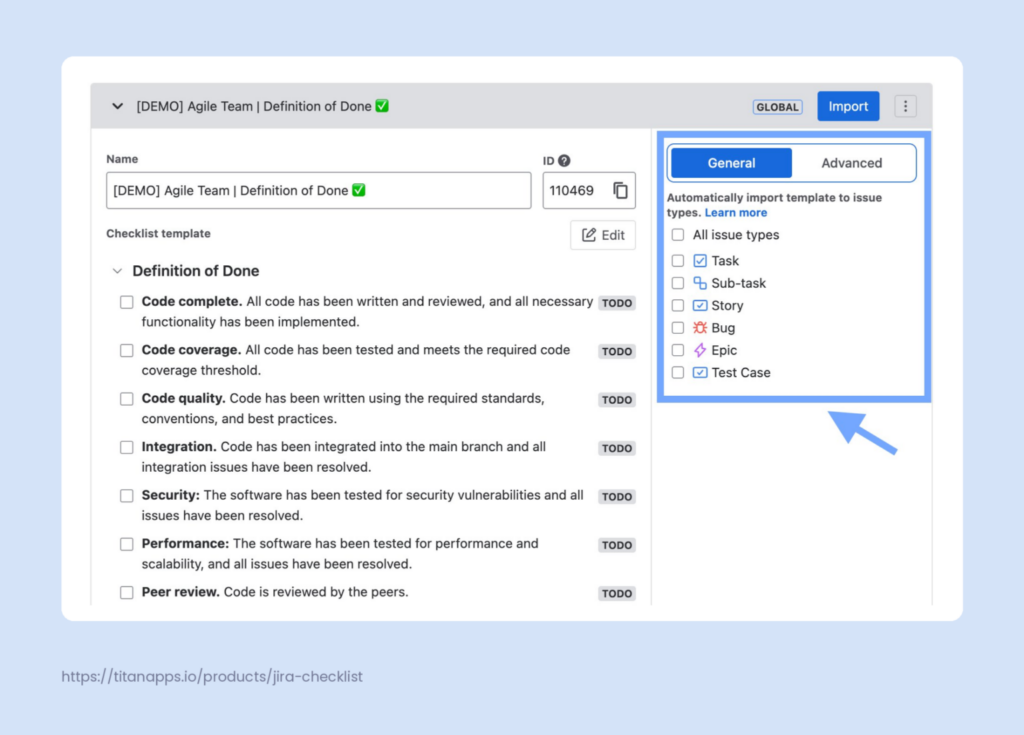
Example 2. A checklist for the Definition of Done
Here’s another common use case for Jira checklists: managing the Definition of Done in Jira. This is an important agile concept. It helps teams streamline processes and ensure a high quality of the work shipped.
When finishing a task, a developer needs to check their code against a list of criteria. This self-review helps to verify if the work is truly done according to the accepted standards. Implementing the Definition of Done in Jira reduces the need for potential rework and saves valuable time.
The Jira checklist below is a reusable template. It documents the Definition of Done criteria and helps the development team to conduct the review. This checklist can be integrated with Jira Automation. This means it can be added automatically to each dev task. Usually this happens when it transitions to the selected workflow status, such as “Ready for testing”.

This checklist is a reusable template that Smart Checklist can add to each dev task automatically. Using native automation rules, you can set it to be applied when a work item of a specific type is created or transitions to a selected status, such as ‘Ready for testing’. For more advanced scenarios, you can also integrate the template with Jira Automation.
Pros and Cons of Jira Subtasks vs Checklists
What Jira Subtasks Do Well and Where They Fall Short
Pros:
- Each subtask is a separate work item with its own assignee, due date, and status
- Can appear on Kanban / Scrum boards and be tracked independently
- Supports comments, attachments, and custom fields
- Good for parallel work handled by multiple people or teams
- Effective for cases where the main task has several distinctive parts with separate deliverables
Cons:
- Slower to create and manage, as each subtask is a separate work item
- Can clutter your backlog or board if overused
- Doesn’t fit for documenting processes or step-by-step instructions
- Not reusable, can’t be natively used as a template for recurring subtasks
The Benefits and Limitations of Smart Checklists in Jira
When adding checklists with the help of Smart Checklist for Jira, you receive, among others, the following benefits:
Pros:
- Fast to set up, allows you to add multiple items in one go simply by copy-pasting them
- Enable you to document multi-step processes and handle complex tasks
- Can be saved as templates and reused for recurring tasks
- Checklist templates can be added to selected work types automatically
- Good for step-by-step instructions or conducting checks against numerous criteria
- Multiple checklists can be added to a single Jira issue / Jira work item
Cons:
- Checklist items are not separate Jira issues (work items), and some fields don’t have a checklist equivalent
- Checklist items do not support comments, so you cannot discuss individual checklist items
Jira Subtasks vs Checklists in Jira Work Item Hierarchy
When comparing Jira subtasks vs checklists, you’ll notice they have different places in the Jira work hierarchy. While a subtask is a separate work item, a checklist does not exist on its own. It’s always a part of a full-fledged work item (unless you turn a checklist into a standalone task).
With an epic being the top level of the out-of-the-box hierarchy, tasks, bugs, and stories are located below epics. Subtasks, in turn, can be a part of a task (most commonly), user story, or bug. Subtasks can also be a part of custom issue types situated on the same level – that is, below an epic. Some people are wondering if it’s possible to add a subtask to a subtask, but Jira doesn’t make this possible in the default hierarchy.
A Jira checklist, on the other hand, is more flexible and can be added to any work item, regardless of its type or place in the hierarchy. And subtasks are not an exception – you can easily add checklists to your subtasks if you want to include more granular detail. Additionally, as we mentioned earlier, checklists can also be added directly to an epic without the task level involved.
In general, checklists allow you to create more lightweight hierarchies and maintain good visibility. In contrast, overusing subtasks can make hierarchies confusing and hard to work with.
A Comparison Table For Jira Subtasks vs Checklists
In case you want a summary of the key differences, we’ve prepared this comparison table. It allows you to quickly estimate the usefulness of Jira subtasks vs checklists for your specific situation and requirements.
| Item type | Definition | Hierarchy Level | Purpose | When to Use |
|---|---|---|---|---|
| Subtask | A breakdown of a parent task into smaller pieces of work | Child of a Story, Task, or another work item below Epic | Manages smaller portions of work within a parent issue | - When a parent task has several distinct parts (typically up to 5-7), each representing a significant portion of work, especially with separate deliverables - When you want to assign different parts of a task to different people or departments - When the parent task doesn't repeat and it's a one-off occurrence |
| Checklist | A list of specific criteria, steps, or quality checks added within a work item | Under the work item it belongs to: Epic, Task, Story, Bug, Subtask, or any custom work type | Organizes multi-step tasks and processes, can document them in the form of reusable templates | - When you have a large number of steps related to the same work item (typically from 5-7 to dozens of checklist items) - When it's a recurring task or process and the checklist can be reused as a template - for example, a Recruitment process template or a Definition of Done template - When you need to document multiple criteria that need to be checked - for example, a Code Review checklist |

When to Use Jira Subtasks vs Checklists
As with most things, there are some rules of thumb when it’s best to go with a subtask or a checklist for your Jira work item.
Subtask Use Cases: When a Subtask Is the Right Call
There are certain cases when it is helpful to divide work items into smaller pieces. For example, you may be working on a research item that has evolved in complexity to the point where it needs several individual subitems. Or, maybe a certain task requires a series of specific improvements. Or, a task has many similar but smaller tasks. For example, you need to replace a button, but it needs to be replaced on several pages.
If put simply, consider using a subtask when:
- The parent task is too large to track on its own
- Different parts of the work item have different deadlines
- You need to delegate work among several team members
- You need to use custom fields in subtasks – for example, to add estimates or log work
This little questionnaire should help you decide whether a Subtask is a good fit in your case:
- Is the task ambiguous, meaning you’ll likely be adding more to the scope?
- Will subtasks require more context and the possibility to add attachments or use comments?
- Would you like to estimate or track time working on the subtask specifically?
If you’ve answered yes to at least one of these questions, you probably need to use a subtask.
Checklist Use Cases: When a Checklist Works Better Than a Subtask
Checklists are an excellent way to communicate what needs to be done. Their applications vary from a simple to-do list to a detailed codification of multi-step processes. Checklists help people follow the flow step-by-step without skipping anything essential. This is especially valuable when you work with repetitive tasks that involve multiple ToDo items.
For example, when you need to organize a business trip for dozens of employees and submit their documents for visas. You can prepare one checklist for this process and use it for each of the employees. This way, you will be able to switch between these tasks quickly, and you won’t have to remember where you left off with each application. At the same time, this ensures that nothing is missing and every step is completed. The same goes for any other recurring task or process. In this regard, checklists undoubtedly win the Jira subtask vs Jira checklist battle.
Use checklists when:
- A task contains multiple steps to complete or criteria to check
- Different steps are rather pieces of the same process than separate mini-tasks
- This is a recurring process or repetitive task
- You need to save a checklist as a reusable template
- You want to add a checklist automatically to a certain work type
Some of the common use cases for Jira checklists include:
- Definition of Done Checklist
- Acceptance Criteria Checklist
- Code Review Checklist
- Migration Steps Checklist
These checklist templates allow teams to streamline processes while maintaining attention to detail and high quality. They also save significant time as you don’t have to start from scratch when working on a typical task. A checklist plan, once developed, can be easily used again whenever necessary.
How to Add a Jira Subtask to a Work Item?
To create a subtask, click the plus button below your work item’s title and select Create Subtask. Name your subtask and hit Enter.

What is important is that as long as subtasks are part of that parent work item, they are also standalone and independent pieces of work, so you can track them separately.
For more details, please see Atlassian’s official guide on creating subtasks. If you don’t see the menu for creating subtasks, ask your Jira administrator to configure subtasks for your instance.
How to Add a Checklist to a Jira Work Item?
You can easily do it with the help of Smart Checklist for Jira – a solution that allows you to create feature-rich checklists, including reusable templates.
- Install Smart Checklist for Jira from the Atlassian Marketplace.
- Type or paste the list of steps for your checklist in the Smart Checklist section of your Jira work item. As an option, you can use one of our free Checklist templates for Agile teams.
- Adjust the checklist using the Markdown editor. For example, structure your checklist with headers of different levels, add bulleted lists to individual checklist items, tag team members, and specify deadlines. You can also set custom progress statuses, as shown in the example below.

Smart Checklist allows you to add multiple checklists to a single work item. Each checklist will be located on a separate tab and will display its own progress.
How Subtasks and Checklists Show Up in Jira Reports
Whichever approach you pick, someone eventually needs to report on it. This is where subtasks and checklists behave very differently, and where teams sometimes get surprised by what the native charts include and exclude. Here’s a straight comparison of Jira subtasks vs checklists to help you get your dashboards and reporting right.
How Subtasks Appear in Native Jira Reports
Jira’s built-in Scrum reports focus on parent-level work items and exclude subtask data from most summary calculations. Estimates on subtasks aren’t counted in the Sprint Report, Burndown Chart, or Velocity Chart. Only estimates on parent work items are. If your team estimates at the subtask level, burndown lines will barely move until each parent story closes out, and velocity numbers won’t reflect actual work delivered. Teams typically address this by moving estimates up to the parent level or by adding a Marketplace reporting app that includes subtask data.
Jira dashboards are more flexible than native Scrum reports. Most gadgets pull data from a saved filter. This includes Filter Results, Issue Statistics, Two-Dimensional Filter Statistics, Pie Chart, and Created vs. Resolved. If the filter includes subtasks, so does the gadget. You can customize your dashboard by using JQL to build filters that surface exactly the subtasks you need. For example, parent = KEY-123 AND issuetype = Sub-task lists all subtasks of a specific work item.
How to Track Checklist Progress on Jira Dashboards
Smart Checklist takes a different approach because checklist items are not work items, they’re indexed content on the parent work item. That means progress shows in several places at once.
On the agile board, each work item card can display its checklist completion (for example, 7/10), so team leads can see progress without opening tickets. The Checklists field and Smart Checklist Progress field are both queryable in JQL, which means any Filter Results gadget on a Jira dashboard can slice by checklist state.
Smart Checklist also ships dedicated dashboard gadgets so you can build a real reporting view without leaving Jira:
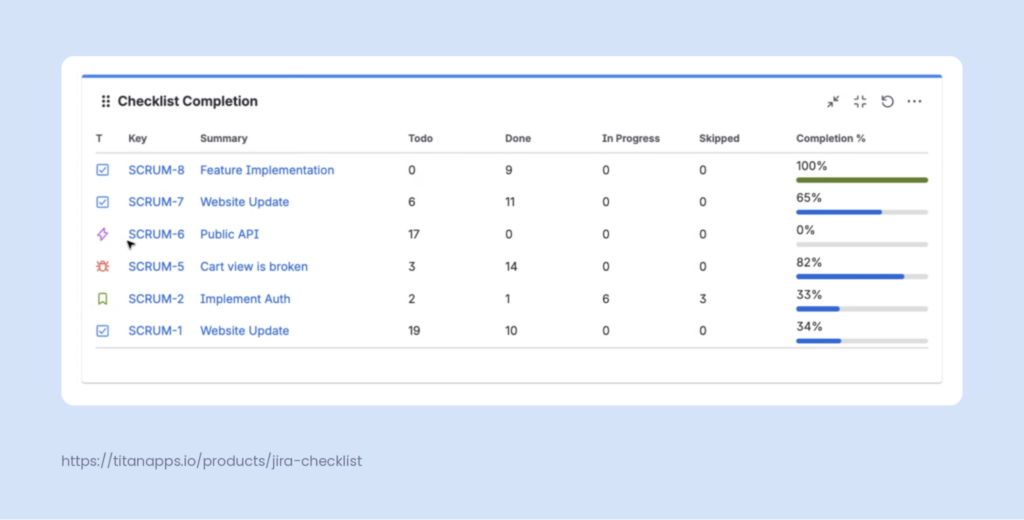
- Completion Gadget shows the checklist completion rate across a filtered set of work items, so a Scrum Master can spot bottlenecks at a glance.
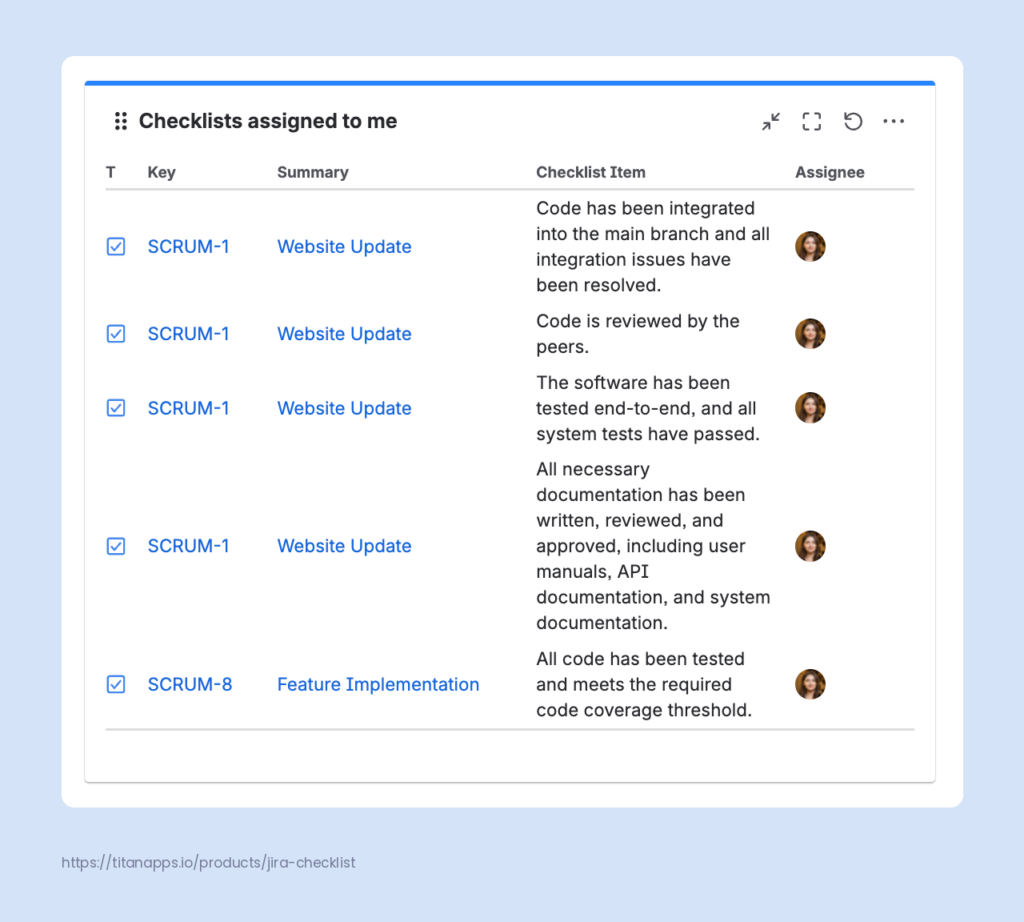
- Assigned to Me Gadget lists checklist items assigned to the current user across every work item, so team members have a single place to see what’s on their plate.
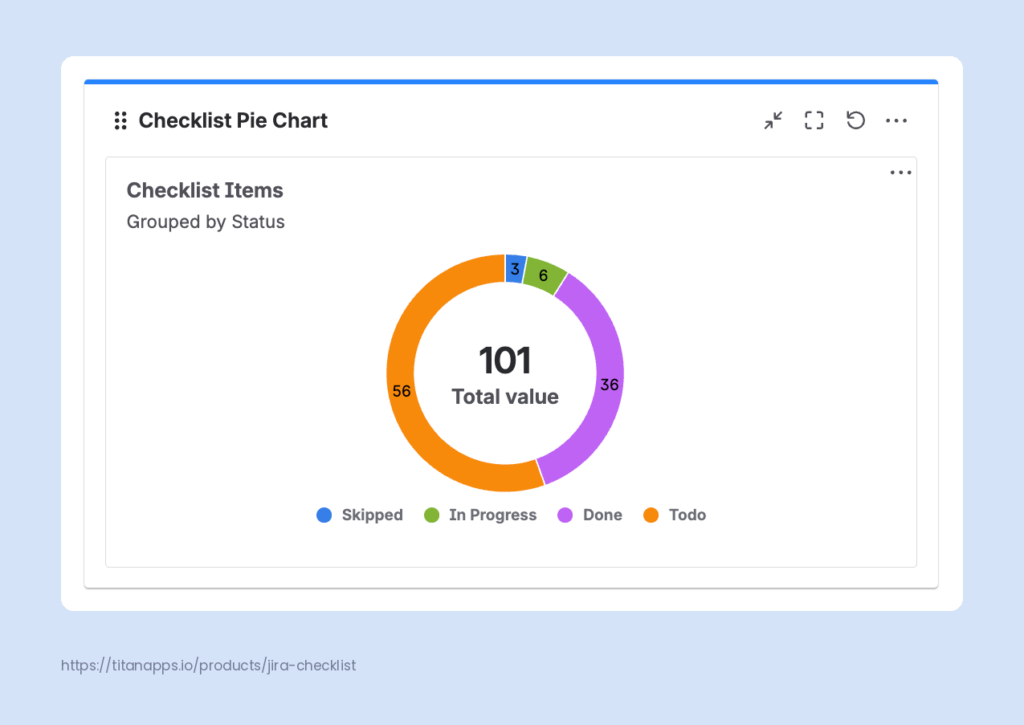
- Pie Chart Gadget visualizes checklist item status distribution (Done, In Progress, To Do, custom statuses) across a filter, which is useful for release readiness and audit views.
When combined with JQL, these gadgets enable a team to build comprehensive dashboards for tracking and reporting.
Smart Checklist content is queryable with JQL, so you can filter work items by checklist progress, item text, or items assigned to a specific person. For example, “Smart Checklist Progress” ~ “-Done” returns every work item with open checklist items. See the JQL Search docs for more query examples./
How to Create Jira Subtasks And Checklists Automatically
When the same set of steps belongs under every work item of a certain type, adding them by hand becomes the bottleneck. So, when exploring the pros and cons of Jira subtasks vs checklists, you should be aware of the automation options available for each of them.
How to Generate Jira Subtasks Automatically
Jira offers built-in automation for subtask creation through Jira Automation rules. You can set up a rule with the “Create subtasks” action. This rule can trigger when a parent work item is created or moves to a specific status. The approach works well for standardized processes where every parent work item needs the same set of subtasks.
In the example below, the Jira automation rule creates a set of subtasks for landing page preparation. It’s triggered when a work item is created and checks if the issue type is Task and whether its summary contains the keyword “landing page creation.”

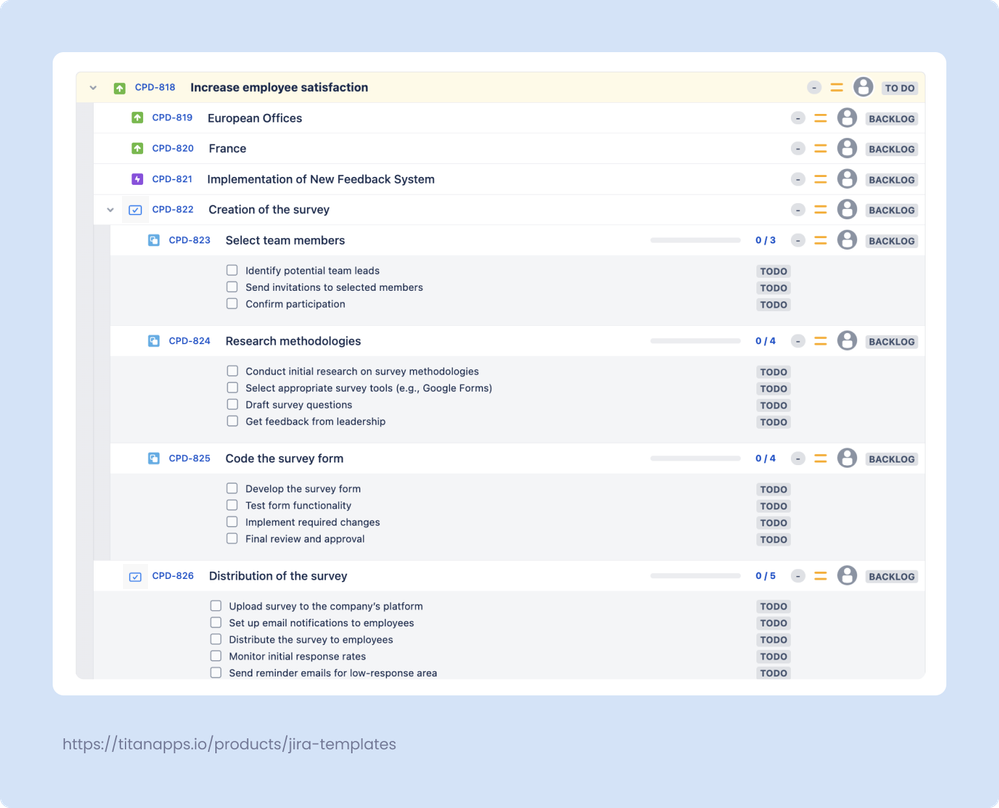
Smart Templates for Jira by TitanApps offer another route to generate subtasks within larger work item hierarchies. You can build a template that includes a parent work item along with its full set of child work items. Applying the template creates the entire hierarchy at once, with Child work items, pre-filled fields, assignees, descriptions, checklists, and due dates already in place. You can also schedule automatic creation with the built-in Scheduler or trigger it through a webhook.
In the example below, the whole custom work item hierarchy, including multiple subtasks and checklists, can be generated with one click of a button:
Which approach fits depends on the shape of your work. Jira Automation rules work well when subtasks need to appear in response to events on an existing parent work item. Smart Templates fit better when you plan the hierarchy in advance. You can create the parent and its subtasks together, with context and structure ready from the start.
Using Smart Templates is usually simpler and more straightforward than setting up Jira automation rules. This solution has a user-friendly and intuitive interface, while Jira’s automation functionality is notorious for its tricky configuration flows.
How to Automatically Add Checklists To Your Work Items
Smart Checklist comes with native automation features that apply pre-saved checklist templates to new work items based on your custom conditions. For example, a specific template can be added to a work item depending on its type, status, or a combination of conditions that fits your specific use case.
In the screenshot below, you see how you can enable automation that will add the Definition of Done checklist to work items of a selected type:
If needed, you can also integrate Smart Checklist with Jira Automation for more advanced scenarios. The “Import Checklist Template” and “Add Checklist Items” actions let you build custom rules that mix checklist logic with other Jira events. Use it when you need different templates based on custom field values, sprint state, or external triggers.
For teams that want a straightforward setup, Smart Checklist’s native rules handle most day-to-day use cases, no Jira automation rules needed. For teams with more complex workflows, layering Jira Automation on top gives you fine-grained control over when and how checklists are applied.
When Choosing Between Jira Subtask vs Jira Checklist, Take Both
In project management, there are always some good reasons to use Subtasks or Smart Checklists in your Jira work items. Both ways are great, and there is no better or worse. It is rather a matter of following Jira best practices for what works best and when. That’s why our final conclusion and suggestion would be to simply try both and then decide which one is the most convenient for your team. In many cases, it’s not necessarily Jira Checklists vs Subtasks – you may need to use both to structure your work flexibly and effectively.
FAQ about Jira Subtask vs Jira Checklist
What is the Jira subtask definition?
A Jira subtask is a child work item that is located below a task, story, or bug in the work item hierarchy. It has its own assignee, status, and fields, and appears on the board as a separate card.
What is the Jira checklist definition?
A Jira checklist is a structured list of steps inside a parent work item. It stays lightweight without separate board cards. Checklists can be created using Smart Checklist for Jira, which also let you save them as reusable templates for recurring processes, multi-step tasks, and complex criteria, such as the Definition of Done.
How to Create a Subtask in Jira?
Open the parent work item, such as a task, story, or bug. Click the plus button under the work item summary and select Create subtask. Enter a name and press Enter. The subtask appears under the parent in the subtask panel. Open it later to add assignee, description, due date, or other fields.
How to Delete a Subtask in Jira?
Open the subtask you want to remove. Click the More actions button (the three dots in the top-right corner) and select Delete. Confirm the deletion in the pop-up window. You need the Delete work items permission for the project to see this option. Once deleted, the subtask cannot be restored.
How to Add a Checklist to a Jira Ticket?
For quick notes, use Jira’s native Action Items feature. Type [] in the description or a comment field, and the brackets turn into a checkbox. This works for simple lists but does not support assignees, deadlines, statuses for individual steps, or reusable templates.
For structured feature-rich checklists, install Smart Checklist from the Atlassian Marketplace. Then, open the work item, find the Smart Checklist panel, and paste your list of steps. You can add assignees, deadlines, custom statuses, and save the checklist as a template for future use.
How to Add a Subtask to a Subtask in Jira?
Jira’s default hierarchy does not allow adding a subtask directly under another subtask. A common alternative is to add a checklist to the parent subtask. A smart checklist can have assignees, deadlines, priorities, and custom statuses for each checklist item, along with expandable sections for details. As a result, you can get most of the functionality of a subtask by adding a smart checklist. You will need to install Smart Checklist to use this option. For a full walkthrough, please see our detailed guide Subtask of a Subtask in Jira.
How to Change a Subtask to a Task in Jira?
Open the subtask. Click the More actions button and select Convert to work item, called Convert to issue in older Jira versions. Pick the destination work type, such as Task or Story. Confirm the change. The subtask becomes a standalone work item at the same hierarchy level as its former parent, and it is no longer tied to that parent.
How to Convert a Checklist Item into a Subtask in Jira?
In Smart Checklist, click the three-dot menu on the right of the checklist item you want to convert to a standalone work item. In the menu that appears, select Convert to Subtask (you will need to have the Checklists field enabled and configured in your project). After this, a new subtask will be added, while the checklist item will be automatically marked as done. This is useful when a checklist item grows in scope and deserves its own task.
Can I Add Story Points to Subtasks in Jira?
Yes, but with a caveat. Jira lets you enable the Story Points field on subtasks, but the default reporting expects story points on the parent Story, not distributed across subtasks. Sprint reports and velocity charts count the parent’s points, not the sum of its subtasks. For this reason, most agile teams keep story points on the parent Story only. If your team needs to estimate each subtask separately, set up a Jira Automation rule to roll subtask points up to the parent.
How to Create Multiple Subtasks at Once in Jira?
Jira doesn’t have a native “create ten subtasks” action out of the box. Teams typically use one of three approaches: CSV import when starting a project or migrating work, Jira Automation rules that create a set of subtasks on a workflow trigger, or a Marketplace app that adds a bulk-create UI.