





 Tools for Jira
 Tools for monday.com





Imagine that you are mapping out a feature launch that spans four teams: Engineering, Design, Marketing, and Sales. The project sequence is clear: Design hands mockups to Engineering, Engineering builds and ships the feature, Marketing’s announcement is timed to the ship date, and Sales cannot demo until the feature is live.
The problem is, each team keeps its timeline in its own Jira Software (Jira) space. There is no single view to see the full picture. You open four spaces, read four sets of dates and dependencies, and stitch everything together. Then something changes, and you have to do it again.
That is the problem with running cross-team initiatives in Jira – unless you have Advanced Roadmaps for Jira (Jira Plans). This article covers how to set it up and which features it has for handling cross-space work.
TL;DR
- Advanced Roadmaps in Jira (renamed Jira Plans) is a Premium and Enterprise feature for planning and tracking work across multiple teams and spaces in one view.
- What it does: Combines timelines from multiple teams into one plan, maps cross-space dependencies, tracks team capacity, models what-if scenarios, and manages releases across spaces.
- What this article covers: How to create a plan, set permissions, configure work item hierarchy, map dependencies, plan capacity, manage releases, run scenarios, filter and save views, track progress, and share updates with stakeholders.
What is Advanced Roadmaps for Jira?
Advanced Roadmaps for Jira is a feature for planning and tracking cross-functional work available on the Premium and Enterprise plans. It offers a single source of truth to schedule work, allocate capacity, map dependencies, and model different scenarios for initiatives across multiple teams and projects. Around late 2023, Atlassian shifted the naming toward “Plans” (and “advanced planning”) for this feature, though “Advanced Roadmaps” is still widely used in the community and remains the name on Data Center.
Advanced Roadmaps for Jira (Jira Plans) allows users to:
- Create visual roadmaps that include multiple projects and teams, mapped-out epics, and initiatives. These help you see the big picture and make informed decisions.
- Plan team capacity realistically to avoid overcommitment and ensure timely delivery.
- Manage dependencies across spaces to anticipate bottlenecks and streamline workflows.
- Experiment with different scenarios and timelines to evaluate risks and adapt plans.
- Prioritize work based on business value, dependencies, and team capacity to ensure the most critical tasks are addressed first.
Who Needs Advanced Roadmaps?
Program managers, project managers, and delivery leads coordinating cross-functional initiatives that span two or more Jira spaces. Those professionals typically face one or all of the following challenges:
- An initiative involves several teams working in separate Jira spaces.
- Dependencies cross space boundaries, and you can’t see them all clearly in one view.
- Team capacity needs to be planned or reported at the cross-functional initiative level, not just per team.
- Stakeholders regularly ask for a status update that requires opening multiple spaces to answer.
- You need to model “what if we delay two weeks” or “what if we cut scope” and see the ripple effects.
If you are wondering whether Atlassian Advanced Roadmaps is the right choice for you, read our article “Does Your Team Need Jira Plans?”
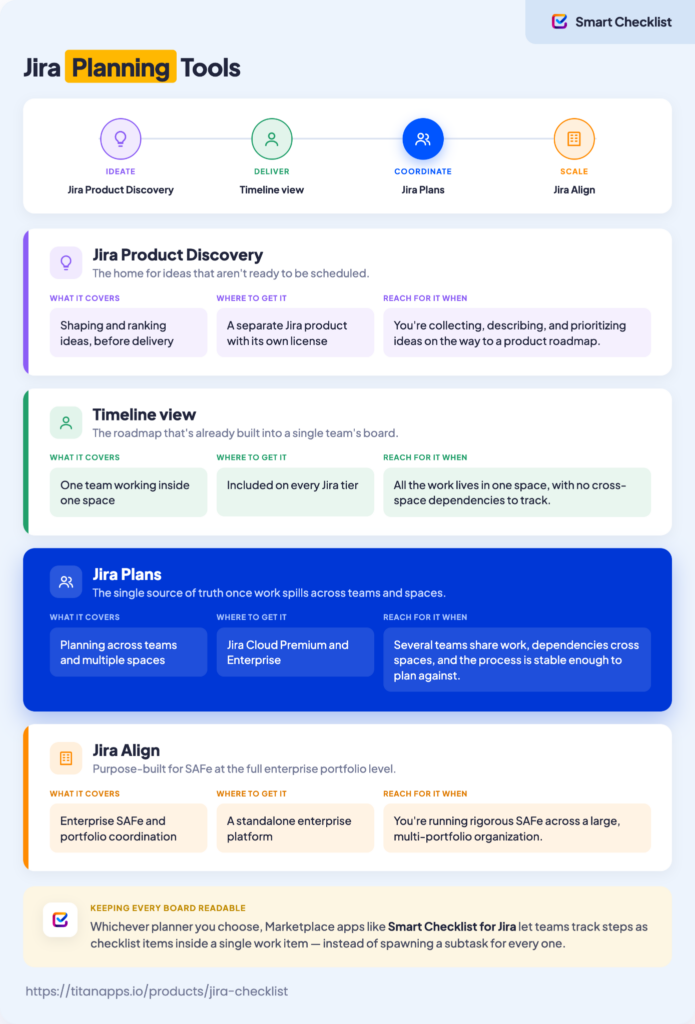
How Does Jira Plans Compare to Other Jira Planning Tools?
Aside from Plans, Atlassian offers several other planning tools:
- Standard Timelines for single-space projects
- Jira Product Discovery for listing and prioritizing product ideas and creating high-level roadmaps
- Jira Align for enterprises with hundreds or thousands of employees running the Scaled Agile Framework (SAFe).
See the infographic to understand the Jira planning toolkit and how Jira Plans fits into it.
How to Use Jira Advanced Roadmaps?
To use Jira Advanced Roadmaps (Jira Plans) for cross-team planning, you should create a plan – a project roadmap consisting of interlinked work items (issues) assigned to teams. You build it in a sandbox environment, and any changes you make will affect your actual Jira data only after you commit them.
Your plan combines Jira roadmaps from multiple teams, making it the key feature you will interact with in Advanced Roadmaps. It serves as a comprehensive view of all ongoing and planned work, integrating separate team efforts into a unified strategy.
Let’s get back to the example we mentioned earlier: a new product launch involving Engineering, Design, Marketing, and Sales teams, each in their own Jira space. Imagine we are building Clienthub – a client portal for boutique professional services firms (law, accounting, consulting) to share documents, track project status, and message clients. Here’s how you can set up and manage the Clienthub cross-team initiative using Advanced Roadmaps (Jira Plans).
Getting Started with Advanced Roadmaps
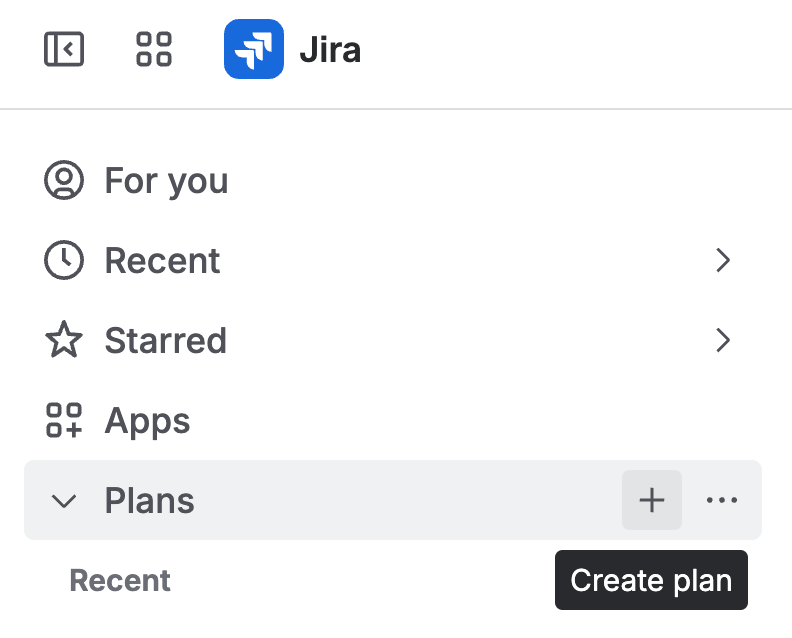
Navigate to “Plan” in the top navigation bar and select “Create plan”
Name your plan and choose the access type: “Open” for team collaboration or “Private” to restrict access. Then add work (issue sources) by selecting the relevant spaces, Scrum or Kanban boards, and filters for each team to ensure that all launch-related tasks are included in the plan.
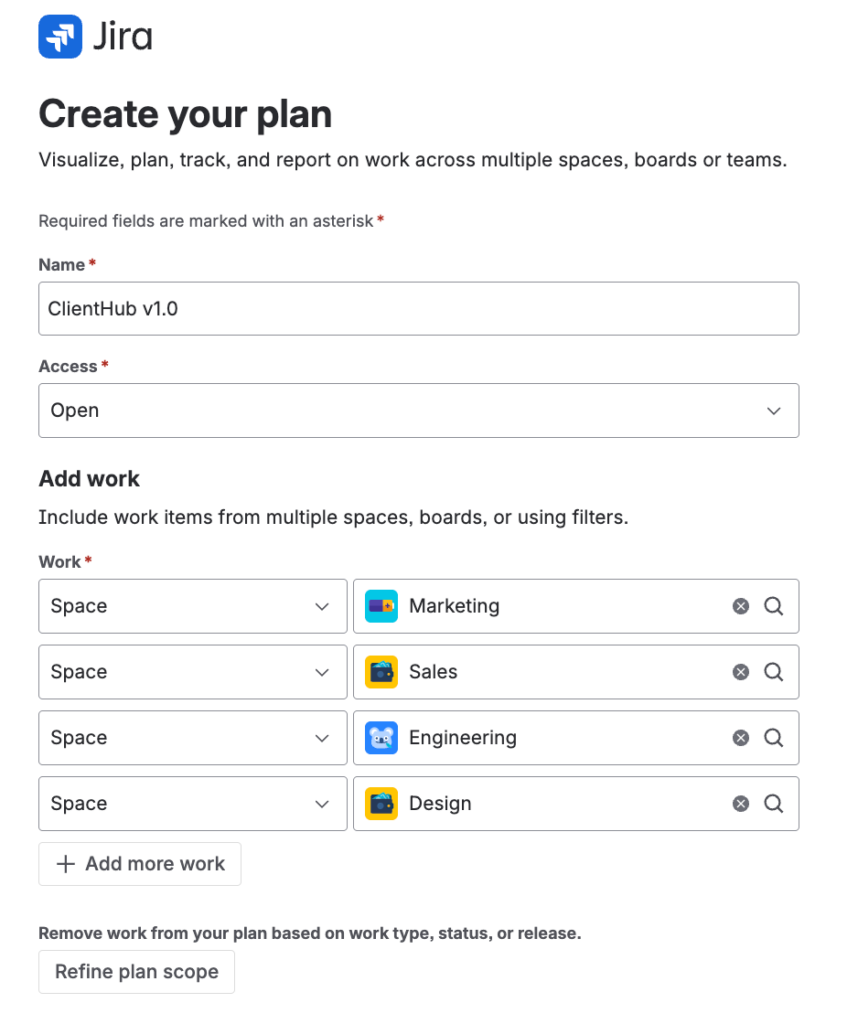
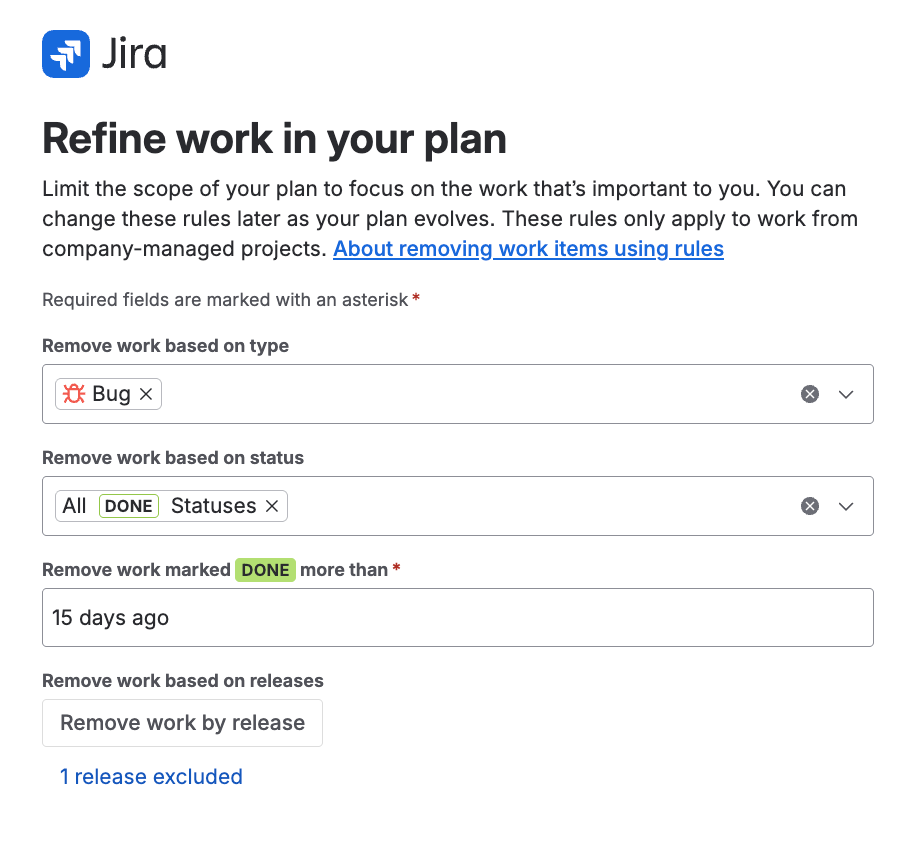
Configure exclusion rules to filter out irrelevant or completed tasks. For example:
- Filter out non-essential tasks like bugs
- Remove tasks with statuses like “Done”
- Exclude work items completed more than 15 days ago
- Exclude irrelevant releases, focusing only on those pertinent to the launch.
 Pro tip 1
You can add or remove Plan’s work sources later. Just go to Plans / [Your plan’s name] / Plan Settings / Work in your plan.
Pro tip 2
Plans reads sprint information from boards, not from spaces. If your team uses Scrum, add the team’s board as an issue source rather than the space. Otherwise, Plans will know your Scrum work items exist but won’t be able to position them on the timeline. That means you’ll see them in the plan’s list but no bars in the sprint windows. Space sources work fine for Kanban teams, since Kanban work items use specific start and due dates.
The following steps are optional, but they will help you to pre-configure your plan before you start working on it.
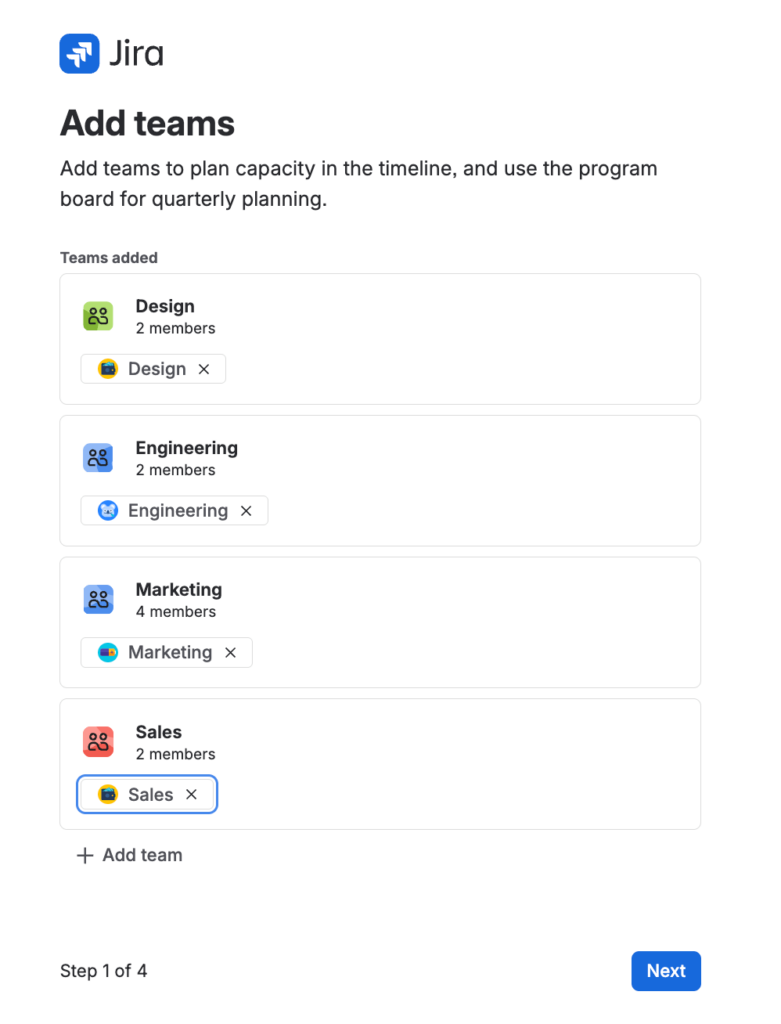
- Add teams to plan capacity. A team in Atlassian is a collection of users that serves to track collective work and assign shared responsibilities across Atlassian products. To manage teams, go to Settings / User management / Directory / Teams.
- Set the default timeline view
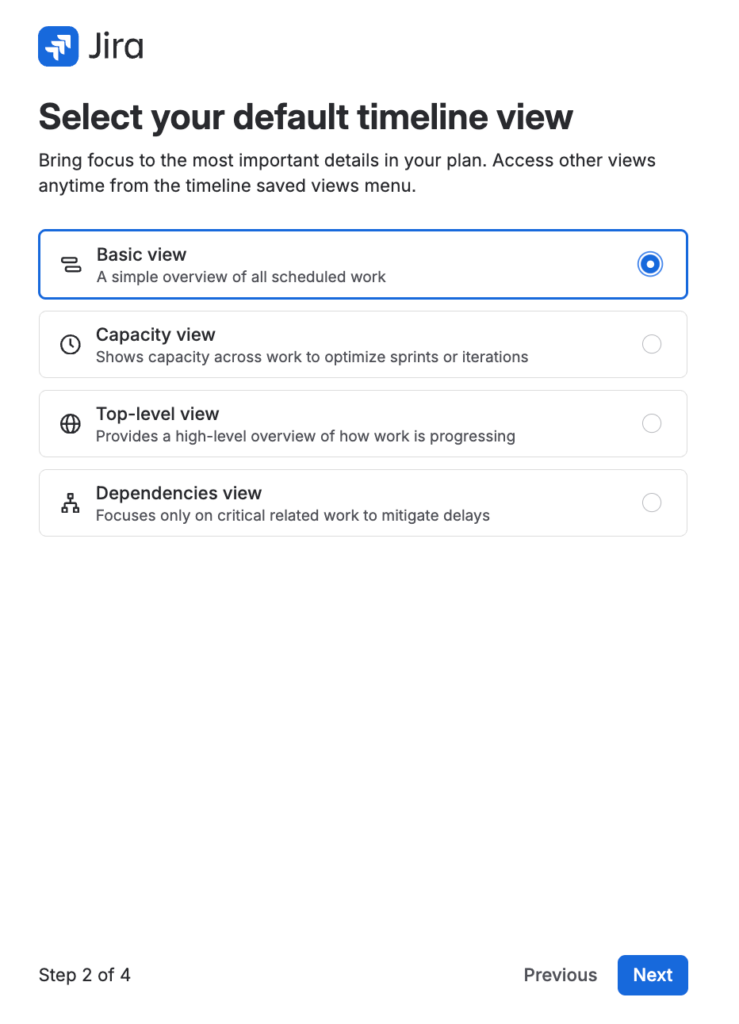
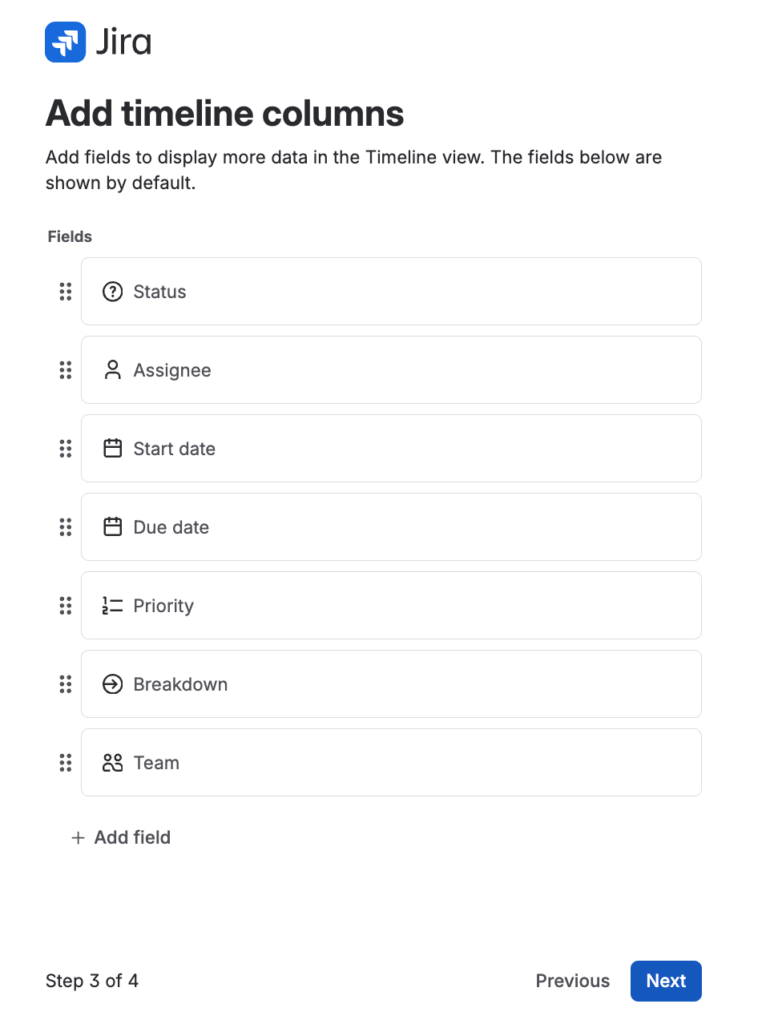
- Pre-configure timeline
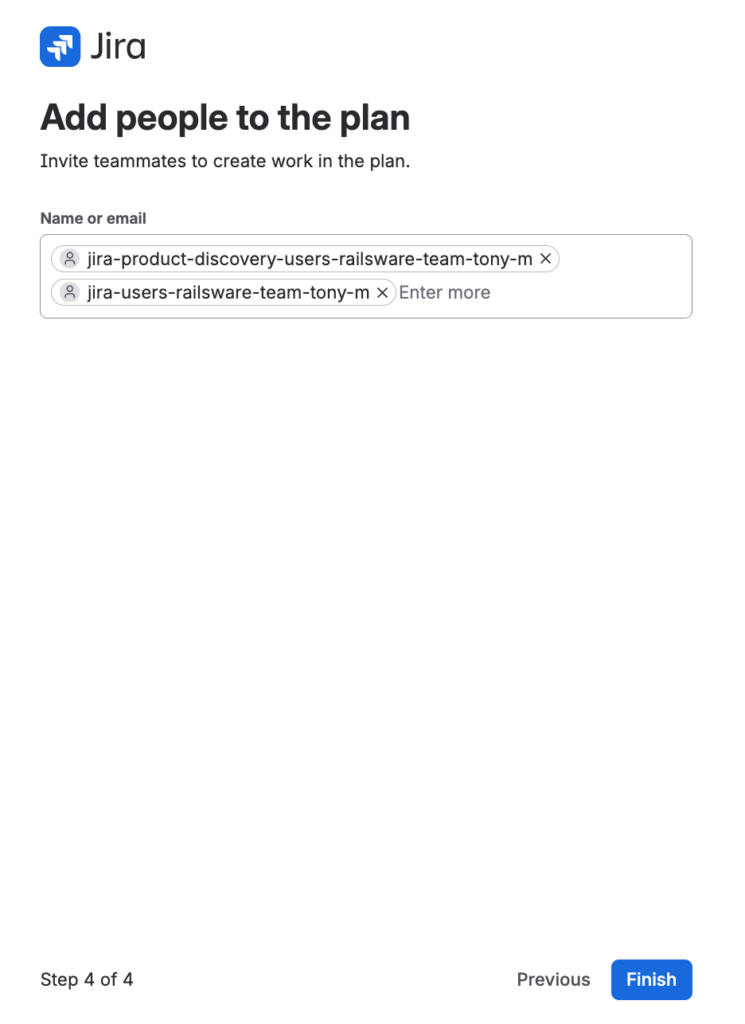
- Add users
Manage Permissions
Plans has a separate permissions model from the rest of Jira. There are four types of permissions:
- Plans Administrator – performs all administrative functions in plans, including accessing any private plans. Jira administrators receive this permission by default.
- Plans User – creates, views, and edits plans.
- Plans Viewer – browses and views plans in read-only mode.
- Labs Access – provides access to experimental features.
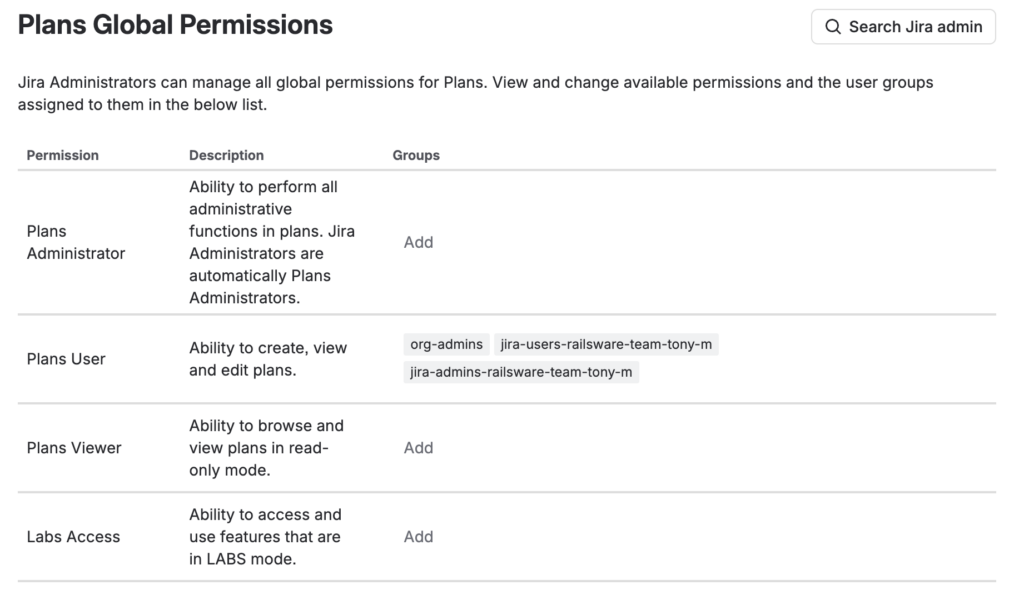
To configure Plans permissions, go to Plans on the side panel and click three dots / Admin Configuration / Plans / Permissions. Note that you can add or remove groups of users, not individual users. To manage user groups, go to Settings (the gear icon) / User management / Groups.
Configure a Work Item Hierarchy
Advanced Roadmaps enhances Jira’s standard work item hierarchy by introducing an additional level called Initiative:
- Initiatives: High-level strategic goals that encompass multiple Epics.
- Epics: Significant bodies of work that can be broken down into smaller tasks.
- Stories/Tasks: Functionalities or features that deliver specific value.
- Sub-tasks: Smaller tasks required to complete a Story.
Advanced Roadmaps allows users to create and customize as many levels as needed. This flexibility ensures a comprehensive approach to planning, helping teams visualize the full scope of work, from high-level objectives down to individual tasks.
For a walkthrough on how to create and configure a custom hierarchy including work levels above Epic, read our article on Jira Themes and Initiatives.
The final Clienthub project work item hierarchy may look something like this:
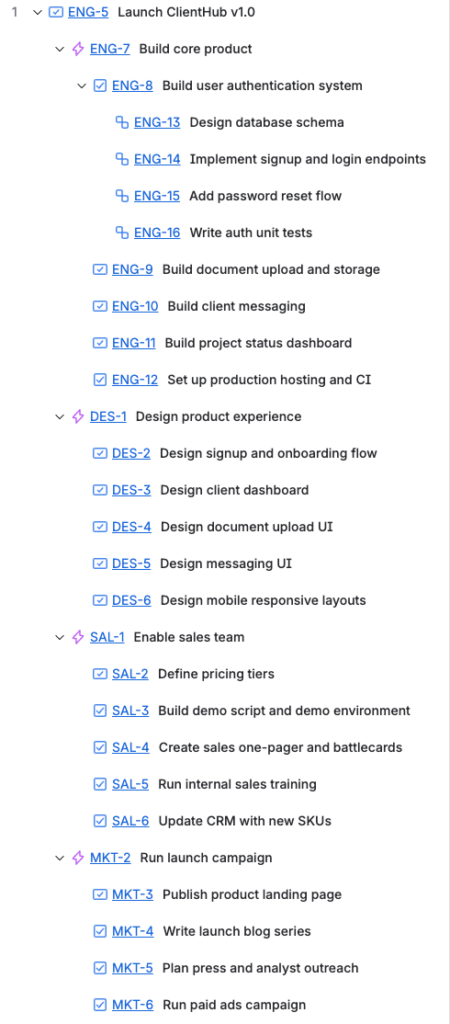
This structured approach provides a comprehensive roadmap, ensuring all aspects of SaaS platform development or any other project are covered and tracked effectively, from API creation to implementing gamification features.
However, a detailed project breakdown often means multiple subtasks cluttering your boards and Jira plan views. Jira’s native action items in a work item description are good for checklisting simple, informal tasks like follow-ups from a daily Scrum, or documenting action points from a meeting. Still, you can’t assign work to specific team members, set due dates, or track progress over time.
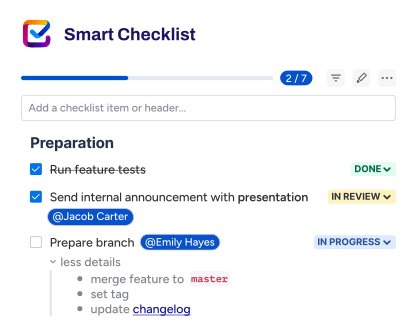
Checklist apps like Smart Checklist for Jira provide the best of both options: a full-fledged checklist inside a work item with assignees, due dates, multi-level headings, custom statuses, progress tracking, and tabs to segment long lists. For example, a checklist for the task Build user authentication system from our Clienthub project might look like this:
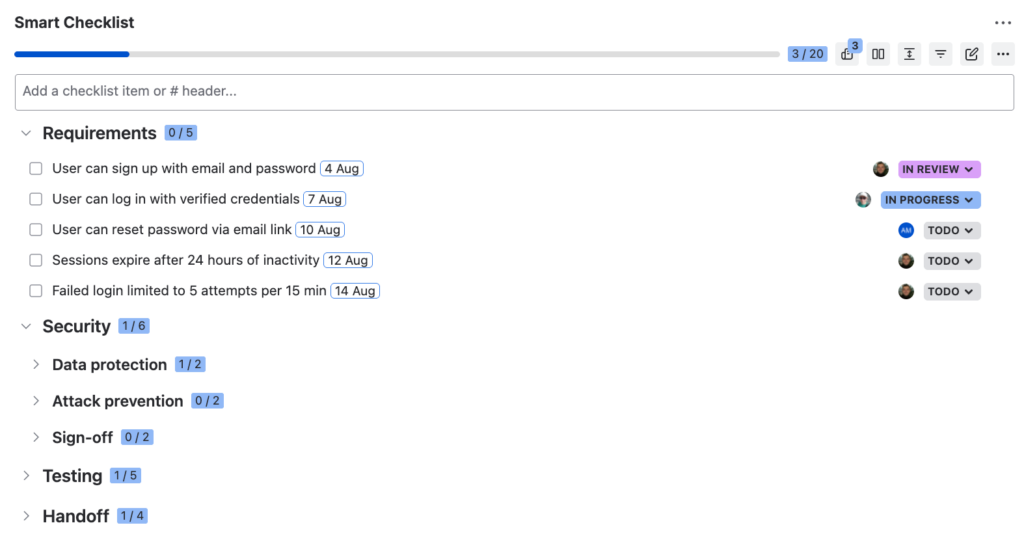
Having a detailed ToDo checklist within a work item helps to break down tasks into actionable steps, ensuring every detail is noticed. Teams get a valuable tool that helps them to maintain clarity and accountability without overloading their Jira boards.
Manage Dependencies
Once the work item hierarchy is ready, link related tasks to anticipate bottlenecks and streamline workflows. A single space is suitable for dependency management within one team. Technically, you can link work items from different spaces – but native Jira has no single view that visualizes those cross-space links. You can find the work items via JQL or cross-space filters, but the dependency relationships between them aren’t drawn anywhere until you open Plans. This feature provides a way both to add and visualize within-space and cross-space blockers.
The most straightforward way to monitor relationships between work items in a Plan is the dedicated Dependencies report tab. In the screenshot below, you can see that “Design signup and onboarding flow” (Design) is linked to the “Build User Authentication System” (Engineering), so development starts only when the design is ready.
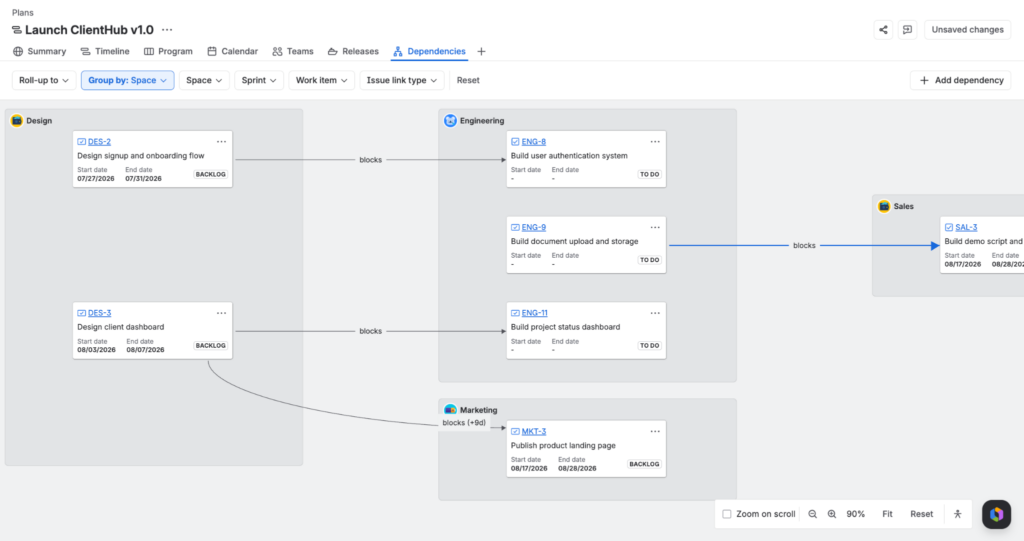
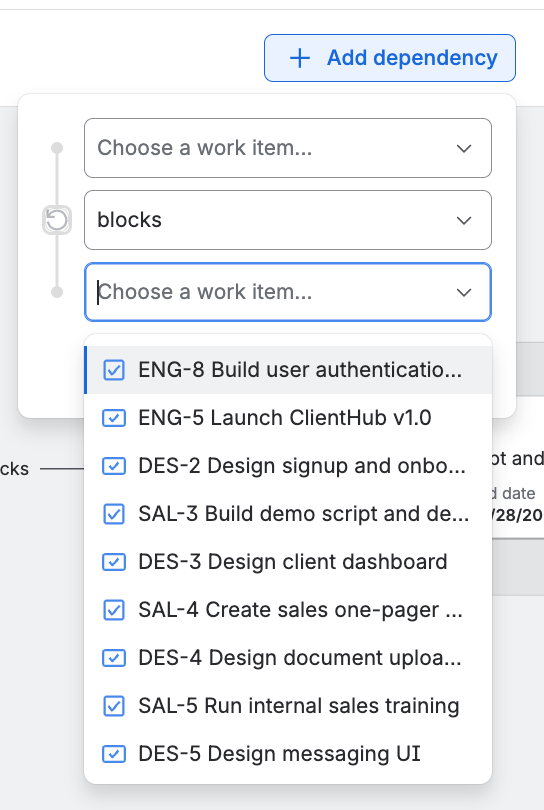
To add a link, click the Add dependency button in the top right corner, choose the work items and the relationship between them.
Another way to manage dependencies in Advanced Roadmaps (Jira Plans) is through the Timeline. If you choose the Capacity view, the links are displayed either as lines or badges. Click a line or a badge to see the relationship details or break the link.
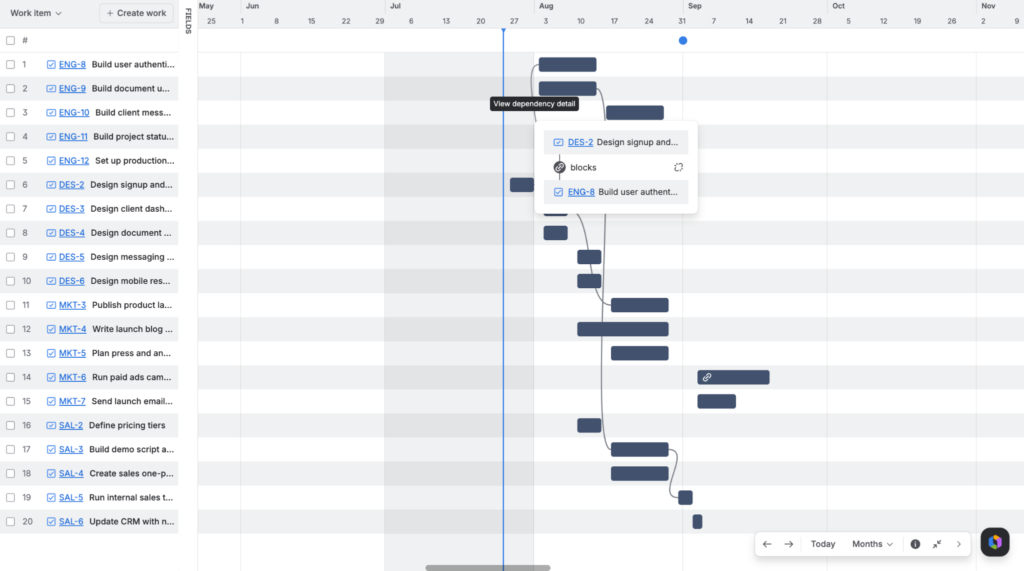
To add a dependency in the Timeline:
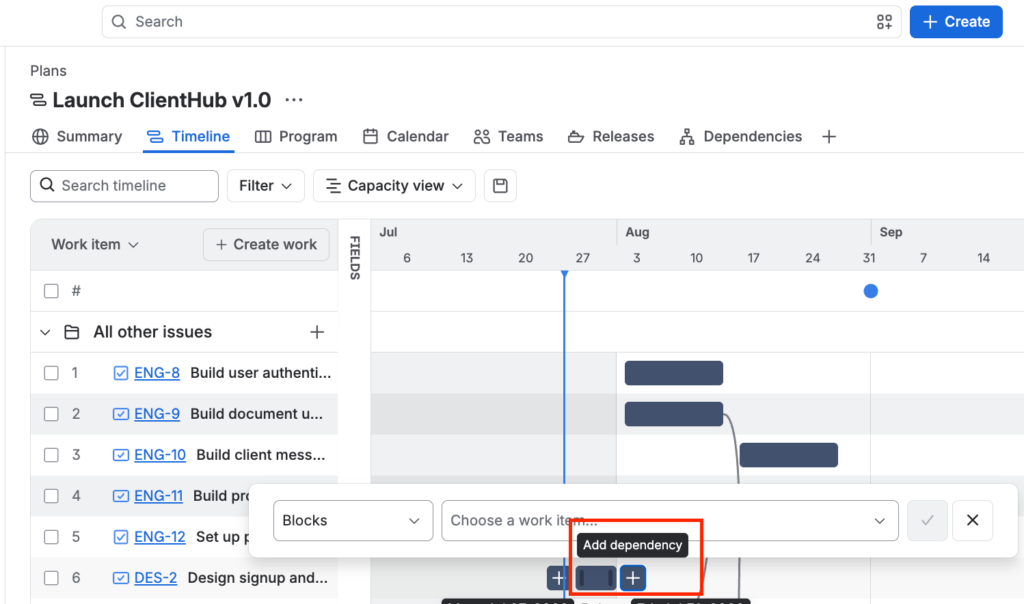
- Hover over the schedule bar of the desired work item and click the + icon.
- Use the right side for an outgoing dependency (indicates the work item must be completed before the dependent work item starts).
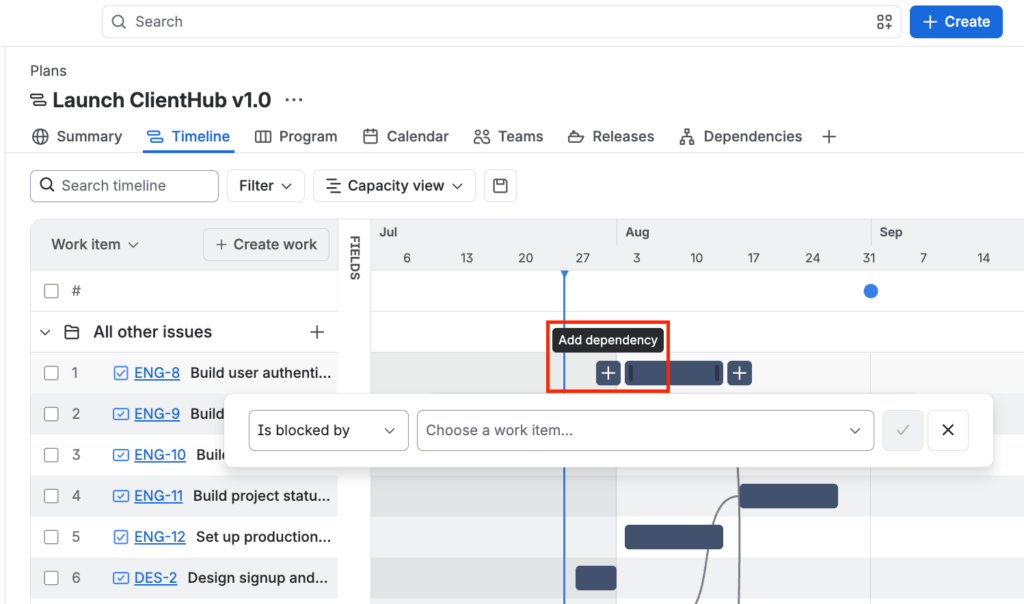
- Use the left side for an incoming dependency (indicates the work item is dependent on another work item being completed first).
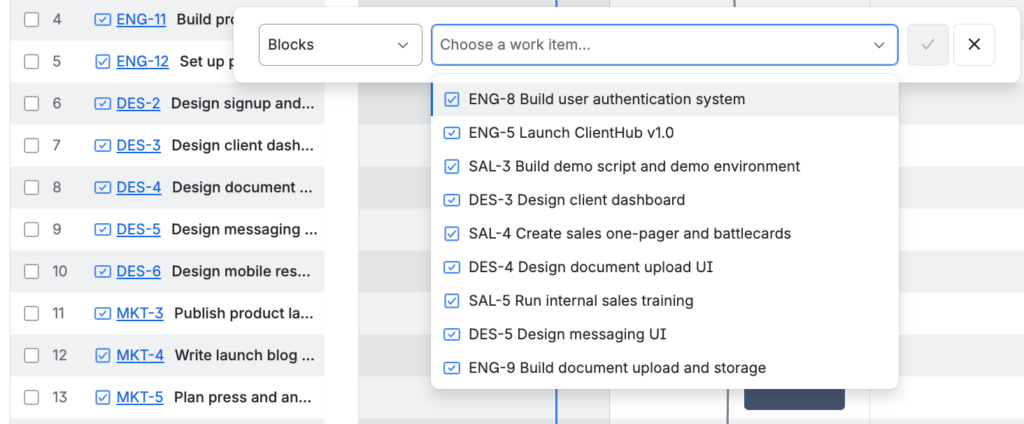
- Select the work item to link as a dependency. Confirm by clicking the checkmark.
- Adjust dates by dragging the ends of the schedule bar; badges and lines will turn red if there are conflicting dates.
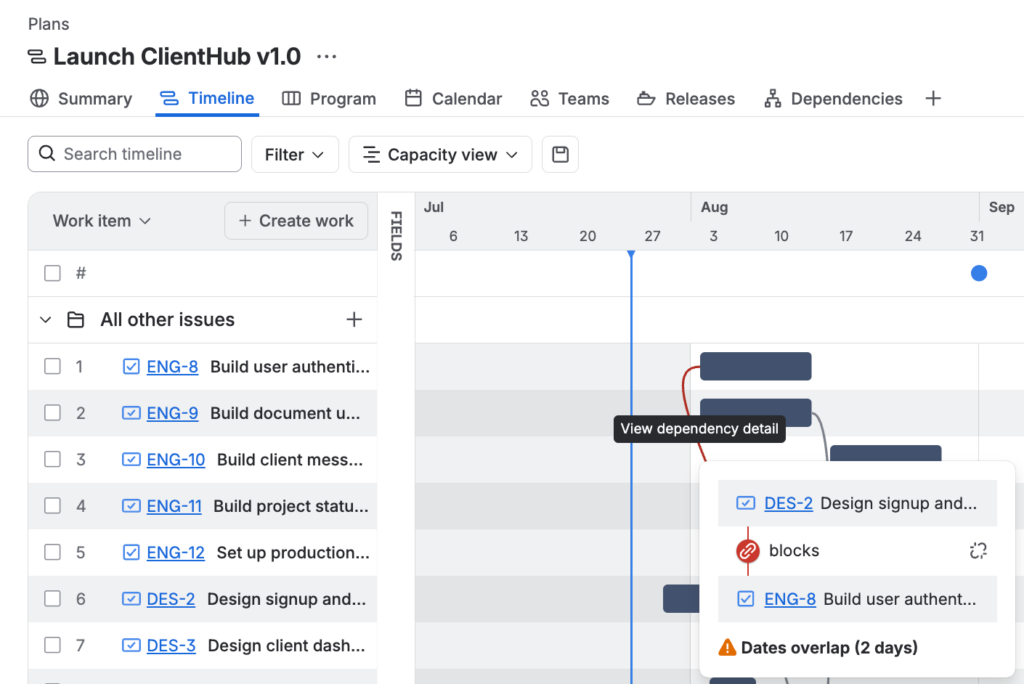
Plan Capacity
Capacity planning helps to ensure teams are not overcommitted. By setting up and managing team schedules based on their availability, you can adjust workloads, assign tasks appropriately, and visualize work distribution over time. Proper capacity planning helps prevent team burnout, streamline resource management, improve project predictability by aligning tasks with available capacity, and set realistic deadlines while managing stakeholder expectations.
Before you start with capacity planning, ensure the sprints are set up in your Scrum backlog, and the board is chosen as the work item source. Also, you should create Jira teams if you haven’t done it before. When everything is ready, proceed to:
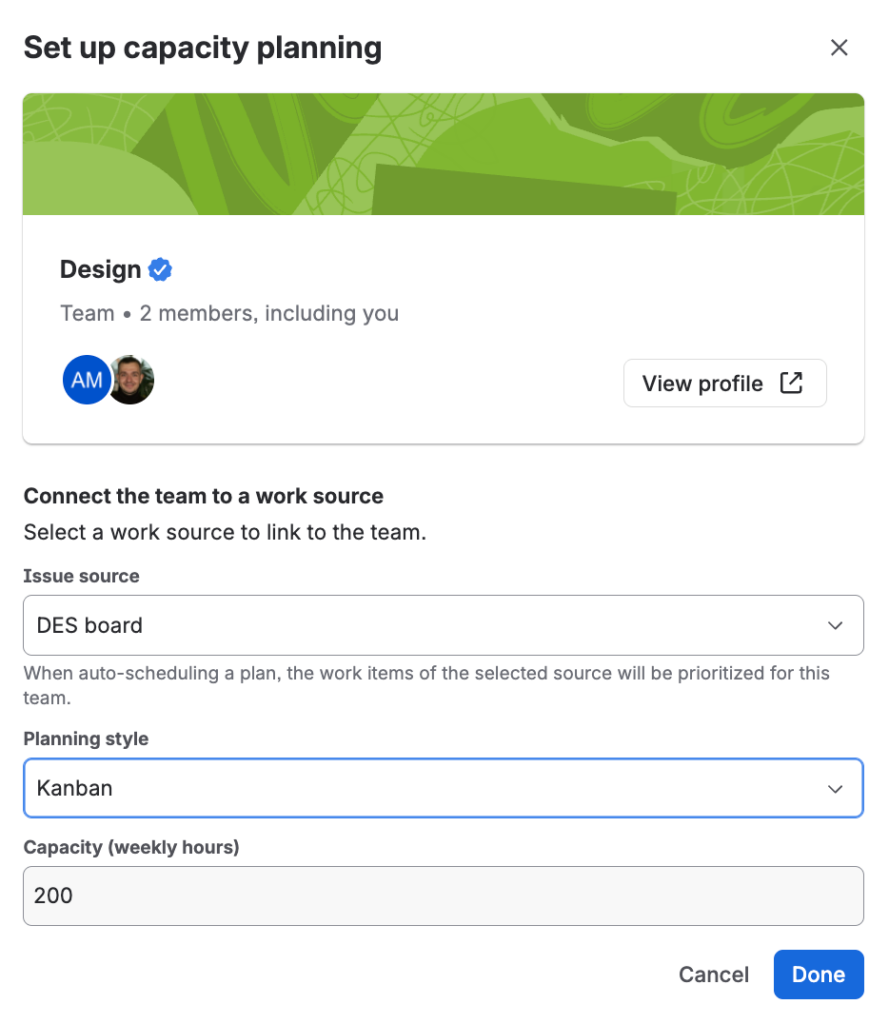
- Link teams to the work item sources via the Teams tab. Select a team and go to Team Settings. Choose the source, the planning style, and adjust weekly/sprint capacity.
 Pro tip
A plan requires a single estimation unit. Story points work only with Scrum teams, so if your plan mixes Scrum and Kanban teams, use Days or Hours as the estimation unit. Story points capacity views are only available for pure-Scrum plans. To choose how you estimate work in your Plan, go to Plan Settings / Estimation and scheduling / Estimate work using. The default weekly capacity is 200 hours, and sprint capacity is 30 story points.
- Check if teams have work items assigned to them.
- Select Capacity view and group work by Teams to see the Capacity on your plan’s Timeline. Tabs at the top represent sprints or iterations, with a vertical bar indicating capacity.
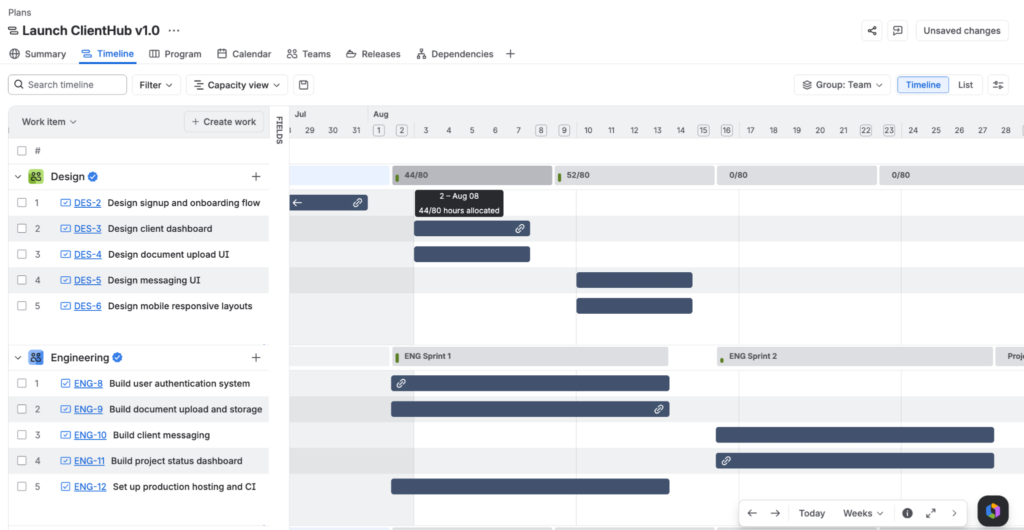
- Drag the vertical bars representing the start and due dates of individual work items to shift load between iterations. If you overload a particular iteration, you will get a warning.
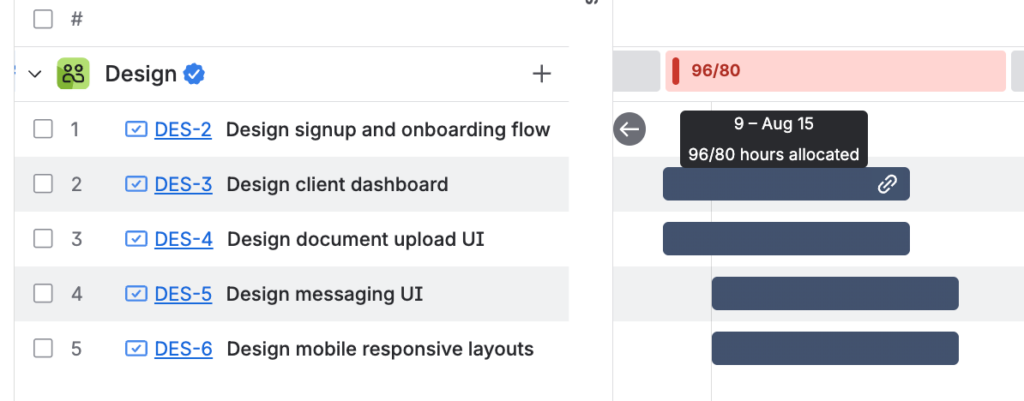
Manage Releases
Advanced Roadmaps (Jira Plans) supports two release types:
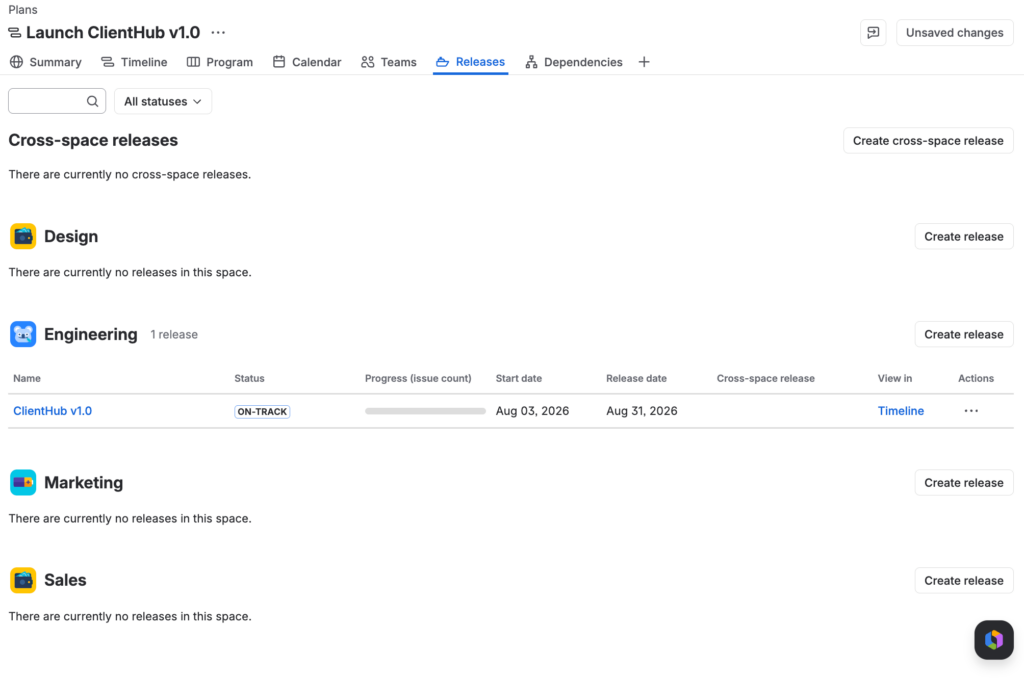
- Single-space release, tied to one Jira space. In our example, an Engineering team has the ClientHub v.1.0 release that lives on the Engineering space. One can see it on the Releases tab of the ClientHub launch plan. To edit or remove it, click Actions (…).
- Cross-space release which aligns the target dates of releases across multiple spaces. Useful when multiple engineering teams ship components that need to align. You can use a cross-space release to synchronize target launch or delivery dates and track combined progress for a shared product milestone.
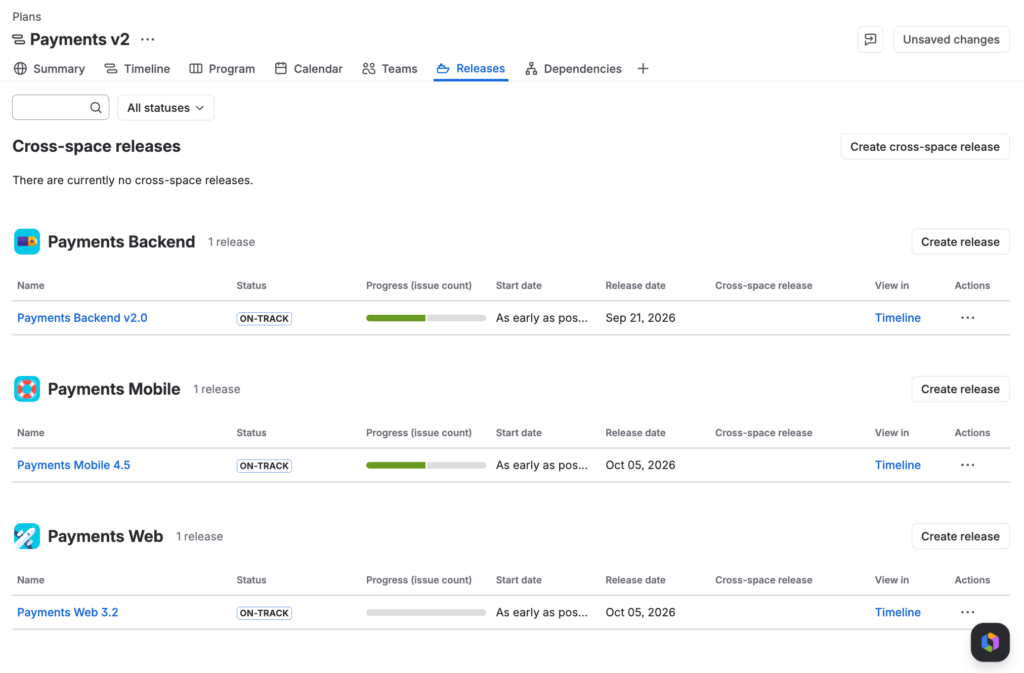
To understand cross-space releases better, let’s consider a different example: a Fintech company is launching Payments v2 – a rebuild of its payments product. The backend, mobile, and web teams each own their component and each ship on their own release cycle. The Releases tab of the plan for this project in Advanced Roadmaps (Jira Plans) will look like this:
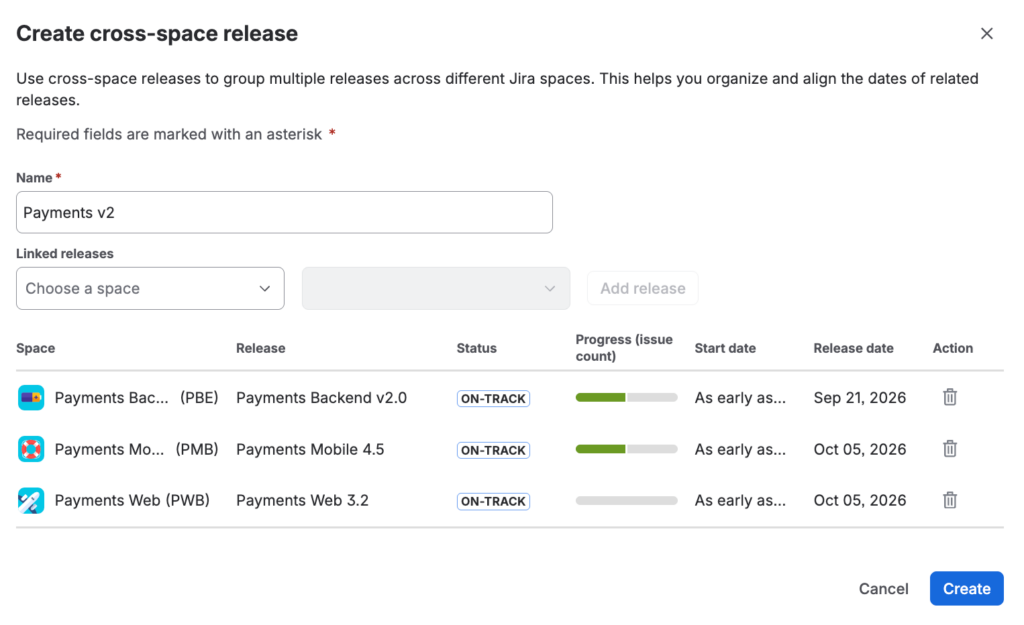
To align these three separate releases, we can create a cross-space release:
- On the Releases tab, click Create cross-space release.
- Name it
- Add relevant single-space releases as linked releases
- Click Create
The new Payments v2 cross-space release will show the general progress across the three linked releases.
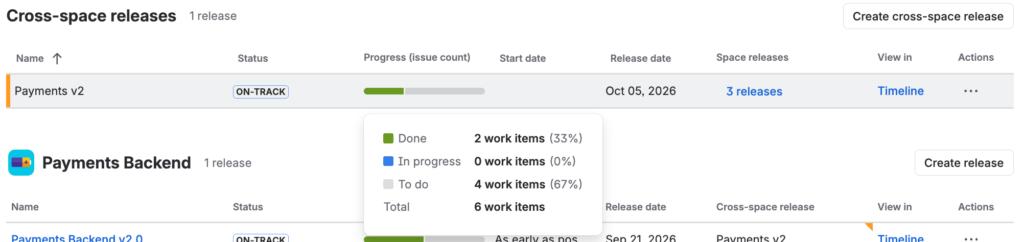
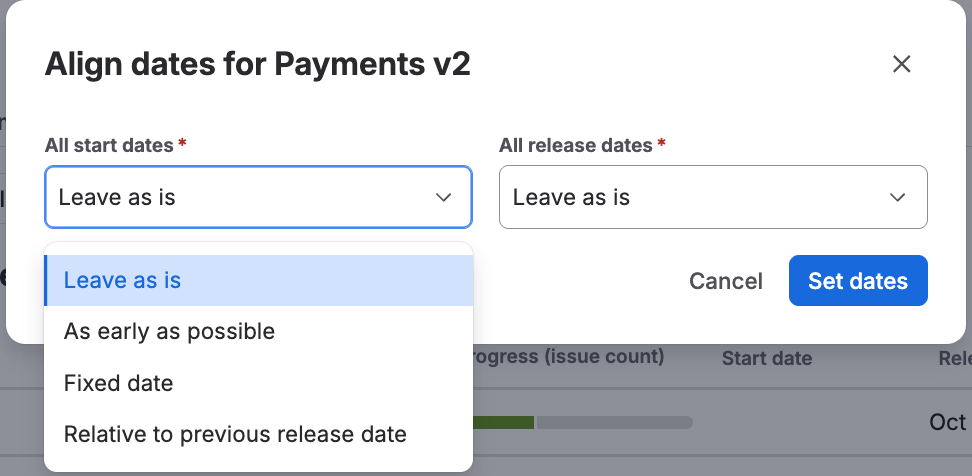
Also, it allows users to align dates. Click on Actions (…) / Align dates. For the start date, you can choose among As early as possible, Fixed date, and Relative to previous release date. For the release date, you have After all issues are completed and Fixed date. Read Atlassian documentation on how to align cross-space release dates in your plan for more details.
 Pro tip
Cross-space releases exist only in Plans and cannot be saved back to individual Jira spaces. Hence, Dashboards, JQL queries, and integrations outside Plans won’t see them.
To learn more about releases in Jira, check out our Jira release management guide.
Explore Different Scenarios
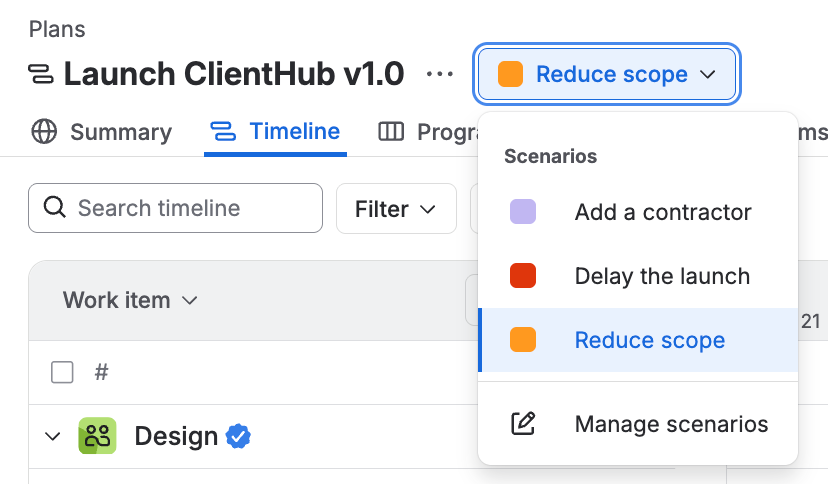
Scenario planning helps simulate various “what-if” situations. Suppose the program manager wants to stress-test the ClientHub v1.0 launch plan against likely disruptions. They create three scenarios:
- Delay the launch by two weeks to accommodate late design changes on the client dashboard, pushing Marketing’s campaign and Sales enablement dates out with it.
- Add a contractor to the Marketing team for the two weeks before launch, accelerating the landing page and blog series so the campaign is ready earlier.
- Reduce scope: cut client messaging from v1.0 and defer it to a v1.1 release, pulling the launch date in by about a week.
Comparing the three side-by-side on the project timeline, the program manager can see the tradeoffs:
- the delay preserves scope but the launch date shifts,
- the contractor keeps the date and scope but adds cost,
- the scope cut saves the initial launch date, but you’ll ship less.
Which scenario wins depends on what the launch has to prioritize – date, scope, or budget.
This is how you set up the scenario planning:
- Turn the feature on. Find your plan on the sidebar, click More actions (…) / Plan settings / Features / toggle Scenarios on.
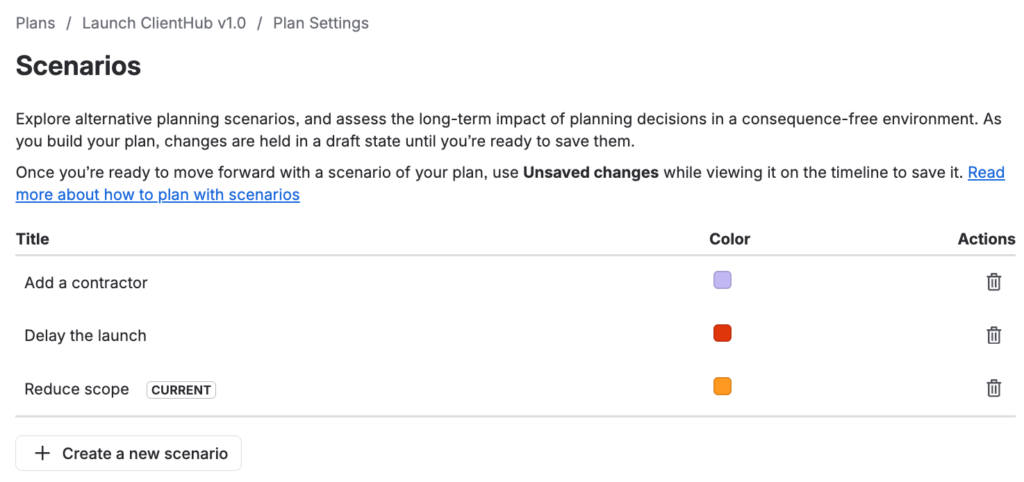
- Create a new scenario. You can do it via Plan settings / Scenarios or by clicking on the Scenario dropdown menu next to your plan’s name and selecting Manage scenarios.
 Pro tip
The same menu allows you to change the color of the plan and delete it.
- Name your scenario and choose a color (any changes will be flagged with that color). You can start from a blank scenario using data from your Jira work items or with a copy of an existing scenario inheriting any changes made. Once everything is set, click Create.
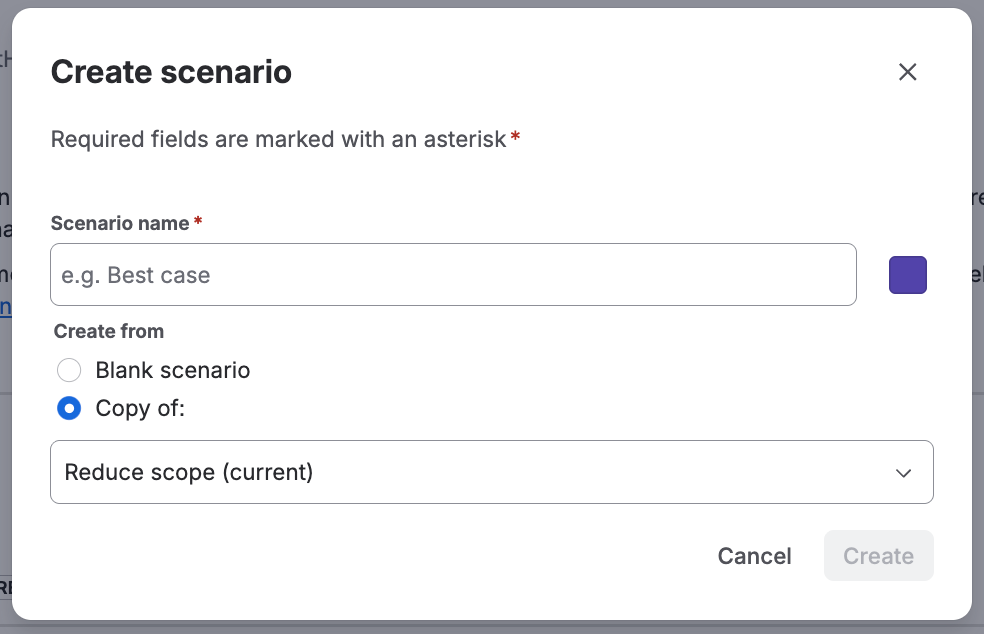
Use the dropdown menu to toggle between different scenarios and make the necessary changes in their sandbox environments. Once you decide which scenario you want to act upon, commit the changes to the plan’s work sources.
Use Filters and Saved Views
Cross-team plans get crowded fast. A single view showing every work item across four teams and three sprints is useful for the big picture but not for daily work. Filters let you narrow down to what matters right now: high-priority work, upcoming deadlines, off-track dependencies, or a single team’s sprint.
Filters appear at the top of the Timeline, Program board, and Calendar views. The Timeline view has the fullest filter set: hierarchy, teams, statuses, assignees, details, sprints, releases, labels, spaces, components, and data ranges.
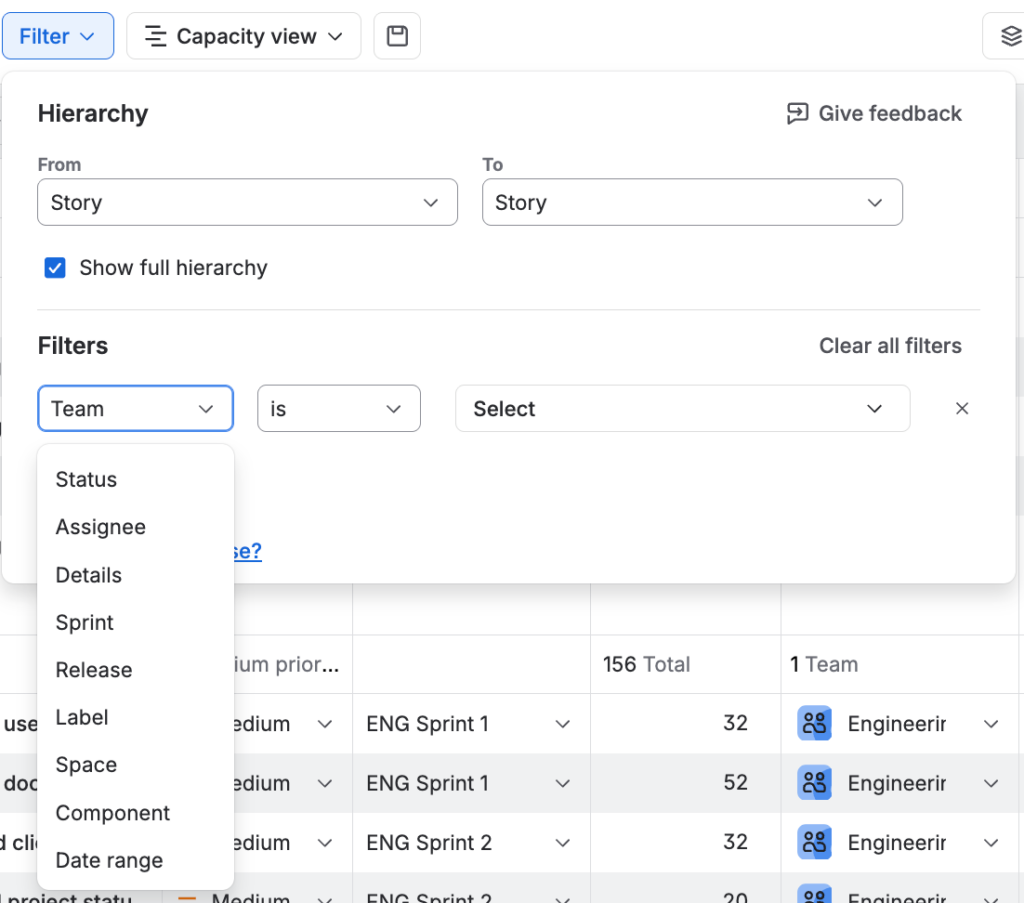
Program board and Calendar expose smaller subsets tuned to their specific job. Custom filters work too if they are enabled on the plan. Click the “What filters can I use?” link under the Timeline filters for the full reference.
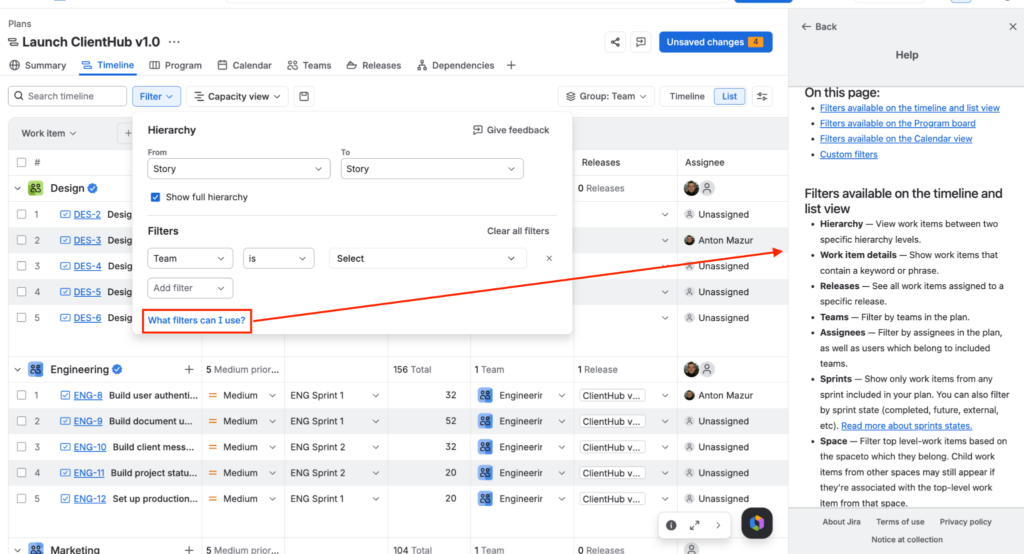
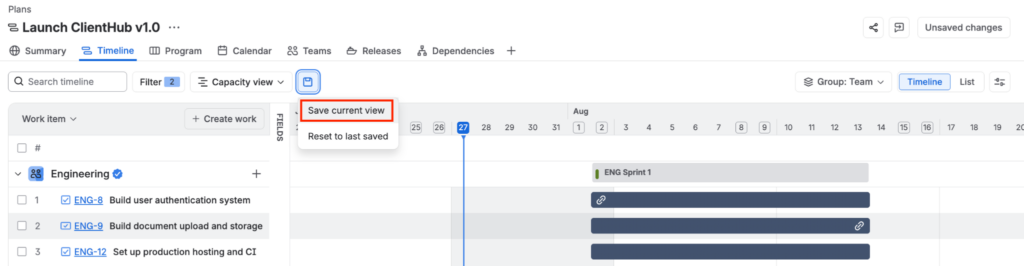
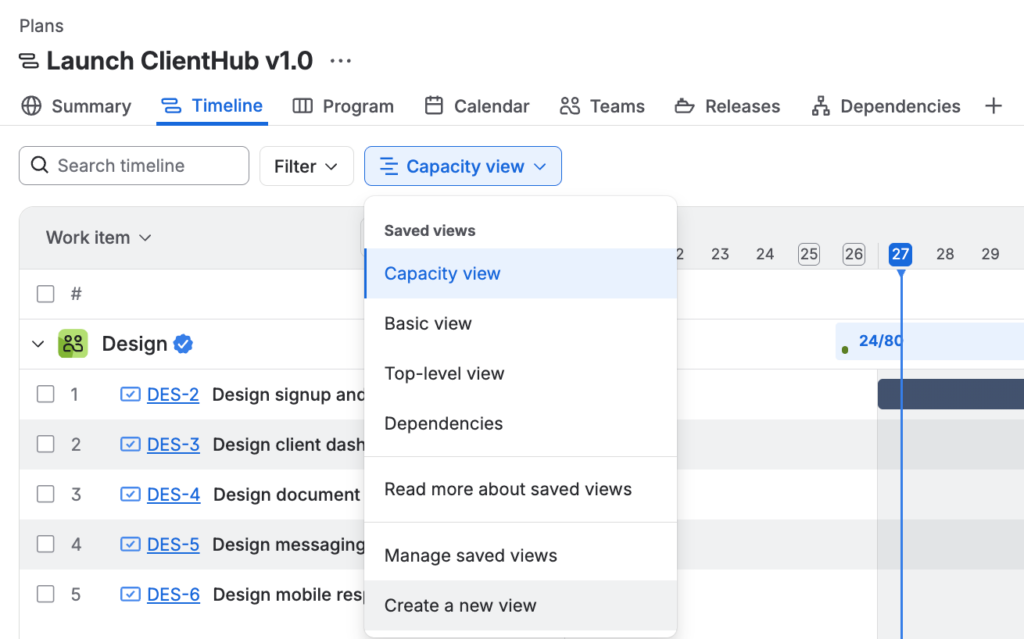
If you want to have a useful custom combination at your fingertips, you can:
- save it as the current view
- Save it as a new, custom view and name this view
Track and Report Progress
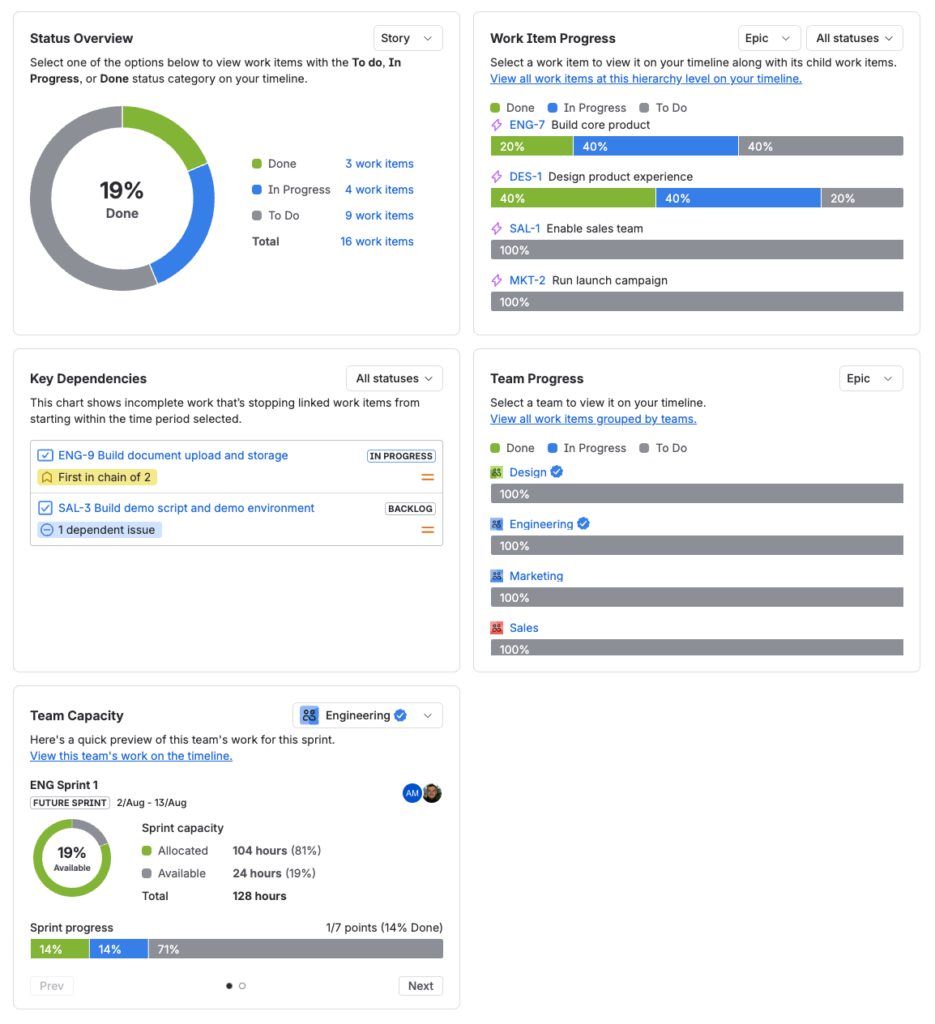
For a quick snapshot of how your Jira plan is progressing, visit the Summary tab. Choose the relevant date range to get an overview of work item progress, key dependencies, team progress, and capacity.
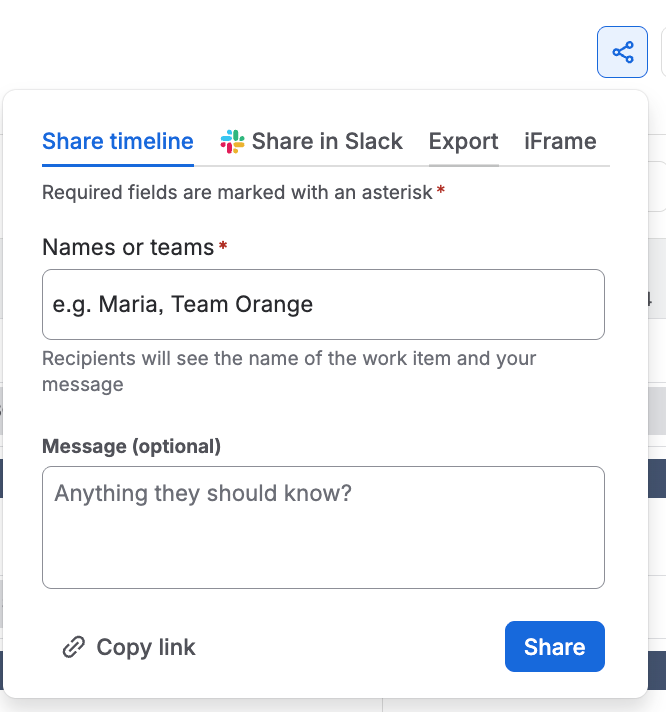
Advanced Roadmaps (Jira Plans) has several options for sharing a plan view:
- Share it with other Jira users
- Share it through Slack (if connected)
- Copy a direct link you can send to anyone
- Embed your plan in an Atlassian app or a third-party app compatible with Smart links.
A Timeline view has some extra alternatives: export as a CSV file or a PNG image for static visualization, or create an iFrame. More information in Share and embed your plan in Atlassian apps.
 Pro tip
For other Jira users to see your plan, they need access to your site or app, permission to view your plan, the Plans viewer global permission, and permissions to view the included spaces and boards.
Wrapping Up: Why Do You Need Advanced Roadmaps?
Without Advanced Roadmaps, coordinating a cross-team initiative in Jira means stitching several timelines together in your head. Advanced Roadmaps (Jira Plans) turns that into one live view: dependencies cross space boundaries, capacity is planned per team, releases align, and scenarios show consequences before you commit.
The setup takes upfront work and may even require some Jira Advanced Roadmaps training. However, once running, a plan becomes the artifact cross-functional projects live in. If you’re coordinating a launch across multiple Jira spaces, Advanced Roadmaps is worth trying.
We hope our guide makes configuring Jira plans smoother for you. For more details, check out official Atlassian documentation, particularly the Jira Advanced Roadmaps tutorial.
Advanced Roadmaps for Jira: Frequently Asked Questions
How much does Advanced Roadmaps cost?
Advanced Roadmaps Jira Cloud isn’t priced as a standalone product. It’s included in Jira Premium and Jira Enterprise plans. Jira Cloud pricing varies depending on the number of users, billing, and other factors. As of July 2026, for a team with 100 users, Jira Premium costs $18.30 per user per month or $18,300 per year. Jira Enterprise is billed only annually, starting at $166,000 for 801-1000 users. You should reach out to Sales for an exact quote. For current rates, check Atlassian’s official Jira pricing page.
What is the difference between Jira Advanced Roadmaps and Jira Align?
They satisfy project management needs at different scales. Advanced Roadmaps (Plans) is a feature inside Jira Premium and Enterprise for coordinating work across teams within one Jira instance. It supports Scrum, Kanban, and custom methodologies and works best for up to 20 Agile teams, about 50-150 people at a time. Jira Align is a separate enterprise product for scaling Agile planning across an entire organization, including multiple Jira instances. It supports hundreds to thousands of users. Aside from Scrum and Kanban, Jira Align can work with SAFe, LeSS, Spotify, Scrum@Scale, and other methodologies. See Atlassian’s Compare Advanced Roadmaps and Jira Align for more information.
What is the difference between Jira basic and advanced roadmaps?
The basic Jira roadmap – Timeline in Jira Cloud – is a lightweight, single-space view available on every Jira plan. Timeline shows work items on a Gantt chart and uses levels up to the Epic. Advanced Roadmaps (now called Plans) is a cross-space planning tool included only in Jira Premium and Enterprise. It supports levels above Epic, such as Initiatives. Aside from a Timeline view, Plans offers capacity planning, scenario modeling, cross-space dependency tracking, and release alignment.
Is it worth upgrading to Jira Premium just to get Advanced Roadmaps?
Upgrading to Premium for Jira Cloud Advanced Roadmaps (Plans) is worth it when you’re regularly coordinating work across two or more Jira spaces and hitting the limits of the built-in Timeline. Signs the upgrade earns its cost include opening multiple spaces to answer one status question, tracking cross-space dependencies in a spreadsheet, planning capacity at the program level, or wanting to model “what if” scenarios without touching live data. Premium also includes other capabilities beyond Plans – expanded Rovo AI features, unlimited storage, and a 99.9% uptime SLA – so the upgrade decision usually factors those in.