






 Tools for Jira
 Tools for monday.com




Custom fields are one of Jira’s most powerful features. They’re also one of the easiest to misuse. Every experienced Jira admin has inherited an instance with hundreds of fields – half of them unused, a third of them duplicates, and a handful named something like “Priority 2 (old).”
Custom fields become a problem when teams create them without a plan. One team adds a “Risk Level” dropdown. Another creates “Risk Rating” for the same purpose. A third builds an entire checkbox field just to track a definition of done that could live in the issue description.
Knowing when a custom field is the right answer – and when a simpler option like a checklist inside the issue works better – saves your team from configuration debt that compounds over time.
This article covers what Jira custom fields are, which field types to choose, how to create custom fields in both company-managed and team-managed projects, and best practices to keep your Jira Cloud instance clean as your team scales.
Key Takeaways
- Custom fields in Jira capture project-specific data that system fields don’t cover.
- Choose structured field types like select lists or number fields for reporting and JQL filtering.
- Every custom field needs the right scope for it to appear on work items – via work type layouts in the new Fields experience or via context, screens, and field configuration in older DC Jira instances.
- Restrict field scope to specific projects and work types to prevent global clutter.
- Smart Checklist can replace checkbox fields when teams need actionable task tracking per issue.
What are custom fields in Jira?
 Definition
Custom fields in Jira are user-created fields that capture data your projects (spaces) need beyond what Jira provides out of the box. System fields like Summary, Description, Assignee, and Priority come built into every Jira issue. You can’t remove or rename them. Custom fields fill the gaps these system fields leave.
For example, your team might need to track a “Risk Level” for each Story or a “Department” for each request. None of these exist as default Jira Software fields. A custom field solves each one.
Custom fields serve three practical purposes in Jira:
Tracking. They capture structured data specific to your workflow. A “Release Version” field on a Task tells your team which deployment this work item belongs to. Fields with predefined options – like select lists or checkboxes – keep the data clean and consistent across your organization.
Reporting and filtering. Custom fields work in JQL queries, filters, dashboard gadgets, and reports. A “Client Name” select list or user picker lets managers build a dashboard showing all open work items per client. Fields with structured options produce the most reliable reports and metrics because they eliminate freeform typos and inconsistencies. The same field also drives sprint reporting in Jira Software – you can group work items by client across multiple sprints to see which accounts consume the most engineering capacity.
Automation. Custom fields can trigger and shape automation rules. Jira’s “Field value changed” trigger supports all custom fields, so a change to a “Severity” field can automatically reassign a Bug to a senior engineer, send email notifications to the team lead, or escalate the work item to a priority queue.
The key distinction: system fields are universal across every Jira instance. Custom fields are yours – you define what they are, what values they accept, and where they appear.
Jira custom fields work across the broader Atlassian ecosystem too. Once created, they’re available in Jira Software, Jira Service Management, and Jira Work Management, and they integrate with Bitbucket, Confluence, and other Jira applications connected to your instance. The same custom field you use to track a release version on a development team’s Story can appear on a Jira Service Management ticket from the operations team – if the field’s scope allows it.
What types of custom fields can you create in Jira?
Jira offers several custom field types. Each one stores data differently and serves a different reporting need. Choosing the right type upfront matters because you can’t change a field’s type after creation.
Here are the most commonly used types:
| Field type | What it stores | Best for |
|---|---|---|
| Short text (plain text only) | Short freeform text | Reference numbers, short labels, external IDs |
| Paragraph (supports reach text) | Longer freeform text | Additional context, notes, detailed descriptions |
| Number field | Numeric values | Estimates, scores, budgets, quantities |
| Date picker | A single date | Deadlines, target dates, review dates |
| Select list (single choice) | One value from a predefined list | Categories, priorities, risk levels |
| Select list (multile choices) | Multiple values from a predefined list | Tags, affected areas, applicable teams |
| Checkboxes | Multiple predefined options (all visible) | Compliance flags, feature toggles |
| User picker (two types - single choice and multiple choices) | A Jira user | Reviewers, approvers, secondary contacts |
| URL field | A web link | External references, documentation links |
| Labels | Freeform tags | Cross-project categorization, ad-hoc grouping |
Apps from the Atlassian Marketplace can add their own field types on top of these built-in options.
How do you choose the right custom field type?
Start with one question: will you need to filter, report, or run JQL queries on this data and who can/should add values to this field?
If yes, use a structured type. Select lists, number fields, and date pickers produce clean, queryable data. A “Risk Level” select list with values Low, Medium, and High lets you build a filter in seconds. Atlassian recommends fields with predefined options for reporting because they keep answers consistent and free of typos.
If the data is freeform context that nobody will search for, consider whether the issue description or a comment covers the need. A multi-line text field that nobody queries is often a field that doesn’t need to exist.
One field type that often gets misused is the checkbox. Checkboxes work well for simple, static field options – like compliance flags or a short list of feature toggles. They break down when teams try to use them as task checklists. The problem is that the default checklist type is not good for task checklists and it is better to use a separate app.
A definition of done checklist, an onboarding checklist, and a QA checklist would each need a separate checkbox field with its own hardcoded options. Three processes means three fields. Ten processes means ten. If you need actionable task tracking inside a work item, a dedicated checklist tool is a better fit than multiplying checkbox fields.
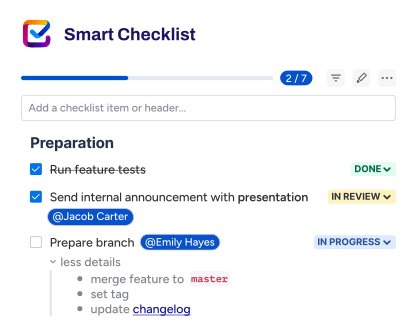
Two more options worth knowing. The select list (single choice) is the most common type for categorical data because it forces one clean answer per work item – ideal for status fields, ownership labels, or any classification used in JQL filters. The user picker handles cases where you need to assign a person who isn’t the assignee or reporter, like a secondary reviewer or a backup approver.
How do you create a custom field in Jira?
The setup process depends less on your project type and more on which admin experience your Jira instance uses. Atlassian has been rolling out a new Fields experience that simplifies how fields are configured. Newer Jira Cloud instances – and all team-managed spaces – use it. Many company-managed projects still see the classic admin experience with separate Layout, Screens, Fields configurations sections. Some instances see both, depending on which features have been enabled depending on the Project type.
You’ll need Jira admin permissions to complete these steps in either experience.
How do you set up a custom field in the new Jira Fields experience?
In the new Fields experience, fields are managed at two levels: globally and per space. The flow takes three steps.
Note: New fields experience is relevant for team managed projects only. Both team managed and company managed projects can live on the same jira instance
Step 1: Create the field.
Go to Settings – Work items – Fields – Create a new global custom field. Choose your field type, give it a clear name, and add a description that explains its purpose. The field is now part of the global field library, available to be added to any space.
You can also possible to create custom field from Space settings in the right sidebar Create Fild -> select type, name it… -> it will be automatically added to the issue type layout
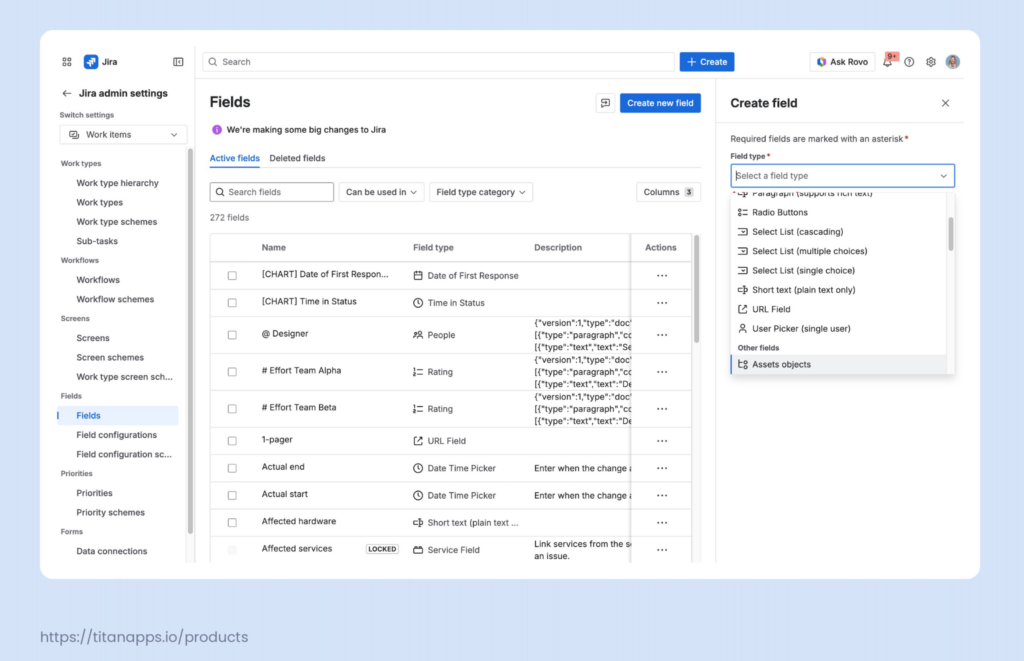
Caption: Creating a custom field in the new Jira Fields experience. The Create field panel lets admins pick from any of the built-in field types, plus types added by Atlassian Marketplace apps.
Step 2: Add the field to a space
Open the space where the field should be available. You’ll need space admin permissions to add fields at this level.
For a team managed project: Go to Space settings ? Fields ? Add field and pick the field you just created (or any other field from the global list). Once added, the field is available, but not visible to all work types in that space.
Note: We don’t need to add Field to Company projects – they are already there although not on the screens.
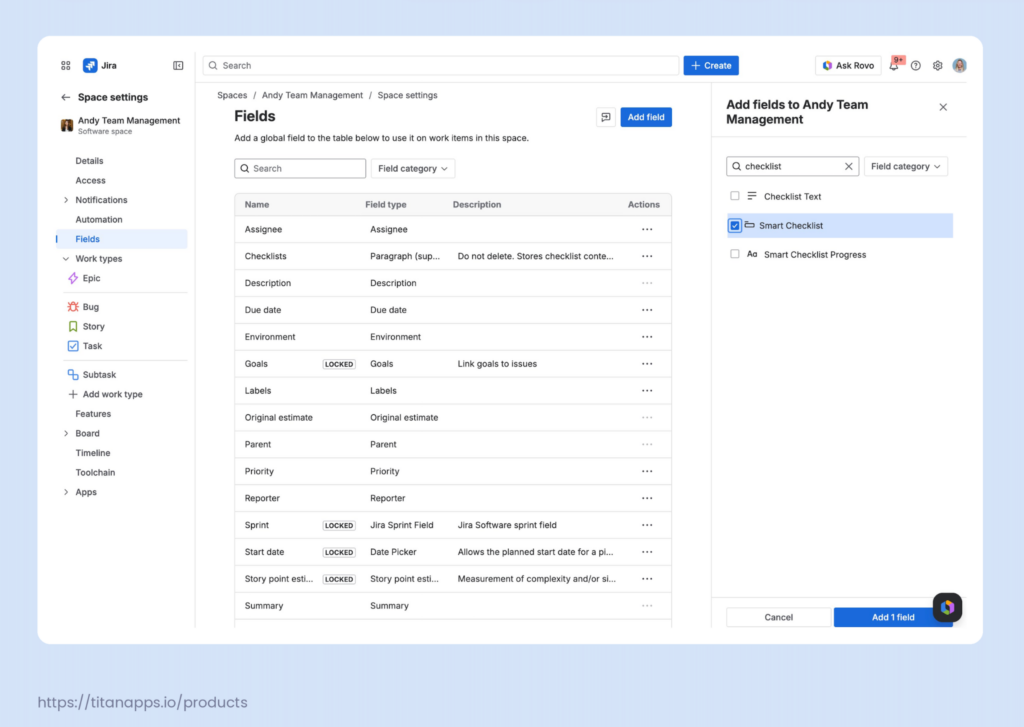
Caption: Adding a field to a Jira space. The Fields table on the left shows fields currently available; the panel on the right lets admins search the global field list and add new fields, including custom fields from Atlassian Marketplace apps.
Step 3: Make the field the field visible on the issue view.
Open Space settings – Work types, click into a work type (Bug, Story, Task), and drag the field from the Fields panel on the right into the work type’s Context fields list. Save changes. Repeat for each work type that should use the field.
The three-dot menu next to each field in the layout lets you mark it required, hide it when empty, and reorder it. There’s no separate Screens admin or Field configurations to manage – visibility and behavior are configured inline.
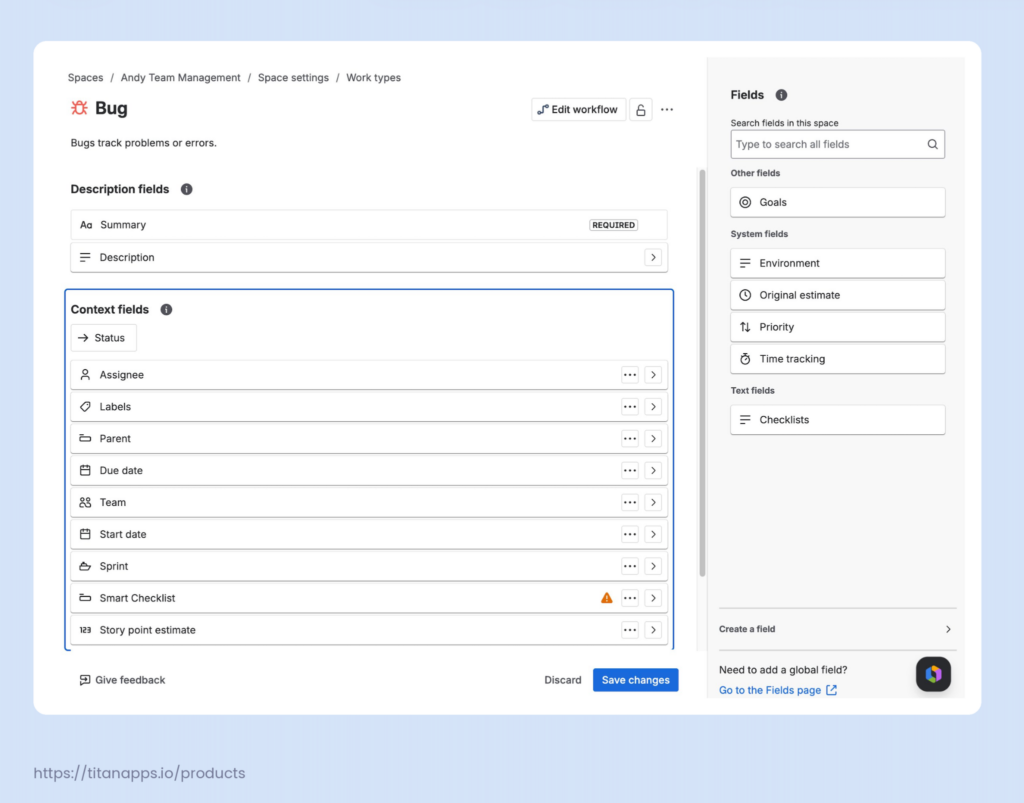
Caption: A field placed inside a work type’s Context fields. The Save changes button confirms the field is now part of the Bug layout in this space.
The mental model in the new experience: for a field to appear on a work item, two conditions must be true. The field must be added to the space for team managed projects, and the field must be in the work type’s layout. Miss either one and the field won’t show up.
How do you set up a custom field in the classic admin experience?
In the classic admin experience, fields are configured through several separate admin sections. The flow takes four steps and each step controls a different layer of visibility. Miss one and the field won’t appear on your work items.
Step 1: Create the field.
Go to Settings – Work items – Fields – Create new field. Choose your field type, give it a clear name, and add a description. You can also add field values (options for lists/checkboxes/radiobuttons etc). In the Actions column you can select the relevant screens – it saves you a separate step later.
The Add custom field flow handles the basics, but a few things to set during creation save admin time later. Pick the field type carefully – you can rename a field anytime, but you can’t change its type after creation, so a select list can’t become a number field down the road. Add a description that explains the field’s purpose; this description appears beneath the field name when users create or edit work items, so make it useful.
Step 2: Set the field context.
After creation, find your field in Settings – Work items – Fields, click the three-dot menu, and select Contexts and default value. A context defines which projects and issue types can use the field.
By default, Jira creates a global context that applies to all projects and all issue types. For smaller instances this is fine. For larger ones, restricting contexts to specific projects prevents clutter and keeps performance healthy. If a project or issue type isn’t included in the context, the field will never appear on those work items – regardless of what else you configure.
Contexts also let you create different versions of the same field for different teams. A “Region” select list could show one set of options for US projects and a different set for European projects, without creating two separate fields. You can also set a different default value per context. All the data still rolls up into a single field for reporting.
Custom field contexts are the foundation of how the classic admin experience handles scope. Every field has at least one context, and you can add additional custom field contexts to support different teams. Each context can specify its own field options, default value, and applicable issue types. The Atlassian documentation recommends keeping contexts as narrow as possible – global contexts that apply to every project tend to grow over time and slow down JQL queries across the instance.
Step 3: Add the field to screens. Screens control what users see when they create, edit, or view a work item. Even if the field exists and the context is correct, users won’t see it until it’s added to the right screen.
The fastest way: open a work item in the target project, click “Find you field,” and add the custom field directly. The admin way: go to Space Settings – Work items – Screens, find the screen your project uses, and add the field. You’ll typically want it on the Create screen, the Edit screen, and the View screen.
Step 4: Check the field configuration. Field configuration controls how the field behaves – whether it’s visible or hidden, optional or required. Go to Settings – Work items – Field configurations and confirm the field is not set to hidden for Configuration used by your project. Set it to “required” if your process demands that users fill it in every time.
Field configuration and field configuration scheme are two related but different things. The configuration defines the field’s behavior. The scheme determines which projects use which configuration. The configuration sets the rules, the scheme decides where those rules apply.
The mental model in the classic experience: for a field to appear on a work item, four conditions must be true. The field exists, the context allows that project and issue type, the field is on the right screen, and the field is not hidden in field configuration. Miss any one of these and the field disappears. This is the most common source of “I created a field but it’s not showing up” questions in the Atlassian Community.
What changes between team-managed and company-managed projects?
Beyond the experience differences, there are also capability differences between team-managed and company-managed projects. Some configuration options are only available in one or the other.
Three things you can do in a company-managed project that you can’t in a team-managed one:
- Share fields across multiple projects with different settings per project. Company-managed contexts let one “Region” field show different options for US and European projects. Team-managed projects don’t support this. If you need regional variation, you’ll create separate fields per space.
- Set per-project required/optional behavior. Company-managed field configuration schemes let the same field be required in some projects and optional in others. Team-managed projects apply visibility settings within the project’s own work type layouts only.
- Apply a field configuration scheme to enforce consistency across teams. Company-managed projects can share one field configuration scheme across many projects so every team uses the same rules. Team-managed projects are self-contained by design.
If your team is small, self-contained, and doesn’t need to share configurations with others, team-managed projects keep things fast. If you need consistent fields across multiple projects with different behavior per team, company-managed is the way to go.
How do you keep custom fields from becoming a mess?
Custom fields multiply fast. A new team joins Jira and creates five fields. Another team does the same. Within a year, your instance has 200+ fields and nobody remembers what half of them do.
Atlassian’s own scaling tests show that a large number of custom fields is the top reason for performance degradation in Jira instances. Keeping your field count low and your configuration intentional makes the difference between a Jira instance that runs smoothly and one that frustrates every team using it.
Ask whether this field will be used for reporting or JQL before creating it. If nobody plans to filter, sort, or build a dashboard gadget from this Jira data, question whether a custom field is the right home. The issue description or a comment might be enough. A field that exists but nobody queries is just clutter on the create screen.
Restrict field context to specific projects. By default, Jira can make new fields globally available across every space in your instance. Resist this. But if the field was created by the APp – better to follow app instructions. Because reducing context can break app functionality. A global field appears in every project’s field list, impacts Jira’s performance over time, and confuses teams who don’t need it. Set the field’s scope to only the Jira projects and work types that actually use it – via the work type layout in the new Fields experience, or via field contexts in older instances.
Use generic, reusable names. “Objective” works across five projects. “Marketing Q3 Objective” locks the field to one team and one quarter. Atlassian recommends giving custom fields non-specific names that can be reused across different spaces. If another team needs the same thing, they’ll reuse your field instead of creating a duplicate.
Reuse existing fields before creating new ones. When someone requests a new custom field, check whether a similar one already exists. A “Customer Priority” and a “Client Priority” doing the same job is a common pattern that leads to messy JQL results and unreliable reports. Atlassian’s governance guidance puts it plainly: question the business need behind the request and see if an existing field can be shared using contexts.
Don’t duplicate system field names. Jira already has Priority, Labels, Due Date, and dozens of other built-in fields. Before creating “Custom Priority” or “Target Date,” check whether an existing system field can do the job. Having two fields with the same name – one system, one custom – causes problems in JQL search and makes Jira administration confusing.
Audit your custom fields regularly. Set a quarterly reminder to review your field list. Look for fields with zero usage, duplicates with slightly different names, and fields that overlap with system fields. Atlassian recommends tracking custom field count on a quarterly basis and establishing a governance policy that your team can follow. Document the policy in Confluence or your internal wiki so every Jira admin can reference it.
Watch your apps and integrations. Custom fields from Atlassian Marketplace apps don’t always follow the same governance rules as fields you create directly. Some apps create their own contexts and screens automatically; others require manual setup. Review which apps have created custom fields in your instance, and ask whether each app’s fields are still in active use. The same applies to Data Center instances – the apps menu and field admin paths differ between Jira Cloud and Data Center, but the underlying governance principles are identical.
Optimize your field setup as you scale. Review which fields appear on which screens and remove any that don’t add value. Consider exporting field usage data to a CSV to identify which fields your teams actually use. When optimizing, select custom fields that drive the most reporting value and prioritize keeping them clean – and prune fields that haven’t been touched in months. A leaner setup means faster load times and a better experience for everyone working in Jira.
Document every field’s purpose during creation. The description field exists for a reason. Write a one-sentence explanation of what the field captures and which teams use it. This description appears beneath the field when users create or edit work items, so make it useful.
When should you use a checklist instead of a custom field?
A checklist is a better fit than a custom field when the goal is tracking actionable tasks inside a work item rather than capturing a single data point.
Custom fields store data: a date, a category, a number, a user. They answer “what” questions. What’s the risk level? Who’s the reviewer? When is the deadline? A checklist answers a different question – what needs to happen next – and tracks whether each step is done.
The checkbox field workaround. Some teams try to bridge this gap with the checkbox custom field type. It works for simple, static options – a few compliance flags, for example. But it breaks down when you need different task lists for different workflows. A definition of done checklist, an onboarding checklist, and a release readiness checklist would each require a separate checkbox field with its own hardcoded options. Three processes means three fields. Ten processes means ten. And every option from every process lives in the same dropdown, making the field harder to use with each addition.
Smart Checklist solves this by keeping checklists inside the issue view without multiplying custom fields.
Here’s a concrete example.Your team uses Jira to coordinate cross-functional onboarding. Each new hire gets a work item with a ‘Department’ custom field. The values include Marketing, Engineering, Sales, and so on. Each department needs a different onboarding process because the stakeholders, tools, and paperwork differ:
- Marketing: subscribe to marketing tools, meet the content team, review brand guidelines
- Engineering: set up the dev environment, get repository access, complete security training
- Sales: provision CRM access, complete sales playbook training, shadow team calls
With Smart Checklist and Jira automation, selecting a department automatically applies the matching checklist template to the work item. The custom field captures the structured data (the department). The checklist provides the step-by-step tasks. Managers see both at a glance: Department = Marketing, checklist progress = 4 of 17 tasks done.
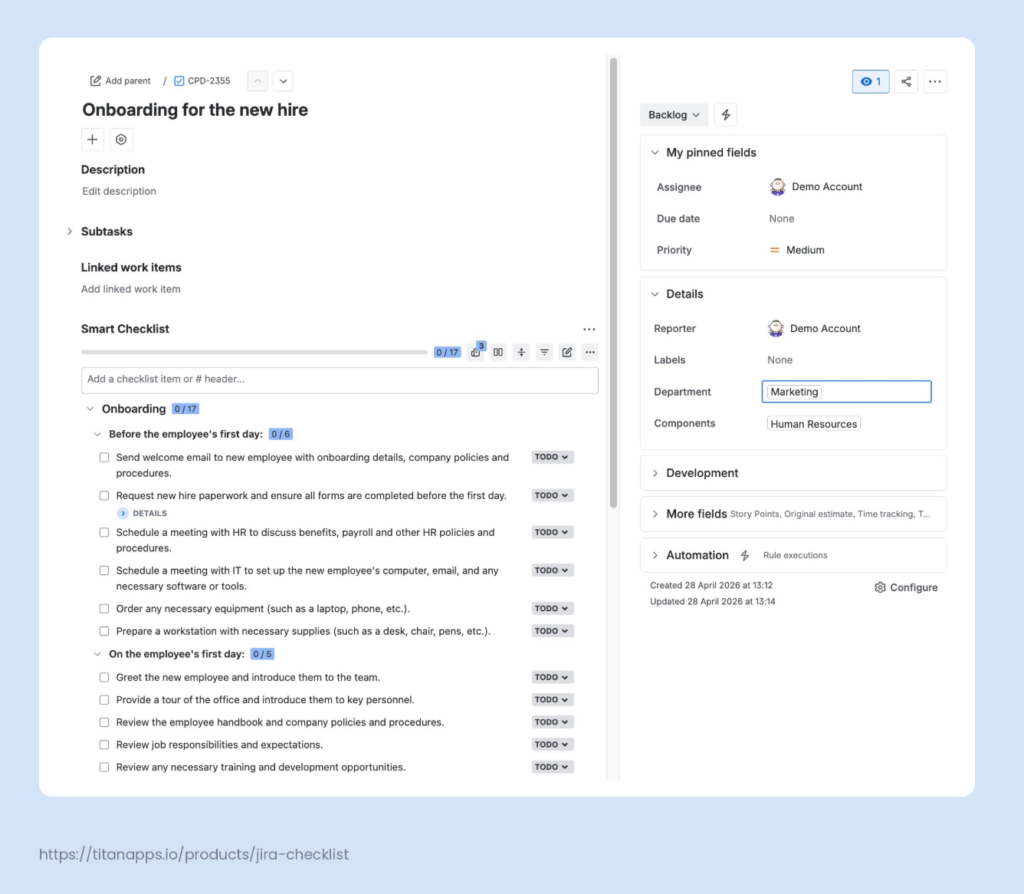
This approach combines what custom fields do well – structured, queryable data – with what checklists do well – actionable task tracking with progress visibility. No extra Sub-tasks, no additional custom fields per process, and no checkbox options piling up across unrelated workflows.
Three benefits stand out for teams that pair custom fields with Smart Checklist this way:
Consistency. Every new hire gets the complete set of required steps for their employee type. Nothing gets skipped because someone forgot to copy a list from a wiki page.
Time savings. HR doesn’t manually pick or copy tasks for each new work item. The automation handles it based on the field value, which means the checklist is ready the moment the issue is created.
Clearer reporting. Managers can track checklist completion alongside the custom field value. Instead of opening each issue individually, they see progress at a glance on the board – which onboarding is on track and which is falling behind.
Final thoughts
Custom fields give your Jira instance the flexibility to track what matters to your teams – from risk levels and hire types to review dates and client names. The key is treating each new field as a deliberate decision rather than a quick fix. Choose the right field type, restrict the context to the projects that need it, and audit regularly to keep clutter from building up. When the work item needs structured data, a custom field is the right tool. When it needs actionable steps, pair that field with a checklist. The combination gives your team both the data for reporting and the clarity for execution – all inside a single Jira issue.
FAQ
How many custom fields can you have in Jira?
Jira doesn’t enforce a hard limit on custom fields. However, Atlassian’s own performance testing shows that a large number of custom fields is the top reason for instance slowdowns. Starting in February 2026, Jira Cloud will also cap field configurations at 700 fields and field configuration schemes at 150 work types per scheme. The practical recommendation is to keep the count as low as possible, audit regularly, and restrict field contexts to specific projects rather than making every field global.
What is the difference between field configuration and field configuration scheme?
Field configuration controls how a specific field behaves – whether it’s hidden, visible, optional, or required. A field configuration scheme determines which projects use which field configuration. You create the configuration to set the rules, then assign the scheme to decide where those rules apply. For example, your development spaces might require a “Severity” field on every Bug, while your marketing spaces keep it optional. Same field, different behavior per project – managed through schemes.
Can you delete a custom field without losing data?
No. Deleting a custom field permanently removes all data stored in that field across every issue in your instance. Always export the data first – either to CSV or through the Jira REST API. The API gives you more control over the export format and lets you script regular backups. If you have automation rules, JQL filters, or dashboard gadgets that reference the field, deleting it will break those too. The Jira REST API also helps audit field usage across your instance – you can pull a report of which fields are referenced in which automation rules and where.
Also check whether any JQL filters, dashboard gadgets, or automation rules reference the field – deleting it will break those too. If you’re unsure whether a field is still in use, hide it in the field configuration first and wait a few weeks to see if anyone reports it missing.
Do custom fields work in Jira Service Management?
Yes. Custom fields created in Jira can be added to JSM request forms so customers fill them out when submitting requests. This functionality extends to your service desk portal as well. The supported field types for the customer portal include checkboxes, date pickers, select lists, text fields, number fields, and user pickers. Some field types like group pickers and version pickers can be added to request types with preset values but won’t be visible to customers on the portal itself.
What is the difference between system fields and custom fields in Jira?
System fields come built into every Jira instance. They include Summary, Description, Status, Assignee, Priority, and others. You can’t remove, rename, or change their type. Custom fields are fields you create to capture data that system fields don’t cover. You control their type, name, behavior, and where they appear. Both system and custom fields work in JQL, filters, and automation – but Atlassian recommends avoiding giving custom fields the same name as system fields to prevent confusion in search results. Note that custom fields are available in both Jira Cloud and Data Center editions, though the administration paths differ between the two.