Jira
Jira monday.com


TL;DR: A Quick Answer
- A Jira checkbox is a custom field for selecting pre-set options – useful for risk tagging, compliance flags, and structured data entry.
- It cannot be used as a checklist: it lives in the side panel, not in the description, and it has no progress tracking.
- For step-by-step task tracking in a work item description, use Jira action items (simple, native) or Smart Checklist for Jira (advanced, with templates and automation).
- Smart Checklist lets you save checklists as templates, auto-apply them by work item type, and integrate them with Jira automation rules.
- The best approach is to combine all three depending on the use case: checkbox fields for data standardization, action items for quick notes, and Smart Checklist for recurring processes.
A Jira Checkbox or Jira Checklist – Which One Do You Really Need?
In Jira, checkboxes can be part of different elements, which include a custom checkbox field, native action items, and third-party checklists. In this article, we cover all three use cases. But before we dive into the details, let’s take a quick look at all of them to help you decide which one best suits your needs.
What is a Jira Checkbox?
Jira Checkbox is a custom field that can be added to Jira work items in company-managed and team-managed projects. It allows a person with administrator rights to pre-set a list of options to choose from. Later, users can pick one or more from the list when filling out work item details.
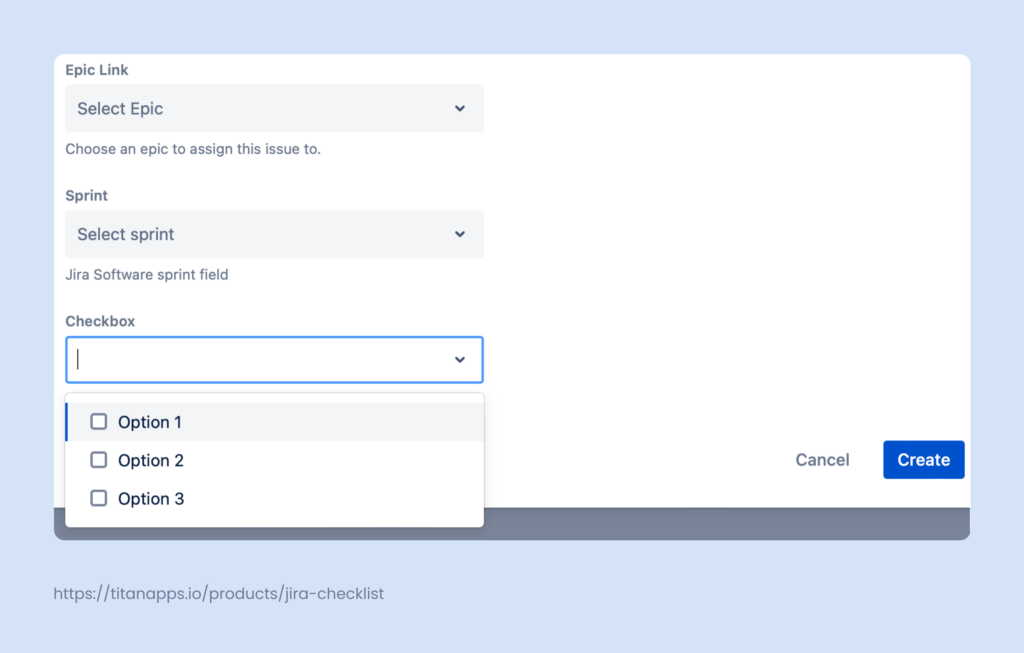
For example, imagine the legal department wants to include information about possible risk factors in every Jira task. For this, they can add a custom Jira checkbox field listing possible options such as:
- Legal Impact
- Reputational Risk
- Financial Risk
- Data Privacy Risk
- No Risks
When someone creates a new task, they can select one or more options from this list. Atlassian recently introduced Jira Action Items as a lightweight inline checkbox for descriptions and comments
Like most other fields, the information in the checkbox field will be visible on the right panel of a work item view (issue view). This means there’s no way to display it in the task description.
For more details, please see the official documentation about the Field types you can create as a Jira admin.
6 Reasons the Jira Checkbox Field Can’t Replace a Checklist
In essence, the checkbox custom field is useful when you need to add a multiple-choice selector to work items in your project. It allows you to fill out task details more quickly and standardize the input. When users select from a pre-set list of options, it reduces errors in data entry.
However, the checkbox field wasn’t designed to function as a full-fledged checklist. Here are some limitations that make it an inadequate substitute:
- Once configured, the field is applied to all work types in the project at once
- The list can’t be displayed in the work item description field
- Requires administrator permission to set up and edit
- Isn’t optimized for progress-tracking – the items on the list lack statuses
- Limited visibility – the list is displayed on the side panel, where it’s easy to overlook it; the options on the list are only visible in a drop-down when you click on it
- Limited searchability – there’s no way to filter work items by checkbox completion status across projects using JQL
In contrast, a dedicated Jira checklist app can offer you much richer functionality and flexibility.
What is a Jira Checklist?
A Jira Checklist is a structured list containing multiple steps to complete or parameters to verify. In other words, it’s a ToDo list designed to help you work on a task rather than just fill out task details. A checklist can be included as part of the work item description or located in a separate section below the description.
There are different ways to add a checklist in Jira:
- With Jira action items – a native feature offering basic checklist functionality
- With Smart Checklist for Jira – a dedicated solution that allows you to create feature-rich checklists
Example 1. A checklist created with Jira action items
The idea behind Jira action items is to let you quickly take notes during a meeting and list steps that require further action.
As a result, you get a simple checklist like the one below. It will only be applied to the individual work item where you typed or pasted it manually. Such checklists can be added to the work item description or used in comments.
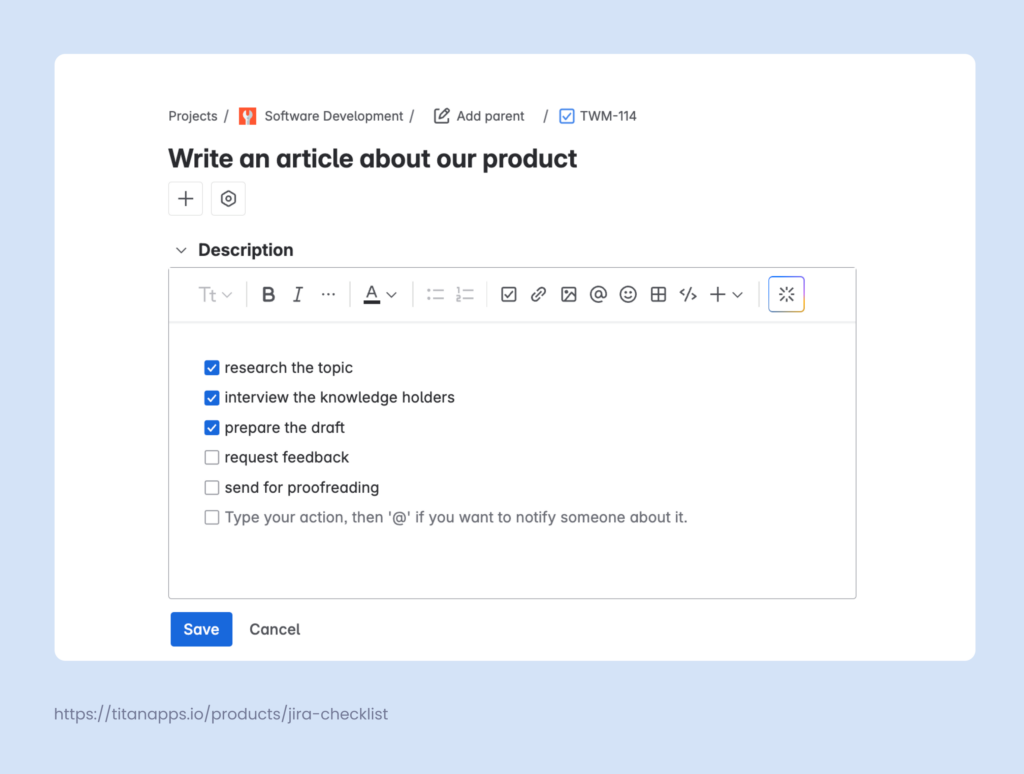
This is a good option for managing simple lists that apply to a single task. You can easily add new items, edit the list, and check off completed steps to mark them as done.
However, Jira action items can’t be used with automation, workflow integration, or for creating checklist templates for recurring tasks. Additionally, they don’t help you track progress as they lack statuses (such as To Do or Under Review).
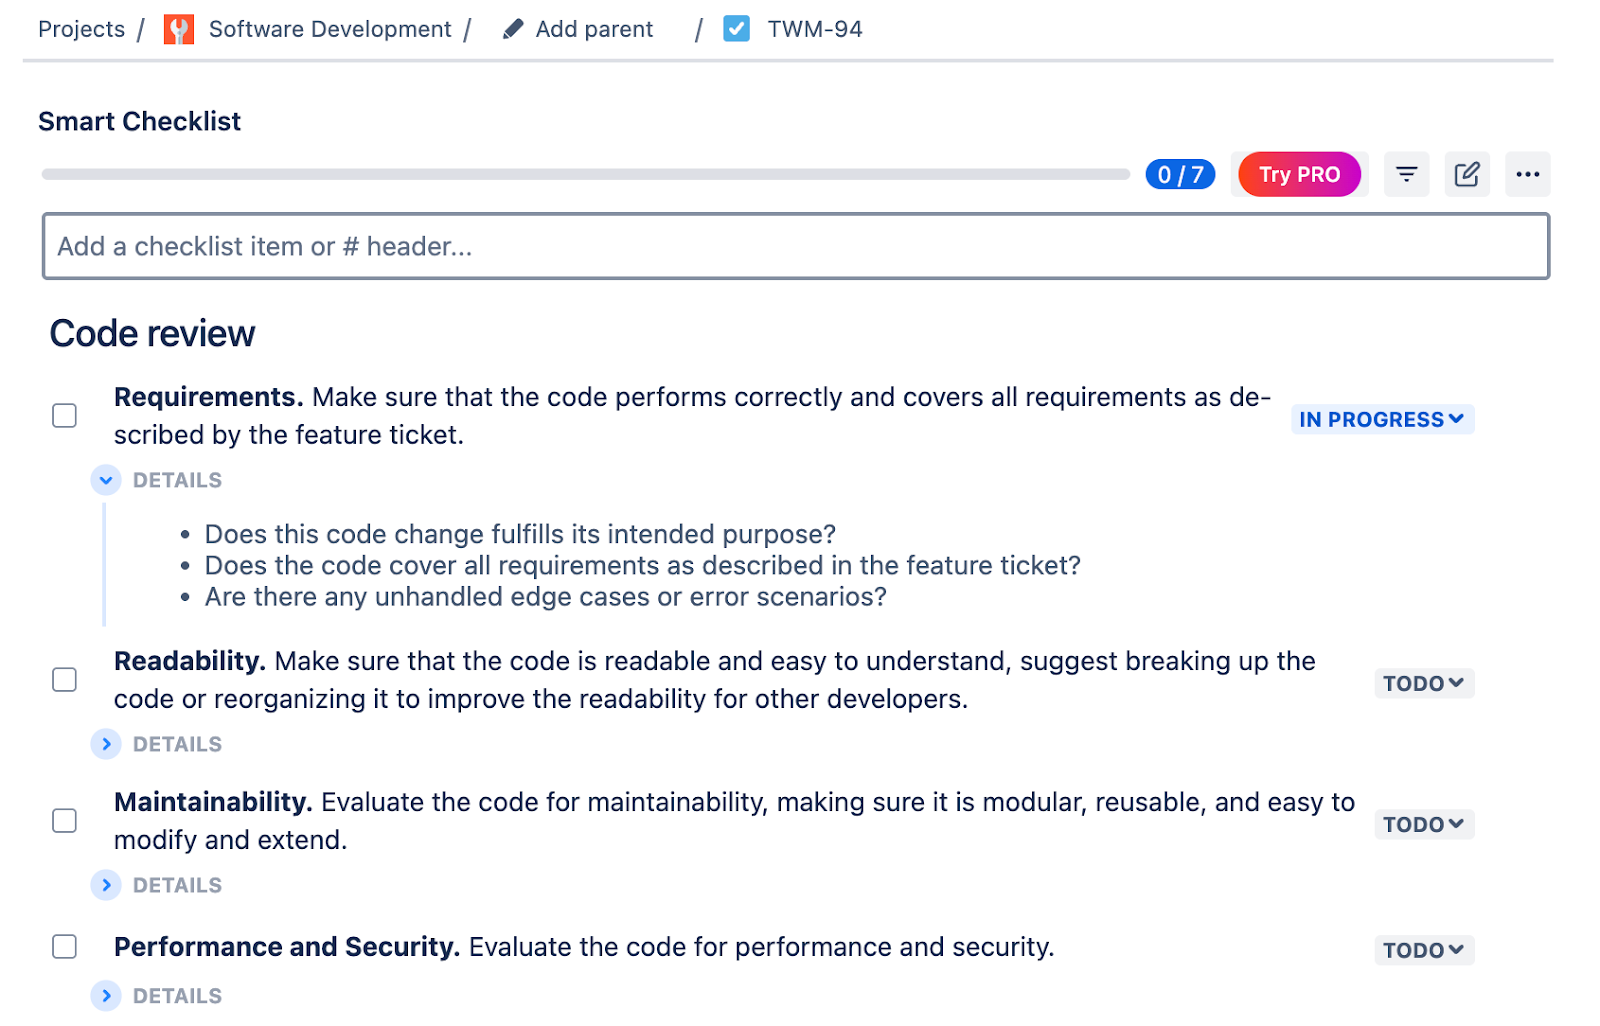
Example 2. A checklist created with Smart Checklist for Jira
Smart Checklist allows you to create highly customizable checklists that overcome the limitations of the native feature.
They can display statuses for each step and include deadlines, mentions, headers, links to various resources, and more. Furthermore, Smart Checklist enables you to save your checklists as templates and reuse them for recurring tasks. It also supports automation and workflow integration.
For example, you can automatically add a Test Review checklist to all testing tasks or a Recruitment checklist to all hiring tasks:
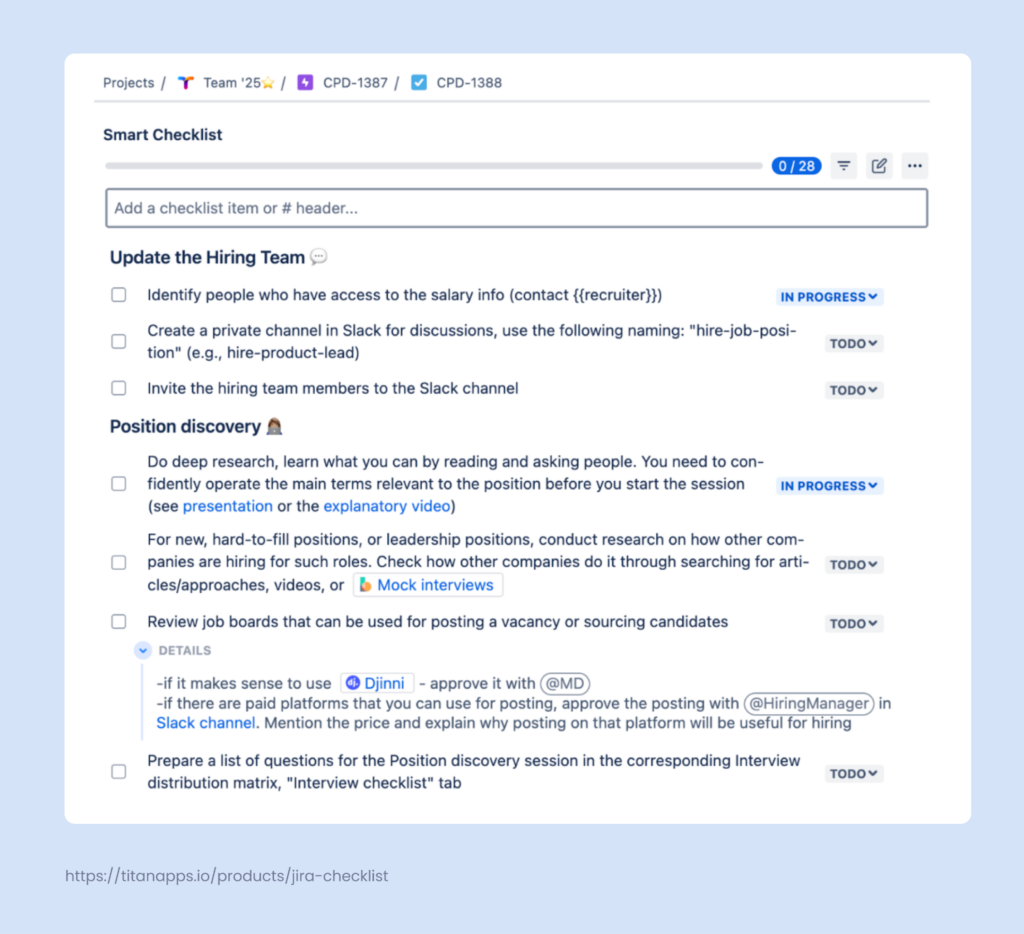
This allows you to document tasks and processes step-by-step and scale the best practices in your organization.
The smart checklist is located in a separate section after the work item description, making it convenient to work with it step-by-step. The solution supports both Jira Cloud and Jira Data Center.
Smart Checklist for Jira is built by TitanApps, an Atlassian Gold Marketplace Partner, and ranks in the Top 3 in its category on the Atlassian Marketplace. Smart Checklist runs on Forge, which means your data doesn’t leave the Atlassian ecosystem. This offers you greater data security and compliance.

To sum up, both the Jira checkbox field and Jira checklists can be useful in different circumstances and for different use cases. Hopefully, this overview has helped you understand the differences, and by now, you know which one is the best fit for your goals.
Comparison Table: Jira Checkbox vs Action Items vs Smart Checklist
| Capability | Checkbox custom field | Jira action items | Smart Checklist |
|---|---|---|---|
| Location | Side panel only | Description / comments | Dedicated section below the description |
| Custom statuses | No | No | Yes |
| Reusable templates | No | No | Yes |
| Automation support | Limited (field value rules) | No | Yes (native + Automation for Jira) |
| JQL searchability | Selected options only; no completion tracking | Not searchable | Full JQL support for checklist content and completion progress |
| Best for | Standardized data input | Quick notes and single-task lists | Recurring processes, DoD, multi-step workflows |
How to Add a Jira Checkbox (Custom Field) to Your Tasks
If you’ve decided that the checkbox custom field is the most suitable option for you, see the following instructions to help you configure it.
- Open your Jira project and navigate to Settings -> Work Items.
- In the menu panel on the left, under the Fields section, select Fields and press the Create new field button.
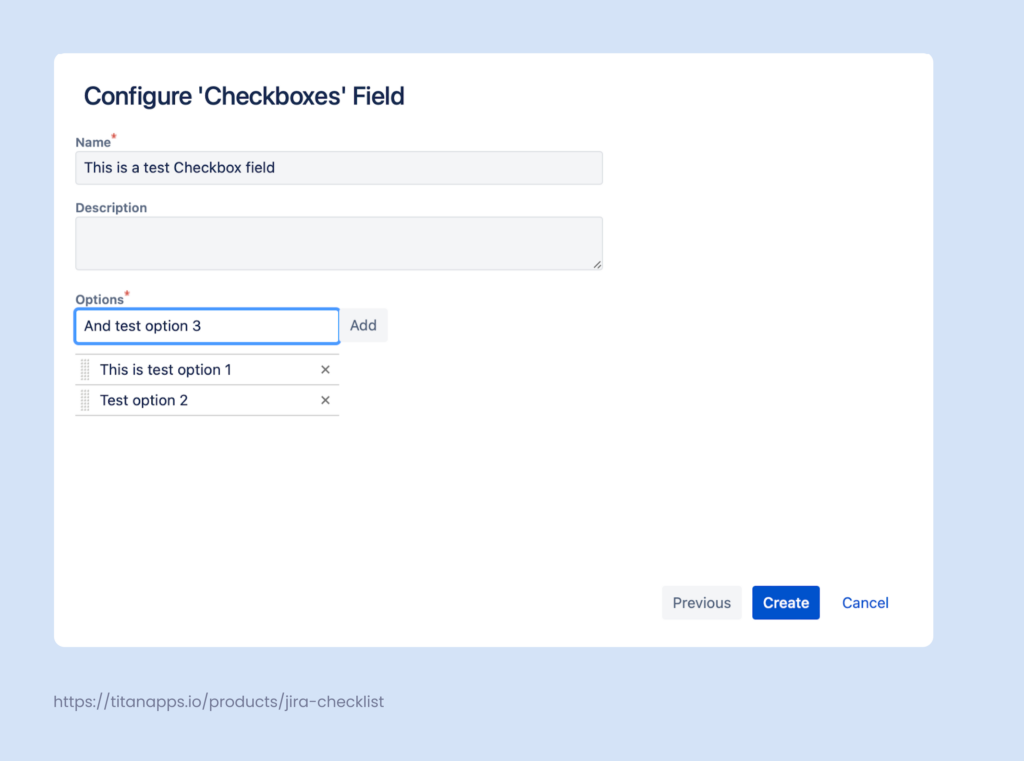
- Then, select Checkboxes and provide the required details.
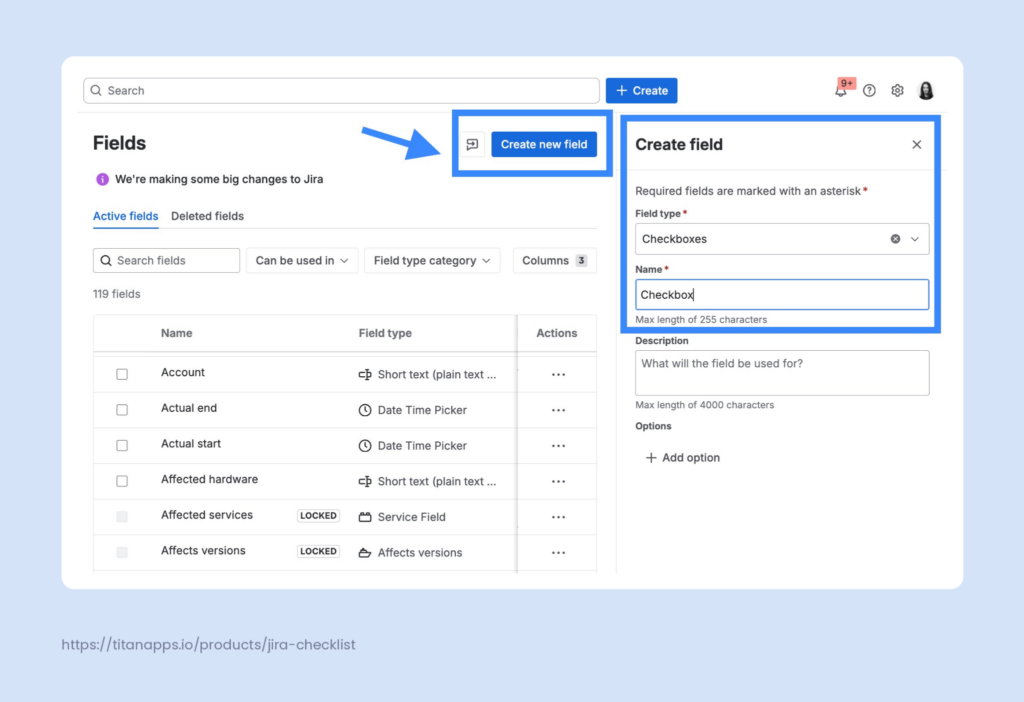
- Name the custom field you are creating. Then, you can add options that will be available for the user in this field. Once done, click Create.
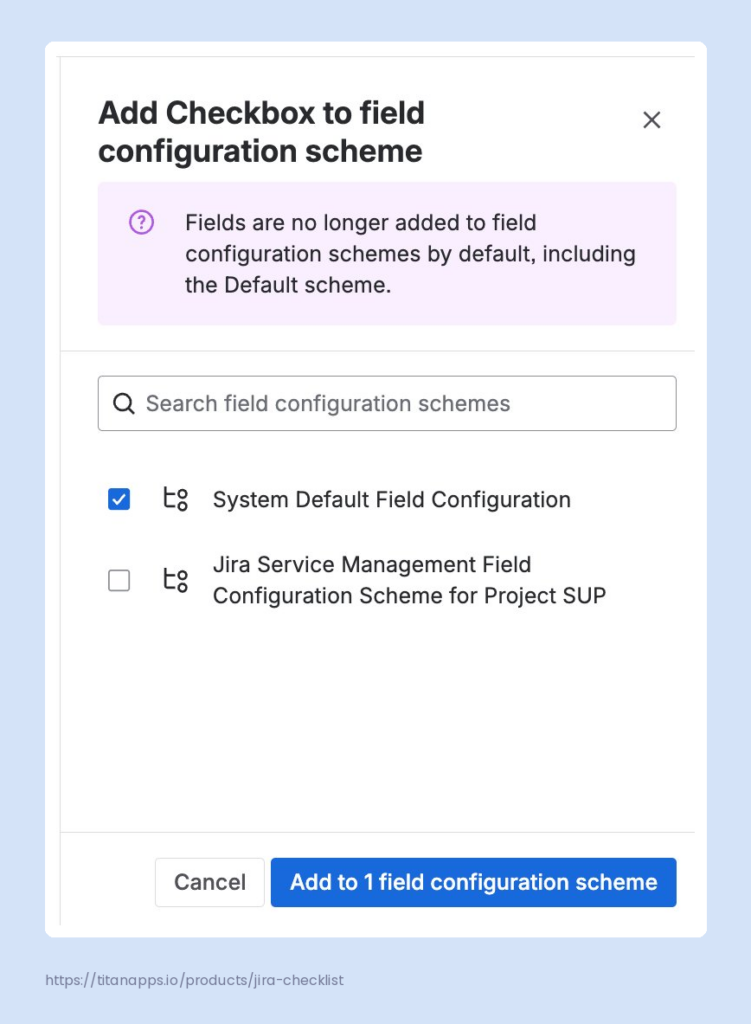
- Then, you will be prompted to add your Jira checkbox field to the field configuration scheme, as Jira doesn’t do this automatically. Select System Default Field Configuration and click the Add button.
- You will also need to associate the new field with the Jira screens where it should appear. To add the Jira checkbox field to your project, navigate to Project Settings -> Work Items -> Screens. In the search bar at the bottom of the page, search for Checkbox and select it from the dropdown list. After this, it will be added to the screen.
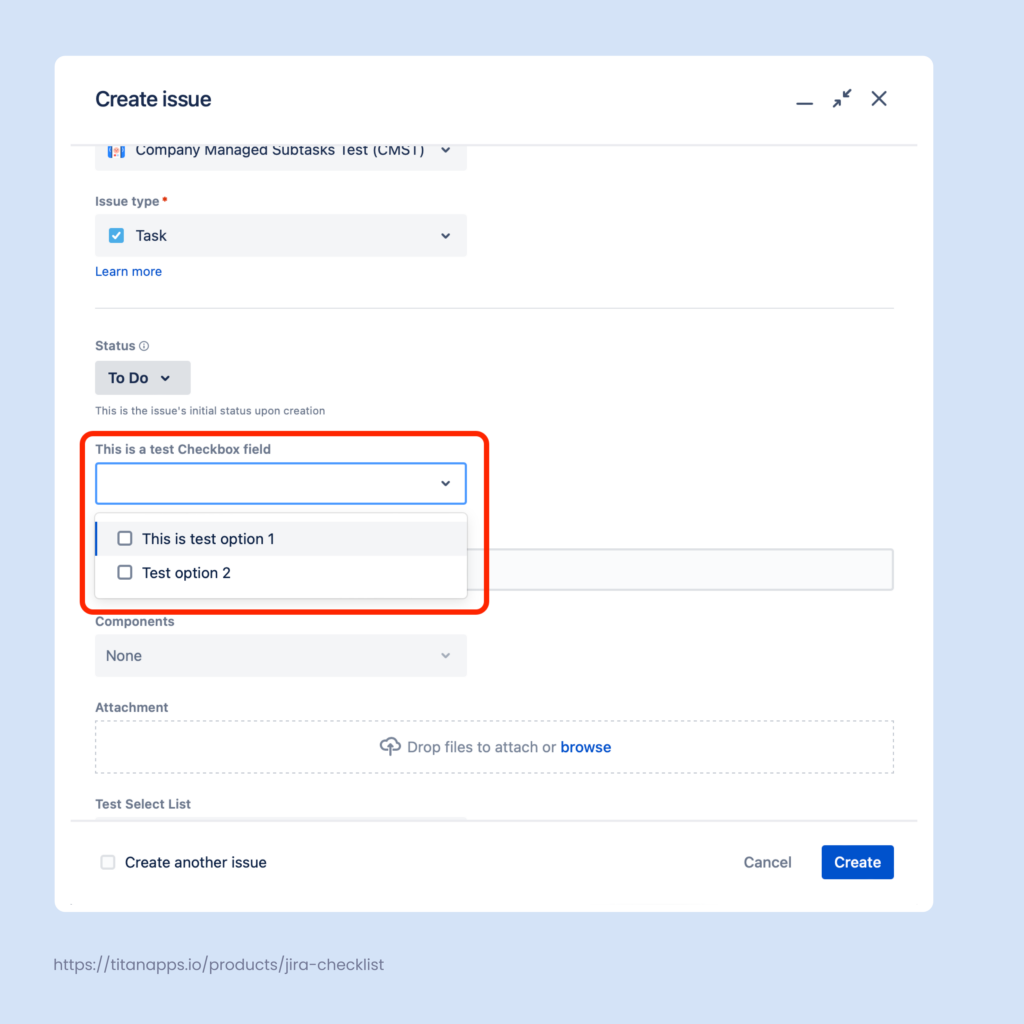
- That’s it! The Jira checkbox custom field has been added. You can now select one or multiple options when creating a work item.
How to Add a Checklist to the Jira Work Item Description?
As we have already explained, the Jira checkbox field isn’t the best substitute for checklists – in particular, it can’t be added to the task description. However, you can achieve this with the help of Jira action items or checklist apps. Let’s explore both options.
Option 1. How to Create Simple Checklists With Jira Action Items
Action items can be included in a work item description, comments, and other text fields that support rich formatting.
One way to add an action item is by typing the / symbol in the text field where you want to add your checklist. In the menu that appears, select Action Item.
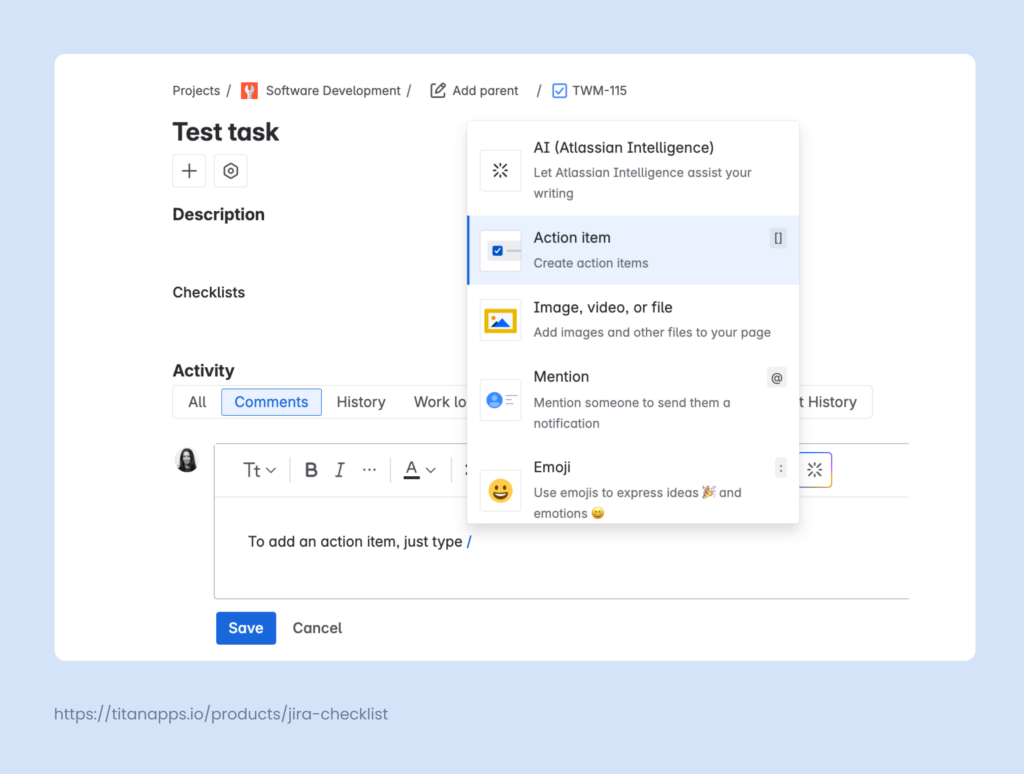
Alternatively, you can type [] – square brackets. They will be automatically turned into a checkbox. These simple ToDo lists help you better structure information when taking notes, giving feedback, or planning what to do next.
For more on this topic, see our article about Jira Action Items Functionality.
Option 2. How to Build Advanced Checklists With Smart Checklist for Jira
Unlike the previous option, this one is suitable for complex processes and multi-step tasks that require progress tracking.
Install Smart Checklist for Jira from the Atlassian Marketplace. Next, open a work item and navigate to the Smart Checklist section below the description block. If it’s not showing, click Apps under the work item summary (task title) and select Smart Checklist.
Type your list in the Smart Checklist section or paste a ready checklist. To add checkboxes, start from a new line and type “-” at the beginning. Use the Markdown editor guide to customize your checklist.
In particular, you can:
- Structure the list with headers
- Mention the responsible people
- Insert links to internal policies
- Link related Jira work (Jira issues)
- Use rich text formatting
- Add deadlines and other dates
- Mark important steps as mandatory
- Add custom statuses for different steps (see the example below)
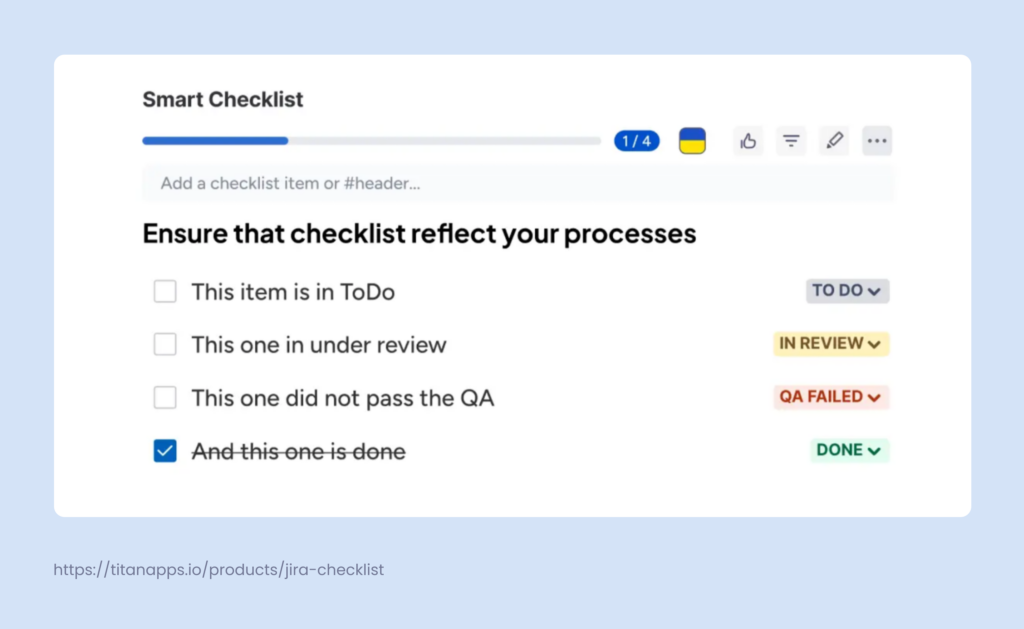
As a result, you get a highly customizable checklist that shows progress at a glance.
How to Create Jira Checklist Templates
For recurring tasks and processes, it’s helpful to build reusable checklist templates. Jira doesn’t offer this functionality natively, but it can be achieved with the help of Smart Checklist for Jira.
First, prepare a checklist that you want to turn into a template. Use the step-by-step instructions from the previous section of this article to guide you.
Once it’s ready, click the three-dot menu in the top right corner of the Smart Checklist section of your work item (Jira issue). Select Save as a template and name your template.
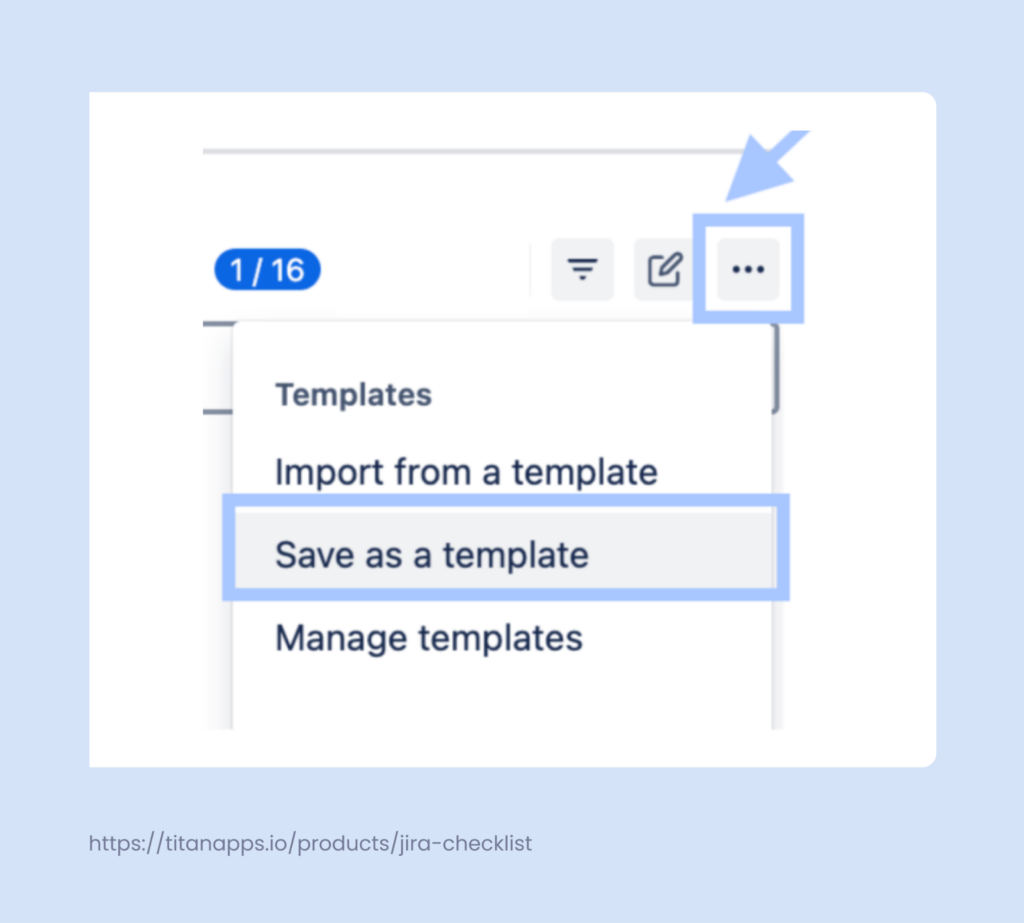
That’s it! Now, you can use the same menu to add the saved checklist template to other work items manually. Simply select Import from a template and pick the one you need.
Alternatively, checklist templates can be assigned with the help of automation.
How to Automatically Apply Checklist Templates to Work Items
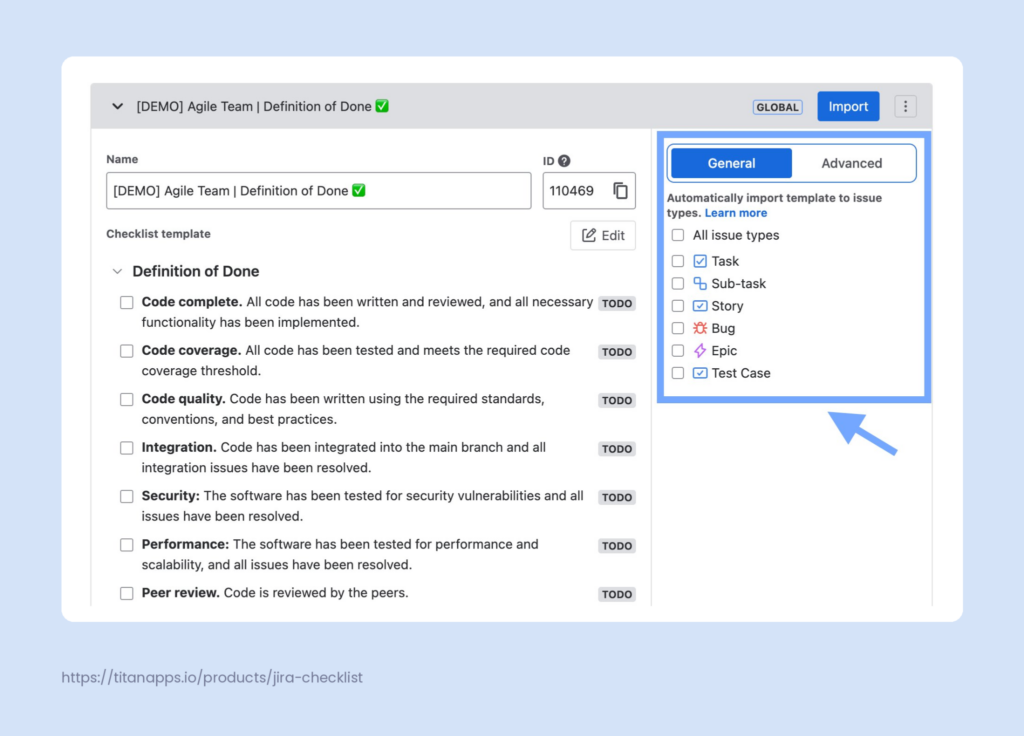
Smart Checklist allows you to automatically add checklist templates based on various conditions – for instance, based on work item type (Jira issue types). For example, you can prepare an Acceptance Criteria or Definition of Done checklist template and auto-apply it to all Stories.
To do this, click the three-dot menu in the top-right corner of the Smart Checklist section of your work item and select Manage Templates.
Locate the template you need in the list and expand it. In the section on the right, select the work types to which you want to apply the template. Please note that this will affect all the new work items of the specified type but not those created previously.
If you want to apply checklist templates based on more complex conditions, you can specify your preferences on the Advanced tab in the Smart Checklist’s native automation settings.
This will allow you to build nuanced rules – for example, you can apply an Onboarding checklist template to all new tasks that have the word “Onboarding” in their summary once they are created. Checklists can also be added automatically when a work item transitions to a specific status, such as “In Review.”
Additionally, you can expand these capabilities further by integrating Smart Checklist with Automation for Jira.
For more details on how to set up such an automation, please see our guide on Confluence: Checklist Templates with Jira Automation.
Checklist Examples and Ready-to-use Templates
Here are some ready-made checklist templates that will be useful to any agile team – in particular, to those working with the Scrum methodology.
Jira Checklist for the Definition of Done
This template lists the standard criteria that should be met to consider work done. It helps the development team maintain a high product quality and consistently implement best practices. It also ensures that the shipped releases are well-prepared so that the team doesn’t have to waste time fixing preventable errors.
Using the Definition of Done in the form of a Jira checklist allows your team to actively work with it on a daily basis. In contrast, if your DoD is documented in Confluence or another external app (not in Jira), it’s easy to forget about it or miss some steps.
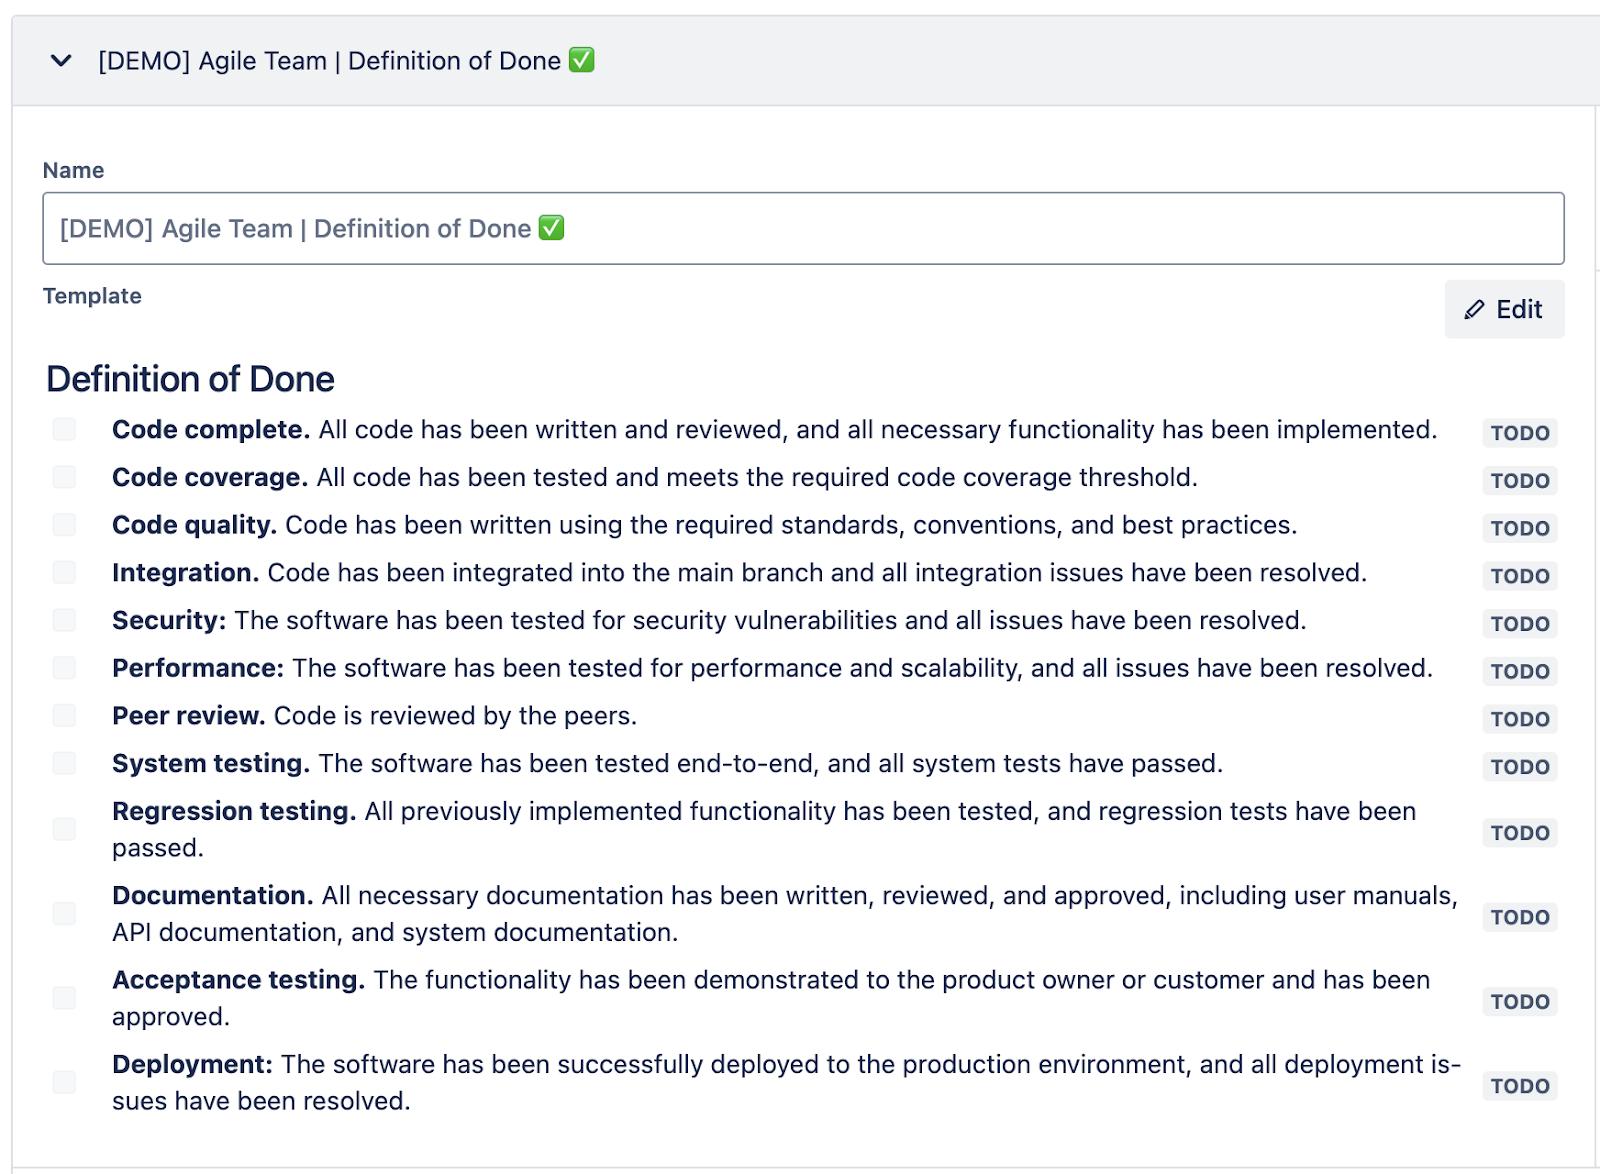
## Definition of Done
- **Code complete.** All code has been written and reviewed, and all necessary functionality has been implemented.
- **Code coverage.** All code has been tested and meets the required code coverage threshold.
- **Code quality.** Code has been written using the required standards, conventions, and best practices.
- **Integration.** Code has been integrated into the main branch, and all integration issues have been resolved.
- **Security:** The software has been tested for security vulnerabilities, and all issues have been resolved.
- **Performance:** The software has been tested for performance and scalability, and all issues have been resolved.
- **Peer review.** The code is reviewed by the peers.
- **System testing.** The software has been tested end-to-end, and all system tests have passed.
- **Regression testing.** All previously implemented functionality has been tested, and regression tests have been passed.
- **Documentation.** All necessary documentation has been written, reviewed, and approved, including user manuals, API documentation, and system documentation.
- **Acceptance testing.** The functionality has been demonstrated to the product owner or customer and has been approved.
- **Deployment:** The software has been successfully deployed to the production environment, and all deployment issues have been resolved.
To start using this DoD template, install Smart Checklist for Jira. Then, follow the instructions from the previous sections of this article to save the checklist as a template in your Jira project and set up automation, if needed.
For more details, please see our article How to Manage the Definition of Done in Jira.
Jira Checklist for the Definition of Ready
The Definition of Ready is another important tool for agile teams. It helps you ensure that the tasks you include in your backlog are feasible, clear, and doable within the planned timeframe. You can take this template as a basis and customize it to match your processes better.

## Definition of Ready
- **Clear description.** The work item has a well-defined goal, purpose, and expected outcome.
- **Acceptance criteria.** Clear and testable acceptance criteria have been defined and agreed upon.
- **Dependencies identified.** All external dependencies (technical, business, or cross-team) have been documented and addressed.
- **Design and scope.** Required mockups, wireframes, or business rules are attached or linked.
- **Feasibility check.** The team has confirmed the work item is feasible within the planned timeframe.
- **Estimation.** The effort has been estimated using the agreed method (e.g., story points).
- **No blockers.** No unresolved issues are preventing the team from starting work.
- **Stakeholder alignment.** All relevant stakeholders have reviewed and approved the item.
- **Priority set.** The item is prioritized appropriately in the backlog.
- **Linked items.** Related epics, tasks, or subtasks are linked for context.
- **Team understanding.** The team agrees on the scope and is confident they can start work.
Jira Checklist for Code Review
This template outlines the necessary steps to be completed during the code review. It’s a good example of codifying processes and best practices in the form of a checklist. Using this template helps teams remain aligned and focus on the most crucial quality criteria.
## Code review
- **Requirements.** Ensure that the code performs correctly and covers all requirements as described in the feature ticket.
> * Does this code change fulfill its intended purpose?
> * Does the code cover all requirements as described in the feature ticket?
> * Are there any unhandled edge cases or error scenarios?
- **Readability.** Make sure that the code is readable and easy to understand, suggest breaking up the code or reorganizing it to improve the readability for other developers.
> * Is the code easy to understand?
> * Are variable names and function names clear and descriptive?
- **Maintainability.** Evaluate the code for maintainability, making sure it is modular, reusable, and easy to modify and extend.
> * [DRY principle.](https://en.wikipedia.org/wiki/Don%27t_repeat_yourself) Are there any duplicated sections of code that could be consolidated into reusable functions or classes?
> * Will this change add undesirable compile-time or run-time dependencies?
> * Are there any best practices, design patterns, or language-specific patterns that could enhance the code significantly?
> * Does this code follow the single responsibility principle?
- **Performance and Security.** Evaluate the code for performance and security.
> * Will this code change negatively impact system performance?
> * Is there a way to significantly improve the code’s performance?
> * Are sensitive data such as user data and credit card information being securely handled and stored?
- **Testability.** Evaluate the code for testability, ensuring that it can be easily tested and that any necessary unit tests or integration tests have been written.
> * Is the code testable?
> * Do the existing tests reasonably cover the code change?
> * Are there any other essential unit, integration, or system tests that should be added?
- **Documentation.** Verify that the code includes appropriate documentation, ensuring that it is clear, concise, and up to date.
> * Does the code include appropriate documentation?
> * Is the documentation clear, concise, and up-to-date?
- **DevOps**. Verify that all the steps needed to be done after the PR deploy are described.
> * Are there any risks related to the deployment of this PR in terms of production operation?
Combine Jira Checkbox and Jira Checklists Depending on Your Needs
In this article, we explored the differences between action items, advanced checklists, and the custom Jira checkbox field. As you can see, despite the superficial similarities, they are designed for different purposes and use cases.
For optimal results, you can combine all the available features according to your team’s current needs. Add checkbox fields to standardize data input, use Jira action items for rapid note-taking during meetings, and implement Smart Checklist to document best practices, create complex action plans, and build reusable templates for recurring tasks and processes.
For more tips on organizing your work in Jira, please see our other articles:
Frequently Asked Questions About Jira Checkboxes and Checklists
How do I add a checkbox field in Jira?
To add a checkbox custom field (a multiple-choice selector on work items), go to Settings -> Work Items -> Fields -> Create new field. There, choose Checkboxes, define your options, and add the field to the relevant screen. For a full checklist of checkboxes with statuses, templates, and progress tracking, install Smart Checklist for Jira and add items in the Smart Checklist panel below the work item description.
How do I add a checklist to a Jira ticket?
You have two main options. For a simple checklist inside the description or a comment, you can use Jira action items – simply type [] or / and select Action Item. For a richer checklist with custom statuses, deadlines, mentions, and templates, use Smart Checklist for Jira. Open the ticket, find the Smart Checklist section below the work item description, and add items manually or paste them in Markdown. This works in both Jira Cloud and Jira Data Center.
Can I save a Jira checklist as a template?
Jira doesn’t offer checklist templates natively, but you can create them with Smart Checklist for Jira. Build a checklist in any work item, open the three-dot menu in the Smart Checklist section, and select “Save as a template.” Templates can be project-specific or global. You can also use linked templates to prevent users from editing imported templates – this is useful for locked, standardized processes.
Does Jira have a built-in checklist feature?
Jira has a lightweight native checklist feature called Jira action items. This is a good option for quick notes and single-task lists, but they don’t support templates, automation, statuses, or progress tracking. For structured, recurring processes, you’ll need a dedicated app like Smart Checklist that gives you richer functionality.
Do Jira action items support templates or automation?
No. Action items are simple inline checkboxes without template support, automation triggers, or status tracking. For reusable templates and workflow automation, you need a checklist app such as Smart Checklist for Jira.
How do I add a checkbox to a Jira issue description?
Jira’s description field supports interactive checkboxes through the native action items feature. Type / and select Action Item, or type [] to convert it into a checkbox automatically. This is a fast way to capture meeting notes or list quick follow-ups. For checklists that need progress tracking, custom statuses, or templates, use Smart Checklist for Jira – it adds a dedicated panel right below the Jira issue description.
What is the best checklist plugin for Jira?
Smart Checklist for Jira by TitanApps is one of the most popular checklist apps on the Atlassian Marketplace and ranks in the Top 3 in its category. It works in both Jira Cloud and Jira Data Center, and supports reusable templates, custom automation rules, custom statuses, and more. Smart Checklist runs on Atlassian Forge, which means all checklist data stays inside your Atlassian Cloud environment. This app is built by TitanApps, which is an Atlassian Gold Marketplace Partner.
For a broader comparison of available options, see our roundup of the 10 best Jira checklist apps.
How do I use checkbox markdown in Jira?
Smart Checklist for Jira supports a simple Markdown syntax for fast checklist creation. Use – for an open item, + for checked, ~ for in progress, and x for canceled. Add ! after the status to mark an item as mandatory, and # for headers. You can paste a Markdown list directly into the Smart Checklist editor, and it will be converted to a structured checklist. See the full Smart Checklist Markdown guide for all formatting options.
Can I add checklists in Jira automatically?
Yes. Smart Checklist for Jira has native automation features that let you configure custom rules to add checklists based on conditions. For example, you can apply a template to all new work items of a selected type, such as auto-applying the Definition of Done checklist to every Story. Please see our guide on automating Jira processes for more examples. You can also have a look at Atlassian’s standard definition of done in Agile.
How do I use a checklist for the Definition of Done in Jira?
The easiest way is to start from our ready Definition of Done checklist template and adjust it to your team’s standards. Save it as a Smart Checklist template, then auto-apply it to every story or task of the relevant type. Mark the most important steps as mandatory so the work item cannot transition to the next status until they’re completed. The same approach works for the Definition of Ready checklist applied at backlog refinement.
How do I manage acceptance criteria as a checklist in Jira?
Open a story in Jira and paste your list of acceptance criteria into the Smart Checklist panel of your story. You can also save this checklist as a template and apply it to every new story automatically. For more details, see our guide on managing acceptance criteria in Jira.