Jira
Jira monday.com


Approvals are everywhere in Jira. A travel request waits on a manager. A release sits on the QA lead. A vendor contract pauses for legal review. Most of this gets handled in Slack threads, ad-hoc comments, and verbal nods in standup. Then someone asks who signed off on what, and nobody can find the answer.
A Jira approval workflow moves that decision into the work item itself. The sign-off becomes part of the workflow, with named decision-makers, a clear status, and an audit trail. Done well, it speeds work up. Done poorly, it adds three statuses and four screens for what used to be a two-minute conversation.
The right shape depends on the situation. Some processes need a formal sign-off step inside the workflow. Others need a simple, visible list of items to verify. Plenty of teams need both. And the options have changed in the last year – native steps are no longer limited to Jira Service Management, which opens new patterns for product, marketing, HR, and finance teams.
This article covers how Jira approval workflows actually work today, when to use a native step, when a checklist is the better fit, and how to combine them. It walks through worked examples for travel requests, invoice review, release sign-off, and change management, and closes with the common mistakes that turn these workflows into bureaucratic dead ends.
Key Takeaways
- A Jira approval workflow adds a formal sign-off step to a workflow status, with named decision-makers, two outcome transitions, and an audit log searchable via JQL.
- Native approvals are now available in Jira Service Management, business spaces, and company-managed projects on Premium and Enterprise plans.
- Timing matters: travel and budget requests get signed off up front, while releases, contracts, and policies get signed off at the end of the work.
- A Smart Checklist with mandatory items can act as a lightweight sign-off mechanism, blocking workflow transitions until each reviewer has ticked their item.
- The strongest setups combine both: a native step as the formal gate, and a checklist of pre-conditions verified before the gate opens.
What is a Jira Approval Workflow?
A Jira approval workflow is a workflow that includes one or more sign-off steps – moments where the work item pauses until a designated reviewer formally accepts or declines it. The decision is captured on the work item itself, with a timestamp and the reviewer’s identity, and it determines which status the work item moves to next.
Three pieces make this work:
- An approver field that points to the right people. This is usually a custom user picker or group picker field, populated either manually per work item or automatically based on project, request type, or assignee logic.
- A sign-off step attached to a workflow status. The step defines how many reviewers are required and whether they need to comment when accepting or declining.
- Two transitions out of that status – one for “approved” and one for “declined” – that route the work item to the next step in either direction.
Once configured, the experience is straightforward. The work item reaches the review status, the reviewers receive an email or in-app notification, and they respond directly from Jira, Slack, Microsoft Teams, or the email itself depending on the channel they prefer. Every decision is logged, and the log is searchable via JQL like any other field, so audit and reporting work the same way they do for status, assignee, or due date.
How jira approval differs from Definition of Done and acceptance criteria
These three terms get used interchangeably in standups, but they answer different questions and live in different places.
Acceptance criteria describe what a single work item must do to be considered complete. They are written by the person who owns the requirement, usually before development starts. They live inside the work item description or in a checklist on the work item, and they are verified by the person doing the work or by QA.
Definition of Done is a team-wide standard that applies to every work item of a given type. It covers the universal checks – tests written, code reviewed, documentation updated – that the team agrees no work item can skip. It lives in a team agreement and is often mirrored as a checklist or template that gets attached to every Story or Task.
An approval is a formal decision by a named person with the authority to release work, allocate budget, or accept risk. It is not a self-check. It is a call made by someone accountable for the consequences of saying yes.
The practical difference matters when designing a workflow. Treating acceptance criteria as a sign-off creates micromanagement – every developer’s checklist becomes a manager bottleneck. Treating sign-offs as acceptance criteria removes accountability – nobody is on the hook for the decision. Build your workflows so each one does its own job.
For deeper guidance on the first two, see the TitanApps articles on Definition of Done in Jira and acceptance criteria in Jira.
When Approval Happens at the Start vs. at the End
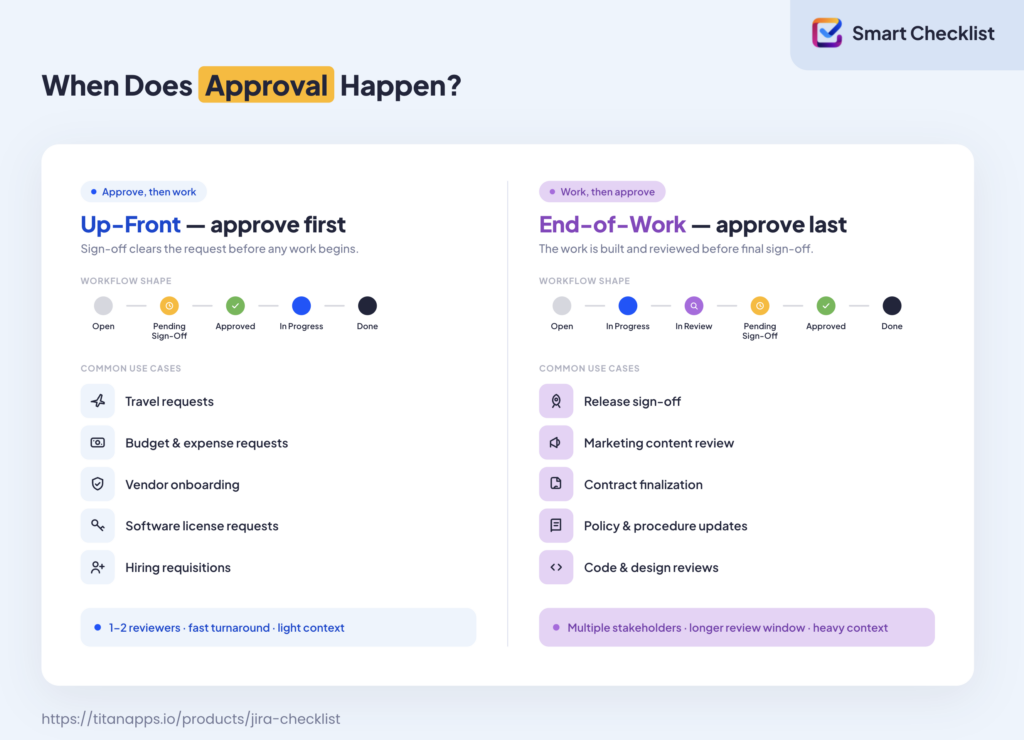
Timing is the first design decision. Some sign-offs exist to grant permission before any work happens. Others exist to certify that completed work is ready to release. The shape of the workflow changes based on which one you need.
Why the timing distinction matters
These two shapes call for different setups, even when the underlying mechanism is the same.
Up-front review usually has one or two decision-makers, fast turnaround expectations, and very little context attached at the moment of decision. The reviewer is judging the request itself – is this trip justified, is this budget appropriate. The right pattern is a simple sign-off step on a status near the beginning of the workflow, with notifications routed to a small group.
End-of-work review usually has multiple stakeholders across functions, longer review windows, and significant context attached – artifacts, test results, supporting documents. The reviewer is judging the work, not the request. The right pattern often combines a formal sign-off step with a checklist of pre-conditions that the team must verify first. This avoids sending half-finished work to senior reviewers and burning their attention on incomplete submissions.
Mixing the two patterns is a common source of fatigue. A travel request that gets four reviewers and a five-day SLA stalls the trip. A release that gets a single up-front nod before any QA work is finished ships bugs.
When designing a Jira workflow, match the shape of the decision to where it actually belongs in the work.
Setting Up an Approval Step in a Jira Workflow
How to set up an approval step in a Jira workflow
Setting up a native step has three moving parts: an approver field, a sign-off step on a workflow status, and the transitions that route the work item based on the outcome. The exact path varies depending on which kind of space you are working in, but the underlying logic is the same.
Before getting into the setup, one important caveat. Native approvals – Jira’s built-in feature, configured directly in the workflow editor – are not available in every Jira plan or every space type. Knowing where you stand changes which path applies and whether a checklist-based approach is the better starting point.
Where native approvals are available today
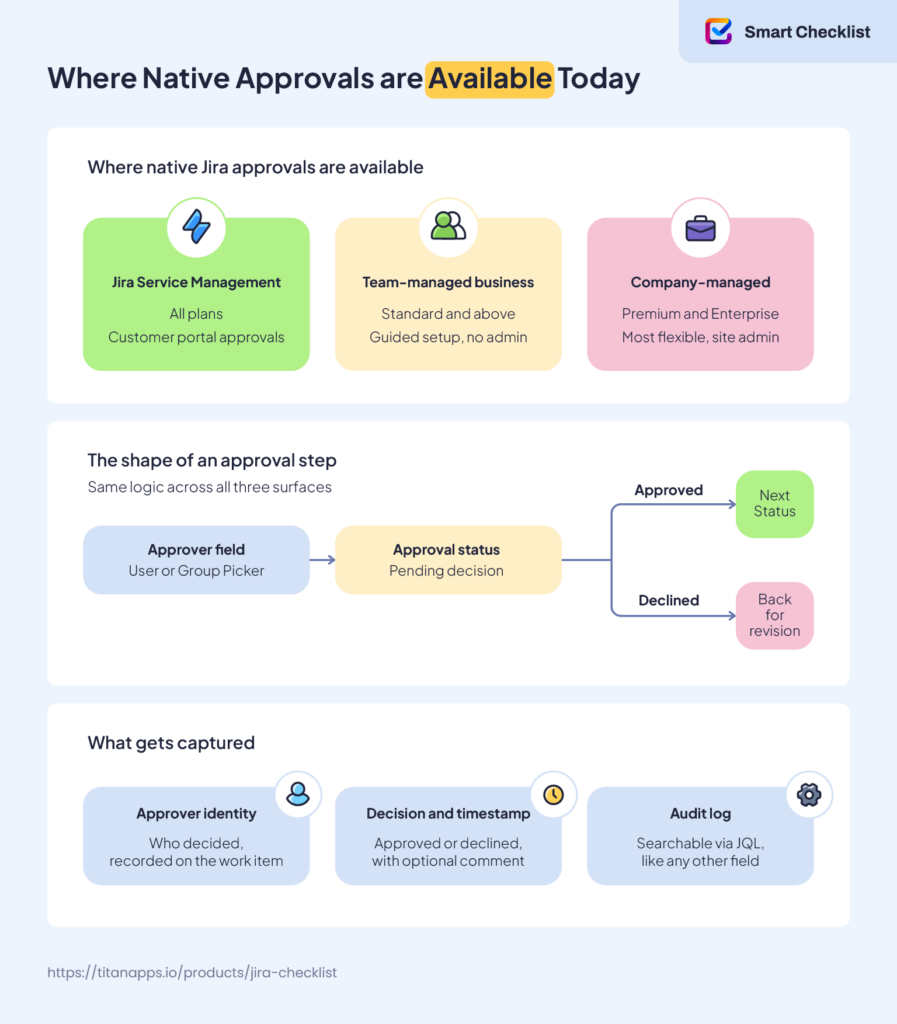
Native approvals show up in three different surfaces in Jira Cloud:
- Jira Service Management (all plans). JSM has had this feature from the start, with built-in Approvers and Approver groups fields and a customer-facing approval experience on the help center.
- Team-managed business spaces (Standard plan and above).Sign-off step is embedded directly into the space’s workflow, with a simpler setup path designed for non-admins.
- Company-managed projects (This reached company-managed projects in late 2025, closing a long-standing gap that previously forced teams to build workarounds with statuses, conditions, and automation rules.
If you are on Jira Free or Standard and your work happens in a company-managed project, you do not have this feature natively. The same applies to Jira Software in older configurations. A checklist-based approach is the most accessible alternative, and it is covered in the next section.
Step 1 – Create or identify the approver field
Reviewers come from a Jira field that holds users or groups. JSM and team-managed business spaces ship with default fields ready to go. In a company-managed project, you usually need to create the field yourself.
Two field types work here:
- User Picker (single user or multiple users) for naming individual reviewers
- Group Picker (multiple groups) for routing the decision to anyone in a group, like “Engineering Leads” or “Finance Reviewers”
Group fields scale better than user fields. When the reviewer is a role rather than a person, naming the role’s group avoids breaking the workflow every time someone changes jobs.
The custom field needs Global context so the sign-off step can find it during configuration. If a field exists but does not appear in the dropdown when adding this step, the context is usually the reason.
Step 2 – Add the approver field to the work item screen and layout
Creating the field is not enough. The field must be visible on the screens used to create and edit work items, otherwise no one can fill it in.
In a company-managed project, this means adding the field to the relevant screens through Settings – Work items – Screens, then dragging it into the work item layout from Space settings – Work items – Layout. In JSM and team-managed spaces, the layout is simpler and the field shows up automatically once associated with the request type or work type.
This step is easy to skip and frustrating to debug. If reviewers cannot be added to a work item, the screen configuration is almost always the cause.
Step 3 – Add the approval step to a workflow status
This is where the approval step itself gets attached to the workflow.
Open the workflow editor, select the status that should require sign-off, and add the step. For the click-by-click setup, see Atlassian’s full setup guide for approval steps. Three configuration choices matter:
- Approver source. Which field holds the reviewers. The dropdown shows fields with Global context that match the right type.
- Number of approvers required. This can be everyone in the group, everyone listed in the field, or a specific count like “2 of 4.” For high-stakes decisions, requiring more than one reviewer introduces a check-and-balance.
- Excluded fields. Any user listed in the excluded fields cannot sign off, even if they are also listed as a reviewer. This is how a setup avoids self-approval – the reporter or assignee is excluded so the same person cannot raise and clear the request.
Once configured, two transitions are required out of the status: one for “approved” and one for “declined.” These define where the work item lands based on the outcome. The new editor publishes changes instantly when you select Update workflow – there is no separate draft to publish.
The new workflow editor is required for adding approval steps.
Step 4 – Test the approval flow end to end
Before rolling the workflow out, create a test work item that goes through the review status. Confirm three things:
- The reviewers receive a notification by email and in Jira itself.
- The accept and decline buttons appear in the right context, including from the email and from any connected channels like Slack or Microsoft Teams.
- The work item transitions to the correct status after the decision.
Every decision is written to the work item’s history and to a dedicated audit log that is searchable through JQL like any other field. This gives reporting and compliance a verifiable record without extra tooling.
How JSM, business spaces, and CMP approvals differ in practice
The mechanics are similar across the three surfaces, but the experience for setup and use is not.
| Surface | Setup path | Notable differences |
|---|---|---|
| Jira Service Management | Space settings - Workflows | Approvals show on the customer portal and route through email, Slack, or Teams |
| Team-managed business space | Approvals view in space navigation, or Space settings - Work types - Edit workflow | Simpler setup designed for space admins rather than site admins. Approvals attach to one or more workflow statuses through a guided flow |
| Company-managed project (Premium and Enterprise) | Project settings - Workflows - Edit workflow - status - Add approval | Requires site admin or Edit workflow permissions, the new workflow editor, and a custom field with Global context |
The shape of the step itself – reviewer field, decision, transitions – is the same. The differences are in who can configure it, how the reviewer experience looks, and how easily the setup can be repeated across spaces.
How to manage approvals with a Jira checklist
The native step is one shape of sign-off. A checklist is another. They are not competitors – they solve the same problem at different scales.
A formal decision with a named reviewer, a workflow gate, and an audit log is what a native step delivers. A simple list of items that need to be ticked by the right people before work proceeds is what a checklist delivers. The lighter shape is appropriate more often than most teams realise, and it is the only option for teams on Jira plans where the native feature is not available.
Smart Checklist turns this lighter shape into a workable sign-off mechanism. The checklist sits inside the Jira work item, items can be marked mandatory, mandatory items can block workflow transitions, and every change is logged in a History tab that the work item carries with it. Three patterns cover most real needs.

Pattern A – Lightweight approval inside an existing workflow
This is the most common pattern. The work item moves through its normal workflow. At the point where someone needs to approve, a small set of mandatory checklist items sits on the work item, each assigned to the person who needs to give the green light. Until those items are ticked, the workflow transition is blocked.
The setup is quick:
- Add a checklist to the work item type with the approval items as mandatory entries
- Assign each mandatory item to the person who owns this step, using user mentions
- Add the All mandatory items completed validator on the workflow transition that should be gated
The validator lives in the new workflow editor, under Rules on the relevant transition. Pick Smart Checklist for Jira (Pro), then All mandatory items completed. A custom error message can be configured, or Jira will use a default. Once the rule is added and the workflow is published, attempting the transition without all mandatory items ticked produces a blocking error.
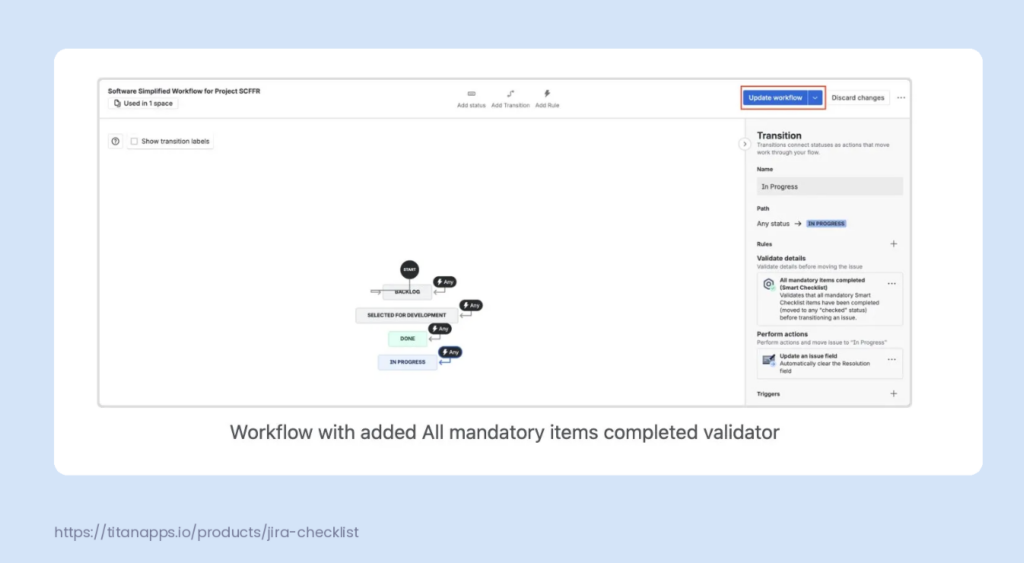
Caption: The Smart Checklist mandatory items validator added to a workflow transition, visible in the new workflow editor’s Rules panel.
This validator is now available for all types of projects.
The pattern fits well for code review sign-off, design clearance, and change requests where one or two named people need to weigh in before the work moves on. It avoids the overhead of building a separate workflow status purely to host a review step. For teams comparing this approach with the native feature, the trade-off is that a checklist item is not a formal Jira sign-off object – it does not show up in the JSM customer portal, and it is not surfaced through the same notification framework that native steps use.
Pattern B – Full checklist for end-of-work sign-off
For decisions that happen at the end of the work – release readiness, policy publication, contract finalization – a single mandatory item on a transition is rarely enough. Multiple stakeholders need to weigh in, often across functions, and the team needs a visible record of who’s still outstanding.
Pattern B uses a dedicated checklist on the work item. It includes one mandatory item per required reviewer, with optional context items below each one for any pre-conditions that need to be verified. The whole checklist is gated by the same mandatory-items validator from Pattern A, but the gate is now a meaningful checkpoint rather than a quick check..
A typical release sign-off checklist might look like this:
- QA lead – all P0 and P1 tests passed
- Engineering manager – rollback plan documented
- Product manager – release notes approved
- Compliance officer – data residency check completed (where applicable)
Each item is mandatory and assigned to the named approver. The transition from “Pending Sign-Off” to “Ready for Release” is blocked until every item is ticked. Responsible personas receive email notifications when assigned, and the checklist’s History tab shows who ticked which item and when.
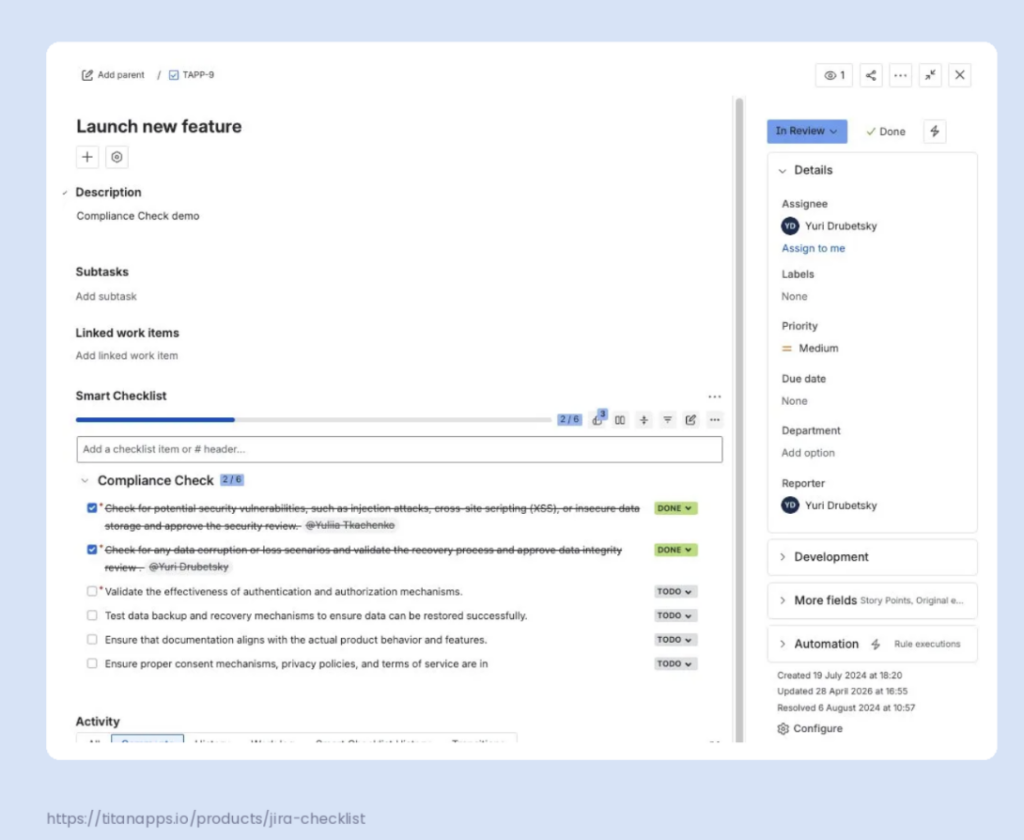
Caption: A compliance checklist on a feature launch work item. Mandatory items, marked with red asterisks, block the workflow transition until completed. The completed items show the assigned reviewers in the History.
For teams that already use checklists for release readiness, adding sign-off items to the existing checklist is often a smaller change than building a whole new workflow.
One limitation worth flagging. The History tab is a strong audit trail for the team, but it is not a separately searchable log the way native decisions are. For workflows that require strict per-decision auditability, a native step is the better fit.
Pattern C – Status-driven checklist via automation
The third pattern combines the workflow with the checklist. Instead of attaching the checklist manually every time, Smart Checklist automation imports the right checklist when the work item enters an approval status.
The setup uses a default template with an Issue transitioned trigger:
- Build the checklist as a project or global template, with the approval items pre-set as mandatory
- Open the template’s settings and switch to the Advanced tab
- Set the trigger to Issue transitioned and add a condition such as Status equals “In Approval”
- Save the configuration
Once configured, any work item moving into the chosen status receives the approval checklist automatically. No manual attachment, no missed steps, no “did anyone add the checklist yet” conversation in standup.
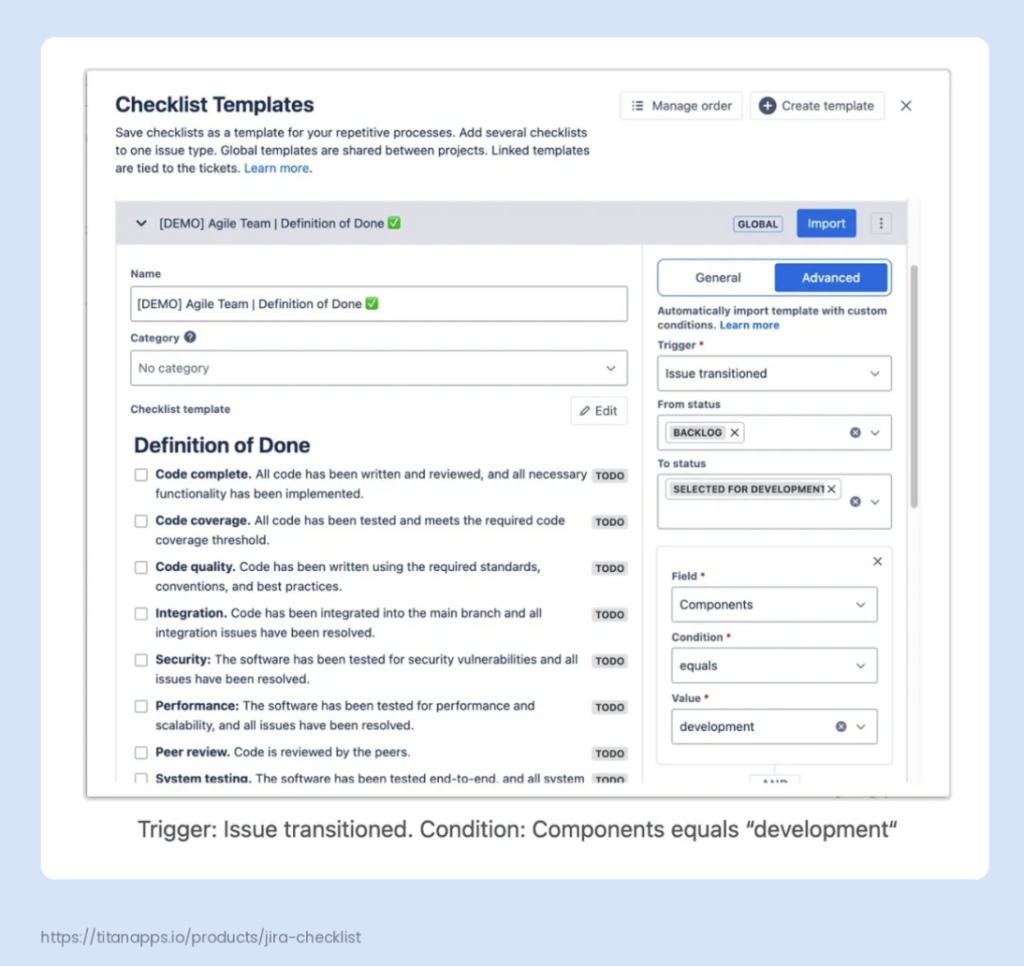
Caption: Configuring a Smart Checklist template’s Advanced tab to import automatically when a work item transitions, with optional field-level conditions for additional control.
The pattern handles a real category of workflow: situations where a work item gets pulled into a review flow that wasn’t predictable at creation time. A vendor onboarding ticket might or might not need legal review depending on contract value. A marketing asset might or might not need brand clearance depending on the channel. Driving the checklist off status rather than off issue type matches reality more closely than pre-attaching a fixed checklist to every work item.
Two operational notes when setting this up:
- Templates are applied only once per issue. If a work item leaves the approval status and re-enters it, the checklist is not re-imported. Plan the workflow accordingly.
- Do not combine Smart Checklist’s native triggers with Jira Automation rules that import the same template. Mixing both methods can cause checklists to be imported multiple times or fail silently. Pick one consistent approach.
Adding an “Approved” status to checklist items for visibility
Smart Checklist ships with four default statuses for checklist items: todo, in progress, skipped, and done. Pro plans allow custom statuses to be added at the project or global level.
Adding a custom status takes two minutes. In the project’s Smart Checklist settings, create a new status, name it Approved, give it a recognizable color, and mark it as a “checked” state – so it counts as completed for the mandatory items validator. The new status appears in the dropdown alongside todo and done.
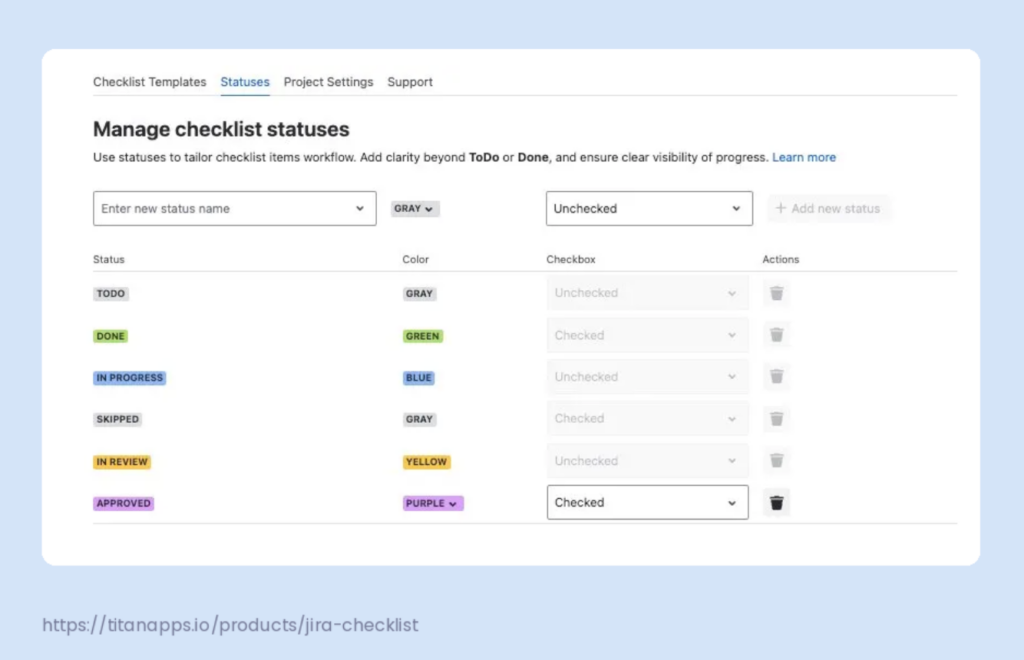
The reason this is worth doing: an item titled “Approval with Victoria” that ends in “done” reads worse than the same item ending in “approved.” The status itself communicates the meaning of the change. For checklists that mix work items with approval items, the visual distinction makes the approval moments easier to spot at a glance.
Caption: The same Approved status applied to a checklist item, sitting alongside default Done items. The visual difference makes approval moments easier to spot at a glance.
This is a small change, not a structural one. There is no need to redesign workflows or add custom fields. It is the kind of polish that makes a checklist-based approval feel intentional rather than improvised.
How Smart Checklist patterns map to approval scenarios
| Approval scenario | Best pattern | Why |
|---|---|---|
| Code review sign-off | Pattern A | One or two reviewers, lightweight, fits inside the existing workflow |
| Design sign-off before development | Pattern A | Single approver, simple gate |
| Release readiness sign-off | Pattern B | Multiple stakeholders, full checklist with audit trail |
| Policy or contract approval | Pattern B | Multiple approvers, end-of-work timing |
| Optional approval that depends on the work item's properties | Pattern C | Automation-driven, attached only when needed |
| Recurring high-volume approval flow with predictable structure | Pattern C | Removes the manual attachment step |
For workflows that are mostly checklists but need a more structured comparison with subtasks, Pattern A often replaces a sub-task-based approval system with something lighter. Subtasks add overhead – their own assignee, status, and time tracking – that an approval rarely needs.
When to Use Native Approvals, Checklists, or Both
Most teams pick one approach and force every decision through it. The result is either a heavy bureaucratic process for calls that should take ten seconds, or a casual checklist standing in for sign-offs that legally need a formal record.
The right approach depends on three things: how much formality the decision needs, how many people are involved, and which Jira plan you are on. The choice is rarely all-or-nothing.
When to use a native step
A native step is the right fit when:
- The decision needs to be a formal, recorded Jira event – searchable, reportable, and tied to a specific person at a specific time
- Compliance or audit requirements demand a separately auditable log, not just a checklist history
- The same review applies to every work item of a given type, not just specific ones
- The decision happens through a customer portal in JSM, where customers without agent licenses need to give the green light
- The team already uses workflow rules and is comfortable maintaining workflow configurations
- The space is on Jira Service Management, a team-managed business space, or a company-managed project on Premium or Enterprise
This approach has overhead. Setting up the field, the screen, the workflow step, and the transitions is more work than adding a checklist. That overhead is worth it when the formality matters. It is wasted effort when the real question is just “did the right person look at this.”
When to use a Smart Checklist
A checklist-based approach is the right fit when:
- The sign-off is one part of a longer pre-condition list, not a standalone gate
- The reviewers vary by work item, so building a separate workflow for each combination is impractical
- The team is on Jira Free or Standard in a company-managed project, where the native feature is not available
- Non-admin users need to set this up – business teams managing their own checklists, without going through a Jira admin
- The decision is internal and lightweight, with no compliance requirement that demands a separately searchable log
- The team already uses checklists for related work and adding sign-off items is a smaller change than rebuilding the workflow
- An entire phase of work, not just one item, needs to be verified before the work item can move – for example confirming every item under a “Definition of Done” tab is complete before the issue can transition
This approach has its own ceiling. Audit trails live in the History tab rather than a dedicated log, JQL combinations across criteria can be imprecise, and customer-facing flows through JSM portals are not supported.
For checklists organized into headers or tabs, Smart Checklist (Pro) includes a validator that blocks a transition until every item under a specific header or tab is complete, not just the items marked mandatory. This fits release sign-off particularly well, since a team can keep a “Definition of Done” tab on the work item and require it fully checked before the issue moves to “Ready for Release,” without converting every item to mandatory or building a separate workflow status.
When to combine both
The strongest setups for high-stakes work use both shapes together. The native step provides the formal gate. The checklist provides the pre-conditions that have to be true before the gate is even worth opening.
For release readiness, the work item enters a “Pending Sign-Off” status with a checklist of verifications – tests passed, rollback documented, security review filed, compliance check completed. The mandatory items validator, or the header/tab completion validator for teams using tabs, blocks the transition out of that status until every item is ticked. Once the checklist is complete, the work item moves to a final review status that has a native step. The release manager then formally clears or declines it.
This pattern uses each tool for what it does best. The checklist enforces completeness. The native step records the decision.
There is also a Jira-native version of this combination worth knowing about. The new workflow editor includes a workflow rule called Block transition until approval. It blocks a transition until a sign-off has been recorded on the work item, similar to how the checklist validators block a transition until items are ticked. For teams on Premium or Enterprise that already use the native feature heavily, this rule lets them gate other transitions in the workflow without adding a separate step.
A simple decision framework when to use native approach vs Smart Checklist
For teams unsure which tier their work needs, a useful rule of thumb: if a regulator, lawyer, or auditor would ever ask “who signed off on this and when,” it needs a native step. If that question would never come up outside the team itself, a checklist is enough.

One more consideration – timesheet and time-off approvals
Some categories sit slightly outside the patterns above. Timesheet sign-offs, time-off requests, and other recurring HR-style decisions have their own scale considerations: high volume, predictable structure, multiple reviewers per request depending on hierarchy.
For these flows, a native step on a dedicated work type is usually the right starting point – the volume justifies the workflow setup, and the pattern is consistent enough to be worth automating. A checklist-based approach can supplement it for situations where the request needs verification beyond the reviewer’s signature, like budget validation against department limits or policy compliance checks. For teams already running their HR processes in Jira, Jira for HR covers the broader workflow context.
Four Approval Workflows You Can Build Today
The patterns and decision frameworks in the previous sections are easier to apply when you can see them work on real scenarios. The four examples below cover the most common approval shapes that show up in mid-sized and enterprise teams. Each one names the trigger, the decision, the right approach, and what the setup looks like.
Example 1 – Travel request approval
The scenario. A team member needs to attend a conference. The travel request needs manager approval before booking, and finance approval if the total spend exceeds a threshold like $1,500.
Approval timing. Up-front. The approval gates the start of the work – no booking until the request is approved.
Recommended approach. Native approval step (when available) for the manager decision, plus a checklist for the documentation that needs to be in place before the manager even sees the request.
What the workflow looks like.
- The team member creates a travel request work item using a dedicated work type
- A pre-submission checklist captures the basics: destination, dates, conference link, business case, estimated total
- The work item moves to “Pending Manager Approval” – a status with a native approval step set to the requester’s manager via the assignee’s reporting line
- Manager approves or declines
- If the total exceeds the threshold, a second status “Pending Finance Approval” applies with a finance team approver
- Once all approvals are in, the work item moves to “Approved” and the requester can book
Why does this fit work? Travel requests are high volume and predictable in shape. Native approvals make sense because the audit trail matters – finance teams need to know exactly who approved what spend and when. The pre-submission checklist keeps incomplete requests from reaching managers in the first place, which respects everyone’s time.
Plan availability note. Teams on Free or Standard CMP plans can swap the native approval steps for business travel checklist patterns where the manager and finance approver each tick a mandatory item on the work item. The audit lives in the History tab rather than a separate approval log, which is acceptable for most travel approval scenarios.
Example 2 – Invoice approval
The scenario. Finance receives an invoice from a vendor. Before payment can be processed, the invoice needs verification by the budget owner, sometimes a second-level approval depending on the amount, and a compliance check for vendor and tax details.
Approval timing. Up-front. The approval gates the payment.
Recommended approach. Native approval step for the formal sign-off (the actual approval decision), supported by a Smart Checklist for the verification steps that must happen before approval is meaningful.
What the workflow looks like.
- Invoice is created as a work item, with the invoice attached and key fields filled (vendor, amount, PO reference, due date)
- A verification checklist sits on the work item with mandatory items: PO matches, line items match the contract, tax compliance verified, vendor on the approved supplier list
- The work item moves to “Pending Approval” only after the checklist is complete – the mandatory items validator blocks the transition until everything is verified
- A native approval step routes the decision to the budget owner (and to a second-level approver if the amount is above a threshold)
- Approved invoices move to “Ready for Payment”; declined invoices return to the requester with a comment
Why does this fit work? Invoice approval has both a verification phase and a decision phase, and they are different work. The checklist enforces verification – the things that must be true before the approver should even spend mental energy on the request. The native step records the formal decision, which is the part that finance and audit care about. For deeper guidance on this scenario, see the TitanApps article on the invoice approval process.
One thing to flag. Threshold-based escalation (over $X needs a second approver) is straightforward to handle through workflow conditions on the second approval status. If your finance team uses tiered approval matrices with multiple levels and conditional routing, plan to spend more time on the workflow design than you would for a single-level approval.
Example 3 – Release readiness
The scenario. A product release is ready to deploy. Before going live, multiple stakeholders need to confirm that their part of the readiness work is done – QA, engineering management, product management, and sometimes compliance.
Approval timing. End of the work. The approval certifies that completed work is ready to release.
Recommended approach. Smart Checklist with mandatory items.
What the workflow looks like.
- The release work item goes through normal development statuses (To Do, In Progress, Code Review, QA)
- When all development work is complete, the work item moves to “Pending Sign-Off”
- An automation rule triggers the import of a release sign-off checklist – or the team adds it manually following Pattern C from Section 6
- The checklist contains mandatory items per stakeholder: “QA Lead – all P0/P1 tests passed,” “Engineering Manager – rollback plan documented,” “Product Manager – release notes published,” “Compliance – data residency check (if applicable)”
- Each stakeholder ticks their item once their checks are complete
- The mandatory items validator blocks the transition to “Ready for Release” until every item is ticked
Why does this fit work? Release sign-off has a fundamentally different shape from up-front approvals. Multiple people need to approve, often working in parallel, and each one is reviewing different work. A checklist’s natural multi-item structure matches this pattern much better than a sequence of native approval steps would. For teams already using a release readiness checklist, folding the formal sign-offs into the same checklist is often less disruptive than building a parallel approval workflow.
The trade-off. This pattern keeps the audit trail in the checklist’s History tab. For most teams, this is sufficient – the History tab shows who ticked what and when, which is the relevant information for retrospectives and post-incident reviews. For organizations with formal release governance requirements, a hybrid approach combining mandatory checklist items with a final native approval step provides both the parallel verification and the formal record.
Example 4 – Vendor and change management approval
The scenario. A team needs to bring on a new SaaS vendor. The change touches procurement, security, legal, and finance, with approval requirements that vary based on contract size, data sensitivity, and integration scope. A similar pattern applies to other change management workflows – infrastructure changes, security policy updates, third-party integrations.
Approval timing. End of the work. Decision-makers approve the completed proposal once verification is done.
Recommended approach. Combined – Smart Checklist for the pre-conditions and discovery work, plus a native approval step (or sequence of steps) for the formal decision.
What the workflow looks like.
- The change request work item is created with key fields populated (vendor name, business case, data scope, estimated cost, integration requirements)
- The work item enters a “Discovery” status where the requesting team gathers the supporting information
- A discovery checklist captures the assessment work: security questionnaire completed, data processing agreement reviewed, vendor compliance certifications collected, integration plan documented
- Once the checklist is complete, the work item moves to “Pending Approval” – a status with a native approval step that routes to the appropriate approvers based on the change category and risk level
- For high-risk changes, multiple approvers may be required in parallel or in sequence
- Approved changes move to “Approved” and the team proceeds with onboarding; declined changes return to Discovery with a comment
Why does this fit work? Change management approvals have the strictest formal record requirements of any approval scenario – regulators, auditors, and security reviews routinely look at change approval logs. The native approval step is non-negotiable for that record-keeping. The checklist enforces the verification work that must happen before the approval is even meaningful, which prevents incomplete requests from burning approver time.
The “Block transition until approval” rule from the new workflow editor fits naturally here. For teams that already use native approvals heavily, this rule can gate downstream transitions in the workflow without requiring a separate approval status. For example, the transition from “Approved” to “Onboarding Started” can be blocked until a separate procurement approval is recorded, even if procurement approval lives on a different work type or in a different space.
For organizations with mature change management processes, this pattern aligns with ITIL-style change advisory boards without requiring dedicated ITSM tooling. The work item carries both the verification evidence (checklist) and the formal approval record (native step) in one place.
How these four examples cover the field
| Example | Timing | Volume | Audit need | Best fit |
|---|---|---|---|---|
| Travel request | Up-front | High | Medium | Native step + pre-submission checklist |
| Invoice approval | Up-front | High | High | Native step + verification checklist |
| Release sign-off | End of work | Medium | Medium | Mandatory items checklist with validator |
| Vendor / change approval | End of work | Low to medium | Very high | Combined: checklist + native step |
These four cover the practical range. Most other approval scenarios you encounter will fit one of these shapes, or a small variation on one. The work of designing your own approval workflow is matching it to the closest example and adjusting the verification or decision steps to fit.
Common Mistakes That Break Approval Workflows
The mechanics of Jira approval workflows are easy enough to learn. The harder part is using them well. Seven mistakes show up again and again across teams and industries.
Mistake 1 – Using a checklist instead of a real native step when formal sign-off is required
Some decisions need a formal record that a regulator, auditor, or legal team can later trace back to a specific person and timestamp – one that can’t be quietly unticked by anyone with edit access to the work item. A checklist item looks similar from the outside but isn’t the same artifact. For change management, financial controls, regulatory compliance, and customer-facing JSM flows, use a native step. The setup overhead pays for itself the first time someone needs to produce an audit trail.
Mistake 2 – Mixing acceptance criteria, Definition of Done, and sign-off into one vague list
Teams often build a single checklist that blends “Code reviewed by senior engineer” and “Cleared by product manager” with genuine Definition of Done items like “All tests passing.” The result does three different jobs badly. Keep these as separate tabs within the checklist to avoid the confusion between different types of criteria.
Mistake 3 – Pushing tickets into review too early
Reviewers exist to make decisions, not chase down missing information. When work items reach a review status with incomplete documentation or unverified pre-conditions, the reviewer becomes a verification engine instead of a decision-maker, and the ticket ping-pongs back and forth until someone gives up and rubber-stamps it. The fix is a Smart Checklist with mandatory items as a verification stage that must complete before the work item can transition into review, so by the time it reaches the reviewer, the only open question is the actual decision.
Mistake 4 – Storing the decision in comments only
A comment that says “OK approved” feels like an approval at the time, but it isn’t a structured event. Comments aren’t searchable as decisions, aren’t tied to a workflow status, and can’t be exported as an audit log – keyword-searching for “approved” surfaces every comment containing that word, including the ones saying it hasn’t happened yet. If the decision matters enough to record, capture it as a native step or a mandatory checklist item, not a comment.
Mistake 5 – Using too many statuses instead of clarifying preparation steps
A workflow with five “Pending X” statuses in a row usually started as an attempt to make every step visible. What it really expresses is verification stages, not workflow positions. A cleaner pattern is one review status with a checklist of items inside it. The work item sits in “Pending Sign-Off,” the checklist tracks who has done what, and the audit trail lives on the work item rather than scattered across transitions.
Mistake 6 – Letting templates drift without governance
A sign-off template that worked for a 20-person team becomes a relic at 200, especially after a few policy changes nobody tracked. Either the template is so outdated that reviewers ignore most items, or it has grown so bloated that reviewers tick through it without reading. Give each template a named owner (a role, not a person) and a quarterly review to confirm every item is still relevant. Smart Checklist’s template categories and centralized template list make that review easier than auditing checklists scattered across work items.
Mistake 7 – Treating a status name as a gate without a real gating mechanism
A status called “Approved” exists on the board, but nothing actually verifies a decision happened – anyone with edit access can drag a work item into it with one click. The fix is to attach a real gate to the transition: a native step that requires a designated reviewer to act, a mandatory items validator, or a header/tab completion validator. Without one of these, the status is a label, not a decision.
A quick sanity check for any approval workflow
Before rolling out a new workflow, run through these questions:
- Does the reviewer need a formal audit record, or is a checklist sufficient?
- Are acceptance criteria, Definition of Done, and the sign-off itself in separate artifacts?
- Is there a verification gate between “work in progress” and “ready for review”?
- Are decisions captured as structured events, not comments?
- Do workflow statuses represent positions in the work, not verification steps?
- Does each template have a named owner and a review cycle?
- Is there an actual gating mechanism on the transition into the final status?
A “no” answer to any of these doesn’t necessarily mean the workflow is broken. It means there is a gap worth closing.
For teams designing workflows from scratch, the Jira workflow and definition of done in Jira articles cover the broader design context. For the checklist pattern, the subtasks vs. checklists comparison covers when to use which artifact for granular work.
Build the approval workflow that fits the work
Approval workflows in Jira have come a long way. Native approvals are no longer locked behind Jira Service Management. Smart Checklist gives teams who don’t need formal sign-off a workable, lightweight alternative. The new workflow editor combines previously scattered configuration into one view. The options have multiplied, and that is mostly good news – but it means the design choices matter more than they used to.
The article’s core argument is simple. Match the approval shape to the work it gates. Use a native approval step when the decision needs a formal record. Use a checklist when the approval is one part of a longer pre-condition list. Combine them when the work is high-stakes enough to need both verification and sign-off. Skip approvals entirely for decisions that should take ten seconds and a Slack message.
Most teams overcomplicate their first approval workflow and undercomplicate their second one. The way out is to match the design to the actual decision, not to the perceived formality of the work. Travel requests do not need a four-stage approval committee. Release sign-offs do not work as a verbal nod in standup. The right shape is usually somewhere between the two, and the patterns in this article cover most of the ground in between.
For teams ready to start, Smart Checklist for Jira is available on the Atlassian Marketplace. The mandatory items validator and the automation patterns work on Free and Pro plans alike, with the Pro plan adding the workflow validator and template library that scale the approach to enterprise teams.
Frequently asked questions about Jira approval workflows
Does Jira have an approval workflow?
Yes. Jira supports native approval workflows in three different surfaces. Jira Service Management has had approval steps from the start, available on every plan with built-in Approvers and Approver groups fields. Team-managed business spaces include approvals on Standard plans and above. Company-managed projects gained native approval support in late 2025, available on Premium and Enterprise plans. The mechanism in each surface is the same: an approver field, an approval step on a workflow status, and approve or decline transitions. Each decision is recorded as a structured event searchable through JQL.
What is an example of a Jira approval workflow?
A travel request is a typical example. An employee creates a request as a Jira work item, fills in destination, dates, and total cost, then transitions it to a “Pending Manager Approval” status. The status has a native approval step configured to route to the requester’s manager. The manager receives an email notification and approves or declines directly from Jira, Slack, Microsoft Teams, or the email itself. Approved requests transition to “Approved” and the employee can book. Declined requests return to the requester with a comment explaining why.
What are the steps in setting up an approval in Jira?
Setting up a native approval step takes four steps. First, create or identify the approver field, usually a User Picker or Group Picker custom field with Global context. Second, add the field to the work item screen and layout so users can assign approvers. Third, open the workflow editor, select the status that should require approval, and add an approval step with the approver source, number of approvers required, and approve or decline transitions configured. Fourth, test the flow end to end before rolling it out to the team.
Do I need Jira Premium to set up approvals in a company-managed project?
Yes, for native approvals. As of late 2025, native approval steps in company-managed projects require Jira Premium or Enterprise. Teams on Free or Standard plans cannot configure native approvals in CMP. Two alternatives work for these plans. The first is to create a team-managed business space, where approvals are available on Standard plans and above. The second is to use Smart Checklist with the All mandatory items completed validator, which blocks workflow transitions until designated approvers tick their assigned mandatory items. Both alternatives provide functional approval gating without requiring a plan upgrade.
Can I use a checklist instead of a Jira approval workflow?
Yes, for many approval scenarios. Smart Checklist with mandatory items can act as an approval mechanism, with each mandatory item assigned to an approver and the All mandatory items completed validator blocking workflow transitions until every item is ticked. The approach works well for code review sign-off, design approval, release readiness checks, and team-internal decisions. It is not suitable for approvals that require formal audit logs or customer-facing JSM portal flows. For high-stakes approvals like change management or financial controls, a native approval step provides the formal record that regulators and auditors expect.
Who can configure approval steps in a Jira workflow?
Configuring a native approval step requires Jira admin access or Edit Workflow permissions, since the setup happens in the workflow editor. Smart Checklist’s mandatory items validator is more accessible: any project member with Administer Projects permissions can add it without involving a Jira administrator. This matters for teams where the approval process needs to launch quickly and waiting on admin bandwidth would stall the rollout.
Can the approval process be automated in Jira?
Yes, in two different ways. Smart Checklist can automatically import an approval checklist when a work item enters a specific status, using a template with an Issue transitioned trigger. Jira Automation can achieve a similar result for native approval steps, routing the next status or notifying reviewers based on rules. The two automation paths solve the same problem – removing the manual step of attaching a checklist or routing a request – so pick one approach per workflow rather than combining them, since overlapping automation rules can create duplicate or conflicting actions.
Does Atlassian support approval steps across Confluence and other Jira products, not just Jira Software?
Native approval steps are a Jira workflow feature, not a Confluence one. They exist across Jira Service Management, team-managed business spaces, and Jira Software company-managed projects on Premium and Enterprise. Confluence has its own separate approval mechanism for page sign-off, unrelated to Jira’s workflow-based approach. Teams using both Atlassian products typically keep work item approvals in Jira and document approval in Confluence only when the decision needs to live alongside written policy.
How do approval steps work with team-managed projects vs. company-managed projects?
Team-managed projects get a simplified approval setup designed for space admins, available from the Standard plan and above, with the step attached directly through a guided flow in project settings. Company-managed projects need a Jira administrator to configure the underlying custom field, the screen layout, and the workflow step itself, and they require Premium or Enterprise. The work types and screens in company-managed projects also tend to be more standardized across the company, which is why their approval setup takes more configuration up front.
Is there a tutorial or template for setting up a Jira approval workflow?
Atlassian’s documentation walks through the native approval step setup directly in the workflow editor, covering the reviewer field, the step itself, and the outcome transitions. For the checklist-based approach, Smart Checklist’s Templates Library includes pre-built process templates that can be adapted into an approval checklist without building one from scratch. Teams building their first approval workflow generally get the fastest result by starting from a template and adjusting the reviewer list and required items, rather than designing the structure from a blank work item.