





 Tools for Jira
 Tools for monday.com




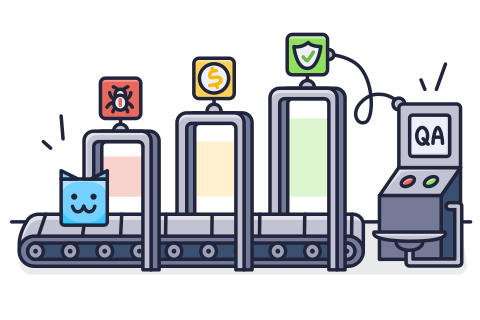
Using a QA checklist is a great way to make your processes more robust. A documented list of checks stays the same from release to release, even when the person running them changes. Teams approach this differently, though. Some keep no checklists at all and rely on the experience of their QA engineers. Others maintain a dozen checklists, one for each release stage and testing type. The format varies too, from spreadsheets with hundreds of rows to short lists that live inside Jira work items.
In this blog post, we explain what QA checklists are and walk through the main types, grouped by release stage and by testing type. We also show how to build these checklists in Jira and keep them enforceable in daily work.
What Is a QA Checklist and Why Do Agile Teams Use it?
 Definition
A QA checklist is a structured list of verification items that guides a software development team through quality-related work. Depending on the checklist type, it can list specific steps to perform, criteria to check against, or systems that need testing. The QA team then goes through the list and marks each item as done, failed, or skipped.
Using QA checklists is a well-established practice, and it’s fairly common among agile teams. QA checklist is mentioned as one of three experience-based test techniques in the Certified Tester Syllabus, issued by the International Software Testing Qualifications Board (ISTQB). This is the leading global organization that sets standards and offers certification for software testers.
Well-prepared QA checklists bring your team tangible benefits:
- Consistent coverage. Every release goes through the same verification steps, regardless of who runs the tests.
- Fewer missed steps. Routine checks live on the list instead of in someone’s memory, which reduces human error.
- Faster onboarding. New QA engineers get a ready reference and don’t have to learn the process by trial and error.
- Best practices in an actionable format. Your team’s proven testing methods turn into concrete steps people can follow and check off. This is a great way to implement the continuous improvement principle, which is key for agile development.
- Standardized processes and easy scaling. All teams and projects follow the same testing approach, so quality doesn’t depend on the project. When you document your processes in a practical QA checklist, they scale more easily as your organization grows.
Note
6 in 10 organizations deploy code that is not fully tested, according to the recent Quality Transformation Report published by Tricentis. This stems from growing pressure to accelerate release cycles and prioritize delivery speed over software quality. Second, the report cites “the sheer volume of AI-generated code becoming too overwhelming for teams to test fully.” In these circumstances, QA checklists let QA teams run their processes more efficiently and help them keep pace with faster delivery.
Larger organizations often need to document more processes in QA checklists to support consistency across teams. However, checklists also help smaller teams. For example, when one QA engineer works with several in-house products or multiple clients, having a separate QA checklist for each lets them switch between projects easily. In this case, the QA engineer does not have to rely on their memory to remember all nuances of each product.

QA checklists can work in any format, from spreadsheets to wiki pages. However, most software teams keep them next to the work they describe. If your team tracks development in Jira, a checklist can live directly inside the work item it verifies.
Here is an example of a QA checklist used by the team working on Smart Checklist for Jira – a solution that allows you to add feature-rich checklists to Jira work items and save them as templates. The checklist below is used for regression testing of this template-creation functionality. As you can see, it lists the key checks our QA team performs during testing. Here’s how this checklist looks inside a Jira work item:
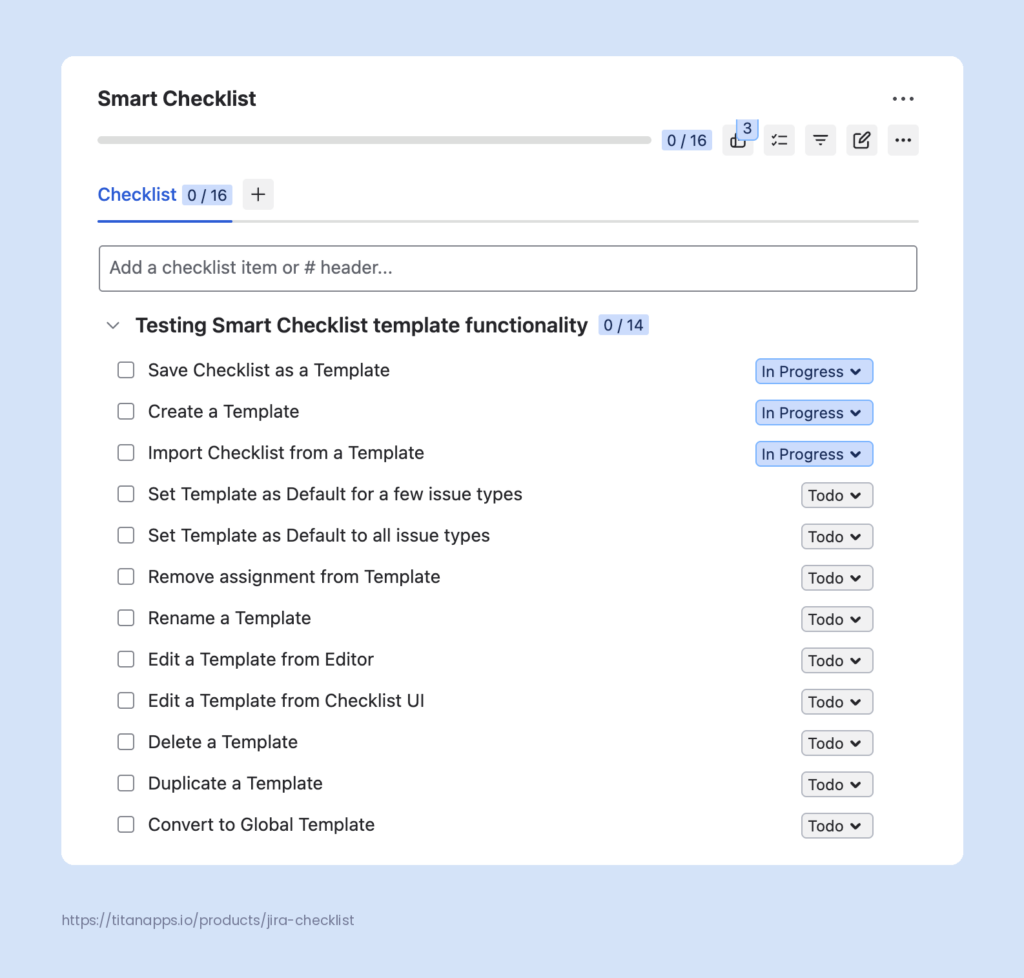
We will explain how to add checklists to Jira later in the article.
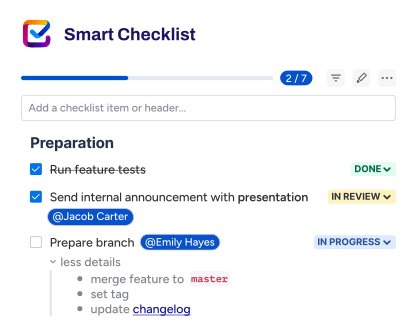
Two Key Ways to Organize QA Checklists: By Release Stage and by Test Type
There are many types of QA checklists, and you don’t have to use them all. Most organizations use only a few, adjusting to their processes and needs. Which ones you need, and how many, depends on your specific situation.
Below, we explore the most common types of QA checklists grouped by release stage and by testing type. Some of these checklists may overlap, and some could fit more than one category. This overview gives you a general idea of the QA checklist types typically used in software development. Then you can discuss this with your team and decide which checklists would benefit you most.
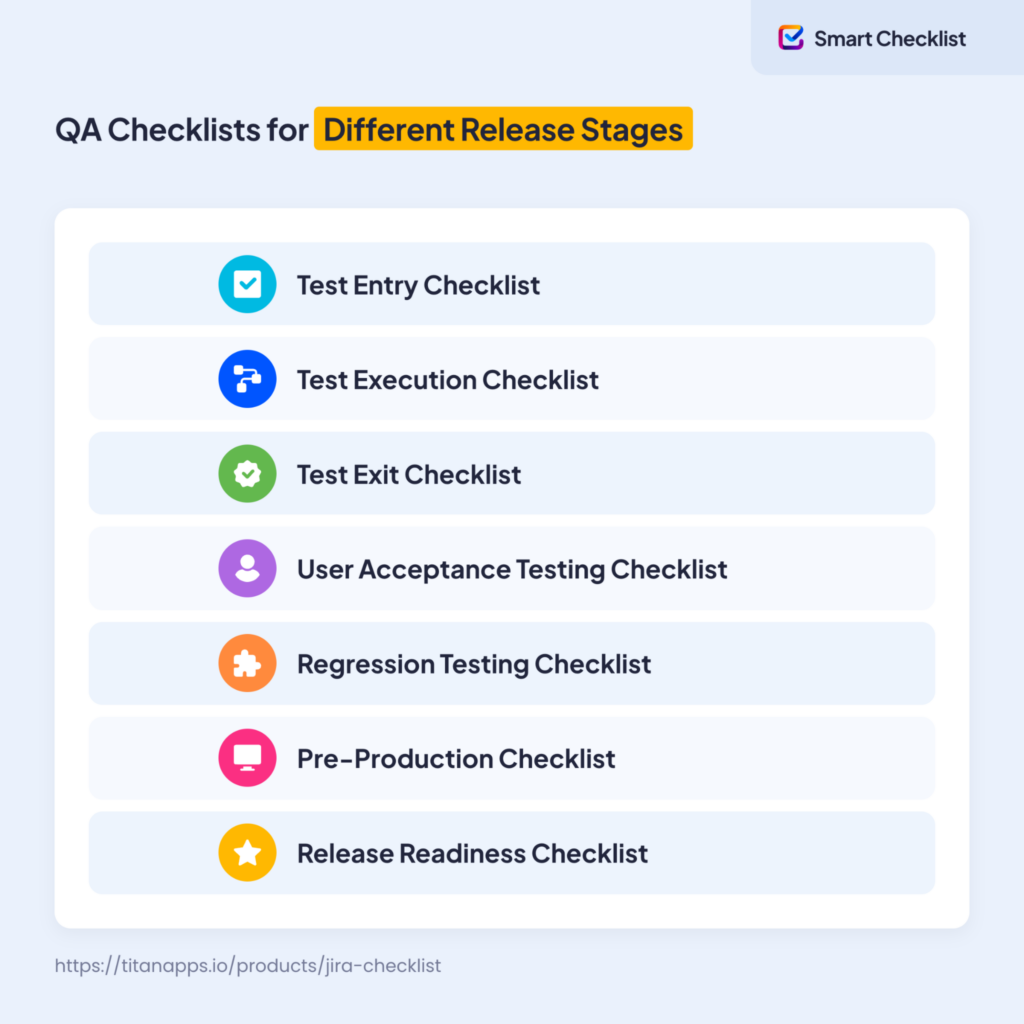
QA Checklists for Different Release Stages
The stage-based checklists below follow the path of a feature from a finished build to a shipped release. Most mark a certain decision point, helping you understand whether you can move forward: testing can start, testing is done, the release can ship, and so on. Others, like the test execution checklist, help QAs organize their work inside a certain phase.
Test Entry Checklist
If testing starts too early, it wastes everyone’s time. When the QA team begins testing a build, they shouldn’t spend two days logging defects that are really setup problems. A test entry checklist prevents this situation. It allows you to confirm that the preconditions for testing are in place. For example, it can include such parameters:
- the environment is set up and stable
- test data is prepared, validated, and available
- requirements are accessible
- test cases are prepared and reviewed
- QAs are allocated
- due dates are set
When every item is confirmed, testing can move forward.
Test Execution Checklist
Two approaches exist for organizing the test execution checklist.
In the first approach, this checklist covers work around testing, but not the tests themselves ( which live in a separate place: test suites with test cases). In this approach, the test execution checklist reminds the QA professional in what order to run the suites, where to log defects, how to record results, and when to report status. This checklist can also include a list of features to test, environments (browser, OS version), and other details, but the scope part typically changes with each sprint.
In the second approach, the test execution checklist contains actual test cases – step-by-step verification actions that you check off during testing.
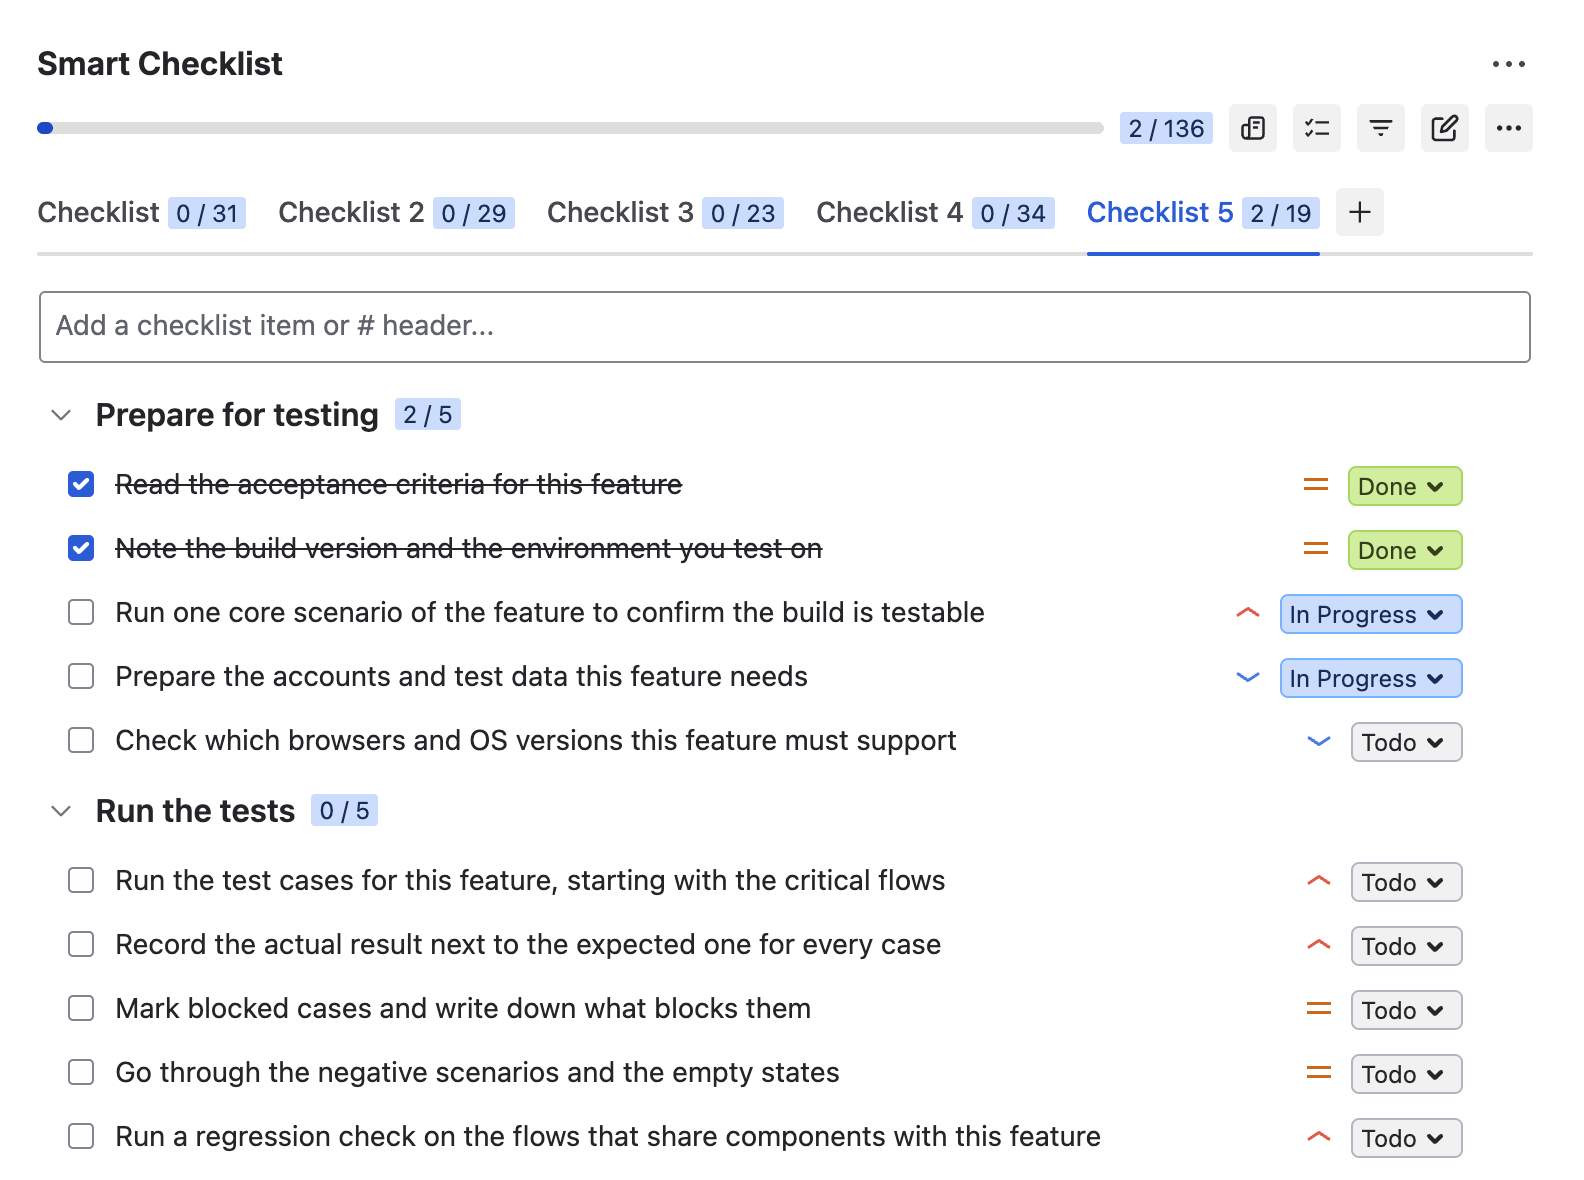
Below we share a reusable test execution checklist, prepared according to the first approach. You can add it to your Jira work items with Smart Checklist for Jira and adjust the steps to your process.
Here are a couple of tips that can make this process more efficient with the help of Smart Checklist:
- Save the checklist as a linked template Then the project admin or QA Lead will be able to edit it in all existing Jira work items at once by updating the initial template. This is useful when your process changes. For example, if the team starts logging defects in a different space, the QA professionals will see the corrected step in their current work items.
- Assign this checklist automatically to all Features. Smart Checklist comes with native automation rules, so you can have this template added to every new work item of the Feature type automatically. When the QA professional opens this work item, the process reminder checklist will already be there.
## Prepare for testing
- Read the acceptance criteria for this feature
- Note the build version and the environment you test on
- Run one core scenario of the feature to confirm the build is testable
- Prepare the accounts and test data this feature needs
- Check which browsers and OS versions this feature must support
## Run the tests
- Run the test cases for this feature, starting with the critical flows
- Record the actual result next to the expected one for every case
- Mark blocked cases and write down what blocks them
- Go through the negative scenarios and the empty states
- Run a regression check on the flows that share components with this feature
## Handle defects
- Log each defect as a separate work item in the QA space, not in the comments
> Title pattern: [Area] what happens and when it happens
> Add steps to reproduce, environment, expected and actual result, and a screenshot or a recording
- Link every defect to this work item
- Set severity and priority for each defect
- Retest every fixed defect, then close it or reopen it with a comment
## Report and hand over
-! Confirm every planned test case is executed, skipped, or blocked for a stated reason
- Summarize what passed, what failed, and what stays open in a comment on this work item
- List the skipped cases and the reason for each one in the same comment
- Update the testing status in the work item
- Notify the team that testing is finished and hand the work item over
## Prepare for testing
- Read the acceptance criteria for this feature
- Note the build version and the environment you test on
- Run one core scenario of the feature to confirm the build is testable
- Prepare the accounts and test data this feature needs
- Check which browsers and OS versions this feature must support
## Run the tests
- Run the test cases for this feature, starting with the critical flows
- Record the actual result next to the expected one for every case
- Mark blocked cases and write down what blocks them
- Go through the negative scenarios and the empty states
- Run a regression check on the flows that share components with this feature
## Handle defects
- Log each defect as a separate work item in the QA space, not in the comments
> Title pattern: [Area] what happens and when it happens
> Add steps to reproduce, environment, expected and actual result, and a screenshot or a recording
- Link every defect to this work item
- Set severity and priority for each defect
- Retest every fixed defect, then close it or reopen it with a comment
## Report and hand over
-! Confirm every planned test case is executed, skipped, or blocked for a stated reason
- Summarize what passed, what failed, and what stays open in a comment on this work item
- List the skipped cases and the reason for each one in the same comment
- Update the testing status in the work item
- Notify the team that testing is finished and hand the work item over
Test Exit Checklist
A test exit checklist defines what “done” means for the testing phase, for example:
- all planned test scripts executed
- the pass rate above an agreed threshold
- no open critical defects
- the remaining defects are documented and deferred
- the people who need to be in the loop are notified.
The exit criteria must be agreed before testing starts, usually as part of the test plan.
This is one of the most useful QA checklists as it helps you complete your work thoroughly even under deadline pressure. When a manager asks whether the release can go out, “the exit checklist is complete” is a stronger answer than “we feel good about it.”
You can turn this QA checklist into a template and reuse it repeatedly. Like many checklists, it’s especially helpful for young professionals and new team members who are learning your processes.
User Acceptance Testing Checklist
Definition
UAT (User Acceptance Testing) is the stage where business users confirm that the product solves their actual problem and they accept the result of your work.
For example, a software development organization is building an app for a bank. After the internal QA team finishes its work, bank employees and selected users test the app to decide whether it meets their needs. This can also be a focus group of beta-testers trying out the new UI or new features in the app. What matters is that real users work through their key flows and use cases and provide their feedback.
This means the user acceptance testing checklist is written for the users, not for the QA team. Typically, it can take two forms:
- a questionnaire filled in after testing
- a list of steps to walk through during user testing
Either way, it’s the organization’s QA professionals who usually prepare it. What you get back is different from what functional testing produces. Users point out where the interface slows them down, what feels inconvenient, and what is hard to understand.
Regression Testing Checklist
Every change to the codebase risks breaking something that used to work. Regression testing manages this risk, and this QA checklist keeps it focused. Rather than re-testing everything after each change, the team verifies a defined set of critical flows: sign-up, login, checkout, data export, and whatever else the product cannot live without.
The checks usually cover positive scenarios, without stress-testing or going into edge cases. However, depending on the scale of the update, you may also need to test negative scenarios.
A regression checklist cannot be standardized across teams because its content depends entirely on the specific product’s functionality. However, within one team working on one product, you can easily turn such a checklist into a reusable template. Core flows rarely change, so you can apply the same checklist before every release.
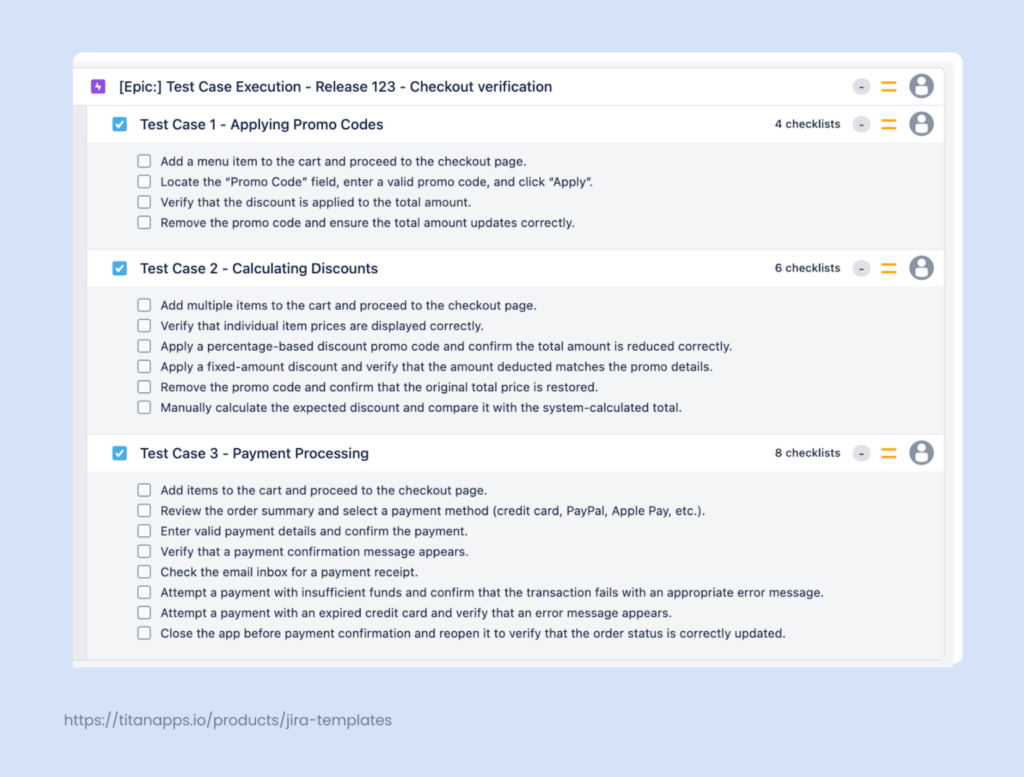
Here’s an example of a regression testing template in Jira. It’s organized as a set of Jira work items with checklists (Jira epic = test suite, Jira tasks = test cases):
 Note
Note
The checklists were added to Jira tasks with the help of Smart Checklist. Then, this epic with all its child work items and checklists was saved as a reusable template with Smart Templates for Jira.
As a result, the epic – regression testing test suite – with all its contents can be easily generated from that template with one push of a button. Alternatively, it can be generated automatically on a biweekly schedule. So when it’s time for regression testing at the end of each sprint, the team already has a work item with regression checklists for this.
Here, we share other regression checklist examples – real-life templates used by the TitanApps team.
Pre-Production Checklist
The pre-production checklist verifies that the build and its configuration are ready to deploy. This is a technical readiness gate, and it comes one step before the final release decision.
Unlike most QA checklists, this one is shared with engineering. Developers confirm that all features are merged into staging, the build compiles in CI/CD, and unit tests and integration tests pass. DevOps engineers confirm that database migrations are reviewed, environment variables are set, and feature flags are toggled as planned.
Here is a free pre-production checklist template prepared by the TitanApps team. You can copy it in the Markdown format from the widget below and reuse it in Jira with the help of Smart Checklist. We will explain how to save it as a template in Jira a bit later in the article.
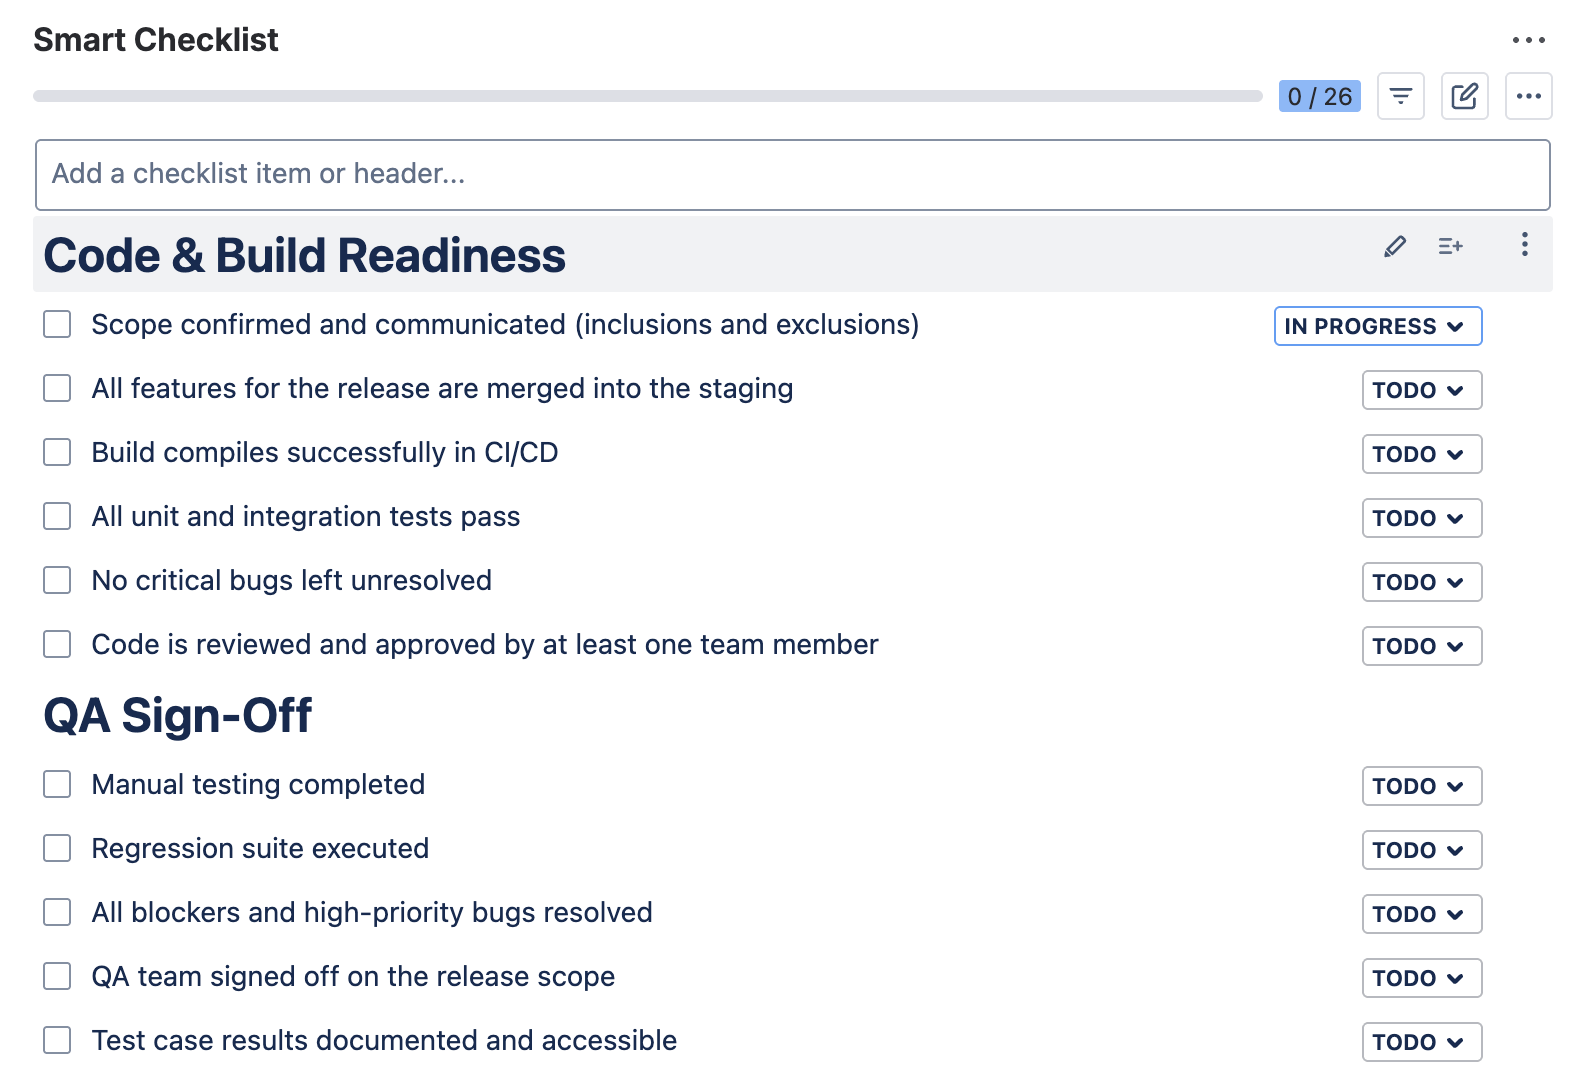
## Code & Build Readiness
- Scope confirmed and communicated (inclusions and exclusions)
- All features for the release are merged into the staging
- Build compiles successfully in CI/CD
- All unit and integration tests pass
- No critical bugs left unresolved
- Code is reviewed and approved by at least one team member
## QA Sign-Off
- Manual testing completed
- Regression suite executed
- All blockers and high-priority bugs resolved
- QA team signed off on the release scope
- Test case results documented and accessible
## Configuration & Dependencies
- Environment variables are configured correctly in the staging/production environment
- Database migrations prepared and reviewed
- Feature flags toggled as planned
- 3rd-party services and integrations tested
- Access credentials and API keys verified
## Documentation & Communication
- User documentation updated (if applicable)
- Release notes written and reviewed
- Support and customer-facing teams were informed and had a demo
- JIRA ticket links and relevant Confluence pages included in the release issue
## Rollout & Monitoring
- Rollback plan documented and accessible
- Monitoring and alerting set up for new features
- Logging reviewed for any changes in coverage
- Materials to notify the customers about the release are ready (for new features / major updates)
- Post-release validation tasks prepared
- On-call team notified of release timeline
## Code & Build Readiness
- Scope confirmed and communicated (inclusions and exclusions)
- All features for the release are merged into the staging
- Build compiles successfully in CI/CD
- All unit and integration tests pass
- No critical bugs left unresolved
- Code is reviewed and approved by at least one team member
## QA Sign-Off
- Manual testing completed
- Regression suite executed
- All blockers and high-priority bugs resolved
- QA team signed off on the release scope
- Test case results documented and accessible
## Configuration & Dependencies
- Environment variables are configured correctly in the staging/production environment
- Database migrations prepared and reviewed
- Feature flags toggled as planned
- 3rd-party services and integrations tested
- Access credentials and API keys verified
## Documentation & Communication
- User documentation updated (if applicable)
- Release notes written and reviewed
- Support and customer-facing teams were informed and had a demo
- JIRA ticket links and relevant Confluence pages included in the release issue
## Rollout & Monitoring
- Rollback plan documented and accessible
- Monitoring and alerting set up for new features
- Logging reviewed for any changes in coverage
- Materials to notify the customers about the release are ready (for new features / major updates)
- Post-release validation tasks prepared
- On-call team notified of release timeline
Release Readiness Checklist
Release readiness is a broader question than build readiness, although they overlap. While the pre-production checklist confirms that the artifact is deployable, the release readiness checklist confirms that the organization is ready to ship it. Beyond technical checks, it can include related steps, such as internal communication procedures, release note preparation, etc.
This isn’t a purely QA checklist, since different teams are involved. Project managers or release managers usually own it, while engineering, QA, marketing, and support each do their part.
Here is a free release readiness checklist template prepared by the TitanApps team. It was created with the help of Smart Checklist for Jira. This solution lets you assign checklist items to different teammates, set priorities, deadlines, and custom statuses for each checklist item, and more. These features help release managers coordinate multiple teams involved in the process.
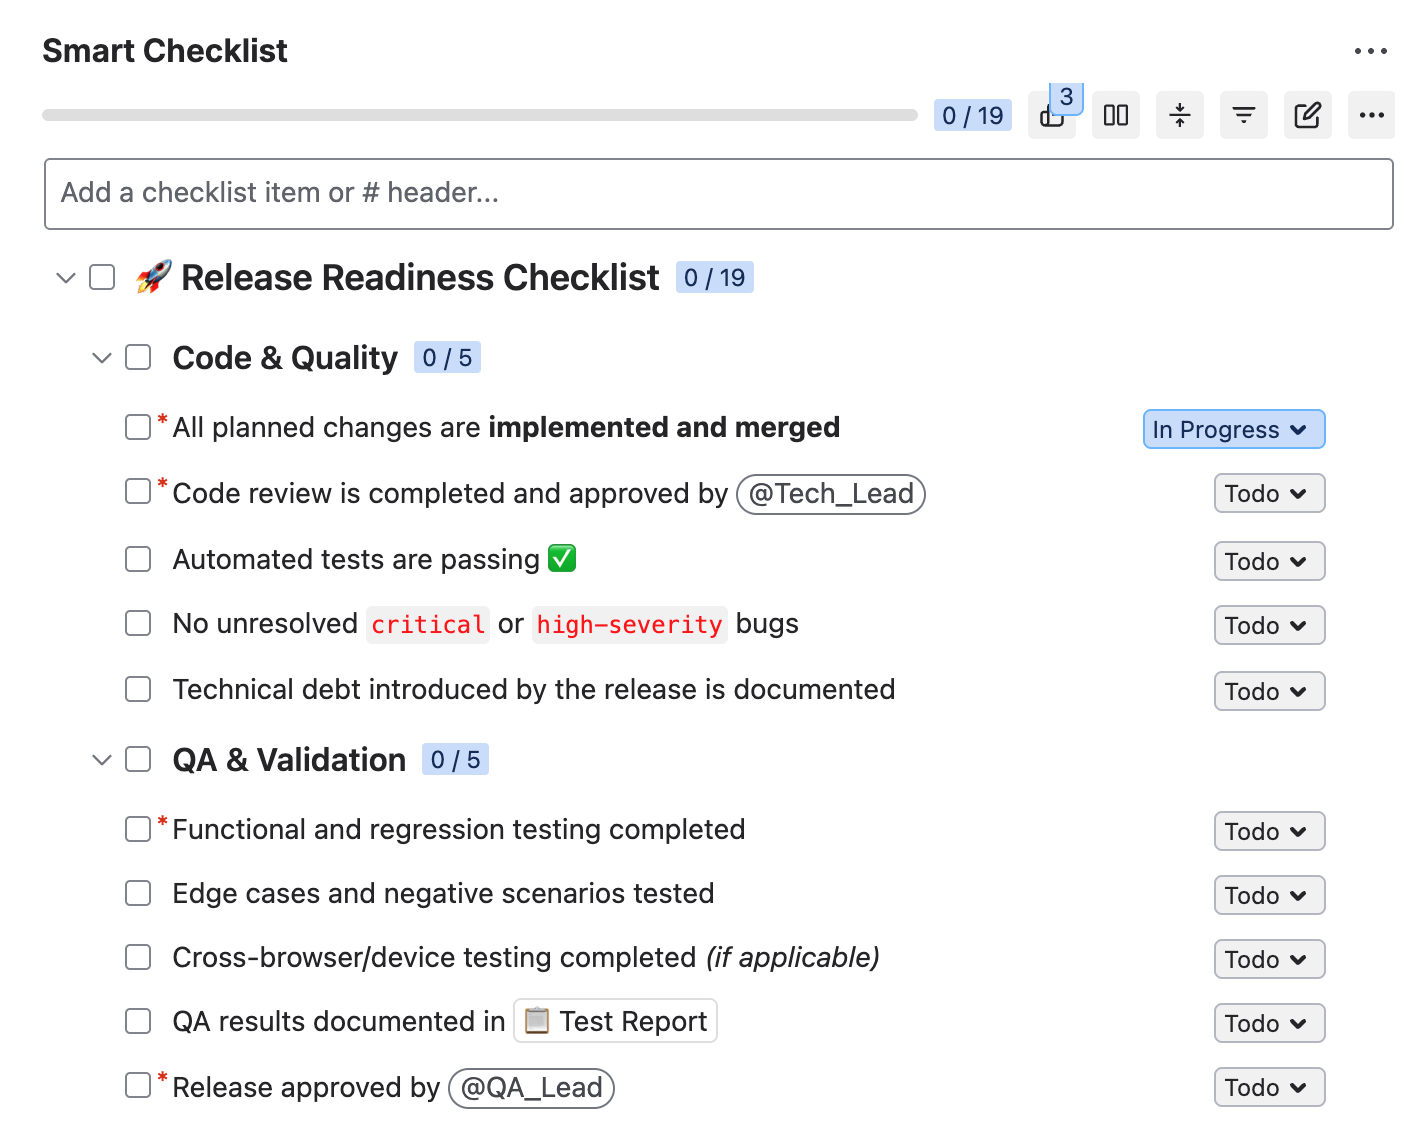
# ? Release Readiness Checklist
## Code & Quality
~! All planned changes are *implemented and merged*
-! Code review is completed and approved by @Tech_Lead
- Automated tests are passing ?
- No unresolved `critical` or `high-severity` bugs
- Technical debt introduced by the release is documented
## QA & Validation
-! Functional and regression testing completed
- Edge cases and negative scenarios tested
- Cross-browser/device testing completed (if applicable)
- QA results documented in [? Test Report](https://example.com/test-report)
-! Release approved by @QA_Lead
## Deployment
- Database migrations are prepared and verified (if applicable)
- Feature flags and environment variables are configured
- Deployment steps are documented in [? Release Guide](https://example.com/release-guide)
- Rollback plan is prepared
> Define rollback conditions, responsible person, and recovery steps.
## Release
- Release notes are prepared
- Monitoring and alerts are configured
-! Production deployment approved by @Release_Manager
- Post-deployment smoke test completed ?
- Release status communicated to @Team
# ? Release Readiness Checklist
## Code & Quality
~! All planned changes are *implemented and merged*
-! Code review is completed and approved by @Tech_Lead
- Automated tests are passing ?
- No unresolved `critical` or `high-severity` bugs
- Technical debt introduced by the release is documented
## QA & Validation
-! Functional and regression testing completed
- Edge cases and negative scenarios tested
- Cross-browser/device testing completed (if applicable)
- QA results documented in [? Test Report](https://example.com/test-report)
-! Release approved by @QA_Lead
## Deployment
- Database migrations are prepared and verified (if applicable)
- Feature flags and environment variables are configured
- Deployment steps are documented in [? Release Guide](https://example.com/release-guide)
- Rollback plan is prepared
> Define rollback conditions, responsible person, and recovery steps.
## Release
- Release notes are prepared
- Monitoring and alerts are configured
-! Production deployment approved by @Release_Manager
- Post-deployment smoke test completed ?
- Release status communicated to @Team
QA Checklists Grouped by Type of Testing
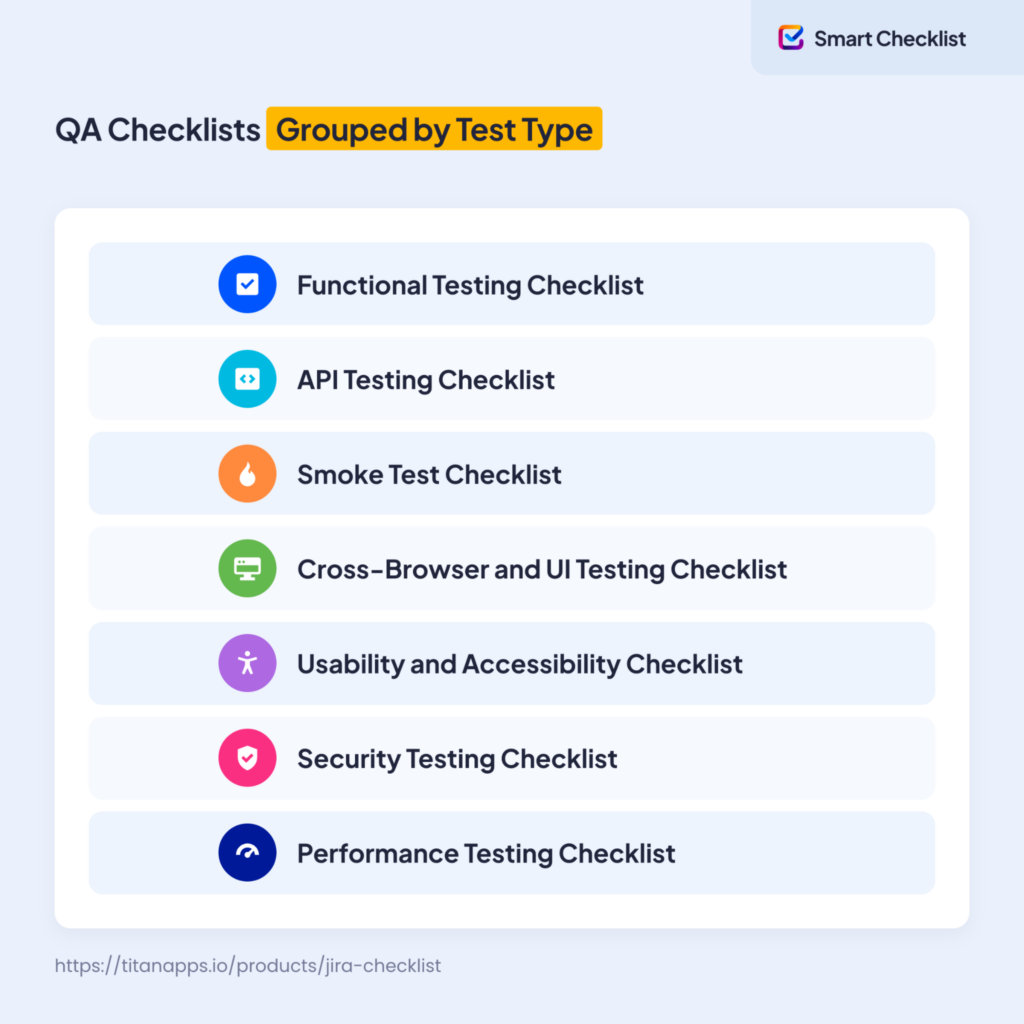
The checklists in this group are organized around the aspect of quality they verify: functionality, performance, security, and so on. They list individual steps that you need to take during the testing process. The step descriptions can be more or less detailed depending on your team’s needs.
Some prefer that a QA checklist spells out each step with input values and expected results. Other teams organize it as a short list of prompts, like “the dropdown works” or “the amount field rejects zero,” without describing how to check them.
Tip
To add your QA checklists to Jira and save them as reusable templates, you can use Smart Checklist for Jira.
Functional Testing Checklist
Functional testing verifies that the product behaves according to its requirements. A functional testing checklist lists what to verify in a given feature, screen, or module, so coverage doesn’t depend on who runs the tests.
Its content is derived from the requirements. Each user-facing behavior described in a specification, user story, or acceptance criteria becomes an item on the list. This makes the checklist a practical way to confirm that nothing in the requirements was left unverified.
The level of detail is a decision your team makes:
- A compact list names the conditions to check and leaves the method to the tester.
- A detailed one includes preconditions, steps, and an expected result for each item, at which point it works as a test case.
Both approaches are legitimate. The compact version suits familiar functionality and experienced testers, while the detailed version works better for complex flows, unfamiliar features, and anything that needs to be reproducible later.
API Testing Checklist
API testing verifies the application layer that clients talk to directly, without going through the interface. Since there is nothing to observe on screen, the checks are performed against requests and responses.
This kind of testing standardizes well. Endpoints differ in what they do, but they are verified against the same criteria, so one checklist template can cover the whole API and stay useful as new endpoints are added.
Here’s an example of a reusable API testing checklist template. You can use this use it as a base and customize it according to your needs:
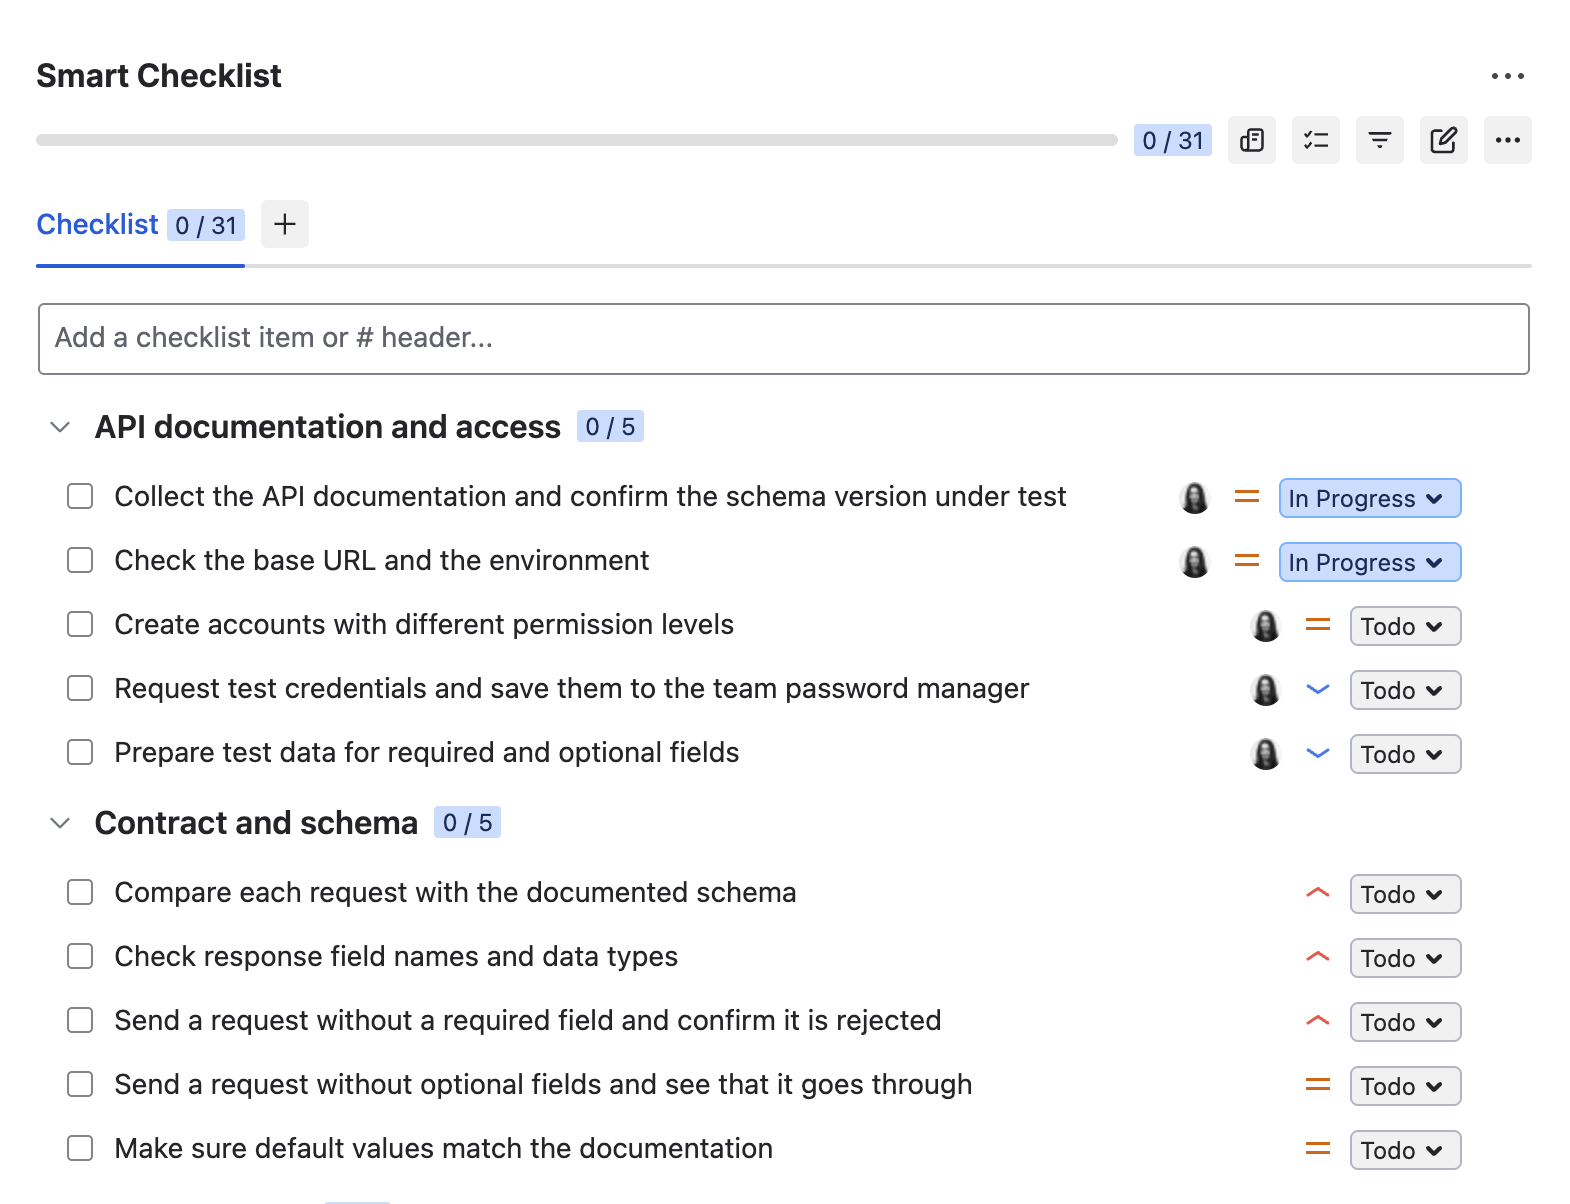
## API documentation and access
- Collect the API documentation and confirm the schema version under test
- Check the base URL and the environment
- Create accounts with different permission levels
- Request test credentials and save them to the team password manager
- Prepare test data for required and optional fields
## Contract and schema
- Compare each request with the documented schema
- Check response field names and data types
- Send a request without a required field and confirm it is rejected
- Send a request without optional fields and see that it goes through
- Make sure default values match the documentation
## Core requests
- Send a valid request to each endpoint and check the success status code
- Confirm the response body contains the expected records
- Repeat a GET request and see that the created record persists
- Update a record and make sure only the intended fields change
- Delete a record, then check the response code and the record itself
- Try the pagination, sorting, and filtering parameters
## Error handling
- Send invalid data types and check for the 400 response
- Send an empty payload and read the error message
- Request a non-existent resource and confirm the 404 response
- Compare the error format across all endpoints
- Look through error responses for stack traces and internal paths
## Authentication and authorization
-! Send a request without a token and confirm the 401 response
-! Try to read and modify data from another account
- Use an expired token and see that it is rejected
- Go through role-based permissions on every endpoint
## Reliability and limits
- Exceed the rate limit and check the 429 response and its headers
- Send the same request twice and look for a duplicate record
- Measure response time of the most used endpoints against the agreed limit
- Confirm the API version in use is the one under test
## Reporting
- Log every defect with the request, the response, and the status code
- Record tested endpoints and their results in the test report
## API documentation and access
- Collect the API documentation and confirm the schema version under test
- Check the base URL and the environment
- Create accounts with different permission levels
- Request test credentials and save them to the team password manager
- Prepare test data for required and optional fields
## Contract and schema
- Compare each request with the documented schema
- Check response field names and data types
- Send a request without a required field and confirm it is rejected
- Send a request without optional fields and see that it goes through
- Make sure default values match the documentation
## Core requests
- Send a valid request to each endpoint and check the success status code
- Confirm the response body contains the expected records
- Repeat a GET request and see that the created record persists
- Update a record and make sure only the intended fields change
- Delete a record, then check the response code and the record itself
- Try the pagination, sorting, and filtering parameters
## Error handling
- Send invalid data types and check for the 400 response
- Send an empty payload and read the error message
- Request a non-existent resource and confirm the 404 response
- Compare the error format across all endpoints
- Look through error responses for stack traces and internal paths
## Authentication and authorization
-! Send a request without a token and confirm the 401 response
-! Try to read and modify data from another account
- Use an expired token and see that it is rejected
- Go through role-based permissions on every endpoint
## Reliability and limits
- Exceed the rate limit and check the 429 response and its headers
- Send the same request twice and look for a duplicate record
- Measure response time of the most used endpoints against the agreed limit
- Confirm the API version in use is the one under test
## Reporting
- Log every defect with the request, the response, and the status code
- Record tested endpoints and their results in the test report
Writing this checklist requires knowing the intended contract, so QA engineers usually prepare it together with the developers who built the endpoints. For public APIs, add one more checklist item: the documentation matches the actual behavior.
Smoke Test Checklist
Smoke testing quickly verifies that a new build is stable enough to test further. It covers only the critical paths: the application deploys and loads, authentication works, the main screens render, and one core transaction completes from start to finish. If any of these fail, the build goes back to development before anyone spends hours on deeper testing.
The checklist is short by design, usually under a dozen items. It is also one of the most stable ones, since core functionality changes rarely. This makes it a common starting point for test automation, and many teams eventually move it into the CI pipeline.
The list is shared across the team rather than owned by one person, because developers and QA engineers both need to know what a build has to pass before it goes further.
Cross-Browser and UI Testing Checklist
This type of testing confirms that the interface renders and behaves consistently across different browsers, devices, and screen sizes. The same code can produce different results in different rendering engines, and this checklist is how teams catch those differences before release.
Typically, this QA checklist has two parts:
- Support matrix: which browsers, versions, and viewports you test against. This is usually defined once per product, based on what your users actually run, and then reviewed regularly.
- Checks themselves, which stay largely the same between releases. For example, it can include such elements as: layouts hold at supported resolutions; forms submitted correctly in every browser; interactive elements respond to both mouse and touch.
Much of this can be automated with tools like Selenium or Playwright, and the checklist can simply reference the suite results. Manual passes are still worth keeping for visual judgment, which scripts handle poorly.
Usability and Accessibility Checklist
A product can work exactly as specified and still frustrate people. The UX and accessibility checklist verifies that people can complete their tasks without confusion, and that the product remains usable for those with disabilities:
- Usability items are specific to your product and stay somewhat subjective. They confirm that navigation is predictable, that primary actions are easy to find, and that error messages explain what the user should do next.
- Accessibility items can be built on a public standard. You can take the success criteria from WCAG 2.2 requirements and turn them into checklist items directly: keyboard-only navigation works, the website is compatible with screen readers, images have meaningful alt text, and color contrast meets the required ratio.
You decide how to organize these checks. Some teams keep everything in one list and go through it in a single pass. In other companies, QA engineers verify accessibility with every release, while usability feedback comes from the design team or a focus group and is collected separately.
Here is an example of a baseline accessibility checklist to run on every page:
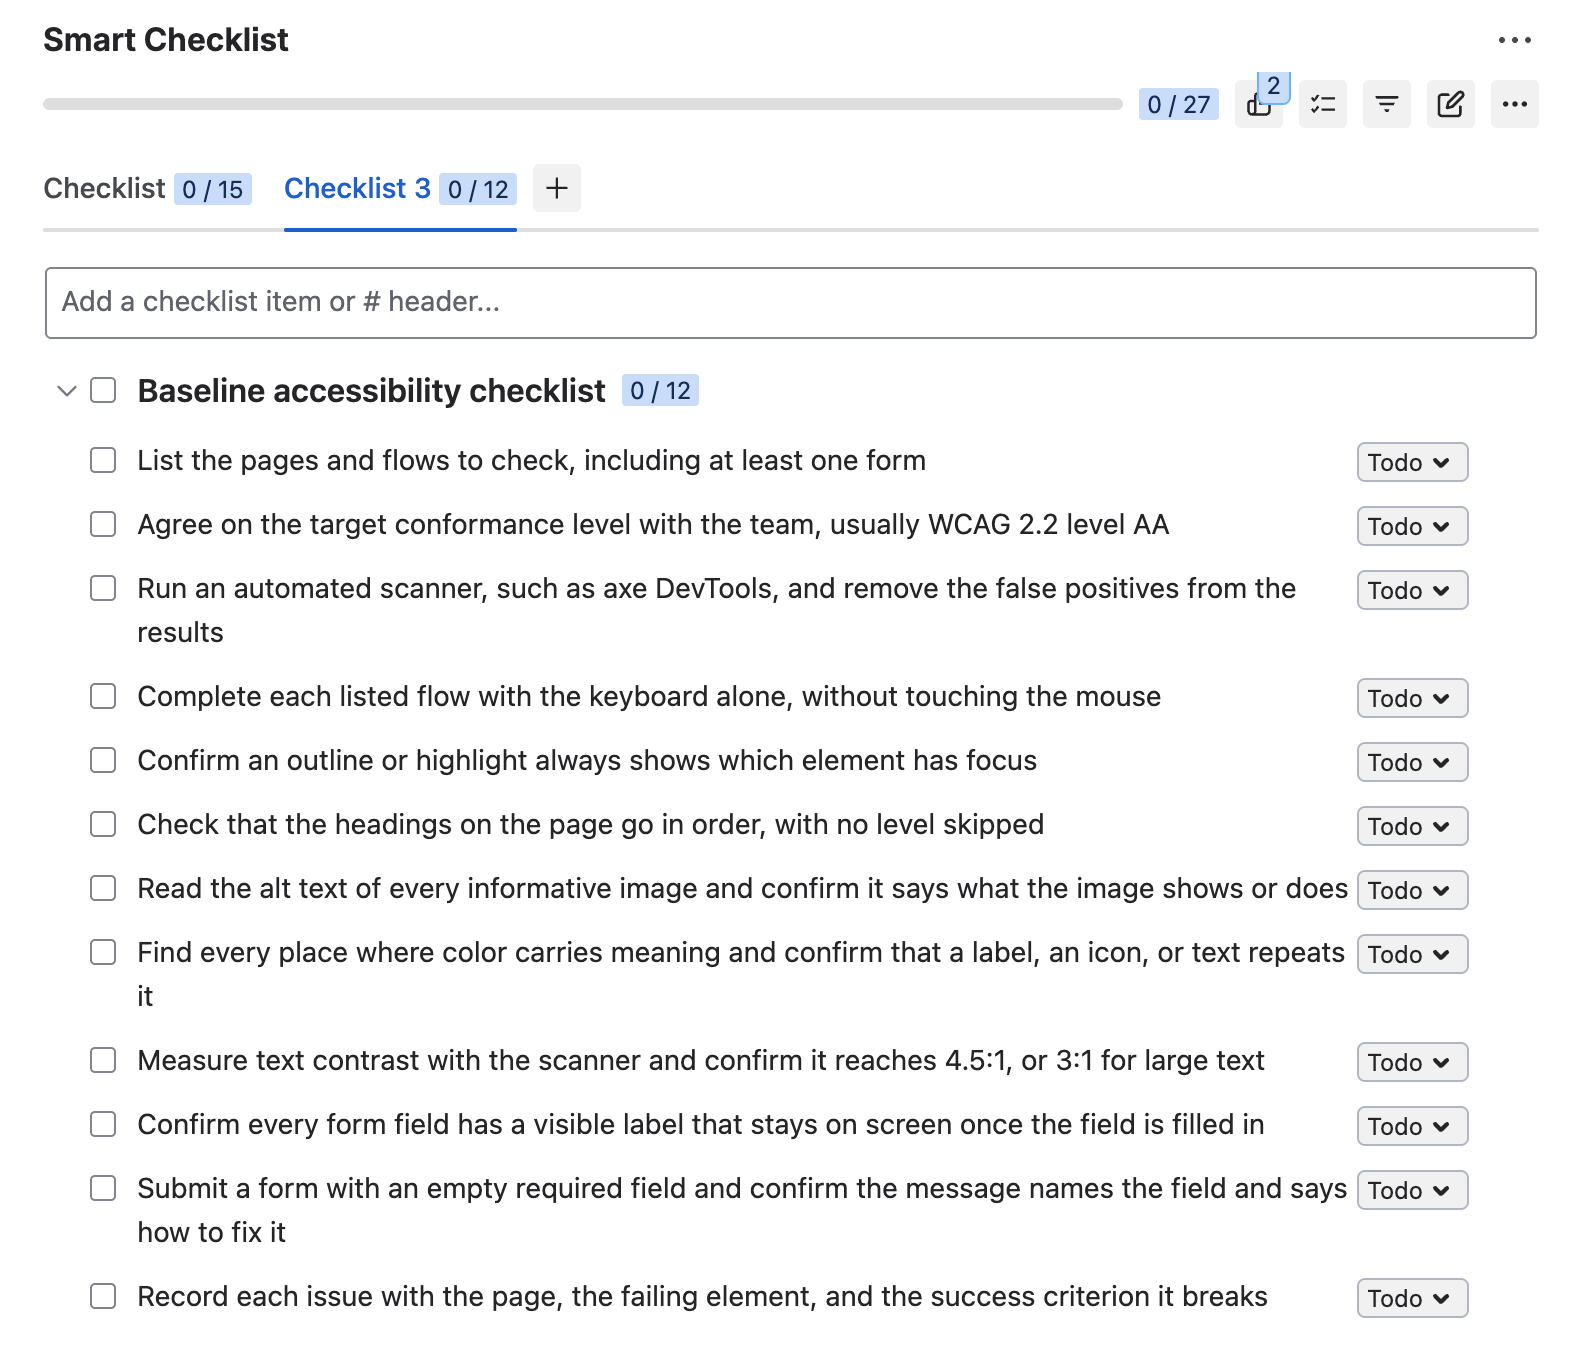
# Baseline accessibility checklist
- List the pages and flows to check, including at least one form
- Agree on the target conformance level with the team, usually WCAG 2.2 level AA
- Run an automated scanner, such as axe DevTools, and remove the false positives from the results
- Complete each listed flow with the keyboard alone, without touching the mouse
- Confirm an outline or highlight always shows which element has focus
- Check that the headings on the page go in order, with no level skipped
- Read the alt text of every informative image and confirm it says what the image shows or does
- Find every place where color carries meaning and confirm that a label, an icon, or text repeats it
- Measure text contrast with the scanner and confirm it reaches 4.5:1, or 3:1 for large text
- Confirm every form field has a visible label that stays on screen once the field is filled in
- Submit a form with an empty required field and confirm the message names the field and says how to fix it
- Record each issue with the page, the failing element, and the success criterion it breaks
# Baseline accessibility checklist
- List the pages and flows to check, including at least one form
- Agree on the target conformance level with the team, usually WCAG 2.2 level AA
- Run an automated scanner, such as axe DevTools, and remove the false positives from the results
- Complete each listed flow with the keyboard alone, without touching the mouse
- Confirm an outline or highlight always shows which element has focus
- Check that the headings on the page go in order, with no level skipped
- Read the alt text of every informative image and confirm it says what the image shows or does
- Find every place where color carries meaning and confirm that a label, an icon, or text repeats it
- Measure text contrast with the scanner and confirm it reaches 4.5:1, or 3:1 for large text
- Confirm every form field has a visible label that stays on screen once the field is filled in
- Submit a form with an empty required field and confirm the message names the field and says how to fix it
- Record each issue with the page, the failing element, and the success criterion it breaks
Security Testing Checklist
Security testing protects the product against deliberate misuse rather than accidental error. A checklist matters here more than anywhere else, because attackers might only need one forgotten item.
This QA checklist can cover areas such as:
- authentication and session management resist common attacks
- the application is protected against injection attacks, including SQL injection and cross-site scripting (XSS)
- sensitive data is encrypted in transit and at rest
- access controls stop users from reaching data that isn’t theirs or performing any actions on other users’ behalf
You don’t have to invent this list from scratch. OWASP’s Application Security Verification Standard offers ready-made security requirements organized into assurance levels, so security is another area where the checklist can rest on an external standard.
In larger organizations, dedicated security engineers perform these checks. In smaller teams, a QA engineer with a security focus can cover the basics checks.
Here is an example of a security testing checklist template prepared by the Smart Checklist team. To use it in Jira for free, install Smart Checklist from the Atlassian Marketplace.
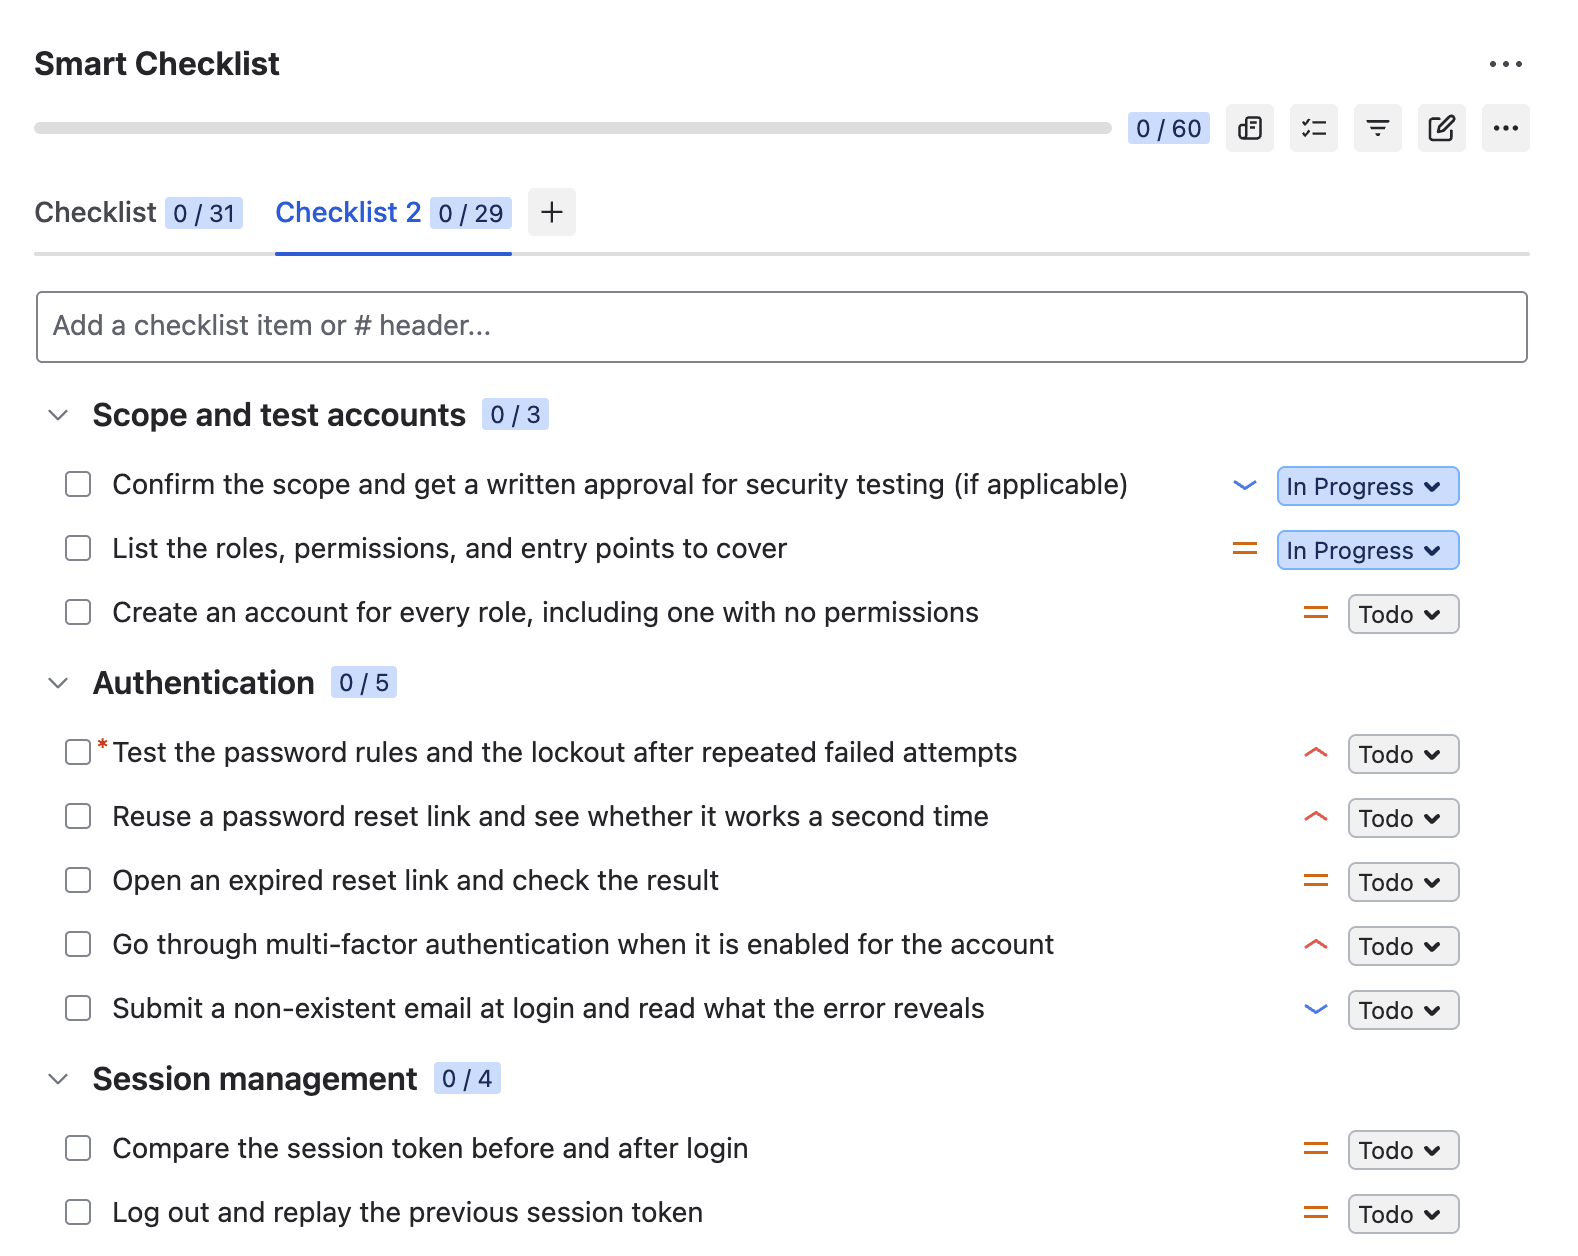
## Scope and test accounts
- Confirm the scope and obtain written approval for security testing (If applicable)
- List the roles, permissions, and entry points to cover
- Create an account for every role, including one with no permissions
## Authentication
-! Test the password rules and the lockout after repeated failed attempts
- Reuse a password reset link and see whether it works a second time
- Open an expired reset link and check the result
- Go through multi-factor authentication when it is enabled for the account
- Submit a non-existent email at login and read what the error reveals
## Session management
- Compare the session token before and after login
- Log out and replay the previous session token
- Leave a session idle past the timeout and see whether it expires
- Inspect cookies for the Secure, HttpOnly, and SameSite attributes
## Access control
-! Change the record ID in the URL and confirm access is denied
-! Open restricted pages and endpoints as a user without the role
- Call admin actions from a regular account through the UI and the API
- Use a file download link from an account without permission to that file
## Input validation
- Submit SQL syntax in text inputs and see how it is handled
- Submit script tags and check whether the output is escaped
- Upload a forbidden file type, an oversized file, and an executable
- Pass an external destination to a redirect parameter
## Data protection
- Open the main flows over HTTP and watch for the redirect to HTTPS
- Search logs and URLs of the main flows for sensitive data
- Make sure personal data is masked in the interface where required
## Configuration and dependencies
- Remove default and test accounts from the environment
- Confirm debug mode and directory listing are disabled
- Run a dependency scan and review the reported vulnerabilities
- Inspect responses for the required security headers
## Reporting
- Record each finding with severity, steps, and the affected area
-! Make sure all critical and high-priority findings are fixed and ret
## Scope and test accounts
- Confirm the scope and obtain written approval for security testing (If applicable)
- List the roles, permissions, and entry points to cover
- Create an account for every role, including one with no permissions
## Authentication
-! Test the password rules and the lockout after repeated failed attempts
- Reuse a password reset link and see whether it works a second time
- Open an expired reset link and check the result
- Go through multi-factor authentication when it is enabled for the account
- Submit a non-existent email at login and read what the error reveals
## Session management
- Compare the session token before and after login
- Log out and replay the previous session token
- Leave a session idle past the timeout and see whether it expires
- Inspect cookies for the Secure, HttpOnly, and SameSite attributes
## Access control
-! Change the record ID in the URL and confirm access is denied
-! Open restricted pages and endpoints as a user without the role
- Call admin actions from a regular account through the UI and the API
- Use a file download link from an account without permission to that file
## Input validation
- Submit SQL syntax in text inputs and see how it is handled
- Submit script tags and check whether the output is escaped
- Upload a forbidden file type, an oversized file, and an executable
- Pass an external destination to a redirect parameter
## Data protection
- Open the main flows over HTTP and watch for the redirect to HTTPS
- Search logs and URLs of the main flows for sensitive data
- Make sure personal data is masked in the interface where required
## Configuration and dependencies
- Remove default and test accounts from the environment
- Confirm debug mode and directory listing are disabled
- Run a dependency scan and review the reported vulnerabilities
- Inspect responses for the required security headers
## Reporting
- Record each finding with severity, steps, and the affected area
-! Make sure all critical and high-priority findings are fixed and ret
Performance Testing Checklist
A functional test with one user and a small database may go well, but it says nothing about what will happen when a thousand people use the same feature at once. This is what performance testing shows you. The checklist covers response times, throughput, and stability under different traffic levels.
To be meaningful, the performance testing checklist should name concrete numbers. “The application is fast” is vague, while “the checkout page responds within 2 sec at 500 concurrent users” is specific.
You can define these benchmarks in advance for several scenarios:
- normal daily traffic
- expected peak load
- sustained use over a longer period
Most of these checks can be performed with specialized tools rather than by hand. In this case, the checklist can record which scenarios to run, the thresholds, and where your team can find the results.
Performance testing covers several test types, so it’s practical to keep a separate checklist for each one. Here is an example of a load testing checklist template:
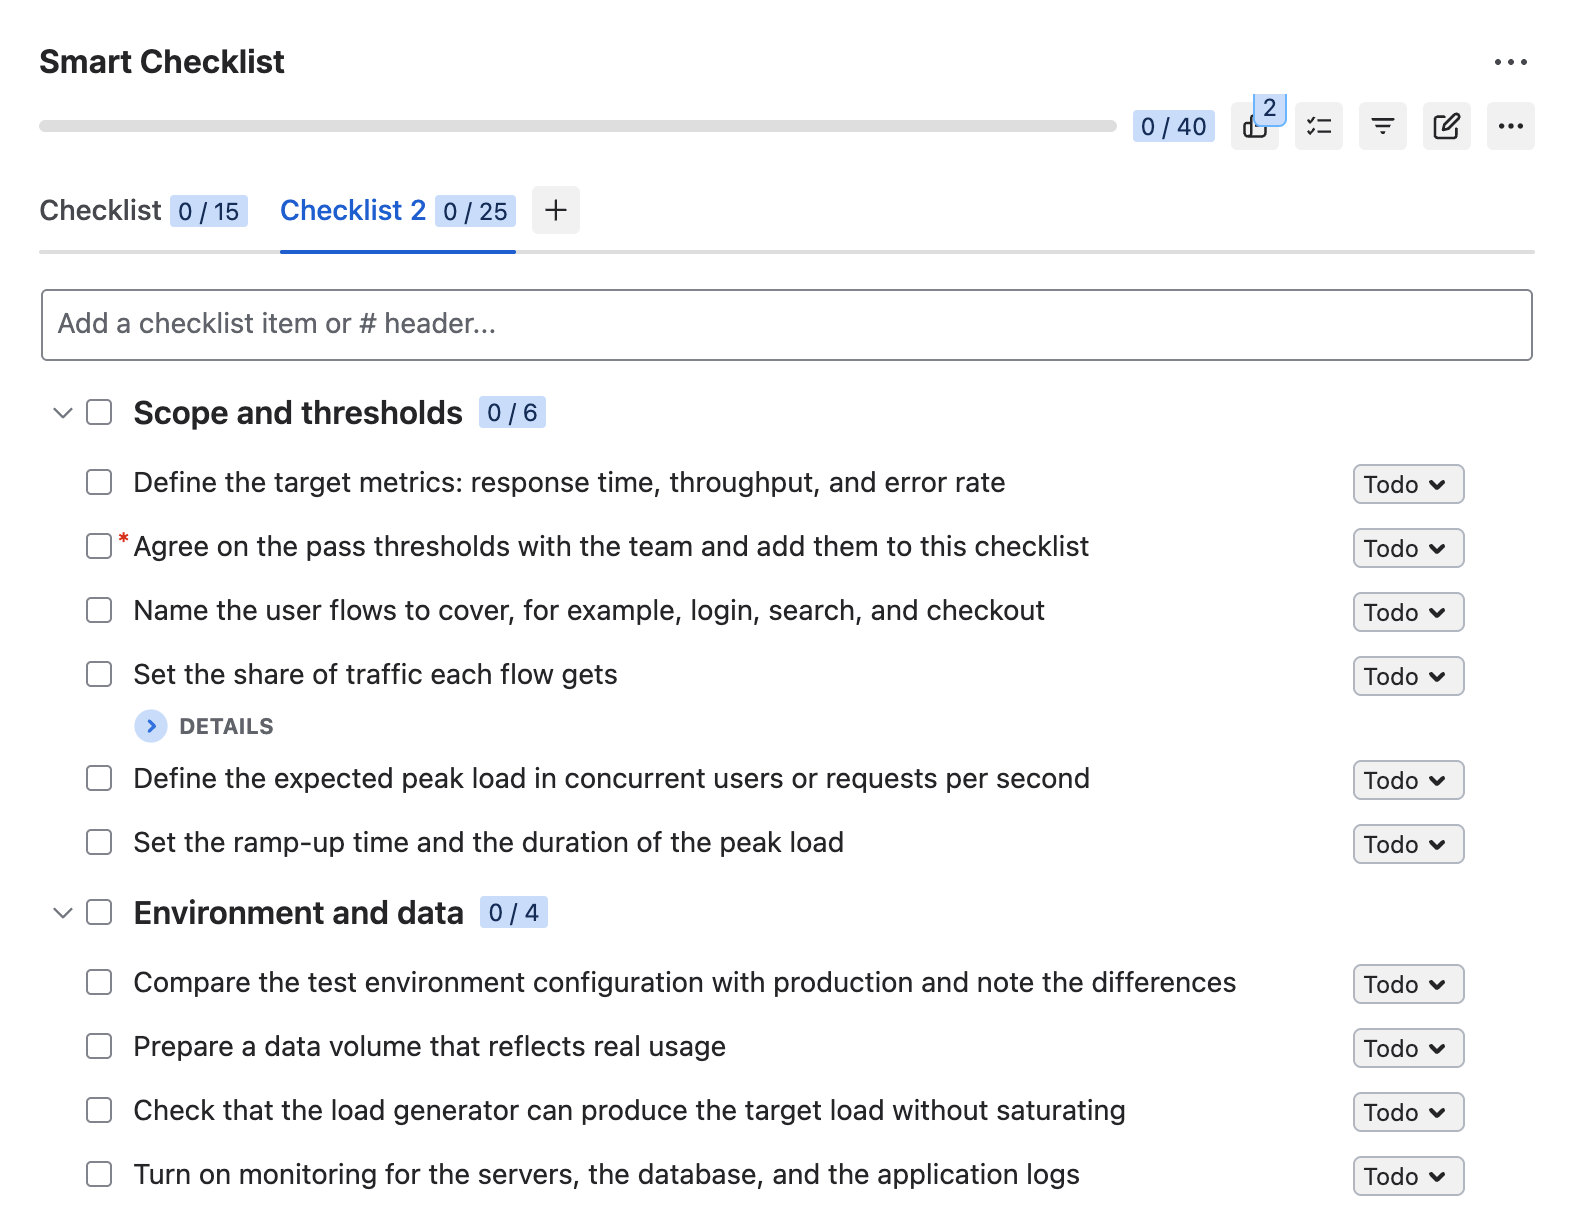
## Scope and thresholds
- Define the target metrics: response time, throughput, and error rate
-! Agree on the pass thresholds with the team and add them to this checklist
- Name the user flows to cover, for example, login, search, and checkout
- Set the share of traffic each flow gets
> For example, 70% browse and 10% checkout
- Define the expected peak load in concurrent users or requests per second
- Set the ramp-up time and the duration of the peak load
## Environment and data
- Compare the test environment configuration with production and note the differences
- Prepare a data volume that reflects real usage
- Check that the load generator can produce the target load without saturating
- Turn on monitoring for the servers, the database, and the application logs
## Baseline
- Run the script with a few users to confirm it works before the full run
- Measure response time for each flow with a single user
- Record the baseline numbers for later comparison
## Peak load run
- Book the test window with the team so nobody else uses the environment
- Ramp up to the expected peak load over the agreed time
- Hold the peak load for the agreed duration
- Confirm that responses contain the expected content, not only a success status code
- Watch the error rate during the run and stop the test if it exceeds the agreed limit
## Results and reporting
- Read response times as the 90th and 95th percentile, not as averages
- Compare peak response times for each flow with the thresholds and the baseline
- Compare the results with the previous load test run
- Check CPU, memory, and database load during the peak window
- List the flows that missed their threshold
- Record the numbers, the thresholds, and the pass or fail decision
- Create a work item for every flow that missed its threshold
## Scope and thresholds
- Define the target metrics: response time, throughput, and error rate
-! Agree on the pass thresholds with the team and add them to this checklist
- Name the user flows to cover, for example, login, search, and checkout
- Set the share of traffic each flow gets
> For example, 70% browse and 10% checkout
- Define the expected peak load in concurrent users or requests per second
- Set the ramp-up time and the duration of the peak load
## Environment and data
- Compare the test environment configuration with production and note the differences
- Prepare a data volume that reflects real usage
- Check that the load generator can produce the target load without saturating
- Turn on monitoring for the servers, the database, and the application logs
## Baseline
- Run the script with a few users to confirm it works before the full run
- Measure response time for each flow with a single user
- Record the baseline numbers for later comparison
## Peak load run
- Book the test window with the team so nobody else uses the environment
- Ramp up to the expected peak load over the agreed time
- Hold the peak load for the agreed duration
- Confirm that responses contain the expected content, not only a success status code
- Watch the error rate during the run and stop the test if it exceeds the agreed limit
## Results and reporting
- Read response times as the 90th and 95th percentile, not as averages
- Compare peak response times for each flow with the thresholds and the baseline
- Compare the results with the previous load test run
- Check CPU, memory, and database load during the peak window
- List the flows that missed their threshold
- Record the numbers, the thresholds, and the pass or fail decision
- Create a work item for every flow that missed its threshold
Other Types of QA Checklists
The two groupings above cover checklists tied directly to a testing cycle. In practice, though, QA teams keep lists for plenty of other things as well. Basically, any recurring process with consecutive steps or standard criteria can become a QA checklist, and in Jira it can live inside the work item it belongs to. Here are a few examples.
QA Checklist for Entry and Exit Criteria for Test Plan
A test plan describes how testing is organized on a project: the scope, approach, tools, and who is responsible for what. Entry and exit criteria make up one of its standard sections, and they cover mostly the same ground as the entry and exit checklists described above. The difference is where they live.
Instead of writing these criteria as plain text, you can add them as a checklist inside the test plan work item. The responsible QA engineer then verifies each criterion and checks it off. As a result, the plan becomes a working document rather than a static one. You can copy ready entry and exit criteria from our test plan template or from the widget below.
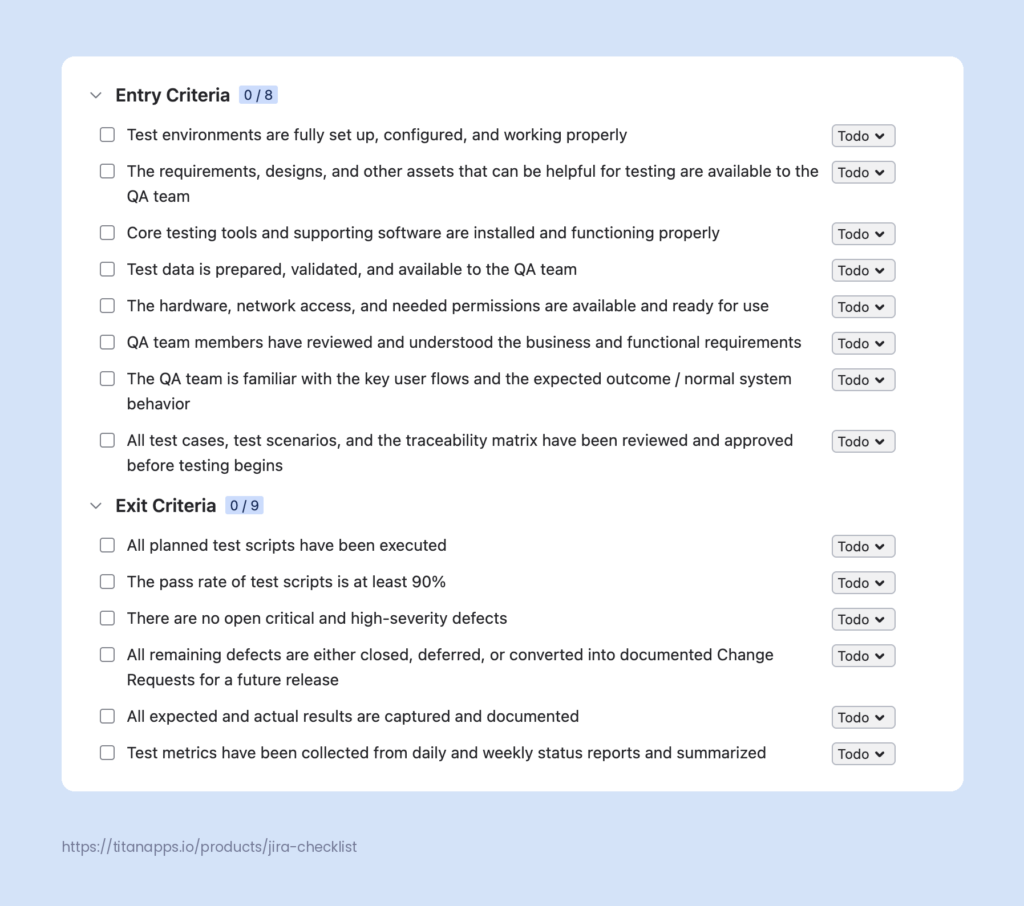
QA Onboarding Checklist
When a new QA engineer joins the team, they need to learn the product, tools, test environments, and the team’s conventions. This knowledge usually lives with whoever has been on the project longest, and passing it on takes their time whenever someone new arrives.
A QA onboarding checklist saves time and standardizes the process. Then, every new QA engineer goes through the same steps. It lists all access, tools, and documentation, and the manager can check what is still pending without asking. Here’s an example of such a QA onboarding checklist in Jira:
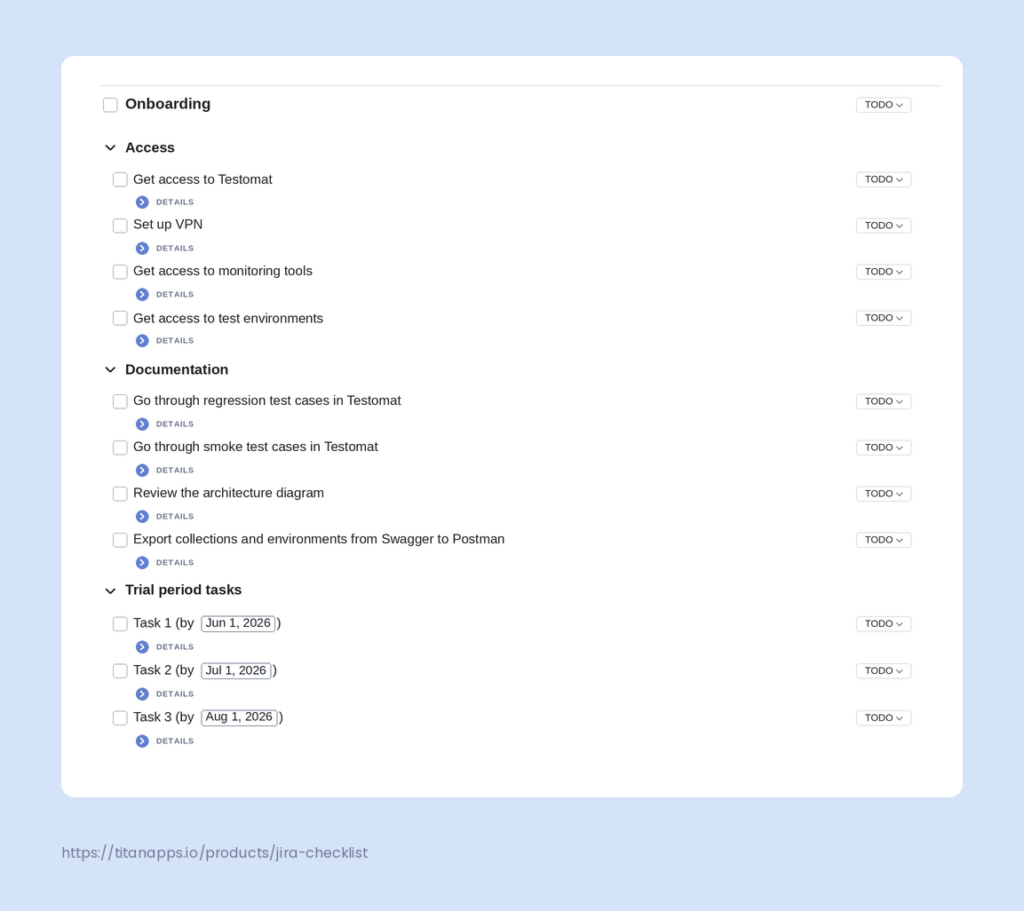
This is a real checklist template used by a QA team at a logistics tech company that collaborated with TitanApps (NDA). Before they built this onboarding checklist, the process description was scattered across several documents, and working with each newcomer took significant time and effort.
“Every time someone new joined, I was basically rebuilding it from memory,” says Kateryna Ivanchenko, a QA Engineer who is responsible for onboarding new team members.
The team rebuilt the process as a single detailed QA onboarding checklist and saved it as a template in Jira. Now, every new hire gets the same pre-filled list, and the responsible person can track progress without micromanaging. You can read the full story in our case study on QA onboarding in Jira.
How to Build a QA Checklist in Jira
Jira offers no dedicated checklist functionality beyond plain bullet points in descriptions, so you will need a dedicated solution for this. Smart Checklist for Jira was built for exactly this kind of task. Here is how to create your first QA checklist with it:
- Install Smart Checklist for Jira from the Atlassian Marketplace.
- Open a work item and add your checklist items. You can type items one by one or paste a whole list into the Smart Checklist section of your Jira work item.
- Add details to the items that need them. You can assign checklist items to specific QA engineers, set due dates, and add priorities. Item statuses go beyond done and not done: an item can also be In Progress or Skipped. You can also add an expandable section with details for each checklist item. It can hold links to documentation, threshold references for functional testing, etc.
As a result, your team gets a structured, feature-rich checklist directly in Jira, and the verification work lives inside the work item it belongs to.
How to Save a QA Checklist in Jira as a Template
Open the three-dot menu in the Smart Checklist panel and select Save as a template, as shown in the screenshot below.
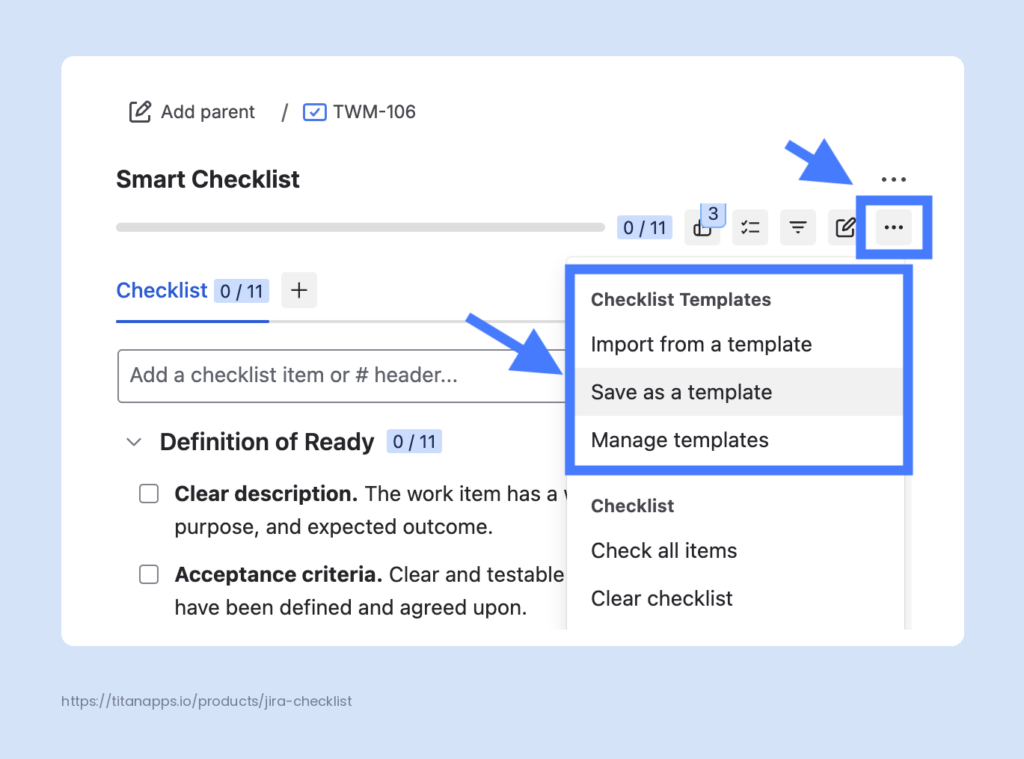
Smart Checklist enables you to make your template project-scoped or global. The latter allows you to share it with everyone who works in your Jira instance across different projects / spaces.
Also, once you save your QA checklist as a template, you can add it to work items automatically. For more details, please see our Jira checklist template guide.
6 Reasons Smart Checklist Is Useful for QA Processes
- Less time spent on repetitive setup. Save a checklist as a template once, and your whole team can reuse it instead of writing the same list again for every work item.
- A standardized testing process. Global templates make the same checklist available across all your Jira projects. This works well for process-level checks that don’t depend on the product, such as test entry and exit criteria or release readiness. Updating the template changes what every new work item receives.
- Faster onboarding. A new QA engineer opens a work item and sees exactly what needs to be verified. They don’t have to reconstruct the process from conversations or wait for a colleague to be available. The steps are documented, so they learn the process while doing the work.
- Transparent progress. Anyone who opens a work item can see which checks are done, which failed, and which are still in progress. You can also configure your Jira boards to show checklist progress on cards. In addition, Smart Checklist offers several gadgets for Jira’s native dashboards, so a QA lead can follow testing status across projects and epics in one place.
- Clear ownership of each check. You can assign individual checklist items to specific QA engineers and set a due date and priority for each one. Everyone sees who is responsible for what, without splitting testing into separate Jira work items.
- Your data stays inside Atlassian. Smart Checklist is built on Forge, so checklist content is stored within Atlassian infrastructure. This makes security reviews easier and supports data residency requirements, which matters for QA teams in regulated industries. Smart Checklist carries the Runs on Atlassian and Cloud Fortified badges and is SOC 2 Type II certified. You can find more details in the TitanApps Trust Center.
Beyond that, Smart Checklist lets you manage granular steps without subtask overhead. Testing a feature can involve dozens of small checks, and creating a Jira work item for each one is not practical. Keep them as checklist items inside the work item they belong to, with their own statuses, assignees, and deadlines. Your QA process stays detailed, and your project stays readable.
What Makes a QA Checklist Work in Practice
Mandatory Items Make QA Checklists Enforceable
Any checklist can be ignored under deadline pressure. The fix is to connect the checklist to the workflow itself. In Smart Checklist, you can mark items as mandatory and add a workflow validator that blocks a work item transition until those items are completed.
For instance, imagine a story moving to Done while the security checks are still open. With the validator in place, Jira blocks the transition.
Checklist History Records What Was Verified
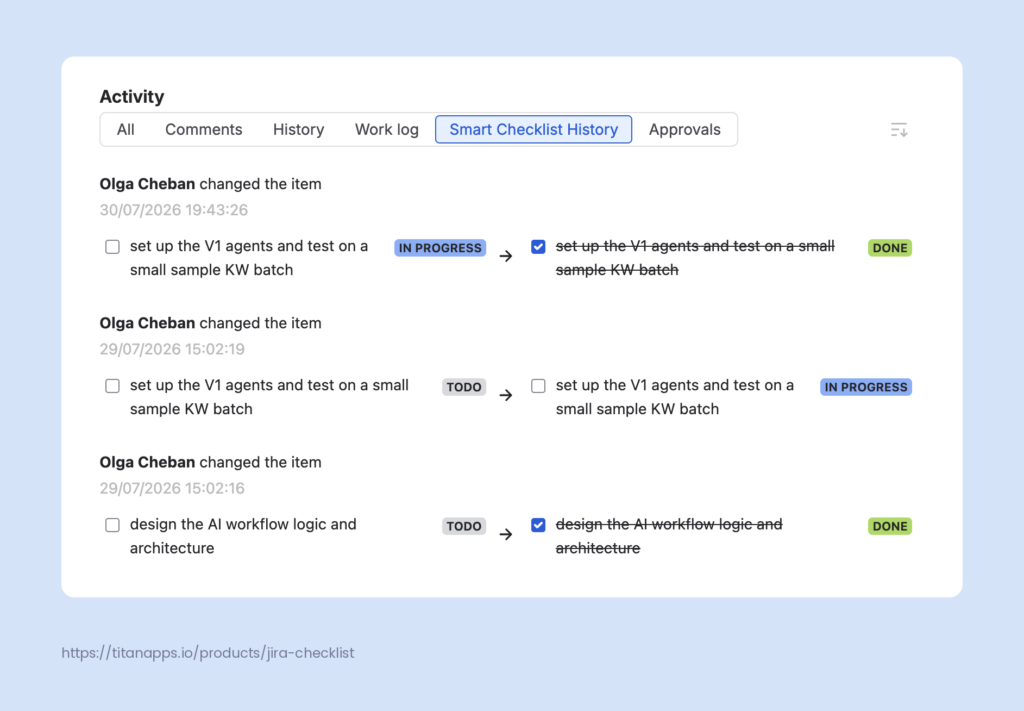
Smart Checklist logs every change to a checklist automatically. Open the Activity section of a work item, and on the Smart Checklist History Tab you can see who marked a check as passed, when they did it, and whether it was reopened later. You might not need to look this up routinely, but in some situations it helps a lot.
After the release, the same log becomes your evidence trail. Every change is time-stamped, so when an external auditor asks for proof that a specific check was performed before a release, you can point to the exact record instead of reconstructing it from memory or chat threads.
QA Checklists Stay Actionable When They Are Part of the Workflow
The most common way checklists die is distance. A checklist stored in a wiki page ages quietly until nobody trusts it. In contrast, a QA checklist that appears inside every relevant work item stays alive because people see it, use it, and update it.
Documentation quality has a measurable effect here. DORA’s State of DevOps Report shows that engineering practices deliver far more value in teams with high-quality documentation. And using QA checklists in Jira is a great way to make your documentation detailed and actionable. The practical takeaway is simple: put the checklist where the work happens, save it as a template, and update it whenever the process changes.
Beyond QA: Quality Control and Quality Audit Checklists
Search for quality checklists, and you will run into two more terms: quality control checklist and quality audit checklist. Both come from quality management, a field much wider than software development. They are often used as synonyms for a QA checklist, but they mean different things:
- A quality control checklist is used to inspect a finished output against its specification. That output can be a manufactured part, a printed document, or a deployed configuration. The logic is the same as in software: define the criteria once, then work through them every time.
- A quality audit checklist works one level up. It covers the process rather than any single output. Companies certified under ISO 9001 run internal audits regularly, record nonconformities, and track corrective actions until they are closed. Checklists can structure every step of this cycle.
For a practical example, see our articles about ISO 27001 Internal Security Audit Template in Jira and Audit Preparation Checklist in Jira.
Frequently Asked Questions About the QA Checklist
What Is the Difference Between a QA Checklist and a Test Case?
A test case is one documented scenario with preconditions, steps, and expected results. A QA checklist is a format, and you can organize a test case in this format as well: each step becomes a checklist item with its own status. However, a QA checklist is a broader category, so many QA checklists do not contain test cases – for example, test entry and exit criteria, release readiness checklist, and onboarding checklist.
What Is a Quality Assurance Review Checklist?
A quality assurance review checklist, or quality assurance checklist, is a list of verification steps a QA engineer runs through before marking a bug fix or feature as release-ready. It defines what needs testing, what counts as “done,” and which checks cannot be skipped. Teams use it for regression testing, edge cases, accessibility checks, and performance passes, depending on what the feature or fix touches. This term also applies across other industries, from manufacturing to healthcare, not just software development.
How Many Items Should a QA Checklist Have?
There is no fixed number, but the ISTQB syllabus gives a reliable rule: phrase each item so that it can be checked separately and directly. If an item hides three checks in one line, it’s better to split it.
The number of checklist items depends on your team’s processes. For some teams, 10-25 steps in a checklist is the most effective format. Other teams use checklists with hundreds of steps. Longer lists are fine when the process requires them, but group them under headers so people can work through them without losing their place. Smart Checklist also allows you to add multiple checklists to the same work item. This lets you organize larger checklists into an easy-to-use format.
How to Use a QA Checklist With Automation in Jira?
Smart Checklist includes native automation rules, so you can automatically add a checklist template to work items based on conditions such as work item type or a workflow transition. For advanced scenarios, you can also integrate it with Jira Automation.