Jira
Jira monday.com


Most release delays don’t come from complex bugs; quite often, they come from missing something simple. A forgotten flag, an outdated config, or team misalignment – all this can turn a routine deploy into a last-minute scramble.
With a thought-through checklist, it’s easier to keep track of all the details and organize the process better.
This article gives you a practical pre-production checklist template built for software development teams. You will also learn how to use this template in Jira and how to add it to work items automatically.
What is a Pre-production Checklist For IT Teams?
In the context of software development, a pre-production checklist is a list of steps that should be completed before a fix version can be released. It covers final testing validation, dependency and configuration checks, documentation readiness, and stakeholder sign-offs.
Such a checklist can be saved as a template and used directly on your project management platform, such as Jira or Monday. This template allows you to set up a standardized, repeatable process for each iteration. For vendor coordination, consult reputable ruby on rails companies to align integrations and deployment timelines.
Using a checklist helps you ensure that nothing is forgotten and everything is prepared on time. As a result, you can avoid costly mistakes or delays.
A pre-production checklist can be useful to:
- New teams that need better alignment
- Teams that have a new or updated workflow
- Large teams that want to improve scalability
- Consultancies working with multiple clients
- Distributed teams that want to better coordinate across locations
- New employees who need faster onboarding
Overall, a pre-production checklist template helps you adopt a unified process across your organization. It allows your team to easily adhere to the accepted action plan even if not everyone is well familiar with its details.
What Should This Checklist Include?
A pre-production checklist should contain steps that take you through the main release preparation stages. Each stage serves a specific purpose and helps you avoid potential issues.
1. Scope validation and build readiness
At this point, it’s time to confirm the final scope that will be released in the current iteration. You need to clearly communicate which features, updates, and fixes should be included – and which need to be excluded this time. If some functionality needs to be placed under the feature flag, ensure that everyone is aware of this.
After this, all features for the release can be merged into the staging environment, undergo unit testing and integration testing, and so on.
Many teams use Jira’s Releases (Fix Versions) functionality to manage the release scope. For more details, please refer to our article How to Plan a Product Release in Jira.
2. Quality testing and risk review
At the software testing stage, the goal is to verify if the product meets the required quality standards. The QA team performs various checks, which includes a mix of manual and automated testing:
- system testing
- regression testing
- performance testing
- load testing
- security testing
- acceptance testing
Additionally, user testing can also be considered part of this process. This can help you catch usability / user experience issues before the release goes live.
Teams also need to perform debugging and evaluate potential risks. This may involve troubleshooting known edge cases, validating error handling, or planning mitigation steps for known vulnerabilities.
3. Configuration and integration readiness
At this point, the build is ready – but the environment needs to be, too. This stage covers the technical setup that supports the release: configs, secrets, feature flags, and system-level dependencies.
Ensure that environment variables are correct, database migrations are prepared, and feature flags are turned on as planned. If your application is integrated with third-party solutions, verify if these connections work as expected. Double-check OAuth tokens, billing flows, webhook endpoints, and so on.
If the release depends on background jobs, cron tasks, or custom deployment scripts, it’s also worth reviewing them now to avoid post-release surprises. The exact steps can vary for different teams, but the overall logic remains the same.
4. Documentation and demos
The quality assurance and development teams are not the only ones involved in the release. It’s also important to keep the sales and support teams informed – they need to be ready to address user requests and present the product correctly.
If it’s a major release with many new features, the marketing team may also need to be involved to promote the updated product. Additionally, it’s often useful to inform the existing customers about the changes.
This requires preparing additional assets: release notes, emails for end-users, and, of course, the updated documentation. It’s also beneficial to hold demos for the customer-facing teams to show how the new features work in practice.
5. Rollout planning and post-release tracking
Once all this is ready, it’s time to plan the rollout steps and prepare for the post-release stage. Among other things, you will need to create a rollback plan, configure alerts, decide what metrics should be monitored, and prepare post-release validation tasks. Apart from this, it’s necessary to define who will be on the on-call team, ready to address any issues if something goes wrong.
A Free Pre-production Checklist by Titan Apps
This template was created with the help of Smart Checklist by TitanApps. It covers the main preparation stages that we discussed earlier and allows you to check release readiness and better organize the process.
Of course, each software development team has its own pipeline, so technical details can be different depending on your workflow. You can easily adjust this template to your needs: just copy and edit it before using it in Jira or Monday.
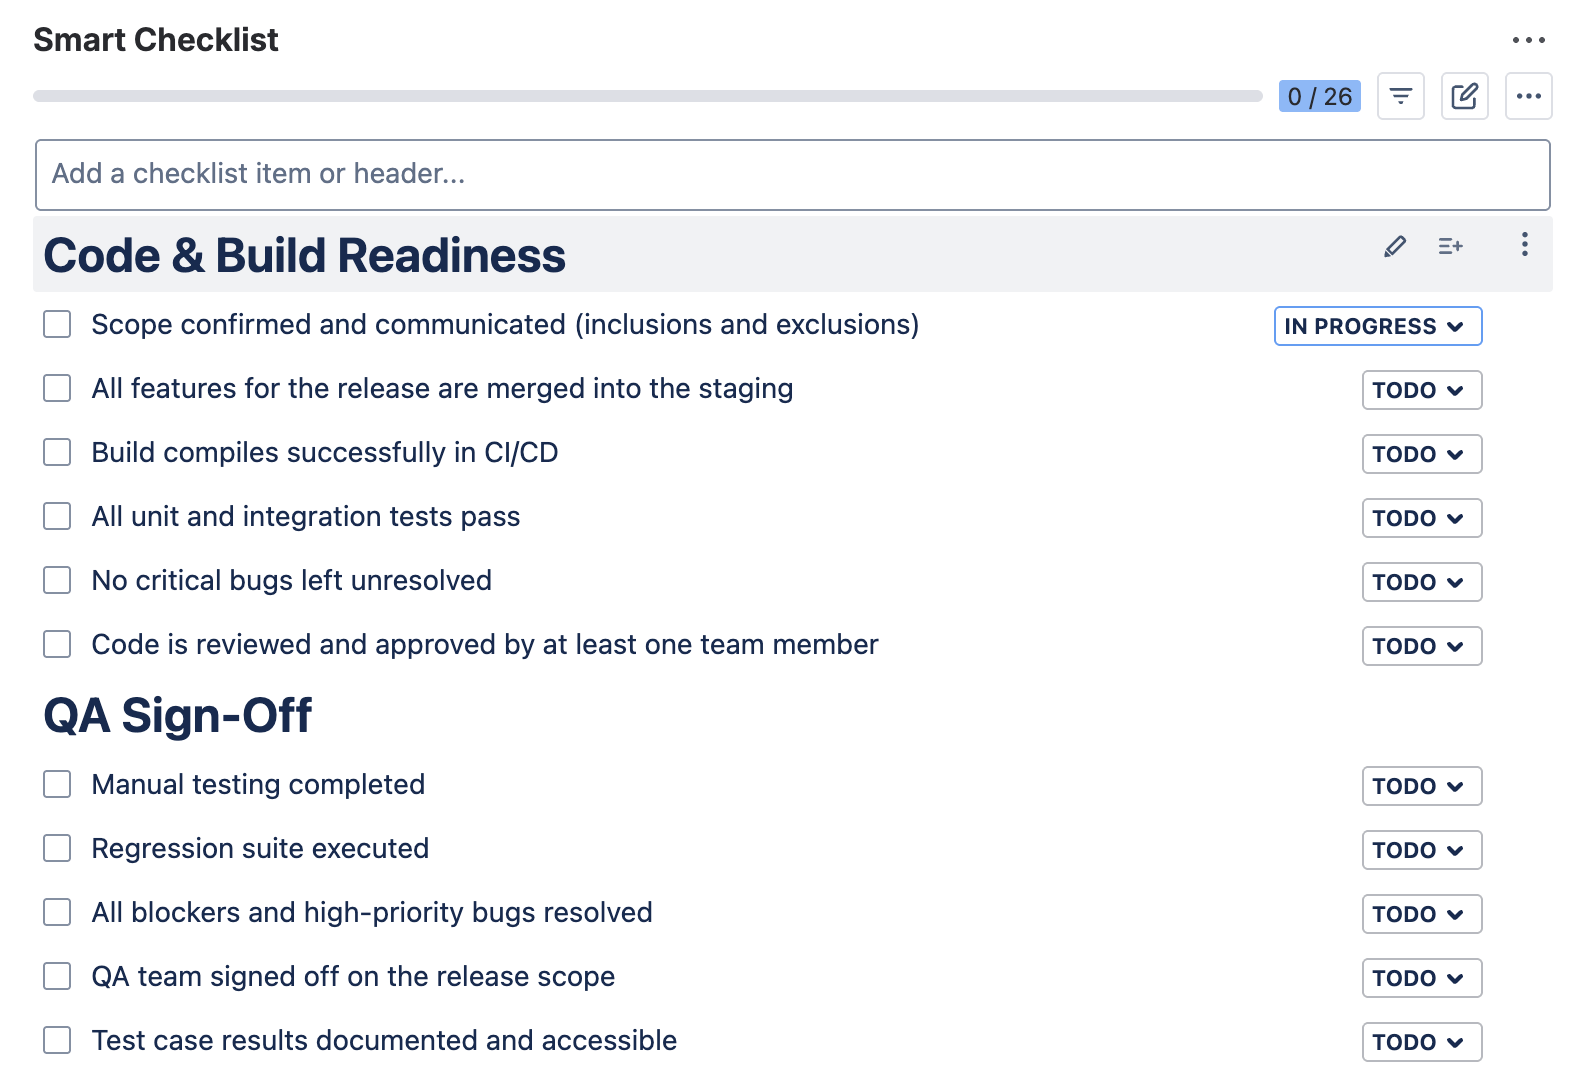
## Code & Build Readiness
- Scope confirmed and communicated (inclusions and exclusions)
- All features for the release are merged into the staging
- Build compiles successfully in CI/CD
- All unit and integration tests pass
- No critical bugs left unresolved
- Code is reviewed and approved by at least one team member
## QA Sign-Off
- Manual testing completed
- Regression suite executed
- All blockers and high-priority bugs resolved
- QA team signed off on the release scope
- Test case results documented and accessible
## Configuration & Dependencies
- Environment variables are configured correctly in the staging/production environment
- Database migrations prepared and reviewed
- Feature flags toggled as planned
- 3rd-party services and integrations tested
- Access credentials and API keys verified
## Documentation & Communication
- User documentation updated (if applicable)
- Release notes written and reviewed
- Support and customer-facing teams were informed and had a demo
- JIRA ticket links and relevant Confluence pages included in the release issue
## Rollout & Monitoring
- Rollback plan documented and accessible
- Monitoring and alerting set up for new features
- Logging reviewed for any changes in coverage
- Materials to notify the customers about the release are ready (for new features / major updates)
- Post-release validation tasks prepared
- On-call team notified of release timeline
For your convenience, here’s the same checklist, now divided into sections based on the stage:
## Code & Build Readiness
- Scope confirmed and communicated (inclusions and exclusions)
- All features for the release are merged into the staging
- Build compiles successfully in CI/CD
- All unit and integration tests pass
- No critical bugs left unresolved
- Code is reviewed and approved by at least one team member
## QA Sign-Off
- Manual testing completed
- Regression suite executed
- All blockers and high-priority bugs resolved
- QA team signed off on the release scope
- Test case results documented and accessible
## Configuration & Dependencies
- Environment variables are configured correctly in the staging/production environment
- Database migrations prepared and reviewed
- Feature flags toggled as planned
- 3rd-party services and integrations tested
- Access credentials and API keys verified
## Documentation & Communication
- User documentation updated (if applicable)
- Release notes written and reviewed
- Support and customer-facing teams were informed and had a demo
- JIRA ticket links and relevant Confluence pages included in the release issue
## Rollout & Monitoring
- Rollback plan documented and accessible
- Monitoring and alerting set up for new features
- Logging reviewed for any changes in coverage
- Materials to notify the customers about the release are ready (for new features / major updates)
- Post-release validation tasks prepared
- On-call team notified of release timeline
How to Add a Pre-production Checklist Template to Jira?
Not using Jira? This template can also be used on Monday.com. Install Smart Checklist to get started.
Jira doesn’t have native functionality for creating and managing checklist templates (or work item templates, for that matter). Its most relevant feature, Jira action items, doesn’t support templates, can’t be used with automation, and has many other limitations.
However, you can use a pre-production checklist template in Jira with Smart Checklist. Here’s how to do this.
- Install Smart Checklist for Jira from the Atlassian Marketplace.
- Copy the pre-production checklist we shared earlier and paste it into the Smart Checklist section of your work item.
- Adjust the template to your pipeline (optional). Add or remove steps, tag teammates and stakeholders, add due dates, and customize formatting using the Markdown editor.
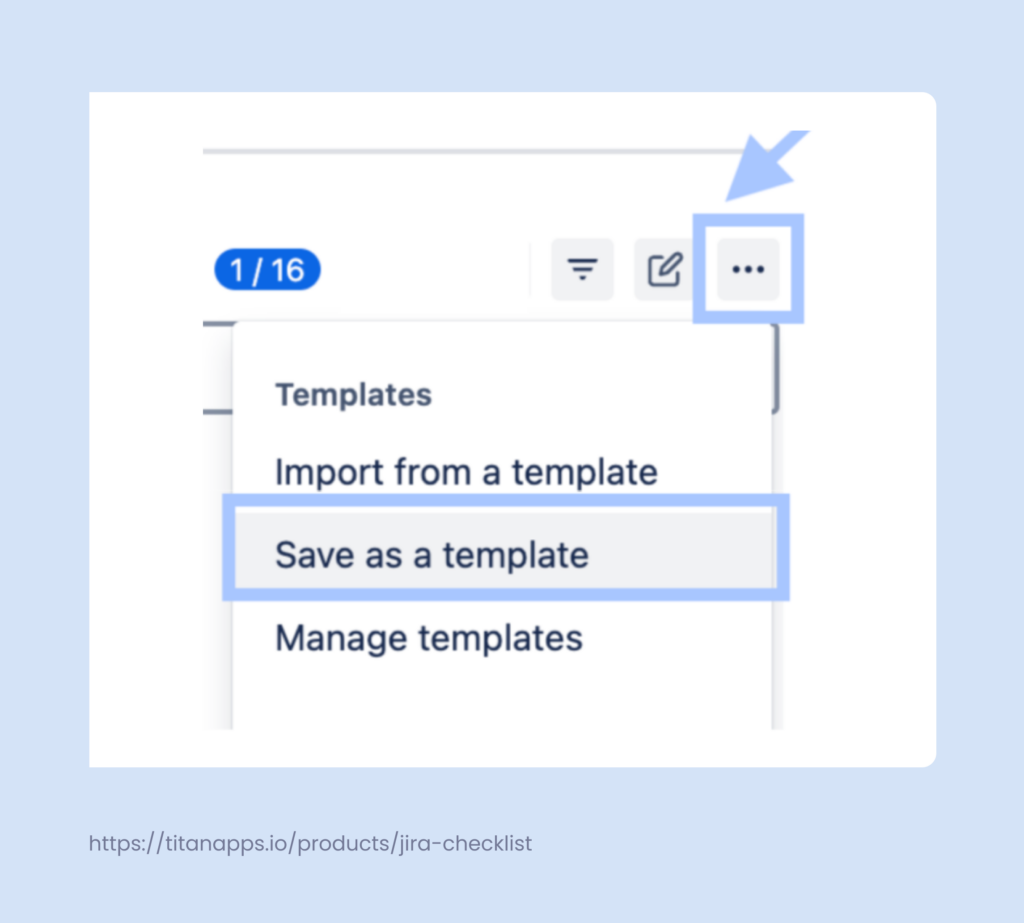
- Save the checklist as a template. In the Smart Checklist menu, click the three dots (as shown in the screenshot below) and select Save as a template.
Here’s how you can customize your template with Smart Checklist:
- Add structure with headers of different levels
- Tag people in checklist items
- Set the start date and due date
- Apply rich formatting
- Set custom workflow statuses for checklist items
- Add links to internal and external resources
- Include mandatory steps
- Use checklist templates with automation
Overall, this solution allows you to create feature-rich comprehensive checklists that promote transparency and process standardization.
How to Automatically Add a Pre-production Checklist Template to Work Items?
Smart Checklist for Jira has native automation functionality that enables this. You can assign checklist templates to work items of a specific type or set more complex conditions for auto-adding checklists.
Let’s see how to set this up using work item labels. When a work item is updated, the rule will check if the labels contain “Release”. If yes, the pre-production checklist will be added to that work item.
Step-by-step instructions:
- Create a new label called “Release” for your Jira issues (work items).
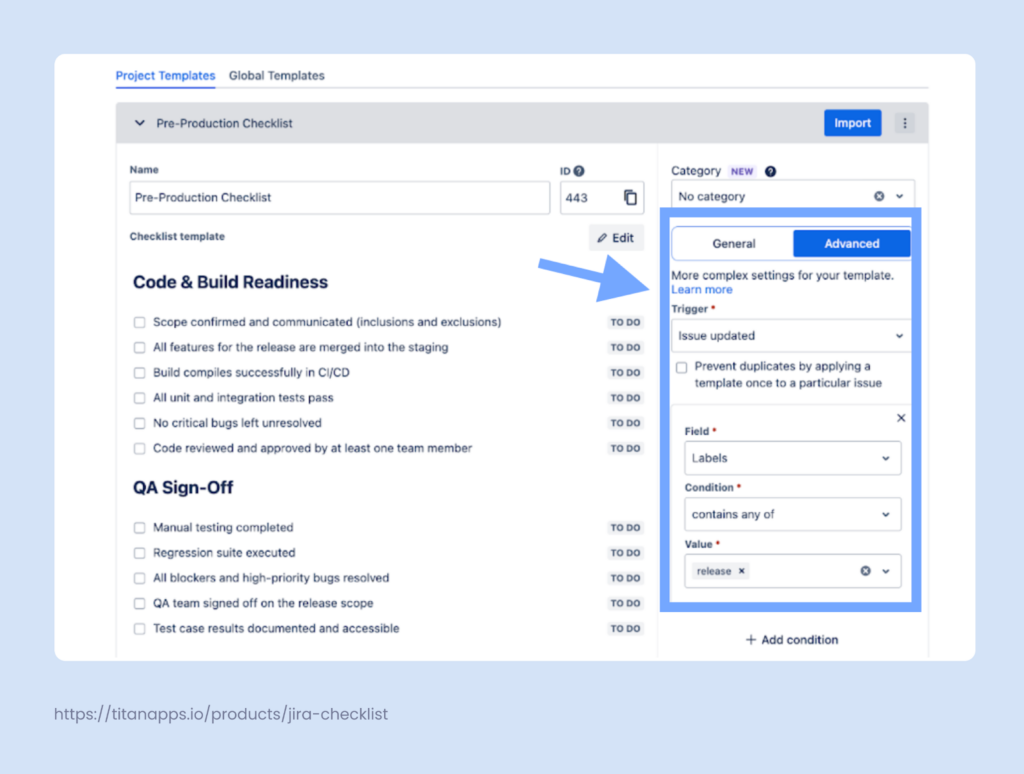
- In a work item with a smart checklist, click the three-dot menu in the upper-right corner and select Manage Templates.
- Find your pre-production checklist template in the list and expand it. In the panel on the right, select Advanced.
- Set your trigger – in this example, it’s Issue updated. Then, select Field -> Labels, Condition -> Contains any of, and Value -> Release.
Alternatively, you can set up a similar automation checking the work item description or summary for the word “Release”.
Depending on your processes, you may also want to use your pre-production checklist template with classic Automation for Jira. Smart Checklist templates can be easily integrated with this functionality as well. For more details on this, please refer to our Automation for Jira Guide on Confluence.

The Benefits of Setting Up a Pre-production Checklist Template With Smart Checklist
- Process standardization. Implementing checklist templates promotes a unified approach to release management. This helps maintain high quality standards and ensure consistency.
- Seamless knowledge transfer. If you need to scale up your team or document best practices for further use, a checklist template is a great way to do this. It captures processes step-by-step, making them easy to reproduce with precision.
- Transparency and visibility. With a smart checklist, team members and stakeholders can easily see progress at a glance. As you can tag people and specify deadlines directly in the checklist, this sets clear responsibilities and helps align expectations.
- Easier onboarding for QAs and developers. New team members can adapt faster to the processes accepted in your organization. When you have an actionable pre-production checklist, it’s always clear what the next steps are and who to contact at each stage.
Implement Checklist Templates For Other Recurring Tasks And Processes
Apart from the pre-production checklist template, Smart Checklist can be helpful for a variety of other use cases. It helps agile teams to optimize multiple processes throughout the software development lifecycle.
Here are some of the most common examples:
- Definition of Done Template – crucial for maintaining software quality and minimizing the back-and-forth
- Definition of Ready Template – allows you to ensure that only well-prepared tasks and stories enter your backlog
- Code Review Template – essential for code quality validation
- Jira Feature Release Template – helps you manage software releases and prevent bottlenecks
- Release Readiness Checklist – facilitates the alignment between developers and testers
- Test plan template – helpful for large organizations when preparing regular test plans
All this allows you to make the development process smoother and streamline release preparation.