Jira
Jira monday.com


Planning is critical to project success, and Jira is a powerful tool that allows you to do this. In this article, we’ll cover the key steps involved in project planning in Jira. This includes defining project goals, determining risks and dependencies, and creating a timeline that accurately reflects the project plan.
Whether you are new to Jira or an experienced user, this article will provide valuable insights into how to make the most of Jira’s project planning capabilities.
TL;DR: What are the Key Stages of Project Planning in Jira?
- Create and configure your Jira project. Set up the project space and configure workflows before adding any tasks.
- Define the work hierarchy. Decide how work will be grouped with high-level epics, tasks, and subtasks. Create custom work types, if needed.
- Add work items and set priorities. Create high-level epics and add tasks. Prioritize them and assign owners to the key work chunks.
- Add checklists with execution standards, such as DoD and DoR, and with step-by-step plans for recurring tasks, such as Code Review.
- Plan execution according to your delivery model. Start sprint planning (for Scrum) or configure your Kanban board WIP limit (for Kanban).
Link dependencies and build a timeline. Connect related work items and visualize sequencing, overlaps, and delivery expectations.
We explore these steps in more detail further in the article.
Project Planning in Jira Starts… Outside of Jira?
The initial phase of any project usually involves defining its purpose and objectives. This includes answering questions such as “What is the need for this project?” “What are the desired outcomes?” and “How will we measure the success of the project?”
Once the objectives are clearly defined, the next step is to secure organizational support. You will need to determine which resources are necessary and assemble the project team. Another important step is to gather detailed requirements.
While the methodologies for executing the project may vary, we’d suggest starting by clearly understanding the following:
- What stakeholders will be involved in the processes
- Who the project’s target audience is
- What the project needs to accomplish
- What the key success metrics are
- What the project’s tech stack will look like
- What related work has already been completed
- Whether your competitors have already done something similar
These insights will help you identify your objectives, blockers, and risks. From here, it becomes easier to structure the solution so it addresses them all. Sometimes this means developing a feature; sometimes it means setting up a new process or a workaround; and sometimes it even means deciding to live with the problem for the time being.
Atlassian offers a nice Project Plan Template for Confluence. It’s perfect for finalizing the scope you’ve worked on, identifying key roles, and drafting a timeline that will later serve as the roadmap for project tasks in Jira.
Additionally, you can use various planning and prioritization frameworks to help you shape the project vision.
Here at TitanApps, we use the BRIDGeS framework. It is a solid approach for multi-context analysis that leads to a conclusive decision or solution. This project planning process guides you through all the necessary stages, including problem description, prioritization, solution variations, and solution breakdown. It will help you prioritize features and develop a viable plan.
Once all initial preparations are complete, you can start working with Jira.
How to Organize Project Planning in Jira in 6 Steps
Project planning in Jira is the process of structuring work before execution. It includes defining scope, work hierarchy, dependencies, timelines, and ownership.
Step 1: Create and Configure Your Jira Project
The first practical step in Jira is to create a project that will hold all planning and execution work. In Jira, projects are now called spaces.
Start by choosing the project type that best matches your needs – for example, Work Management or Software Development. This choice affects available views, reports, and pre-set workflows. For Software Development, you will also need to choose a delivery model: sprint-based (Scrum) or continuous (Kanban).
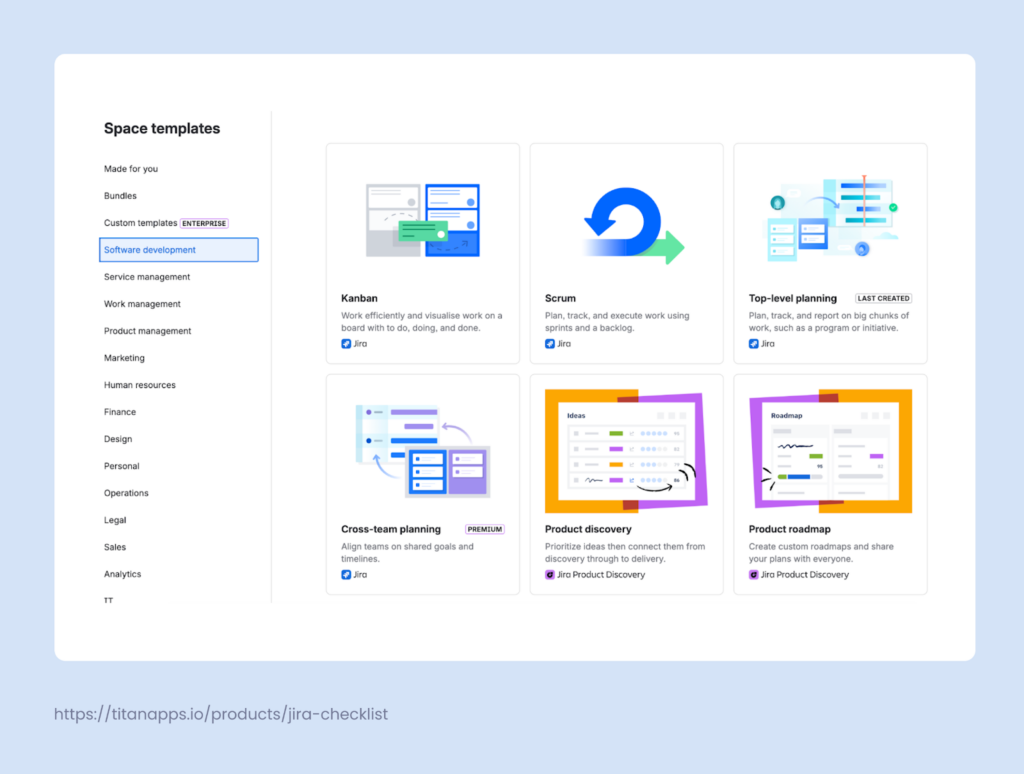
There are additional project/space templates that can help you get started quickly. Among others, they include templates such as Top-level planning and Cross-team planning. These templates are available only with Jira Premium and Enterprise subscriptions, and their main features are based on Jira Plans functionality. It was designed for advanced planning, so we will discuss it further once we have covered the basics.
These templates can be helpful if project planning in Jira is your main focus. But don’t worry – if you select Kanban or Scrum, you will still be able to use all the planning features in your project (according to what’s included in your current Jira subscription).
Next, you need to decide how the project should be managed. Team-managed projects work well for autonomous teams that need flexibility. Company-managed projects make sense when you have several teams and want to set shared standards, reusable configurations, or reporting across multiple projects.
After creating the project, you’ll need to set up workflows and configure your Jira board. As this is another broad topic, we won’t cover this process in detail here. If you’d like to explore further, please refer to our Jira configuration guide, which contains all the information you need.
Step 2: Decide how to Structure Your Project And Define Work Hierarchy
Before adding any work items, take time to define how work will be structured inside the project. This decision affects planning, reporting, and long-term maintainability.
Start by defining your top planning level. In many projects, epics represent major deliverables, phases, or outcomes. They usually contain tasks and subtasks. In simpler setups, the project itself can serve as the main container, with epics used only where grouping is needed. Decide which main chunks of work should become epics, and the rest of the structure will follow.
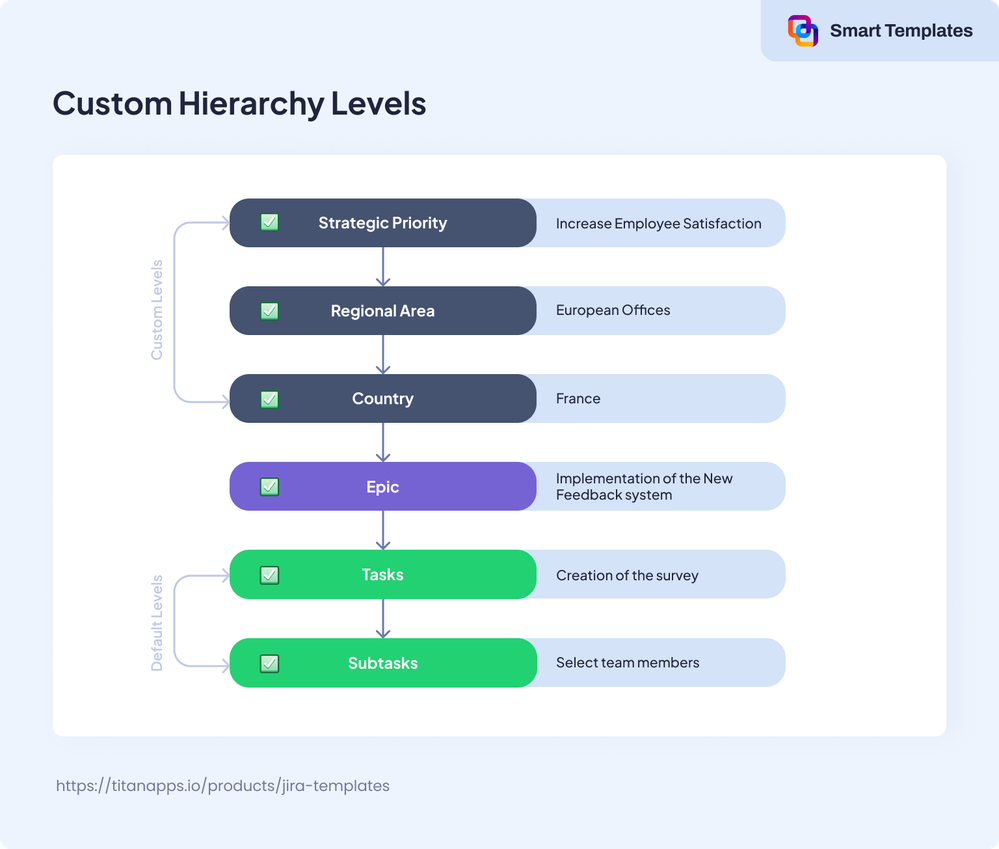
If your subscription includes Jira Plans (available with Jira Premium and Enterprise tiers), you can introduce additional hierarchy levels above epics. These can be Jira Themes and Initiatives or other custom levels.
At this stage, you also need to review the available work types in the project. You can remove those you do not need and add custom work types if your planning requires them. For example, some teams add Ideas, Goals, or OKRs. If you selected the project template that matches your industry, you’ll already have the key work types you need, but there’s always room for improvement.
For best results, choose the simplest hierarchy that supports clear ownership and realistic planning. Once this is in place, it becomes much easier to build timelines, manage dependencies, and plan execution.
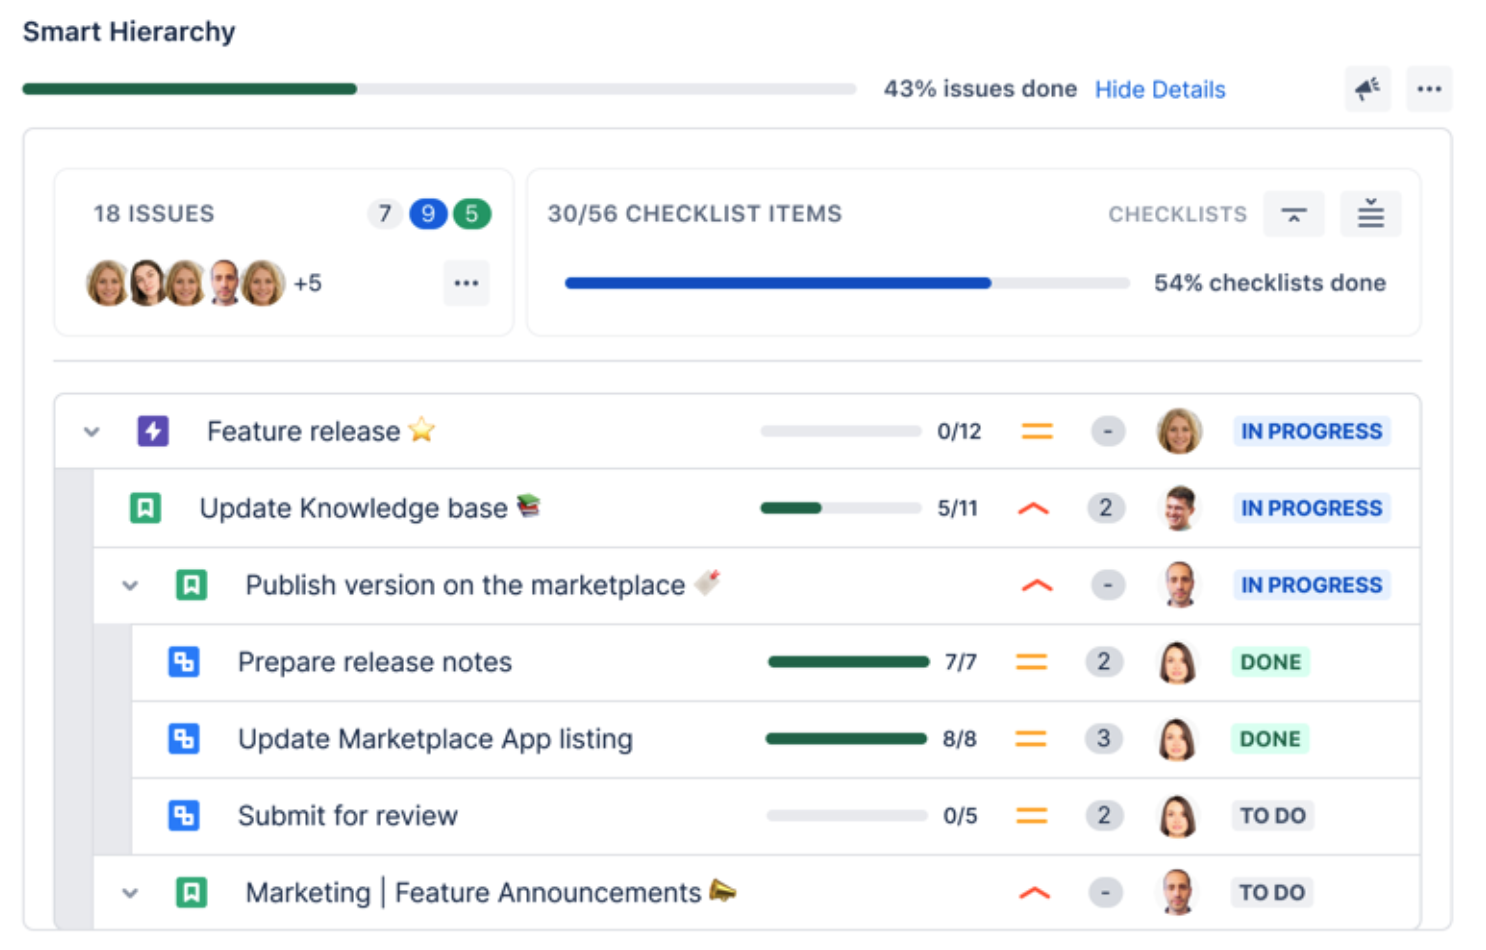
Pro tip: Get a Clear Overview of Your Project With Smart Hierarchy
For large-scale projects, navigating complex structures can become rather challenging. This is especially true if you have five or more levels of hierarchy. To improve clarity and simplify navigation, you can use Smart Hierarchy, a free add-on from TitanApps.
Here’s what it can look like:

It shows you the complete work hierarchy in a single view, visualized in a nested layout. Here, you can track project progress in real time and view the most essential work item details, such as story points, assignees, and completion rates. In addition, Smart Hierarchy shows progress across projects, enhancing transparency for the collaborating departments.
You can install Smart Hierarchy from the Atlassian Marketplace to see how it works for your team.
Step 3: Add Work Items and Set Priorities
Once work items are created, they need to be prioritized so the team knows what to focus on first. In Jira, this is handled through the backlog, the priority field, and board configuration.
The backlog is where work is ordered at the project level. Items at the top indicate what should be addressed next, while items further down are intentionally deferred. This ordering is used during sprint planning or when selecting the next items to work on in a continuous flow setup.
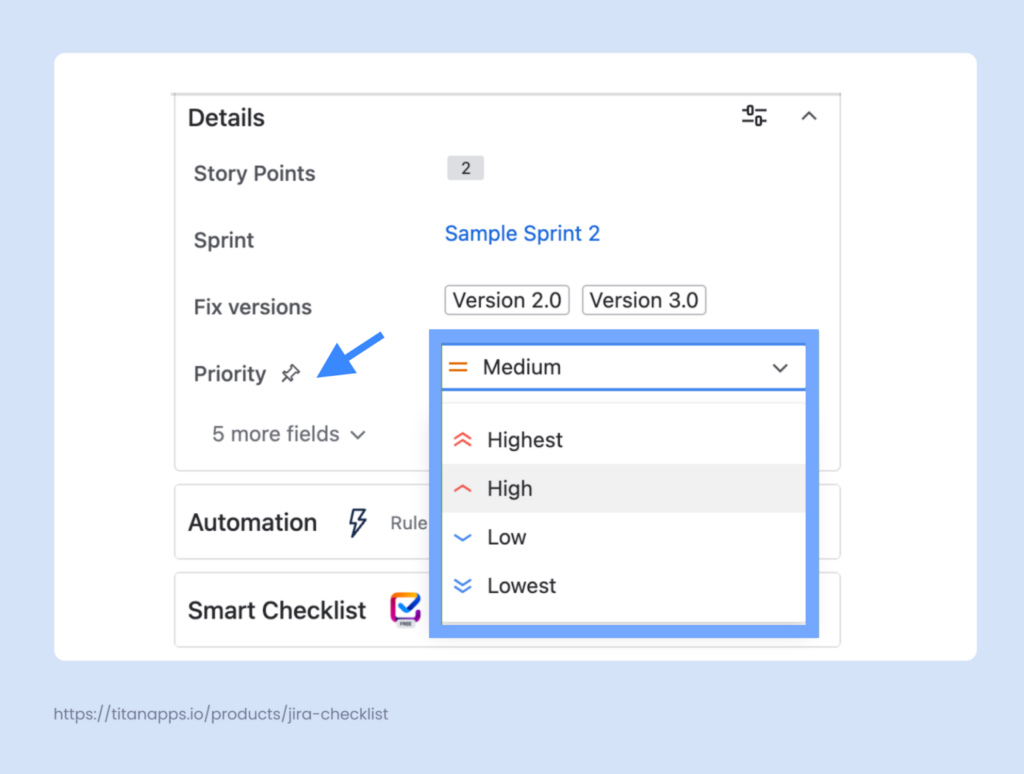
The priority field adds an explicit urgency signal. Jira provides default priority levels: Highest, High, Medium, Low, and Lowest. If necessary, you can add custom priority levels, such as Must, Should, and Could.
Prioritization can also be displayed directly on the board, depending on its configuration. One option is to allow team members to freely drag and drop items on the board, letting them organize and prioritize the work they are personally responsible for.
Another option is to configure the board to display items based solely on the priority field, with higher-priority cards displayed at the top. This approach enforces a consistent priority order and reduces subjective reordering during execution.
At this stage, you can also assign key work items or epics to the people responsible for delivering them. Each item needs a single owner who drives progress and coordinates contributors. This helps priority decisions translate into real action rather than open questions.
Step 4. Add Checklists for Granular Planning and Recurring Tasks
At this stage, planning shifts from individual work items to how work should be executed across the project. You can integrate work quality criteria directly into your plan. In other words, you’ve already planned what should be done, so now you can also plan how and at what quality level it should be done.
This is where checklists are most effective. They are great for documenting multiple parameters or for capturing step-by-step processes for repetitive tasks. You can use Smart Checklist for Jira to automatically include such checklists in your work items. This will help you ensure high quality, promote consistency, and save time on recurring processes.
A classic example is the Definition of Done checklist. It helps your team members confirm that all the quality requirements are met consistently:
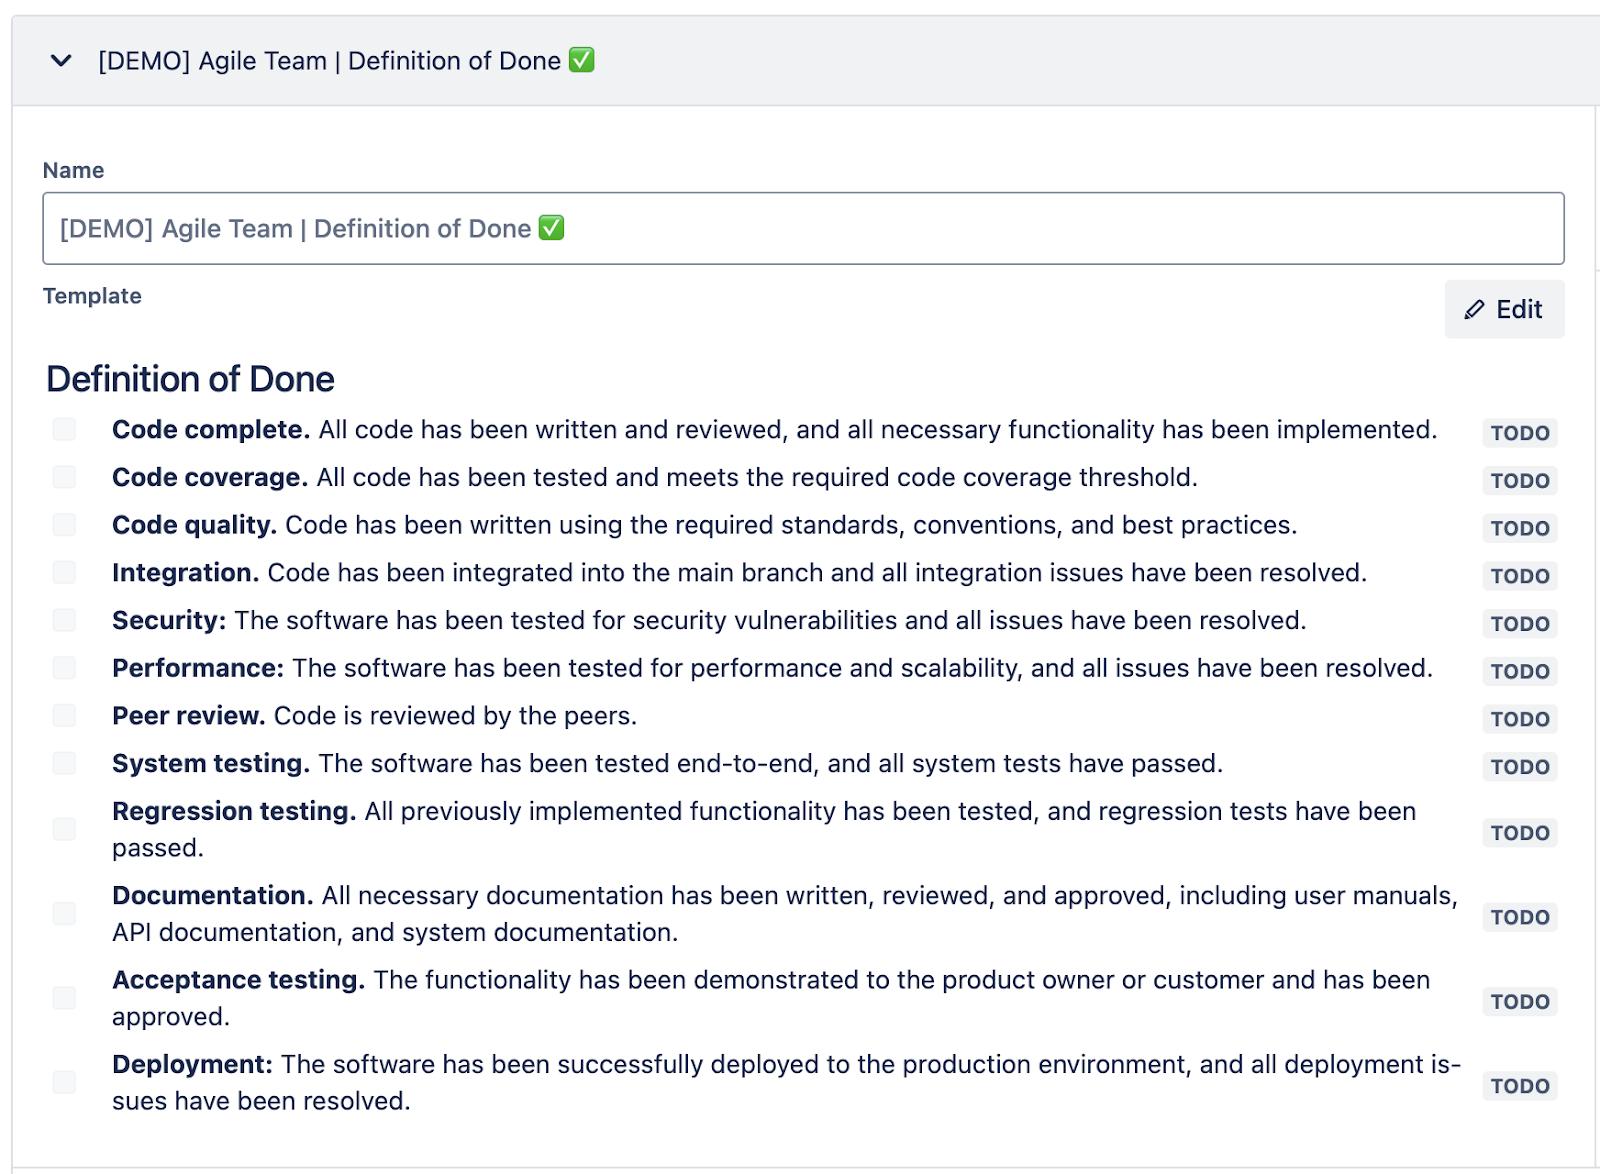
## Definition of Done
- **Code complete.** All code has been written and reviewed, and all necessary functionality has been implemented.
- **Code coverage.** All code has been tested and meets the required code coverage threshold.
- **Code quality.** Code has been written using the required standards, conventions, and best practices.
- **Integration.** Code has been integrated into the main branch, and all integration issues have been resolved.
- **Security:** The software has been tested for security vulnerabilities, and all issues have been resolved.
- **Performance:** The software has been tested for performance and scalability, and all issues have been resolved.
- **Peer review.** The code is reviewed by the peers.
- **System testing.** The software has been tested end-to-end, and all system tests have passed.
- **Regression testing.** All previously implemented functionality has been tested, and regression tests have been passed.
- **Documentation.** All necessary documentation has been written, reviewed, and approved, including user manuals, API documentation, and system documentation.
- **Acceptance testing.** The functionality has been demonstrated to the product owner or customer and has been approved.
- **Deployment:** The software has been successfully deployed to the production environment, and all deployment issues have been resolved.
Moreover, you can easily set up Automation on issue creation. It will assign the DoD checklist to all stories – or to all work items that meet other criteria of your choice. As a result, this Definition of Done checklist will always be placed exactly where it’s needed – directly in Jira work items.
Checklists also let you plan recurring processes and repetitive tasks in advance. Instead of deciding each time how a process should run, you define it once and reuse it across projects or work items. This makes execution more predictable and helps you document and reuse best practices.
Here’s an example of a checklist for a recurring task, Code Review:
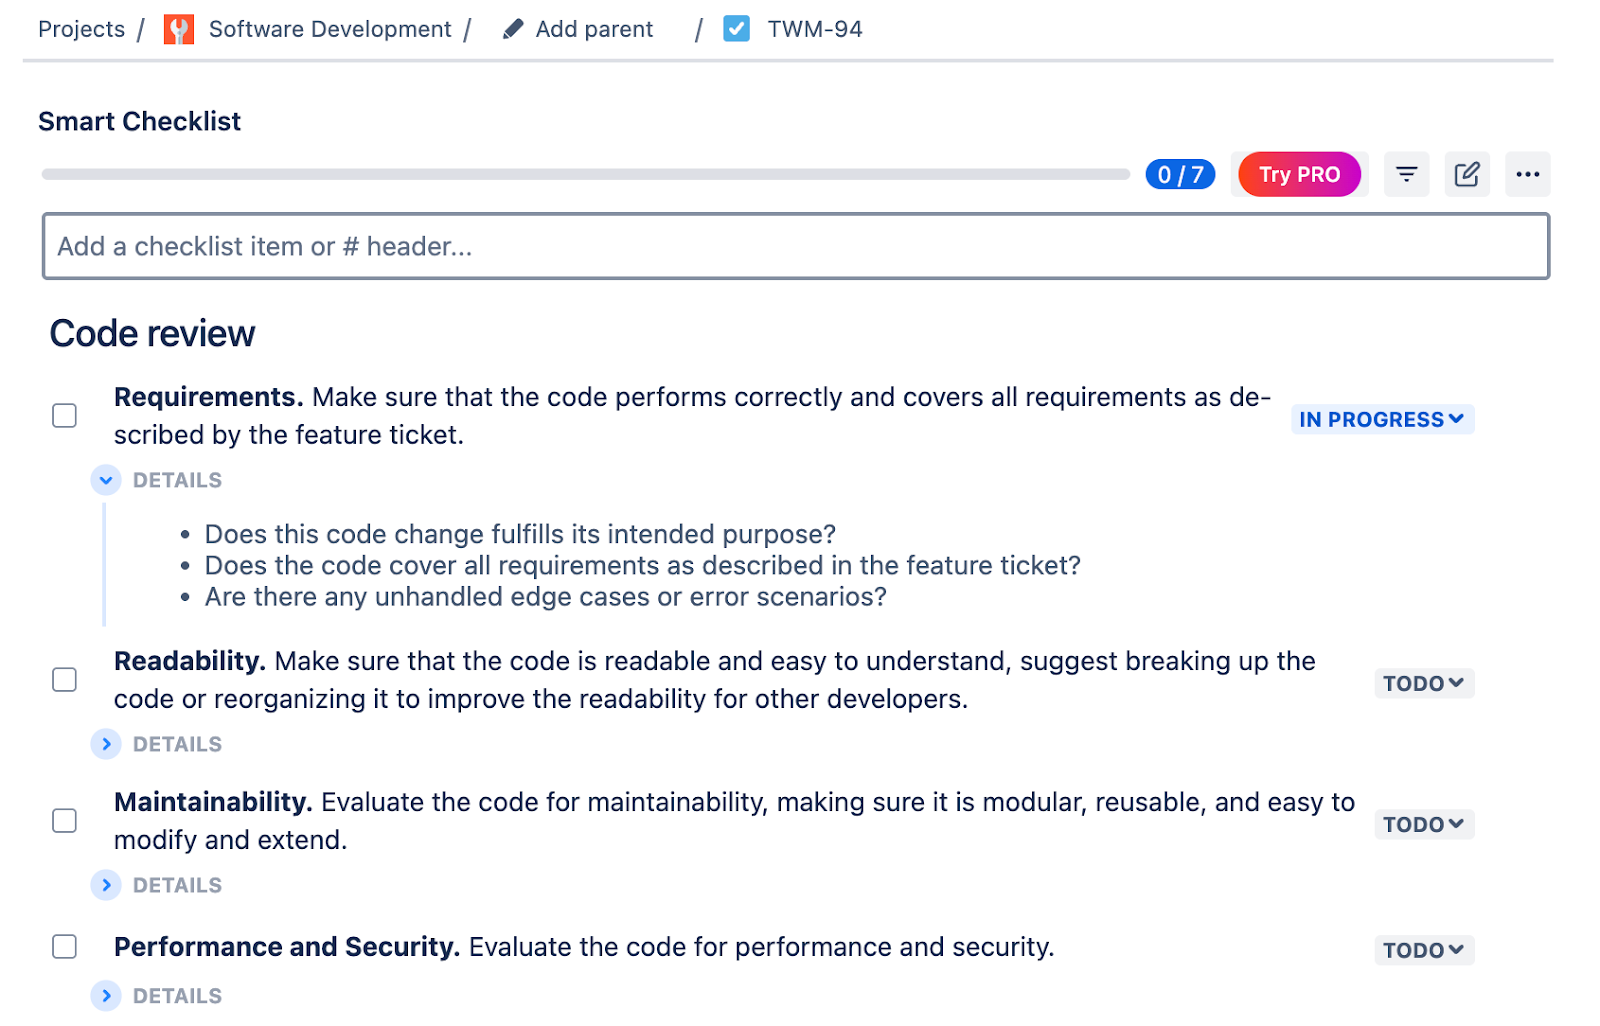
## Code review
- **Requirements.** Ensure that the code performs correctly and covers all requirements as described in the feature ticket.
> * Does this code change fulfill its intended purpose?
> * Does the code cover all requirements as described in the feature ticket?
> * Are there any unhandled edge cases or error scenarios?
- **Readability.** Make sure that the code is readable and easy to understand, suggest breaking up the code or reorganizing it to improve the readability for other developers.
> * Is the code easy to understand?
> * Are variable names and function names clear and descriptive?
- **Maintainability.** Evaluate the code for maintainability, making sure it is modular, reusable, and easy to modify and extend.
> * [DRY principle.](https://en.wikipedia.org/wiki/Don%27t_repeat_yourself) Are there any duplicated sections of code that could be consolidated into reusable functions or classes?
> * Will this change add undesirable compile-time or run-time dependencies?
> * Are there any best practices, design patterns, or language-specific patterns that could enhance the code significantly?
> * Does this code follow the single responsibility principle?
- **Performance and Security.** Evaluate the code for performance and security.
> * Will this code change negatively impact system performance?
> * Is there a way to significantly improve the code’s performance?
> * Are sensitive data such as user data and credit card information being securely handled and stored?
- **Testability.** Evaluate the code for testability, ensuring that it can be easily tested and that any necessary unit tests or integration tests have been written.
> * Is the code testable?
> * Do the existing tests reasonably cover the code change?
> * Are there any other essential unit, integration, or system tests that should be added?
- **Documentation.** Verify that the code includes appropriate documentation, ensuring that it is clear, concise, and up to date.
> * Does the code include appropriate documentation?
> * Is the documentation clear, concise, and up-to-date?
- **DevOps**. Verify that all the steps needed to be done after the PR deploy are described.
> * Are there any risks related to the deployment of this PR in terms of production operation?
For greater efficiency, this checklist can also be assigned to work items automatically. This can be done using Smart Checklist’s native functionality or by integrating it with Automation for Jira, which can be useful for advanced scenarios.
You can also prepare such checklists for other recurring processes or for tasks that require standard criteria. When you have a set of checklist templates automatically added to work items, it saves you a lot of time and improves team collaboration. Everyone will have a clear action plan when they open their Jira ticket. This creates shared expectations and reduces the back-and-forth.
Documenting processes with Smart Checklist is a powerful way to streamline and optimize your workflows. When used this way, checklists become an essential part of project planning in Jira. They define the quality bar, validation steps, and execution rules for the entire team, helping your project move faster without compromising quality standards.

Step 5: Start Sprint Planning / Configure a Kanban Board
Now, it’s time to decide how work will move through the project on a day-to-day basis.
If your team works in Scrum, planning happens in fixed iterations called sprints. Work is prepared and prioritized in the backlog, then it’s selected during a sprint planning session based on team capacity.
Each sprint has a clear goal and timeframe, which helps the team focus on delivering a defined set of outcomes. Progress is tracked against the sprint, making short-term planning more predictable. If you work with Scrum, your next steps are creating a new sprint in Jira and populating it with work items.
You will also need to hold a sprint planning meeting with your team and agree on estimations.
In the Scrum framework, assigning story points to work items is an important part of project planning in Jira. It helps you understand how much time a certain task will require. Then you can see how much work can realistically be completed within a sprint, so you can plan accordingly.
| Story Point | Time to deliver work |
|---|---|
| 1 | Minutes to 1-2 hours |
| 2 | Half a day |
| 3 | 1-2 days |
| 5 | Half a week |
| 8 | Around 1 week |
| 13 | More than 1 week |
| 21 | Full Sprint |
For more details on preparing estimates and running the planning session, please see our tutorials: Jira Sprint Planning and How to Plan a Product Release in Jira.
If a team uses Kanban, work is planned as a continuous flow rather than in time-boxed iterations. There is no sprint planning in this case. Instead, the focus is on visualizing all active work on a Kanban board and controlling the number of work items in progress at any given time.
This is where work-in-progress limits come into play. They cap the number of items allowed in specific workflow stages, such as In Progress or In Review. When a column reaches its limit, new work should not be started until existing items move forward. This encourages the team to be more focused, reduces context switching, and makes bottlenecks visible early.
In contrast, a Scrum board shows all work planned for the current sprint. In both approaches, the board serves as the primary execution view. It reflects the workflow you defined earlier and shows how work moves from start to completion. Choosing the right delivery model helps your project plan translate into daily execution.
Step 6: Set Up Dependencies and Build a Timeline
The next step is to map how work depends on other work and place it on a timeline.
A dependency is a relationship in which one work item cannot start or finish before another one does. The most common case is a blocker, where task B depends on the completion of task A. Dependencies help teams understand sequencing, spot risks early, and avoid planning work that cannot realistically begin yet.
In Jira, dependencies are usually set by linking work items. You select the relevant link type, such as “blocks” or “is blocked by,” and connect the related items. This creates a visible relationship that can inform planning and coordination. The key is to link only meaningful dependencies, not every loosely related task.
With dependencies in place, you can switch to the timeline view. The timeline allows you to place epics or other high-level work items on a time axis using start and end dates. This turns your project plan into a visual roadmap. You can immediately see overlaps, gaps, and problematic sequences.
To make dependency lines visible in a basic project timeline, you need to set the start and due dates for the key tasks. The timeline only works with date-based items. Then, link the items using a dependency link type. For example, link Epic A ? blocks ? Epic B. Please note that this instruction applies only to software projects (spaces). For business projects, you may need to use Jira Plans to visualize dependencies.
With Jira Plans, timelines become even more powerful. Plans automatically visualize dependencies, highlight scheduling conflicts, and support cross-project timelines. This is essential when work spans multiple teams or projects. Cross-project planning in Jira helps you adjust dates and priorities.
At this stage, the goal is not to create a perfect schedule. It is to build a realistic view of what depends on what and when work is expected to happen, based on the structure you defined earlier.
Advanced Project Planning in Jira: How to Use Jira Plans
For larger initiatives or projects involving multiple teams, Jira’s standard planning tools may not be sufficient. As mentioned earlier, with Jira Plans you can access advanced features and enable organization-wide planning. This functionality is available to users with the Jira Premium or Enterprise subscription.
The key features include:
- Cross-project planning and roadmaps. Jira Plans lets you consolidate work from multiple Jira projects into a single roadmap. This makes it easier to coordinate timelines, align delivery across teams, and understand how different work streams relate to one another.
- Additional hierarchy levels above epics. Plans support custom hierarchy levels, such as Jira Themes and Initiatives, OKRs, Strategic Priorities, and so on. These higher-level containers help you plan and track work at a strategic level while keeping a clear connection to execution items inside individual projects.
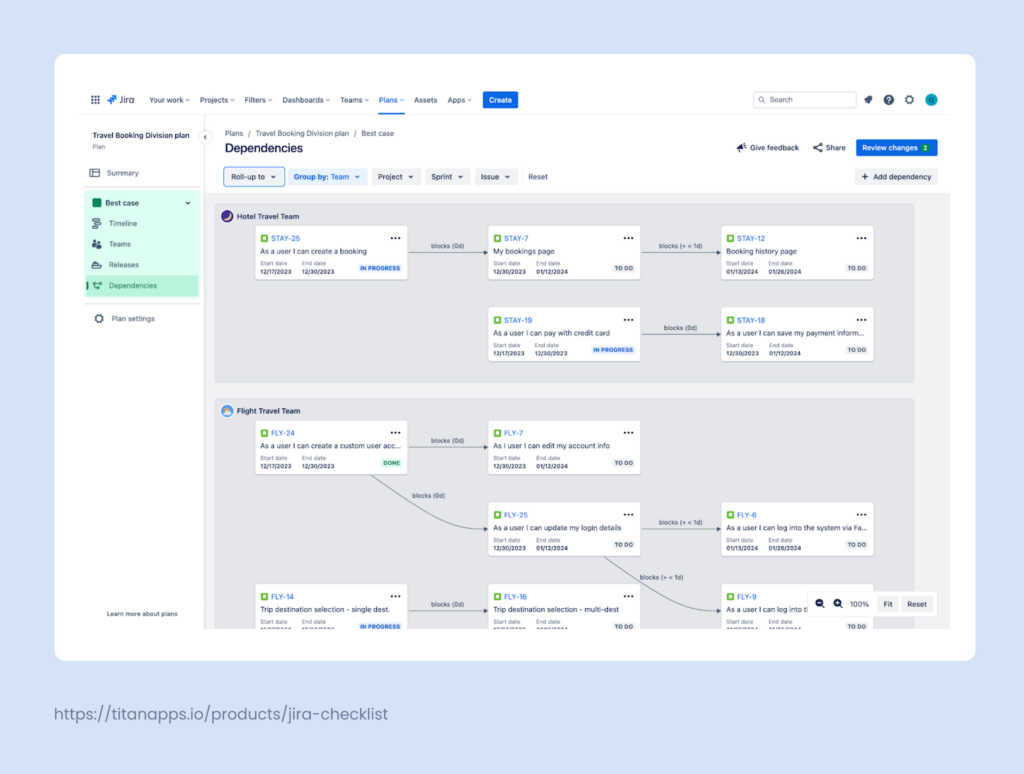
- Dependency management. Dependencies on your plan can be visualized as lines or badges. In addition to the timeline view, Jira Plans include a dedicated Dependencies view. There, you can see all dependencies between work items across projects presented as cards connected with lines. This additional instrument gives you greater visibility and more flexible dependency management. It’s useful for resource management, capacity planning, and allocation.
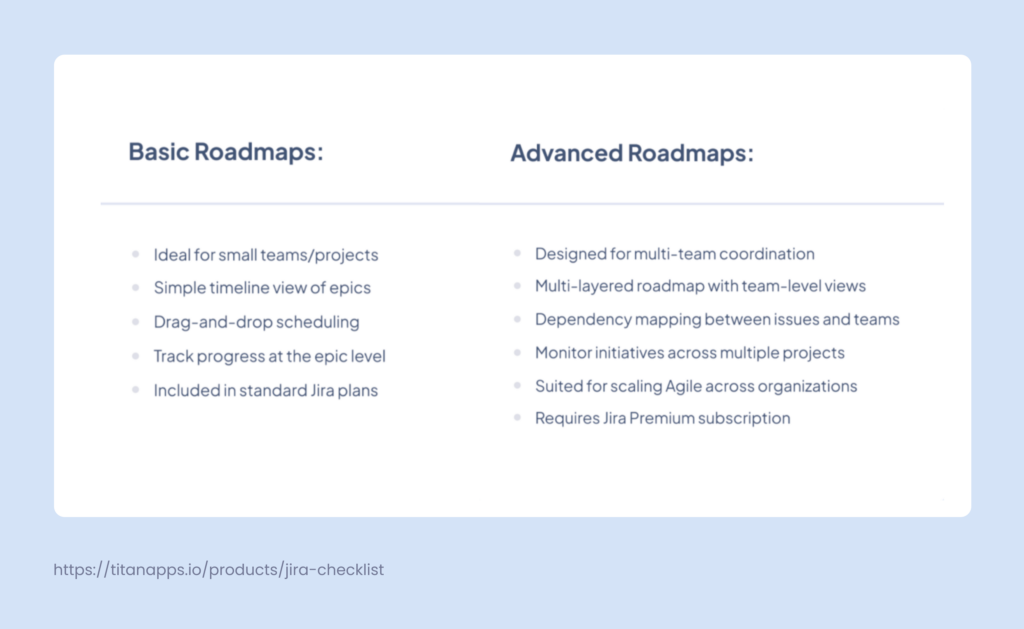
Here’s a brief comparison of the basic planning features and Jira Plans (also known as Advanced Roadmaps):
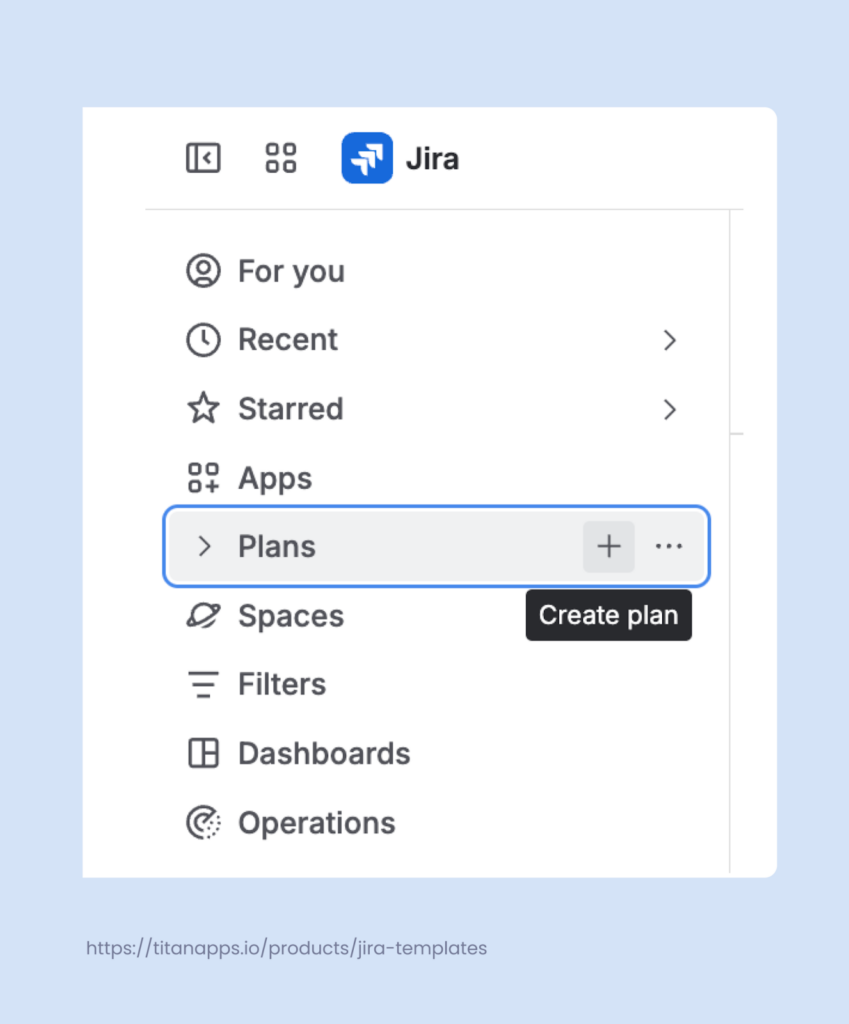
To create your first plan, navigate to the menu panel on the left and find Plans. Then, click Create Plan and provide the necessary details.
Another way to add your first plan is to use Jira’s top-level planning template. This can be an option if you are creating a new project from scratch.
Then, you can add data sources to your plan. These can be projects, boards, and filters that should be applied. You can also create custom work types and expand the hierarchy. For detailed instructions, please refer to our Advanced Roadmaps Hierarchy Configuration Guide.
Jira Plans is most effective when project-level planning is already structured. Clear hierarchies, priorities, and ownership at the project level allow Plans to act as an overarching alignment layer.
Used in the right context, Jira Plans help teams move from isolated project plans to a connected, organization-wide view of delivery.
Managing Risks in Your Jira Backlog
Every project carries uncertainty, and it’s entirely normal. No matter how hard we try, it’s impossible to eliminate all risks. What you can do is make sure they don’t catch you off guard.
Start by capturing risks as Jira issues the moment they’re identified. Using a dedicated label or issue type keeps them visible and searchable across the project.
For each risk, it helps to record three things: the likelihood of occurrence, the severity of the impact, and your response options. A simple High/Medium/Low assessment is usually enough to guide prioritization.
From there, decide how to handle it. There are four ways to respond to a risk:
- Mitigate – reduce the likelihood or impact
- Avoid – change the plan to remove the risk entirely
- Transfer – shift responsibility elsewhere (i.e., as to a vendor)
- Accept – acknowledge it and move on
Each response that requires action then becomes a work item in the backlog, prioritized like any other.
Here are a few tips to keep risk management effective:
- Assign an owner to every risk – without ownership, risks get acknowledged but not actually managed
- Review the risk log at the start of each sprint – close anything that no longer applies and reprioritize what has become more pressing
- Flag time-sensitive risks during sprint planning – so mitigation tasks land in the right sprint before it’s too late
A risk log that isn’t maintained is just noise. Keep it current, and it becomes one of the most useful planning tools you have.
For more on this topic, please see our article on Change Management Tools.
Explore Further: Project Planning in Jira and Agile Management
Effective project planning in Jira is about connecting structure, visibility, and execution in one place. When your work is organized around clear milestones, realistic due dates, and visible dependencies, it becomes much easier to track progress and adjust plans before issues escalate.
As we explained in this article, Jira offers different planning layers, from simple project-level timelines to cross-project roadmaps with Jira Plans. You don’t need to use everything at once. Start with a solid foundation, add complexity only where it helps, and keep planning close to execution.
If you wish to explore this topic further, here’s a list of resources you may want to check out before planning your first project in Jira:
- Product roadmap in Jira
- Using projects as templates in Jira
- Best tools for test management in Jira
- How to create multiple subtasks in Jira
- How to manage the Definition of Done in Jira
- Jira best practices
Project Planning in Jira: Frequently Asked Questions
What is project planning in Jira? How does it differ from task tracking?
Project planning in Jira is the process of structuring work before execution. It includes defining scope, work hierarchy, dependencies, timelines, and ownership.
In contrast, task tracking focuses on monitoring progress after work has already started.
How do I plan a project in Jira from scratch?
You begin by creating and configuring a Jira project. Then, define the planning hierarchy, set dependencies, and timelines. The next stage is planning execution based on your project type (for example, Scrum or Kanban).
How do dependencies work in Jira, and how do I set them up?
Dependencies in Jira are defined by linking work items with dependency link types, such as “blocks” or “is blocked by.” These links indicate that one item cannot start or finish before another one does.
Why don’t dependency lines always appear in the Jira timeline?
Dependency lines appear only when the project setup supports them, and both linked items are visible on the timeline with start and end dates.
How do I build a project timeline or roadmap in Jira?
You build a timeline by assigning start and end dates to high-level work items and viewing them in the Timeline or Plans view. This creates a visual roadmap that shows sequencing, overlaps, and planned delivery windows.