Tools for Jira
 Tools for monday.com


Following Jira best practices for agile project management, break work into smaller, manageable pieces to improve clarity and track progress. For many teams, the default approach is to use Jira subtasks – child work items linked to a parent task. While this method works for small projects or simple Scrum workflows, it often creates more problems than it solves in larger teams or complex workflows.
As soon as you scale up, the standard subtask work item structure leads to cluttered boards, fragmented information, and a heavy load of admin work. You end up juggling dozens of work items, each with its own fields, assignees, and status, just to track a handful of routine tasks. It becomes harder to coordinate across teams, track progress at a glance, or enforce consistent processes.
In this guide, we’ll show you how to:
- Use Jira’s built-in subtask creation features for basic needs
- Identify common pitfalls with multiple subtasks in Jira
- Explore how TitanApps’ Smart Checklist app (available on the Atlassian Marketplace) can serve as a more scalable alternative to subtasks
- Use automation flows and templates to streamline repeatable processes
- Balance between simplicity and visibility in your team’s Jira workflow
This tutorial will help you choose the best way to manage recurring tasks without drowning in unnecessary work items.
Creating Multiple Subtasks in Jira Explained in One Minute
- You can create multiple subtasks in Jira one by one from the parent, by cloning a work item with its subtasks, with a Jira Automation flow, or with the help of Rovo.
- One by one. Open the parent work item, select + > Create subtask, type a summary, and press Enter.
- Cloning. Open a work item that already has the right subtasks and select More actions (•••) > Clone. Under Include, select Subtasks, then select Clone.
- Jira Automation. In Space settings > Automation, create a flow with the Create sub-tasks action or Create work item action
- Rovo. Select + > Create subtask > Suggest, and Rovo drafts subtasks from the parent’s summary and description.
- Checklists as an alternative. Each subtask is a separate work item, so many of them crowd the board and add upkeep. If the work is a list of steps inside one work item, a checklist may serve you better. Smart Checklist for Jira keeps those steps on the parent, with assignees, due dates, and templates.
What Are Multiple Subtasks in Jira?
 Definition
Multiple subtasks in Jira are several subtask work items under one parent, such as a story, task, or bug, each covering a smaller piece of that work. Each subtask has its own key, assignee, and status, so you can assign and track the pieces separately. Subtasks are often used in Scrum and Kanban teams to distribute work across assignees, track granular tasks, or separate responsibilities (e.g., dev vs QA).
The term can also mean several subtask work types. In company-managed spaces (Jira projects), an admin can create extra subtask types to sort granular work, for example, development and testing.
How to Create Multiple Subtasks: Step-by-Step Guide
Make Sure Subtasks Are Enabled
To enable subtasks in company-managed spaces:
- Select Settings (the gear icon) in the top bar, then Work items.
- In the sidebar, under Work types, select Sub-tasks.
- If the status line says subtasks are turned off, select Enable.
With subtasks on, the page looks like this:
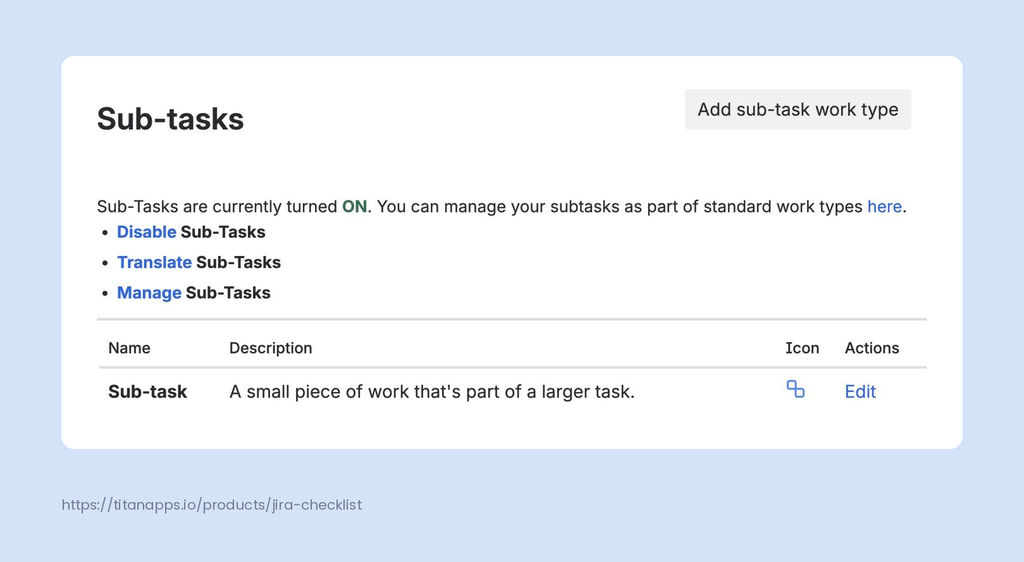
The site-wide setting isn’t always enough. The Sub-task work type also has to be in your space’s work type scheme. To check, open Space settings and select Types under Work items. If subtasks are missing, select Actions > Edit work types and add it.
In team-managed spaces:
- Open Space settings,
- Select Work types, then Add work type,
- Choose Subtask.
Note
Extra subtask types are optional, but they help sort granular work. For example, a Jira admin can add Development and Testing subtask types. You can then filter by type to bulk edit or delete one kind of subtask at a time.
Option 1: Create Subtasks in Jira One by One
Before we consider adding subtasks in bulk, let’s discuss how to create a subtask in Jira one at a time from its parent work item (parent issue):
- Open the work item you want to be the parent.
- Under the work item title, select the + icon, then Create subtask. You can also press Shift+C.
- Type a summary in the Name this sub-task field and press Enter.
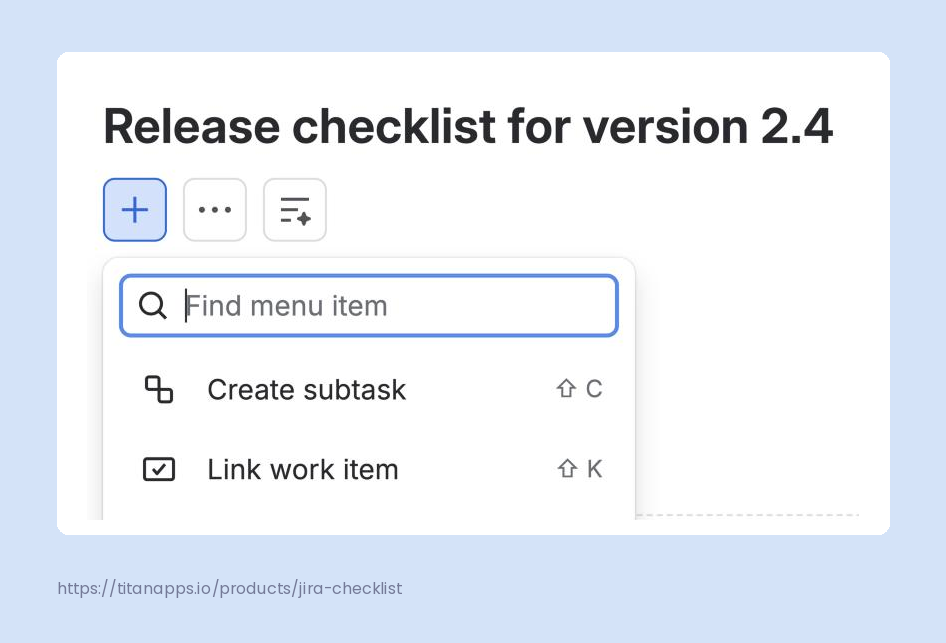
After you press Enter, the field stays open for the next summary. That makes it the quickest native way to create multiple subtasks by hand.
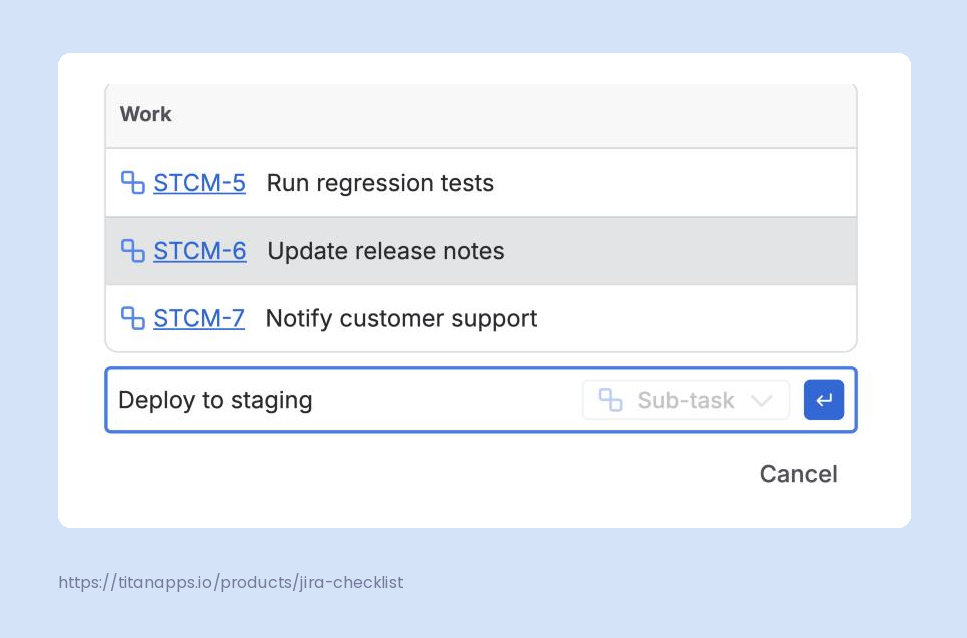
Each summary becomes a separate subtask with its own key. When you’re done, select Cancel to close the field.
Option 2. Clone a work item with its subtasks
If a story already has the subtask structure you need, you can clone it.
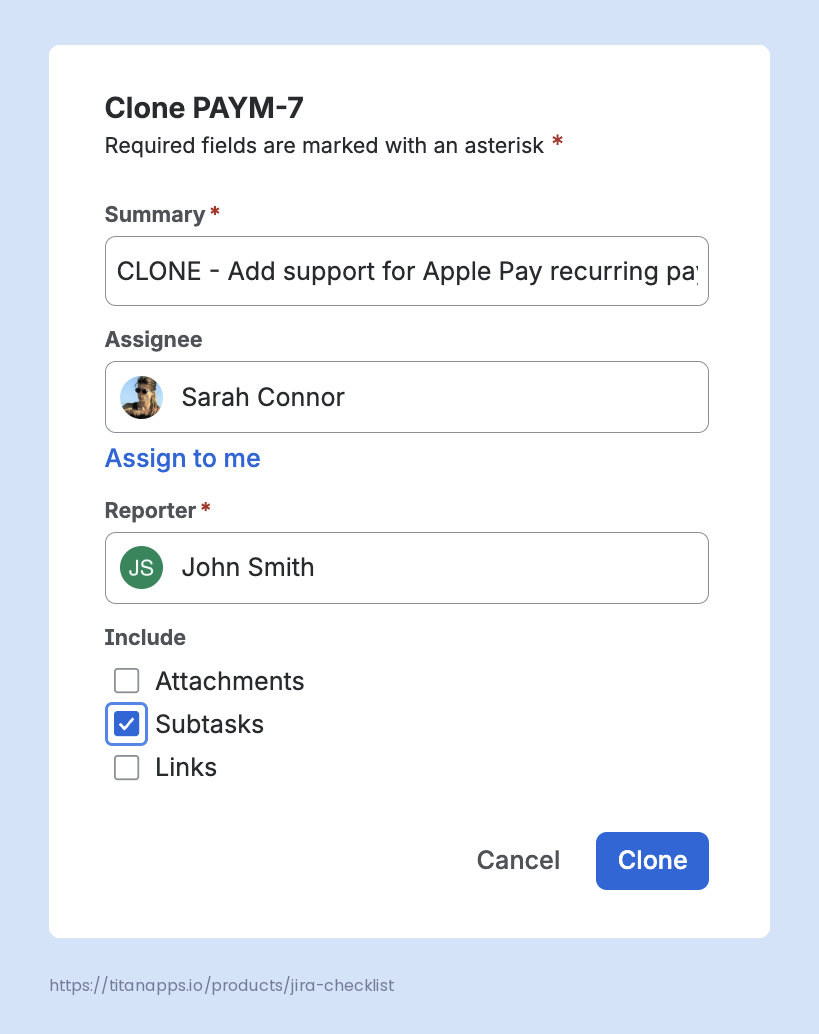
- Open the work item and select More actions (•••), then Clone.
- Edit the summary and, if needed, the assignee. Jira adds a CLONE – prefix to the summary by default.
- Under Include, select Subtasks. This option is off by default.
- Select Clone.
Option 3: Use Jira Automation
You build a flow once, and Jira Automation adds the same subtasks to every matching work item. Let’s consider an example, when a flow adds a set of subtasks to each new Story. To set one up:
- Select More actions (•••) next to the space name, then Space settings. In the sidebar, select Automation.
- Select Create flow, then Create from scratch.
- Choose the Work item created trigger.
- Select Add condition, choose Work item fields condition, and set Issue Type equals Story. Then select Next.
- Add an Action step and search for Create sub-tasks.
- Type a summary for the first subtask. Select Add another sub-task for each additional one.
- Name the flow and select Save and enable.
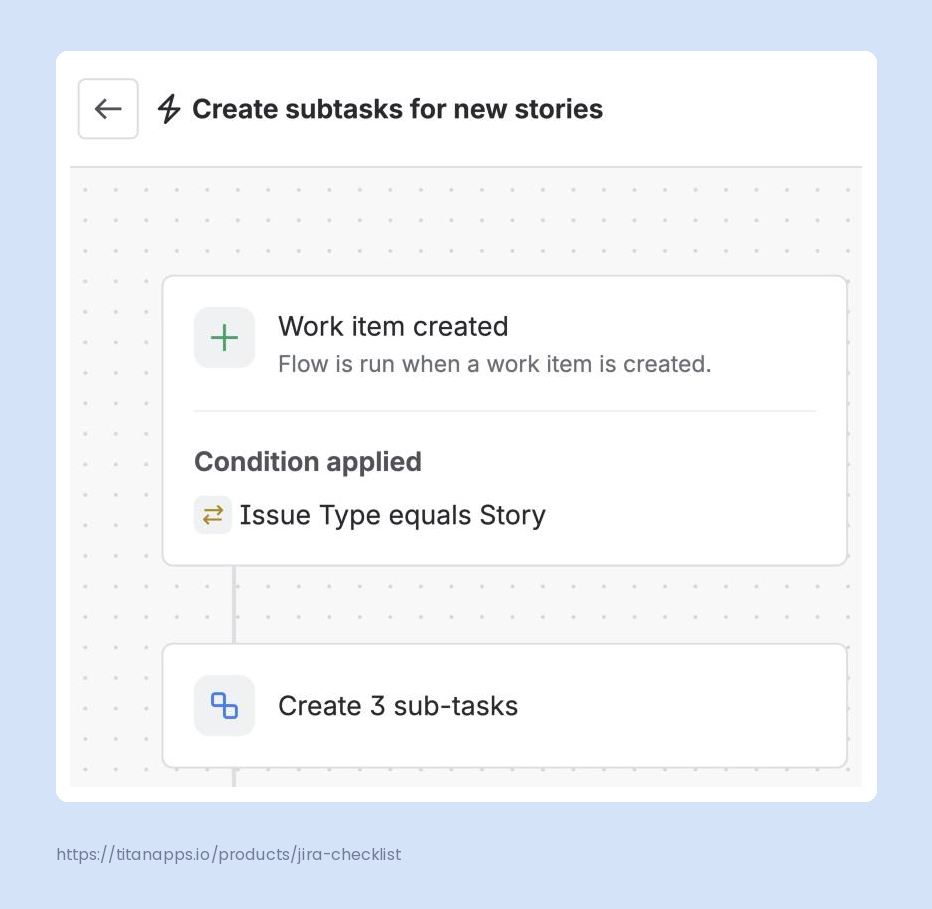
Create sub-tasks action only sets the subtask summary. To fill in other fields, like the assignee or due date, select Add fields next to a subtask. Jira then converts it into a Create work item action with the Sub-task work type.
Tip: Jira administrators can also use CSV import or scripts via the REST API to create work items, including subtasks, in batches. These options, however, require more setup, such as preparing a file and mapping fields.
Can you create multiple subtasks with Rovo?
If you’re not sure how to structure a story into subtasks, Rovo can draft the list for you. It suggests child work items (child issues) based on the summary and description of the parent work item. A clear description gives better results.
To get subtask suggestions from Rovo:
- Open the story, task, or bug you want to break down.
- Under the work item title, select the + icon, then Create subtask. You can also press Shift+C.
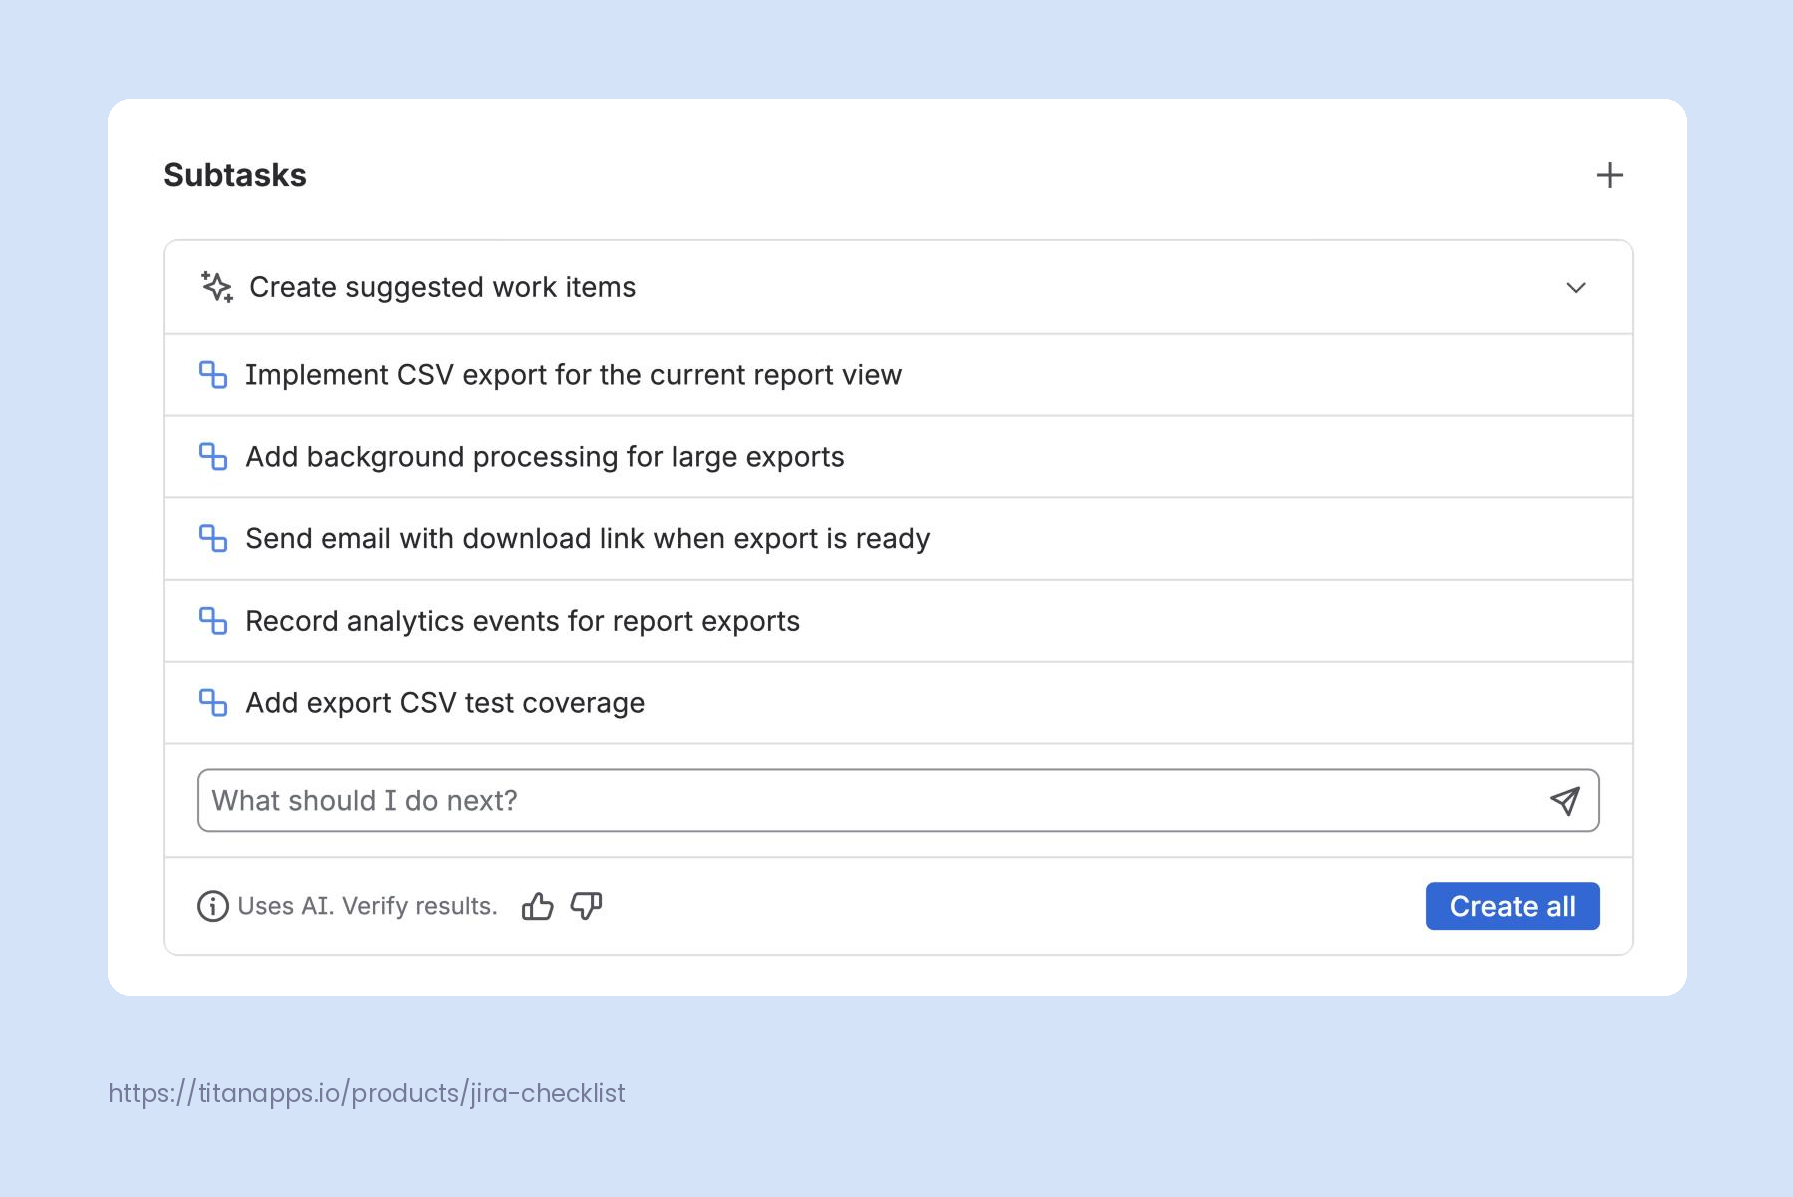
- In the Create suggested work items row, select Suggest.
- When the list is ready, select View suggestions.
- Review each suggestion. Hover over it to create, remove, or edit it individually.
- Select Create all to add the remaining suggestions as subtasks.
Here are the suggestions Rovo generated for a story about exporting reports to CSV:
Are Multiple Subtasks What You Really Need?
While the options above work for one-off task breakdowns, they fall apart when you try to use them repeatedly or at scale. Using multiple subtasks in Jira for repeatable work quickly becomes inefficient. Every Jira subtask must be created manually, through automation flows with usage limits, or by cloning outdated work items, increasing the risk of errors and slowing down your team. Rovo suggestions vary between runs and need review, so they are no substitute for a template.
As complexity grows, so does board clutter. It becomes harder to maintain structure, enforce consistency, or get a quick view of progress, especially across large projects in Jira Cloud or Jira Data Center.
Common Problems with Traditional Jira Subtasks
Jira’s subtask functionality works on paper, but in practice, it often leads to more work and less clarity.
Hard to Navigate
Each subtask work item is a standalone Jira item with its own screen, fields, and status. While subtasks are linked to a parent work item and grouped under it, jumping between them can feel like tab-hopping across Confluence pages. You lose the ability to quickly scan everything in one place, especially in a large Jira space with hundreds of work items.
Maintenance Overhead
Each subtask requires separate management: updating statuses, fields, assignees, or due dates. This means more time spent on Jira, less time on actual work.
As your team grows or your workflows evolve, clutter builds, and so does the need for a lighter, better solution.
Smart Checklist: The Superior Alternative to Subtasks
When it comes to organizing Jira work at scale, Smart Checklist offers a faster, cleaner, and more flexible alternative to traditional multiple subtasks. Instead of breaking a task into many subtask work items (each with its own screen, work item type, and clutter), you can keep everything in one parent work item, neatly organized and easy to track.
1. Simplicity and Speed
Checklists are lightweight. You don’t need to create, assign, or manage dozens of Jira work items. For small, repeatable steps like QA testing, onboarding, or acceptance criteria, a checklist is often all you need.
Create a new checklist, paste in your items, and you’re ready to go — no need to worry about subtask transitions or extra permissions.
2. Better Visibility
Instead of digging through multiple subtasks, all work items live in the same work item. Team leads and stakeholders get a clear overview at a glance, especially useful on busy Scrum or Kanban boards.
Board cards show checklist progress on the parent work item. For a wider view, add a Smart Checklist gadget to a Jira dashboard. The Checklist Completion gadget tracks progress across work items, epics, and spaces. The Checklists Assigned to Me gadget works for any selected users, so a lead can view the whole team.
3. Easier Template Management
Smart Checklist supports reusable templates. You can apply standard task structures (like “Definition of Done” or “Bug Reproduction Steps”) across work items and spaces. This helps you enforce team standards and saves setup time.
Template conditions add a checklist template by work type, field value, or transition, without building an automation flow. With Linked templates, you edit the template once, and every work item that uses it gets the change.
4. Reduces Jira Noise
Checklists reduce board clutter. You don’t flood your Jira Cloud or DC instance with dozens of subtask work items per Story or Epic. This improves search, filtering, and reporting — especially across large project management teams. It also simplifies life for Jira administrators, who no longer have to maintain workflows with bloated subtask structures.
5. More Flexibility for Teams
Smart Checklist supports:
- Inline editing and markdown formatting
- Assignments per checklist item
- Priority levels
- Due dates
- Status tracking
- Adding details to each checklist item
- History logs
No need to request custom workflows or wait for admin-level changes, teams can manage their own processes with a few clicks.

When powered by the Smart Checklist app from the Atlassian Marketplace, you also unlock:
- Completion validators
- Custom permissions
- Full-screen editing
- Automation actions to add checklist items or update their statuses
- Default templates added by work type, field value, or transition
- CSV exports – checklist content is included in Jira CSV import and export.
This turns a simple checklist into a powerful task management engine inside Jira.
When to Use Subtasks vs. Smart Checklist
Smart Checklist offers a simpler, cleaner, and more flexible alternative to multiple subtasks in Jira. But there are still cases where subtasks make sense, especially if your team needs more granular tracking or formal workflows.
Here’s a quick comparison:
| Choose subtasks if… | Choose a checklist if… |
|---|---|
| The work splits into several distinct parts, usually up to 5–7, each with its own deliverable | The work item has many related steps, from several to dozens |
| Each part needs its own estimate, time tracking, or discussion in comments | You need to list criteria to check, like a code review checklist |
| The scope is unclear and likely to grow | The steps are known in advance and part of one process |
That doesn’t have to be an either-or choice, though. A story can have subtasks for its main parts and a checklist inside each subtask for the smaller steps. For a detailed comparison with examples, see our guide to Jira subtasks vs checklists.
Pro Tip
If a checklist step later grows into its own piece of work, convert the item into a subtask or a separate work item.
Checklist Tabs for Complex Projects in Jira
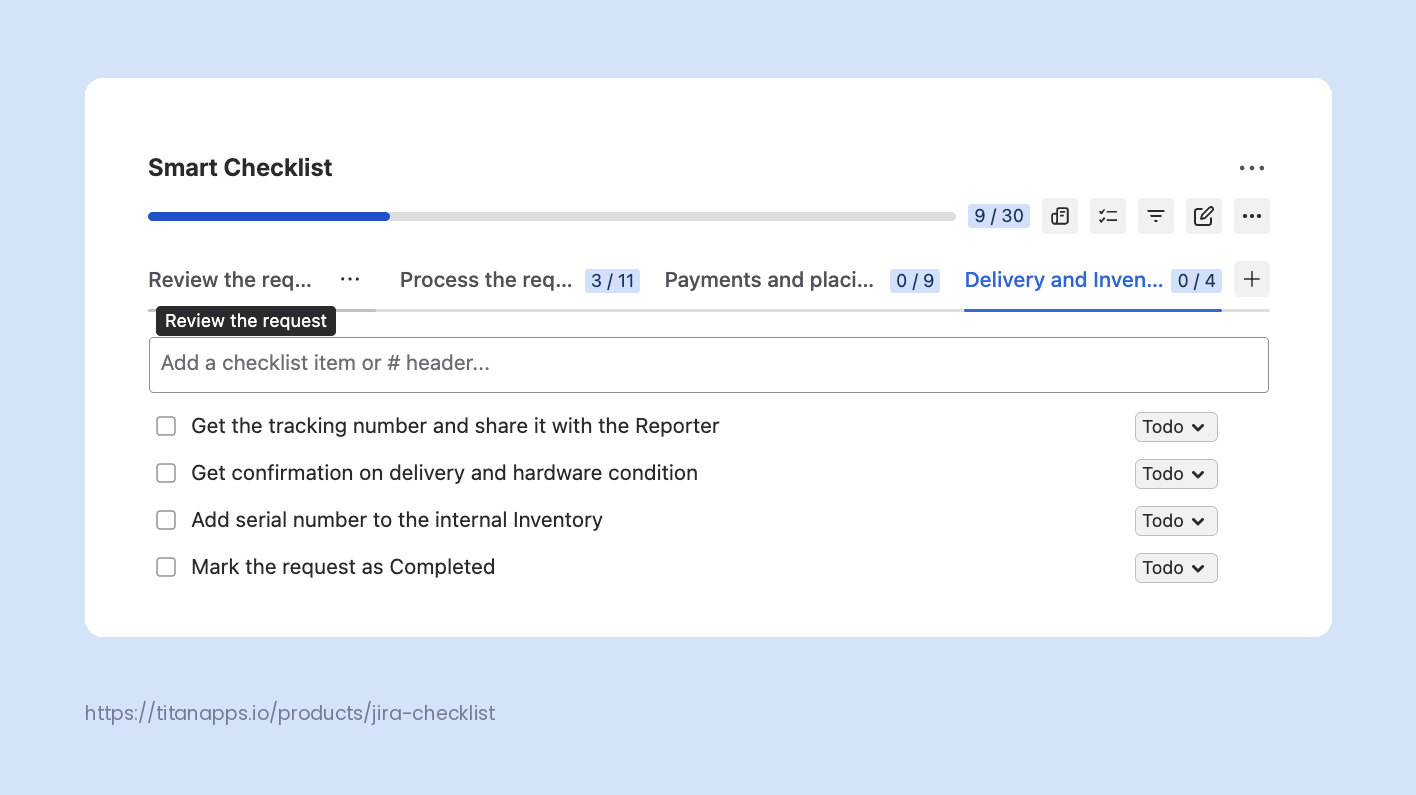
Smart Checklist’s Checklist tabs feature (Multiple Checklists in Smart Checklist for Data Center) is built to solve the exact problems that traditional Jira subtasks introduce as projects scale: cluttered boards, siloed teams, and scattered task details. Instead of managing a dozen subtasks per work item, teams can break down work into organized, tabbed checklists, all inside the parent work item.
Why Checklists with Tabs Work Better Than Subtasks
- Clarity without Clutter: Tabbed checklists let you separate task groups (by team, phase, or function) without needing multiple subtask work items.
- Progress Tracking per Tab: Each tab shows its own progress, giving visibility into how each workstream or phase is progressing.
- Centralized Context: All checklist items grouped in tabs live in the same work item, keeping information unified and reducing admin work.
- Template-Driven: You can apply pre-defined templates, each with its own tabs – great for enforcing standards like DoR, DoD, or QA reviews.
- Automation-Ready: Default template conditions or an automation flow can add templates by work type or transition.
Key Use Cases for Checklist Tabs
Here are a few ways teams use Checklist Tabs to improve their Jira workflows:
- Cross-functional collaboration: Keep different teams’ deliverables (Marketing, Support, Legal) in their own tabs — all inside one work item.
- Standard operating steps: Attach Definition of Ready (DoR) and Definition of Done (DoD) checklists automatically to Stories or Bugs.
- Enforce quality gates: Block a transition until every item in a tab or every mandatory item is done.
Real-World Impact: A Complex Process, Made Simple
One of our enterprise users applied Multiple Checklists (Checklist Tabs version for Data Center) to replace their complex, subtask-heavy workflows:
– Their internal engineering framework spans 100+ steps across multiple product phases, tracked in detail.
– Each new Jira space follows a certain standard process with multiple steps, previously managed with subtasks.
– With almost 200 Jira spaces and thousands of users, subtask sprawl was becoming unmanageable.
Smart Checklist solved it by enabling:
- Tracking detailed processes without subtask clutter
- One work item key per engineering change (no loss of traceability)
- Automation of checklist tabs for different project stages
- Seamless Server-to-Cloud migration without disrupting workflows
- Department-specific templates activated only where needed
“We needed a smaller unit of work than a subtask – something flexible, lightweight, and visible right in the work item. Smart Checklist checked all the boxes.”
Multiple Checklists are now an integral part of their project setup process. Instead of managing dozens of subtasks, the team relies on standardized checklists embedded in work items. Workflow is faster, cleaner, and easier to maintain.
Conclusion: Simplify Work. Maintain Clarity. Scale with Confidence
Traditional Jira subtasks can work, but they’re not always the best fit for fast-moving teams or repeatable workflows. Smart Checklist with Checklist Tabs (Multiple Checklists) offers a more scalable and organized approach to managing complex task structures inside a single work item.
Instead of cluttered boards and scattered work items, you get:
- Task breakdowns organized by team, phase, or process
- Automation-driven consistency
- Clean Jira views that match how your team actually works
Whether you’re tracking 99-step QA flows, launching product releases, or onboarding new employees, Smart Checklist helps you stay organized without overwhelming Jira.
Frequently Asked Questions About Jira Subtasks
What are subtasks in Jira?
A Jira subtask is a child work item under a story, task, or bug. This tool is used for either splitting a complex work item into several smaller parts or for assigning different parts of the workload to different people.
What is the maximum number of subtasks for one work item?
Technically, there is no limit to the number of subtasks you may have in one Jira work item. Jira Cloud caps work item links at 2,000 per work item, but that limit excludes subtasks. That said, more subtasks are harder to manage than they are helpful. Tracking work becomes a chore. I’d suggest breaking up the parent work item if it involves too high a number of subtasks.
How do I create multiple subtasks in Jira?
There are three main native ways: cloning, Jira Automation, and Rovo suggestions. Clone a work item for occasional repeats, or let a Jira Automation flow add subtasks under certain conditions. Rovo is a good fit for new tasks with a set of subtasks not yet established. In some cases, admins and more tech-savvy users can employ CSV import and scripts.
How do I delete multiple subtasks in Jira?
To delete a subtask in Jira, open it and select More actions (•••), then Delete. Type Delete in the text box to confirm. To delete several subtasks, select them in the search results, then select More actions (•••) > Delete in the toolbar. Note that deletion is permanent, and Atlassian support can’t recover deleted work items. If you want to hide finished work instead, archiving may be a better option.
How do I move multiple subtasks in Jira?
You can’t move multiple subtasks in Jira to a new parent at once, so move each one separately. Open the subtask, then select the work type icon of its parent in the breadcrumbs, and pick the new parent from the list. In a team-managed space, you can also select More actions (•••), then Change parent. Note that if you move a parent to another space, Jira moves its subtasks too.
How do I edit or close multiple subtasks in Jira?
The quickest way to bulk update subtasks is a Jira bulk edit from the list of search results. Select Filters in the sidebar, then Search work items, and search for parent = APP-101. Then choose the subtasks with the checkboxes, and select Edit fields in the toolbar at the bottom. Change the fields you need, review the changes, and confirm. To close several subtasks at once, select them and choose Change status in the same toolbar. Pick a status, such as Done, and select Submit.
What happens to subtasks if I delete the parent work item?
They’re deleted too. The Jira Delete dialog will warn you that deleting “permanently removes the work item, child work items, comments, and attachments.” To keep the subtasks, move them to a different parent first. If you only want to hide finished work, archive the parent work item instead. Archiving hides its subtasks as well, and restoring the parent brings them back.
How do I close the parent work item when all subtasks are done?
With Jira Automation, because Jira doesn’t do it on its own. Start from the template When all sub-tasks are done > move parent to Done. The parent stays in To Do until its last subtask is done, then moves to Done automatically. To do it the other way round, use the When parent is done > move all sub-tasks to Done template.