






 Tools for Jira
 Tools for monday.com





When a customer submits “app broken” with garbled details or no context at all, the service team wastes time clarifying details like version, reproduction steps, or severity. That is why Jira Service Management needs forms: to ensure structured information intake and turn vague requests into clear work items.
However, “Jira forms” is a crowded term. Three separate features can be called that name, and each does something different. In this article, we cover the JSM forms feature specifically: what sets it apart from the others, when to use it, and how to configure such a form for cleaner, faster data collection.
Key Takeaways on Jira Forms in JSM
- Three separate features that can be called “Jira forms”: forms in the Jira product, JSM request forms (the field layout built into every JSM request type), and JSM forms (formerly ProForma, the richer independent feature). They have different features and use cases.
- JSM forms are a native intake feature that turns unstructured requests into structured work items. They offer form-only fields, conditional logic, rich formatting, and over 200 pre-built templates.
- You can share JSM forms in different ways: attach them to one or more request types in the customer portal, share a link, or add them to an existing work item mid-resolution.
- Access to JSM forms for submitters is regulated largely by request type permissions and portal settings. You can also specify who can see the form after submission and whether a submitter can edit the answers.
- JSM forms integrate with Jira automation through dedicated triggers, actions, a form-specific condition, and smart values that read submitted answers.
What Are Jira Forms?
 Definition
Jira forms are data-collection tools for gathering structured information from teammates, customers, or external stakeholders. They are available on all plans, including Free, across both Jira and Jira Service Management.
Simply put, a Jira form is a questionnaire that, when submitted, saves answers into a work item. You can map the information to Jira fields and/or attach it to the work item as a set of questions and answers. It is useful, for example, to collect information on internal requests, like “add a new feature” or “create a blog post”, and customer requests, like bug reporting. You get all the details in one place, and the new request starts moving through the predetermined workflow.
Three Types of Jira Forms
Technically, Jira has three features, which can be referred to as “forms”, but differ in purpose and capability:
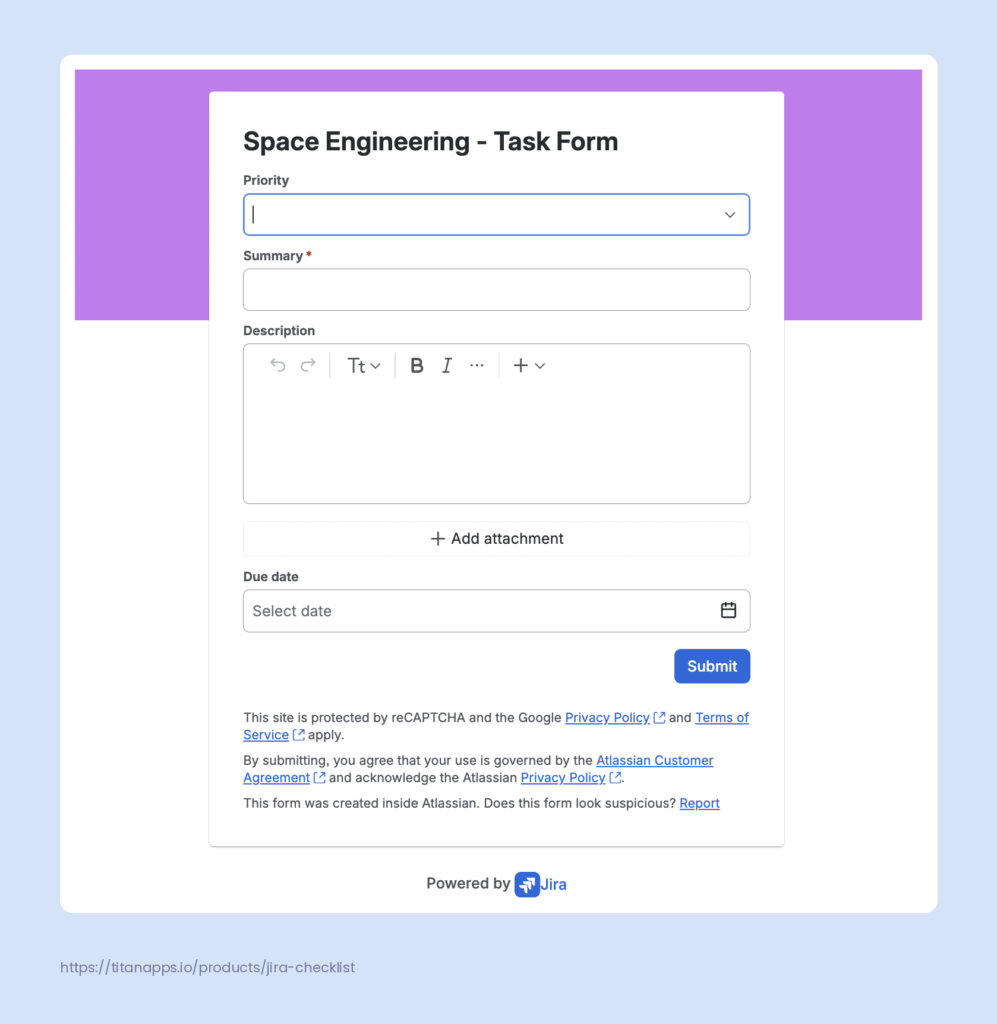
- A form in Jira is a feature that came from Jira Work Management and is now part of the unified Jira. You can find it on the Forms tab on your Jira board. Such a form collects information and captures work from other teams or stakeholders. Although most use cases are internal, you can make a form public – anyone with the link can submit.
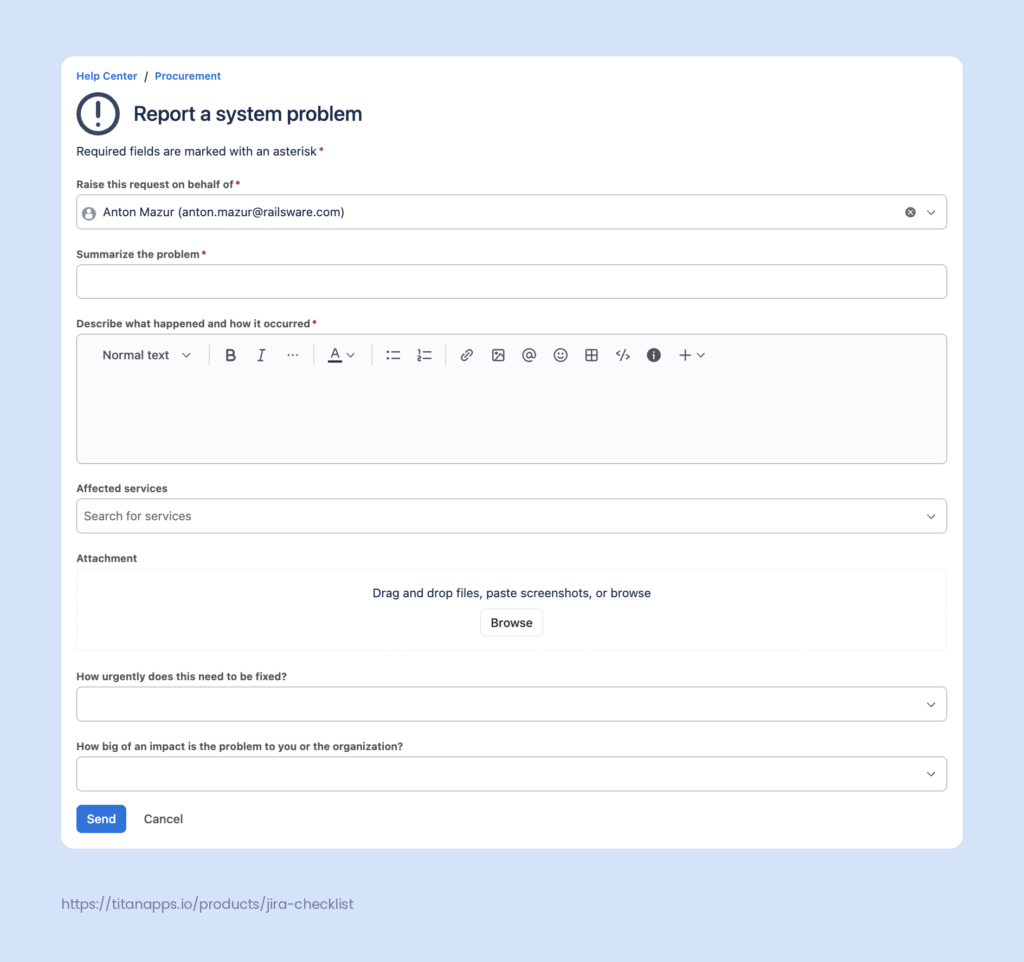
- A JSM request form is a native Jira feature and part of every request type on a help portal. You can customize it by adding fields and specifying the field name and description the submitter sees. On its own, a JSM request form works well for collecting basic information, but to capture intricate details, you’ll have to create multiple custom fields.
- A JSM form adds advanced features on top of the request form:
- form-specific fields you can create without saving new custom Jira fields
- rich formatting
- conditional logic
- can be attached to several request types
- can be added mid-resolution to collect more information.
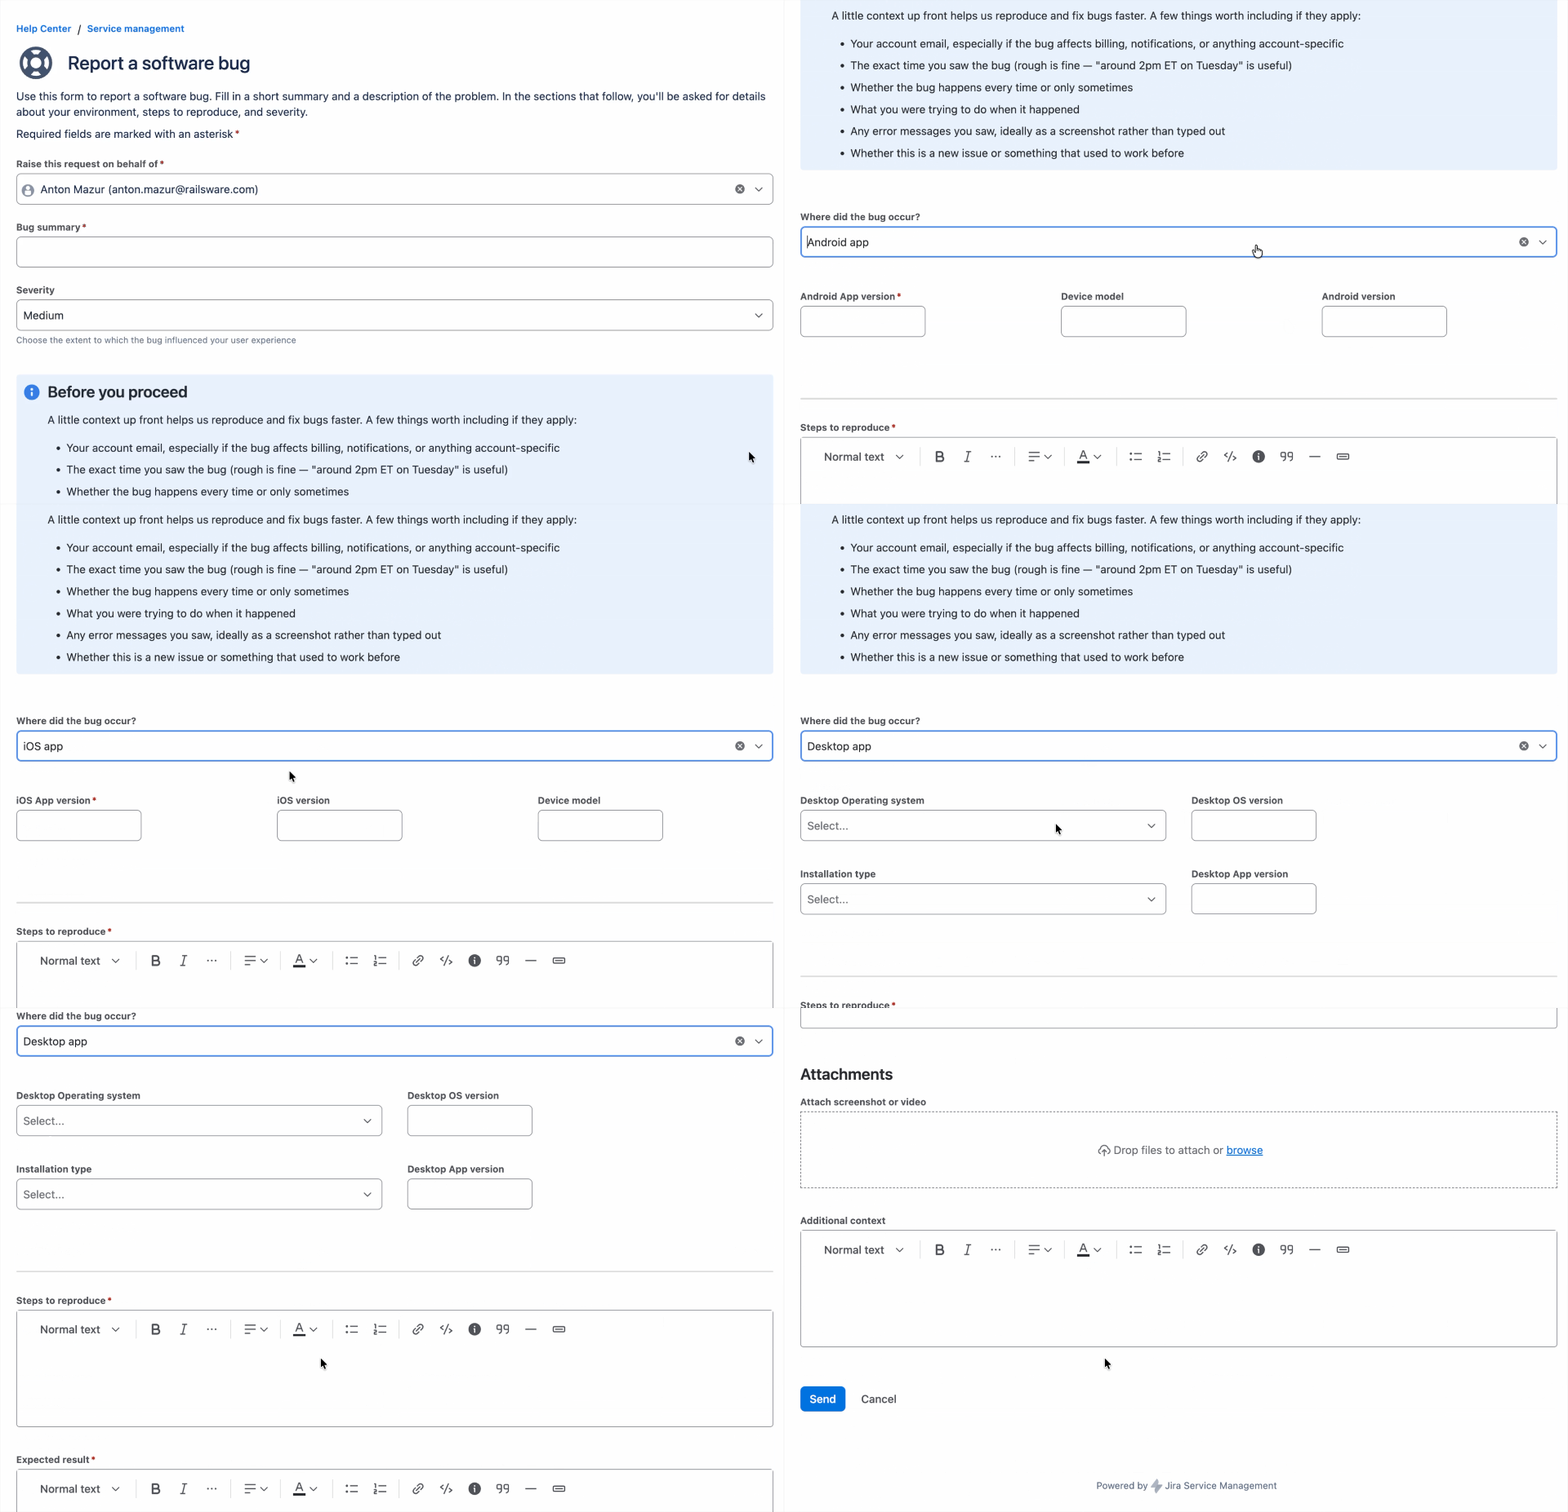
The following section explains the difference between three types of Jira forms in more detail.
Jira Forms, JSM Request Forms, JSM Forms: What’s the Difference?
| Capability | JSM forms | JSM request forms | Jira forms |
|---|---|---|---|
| Product | Jira Service Management | Jira Service Management | Jira |
| Origin | ProForma, acquired by Atlassian in 2021 | Native JSM feature | Native Jira feature |
| Main purpose | Rich customer service intake via portal, plus follow-up data capture during ticket lifecycle | Basic intake fields for a specific request type | Input intake inside the organization |
| Independent object? | Yes, a form lives in the space and can be reused across request types | No, a request form is part of the request type itself | Yes, a form lives in the space |
| Fields | Form-only fields plus linked Jira fields | Jira system fields and custom fields only (no form-only fields) | Jira system fields and custom fields |
| Conditional logic | Yes (section-level) | No | Yes (field-level) |
| Templates | 200+ form templates | No templates, you build the layout from Jira fields for each request type | Template selection varies by space |
| Rich editor | Confluence-style editor with columns, tables, and dividers | Basic drag-and-drop field layout only | Linear field list with basic controls |
| Reusable across request types | Yes, one form can be attached to many request types | No, the layout belongs to that one request type | Not applicable |
| Share options | Attach to a request type (portal), direct link, embed, add to an existing work item | Available on the portal only through its request type | Direct link, embed |
| Access levels | Governed by request-type permissions and portal settings. For external stakeholders or grant public portal access. | Governed by request-type permissions and portal settings | Three tiers per form: Limited (space members), Open (any Jira user), Public (anyone with the link) |
| Automation | Form-specific triggers (Forms submitted, Form attached, Form opened for edits) and actions (Attach forms, Attach form with values, Change form status, Copy forms), smart values ({{forms}}) | None (automation reacts to the resulting work item creation) | None |
The distinction between the JSM forms (ProForma) and JSM request forms is subtle. A submitter sees one set of questions and is unaware of what’s happening under the hood. Before we proceed, let’s settle why JSM needs an extra form using an example.
How JSM Forms and Request Forms Combine: Example
Imagine your team releases an app available via a browser, iOS, Android, or desktop and needs to collect bug reports in JSM. You create a Report a software bug request type and have to decide how to build a form.
Technically, you can customize a request type form to fit your needs. However, you will need an array of custom Jira fields to accommodate all the details – platform, OS version, app version, etc.
The details you need to collect may also depend on the platform. For example, if a bug occurred on the desktop version, knowing the installation type may be useful. For a web version, the URL where the bug occurred is a noteworthy detail. With the request type form, you will need to cover all those details in one static form, asking the submitter to choose the relevant questions and skip the rest.
If you attach a separate JSM form (ProForma), its fields will capture the details without cluttering Jira with custom fields. The submitted form gets attached to the request work item, so all the information is available.
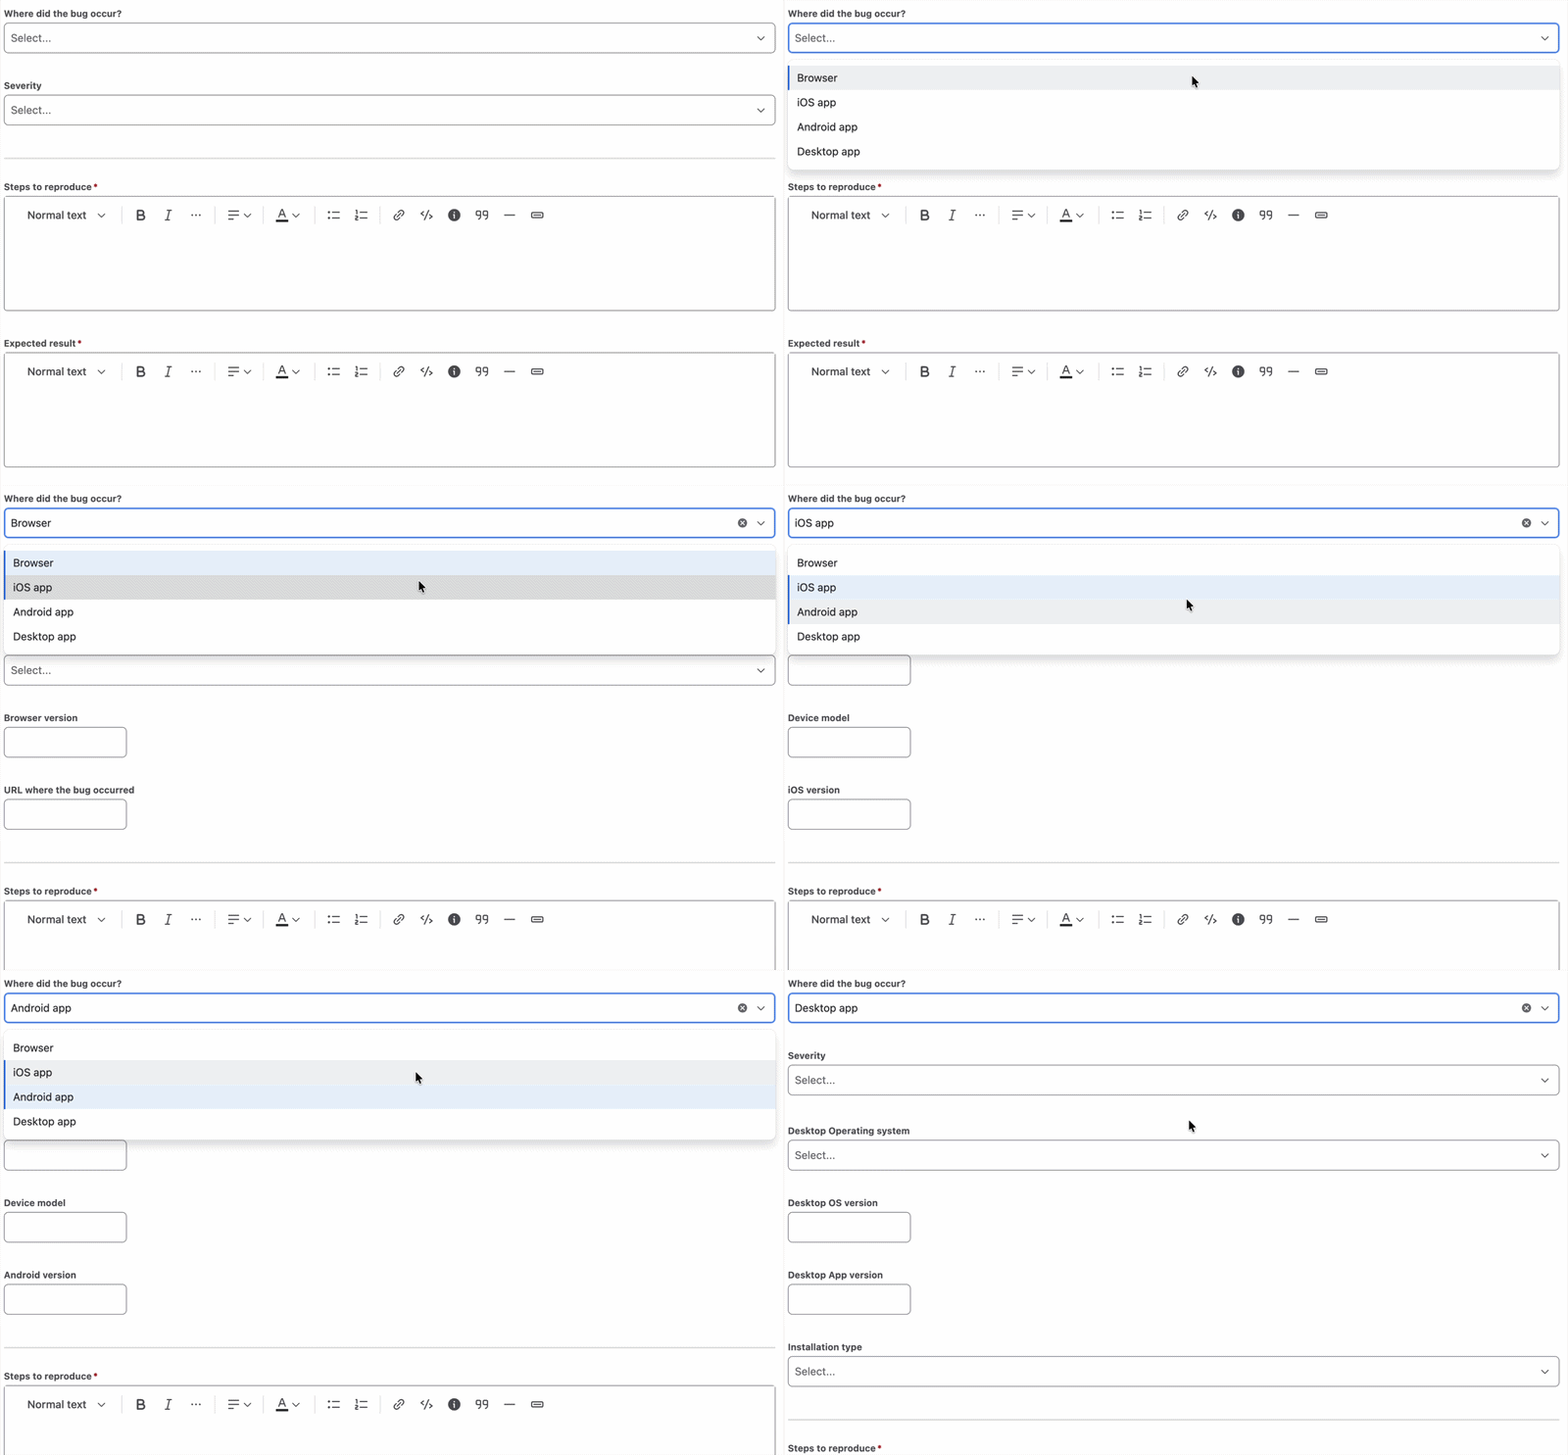
You can also make a dynamic form by configuring conditional sections based on where the bug occurred. That way, the customer sees only the relevant fields. That will increase the chance the form will actually be completed and help to avoid annoying the disgruntled user even further with unnecessary questions.
JSM Forms Use Cases
- IT and systems support: help desk requests, access provisioning, hardware and software intake, incident handling
- Change management: change intake, risk assessment, approval routing, post-implementation review
- Human resources: onboarding and offboarding checklists, recruitment, employee-initiated requests, performance management, training
- Facilities, operations, and safety: maintenance and moves, access and room bookings, event permits, equipment tracking, workplace health and safety
- Finance and procurement: reimbursements, budget changes, purchase requests, request for proposal, supplier management
- Legal and compliance: contract review, document approvals, regulatory requests
- Marketing, design, and sales support: creative briefs, campaign requests, design intake
- Project management and business operations: meetings, retrospectives, risk and change tracking, project checklists
- Customer service: feedback capture, refund handling, service-specific requests.
In some cases, JSM forms are referred to as checklists, for example, “project delivery checklist,” “new hire checklist,” and others. However, these are structured input or attestation forms, not check-as-you-go execution surfaces. They’re filled out before or after the work is done, not during.
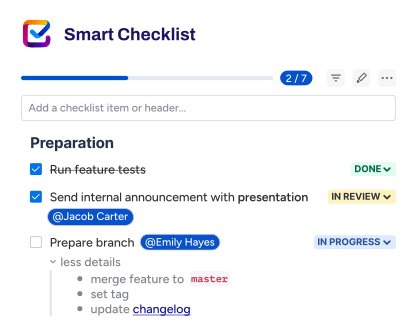
For teams that need interactive, step-by-step tracking inside the work item as execution happens, Atlassian Marketplace apps such as Smart Checklist for Jira by TitanApps can handle this pattern well. It offers an interactive checklist that lives on the work item, with items that can carry an assignee, due date, and priority, and mandatory items that gate the work item transition.
How to Create, Edit, Save, and Delete Forms in JSM
Getting Started
Go to your JSM space in the sidebar, click the three dots next to its name, then select Space Settings (project settings). In the Space Settings sidebar, choose Request Management and find Forms. Then click Create a form. You get two options:
- Create from template. Select the template that fits your task, preview it, change it in the editor if necessary, and save.
- Create blank – you open a blank form in the editor and configure it from scratch.
How to Create a Jira Form From the Ground Up
Start by entering the form title at the top. However, the form’s backbone is fields. The Add field button allows you to choose from text fields, choice fields, date fields, numeric fields, user fields, and other fields (e.g., Attachment).
After you add a field, you can edit it in the sidebar: add a display name and description, choose a default response, add a linked Jira field, require field validation, add choices for the choice fields, etc.
Note
Jira fields and form fields aren’t the same. Form fields exist only in the form where they were created. They can’t be saved and reused. To learn more, read What are form fields and Jira fields?
Large forms will likely need to be segmented into sections. Click Add section, and a horizontal bar will appear, marking the end of the previous section and the start of the new section. Add the necessary fields, then click the Add section button again – the part between the two bars is a form section.
Sections allow users to add conditional logic to the form. Click the horizontal bar at the section start, and go to Create logic on the sidebar. A new floating window will appear, allowing you to configure conditions under which the section is visible or hidden.
See how it’s done in the video below:
Aside from fields and sections, you can add extra elements, like text or tables, and configure them. You can adjust text formatting, alignment, and color, add lists, change layouts, insert quotes and code snippets, etc.
Once the fields and other elements are ready and the preview looks fine, adjust the settings: specify where the form appears and how it behaves. Note that you have an important choice to make: whether the form will be tied to a request type and/or have a shareable link – more on that in the next section.
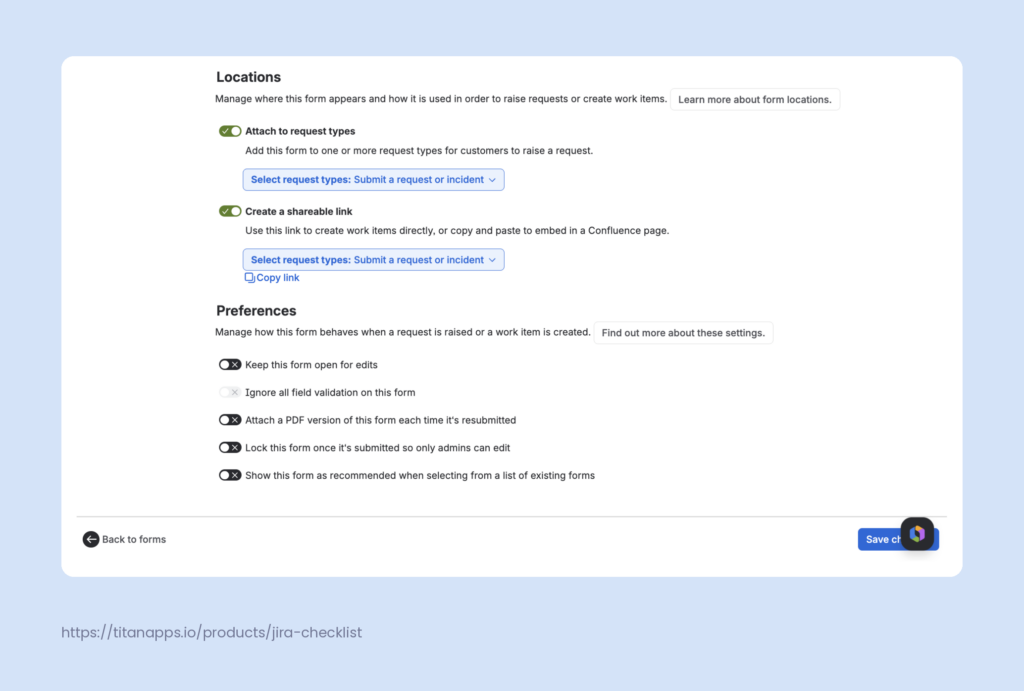
Also, decide if you need to keep the form open for edits:
- “Keep this form open for edits” determines whether a submitter can edit a form after they fill it out and click Send. A work item is created with the form attached, but the submitter will be able to change their answers until they click Submit.
- “Lock this form once it‘s submitted so only admins can edit” controls the service team access: where anyone aside from Jira admins can edit the submitted form.
On top of it, choosing to save a PDF version of the form each time it’s resubmitted will help you track changes or email the form’s contents.
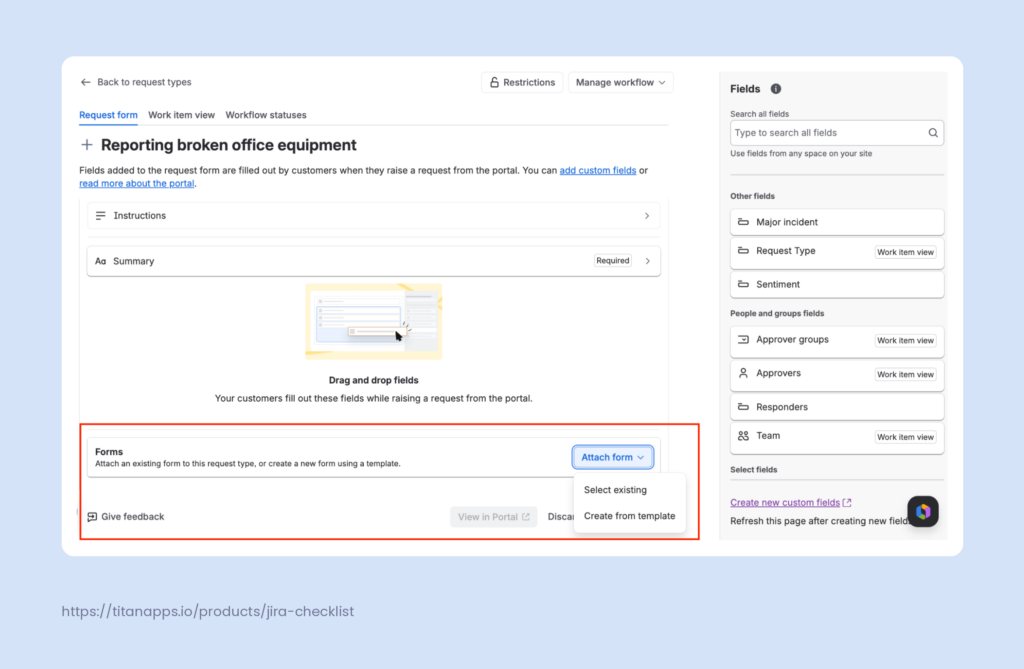
You can either attach a form to a request type or create a shareable link. There are two ways to attach a form to a request type:
- In the form editor settings.
- In the request type editor. You can either attach an existing form or create a new one from a template:
To create a shareable link, go to your form’s builder Settings tab, toggle Create a shareable link on, then select the associated request type.
The Copy link icon you see isn’t the direct link you are looking for, though. After you save the changes, go to the Forms page, find the one you enabled a shareable link for, and click Actions (three dots). You’ll see Copy direct link in the list.
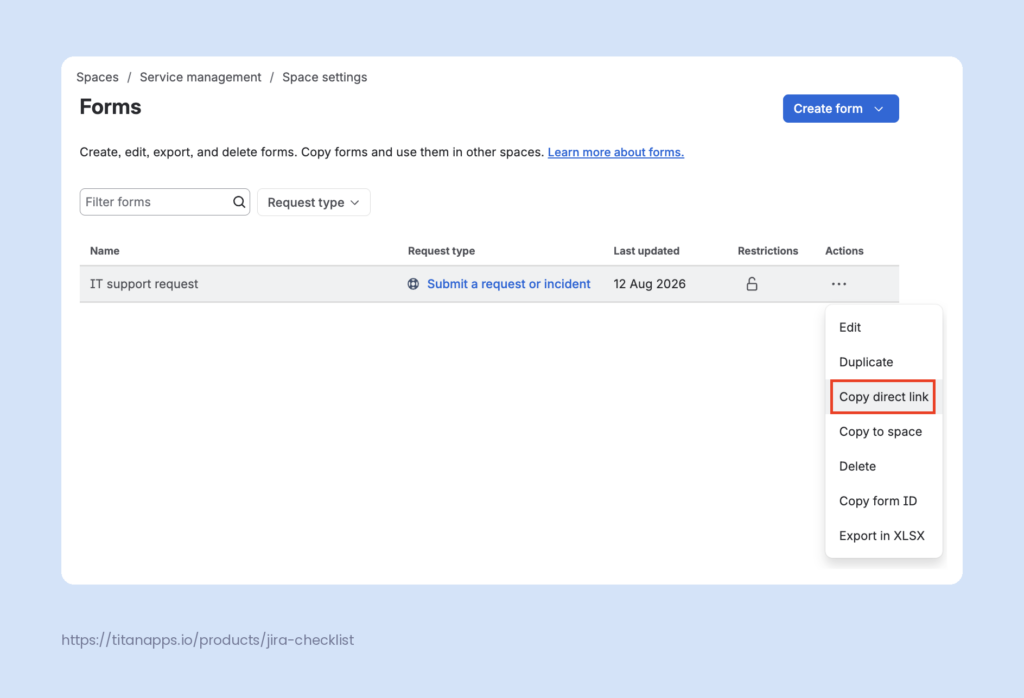
You can paste it on any Atlassian site, for instance, on a Confluence page, to embed the form.
Note
A shareable link recipient still needs to be authenticated as a portal customer, agent, or admin. For public submissions, you’d need to open portal access or use Jira’s public forms feature (see FAQ).
What You Can Do to a JSM Form: The Actions Menu
The Actions menu on the Forms page lets you edit, delete, duplicate, or copy a form to another space, copy the form ID, or export it as an XLSX file.
If you decide to make a copy to another space, be aware that copies are independent, and changes made to one are not reflected in the other. Also, you’ll need to reconfigure the copy’s request type and shareable link.
How to Configure Access to a Submitted JSM Form
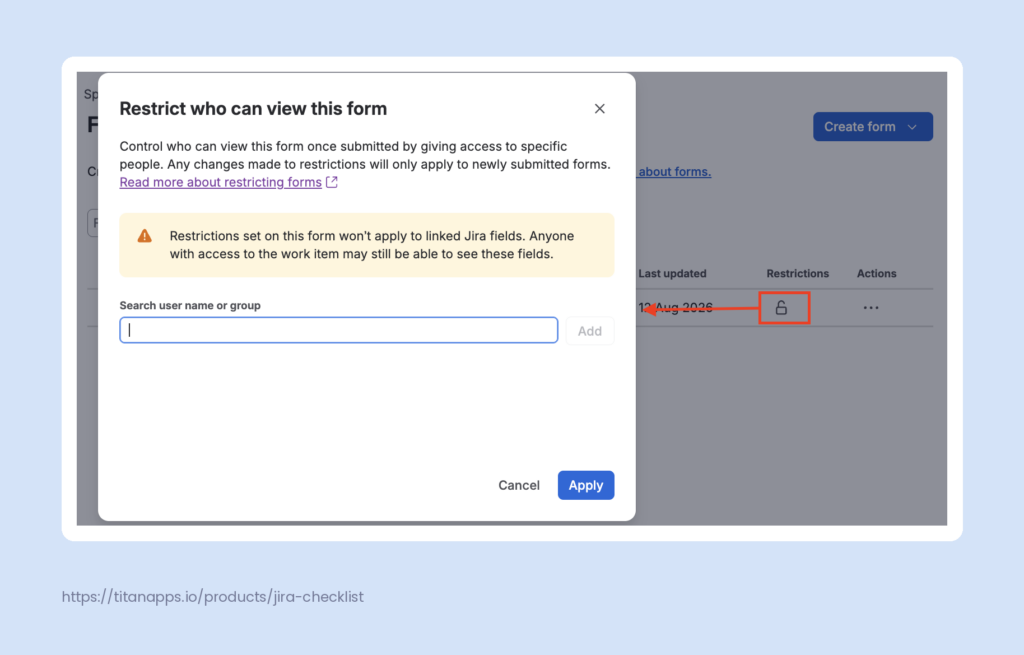
You may have forms that only specific people in your organization should be able to see, for instance, containing sensitive information. To configure access to the form once it’s submitted, click the lock icon next to the form name in the forms list, then add the users you want to grant access to.
Note that the restrictions you set will apply only to forms, not linked Jira fields. Also, updates apply to newly submitted forms. Already submitted forms remain accessible to whoever had access before the settings were changed.
Automating JSM Forms
JSM forms integrate with Jira’s automation engine through dedicated form-related triggers, actions, and a condition. You can also use smart values to pull information from the submitted form into your automation sequence.
However, despite these versatile options, JSM form automation has one important caveat: form-related steps are project-specific. Thus, you can not configure form automation at the Global level.
Form-Related Triggers
- Forms submitted – runs when forms attached to a work item are submitted. Useful for auto-triage and notifications.
- Form attached – runs when a form is attached to an existing work item. Useful for reacting to form additions mid-resolution.
- Form opened for edits – runs when a form is opened for edits. Useful for notifying a customer that they need to resubmit a form.
Form-Related Actions
- Attach forms — attach one or more forms to a work item. Useful for adding follow-up forms mid-resolution.
- Attach form with values — attach a form and pre-populate specific field values on it. Useful when you know the answers in advance based on the work item’s context. For example, attaching a change review form with the change owner already filled in.
- Change form status — change a form’s status between Open for edits and Submitted. Useful for reopening a submitted form so a customer can update their answers.
- Copy forms — copy forms from another work item and attach them to the current one. Useful for copying an intake form from a parent request to its child tickets.
Note
You can hit the Jira Forms REST API using the Send Web Request action for operations the native actions don’t cover, like changing form visibility (Internal / External). See Atlassian’s Forms REST API documentation.
Form-Related Conditions
- Forms attached – checks if a work item has forms attached. You can select one or more specific forms to check for, and filter by the form’s status (Open vs Submitted or locked). Useful for rules that should only run when a specific form is present or has reached a specific state.
Smart Values for Forms
Definition
Smart values are placeholders that Jira automation replaces with real data when a rule runs. Written as {{…}}, they read information from work items, forms, users, and other Jira objects at runtime.
Two prerequisites for smart values to work with forms:
- The rule needs the Forms submitted trigger. Atlassian documents an alternative route via the Universally Unique Identifiers (UUIDs) that doesn’t need this trigger, but this is the supported default.
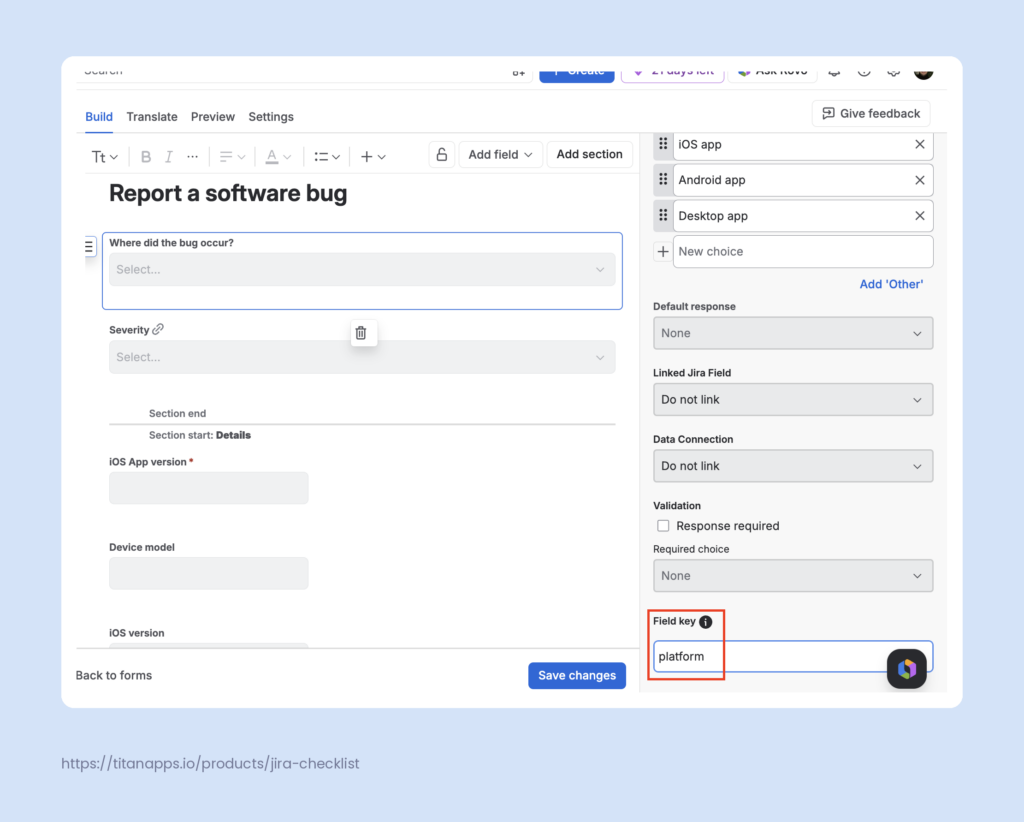
- Each field you want to read needs a field key, the unique identifier of a field within a form. You set it in the side panel when configuring the form (see the example below).
The core syntax is {{forms.last.<field-key>}}. It reads one field from the most recently submitted form on the work item. For instance, {{forms.last.steps-to-reproduce}} will return the contents of the text form field with the field key ‘steps-to-reproduce’.
For the full syntax by field type, see Atlassian’s Access smart values for forms and form fields documentation.
JSM Form Automation Example
Let’s continue with our earlier example – an app available via a browser and on iOS, Android, and desktop. Assume each platform has a different engineer responsible for it. Their workflow would benefit from a JSM automation that assigns a work item with a submitted form to the right engineer. Here is how to build it:
1. Find the relevant field and assign the field key to it in your form builder
 Note
Note
Remember that field keys are case-sensitive, so mind the spaces and capitalization.
2. Go to Space Settings / Automation / Create a flow.
3. Add a trigger “Forms submitted”. Specify the form you want to apply it to.
Note
If the submitter clicks Send, but your form is still open for edits, the work item will be created, but the rule won’t fire until they choose to submit it.
4. Add an IF condition using smart value {{forms.last.platform.label}} = ‘Browser’. ‘platform’ is the required field key, and ‘label’ is used to retrieve the label of a selected choice.
5. Add an action ‘Assign the work item’ and select the necessary user. Make sure that the user has all the necessary permissions to be assigned a work item. Otherwise, automation won’t work.
6. Add ELSE IF blocks matching {{forms.last.platform.label}} to other labels: iOS app, Android app, Desktop app – and actions assigning the work item accordingly.
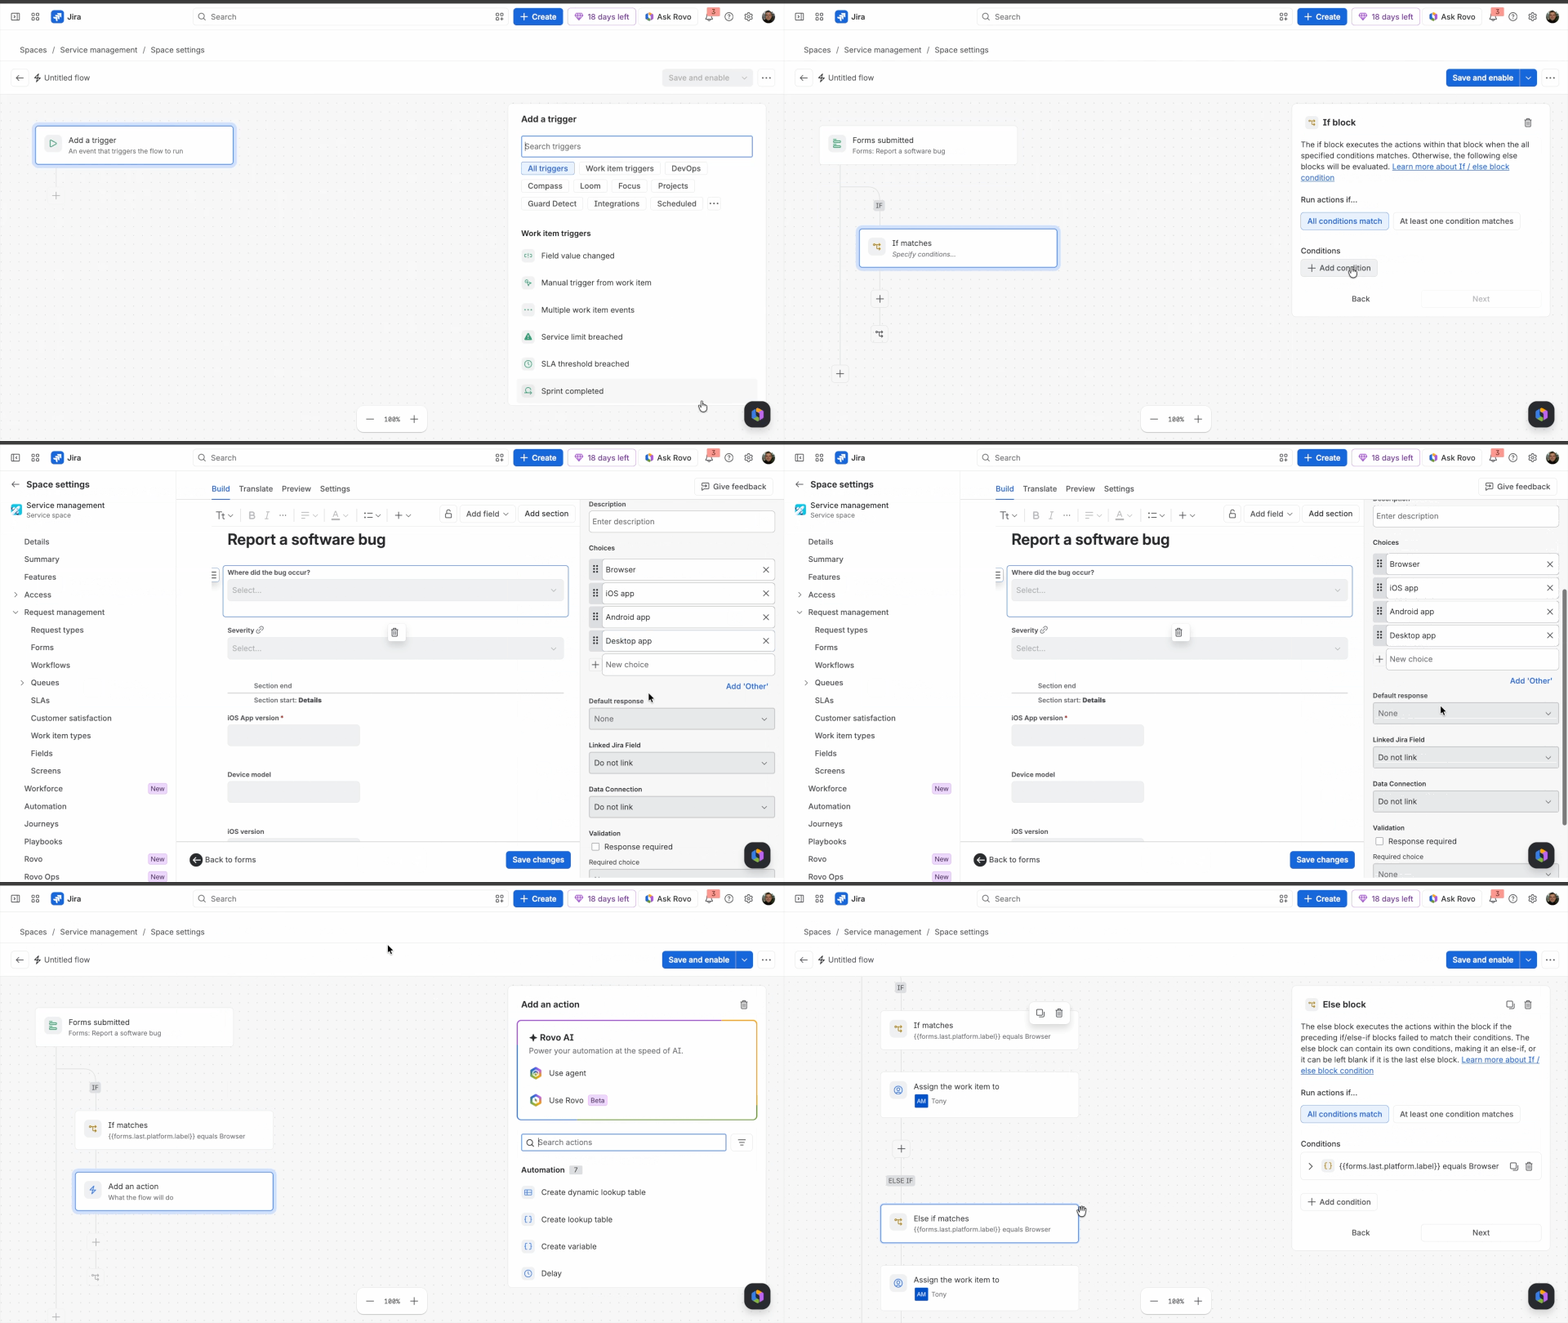
7. (Optional) You might include a fail-safe ELSE at the end to route the request if other conditions fail.
8. Click Save and enable. The new automation flow is ready and will assign the next form submission to the right engineer.
Want to find out more about automation in JSM? Read our Jira Service Management Automation Guide With Examples.
Wrap-Up: What Do JSM Forms Have to Offer?
JSM forms are a flexible data intake surface that turns unstructured requests into structured work items. They come with
- form-only fields to keep custom-field sprawl in check
- rich formatting and conditional logic to make forms easier to fill out
- multiple sharing options to cover most scenarios
- automation triggers, smart values, and dedicated form actions to reduce manual work.
JSM forms aren’t a fit for every job. If you need to receive submissions from people without a Jira account, Jira forms have public access. If you just need lightweight intake for a specific request type mapped to existing Jira fields, the JSM request form may be enough on its own. However, JSM forms earn their place for complex, detailed information gathering that other Jira forms struggle to handle.
Frequently Asked Questions About Jira Forms
Are Jira Forms free?
Yes. The two form features named in Jira Cloud – Jira forms in the Jira product and JSM forms in Jira Service Management – are available on all plans, including Free. Plan choice affects surrounding capabilities like automation rule limits, Rovo access, storage, not access to the forms feature itself.
Where do Jira forms go?
Form submissions create work items in the space where the form lives. Regular Jira fields (Summary, Priority, custom fields) appear at the top of the resulting work item. In Jira, the form’s answers populate those Jira fields. In JSM, the form itself is preserved and appears in an Attached forms section on the work item. If the form’s settings have “Attach a PDF version of this form each time it’s resubmitted” turned on, a PDF version is saved under Attachments each time the form is submitted.
Who can access Jira forms?
Jira forms have three per-form access levels: Limited (people with the “create work items” permission in the space), Open (any licensed Jira user on the site), or Public (anyone with the link, no license needed). JSM forms are governed by the request type’s customer permissions and the portal’s access settings. JSM also has a “Restrict who can view forms” feature to limit which specific users see individual forms on work items after submission.
How to make a public form in Jira?
Public forms are a Jira feature, not a JSM one. In a Jira space, go to Forms in the space navigation, open the form you want to share, then change its access setting to Public. You’ll be asked to select a default reporter (this person becomes the Reporter on all work items created from public submissions). A mandatory email field is automatically added to the form. Some restricted field types with sensitive data can’t be used on public forms. Public forms are protected by reCAPTCHA and respect any IP allowlists on your Jira site.