


 Jira
Jira monday.com


There are thousands of hundreds of teams in this world. Big and small, distributed and in-house, software, and non-software. Add to it the fact that no two teams are identical; you’ll realize that their workflows also come in all levels of complexity. With Jira’s workflows, putting together your custom process is simple, yet so powerful.
In this article, you’ll learn the ins and outs of Jira workflows, why it’s essential to have a custom workflow in Jira, how to create one and fit it within some of the best practices in Jira, and make the best of Jira work items (issues) using checklists.
What is a Jira workflow?
As stated by Atlassian, “Workflows can be associated with particular projects and, optionally, specific work (issue) types by using a workflow scheme.”
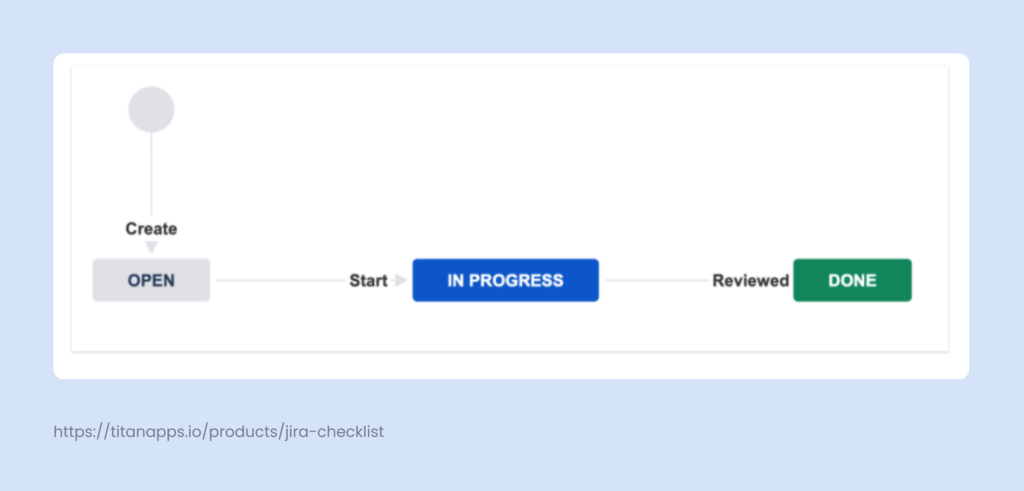
A Jira workflow defines your process and lists all the steps (statuses) that a task goes through – from start to finish. More about statuses later.
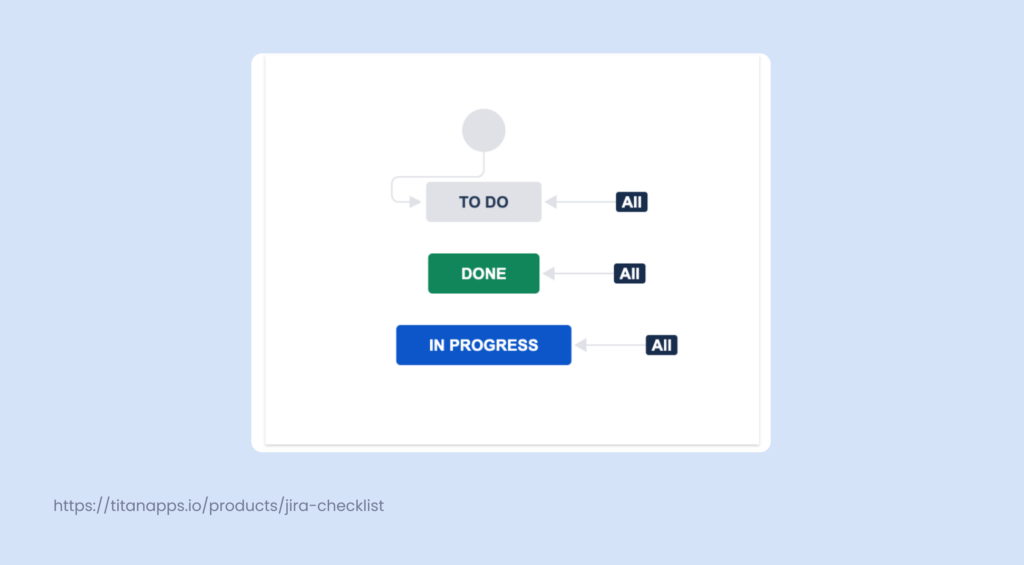
Jira Workflows are the behind-the-scenes process of your tasks. From start to finish, they list all the steps that the work item walks through using statuses. So project workflows will allow your work items to move from the backlog to “to do” to “done” and everywhere in between depending on the process you’ve established for your team.
A Jira workflow reflects the full lifecycle of a task, from backlog to done. It defines how your team moves work across stages like “To Do,” “In Progress,” and “Done.” But it can also include more advanced stages like “QA Review,” “Ready for Deployment,” or “Blocked.”
You can customize workflows per project, work type, or team. Jira workflow schemes help you map different workflows to different work types within a project.
The complexity of the workflow will vary based on your needs and you can use automation to either speed it up or set some ground rules in place (a certain task or subtask can’t be moved to a different columns in Jira unless certain, pre-defined criteria are met).
For a quick overview, check Atlassian’s Workflow Basics Guide.
In addition to that Atlassian offers certain pre-made project templates that come with specific workflows for various teams like service management or DevOps, etc.
Workflows in team-managed and company-managed projects have certain differences. For starters, Project Admins can make changes to workflows in team-managed projects as opposed to Jira Admins. That being said, the workflow scene will be specific to a project so you will not be able to share it across several Jira boards.
In addition to that team-managed projects have certain limitations like the inability to have specific workflows per each work type.
Moreover, there is a specific difference for Jira Service Management users. Each request type has its own workflow in team-managed projects whereas company-managed projects have workflows that are independent of request types. This means that multiple request types can have the same existing workflow, however every change will affect all of them.
Why do custom workflows matter?
The goal of custom workflows is to create a transparent and visualized process that meets your company’s needs on one Kanban board. It also simplifies communication in an organization and provides an overview of a project’s or sprint’s progress thus helping with sprint capacity planning in Jira.
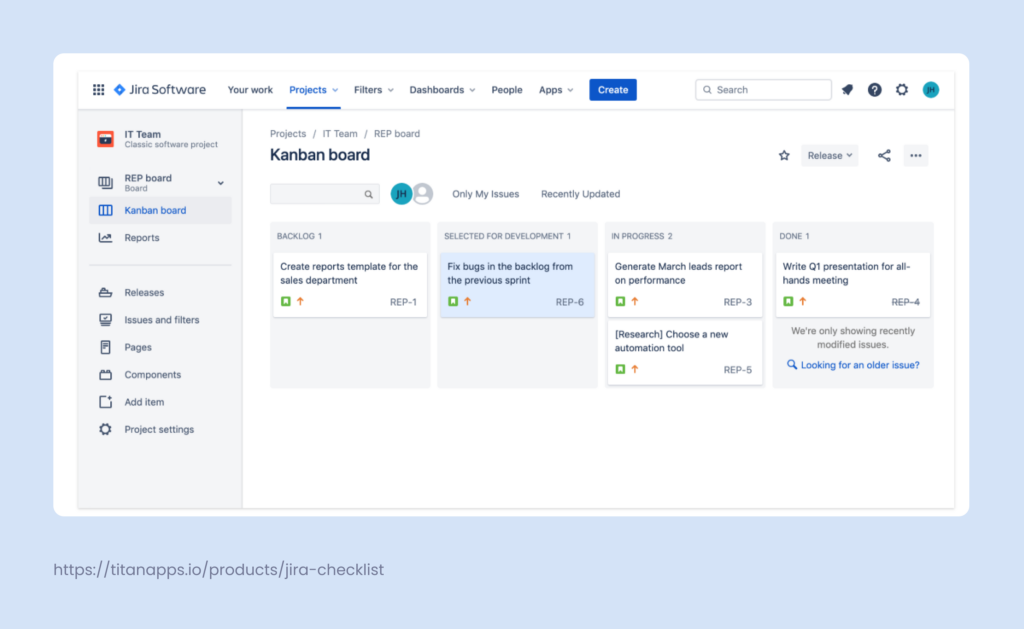
Jira comes with ready-to-use default workflows to copy and use for your project, for example, Jira Core for project management which lets you define work items as To Do, In Progress, and Done.
In reality, however, things get far more complicated than just these three statuses. You know the drill, tasks need to be reviewed, tested, approved, or even put on hold. So, it’s better to build your custom workflow and adapt it to the way your agile team works – precisely.
Another reason for customizing workflows is the fact that “one workflow simply won’t fit all needs”. To state the obvious: the same approach to work management for software development teams will not work for content teams or customer support teams. This is great for certain use cases when different support requests must go through a set of similar workflow steps.
Custom workflows also help you define automation rules, apply validators, and set up transitions that match your business logic. For example, a DevOps team may add “Waiting for CI” or “Staging Deployment” to better track release steps. A legal team may include review or compliance checkpoints.
Using Smart Checklist, teams can also embed task lists inside work items to clarify what “In Progress” or “In Review” really means. This keeps team members aligned, especially during sprint planning or cross-functional work.
What are the building blocks of a workflow?
Now, let’s break a Jira workflow into pieces and look closely at each. A Jira workflow has four main parts: a status, a transition, an assignee, and a resolution.
Statuses
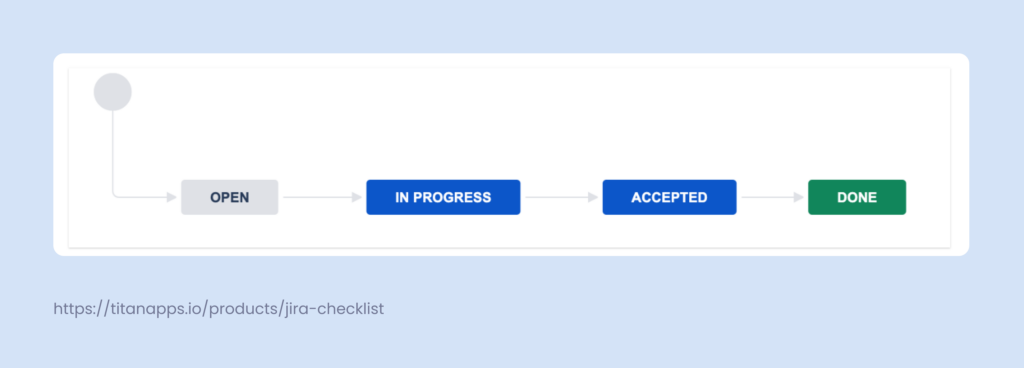
Statuses describe the current stage of the task – it can be “In Progress”, “Accepted”, “Reopened” or “Done”. There can’t be two statuses for one task at the same time.
Once again, the way you customize your statuses depends on what your team needs. For example, the “In Negotiation” (if we’re talking about leads) status will make perfect sense for a sales team workflow, but it wouldn’t be of much use for the QA team members.
To streamline your project workflows, make sure to add only statuses your team actually uses. Too many statuses can slow down transitions and confuse new team members. Teams handling sensitive client data may include e-KYC steps in their workflows to verify identities and meet compliance requirements.
Assignees
An assignee is a person responsible for something. Just as a work item can have more than one assignee, every status can have its own assignee. Meaning, a developer will be responsible for writing the code of a new feature when the work item is “In Progress”, but it’s the QA Specialist that takes it over when it’s “Ready for Testing”.
Jira allows reassignment during transitions. This way, team members are notified when it’s their turn to act.
Transitions
Transitions are the links between statuses. A transition is exactly what it takes for the work item to go from one status to another. You can compare it to driving down a one-way road from point A to point B, a transition between two statuses will be that road linking them together.
For example, between “In Progress” and “Done” you may need a transition named “Reviewed.” As a Jira Admin, you can prevent users from transitioning work items, either all of them or chosen ones.
Smart Checklist can also trigger actions or modify checklists during transitions, using Jira post functions.
Resolutions
Resolutions are the last stage of the work item’s workflow journey. They specify why a work item is closed, like “Done”, “Published”, or “Fixed”.
Here’s a tip on how not to use resolutions and why – don’t create an “Unresolved” resolution. This is because Jira displays any work items without a set resolution field as “Unresolved” by default. As a result, “Unresolved” work items are treated as “Resolved”.
Use consistent resolution names across teams. This helps your dashboards and reports stay clean and clear.
How to Create a Custom Jira Workflow
Let’s get under the hood and see how to create a new workflow in Jira. Please note that you will require Jira Administrator permissions.
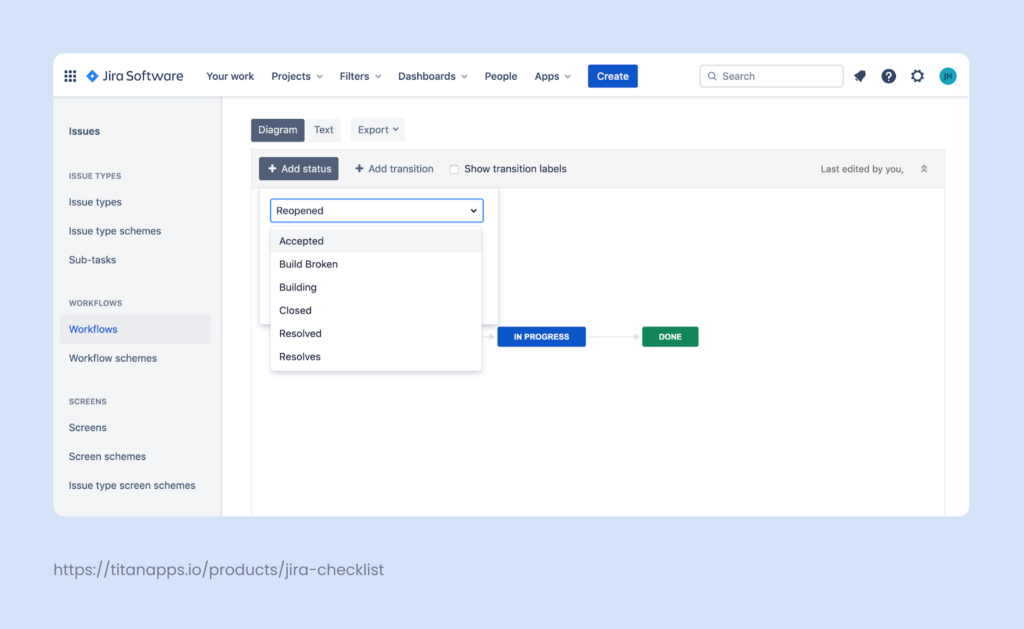
Creating a custom workflow in Jira can be done using the built-in Workflow Designer. It’s available to Jira administrators and lets you tailor workflows to the way your team works.
- Go to Project Settings – Workflows – Add Workflow
- Name your workflow and begin editing it in the Workflow Designer
- Click “Add Status” to include each step your work item should go through
- Connect statuses with “Transitions”
- For each transition, configure Conditions (who can do it), Validators (check for required fields), and Post Functions (e.g., notify assignee, update fields)
- Optionally, add Triggers to automate transitions
- Publish your workflow and associate it with a Workflow Scheme
- Apply the Workflow Scheme to your project and work types
You can create different workflows for each work type, such as Stories, Bugs, and Tasks, using workflow schemes. This lets you tailor each process to its purpose.
Want to go faster? Start with an existing workflow and modify it to fit your needs.
When you’re setting up custom transitions, use Smart Checklist Post Functions to auto-update checklist items. For example, when a work item moves to ‘QA Review,’ your checklist can update with testing steps.
Enrich your Jira work items (issues) with a Smart Checklist for Jira
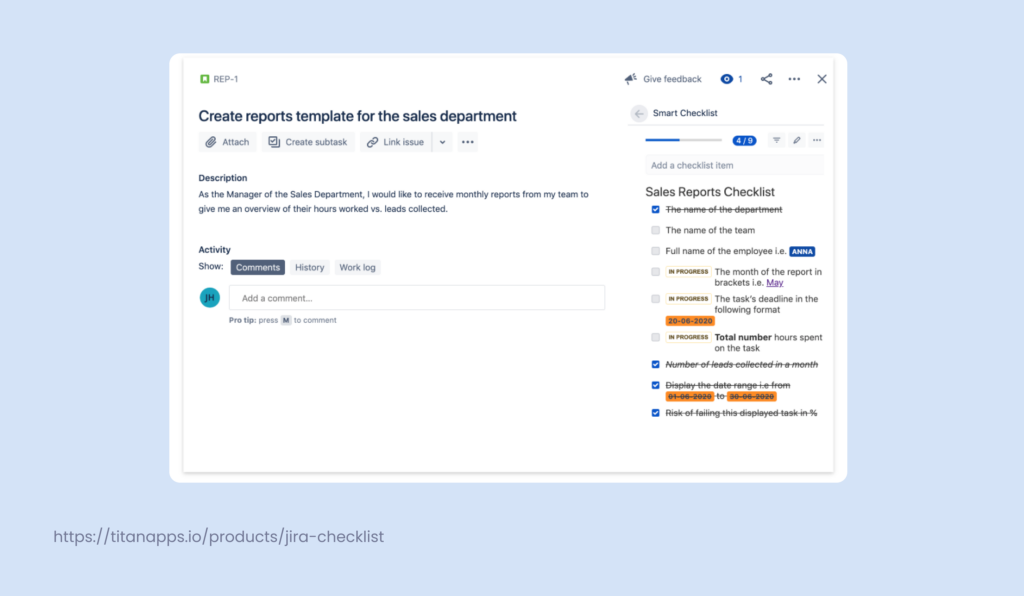
How many times have you felt the urge to just “tick things off” in a Jira task? With Smart Checklist for Jira, you can create checklists and edit them the way you want to keep things more organized.
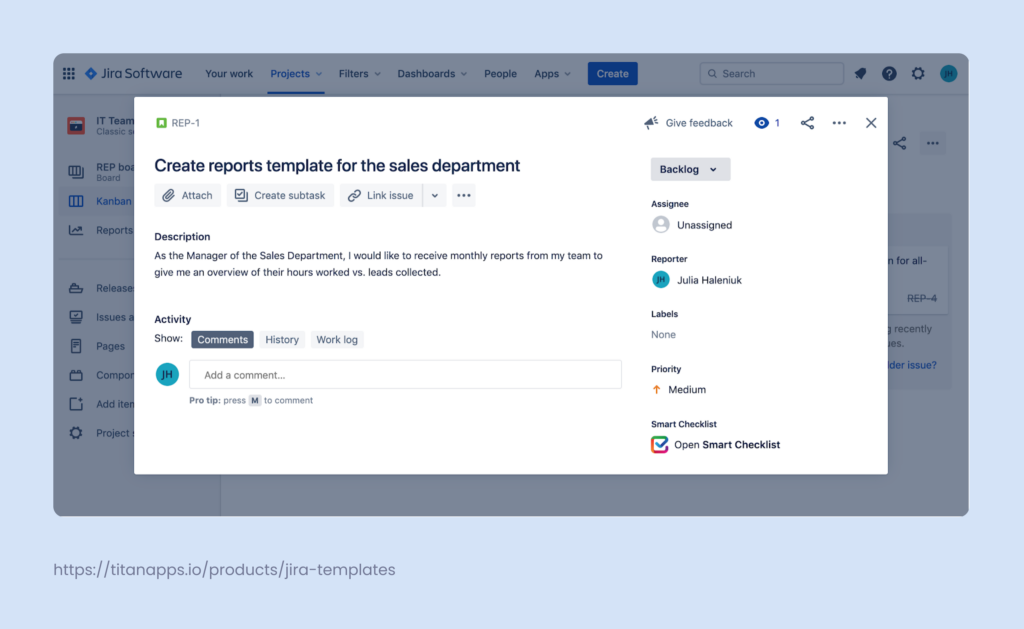
- Once installed, the Smart Checklist option will be available for all your Jira work items at the bottom of the right-hand panel, but you can move it to the center. Click Open Smart Checklist.
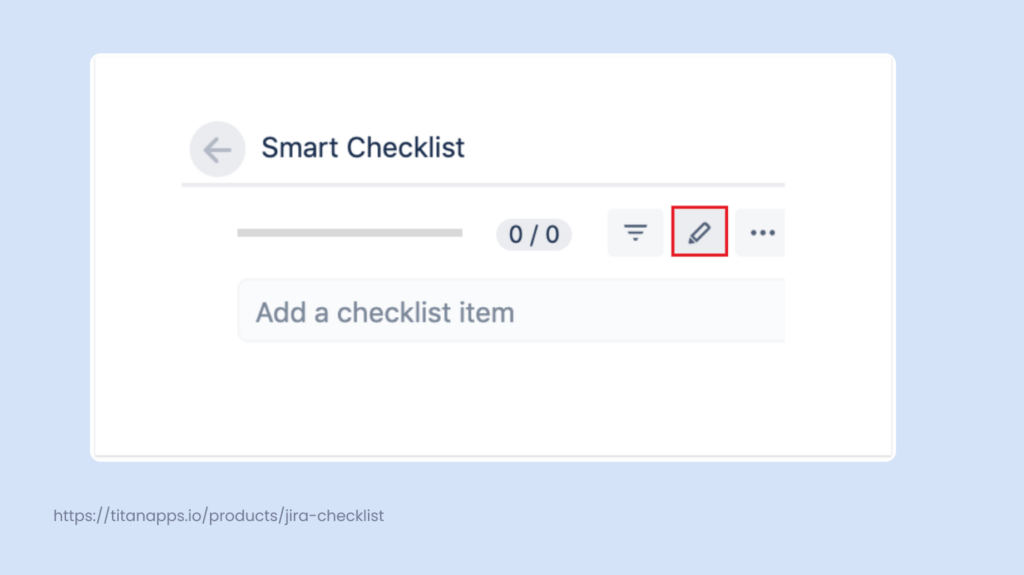
- You can start adding your checklist items one by one or click the Pen icon to edit the entire list in the Fullscreen Editor.
- In the Fullscreen Editor, you can use Markdown features to customize every item on the list. For example, to mark an item as “To do” put a hyphen “-” before it. As you format your list, please don’t put spaces between the text and the markdown. Otherwise, the text will not display correctly in the Jira work item. Other options include:
– to do
+ done
~ in progress
x canceled
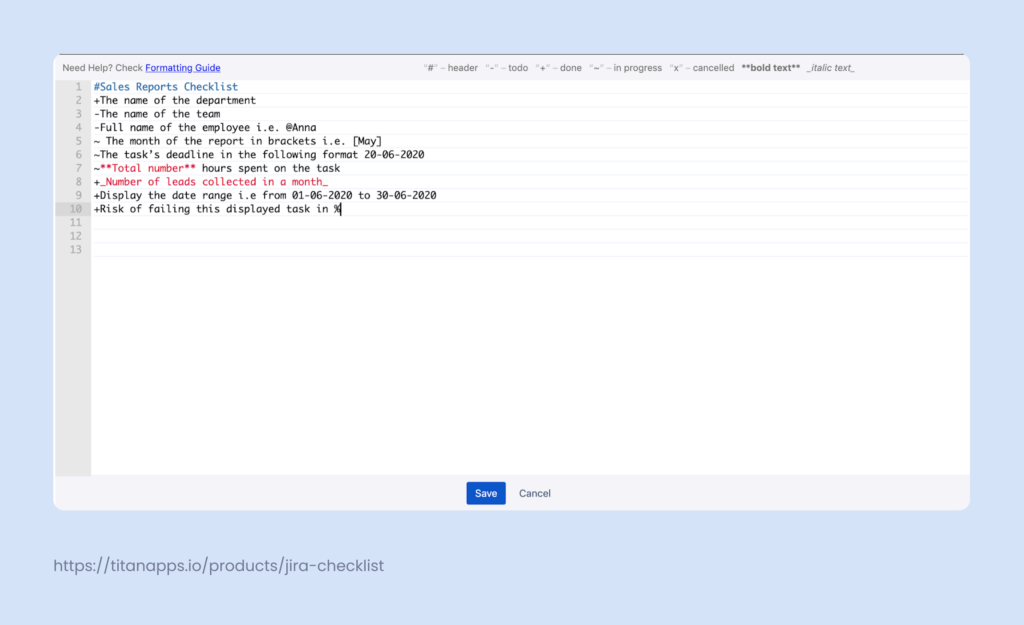
- Apart from displaying items with different statuses, Smart Checklist also allows you to mention teammates and highlight dates on lists. As in the screenshot above, to mention a person, use “@”. However, please remember that the person you tagged will not get an automatic notification.
Last but not least, if you’re using Smart Checklist on a Jira Data Center, update your Smart Checklists items upon workflow transitions. You can also read more about it here.
- Once you’re done editing, hit Save and view your Checklist in all its glory.
Using Smart Checklist to Streamline Jira Workflows
Workflows show the big picture. Checklists handle the details.
Smart Checklist helps you bring structure into each stage of your workflow. It sits inside every Jira work item and allows you to define step-by-step tasks that support each workflow status.
Here’s how Smart Checklist fits into your Jira workflow:
- Add a checklist template when a work item is created — great for onboarding, dev tasks, or QA tickets.
- Update checklist items based on transitions — for example, move certain steps to “done” when an work item passes review.
- Track which steps are complete before allowing status changes — helps prevent missed steps or human error.
- Apply separate checklist tabs per workflow stage — with multiple checklists, you can show different sets of tasks depending on what phase the work item is in.
Example use case:
A story moves from “In Progress” ? “Code Review”.
- Smart Checklist removes development tasks
- A new tab called “Code Review” appears with items like:
- Code pushed to repo
- Peer reviewed
- All tests passing
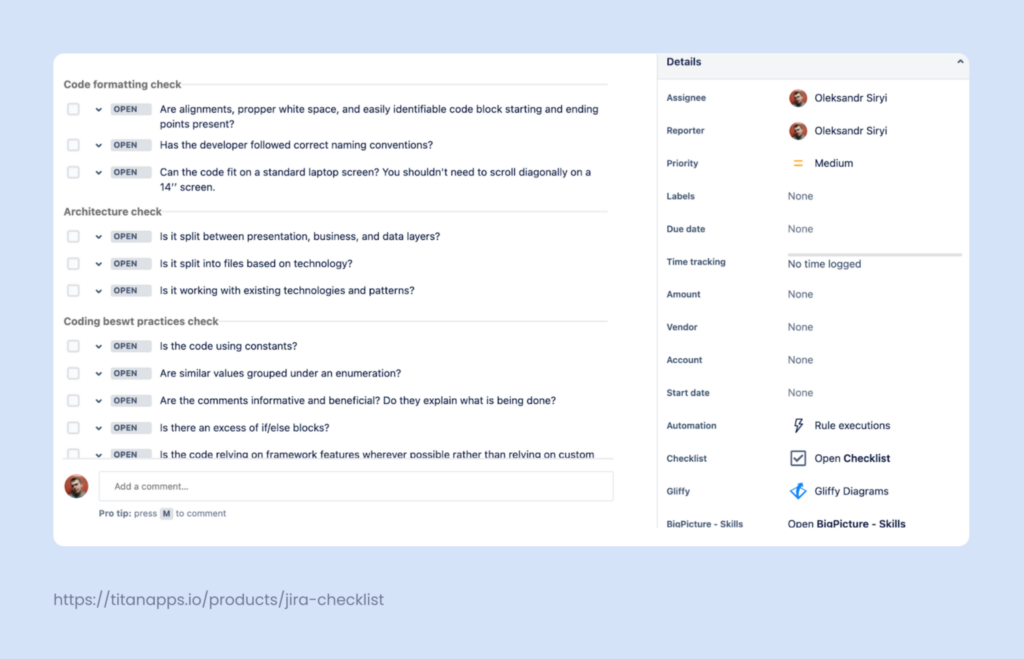
See example of the checklist below:
# Code formatting check
- Are alignments, proper white space, and easily identifiable code block starting and ending points present?
- Has the developer followed correct naming conventions?
- Can the code fit on a standard laptop screen? You shouldn’t need to scroll diagonally on a 14’’ screen.
## Architecture check
- Is it split between presentation, business, and data layers?
- Is it split into files based on technology?
- Is it working with existing technologies and patterns?
## Coding best practices check
- Is the code using constants?
- Are similar values grouped under an enumeration?
- Are the comments informative and beneficial? Do they explain what is being done?
- Is there an excess of if/else blocks?
- Is the code relying on framework features wherever possible rather than relying on custom solutions?
## Maintainability check
- Is the code easily readable by a human being?
- Is the code easily tested?
- Can it be refactored into a separate function?
- Are there flow of control, parameter, and data exception details necessary for debugging?
- Are configurable files kept in place? There must not be a need to make changes if the data changes frequently.
## Reusability check
- Are the same principles not repeated more than once?
- Are reusable services and functions used when applicable?
## Security check
- Validation against SQL injections
- Validation against XSS
- Is sensitive data encrypted?
## Scalability check
- Is the code scalable?
## Useability check
- Is the solution usable from the user’s POV?
## Performance check
- Is the correct data type used?
- Lazy loading, asynchronous and parallel processing
- Caching and session/application data
This way, you not only define your workflow stages but also guide team members on what to do at each stage — without creating subtasks or switching tools.
Try Smart Checklist on Atlassian Marketplace
Example Workflow Use Cases with Smart Checklist
Smart Checklist helps different teams stay aligned by supporting their unique workflows — whether you’re shipping code, managing releases, or onboarding new hires.
| Team | Workflow Stage | Smart Checklist Use |
|---|---|---|
| Development | Code Review – Done | Add a DoD checklist with review and test items |
| QA | In Testing | Checklist for manual/automated tests and environment checks |
| Product | In Review | Approval checklist for release readiness |
| Support | Waiting for Customer | Follow-up checklist and ticket handover notes |
| Marketing | Published | Checklist for distribution and campaign tasks |
| HR | Candidate Accepted | Onboarding steps and documentation checklist |
You can trigger these checklist templates automatically using Jira Automation or Smart Checklist Post Functions.
This gives each stage of your Jira work item lifecycle a structure that’s clear, repeatable, and easy to manage.
Best Practices for Managing Workflow in Jira
Start simple. Then grow. If your team is new to Jira or workflows, begin with a basic structure. A “To Do ? In Progress ? Done” flow works for most projects. Over time, evolve the process as your needs grow.
Name statuses clearly. Avoid vague terms like “Ongoing.” Use action-oriented names like “Awaiting QA” or “Blocked for Approval” to guide users.
Map workflows to how your team works. Use separate workflows for different work types (e.g., bugs, stories, tasks). This allows you to define steps that are actually needed — no more, no less.
Use validators and conditions. Prevent work items from moving forward if required fields aren’t filled or checklists aren’t complete.
Track progress visually. Jira dashboards, board filters, and the Smart Checklist progress field can show where things get stuck.
Review and refine workflows regularly. Project needs change. Set time each quarter to review workflows and simplify where possible.
Connect workflows with team rituals. Make transitions like “Ready for Review” part of your sprint planning, standups, or retros.
Embed structure using Smart Checklist. Whether you need a recurring task list, a Definition of Done, or onboarding steps — checklists make every transition more predictable.
Keep your teams aligned and your projects moving by combining Jira workflows and Smart Checklist templates.
Summary
The topic of Jira workflows is vast. We hope that by covering why it’s important to have custom workflows and how to enrich them with a Smart Checklist, managing your work will be as easy as it goes.
Would you like to know more about effectively working with Jira?
- Learn about building a Jira product roadmap
- Test management tools in Jira
- How to automatically add checklists to your Jira instance
- Explore Jira workflow examples in the Epic vs Story vs Task article
- Jira workflow management


