





 Tools for Jira
 Tools for monday.com




Looking to create a Kanban board in Jira? Then this guide is for you.
In this Jira Kanban board tutorial, I’ll walk you through:
- Creating a space and a board
- Setting up the backlog
- Customizing columns, statuses, and swimlanes
- Setting WIP limits so work keeps moving
- Reading what the reports tell you
While explaining the setup, I’ll also cover Kanban board best practices.
Before we dive in, here’s the short version and the terms worth knowing
Jira Kanban Board Setup at a Glance
- A Jira Kanban board maps statuses to columns between which work items move. Use it when work arrives continuously and priorities shift.
- Create one from the Kanban board template. On the setup screen, you can add or remove work types and statuses, and pick which views the space has from the start.
- By default, the Kanban template includes a Backlog status that appears as a column on your board. Drag it into the Kanban backlog area in board settings to enable the backlog, then add the Backlog view to your view list to reach it.
- Add columns from the board itself with the “+” at the end of the column list. New columns land in the In Progress category, so use board settings if you need a To Do or Done status.
- Set WIP limits as the Max work item count in a column. You might also want to turn on Days in column in Card layout to see how long cards have been sitting.
- A column shows where work is, not whether it was actually done. A checklist app like Smart Checklist for Jira keeps the completion steps inside the work item.
What Is Kanban?
[Definition] Kanban is a work management method built on visualizing work, limiting how much is in progress at once, and improving flow over time. It does not prescribe roles, ceremonies, or fixed iterations. A Kanban Jira board is one implementation of that method.
Kanban methodology is one of several agile methodologies, and the lightest of them. Kanban principles cover how work flows, not who does what, so a team can adopt it without changing roles or meetings.
What Is a Jira Kanban Board?
[Definition] A Jira Kanban board is a visual board that maps Jira statuses to columns so teams can manage work as a continuous flow. Use it when work arrives continuously, priorities change often, or your team ships small updates frequently. Kanban helps teams spot bottlenecks early and improve cycle time by limiting work in progress.
Here is a Jira Kanban board example:
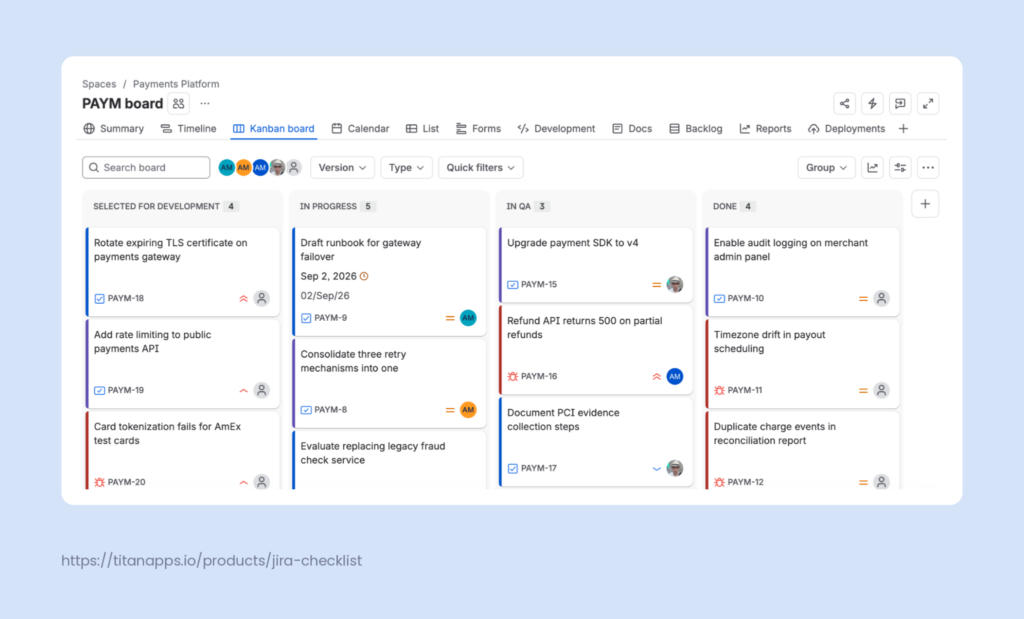
A Kanban board in Jira works for software teams and non-technical teams: support, operations, platform, and maintenance teams, as well as product teams that ship continuously. The key decision-making factor is not the role but the delivery style.
Jira supports two agile project management approaches out of the box: Kanban and Scrum. This guide focuses on Kanban in Jira. If you are not sure whether it fits your team, see the quick decision table below.
Kanban vs. Scrum for Jira Boards: What Should You Choose?
Choose Scrum when your team plans a fixed set of work for a fixed period, and Kanban when work arrives continuously and priorities shift.
A Kanban board emphasizes continuous improvement of processes. You can break your entire project into cards in the backlog, then pull out the ones the team should work on next.
A Scrum board works in Sprints. Each Sprint has its own backlog of work items the team commits to before the Sprint starts.
| Decision factor | Choose a Jira Kanban board | Choose a Jira Scrum board |
|---|---|---|
| Work intake | Work arrives continuously | Work is planned into iterations |
| Planning style | Pull-based (start when capacity exists) | Commitment-based (plan sprint scope) |
| Release approach | Frequent small releases (often CI/CD) | Batch releases per sprint (common) |
| Best metric focus | Cycle time, flow efficiency, WIP | Velocity, sprint progress, burndown |
| Team priority | Keep work moving and reduce bottlenecks | Hit a sprint goal and deliver a planned scope |
| Best for | Support, Ops, platform teams, continuous delivery product teams, maintenance teams | Feature teams that benefit from timeboxing and sprint rituals |
For a deeper comparison, read our blog article Scrum vs Kanban Boards in Jira.
How to Create a Kanban Board in Jira?
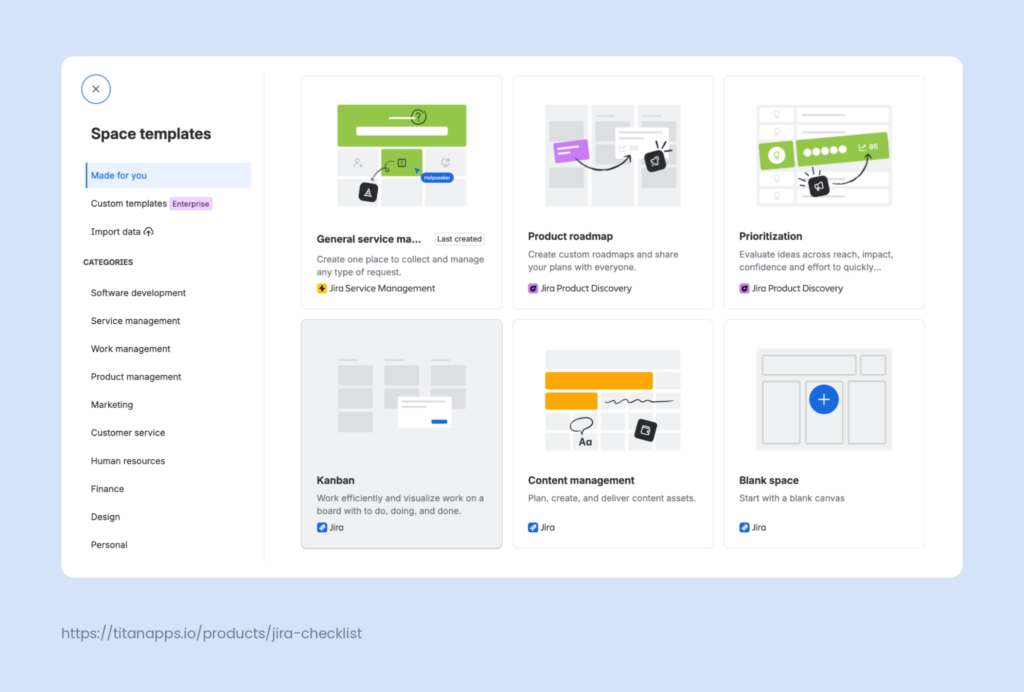
Jira spaces are located under the Space tab on the sidebar. Click the “Create space” option (the “+” symbol), and you will be prompted to select a space template. Obviously, we’ll go with the Kanban template.
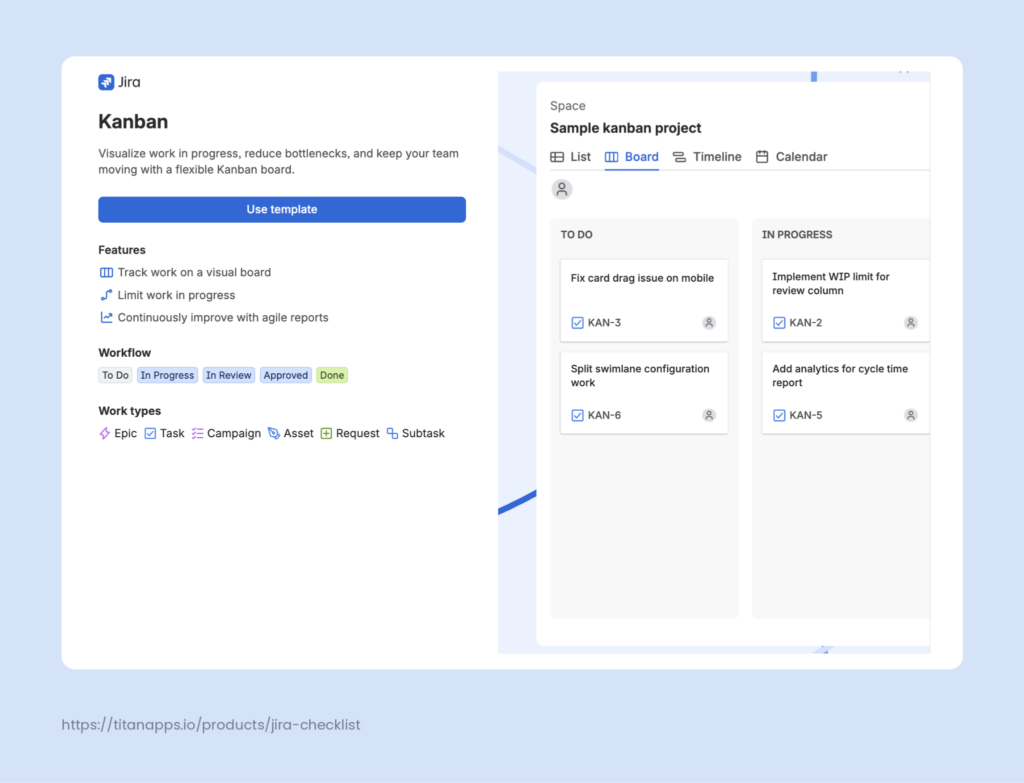
The next screen will cover the essentials, including features, the default workflow, and starter work types (issue types). Please note that this is a preview of what you get – you’ll be able to customize the workflow as well as the work types to fit your space’s specific needs later on.
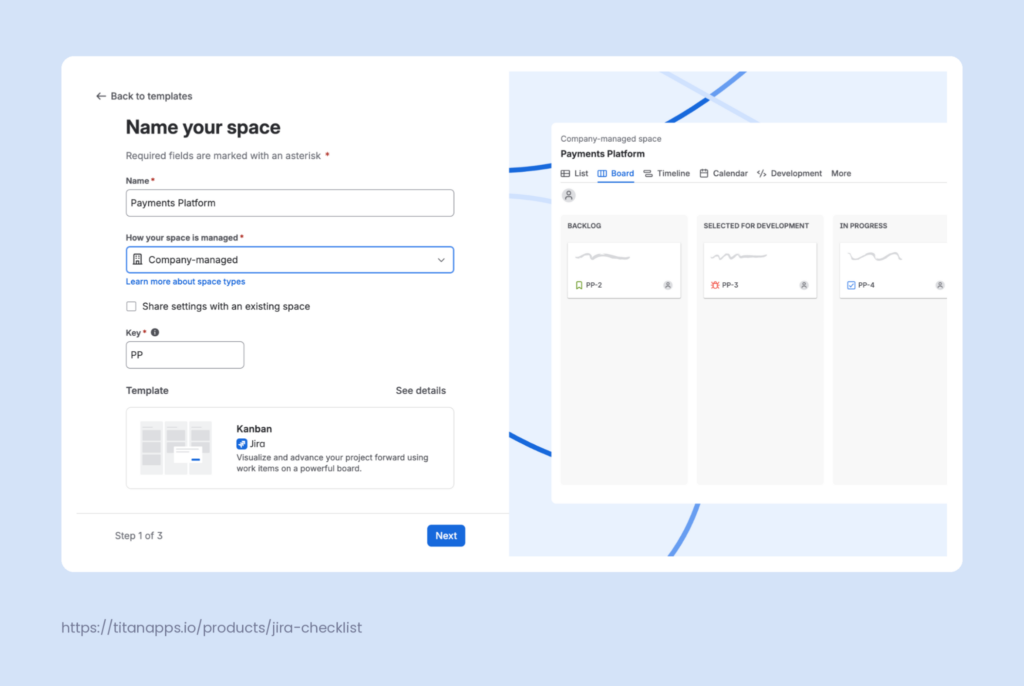
After you name your new space, you’ll choose whether it will be company-managed or team-managed.
- A team-managed space is a nice fit for teams that prefer to work autonomously. It is self-contained, and the space admin controls setup without involving a Jira admin. Its settings do not affect any other space on your site.
- A company-managed space is set up and maintained by a Jira admin. The admin configures screens (collections of fields) and the schemes (which spaces a configuration applies to) these spaces are based on. When an admin changes a scheme or screen, every company-managed space using that configuration changes too. That makes company-managed the better fit when several teams need to share a workflow.
There are more nuanced differences between team-managed and company-managed spaces in Jira, but I won’t be focusing on them in this article.
I’ll take a look at both, starting with a company-managed space.
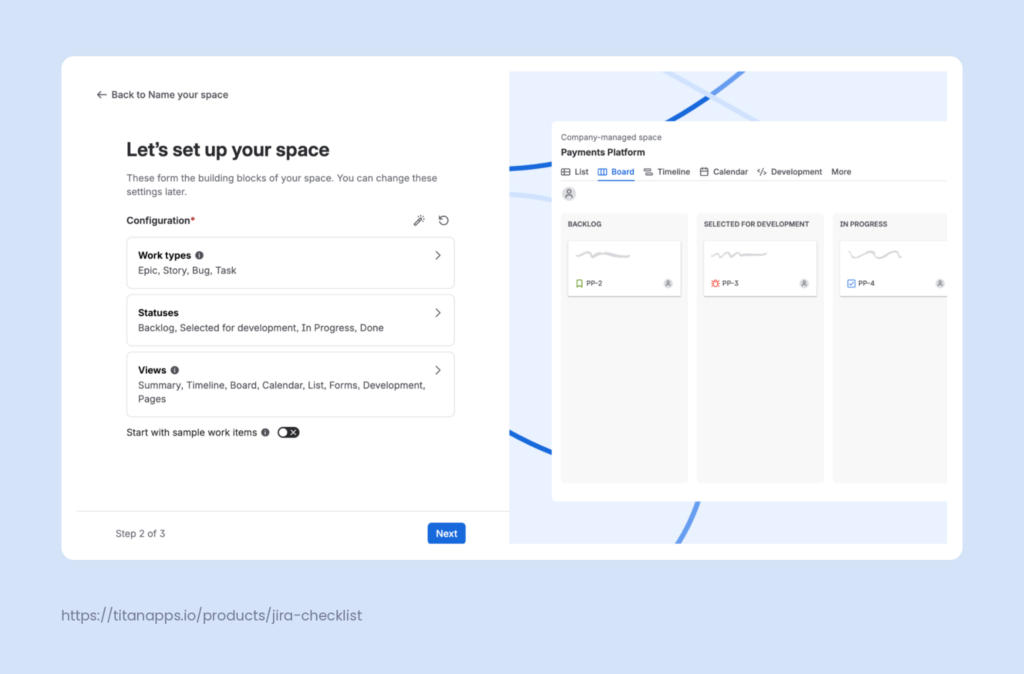
The next step is to revise your configurations: add or remove work types and statuses, and revise the views available at the start. List and Board views are always included.
Before you finish, you can add users to your space and assign them roles: members, administrators, or viewers. However, that’s optional, you can do it later.
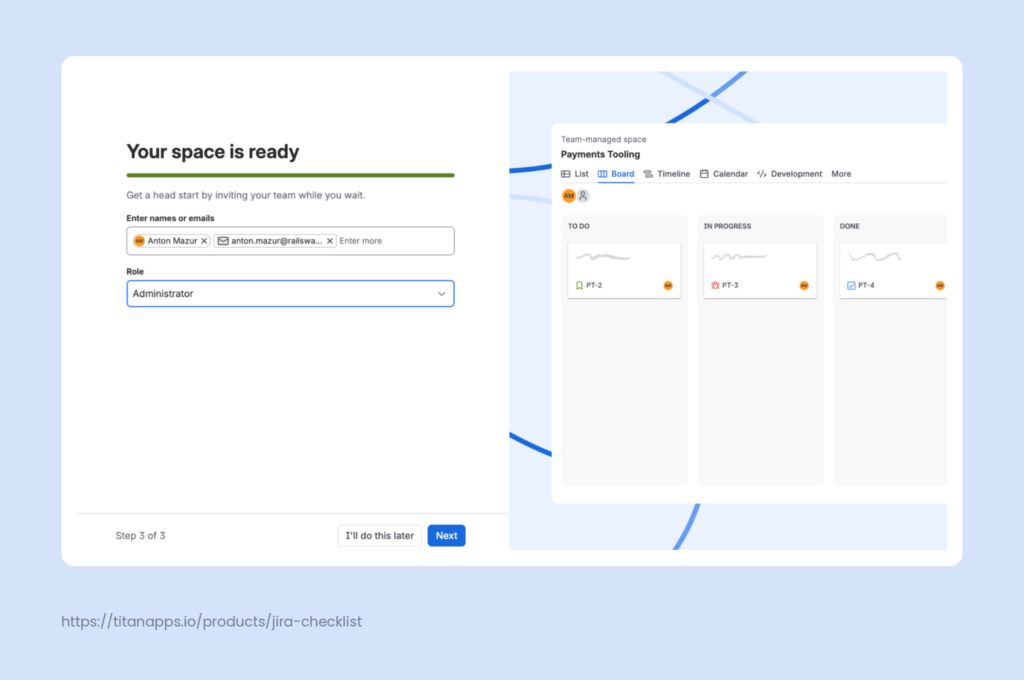
Clicking the “Next” button will take you straight to your brand-new Atlassian Kanban board.
How to Customize Your Jira Kanban Board?
You have your board looking nice, the columns are there, so it’s about time to start adding work items like user stories, right?
Not quite yet.
Sure, if the default layout fits within your processes, I say go for it. But something in my mind tells me you’ll probably need a bit more fine-tuning. Luckily, Atlassian is a powerhouse when it comes to flexibility and customizability of Jira spaces.
How to Configure Your Jira Kanban Workflow
By default, Jira gives a Kanban board a simplified workflow. You can drag cards between any two columns and add new statuses straight from board settings.
That works for a lot of teams. The first thing you will probably want to change is the board columns themselves.
For instance, you might need a separate column for tasks that are blocked, in QA, in review, etc. The easiest way to do this is to click the Create column button – the new column appears along with the new status. Then drag it to the right position on the board.
By default, the new column has the “In Progress” status category. If you want to add the column in “To Do” or “Done” categories, follow these steps:
- Go to the three-dot menu next to the board name
- Go to Board settings
- Go to Columns
- Click on the Add Status button (you need Admin permissions if this button is grayed out)
- Name your status
- Choose a status category. This category will show where your work items should be in the workflow.
- Click Add
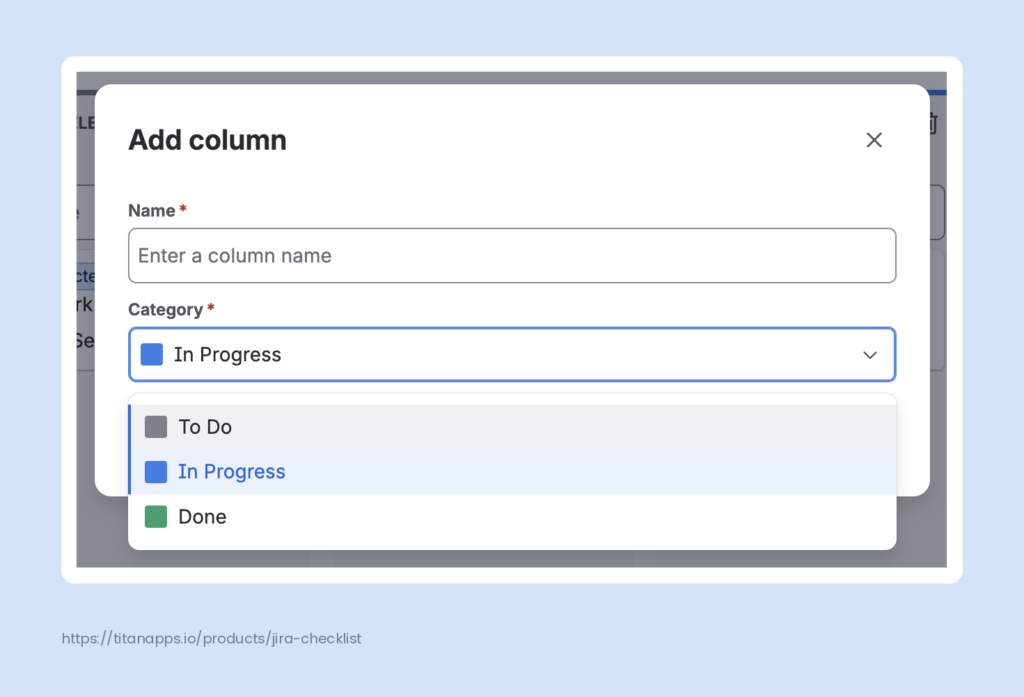
Go back to your board, and you will see a new column.
Jira board columns best practices: columns that match real work
A Kanban workflow works best when columns represent real steps, not just generic labels.
A common Jira Kanban pattern looks like this:
- To Do (ready to start)
- In Progress (active development or execution)
- In Review (code review, content review, approval)
- In QA / Testing (validation and regression)
- Done (meets the team’s completion rules)
This structure makes it easier to spot where work slows down. It also makes board metrics like “time in status” more meaningful.
 Pro Tip
A column can tell you where work is, not whether it was actually done. You could split detailed requirements into subtasks to ensure nothing goes amiss. However, should you opt to show subtasks on your Jira board, it risks looking cluttered and overwhelming. What you need is rather a checklist inside a work item. Native Action items offer a checklist-like surface in the work item description, but they have limited functionality. This is where a checklist app like Smart Checklist for Jira can come in handy.
How Smart Checklist supports Kanban work items
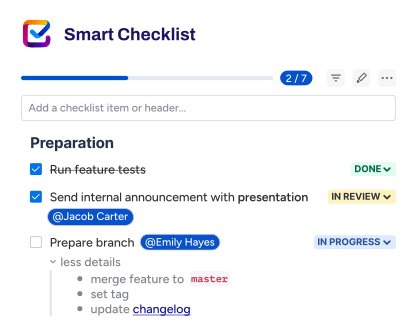
Smart Checklist adds checklist items inside a Jira work item. It offers
- Descriptive checklist items
- Tabs to group them
- Dates, priorities, as well as assignees and @user mentions if you’d like to break up work
- Mandatory checklist items that will block a work item from transitioning unless the work is marked as done
- And room to add notes, links, and resources
These features help to make work easier to review, hand off, and complete consistently, even when priorities change.
Use Smart Checklist in Kanban when:
- “Done” requires repeatable steps (review, QA, sign-off, release notes).
- Multiple roles collaborate on the same work item.
- You want to reduce missed steps during handoffs.
Enabling Backlog on Your Kanban Board
While dealing with the workflow, you might have noticed Backlog among the columns on your board. The Kanban template ships with a Backlog status, and by default it gets its own column. However, having your backlog on the board might not be a good idea. You’ll probably have lots of tasks with different priorities, and seeing them all the time is quite distracting. I very much prefer it when the board shows only the work items the team is focused on at the moment.
Luckily, it’s quite a simple fix in line with Kanban best practices.
Kanban does not require a backlog view. Many Kanban teams work from the first actionable column (often “To Do”) and keep the board focused on items that are ready to move.
However, the backlog is useful when you need a separate place for:
- drafts and ideas
- low-priority work items
- items that are not ready to be pulled into “To Do” yet.
This separation keeps the board readable and reduces noise for the team. This is how you enable Backlog and make it accessible as a view while removing the dedicated column from your board:
- Go to the three-dot menu near the name of your board
- Select Board settings
- Select the Columns option
- Drag the backlog card from the board and into the Kanban backlog column
- Delete the original Backlog column by clicking on the trash bin icon. Going back to the board, you’ll see that it has only three columns left.
- Click the “+” at the end of your current view list and add Backlog to the view list.
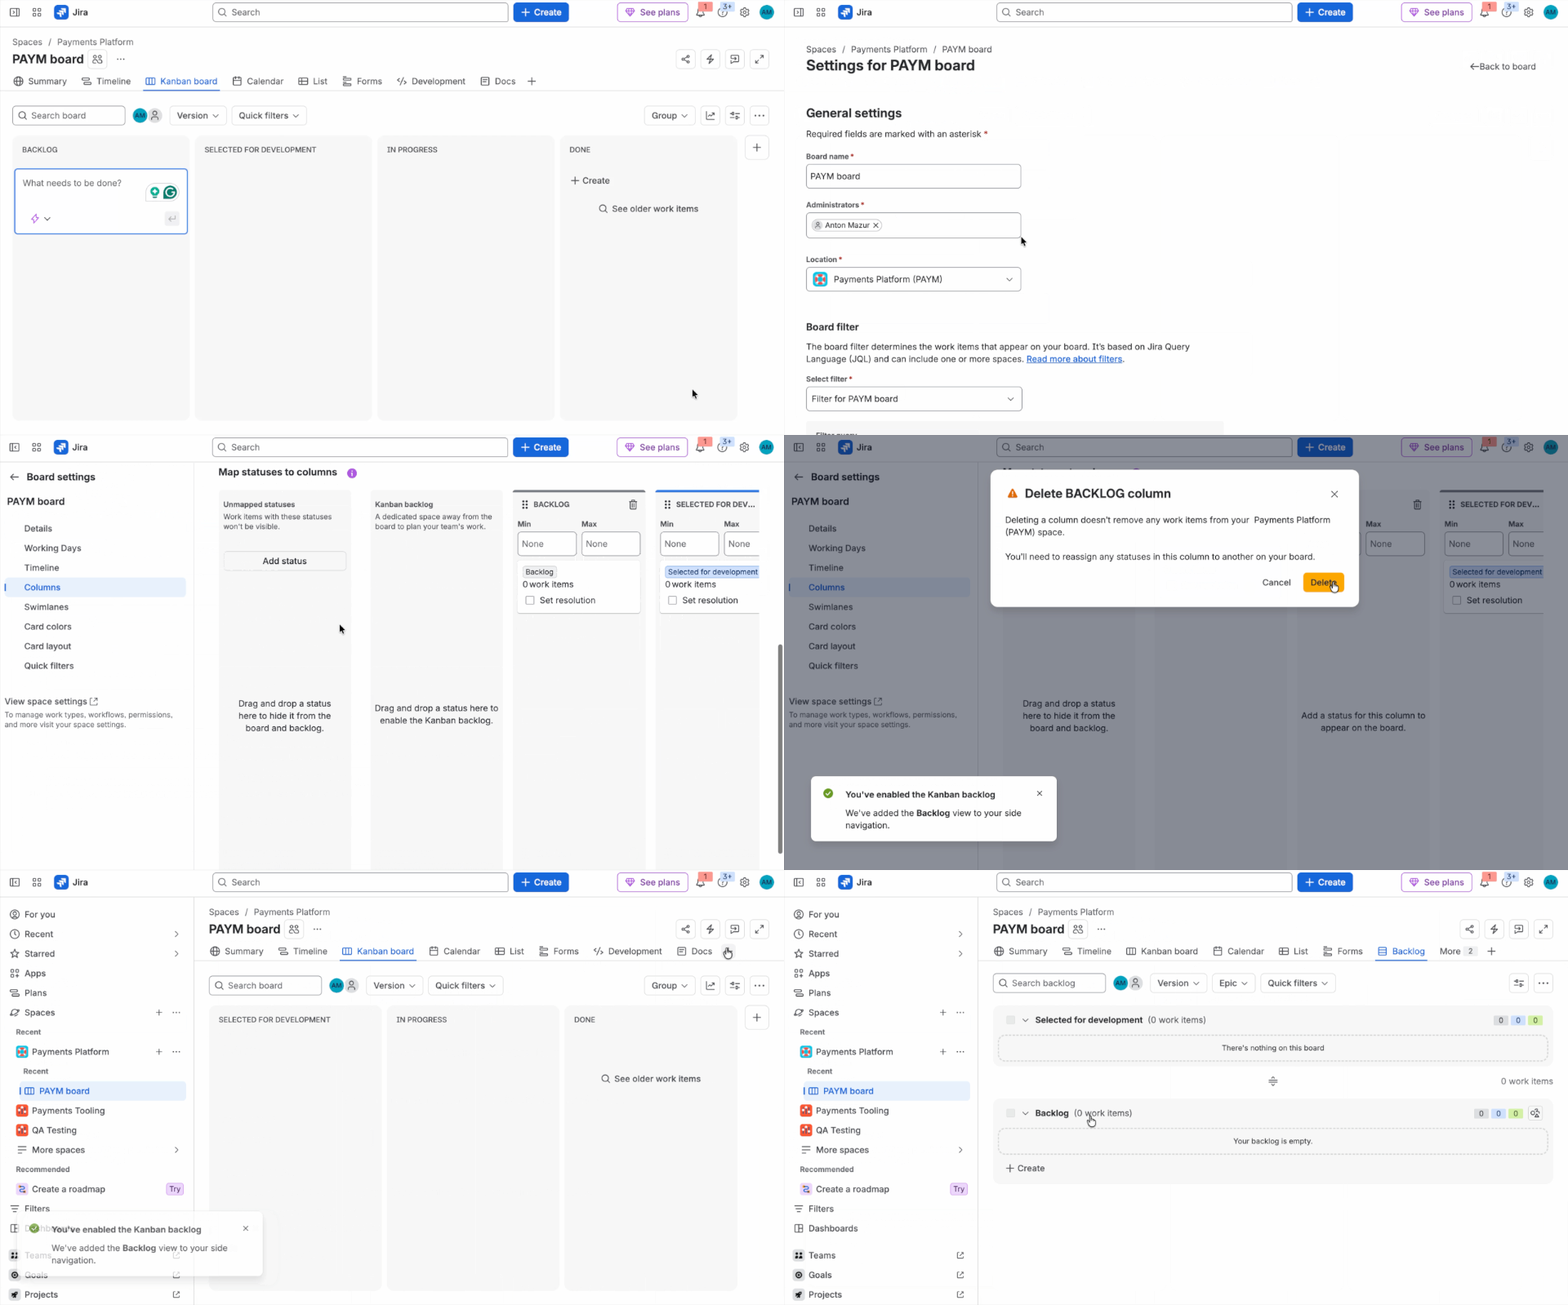
Creating work items from the Backlog screen is much simpler and faster than from the board. Click the + Create Work item button and type the name of your task. You can keep on typing and hitting Enter to add new work items. You can also change their type.
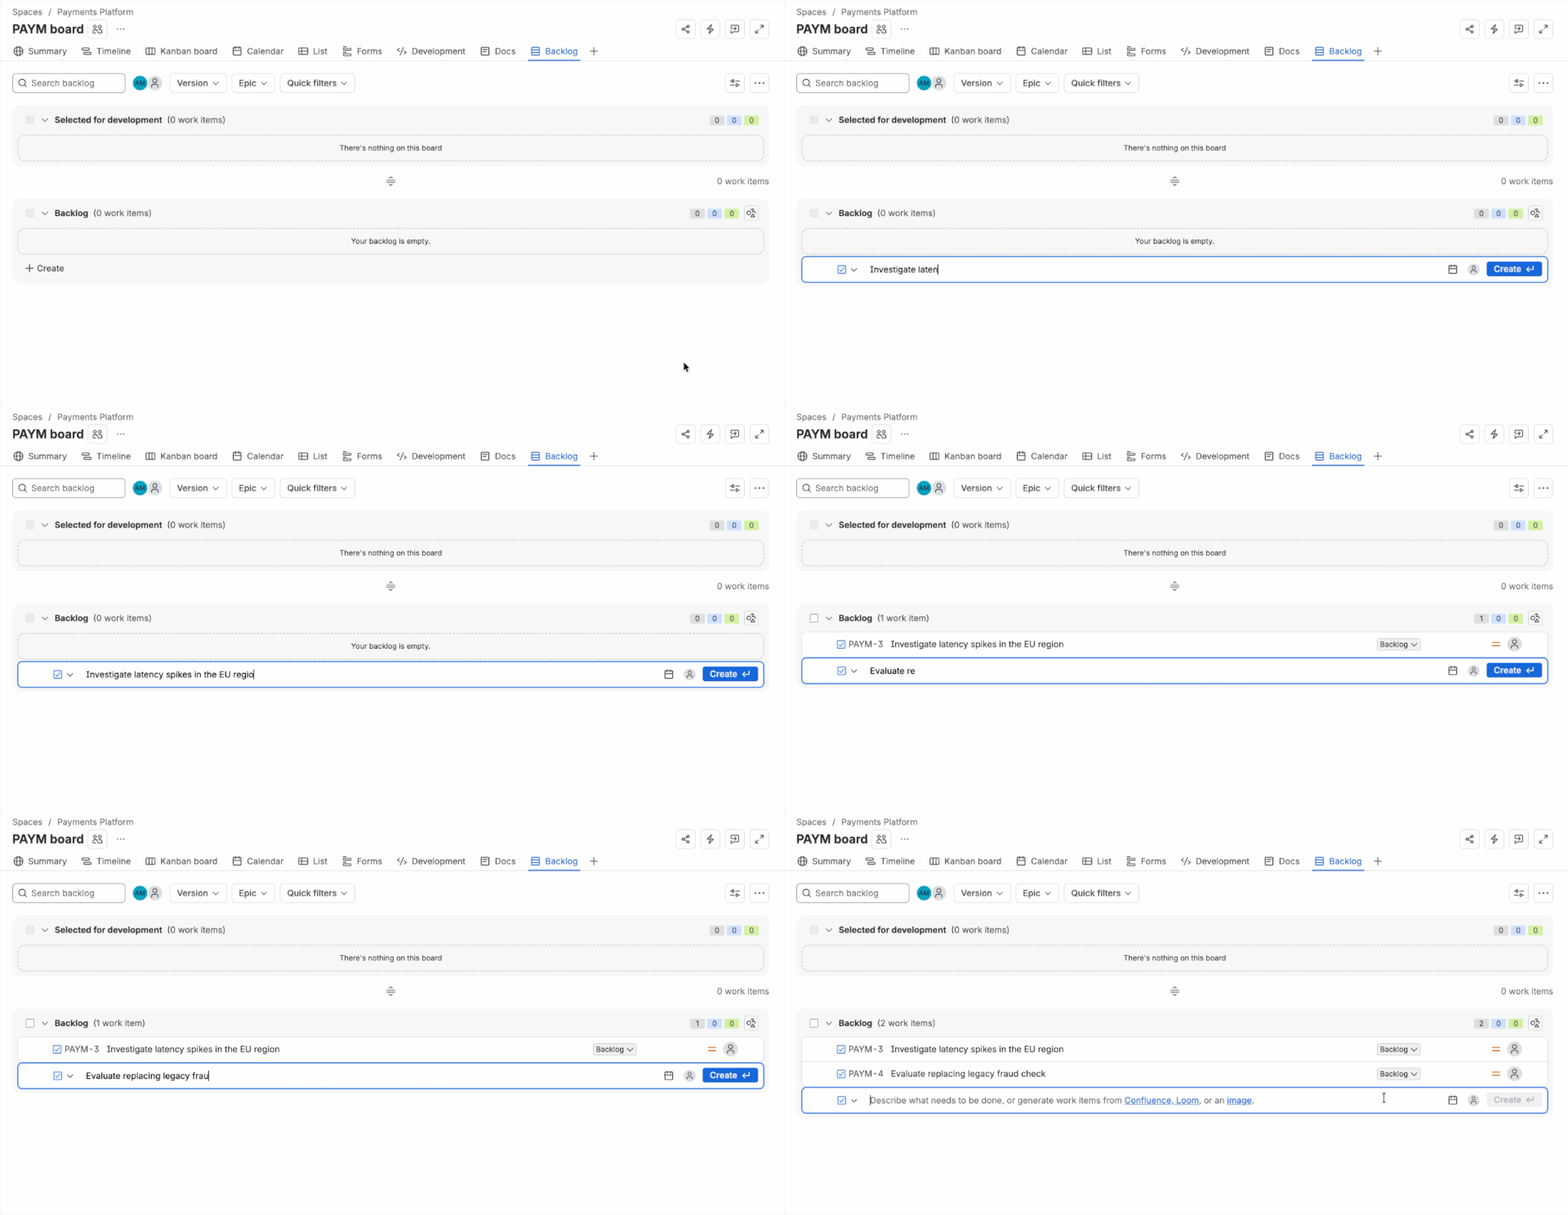
To see new work items on the board, drag them from the Backlog to the Selected for development column.
If you need more information on how to manage a backlog in Jira, read our article on Jira Backlog Management Best Practices.
Note
Click on any work item on the board to open it in floating windows. Alternatively, you can toggle “Open work items in sidebar” on in the View settings. This way, as the name suggests, a click will open the work item in the sidebar. Either way, you can add assignees, reporters, priority, and additional details.
Set Work in Progress (WIP) Limits with Column Constraints
Kanban boards make bottlenecks visible. If the team keeps “starting too much and finishing too little”, WIP limits are what you need.
How do WIP limits work?
Each column has a maximum number of work items allowed at the same time. When a column exceeds its limit, the workflow tells you the step is overloaded. The fastest fix is to finish or unblock work already in progress before pulling more items into that column.
Example: Testing keeps growing. QA capacity is limited. Automated tests are missing. A WIP limit forces the team to fix the bottleneck instead of feeding it.
Why this works: WIP limits reduce multitasking and force the team to finish work before starting new tasks.
How to set WIP limits in Jira (company-managed Kanban)
- Next to your board’s name, open Board settings (hidden behind the three dots)
- Click Columns
- Check the Column constraints section – to make WIP limits available, a constraint should be set either to Issue count or to Issue count, excluding subtasks
- Set column constraints (Max work items) for the columns you want to control
Jira shows the limits near the column names and highlights the column when it exceeds the limit. Treat the highlight as an action signal, not just a warning.
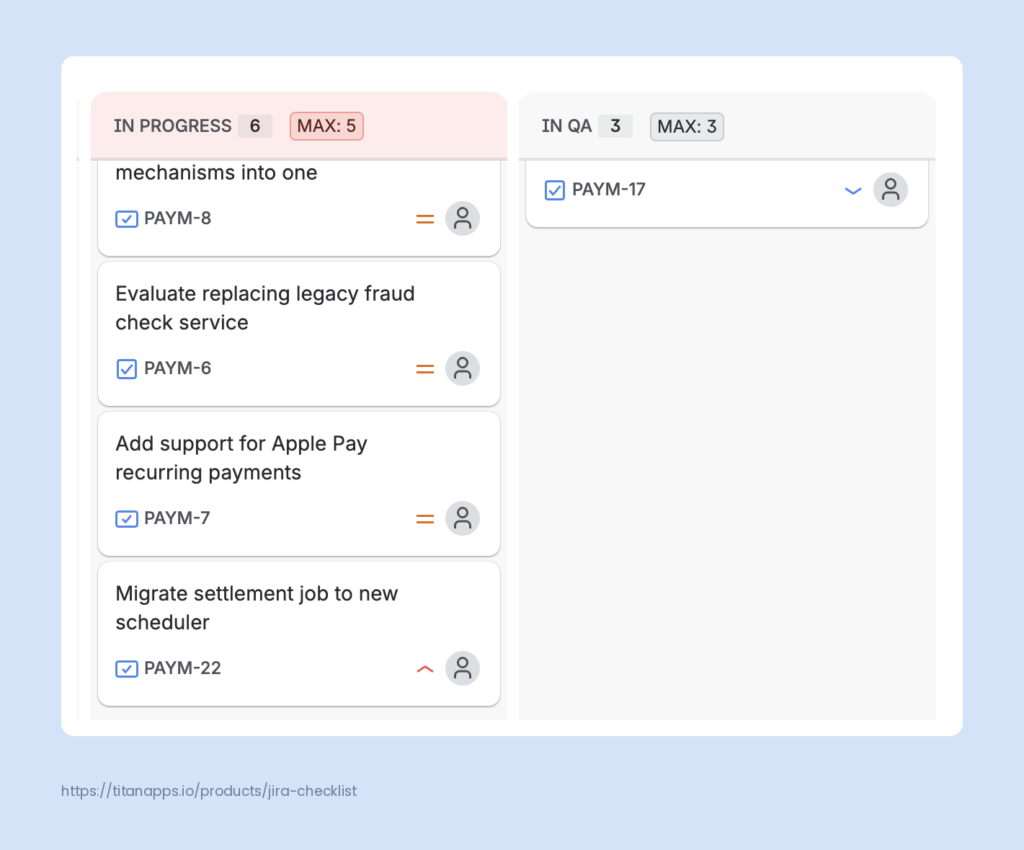
Which WIP limits should you start with?
Consider the example below:
- In Progress: Max 5
- In Review: Max 3
- In QA / Testing: Max 3
Adjust limits based on capacity.
How to Group Work with Kanban Swimlanes
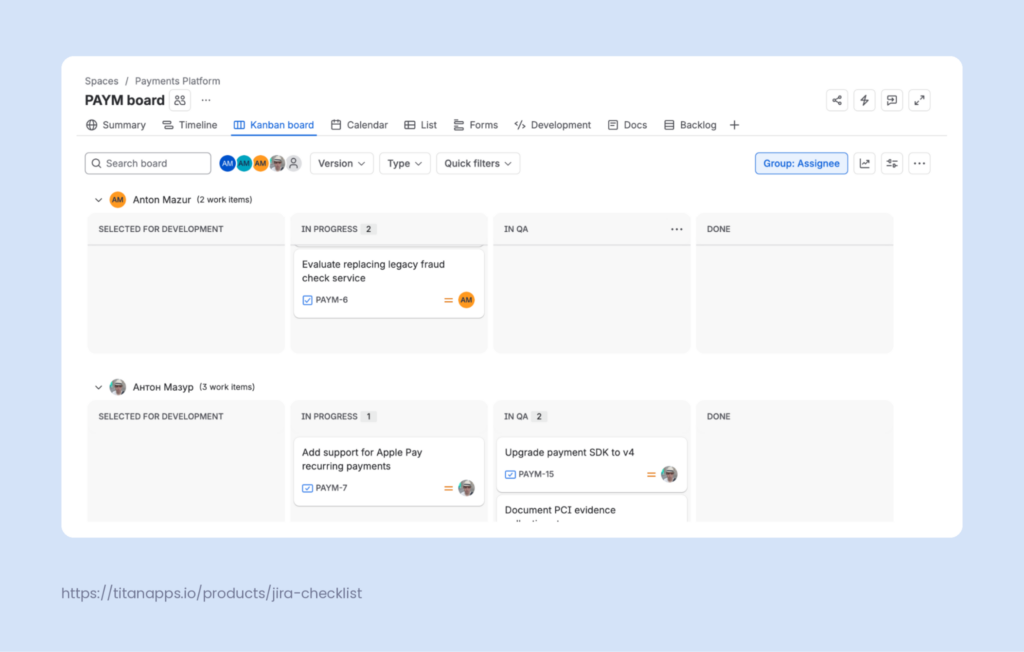
Swimlanes let you group work items horizontally on the board. Jira offers several types of swimlanes for grouping work items: JQL query, story, assignee, epic, etc. For example, selecting Assignee groups all work items assigned to a specific user together.
You can go to Board settings / Swimlanes to make these adjustments.
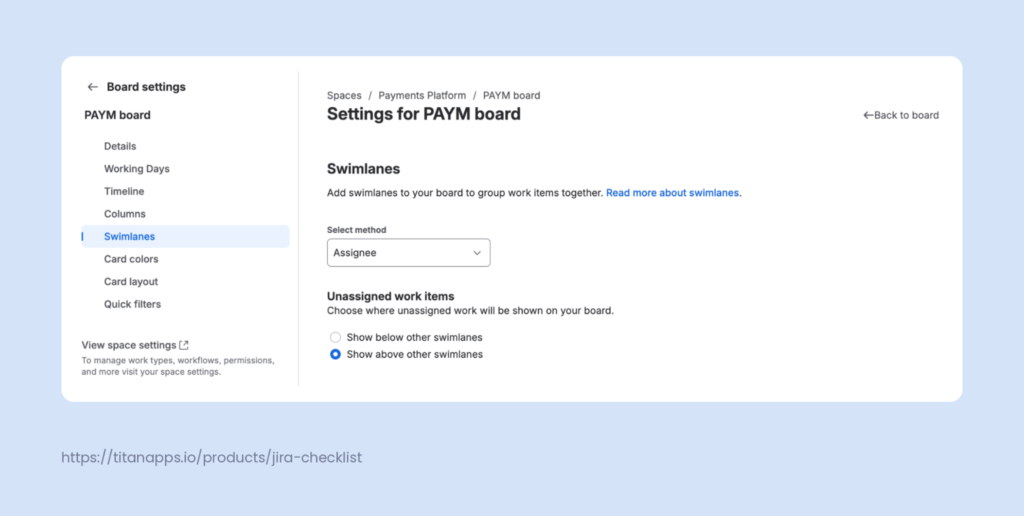
Adding this option gives a much clearer view of the board, as users like Product Owners and Project Managers can easily review each team member’s workload and capacity.
 Note
Note
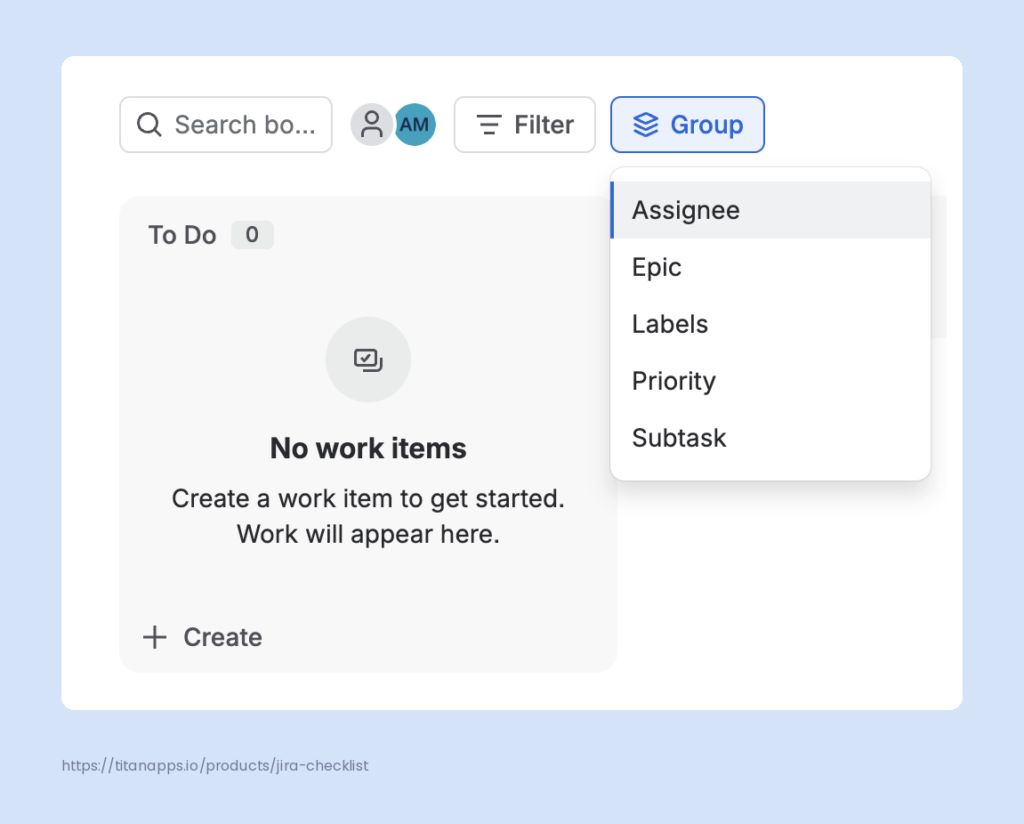
You might have noticed the Group menu on the board toolbar. It groups work items horizontally as swimlanes do, but affects your personal view setting, while Swimlanes apply to everyone. Swimlanes apply to everyone, and you need board or space admin rights to configure them.
Card Layout: What to Show on a Kanban Card Without Opening It
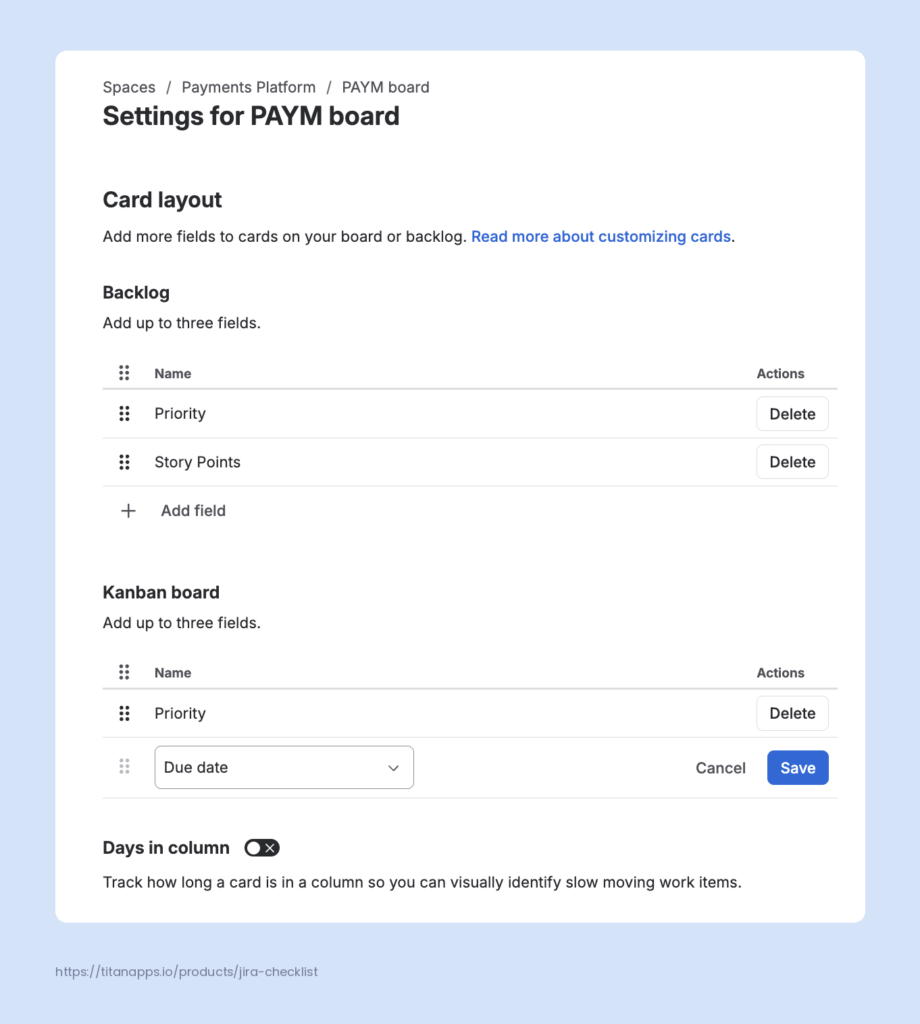
The card layout controls what shows on a card without opening it. Go to Board settings / Card layout. You can add up to three fields for the board and three for the backlog.
Note the Days in column toggle. It shows how long each card has sat in its column, which makes slow-moving work visible before anyone opens a report.
How to Color-Code Kanban Cards for Faster Scanning
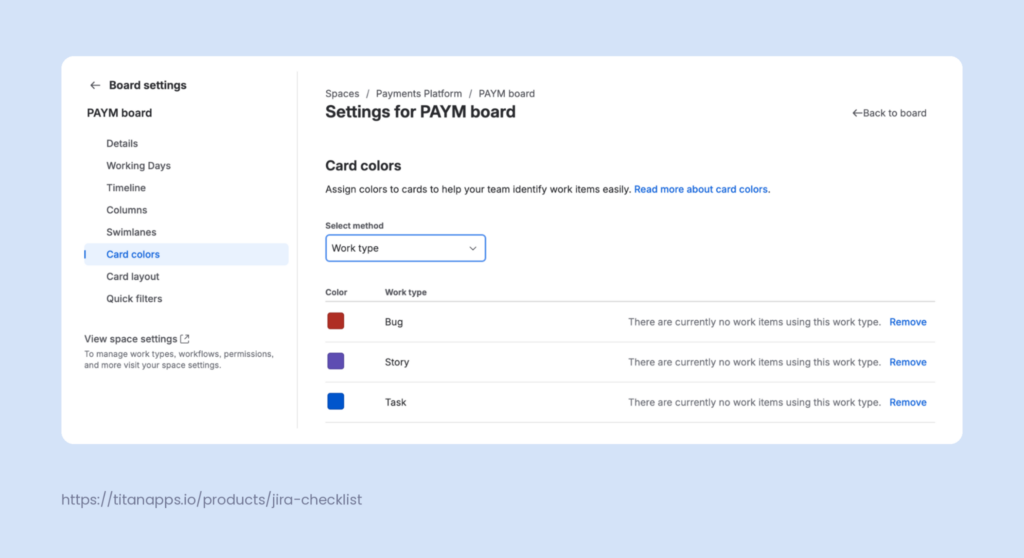
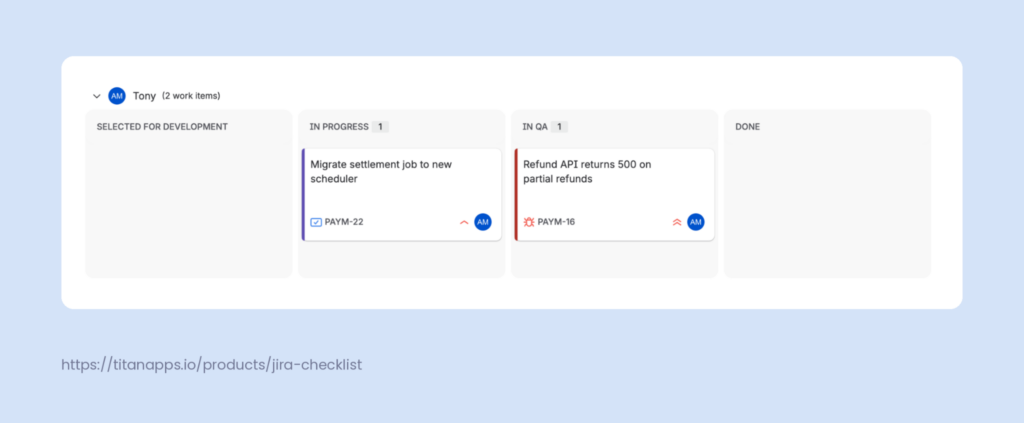
Card colors are the last touch I’d like to mention before we wrap up this section. Adding clear and intuitive color coding to your Kanban cards will make your board much more readable at a glance.
Go to Board settings / Card colors and select the option you’ll base your colors on. I suggest going for the Work type option. You can also pick specific card colors.
This is how it looks on the board.
What Does the Kanban Board Reports Reveal
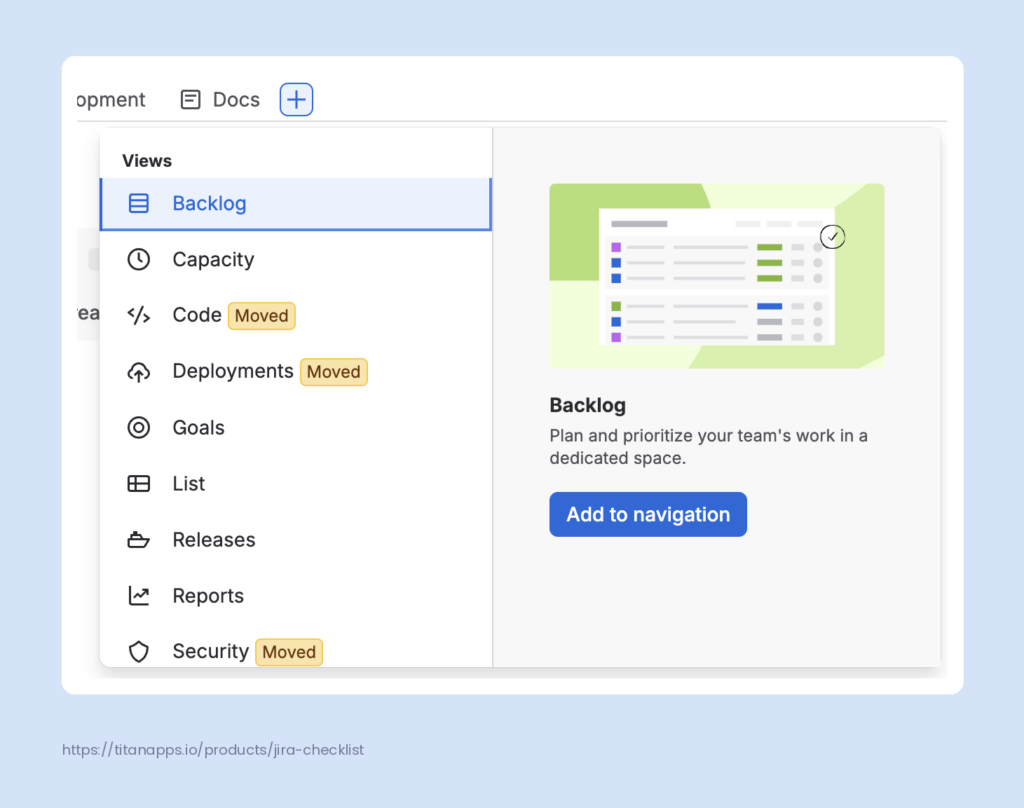
Jira offers a wide variety of useful insights, and the best place to look for them is the Reports tab. If you didn’t enable it during space creation (see the “Let’s set up your space screen” above), turn it on via “Add to navigation” (the “+” button to the right of all existing views).
When you open Reports, Jira shows a default set of charts:
- Work items completed, updated, created, and due.
- Breakdown by status, work type, and assignee.
- Trend charts for creation, cycle time, lead time, and completion.
A searchable table of all work items sits at the bottom.
The cycle time and lead time charts are worth checking regularly as they show how long work takes. Keep in mind that both need completed work before they reveal anything.
The More reports button opens a wide selection of Jira reports for Kanban to choose from:
- Agile reports
- Cumulative Flow Diagram: Shows the status of work items over time. This helps with understanding potential blockers and bottlenecks.
- Control Chart: Shows cycle time for your product, version, or sprint and helps predict future performance.
- DevOps
- Cycle Time Report: Helps you understand how long it takes to ship through the deployment pipeline and how to address outliers.
- Deployment Frequency Report: Helps you understand how frequently you ship value to customers.
- Issue analysis
- Average Age Report: Average age of unresolved work items, shows whether the backlog is current.
- Created vs. Resolved Issues Report: Shows the dynamic between created and resolved work items.
- Pie Chart Report: Chart of work items for a space/filter grouped by a field
- Recently Created Issues Report: Shows the number of work items created over a period of time.
- Resolution Time Report: Helps identify trends and potential solutions based on the time it typically takes to resolve a set of work items.
- Single Level Group By Report: Helps you group search results by a field and see the status of the group.
- Time Since Issues Report: Helps track how many work items were created or updated over a period of time.
- Forecast & management
- Time Tracking Report: Shows original vs current time estimates to resolve work items.
- Other
- Workload Pie Chart Report: A handy report for visualizing work items as a pie chart.
Use Board Insights to Spot Stuck Work Items (Without Opening Reports)
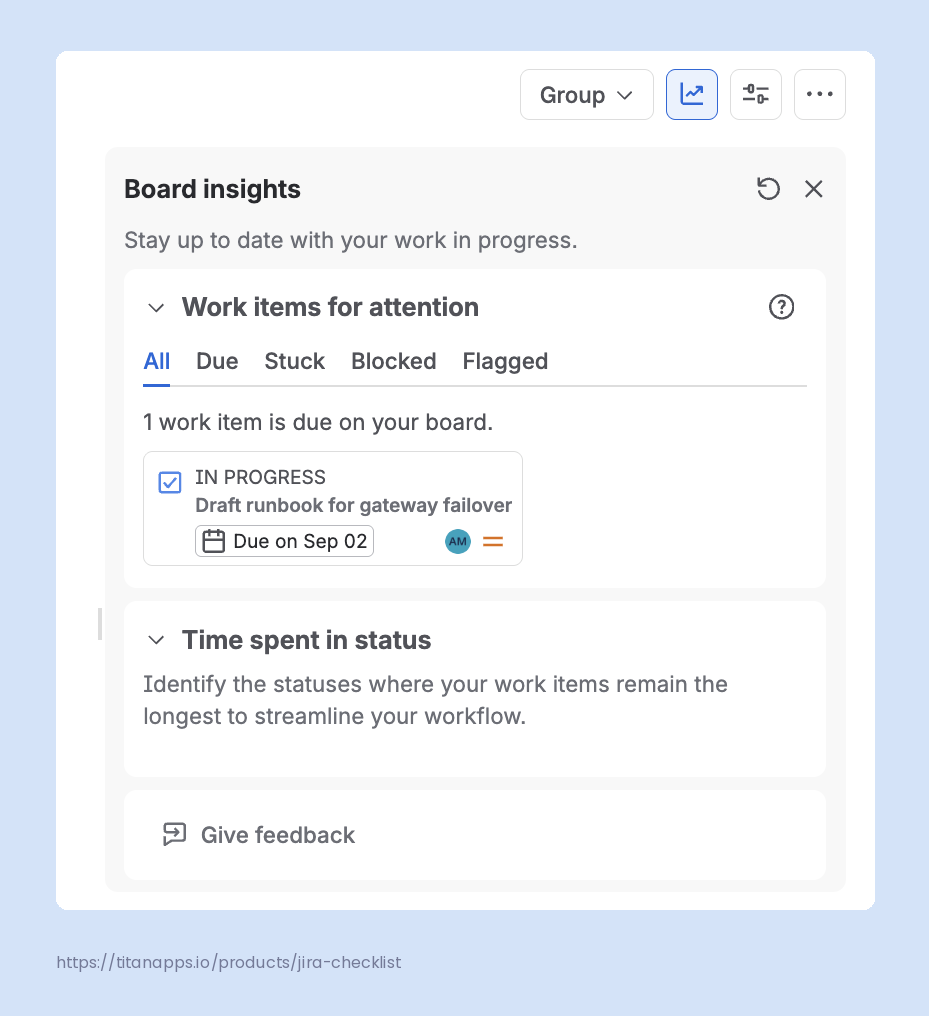
Jira also provides Board Insights on the Board view – a quick way to catch problems early without opening full reports.
What Board Insights shows on a Kanban board:
- Work items that need attention (for example, items that are blocked or stuck)
- Time in status, including the average time work items spend in each status
Where to find it: open your Board and select the Insights icon. 
How to use Board Insights in daily Kanban work
Use Board Insights as a daily check for stuck work, for example, during your daily stand-ups. Look for statuses where items spend the most time. Treat that status as a bottleneck and adjust the workflow, capacity, or WIP limit to reduce waiting time.
How to Configure a Kanban Board in a Team-Managed Space
A Kanban board in a team-managed space offers similar functionality. However, the configuration details vary.
If you need a Backlog, add it as a view via the Add to navigation button (to the right of all existing views). The same applies to Reports.
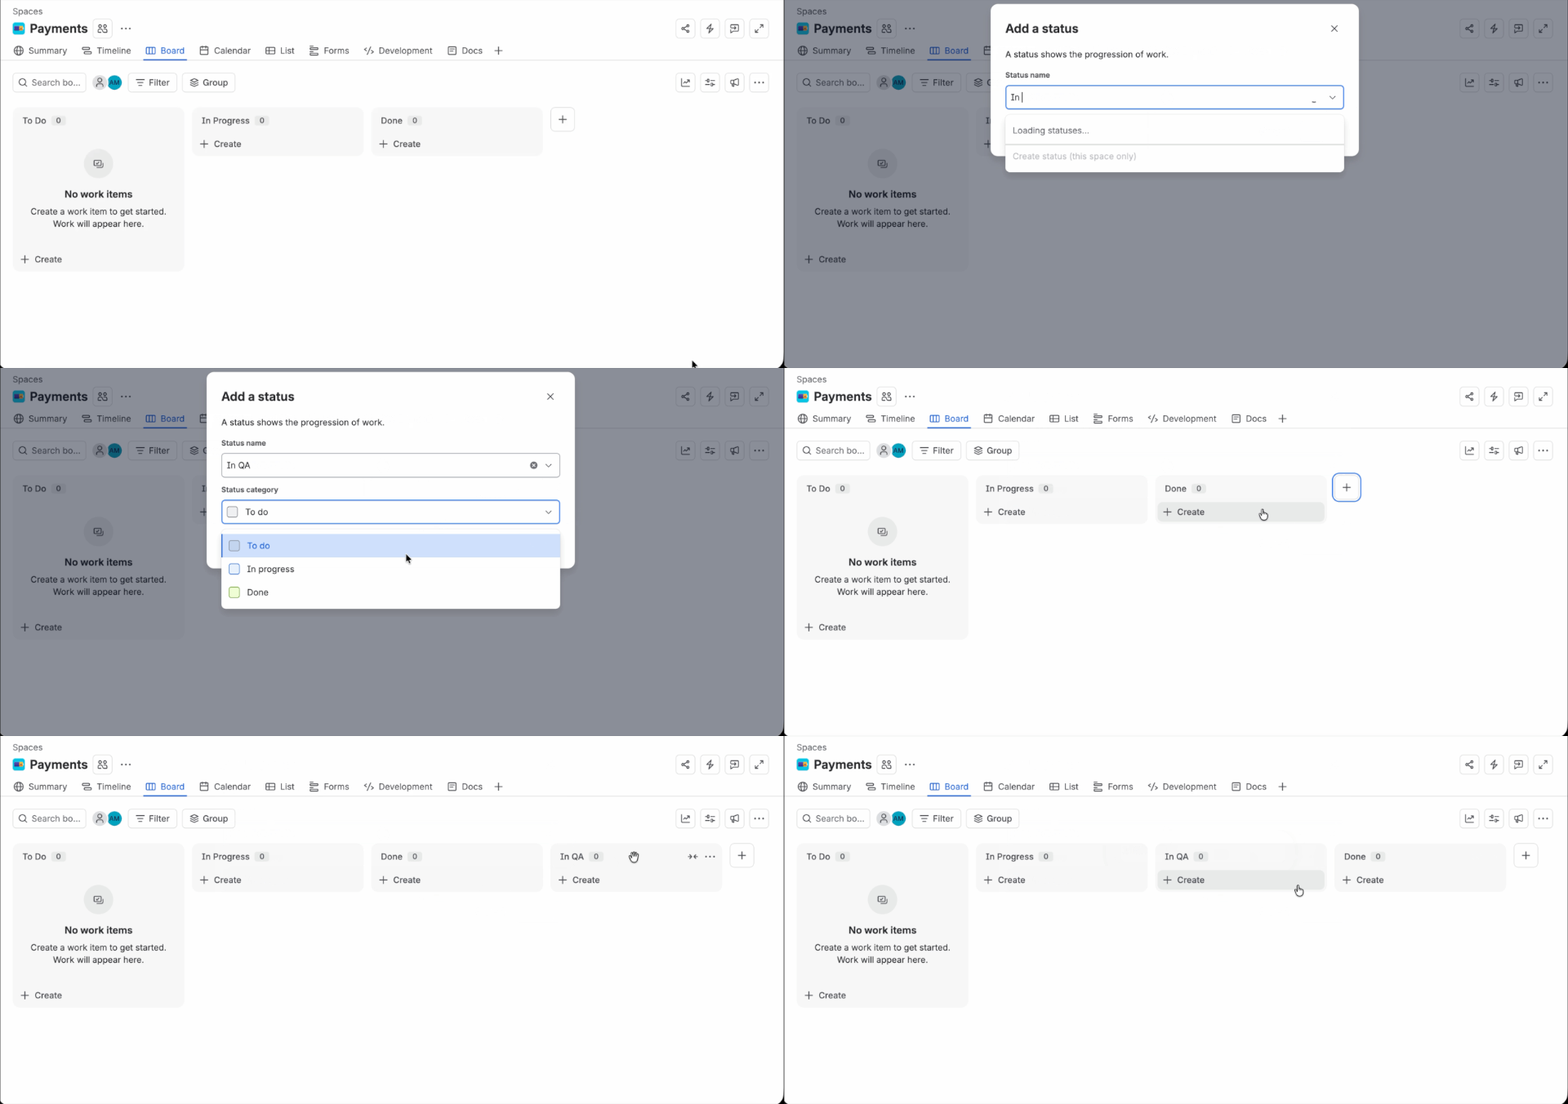
To add a status, just hit the “Add status” button to the right of the existing columns on the Board view and select its status category, then click Submit. Refresh the page and the new column will appear.
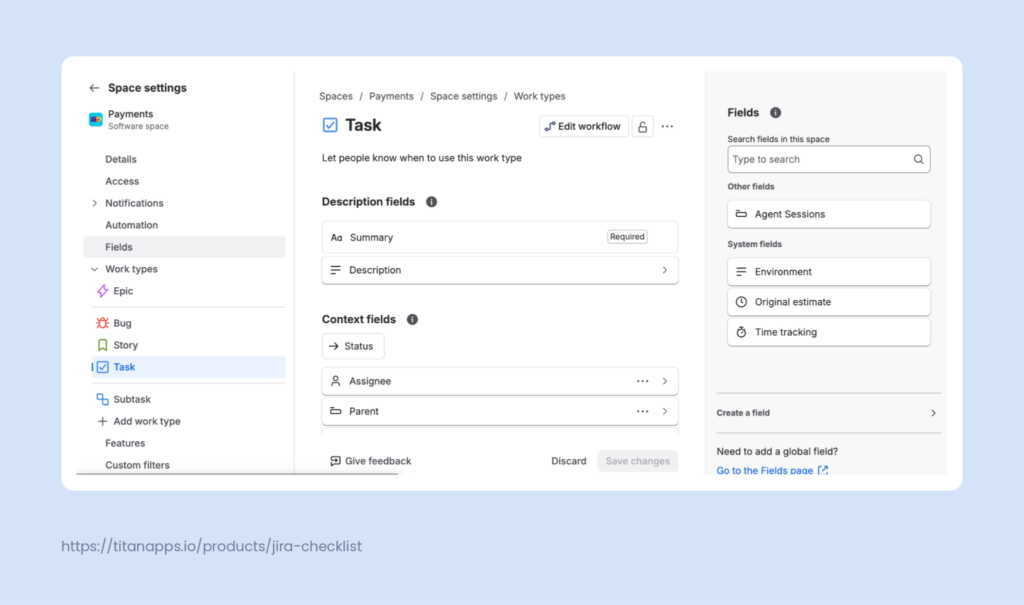
You can customize the fields in your work items if you go to Space Settings (the three dots next to the space name) / Work Types and select the work type you’d like to edit, like Story. After that, select a field you’d like to add from the right-hand menu bar and drag-&-drop it into the work item. In the same window, you can add a new work type and open the workflow for edits.
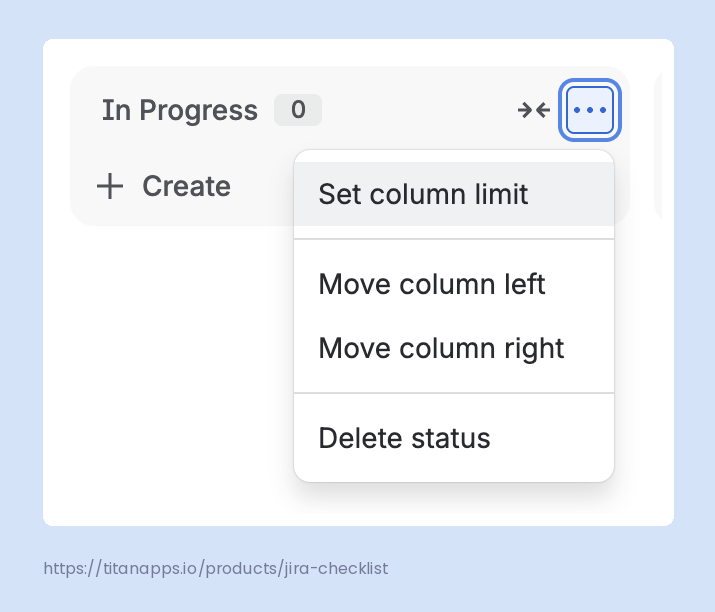
You can also set the WIP limits as a maximum number of work items per column via the More actions menu for each column.
To visually group work items in the Board view columns, use the Group menu. Compared to the company-managed Kanban board swimlanes, the configuration is less flexible, as you can’t use a JQL query, only a predetermined list of options.
 Pro Tip
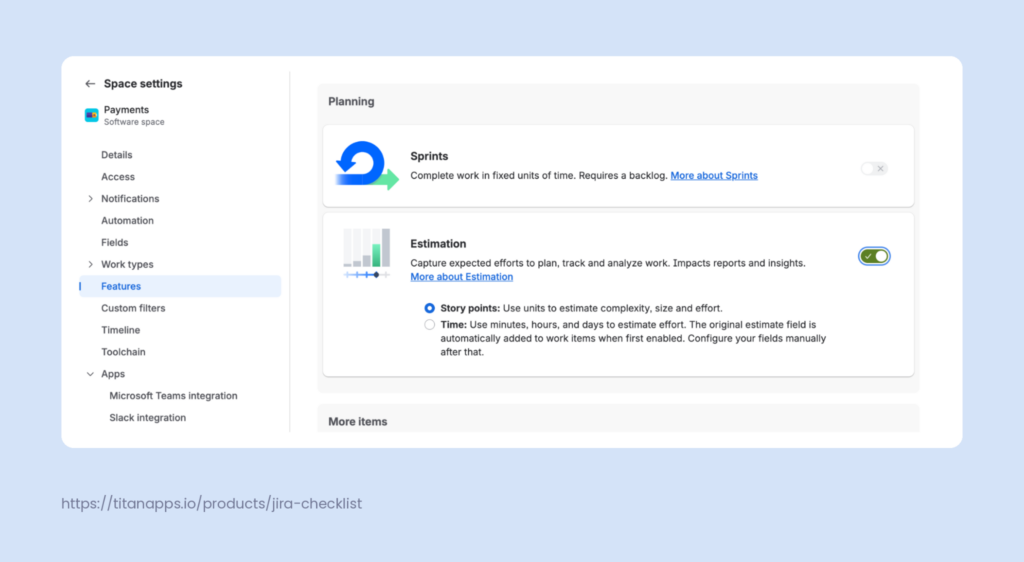
Team-managed spaces are somewhat limited in terms of reports if compared to company-managed spaces. I’d suggest enabling the Estimation feature. You can do it via Space settings / Features. This is quite helpful for capturing expected effort, planning, and analyzing work. You can use either Story Points or Time for estimates. The latter option is a bit more suited to Kanban, while Story Points are a nice fit for Sprints, but both can work for you.
Your Kanban Board Is Ready. What’s Next?
You now have a working board. A space, work types, columns that match the stages work actually goes through, limits on the stages where work waits, and a card layout your team can read without opening anything.
That is enough to start. The rest is adjustment, and it gets easier once real work is on the board rather than test items. Give it a few weeks, then see if the board needs more columns and whether the WIP limits are right.
Once the workflow is settled, you may want to consider adding other tools, like Atlassian Marketplace apps, to make your work in Jira more efficient. In particular, Smart Checklist for Jira from TitanApps can help you to ensure each detail is accounted for as part of the checklist inside a work item without crowding your Kanban board with subtasks.
Jira Kanban boards FAQ
What are the 5 key elements of a Kanban board?
The five key elements of a Kanban board are visual signals, columns, work-in-progress limits, a commitment point, and a delivery point. Visual signals are the Kanban cards themselves, usually one per work item. Columns are the stages those cards move through. Work-in-progress limits cap how many cards a column can hold at once. The commitment point is where the team picks up work and starts on it. The delivery point is where the work reaches the customer.
What is the difference between a Kanban board and a Jira board?
A Kanban board is a visual project management tool. A Jira board is Jira’s implementation of managing work as a continuous flow. Jira offers Scrum and Kanban boards out of the box for iterative and continuous workflows, respectively. The Board view is one of the views of the same work among others like List, Calendar, or Timeline.
How do I manage a Jira Kanban board release?
To create a release, open the Releases view, select Create release, and name it. Add work items to it from the dedicated release page or by opening each item and filling in the Fix version field. Kanban does not tie releases to iterations, so you can cut one whenever the work is ready. Jira will ask what to do with anything unfinished, so you can move those items to the next version. Also, it offers to generate release notes grouped by work type. Completed items linked to one released version drop off the board.
How to create a sprint in a Jira Kanban board?
You can do that only in a team-managed space: open Space settings, select Features, and enable Sprints. Note that you need the backlog enabled first. Once sprints are on, every work item on your board moves to the backlog with its current status, and Jira creates your first sprint for you.
When should agile teams use a Kanban board vs a Scrum board in Jira?
Use a Kanban board when new work arrives continuously and priorities change often. Kanban teams focus on continuous improvement, cycle time, and limiting work in progress.
Use a Scrum board when you plan work in iterations (sprints) with a sprint goal and a committed scope. Scrum teams typically track velocity, sprint progress, and burndown-style metrics.
What is the Kanban backlog in Jira and how do I use it to prioritize work items?
A Kanban backlog is a separate view that holds work items that are not ready to start. It keeps the board focused on active work and helps product managers, product owners, and stakeholders prioritize what the team pulls next. Use the Kanban backlog to collect ideas, user stories, epics, and low-priority tasks, then move the most important items into “To Do” or “Selected for development.”
Which Jira metrics and reports matter most for Kanban teams?
The Jira metrics that matter most for Kanban teams are cycle time and lead time. The key reports are the Cumulative Flow Diagram, the Control Chart, and the Created vs. Resolved Issues Report. Cycle time tells you how long work takes once the team starts it. Lead time measures from when the work item was logged. The Cumulative Flow Diagram shows work in each status over time and reveals where things pile up. The Control Chart shows how predictable your delivery is. The Created vs. Resolved Issues Report shows whether incoming work is outpacing completion.
Can I use dashboards with a Jira Kanban board?
Yes. While you may consider a Kanban Jira dashboard as a separate entity, a dashboard sits outside any single space, so it works well for tracking several boards at once, or for people who do not open Jira boards daily. Select Dashboards from the sidebar, create one, then add gadgets.
How do I manage blockers, dependencies, and assignees in Kanban work items?
Open a work item from the board to update its fields. Set an assignee for ownership. For dependencies, use Link work item and choose blocks or is blocked by. Links are hidden on cards by default. Switch on Linked work items in View settings to see them.
Who can change Kanban board settings in Jira?
It depends on the space type. In company-managed spaces, board configuration is limited to the board’s administrators, space administrators, and Jira admins. Whoever created the board is a board admin by default. In team-managed spaces, the Administrator role covers board and space settings. If an option is greyed out, permissions are usually at fault. If it is missing entirely, the space may be using a standard Jira workflow rather than a simplified one.
Should software development teams using continuous delivery run Kanban in Jira?
Yes. Kanban often fits continuous delivery and DevOps workflows because it supports small increments, continuous flow, and fast feedback. It also helps reduce release crunch by making review, testing, and deployment stages visible and controlled.
How do templates help standardize Kanban work items in Jira?
Templates help teams standardize work item structure and reduce missing steps. A good template can enforce required fields for user stories, define workflow expectations, and include completion rules so work moves through the process consistently across the development team, product manager, and stakeholders.