Jira
Jira monday.com


In the fast-paced world of project management, staying organized is the heartbeat of success, and Jira is the conductor orchestrating seamless efficiency. Embracing the importance of Jira in project organization is like unlocking a hidden superpower, empowering teams to collaborate, prioritize tasks, and track progress more efficiently.
How do you organize and customize Jira project data?
Organizing and customizing Jira project data can significantly improve project management and team collaboration. Here is a brief overview of the features and elements of Jira that will help you organize project data:
- Project Boards: Set up Agile boards like Scrum or Kanban to visualize and manage tasks efficiently. Customize columns and swimlanes to suit your team’s workflow.
- Custom Fields: Assess your project’s unique requirements and create custom fields to capture specific data points. From text fields to checkboxes and date pickers, Jira allows you to tailor data collection.
- Work (Issue) Types and Workflows: Define relevant work (issue) types (e.g., task, bug, feature) and create workflows that mirror your team’s processes. Customize the workflow states, transitions, and permissions to match your project’s needs.
- Screens and Field Configurations: Design screens to display relevant fields for each work type. Assign field configurations to screens, ensuring data consistency and appropriate information capture.
- Work Item Prioritization: Utilize priority schemes to rank work items based on urgency and importance, streamlining your team’s focus on critical tasks.
- Filters and Dashboards: Create filters to segment and organize project data. Leverage dashboards to present vital statistics, progress charts, and project insights.
- Project Permissions: Define user roles and access levels using project permissions, ensuring data security and confidentiality.
- Work Item Linking and Dependencies: Establish links between related work items to track dependencies and streamline complex workflows.
- Automation Rules: Use automation to streamline repetitive tasks, update fields automatically, and trigger actions based on specific events.
- Add-ons and Integrations: Explore Jira Marketplace for add-ons and integrations that enhance data organization and provide advanced reporting capabilities.
By customizing and organizing Jira project data, your team can streamline workflows, improve visibility, and maximize productivity, ultimately leading to successful project delivery. Regularly review and fine-tune these configurations to ensure they align with evolving project needs.
An Introduction to Jira boards
Jira boards are powerful visual tools designed to enhance project management and team collaboration within the Jira software platform. These boards provide a dynamic and real-time view of tasks, work items, and project progress, enabling teams to stay organized and focused. There are different types of Jira boards, including Scrum boards, Kanban boards, and Agile boards, each tailored to specific project management methodologies.
Scrum boards facilitate iterative development by displaying user stories, tasks, and bugs in customizable columns, representing the workflow stages. With sprint planning and backlog prioritization features, Scrum teams can efficiently plan and execute their work. Kanban boards, on the other hand, enable teams to visualize work in progress, limit work items per column, and optimize the flow of tasks.
Agile boards, a combination of Scrum and Kanban boards, offer versatility for projects with evolving requirements. Whether managing software development, marketing campaigns, or any project, Jira boards revolutionize team collaboration, providing a central hub for tracking tasks and project status, leading to improved productivity and project success.
We can create multiple Jira boards or run multiple sprints at the same time. Now, as we know, there are multiple types where we can use the boards i.e., Kanban board and Scrum board.
The user can create as many Kanban boards as they want based on the project’s requirements. Similarly, users can also create multiple Scrum boards or activate multiple sprints at the same time.
Let’s assume that there is parallel development going on for a project that includes the frontend and backend development with an enormous amount of tickets. Now, it would be hard for the developers to go through each ticket and see which ticket relates to their area i.e., frontend or backend in order to start the development. For this problem, we can create multiple kanban boards or scrum boards where we can move the tickets of the teams respectively e.g., the frontend team’s tickets will go in one board, and the backend team’s tickets will go in the other board. This will help the manager segregate the tickets as well as help the team to work on their assigned task, and manage the team members’ performance accordingly.
This can also be helpful in the sprints by creating two parallel sprints. This can allow us to create a separate board for each sprint where we can assign each sprint to a department, i.e., frontend and backend, where they can only view the tickets from their work in the board. The QA column can be in both boards so that the QA can do the API and frontend screen testing. These columns can also be customized based on the user’s requirements for the project and what they need to define in terms of the columns.

Type, priority, assignee, and status may all be included in a Jira card layout for a software development project, giving a clear overview of each task’s essential information. Teams can efficiently track and manage their work during Agile sprints using this layout.
Kanban vs. Scrum boards
Kanban and Scrum boards are two different types of Jira boards, each suited to distinct project management approaches.
- Kanban boards are visual tools emphasizing continuous delivery and a steady workflow.
- Tasks are represented as cards moving through customizable columns that represent the workflow stages, such as “To Do,” “In Progress,” and “Done.”
- Kanban boards provide real-time visibility into work in progress, enabling teams to manage their workload efficiently and identify bottlenecks.
- Teams can set work item limits per column, preventing overload and promoting a smooth flow of tasks.
- Kanban boards are particularly useful for projects with fluctuating priorities and variable task durations, as they accommodate changes easily without strict timeboxing.
Scrum Boards:
- Scrum boards are designed for teams practicing the Scrum framework, an agile methodology focused on iterative development and fixed-length timeboxes called sprints.
- Scrum boards feature backlogs for managing user stories and sprint planning, allowing teams to organize tasks for each sprint.
- During a sprint, tasks progress through columns representing workflow stages like “To Do,” “In Progress,” “In Review,” and “Done.”
- Scrum boards facilitate sprint ceremonies, such as sprint planning, daily stand-ups, and sprint reviews, keeping teams aligned and focused on achieving sprint goals.
- Scrum boards are ideal for projects requiring fixed timeframes, with a clear scope defined for each sprint, promoting regular releases and progress evaluation.
In summary, Kanban boards offer flexibility and continuous workflow management, making them suitable for projects with variable demands, while Scrum boards follow a structured approach with fixed-length iterations, making them ideal for projects adhering to the Scrum framework. Choosing the right board depends on the project’s specific needs and the team’s preferred project management methodology.
Backlog and Sprint Management
Backlog and Sprint management are crucial components in both Kanban and Scrum boards within Jira, connecting them to the above content on Jira boards and project management approaches.
Backlog Management:
- In both Kanban and Scrum boards, the backlog serves as a repository for tasks, user stories, or work items that need to be addressed in the project.
- For Kanban boards, the backlog allows teams to plan and prioritize work items that will be pulled into the “To Do” column when team capacity allows.
- In Scrum boards, the backlog is essential for sprint planning. The team selects a set of user stories or tasks from the backlog to be completed during a sprint, ensuring a clear focus on achievable goals for the sprint duration.
- Backlog management is an ongoing process where new items are added, priorities may change, and the team collaboratively refines the backlog regularly to reflect the evolving project needs.
Sprint Management:
- Sprint management is specific to Scrum boards and involves organizing work into timeboxed iterations known as sprints.
- During sprint planning, the team pulls tasks from the backlog into the sprint, committing to completing them within the sprint duration.
- The Scrum board visually represents the sprint’s progress, with tasks moving through the workflow stages until completion.
- At the end of the sprint, a sprint review is held to demonstrate the completed work, and a sprint retrospectively allows the team to reflect on the process and identify areas for improvement in the next sprint.
Connecting it to the above content, Jira boards facilitate both Backlog and Sprint management, enabling teams to stay organized, prioritize tasks, and track progress efficiently. For Kanban boards, backlog management ensures a constant flow of tasks, while in Scrum boards, it enables the planning of sprints with specific goals and a clear focus on iterative development. The combination of Backlog and Sprint management within Jira boards ensures that projects are structured, well-organized, and aligned with the chosen project management approach.
Understanding Filters, Dashboards, Reports, and Labels
In Jira, Filters, Dashboards, Reports, and Labels are powerful features that aid in organizing, visualizing, and analyzing project data efficiently.
Filters:
- Filters allow users to define specific criteria to search for and display relevant work items or tasks within a project.
- By creating custom filters, teams can segment and organize project data based on attributes like assignee, status, priority, or labels.
- Filters can be saved for future use or shared with team members, providing a consistent view of project information.
For example, there are hundreds of tickets in one project, and we need to search for a ticket related to the user listing functionality. In such case, we can go to the filters and apply the filters in various ways:
- Searching the ticket name (if known).
- Specifying the project name by choosing from the project’s list dropdown.
- Specifying the type i.e. epic, story, task or bug.
- Specifying the status i.e. todo, in progress, ready for deployment, etc. based on what the user has set on the board.
- Specifying the assignee.
- Specifying the time range the ticket might have been created in.
The user can either specify any of the above filters or can specify all the filters at once in order to get accurate and precise results.
The filters also allow us to search through the JQL queries, which can also help search for the accurate result. An example is:
- Created >= -30d And text ~ “user listing” order by created DESC
The above query means that we are searching for a user listing keyword which has been created over the last 30 days and, if found, arranging them in descending order.
Dashboards:
- Jira Dashboards offer customizable, visual overviews of project data and key metrics.
- Users can add gadgets, such as charts, burndown charts, and activity streams, or use pie chart maker to display real-time project insights.
- Dashboards provide a centralized location for teams to monitor progress, identify bottlenecks, and make data-driven decisions.
For example, in order to track the workload of the team, we can set a pie chart graph by selecting the workload pie on the dashboard screen, which will create a section for the graph to show which team member has the maximum amount of work on the projects. Similarly, we can set the activity stream to check any team member’s activities on the board or the project. There are many options to set different stats or reports that can help us keep track of the project’s progress so the user can set it according to their own needs.
Reports:
- Jira Reports provide comprehensive summaries of project data and progress.
- Different types of reports, such as Work Item Statistics, Control Chart, and Created vs. Resolved, offer valuable insights into team performance, work item status, and project trends.
- Reports aid in project evaluation, tracking team productivity, and identifying areas for improvement.
For example, assume there is a sprint going on, and we need to track the performance of the sprint so that we can define the sprint burndown chart where we can track and manage the total work and time remaining within the sprint. This will help us manage the sprint and the team according to their work left along with the remaining time. Similarly, there are other reports i.e., burnup reports, velocity reports, cycle time reports, and more that can help users according to their own needs
Labels:
- Labels are user-defined tags attached to work items to categorize and group related items together.
- Teams can use labels to mark similar tasks, identify common themes, or organize work items across multiple projects.
- Labels streamline search and filtering, making locating specific items easier and providing a powerful tool for project organization.
By utilizing these features, teams can effectively organize, visualize, and analyze project data, improving collaboration, productivity, and project success.
For example, assume there are a total of 50 tickets within a project, and you want to list down all the tickets that are associated with authentication. What will you do? To get this list, we will specify the labels against each ticket e.g., on the login tickets, we will specify the label as authentication, which means whenever we search or filter the tickets by authentication, it will always list down login tickets within the search or filter. Similarly, we can specify the labels to each ticket within the project in order to reduce the amount of work spent searching the tickets.
What is a Jira workflow?
A Jira workflow is a series of statuses and transitions representing how work progresses through different stages in a project. It defines the life cycle of a work item, from its creation to its resolution. In the context of organizing and customizing Jira project data, the workflow plays a crucial role.
As mentioned before, customizing Jira workflows involves defining relevant work types and configuring the states and transitions that match your team’s processes. For example, you can create a workflow with statuses like “To Do,” “In Progress,” “Testing,” and “Done” to represent the different stages of task completion.
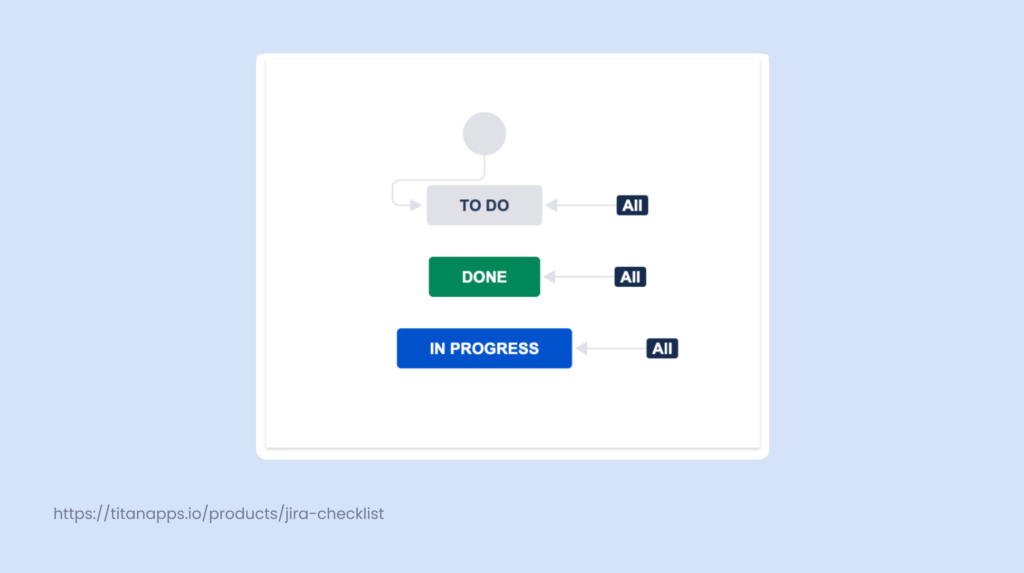
By customizing the workflow, you can ensure that work items move through the project pipeline efficiently, helping your team visualize the progress of tasks and identify potential bottlenecks. The workflow also facilitates the automation of actions based on status changes, such as assigning tasks to specific team members when they enter the “In Progress” status.
Overall, a well-organized and customized Jira workflow streamlines project management, enhances collaboration, and ensures that project data is structured to support effective decision-making and project success.
Best Ways to Organize Jira for different types of projects
Organizing Jira for different types of projects requires tailoring its configuration to match the specific needs and methodologies of each project. Here are some best Jira practices to organize Jira for different types of projects:
- Software Development Projects (Agile/Scrum):
- Customize workflows to reflect the stages of development, such as “To Do,” “In Progress,” “Ready for Deployments,” “QA,” “QA Failed,” “Client Review,” and “Done.”
- Incorporate Epics for large features or overarching goals, and link stories to their respective Epics.
- Use Agile reports like Burndown Charts and Velocity Charts to track progress and team performance.
- Continuous Delivery Projects (Kanban):
- Employ Kanban boards for projects with a continuous workflow. Customize columns to represent different workflow stages.
- Set work-in-progress (WIP) limits per column to ensure a balanced workflow and avoid bottlenecks.
- Utilize swimlanes to categorize tasks based on priority, team, or other criteria.
- Monitor lead and cycle time metrics to optimize team efficiency.
- Project Management:
- Create custom work types and fields to capture project-specific data.
- Customize workflows to match the project’s unique stages and approval processes.
- Use filters to segment and organize tasks based on project attributes, such as department, client, or status.
- Build dashboards to display project metrics, timelines, and resource allocation.
- Marketing or Creative Projects:
- Employ custom fields to capture specific project information, like campaign type, target audience, or creative assets.
- Create custom workflows to represent the stages of the creative process, from ideation to final delivery.
- Utilize Jira Confluence integration for seamless collaboration on creative briefs, design reviews, and feedback.
- IT Operations Projects:
- Use Jira Service Management (formerly Jira Service Desk) for IT support and incident management projects.
- Customize request types and queues to match different types of support requests.
- Set up SLAs (Service Level Agreements) to manage response and resolution times effectively.
By tailoring Jira’s configuration to the specific requirements of each project type, teams can enhance collaboration, streamline workflows, and achieve successful project outcomes efficiently. Regularly review and adapt the Jira organization to meet the evolving needs of the projects and the team.
Jira Best Practices: 5 Ways to Set Up Jira for Your Project Pipeline
Setting up Jira for your project pipeline requires careful planning and consideration. Here are five best practices to optimize your Jira configuration:
- Define Project Goals and Workflow: Clearly define your project goals and requirements. Design a workflow that mirrors your team’s processes and aligns with the project’s specific stages. Tailor work types, statuses, and transitions to reflect the work flow, ensuring a seamless project pipeline.
- Customize Fields and Screens: Create custom fields to capture essential project data. Design screens to display relevant fields for each work type. This ensures consistent data entry and meaningful information retrieval. Avoid unnecessary fields to streamline data entry and keep the interface user-friendly.
- Implement Agile Boards: Choose the appropriate Agile board (Scrum, Kanban, or Agile) based on your project management methodology. Customize board columns to represent your workflow stages accurately. Utilize swimlanes and quick filters to categorize and organize work items effectively.
- Configure Permissions and Security: Set up project permissions to control access levels and ensure data security. Grant appropriate user roles and restrictions based on team responsibilities. Restrict sensitive data access to authorized personnel only.
- Automate Tasks with Workflows and Rules: Automate repetitive tasks and streamline processes using Jira workflows and automation rules. Implement post-functions and triggers to automate status changes, assignment, and notification processes, saving time and reducing manual effort.
- Establish Agile Metrics and Reporting: Define key performance indicators (KPIs) and establish agile metrics to measure project progress and team performance. Leverage Jira’s reporting features to create customized reports and dashboards, providing real-time insights and facilitating data-driven decision-making.
- Labeling and Tagging: Encourage consistent labeling and tagging of work items to categorize and group related items. This helps in organizing and tracking work items across projects, making it easier to find and manage specific tasks.
By adhering to these best practices, you can set up Jira to align seamlessly with your project pipeline, ensuring enhanced collaboration, improved productivity, and successful project outcomes. Regularly review and adjust your Jira configuration as the project evolves to maintain optimal efficiency.