


 Jira
Jira monday.com


Jira has many flaws that have been highlighted by numerous competitors, such as monday.com. Yet, there’s a reason why Atlassian dominates the project management market with a whopping 86.63% market share in bug-and-issue-tracking: the flexibility and customizability of their solutions.
In this article, we first provide you with an overview of some basic Jira Automation concepts that give you important context. Next, we move on to exploring the top 10 most common use cases for automation in Jira.

Jira Automation 101
Jira Automation (officially called Automation for Jira) is a no-code feature that allows Jira users to create if this – then that conditions. It’s based on a wide selection of events and triggers, such as moving a work item from “To Do” to “In Progress” or changing a field value.
Here are some examples of automation for Jira:
- Making changes based on workflow transitions
- Automatically assigning tasks to specific team members based on the content of a work item
- Cloning tickets from Jira Service Management to create a task for developers in Jira
- Sending regular status updates and other notifications via email or a messenger app, such as Slack
- Automatically creating work items for recurring tasks
- Adding checklists to the work item creation or on transition
We’ll talk about examples in more detail shortly. But first, let’s review some basics.
What Types of Automation Can You Use in Jira?
As a truly versatile project management platform, Jira allows you to set up automation in various ways. Here are the options to choose from:
- Automation for Jira – this is the core native automation functionality. It enables you to create complex custom rules that take into account multiple conditions. With rules, work items can be automatically created, closed, reassigned, and so on.
- Workflow automation – you can incorporate automation directly into your workflows by using Workflow Editor and other tools. As a result, certain actions can be performed automatically once a Jira work item moves from one workflow status to another.
- Data integration – if needed, you can connect Jira to external apps and set up automated data exchange. For example, export data from Jira to Excel for advanced analysis or sync GitHub statuses to Jira tickets.
- Using third-party solutions – it’s also possible to automate different aspects of your work in Jira with the help of various Jira add-ons, plugins, and other solutions. For example, Smart Checklist by Titan Apps can automatically add the Definition of Done checklist to your Jira tasks – without using Jira’s native rules.
- Advanced automation with the Jira API – this option is only suitable for users with a strong technical background. By calling the API, you can programmatically change work items in Jira or trigger actions based on events in other systems.
This article will primarily cover Jira’s native automation features, but we’ll also discuss using third-party solutions and briefly touch on other options.
Project VS Global Jira Automation Rules
Project-specific rules only apply to the current Jira project, while global rules can apply to multiple projects within your Jira instance. Using the latter option is often more convenient than having to set up the same rule separately for each project.
While native automation functionality is included with all Jira plans, there are some limitations. For example, you can add global or multi-project automation rules only if you have a Premium or Enterprise plan. There are also different rule run limits depending on your plan.
Users and Permissions
Not every Jira user can create or edit automation rules. You will need to be a Jira admin or a Project Admin to access this functionality.
If you have access, you can set up new rules by navigating to Project Settings -> Automation. Alternatively, press the lightning icon above your project board.
Jira Automation Rules
Individual automations created with Jira’s native functionality are called rules. You can create them using 4 elements:
- Trigger: When a trigger event happens, the automation rule runs
- Condition: Once the rule runs, it checks whether the conditions specified in the rule are met. If yes, the prescribed action is performed
- New branch: This element creates a branch that allows you to set up separate conditions for certain elements, such as subtasks of a parent work item (Jira issue)
- New action: This one defines what the system does when the rule is triggered and all the conditions are met
Don’t worry if this seems too complicated – all Jira best practices look hard at first. Luckily, creating rules is only intimidating on paper and gets much easier with practice. Speaking of the devil – let’s do just that and create a custom automation rule.
How to Set up a Jira Automation Rule?
- Go to Project Settings -> Automation. Click Create Rule. To use this feature, you must have Administrator rights for your project.
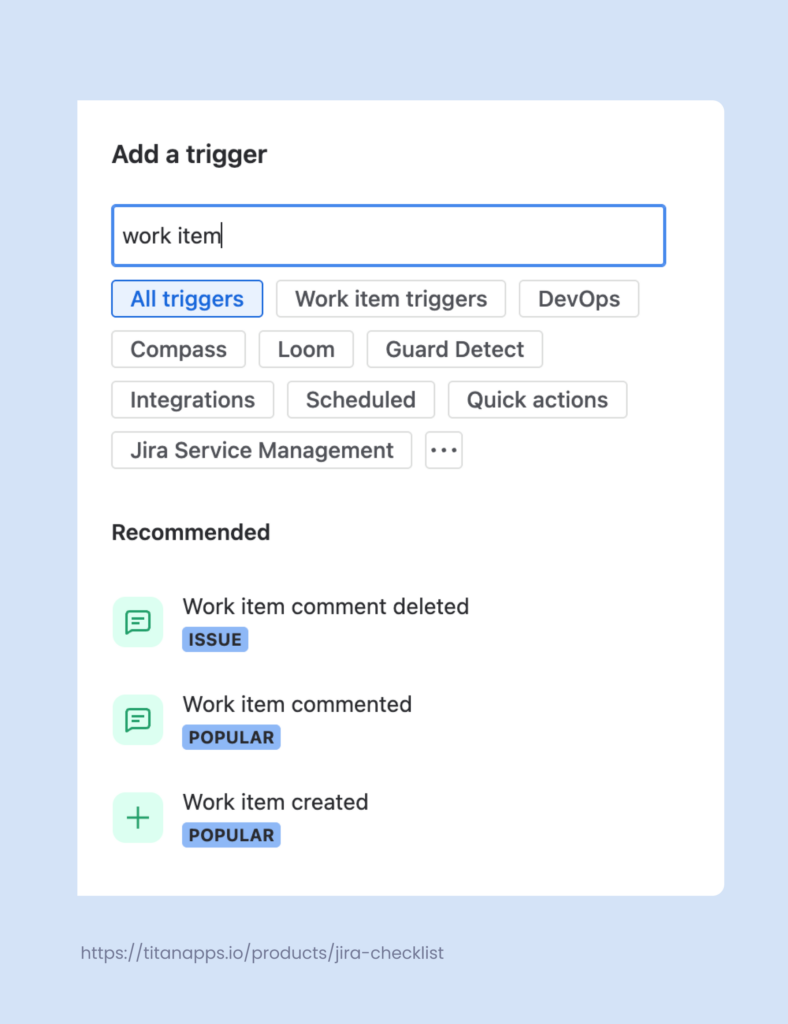
- Select the trigger. Type in the action or event you’d like to add as a trigger into the search bar and find it on the list. For example, Work item created (Issue created) or Work item commented.
- Add conditions to your rule and specify the required details. For example, Work item type is Epic or Reporter field is empty. If you don’t have a condition, you can skip this part. In this case, the target action will be performed every time the rule is triggered, without any conditions.
- Select the action that should be performed and provide the details related to that action.
- Save and turn on your rule. You can also validate it before enabling it.
How to Set Up Automation in Jira Not Using The Native Rules
As I mentioned earlier, you don’t necessarily have to use Jira’s native functionality. Some automations are easier to set up with third-party tools.
You can use Smart Checklist by Titan Apps to automatically add checklists to work items, demonstrating how AI enhances SaaS automation workflows by reducing manual effort and improving process consistency. Another solution, Smart Templates, enables you to create work item templates and generate new Jira tasks on a scheduled basis.
There are many other apps on the Atlassian Marketplace. Many of them support various automation needs.
This approach has several advantages:
- You don’t spend your Jira automation limit: Depending on your plan, you will have a certain number of rule runs available to your organization per month. Using third-party tools for automation allows you to save these limits.
- You can set up automation faster: It’s typically easier to configure an automation with a user-friendly third-party solution. This doesn’t require prior knowledge or a tech background.
- You get feature-specific automations: For example, Smart Checklist allows you to set up automations involving checklists. The solution is specifically tailored to this use case.
Let’s see how this can be done in practice.
Example 1. Automatically Add Checklists to Work Items of a Selected Type
Checklists are particularly helpful when tasks involve multiple steps. If these tasks repeat often, then checklists will be even more useful. They can be saved as templates and reused multiple times. What’s best, they can be added to work items automatically. As a result, you won’t have to start from scratch and will have a ready checklist when you begin working on the task.
A classic example for agile teams is the Definition of Done checklist. It contains a set of criteria that help you check if a task is truly done and whether it meets all the quality requirements. Here’s how it can look:
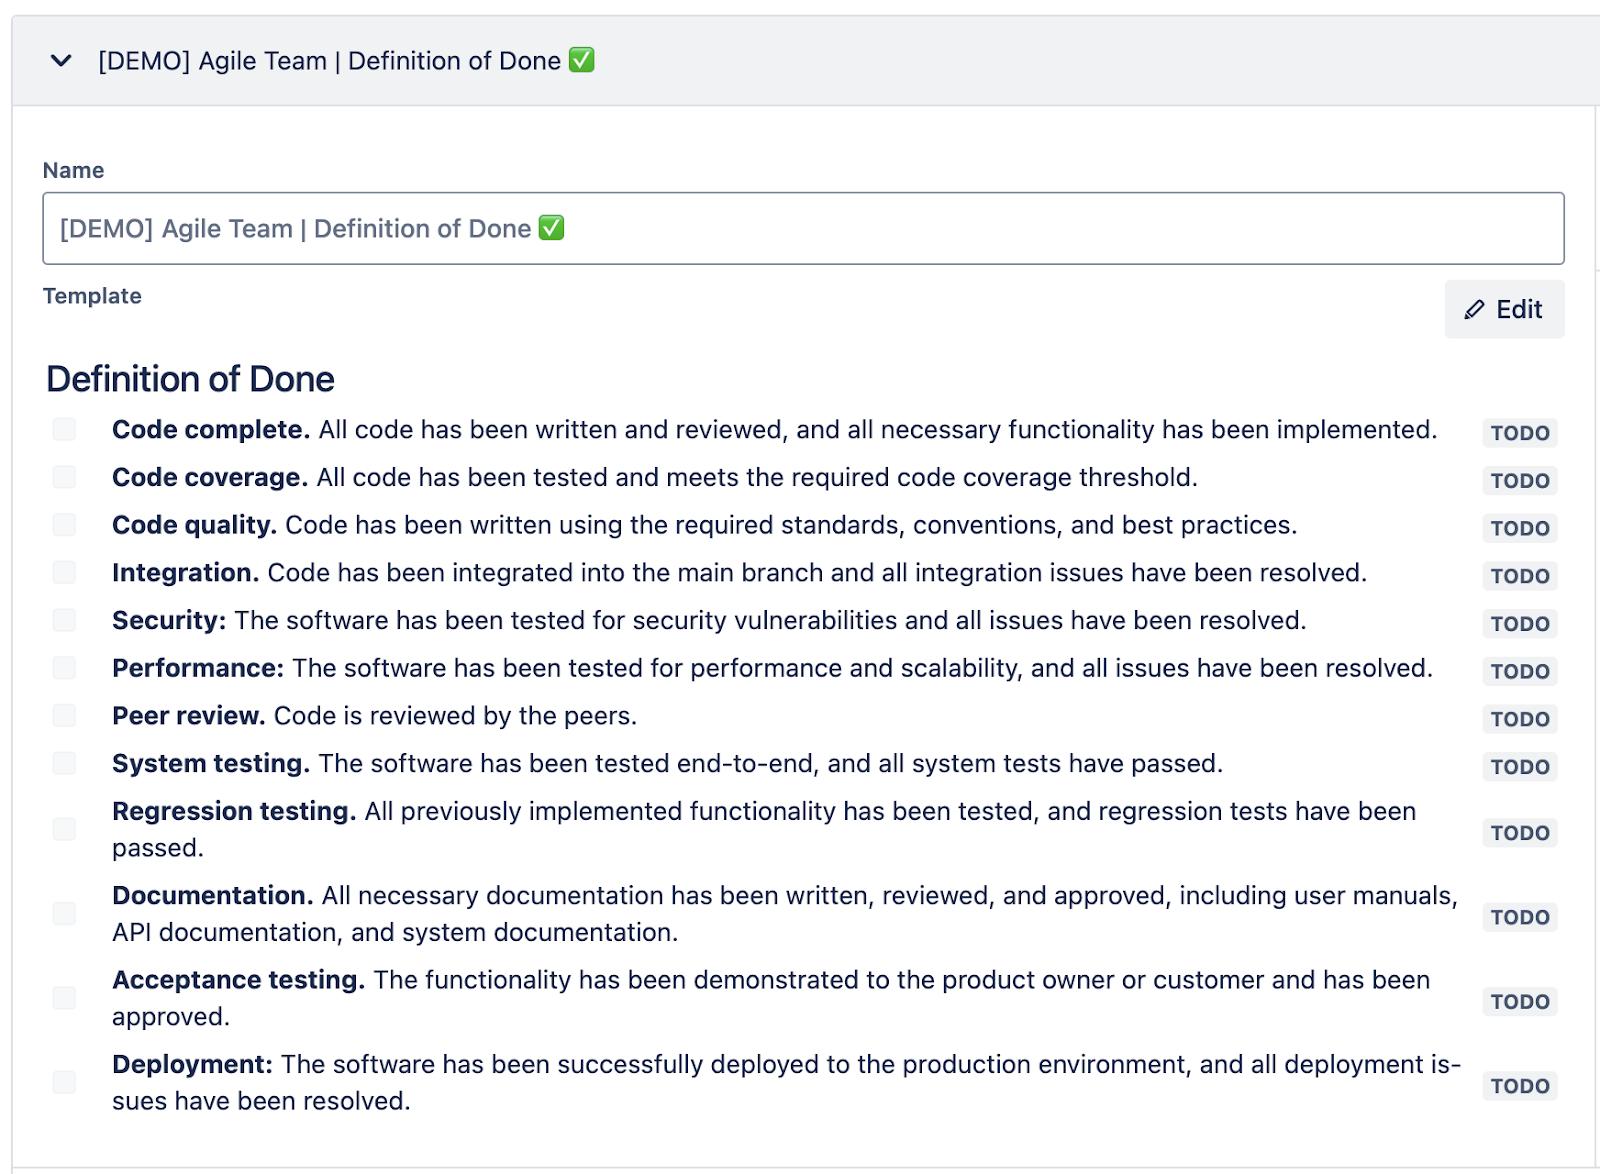
## Definition of Done
- **Code complete.** All code has been written and reviewed, and all necessary functionality has been implemented.
- **Code coverage.** All code has been tested and meets the required code coverage threshold.
- **Code quality.** Code has been written using the required standards, conventions, and best practices.
- **Integration.** Code has been integrated into the main branch, and all integration issues have been resolved.
- **Security:** The software has been tested for security vulnerabilities, and all issues have been resolved.
- **Performance:** The software has been tested for performance and scalability, and all issues have been resolved.
- **Peer review.** The code is reviewed by the peers.
- **System testing.** The software has been tested end-to-end, and all system tests have passed.
- **Regression testing.** All previously implemented functionality has been tested, and regression tests have been passed.
- **Documentation.** All necessary documentation has been written, reviewed, and approved, including user manuals, API documentation, and system documentation.
- **Acceptance testing.** The functionality has been demonstrated to the product owner or customer and has been approved.
- **Deployment:** The software has been successfully deployed to the production environment, and all deployment issues have been resolved.
Other common examples include the Definition of Ready Checklist, Code Review Checklist, and Onboarding Checklist. Basically, checklists can be used for any repeatable processes or recurring checks.
With Smart Checklist, you can add a checklist to all new work items of a selected type. Here, we assigned the Definition of Done checklist to all Tasks:
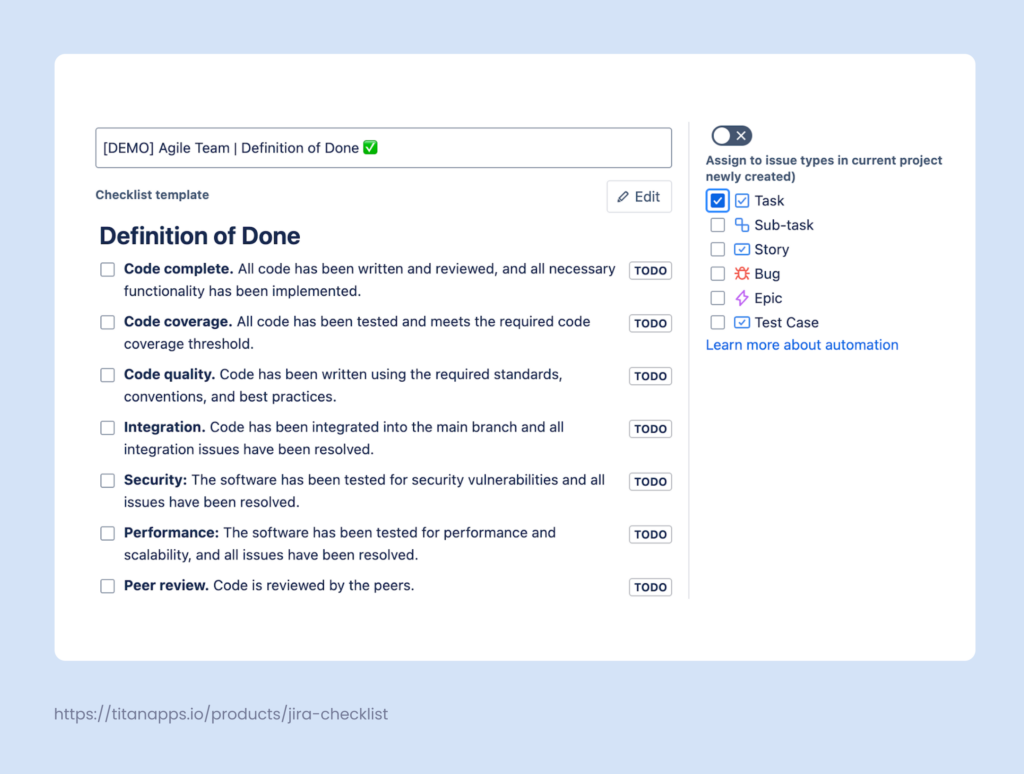
It’s also helpful to create a dedicated work type for this purpose. For instance, a work type called “Test Case” for assigning test case checklists or a work type “Hardware Request” for hardware purchase checklists.
Here’s how to set up this automation:
- Install Smart Checklist for Jira by TitanApps. This solution works with any Jira Software instances: Jira Cloud (including JSM) and Jira Data Center.
- Add your checklist items in the Smart Checklist section of your work item. You can copy and paste the Definition of Done checklist from the example above or find more templates on the Titan Apps Blog (filter by the “template” article type).
- Click the three dots in the Smart Checklist menu and select Save as a template.
- In the same menu, select Manage Templates. Find your template in the list and expand it. Then, select the work types to which you want to add your checklist.
After that, all new work items of that type will contain the checklist you pre-assigned to them.
Example 2. Generate Work Items Automatically on a Custom Schedule
Let’s say your team runs regular regression tests on the same features. Then, it’s practical to reuse test cases so that you don’t have to set up the same work items every sprint.
You can organize your test cases as tasks within the same epic and then use Smart Templates to turn this structure into a reusable template.
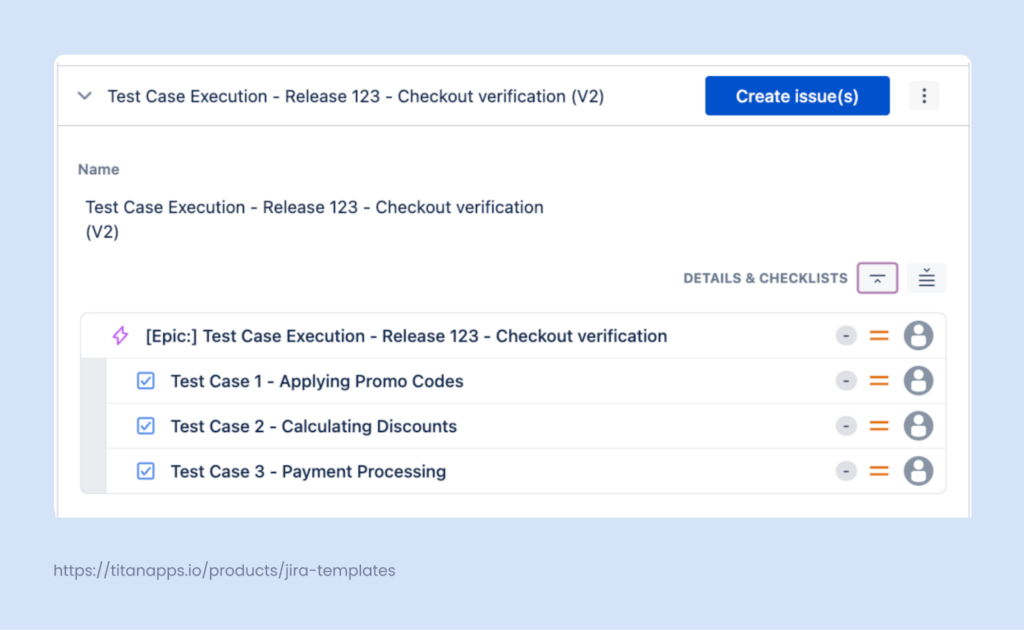
With the in-app Scheduler, this set of test cases can be generated automatically every two weeks – right on time for regression testing. You will receive the epic containing your test cases – the same as in your template.
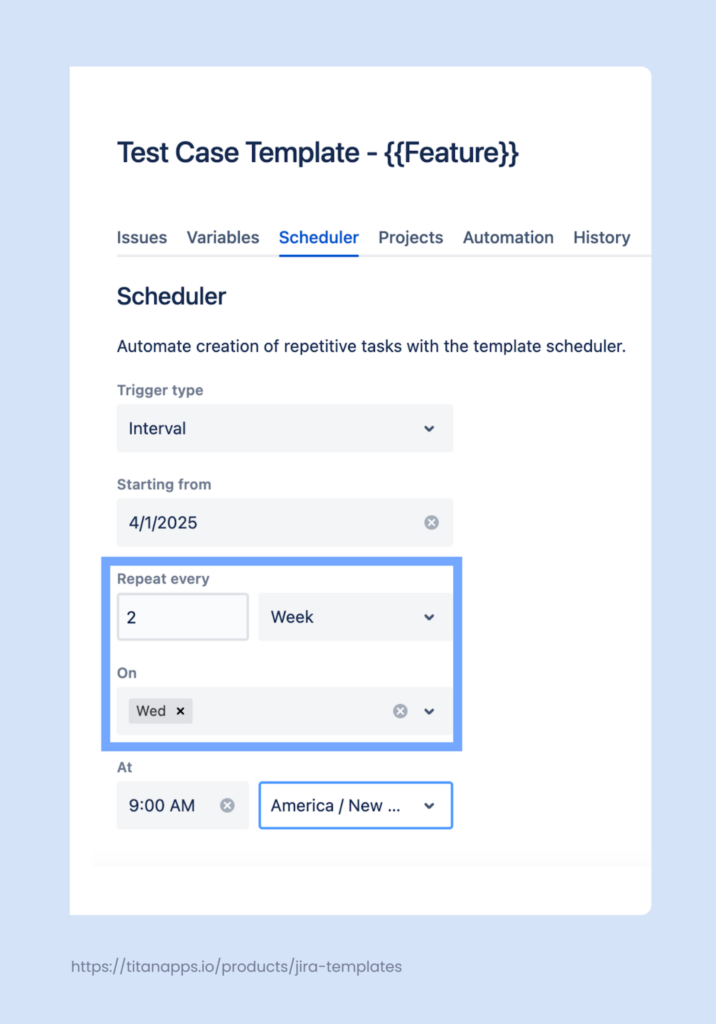
This approach can be applied to any repetitive task or recurring process. Smart Templates allows you to automatically generate any work item (or a set of work items) based on your custom schedule.
Here’s how to set up this automation:
- Install Smart Templates for Jira.
- Create a work item or set of work items that will serve as a template.
- Click Save structure as a template, name your template, and save it.
- To configure a schedule, open the Smart Templates tab in your project.
- Navigate to your list of smart templates, choose the one you want, and click the three dots -> Edit -> Scheduler. Set your preferences and save the changes.
That’s it! New work item(s) will be generated from the template according to your settings. Additionally, you can generate tasks from your template manually any time you need.
Top 10 Jira Automation Examples: Most Common Use Cases
1. Link Mentioned Work Items
This rule is rather simple, but it’s helpful if you want to optimize time and improve communication. Let’s say you have a task in Jira and someone adds a comment mentioning another work item (issue). This rule automatically links the mentioned work item to the current task. As a result, you will see it in the Connected work items section.
Here’s what this Jira automation rule looks like:
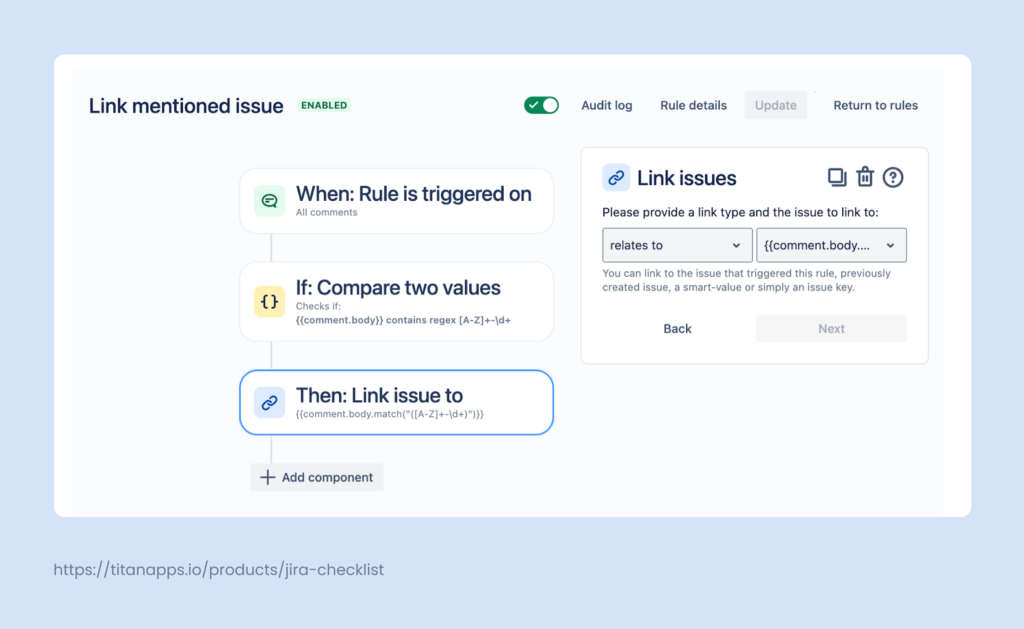
It’s triggered whenever a new comment is added to any work item. Then, it checks the content of the comment to define if it contains a work item identifier (for example, TWM-106). If it does, the work item with this number is linked to the original ticket. Additionally, you can select the type of link – for instance, “Relates to” for related issues.
If linked issues is a topic you are interested in, please see our article How to link work items in Jira.
2. When All Sub-Tasks Are Done, Move The Parent to Done
Here’s another Jira automation use case that is common for agile teams. It helps you keep the workflow statuses of child and parent work items aligned.
For example, you have a task consisting of several parts, which are presented as sub-tasks. When the sub-tasks are completed, so is the main task. This rule automatically updates the parent work item’s status and moves it to Done.
Here’s what it looks like:
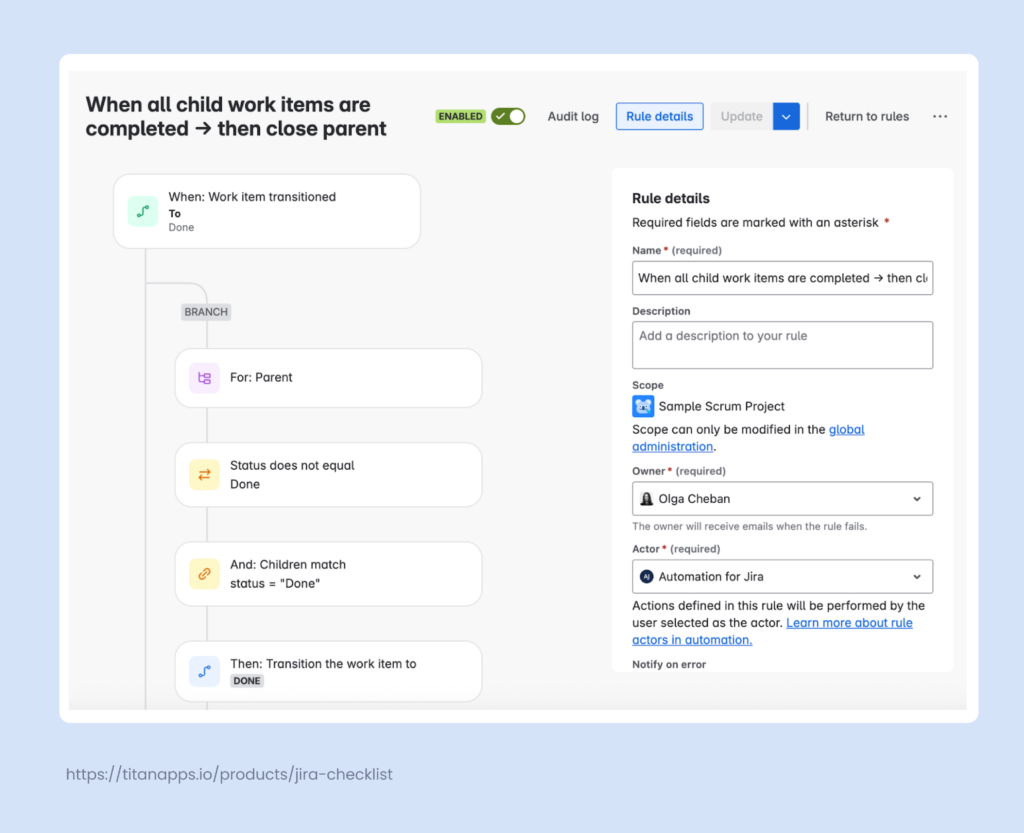
The rule is triggered when any work item is marked as completed. Then, we have a branch for parent items – this means the changes will be applied not to the trigger work item but to its parent. The rule checks if its status is not Done and if the child items’ status is Done. If these conditions are met, the parent item is also marked as Done.
3. Auto-add a Checklist to a JSM Ticket based on Request Type
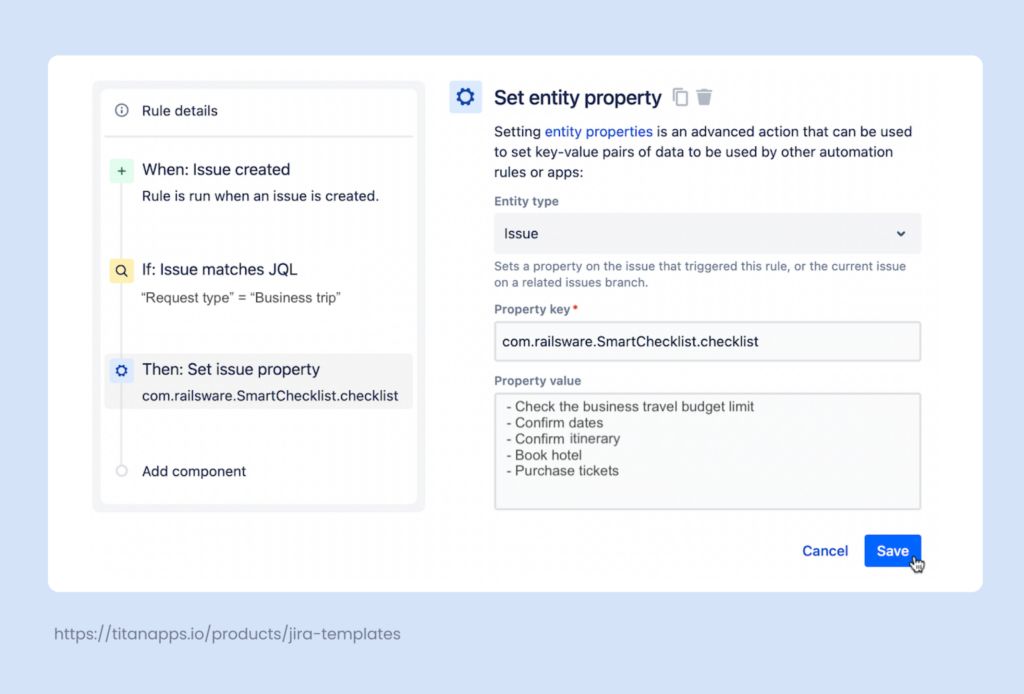
The next example is a rule that automatically adds a Smart Checklist to JSM tickets of the specified type.
Let’s say an employee submits a ticket with the request type “Business Trip.” The rule will add a business trip planning checklist to this ticket. As a result, the responsible person will receive a processing-ready ticket with a clear action plan.
To add checklists to your Jira work items, you must first install Smart Checklist by Titan Apps. For more details on setting up this automation, please refer to the Adding a Checklist to JSM guide on Confluence.
You can use the same logic to auto-add checklists to any Jira work items, not only JSM tickets.
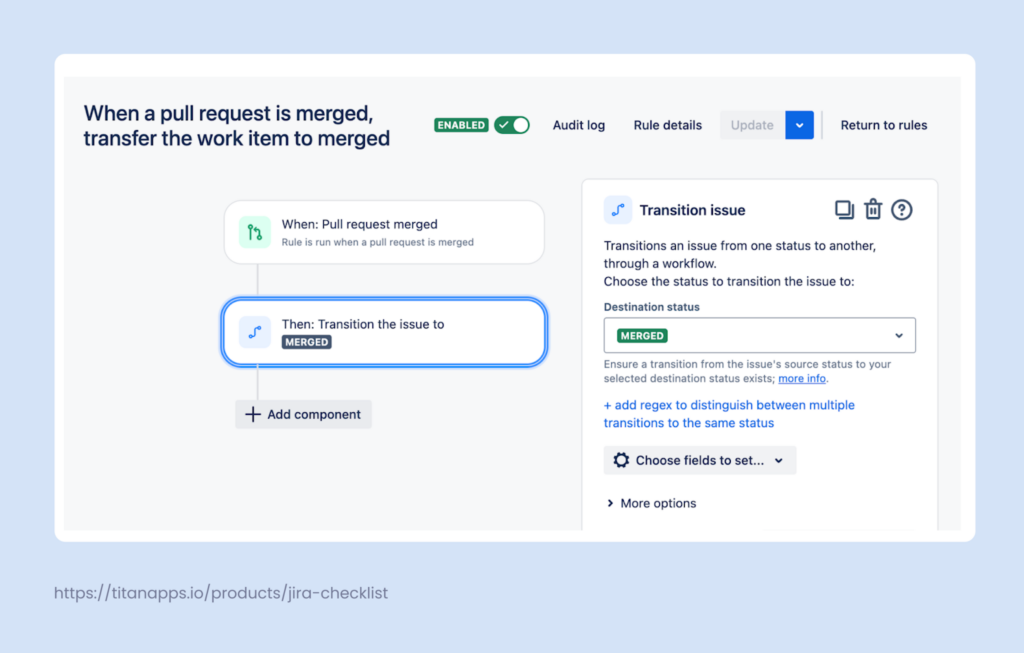
4. Update Work Item Status Based on GitHub Activity
Teams working in software development frequently integrate Jira with GitHub, GitLab, Bitbucket, or other dev tools. This allows them to see dev statuses in Jira tickets and manage Jira work items directly from their Git app. Among other things, this enables them to automatically update Jira work item statuses based on Git activity. Please note that the automation rule will not work unless you first set up a Git and Jira integration.
The rule in the example below is triggered when a pull request is merged. Once this occurs and the information about the trigger event is synced to Jira, the corresponding ticket is transferred from In Progress to Merged. This saves time and reduces context switching, as the developer doesn’t have to update information in two apps simultaneously.
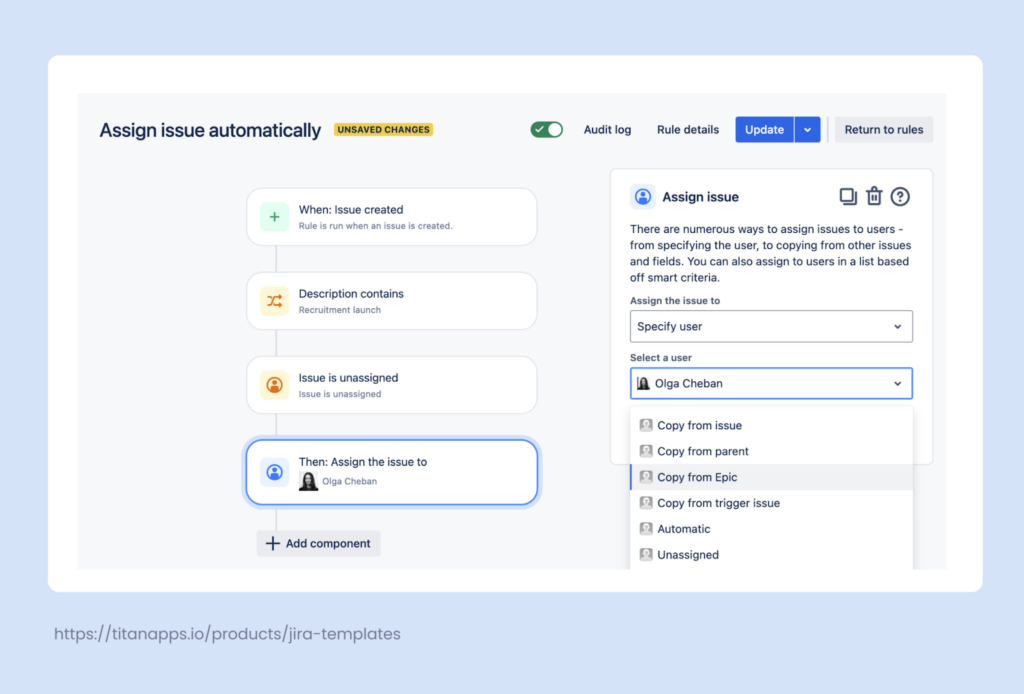
5. Auto-Assign Work Items Based on Their Summary
Another popular use case for Jira Automation is assigning work depending on various criteria. For example, in your HR team, there is a person responsible for managing recruitment activities. You can set up a rule that will automatically assign all work items with “Recruitment launch” in their description to that person as a default assignee.
The rule below is triggered when a new work item is created. It checks whether the description contains this phrase and whether the work item is unassigned. If both conditions are met, the task will be auto-assigned to the person specified in the action part of the rules.
Now that you know how to auto-assign issues, you can apply the same structure to other similar cases. It’s also possible to trigger the rule manually. For this, select Manual trigger from work item as your trigger.
6. Clone JSM Tickets Into Jira
Jira Service Management is a popular solution for handling customer requests. However, work on these requests is often managed in a Jira project, not in JSM. For example, a software user raises a ticket requesting a new feature. While the request itself needs to be tracked and handled in JSM, the dev team will need to have this task in their scope in Jira.
A popular use case for Jira automation is to set up a rule that clones new JSM requests as work items in Jira. The trigger can be when the request status changes from To Do to In Progress. Here’s what the basic rule looks like:
If needed, you can also add other conditions. For example, to only perform the cloning if the JSM request summary includes a specific word.
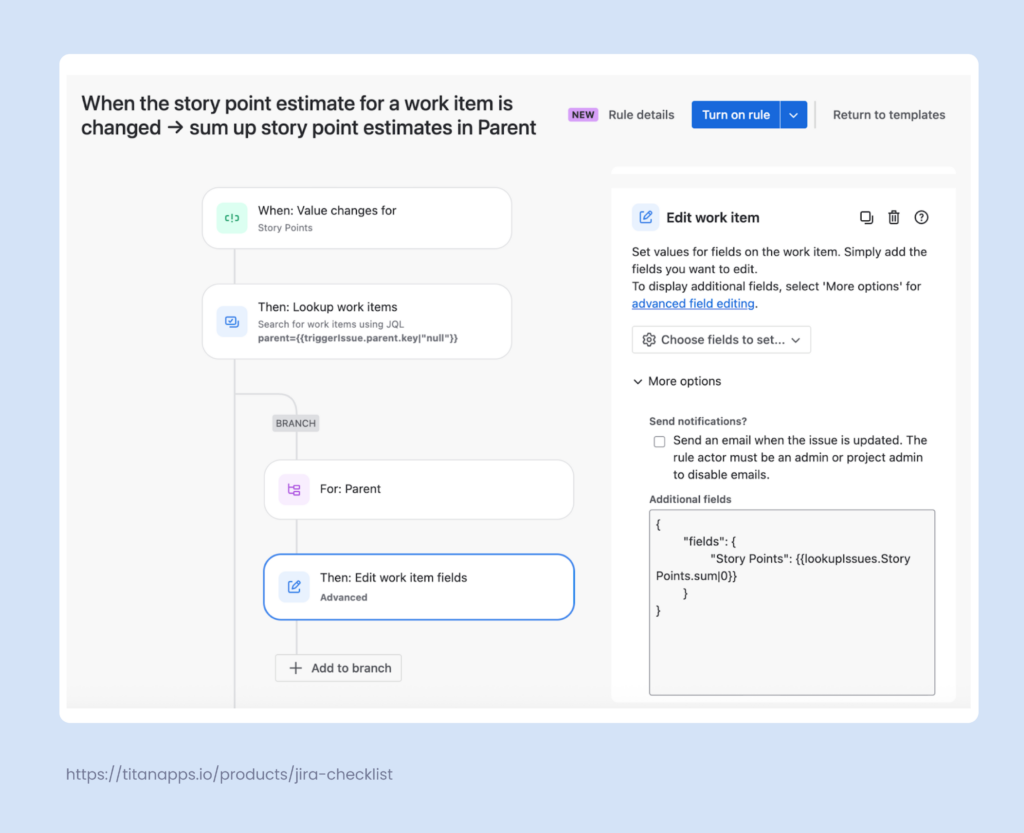
7. Sum up Story Points in a Parent Task
Here’s another common use of Jira Automation. When you update the story point estimate for a child work item, ideally, you want to see the updated total in the parent work item. You can set up a rule that sums up story point estimates in the parent task.
The rule shown below is triggered when the value of the Story Points field changes. Then, it looks for the parent issue using JQL: parent={{triggerIssue.parent.key|”null”}}. The action is Edit work item fields. You will need to paste the following text in the Additional fields box under the More options menu:
{
“fields”: {
“Story Points”: {{lookupIssues.Story Points.sum|0}}
}
}
Similar logic can be applied to managing other custom fields.
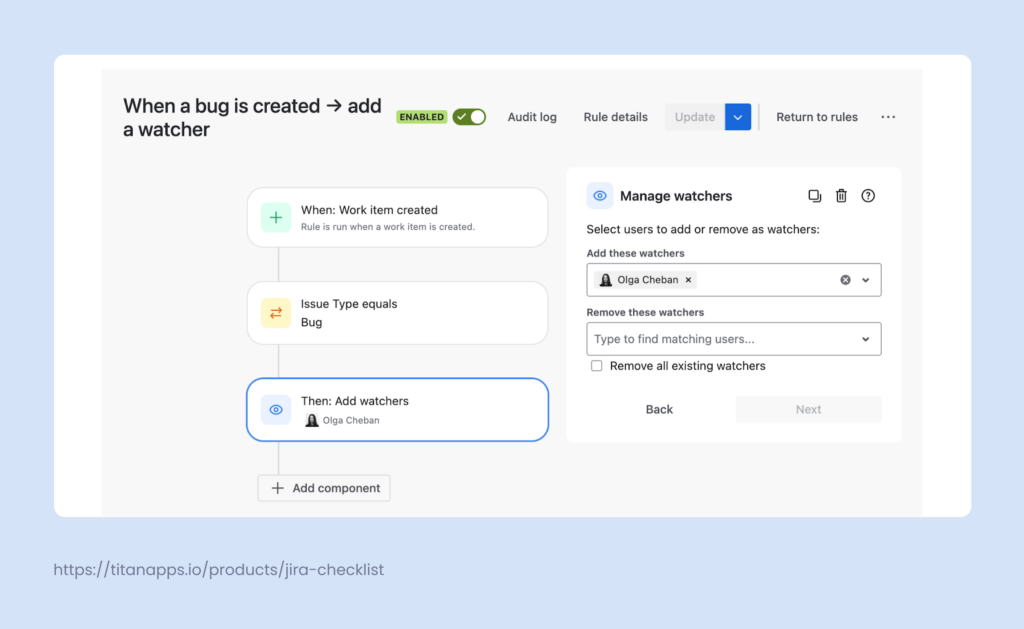
8. Add a Watcher When a Bug is Created
Our next rule helps you keep everyone in the loop. When a work item with the Bug type is created, you can automatically add a watcher from the list of your teammates.
You’ll need to set work item creation as a trigger and add a condition that the issue type is Bug. Finally, select Add watchers as your action and select the people who should be informed.
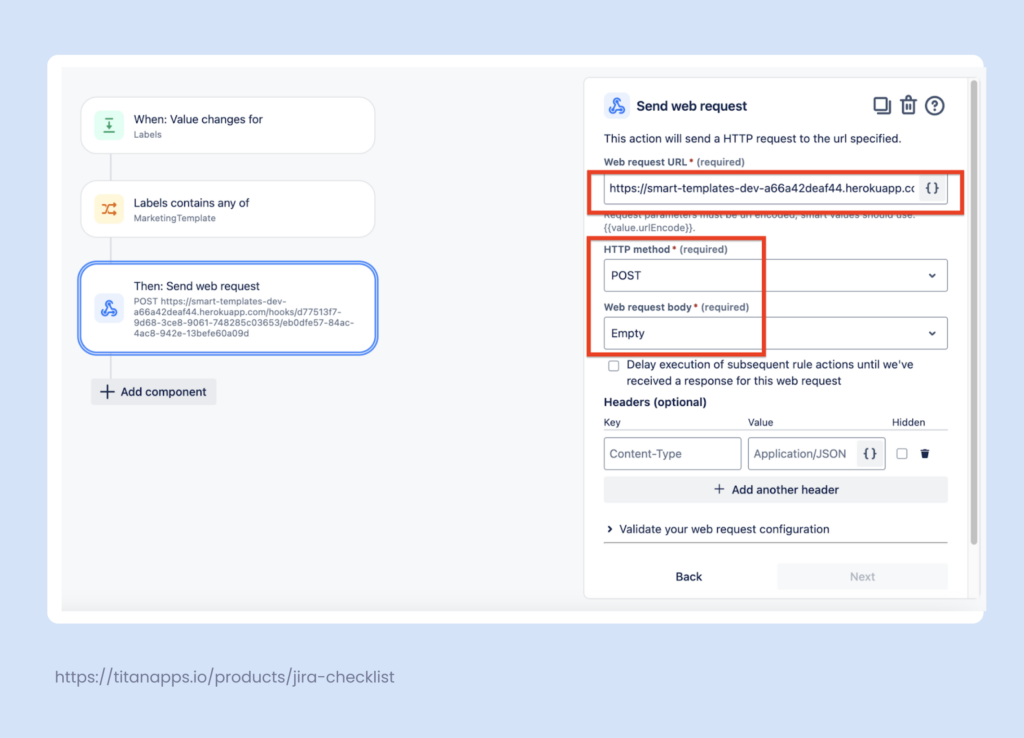
9. Generate Work Items Based on Conditions With Smart Templates
Earlier, we explained how to create work items automatically based on a Schedule with the help of Smart Templates. If you have various conditions beyond the scheduling information, you can use Smart Templates in conjunction with Automation for Jira.
Let’s say your team is working on new features and you want to launch a marketing campaign for them. You can generate a standard set of marketing tasks from a template when you add a new label to your main task. This can also work with any other triggers.
To do so, you will need to install Smart Templates and create your work item template first. Then, generate a webhook that you will use in the automation rule.
For more information on integrating Smart Templates with Jira Automation, refer to this guide.

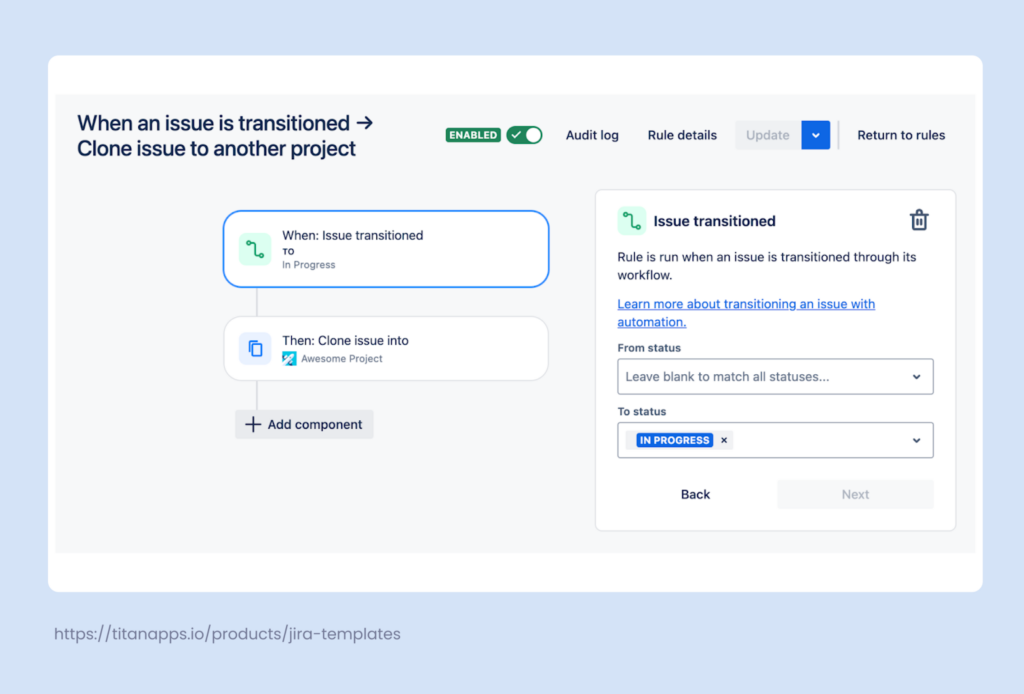
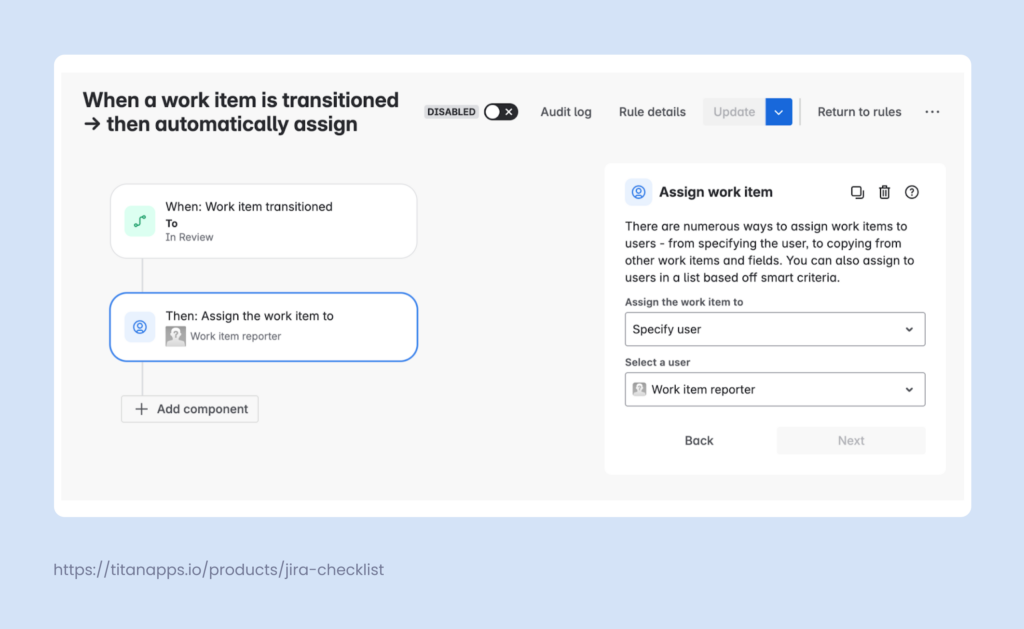
10. Reassign a Work Item When Its Status Changes
This is an example of integrating automation into your Jira workflows. You can reassign a work item automatically when it’s transferred from In Progress to In Review. This allows you to quickly pass it on to the reviewer.
The task can be reassigned to a specified user or role, such as Work item reporter:
Optimizing Your Processes with Jira Automation
This article has covered a lot of automation options for different workflows. But, of course, there are many more possible use cases. You can find them among Jira’s automation templates – or discover them in practice, in daily communication with your team.
Jira Automation is a large topic, as the platform allows you to automate things in various ways. For a maximum effect, consider using different automation approaches. You will certainly need to utilize Jira’s native functionality, but it’s also beneficial to automate certain tasks with third-party solutions, as well as set up an integration with dev tools.
Use Smart Tools by Titan Apps to optimize and streamline your processes. You can automatically assign checklists with Smart Checklist and generate work items on a schedule with Smart Templates. All of this will help you save precious time and make your team more agile.
Looking to discover more about Jira? Check out some of our other articles:
- Build an effective Jira roadmap
- Set up a procurement process in Jira
- Write kick-ass user stories


