Jira
Jira monday.com


The quality of the hiring process defines the quality of the teams working in your organization. That’s why it’s paramount to ensure that this process is well-organized and built upon best practices. Using templates in Jira for recruitment tasks is a great way to achieve this. They allow you to document your approaches and policies, promote consistency, and simply save time.
In this article, we explain how to create a position opening template for Jira in two different ways. We also provide you with a reusable checklist template, which you can copy and paste into your Jira task. But first, let’s decide what type of template you need.
Two Approaches To Building HR Templates In Jira
A position opening template should list the main steps of the recruitment process and allow you to organize your work effectively. In Jira, this can take different forms:
Checklist in a work item
This type is used when you organize your recruitment process as a stand-alone Jira task (or another work type). In other words, when you have one Jira task for each position you need to close. Then, you can add a structured checklist to that task, documenting all the necessary activities from start to finish. This checklist can be saved as a template and reused for every new position opening.
Pre-configured set of Jira work items
This format is a good fit if you prefer to have several Jira tasks per position. For example, this may be more convenient if you have different assignees for different stages of the process. In this case, you can create a standardized set of Jira tasks and save the whole hierarchy of work items as a template.
For instance, this can be an epic “Recruiting for a CTO position” with separate tasks such as “Position discovery”, “Vacancy posting”, and so on. These tasks can also include subtasks and checklists. Then, for each new position opening, you can quickly create the whole set of ready tasks from this template. This can be done both manually and with the help of automation.
Both formats allow you to optimize time and effort. Moreover, this ensures that each recruiter follows the same sequence of pre-defined steps so that the process runs smoothly and consistently. Let’s see how to build both types of templates with Smart Tools for Jira.
1. A Position Opening Template in The Form of a Checklist
We’ve prepared a free checklist template covering the main stages of the recruitment process. It encompasses everything from the initial steps and position discovery to vacancy posting and shortlisting candidates. The template is organized as a structured action plan where the headers are used to separate one stage from another.
Smart Checklist is a tool that offers a lot of flexibility. As you can see in the screenshot below, this position opening template supports emojis, variables, rich text formatting options, and more:
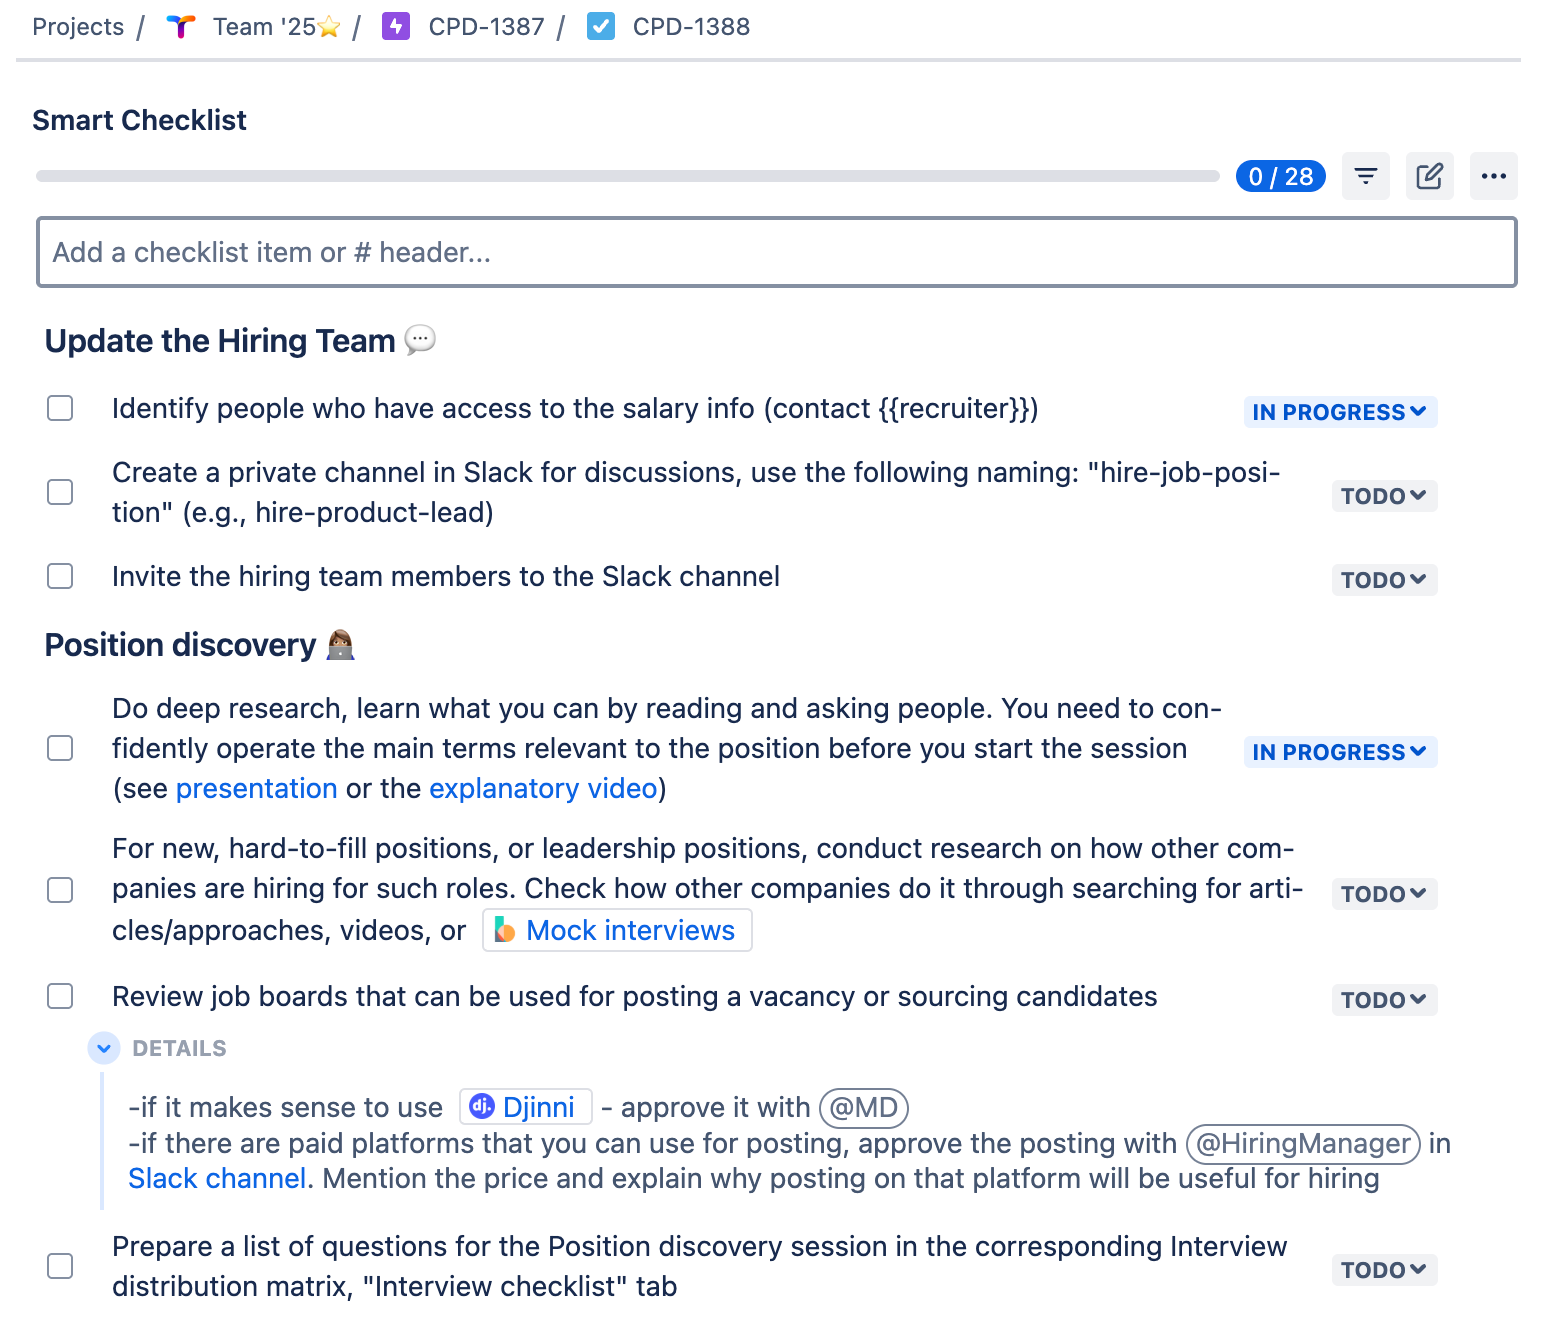
### Update the Hiring Team
- Identify people who have access to the salary info (contact {{recruiter}})
- Create a private channel in Slack for discussions, use the following naming: “hire-job-position” (e.g., hire-product-lead)
- Invite the hiring team members to the Slack channel
### Position discovery
- Do deep research, learn what you can by reading and asking people. You need to confidently operate the main terms relevant to the position before you start the session (see [presentation] or the [explanatory video])
- For new, hard-to-fill positions, or leadership positions, conduct research on how other companies are hiring for such roles. Check how other companies do it through searching for articles/approaches, videos, or [Mock interviews](https://www.thebalancemoney.com/how-to-use-mock-interviews-to-practice-interviewing-2061626)
- Review job boards that can be used for posting a vacancy or sourcing candidates
> -if it makes sense to use [Djinni](https://djinni.co/developers/) - approve it with @MD
> -if there are paid platforms that you can use for posting, approve the posting with @HiringManager in [Slack channel]. Mention the price and explain why posting on that platform will be useful for hiring
- Prepare a list of questions for the Position discovery session in the corresponding Interview distribution matrix, “Interview checklist” tab
- Schedule the Position discovery session (1-3h, depending on the role). If the team cannot come up with the list of projects, schedule +1h.
### Job Description
- Prepare a job description using [this guide](insert your link)
- Define job title, responsibilities, and requirements
- Outline key qualifications, skills, and experience needed
- Include salary range and benefits (if applicable)
- Approve the JD draft with the hiring team. Ask them to review the structure and content, NOT the grammar
- Review the JD draft with the @ContentWriter
### Vacancy posting
- Post on the company website
- Post on job boards (LinkedIn, Indeed, etc.)
- Post on social media channels
- Post internal referrals and employee networks
- Add vacancy to the applicant tracking system (ATS)
### Tracking & Follow-up
- Monitor application responses
- Ensure compliance with equal opportunity policies
- Review applications against job requirements
- Filter out unqualified candidates
- Prioritize top candidates for further evaluation
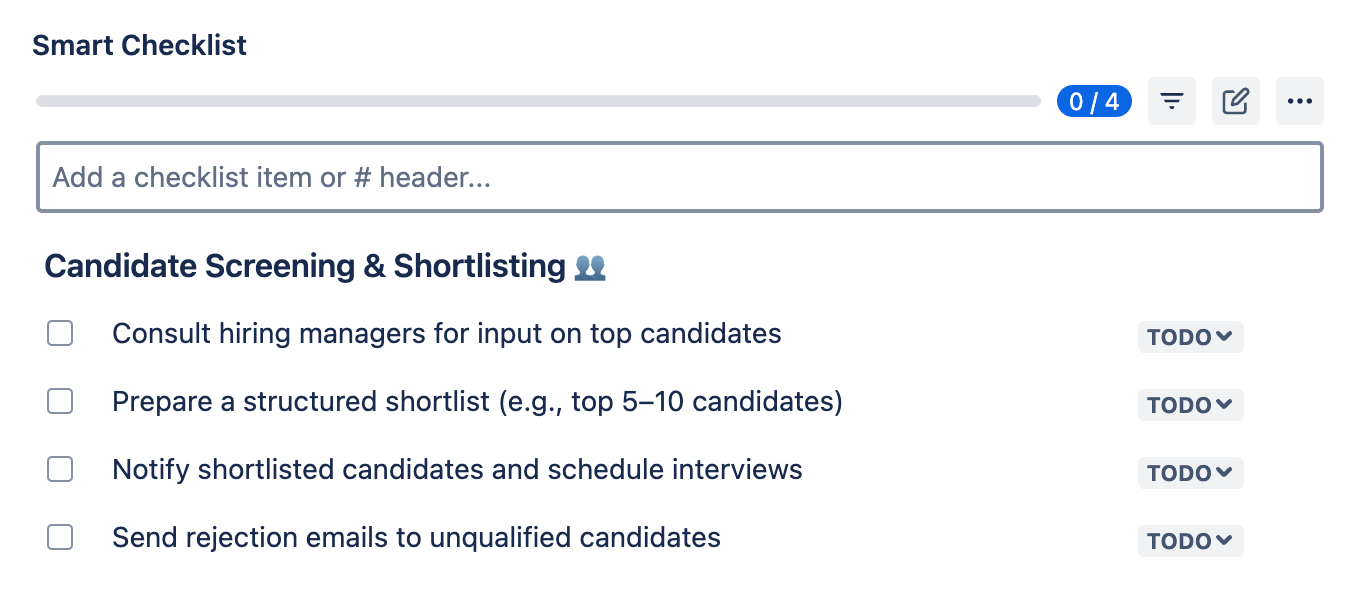
### Candidate Screening & Shortlisting
- Consult hiring managers for input on top candidates
- Prepare a structured shortlist (e.g., top 5–10 candidates)
- Notify shortlisted candidates and schedule interviews
- Send rejection emails to unqualified candidates
It also allows you to mention a person who is responsible for a specific step and add links and deadlines. Apart from that, you can set custom statuses for checklist items (such as “Next Up” or “Approval Pending”). There’s also an expandable Details field available for each step. This helps you provide context or additional instructions without cluttering or overloading the checklist.
As a result, you get a clear action plan that also includes all the necessary materials. This can be links to company policies and guidelines, contacts of the people participating in the process, slack channels where you can contact them, mock interview examples, assessment criteria, and so on.
This helps you streamline the process and better organize teamwork:
- For example, a new employee is taking part in the recruitment process for the first time. With a checklist, it will be easy for them to understand what to do, where to get the needed materials, and who to contact and when. Using Smart Checklist makes the onboarding into the recruitment process much faster and smoother. So, instead of wasting time and asking around, a person can dive in quickly and start bringing value to the company.
- Another example is when a recruiter has to take sick leave or vacation. With a transparent checklist, their colleagues from the HR team can step in and easily see what was done and what was not.
How to create a position opening template in the form of a checklist
- Install Smart Checklist for Jira by TitanApps.
- Copy the template above and paste it into the Smart Checklist section of a Jira work item. Then, use the markdown editor to customize the template so that it better fits your processes.
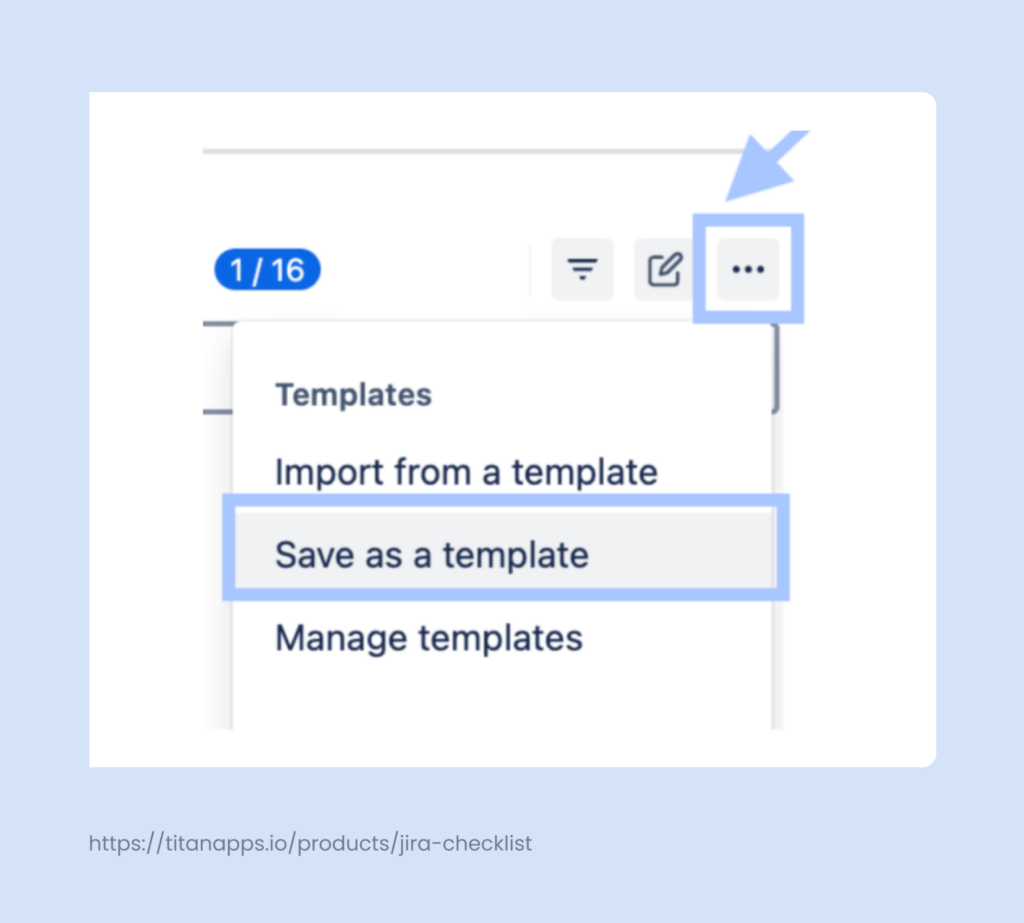
- Save the checklist as a template. Open the Smart Checklist menu (three dots) and save your checklist as a template:
In particular, Smart Checklist allows you to make such adjustments as:
- Edit, add, or remove checklist items
- Structure the list with headers
- Mention the responsible people
- Insert links to internal policies
- Mark important steps as mandatory
- Add custom statuses for different steps
- Add deadlines and other dates
After completing the 3 steps described above, you will be able to reuse this template in new work items whenever you have a new position opening.
How to add this checklist automatically to all recruitment tasks
To further optimize time, it’s useful to automatically add the position opening template to all recruitment tasks in Jira. Smart Checklist has native functionality allowing you to assign this checklist to all Jira work of a specified type. For this purpose, it’s better to have a separate work type reserved for recruitment tasks. In our example, we added a work type called Position Opening to our workflow.
To set up this automation, click the three-dot menu in the Smart Checklist section and select Manage Templates. Find your position opening template on the list and expand its details. Then, select the work types you want to apply it to:
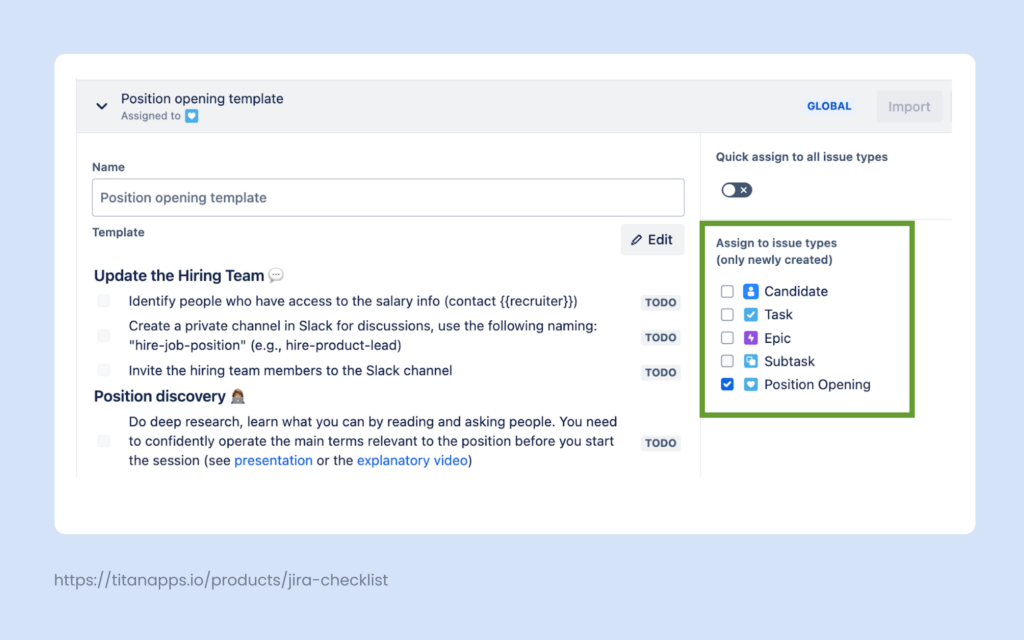
After this, your Smart Checklist template will be included in all new work items (Jira issues) of the selected type for this project. Please note that the work created before making these changes won’t be affected.
A Jira Position Opening Template Split By Stage
To make it more convenient for you, we have split the full template into smaller checklists. Each of them covers a separate stage of the recruitment process.
Recruitment Launch
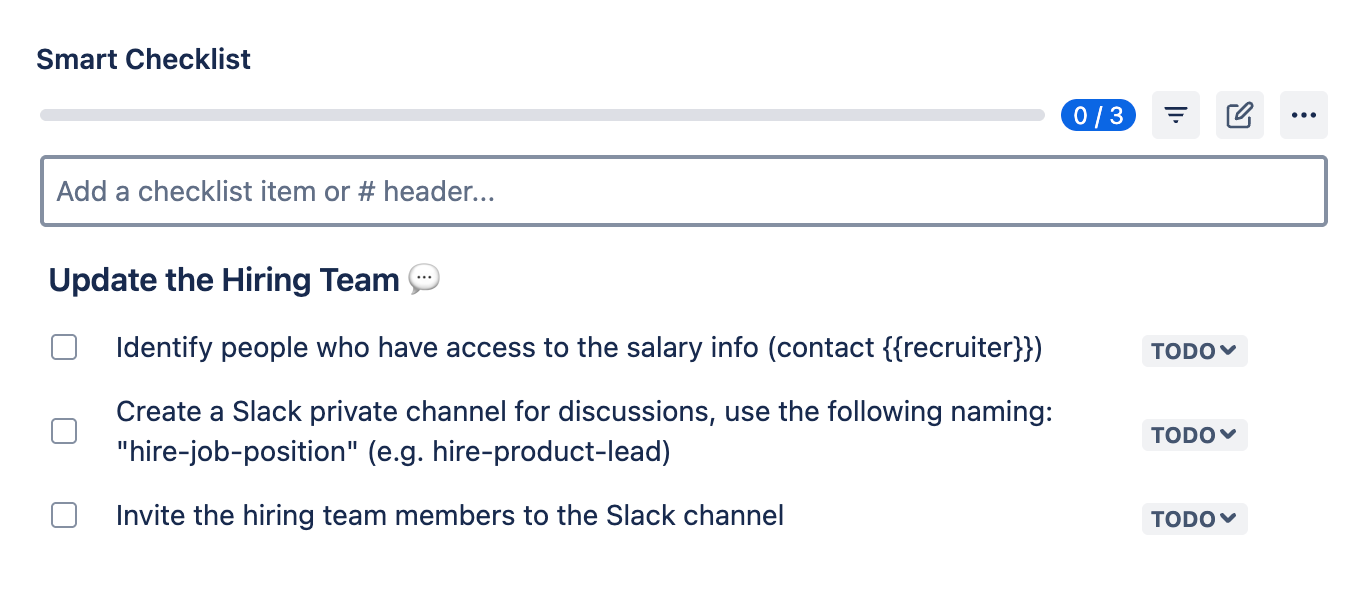
### Update the Hiring Team ?
- Identify people who have access to the salary info (contact {{recruiter}})
- Create a private channel in Slack for discussions, use the following naming: “hire-job-position” (e.g., hire-product-lead)
- Invite the hiring team members to the Slack channel
Position Discovery Template
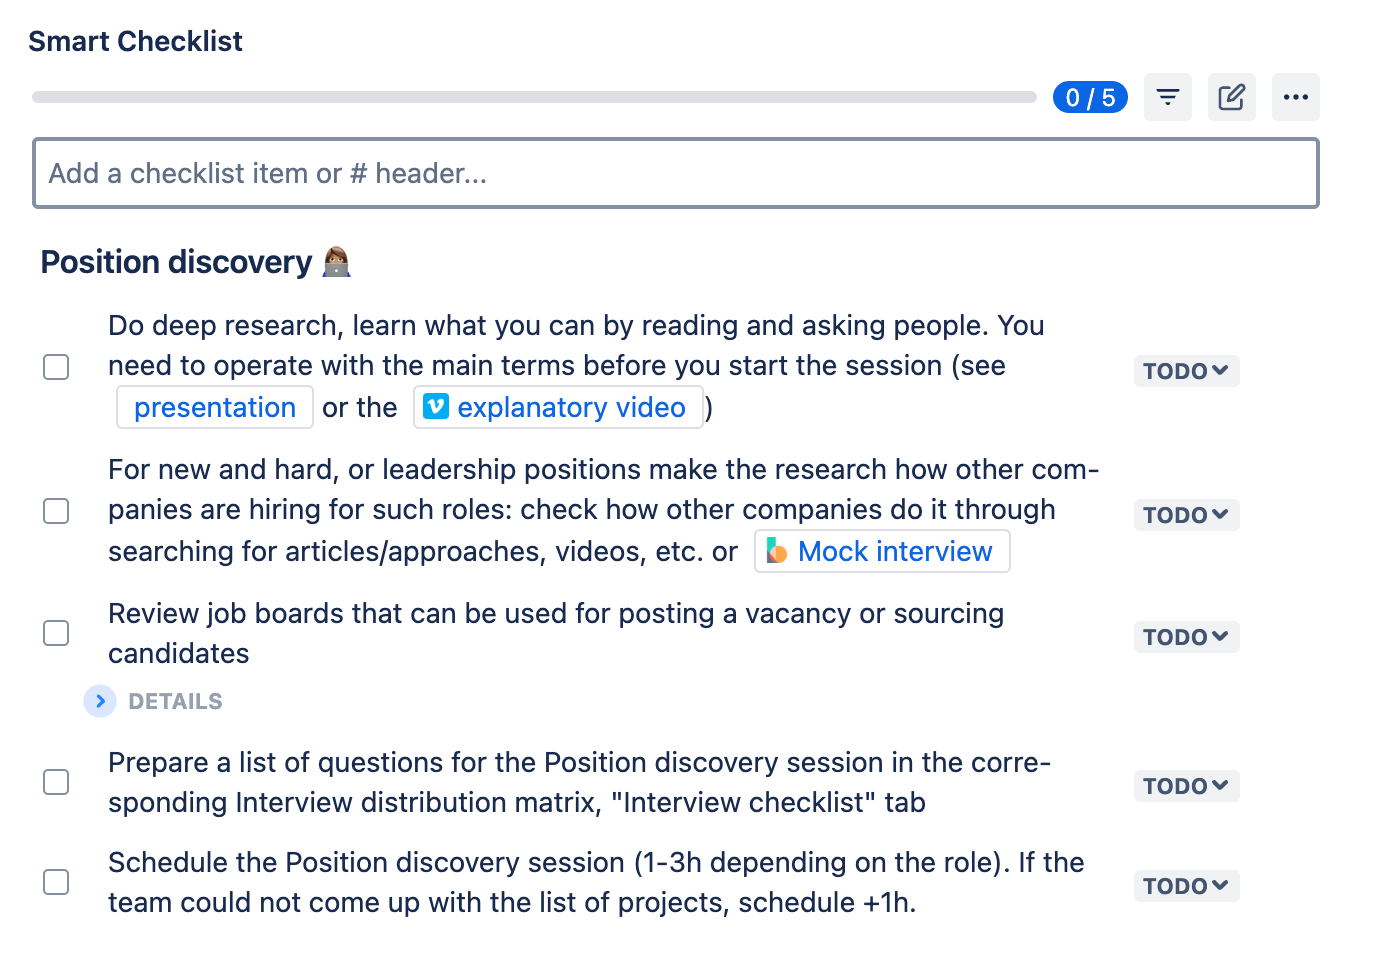
### Position discovery ????
- Do deep research, learn what you can by reading and asking people. You need to confidently operate the main terms relevant to the position before you start the session (see [presentation] or the [explanatory video])
- For new, hard-to-fill positions, or leadership positions, conduct research on how other companies are hiring for such roles. Check how other companies do it through searching for articles/approaches, videos, or [Mock interviews](https://www.thebalancemoney.com/how-to-use-mock-interviews-to-practice-interviewing-2061626)
- Review job boards that can be used for posting a vacancy or sourcing candidates
> -if it makes sense to use [Djinni](https://djinni.co/developers/) - approve it with @MD
> -if there are paid platforms that you can use for posting, approve the posting with @HiringManager in [Slack channel]. Mention the price and explain why posting on that platform will be useful for hiring
- Prepare a list of questions for the Position discovery session in the corresponding Interview distribution matrix, “Interview checklist” tab
- Schedule the Position discovery session (1-3h, depending on the role). If the team cannot come up with the list of projects, schedule +1h.
Job Description Template
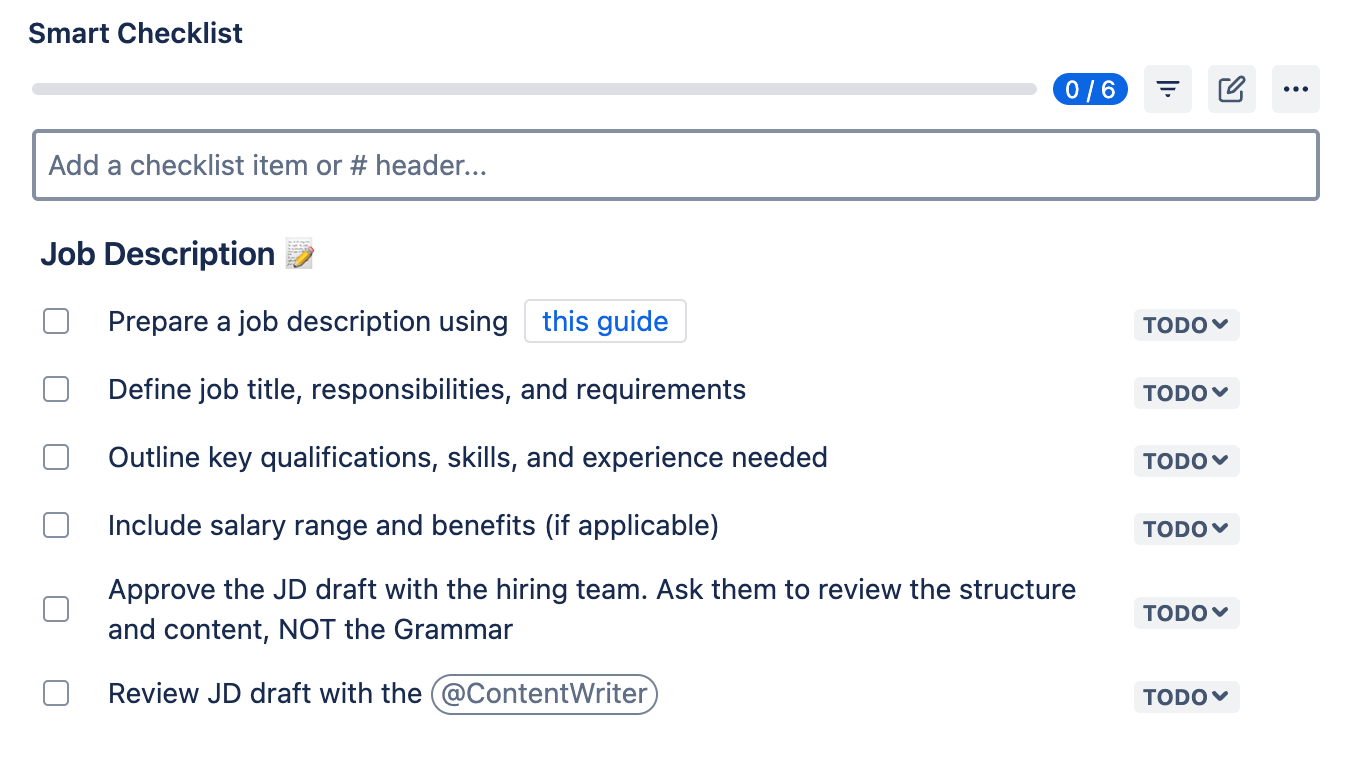
### Job Description ?
- Prepare a job description using [this guide](insert your link)
- Define job title, responsibilities, and requirements
- Outline key qualifications, skills, and experience needed
- Include salary range and benefits (if applicable)
- Approve the JD draft with the hiring team. Ask them to review the structure and content, NOT the grammar
- Review the JD draft with the @ContentWriter
Vacancy Posting Template
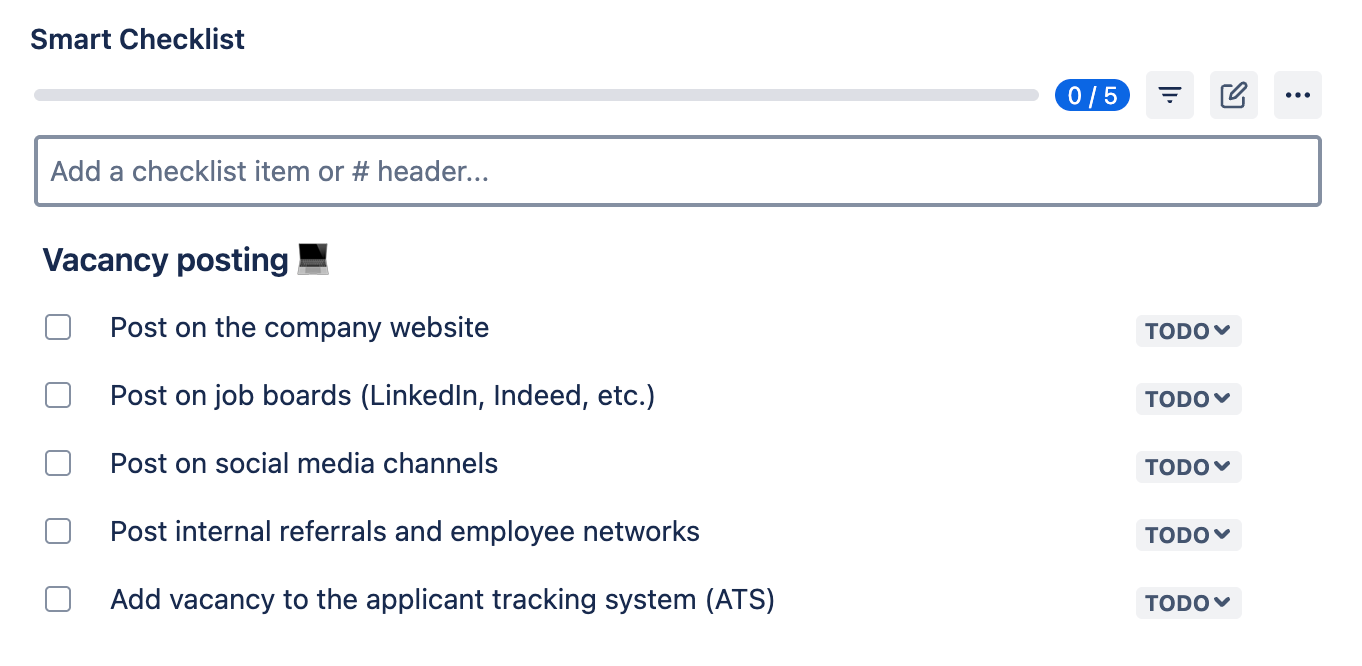
### Vacancy posting ?
- Post on the company website
- Post on job boards (LinkedIn, Indeed, etc.)
- Post on social media channels
- Post internal referrals and employee networks
- Add vacancy to the applicant tracking system (ATS)
Responses Tracking & Follow-up Template
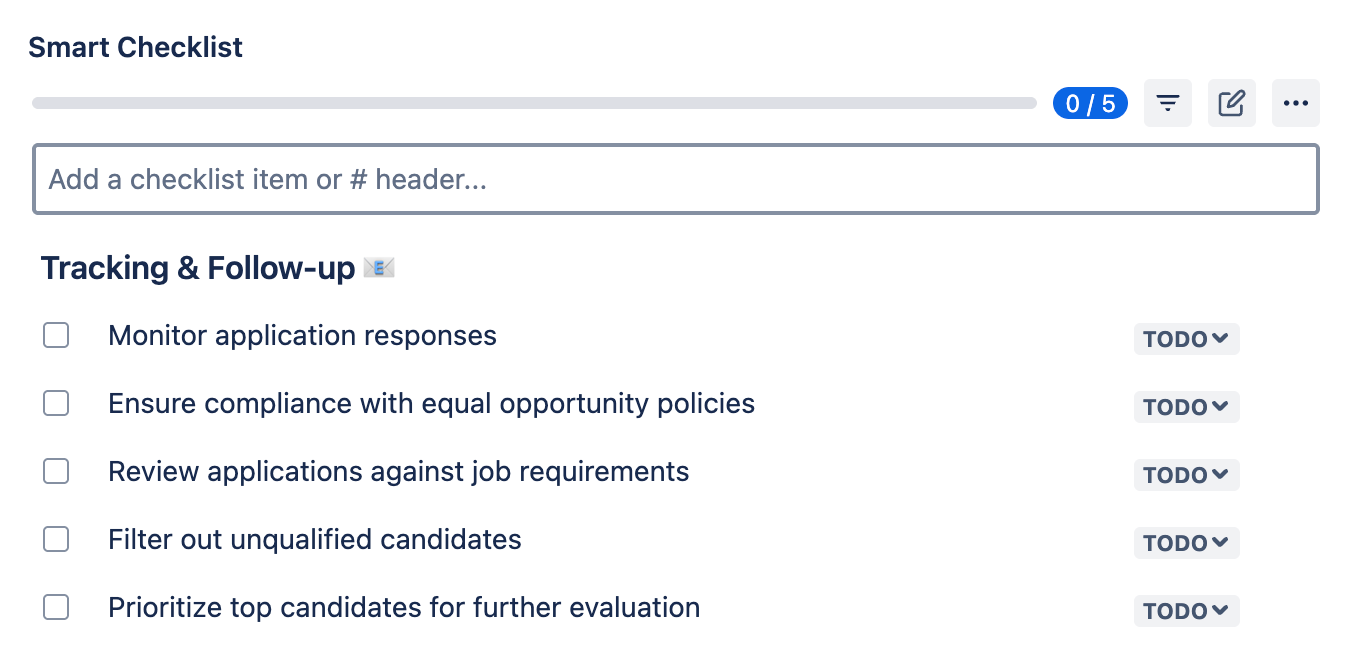
### Tracking & Follow-up ?
- Monitor application responses
- Ensure compliance with equal opportunity policies
- Review applications against job requirements
- Filter out unqualified candidates
- Prioritize top candidates for further evaluation
Candidate Screening & Shortlisting Template
### Candidate Screening & Shortlisting ?
- Consult hiring managers for input on top candidates
- Prepare a structured shortlist (e.g., top 5–10 candidates)
- Notify shortlisted candidates and schedule interviews
- Send rejection emails to unqualified candidates

2. A Position Opening Template Organized As a Set Of Jira Work Items
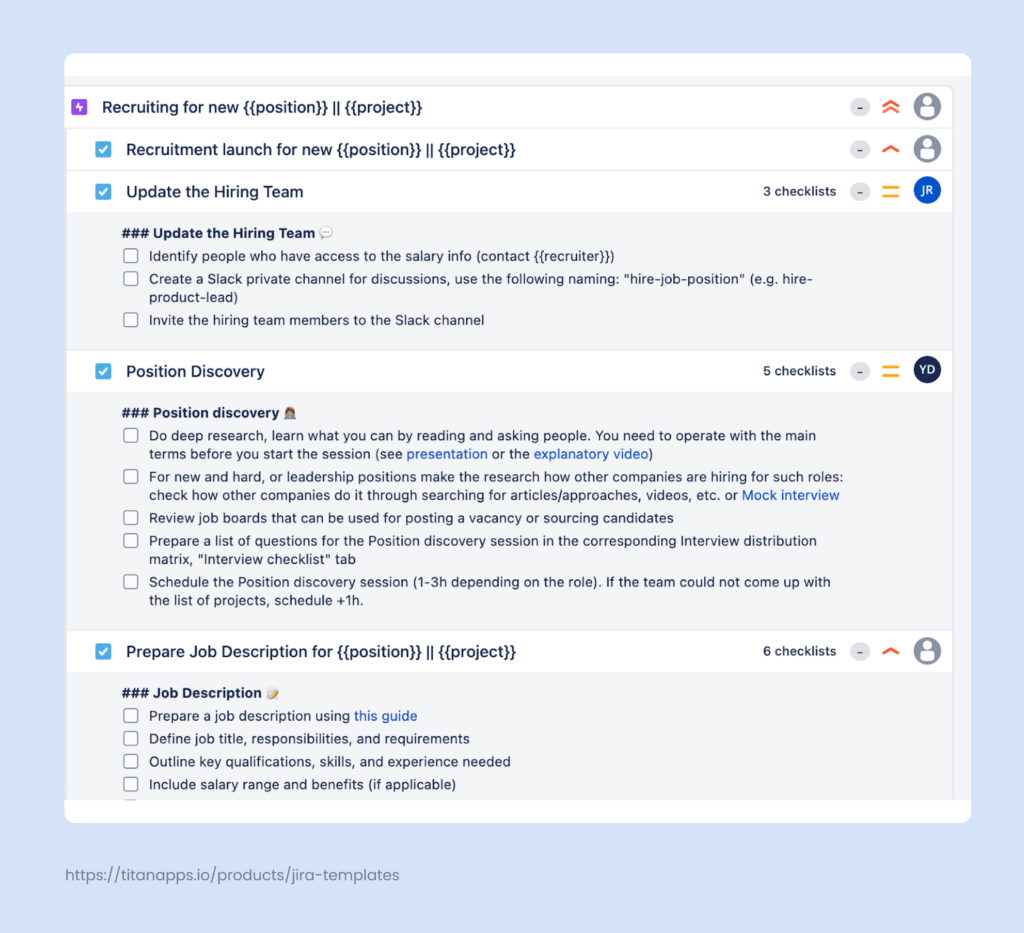
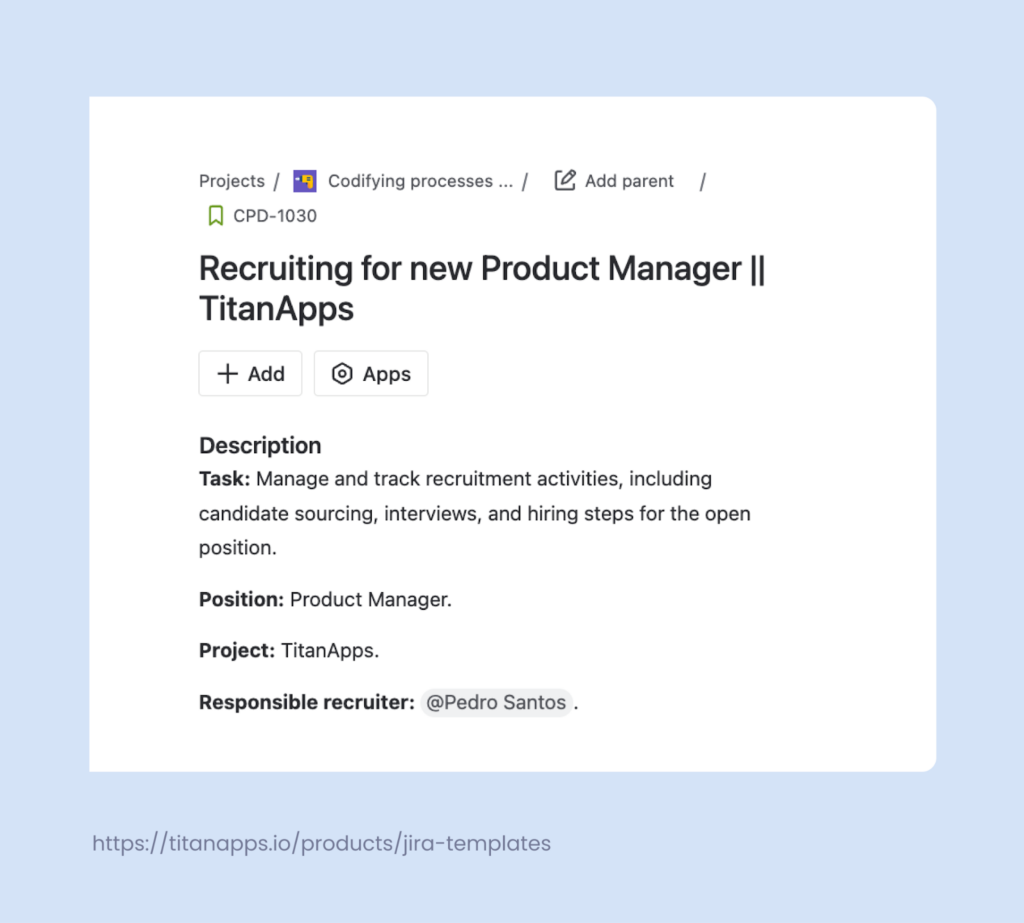
In Jira, templates for recruitment can also take the form of an epic containing several tasks with checklists. For example, you can have an epic “Recruiting for a new {{position}} || {{project}}”. It can contain several tasks, such as “Recruitment launch”, “Position discovery”, “Vacancy posting”, and so on. Each of these tasks (or work items of another type) can include subtasks and detailed checklists with step-by-step instructions.
With the help of Smart Templates for Jira, you can save this pre-configured set of work items as a template. Then, you will be able to create a new work item from this template every time you start the recruitment process for a new position. The whole task hierarchy will be preserved: an epic with all its work items, subtasks, and checklists. Work item descriptions are included in the template as well.
Here’s what it looks like:
Alternatively, it’s also possible to organize your template as a single Jira task with subtasks and checklists, skipping the epic level.
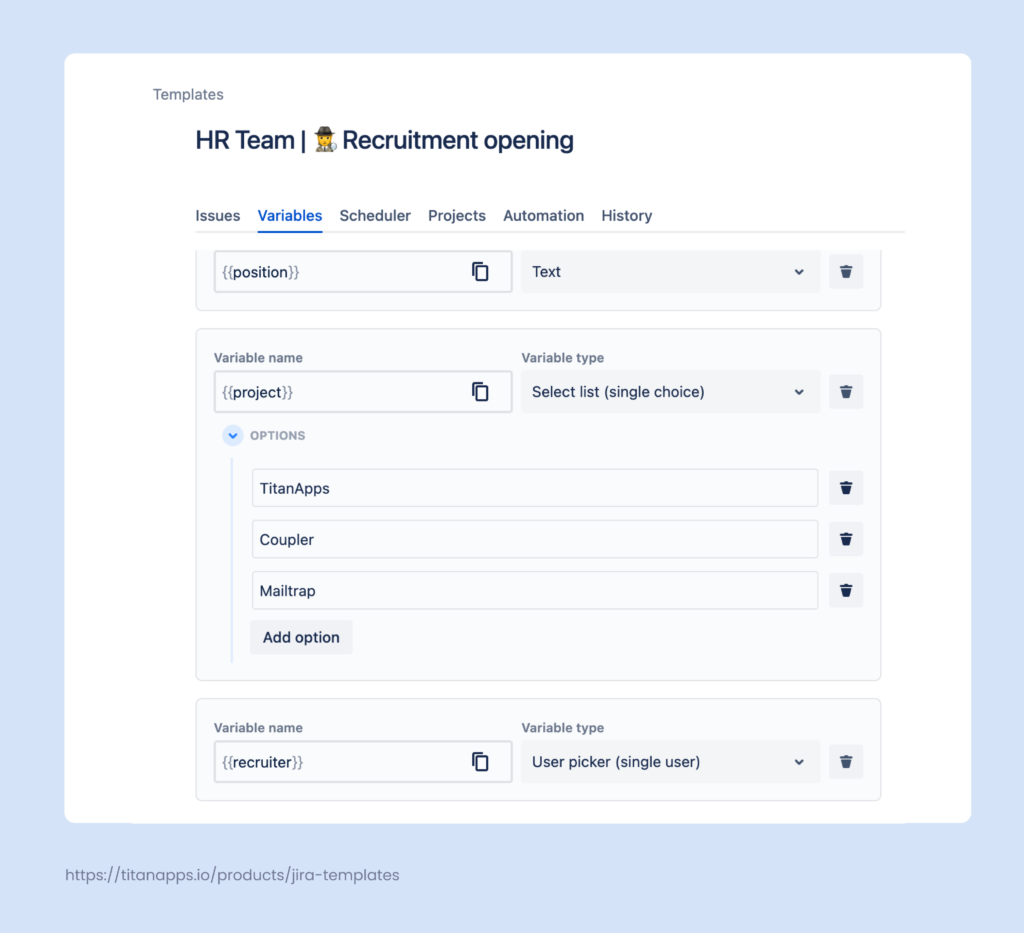
In addition, Smart Templates support variables of different types. This allows you to include values that change from one task to another, such as {{position}}, {{recruiter}}, and the {{project}} for which a new hire is needed:
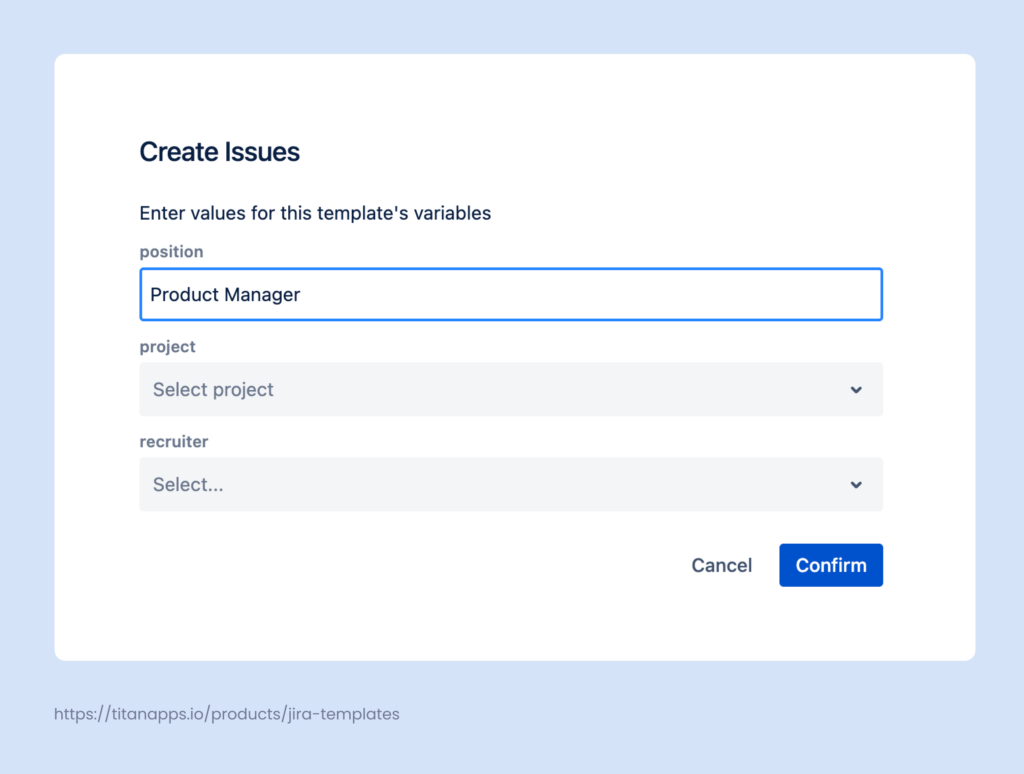
When creating a new Jira work item, you will see a pop-up asking you to provide information for the variables:
After this, the specified information will be used in the new work item in all places where you had placeholders for it: work item titles and descriptions. Here’s what it looks like in the template before applying variables:

And this is how the information provided at the setup is incorporated into the work item title and description:
Apart from reusing task descriptions and including variables, Smart Templates also allow you to pre-select assignees, set dynamic deadlines, and pre-fill both standard and custom fields.
All this helps you streamline and standardize the recruitment process, as well as save time on creating typical tasks and filling in their details. With such a template, you will get a ready set of recruitment tasks in just a few clicks.
How to create a position opening template as a set of Jira work items:
- Install Smart Templates for Jira from the Atlassian Marketplace.
- Prepare and open the work item that you want to turn into a template. This can be an epic with a hierarchy of child issues, or it can be a standalone work item with subtasks and checklists. Use the checklist templates that we provided before: add them to the corresponding tasks using Smart Checklist for Jira.
- Adjust the structure further before saving it as a template. Pre-select assignees, add variables, fill out work item fields, insert links to internal documentation, etc.
- In the Smart Templates section of your issue, click Save structure as template, name your template, and save it.
That’s it! Now you can create new Jira work items from this template whenever you need to. Just provide the information for variables during the setup, and your set of recruitment tasks will be ready in seconds. For more details on how to use Smart Templates, please see the official documentation.

Benefits of Using Smart Tools in Jira For Recruitment Tasks
Here are the main advantages of utilizing Smart Checklist and Smart Templates for your agile project and, in particular, for recruitment:
- Consistency and standardization. Everyone in your organization can follow the same flow step-by-step, ensuring the quality is on a high level and nothing important is missing. As a result, the best practices don’t stay on paper and are integrated into daily tasks.
- A single source of truth. A thoroughly prepared position opening template can include all the related information, materials, links to Confluence knowledge bases, contacts of the approvers, and other assets a recruiter might need. With everything in one place, there’s no need to waste time on finding the needed information across different apps and systems.
- Better teamwork. Using checklists and epic templates makes processes more transparent. As everyone is on the same page, it’s easier to organize in-team and cross-team collaboration effectively.
- Time optimization. With the help of Smart Tools, you can automate the creation of repetitive tasks and eliminate the need to plan the next steps from scratch. Apart from this, using checklists keeps your team more focused.
And, of course, clear milestones and prioritization are important for many areas besides HR: from software development and project management to procurement, finance, legal, and any other field involving complex processes and recurring tasks. For all these use cases, Smart Tools for Jira help teams to better organize their work and produce more value in less time.