Jira
Jira monday.com


Every product has bugs, and reporting them properly can be the difference between a fast fix and a frustrated developer. Whether you’re a QA specialist, product owner, or developer testing your own features, how you describe a bug matters.
At TitanApps, we work across multiple Smart Tools for Jira (like Smart Checklist, Smart Templates), and bugs can come from anywhere: internal testing by QA, customers, or even colleagues’ feedback. To make sure bugs are reproducible and prioritized correctly, we’ve developed a consistent reporting process — and it lives entirely inside Jira.
Instead of jumping between spreadsheets or Slack threads, we rely on Jira issue templates, project-level structure, and customized boards to keep the process clear for both QA and developers.
In this guide, we’ll walk you through:
- What a bug report is and why it matters
- Which Jira fields we use and how to fill them
- Common best practices and automation tips
- TitanApps-specific examples and caveats
What Is a Bug Report and Why Does It Matter?
A bug report is a Jira issue that describes a problem in the product: something that doesn’t work as expected, breaks under specific conditions, or disrupts the user experience. Bug report is a technical artifact that helps developers understand, reproduce, and fix the problem.
A good bug report does three things:
- Explains what’s broken
- Describes how to reproduce it
- Helps the team decide how urgent the fix is
Bug report is important because in real teams:
- Developers don’t always know the feature context.
- Product managers need to prioritize bugs among feature work.
- QA needs to track what’s fixed and what’s still in limbo.
- Support needs to find and reference bug reports for customer issues.
A well-written bug report saves time for everyone and makes sure serious problems don’t fall through the cracks.
Bug Reporting Fields in Jira (And How to Use Them)
At TitanApps, we’ve developed a practical approach to structuring bug reports in Jira that helps reduce noise, improves developer efficiency, and ensures accountability across QA, devs, and PMs. The setup relies entirely on Jira Cloud, without additional tools though the same logic can be adapted to more advanced test management systems if needed.
Our core principle is simple: when QA creates a bug, the ticket must already contain everything needed to reproduce and prioritize it. To support that, we’ve configured a default work type for software project with several required fields.
Note: This workflow works well for us, but every team is different. Some companies don’t use severity, others don’t link bugs to sprints, and automation setups vary. Use this as a guide, not as an instruction to follow for all use cases.
To ensure each bug report is clear, actionable, and complete, make the following fields mandatory when configuring the Bug issue type in Jira:
| Field | Description | Best Practices |
|---|---|---|
| Summary | Short title of the bug | Use the "What–Where–When" format. Include key info like affected feature, platform, or trigger (e.g., “[Forge] Templates are not applied to the issue on issue creation when they are assigned to the issue types”). Should be descriptive enough to understand the issue without opening the full ticket. |
| Description | Full bug details | Full bug details |
- Steps to Reproduce
- Actual Result
- Expected Result
- (Optional) Prerequisites – conditions required before steps (e.g., user has 500+ templates).
Let’s go into more details of each section:
Summary
The summary is the first and often only thing a developer or product manager reads at a glance, especially when skimming boards or release scopes. That’s why we write it as a compressed description of the problem. It should follow a clear “What – Where – When” structure
TitanApps tip: Summary is the first thing everyone sees – devs, PMs, support, and even customers (via linked portals). It should be clear and concise, ideally under 255 characters (Jira’s limit). We try to write summaries that make the bug self-explanatory, even if someone never reads the description.
Description
Purpose: A detailed breakdown of the problem, including how to reproduce it.
We use a clear format:
- Prerequisites (optional) – conditions required to see the bug
- Steps to Reproduce – written in bullet form
- Actual Result – what happened
- Expected Result – what should have happened
This structure can be pre-filled using Smart Templates or added manually. The most important thing is clarity: we want anyone, even someone unfamiliar with the feature, to be able to reproduce the bug based on this description alone. When needed, we also include supporting artifacts: screenshots, short video recordings (e.g., Loom), and logs.They’re easier to grasp than written steps alone. Especially helpful when dealing with visual bugs or bugs that depend on specific UI states. Large screenshots can slow down ticket loading, so you can compress image files before uploading to keep attachments manageable.
As one of our QA team members explained, the description should be so detailed and well-structured that a developer doesn’t need to ping QA for clarification. And yet, not so bloated that the main points get lost.
Priority
Priority indicates how urgent the fix is. It answers the question: how soon does this need to be addressed?
We typically use categories like Must, Should, or Could. “Must” is used when core functionality is broken, especially if it affects production or delays a release. “Should” covers important but non-blocking issues. “Could” is for things that are minor, cosmetic, or unlikely to be noticed by users.
In TitanApps team QA usually sets the initial priority, but PMs or team leads can revise it during triage.
Severity (optional, varies by team)
Purpose: Measures the business or reputational impact, regardless of technical complexity.
Some common cases to use Severity when bugs:
- Appear in highly visible areas (e.g., product homepage, customer-facing UI)
- Affect branding (e.g., a typo in the company name)
- Don’t block the product technically but damage perception
Note: Severity is different from priority. A bug can have high severity (e.g., offensive word on homepage) but low priority if it’s easy to ignore for a few days.For example, a bug that displays a typo in the company name on the landing page may not break any functionality, but it’s still considered high severity.
As we mentioned before, not all teams use this field. In some Jira setups, only priority is tracked or severity is logged in description or labels. In some setups (and in some TitanApps projects), severity is omitted entirely or treated as an internal classification by QA. In others, it’s explicitly configured and used alongside priority.
The key thing to remember is that these two don’t always align. A bug can be severe but not urgent (if the issue hasn’t reached customers yet), or urgent but not severe (like a minor functional issue that’s blocking a critical release).
Components
Components let us define which part of the product the bug belongs to. For example, Smart Checklist, Smart Templates, or Forge integration. These are useful for filtering issues on boards, assigning ownership, and creating rules that auto-assign bugs to the correct developer.
One challenge we faced early on was deciding whether to use separate Jira projects per app or to consolidate everything under a single project and organize by components. We chose the latter for simplicity, using components to reflect both the product and the platform (e.g., DC vs Cloud).
Purpose: Shows which module or feature the bug affects (e.g., Frontend, Backend, Forge, DC).
TitanApps use case:
We group our bugs by components like Smart Templates, Smart Checklist, Forge, DC. This helps with:
- Auto-assignment to the right developer
- Filtering on boards
- Analytics and reporting
Sprint
Critical bugs found during regression testing go straight into the current active sprint, regardless of whether the sprint is “frozen.” Others may be logged into Icebox or scheduled for future work.
Note from TitanApps team: The bug’s inclusion in a sprint is tied more to impact on the release than technical complexity. If the bug is a release blocker, it enters the current sprint immediately.
When we use it:
- Critical bugs – Added to the current active sprint
- Non-critical bugs – Moved to Icebox/backlog
- Bugs from upcoming features – Tagged to the sprint containing the feature work
If a live release is broken, the bug goes straight into the current sprint, even if the sprint scope is already full. We treat it as an emergency scope.
Labels
Labels are flexible tags we use for filtering, visibility, and sometimes automation. These can include support, tech-debt, hotfix-staging, e2e, or specific team tags. They help us slice and dice bugs when doing post-mortems, retrospectives, or sprint wrap-ups.
We often filter by label during sprint retrospectives to see how many release-blockers we had and whether they were caught early.
Environment
Knowing where a bug occurred is critical for debugging. At TitanApps, we track whether the bug was found on staging, production, or a local dev environment. If the Environment field isn’t configured in Jira, we include this info at the top of the Description field.
QA often notes variations in bug behavior across environments. For example, a bug might appear only in staging but not in production, or only under a specific feature flag setup.
Best practice:
Include this either in a dedicated Environment field (if configured) or at the top of the Description.
Examples:
- Staging – during QA testing
- Production – reported by customer
- Development – caught by devs before commit
Reporter & Assignee
The Reporter field is filled automatically by Jira and it’s whoever created the issue. The Assignee, on the other hand, can be manually selected or assigned via automation rules. In some cases, we configure auto-assignment based on the selected component. For example, any bug with Smart Checklist as a component can go directly to that module’s lead developer.
In smaller teams, QA may leave Assignee empty and let devs triage issues during standups. In larger setups, auto-assignment becomes essential to avoid things falling through the cracks.
Affects Version / Fix Version
These fields are used to track where the bug appeared (Affects Version) and where it’s expected to be fixed (Fix Version). This is particularly helpful when validating releases or conducting QA sign-off.
Not every team uses these fields rigorously. But when used, they provide a clear version trail that helps QA test fixes against the correct builds, especially in release-heavy environments.
Linked Issues
We link bugs to their related Stories, Epics, or other bugs. This gives context: is this bug part of a larger feature rollout? Is it blocking another ticket? Was it caused by a specific change in a Story?
As one QA noted during a team discussion, this also helps support teams trace customer-reported bugs back to their origin, especially when customers reference a broken feature without knowing the underlying implementation.
Attachments (optional but recommended)
We often include:
- Screenshots of the bug state
- Videos (via Loom or screen capture)
- Logs (if backend error)
- Sample files (e.g., uploaded config that caused failure)
The more context we give, the faster the devs can reproduce the issue and avoid bouncing tickets back and forth.
How a Good Bug Report Looks Like – Examples
A well-written bug report is a communication tool. It reduces questions, speeds up fixes, and helps teams track recurring patterns across releases. In our workflow at TitanApps, a good bug report is structured, neutral in tone, and complete enough that developers can take action without back-and-forth clarification.
The best reports follow a consistent internal standard, whether the bug was discovered by QA during regression testing, by a developer working on a feature, or by support relaying customer input.
Here’s what we expect a strong bug report to contain:
1. Clear and Informative Summary
A good summary acts like the headline of a newspaper article. It should let the reader instantly understand what the problem is, where it happens, and (if applicable) when or under what conditions it occurs.
Bad example:
“Something’s broken in the checklist”
Better example:
“[Forge] Templates are not applied to the issue on issue creation when they are assigned to the issue types”
This second version immediately tells us:
- The functionality affected (Template assignment)
- The platform (Forge)
- The condition (Issue creation)
This clarity allows faster triage, especially when hundreds of issues are open at once. It also improves issue filtering and searching — something the support team relies on when referencing bugs from customer reports.
2. Structured Description
The description field carries most of the information — and it must be easy to scan. At TitanApps, we follow a standardized template that includes these parts:
Prerequisites (optional)
Conditions that must exist before the bug can be reproduced. These may include account setup, feature flags, data thresholds (e.g., “500+ templates exist”), or user roles.
Steps to Reproduce
A simple, numbered list that anyone can follow, even without deep product knowledge. Avoid assumptions or hidden steps.
Example:
1. Open any Jira issue of type ‘General’
2. Click Smart Checklist > Apply Template
3. Select any saved template
4. Click ‘Apply’
Actual Result
Describe exactly what happens after the final step. Be specific, and include what’s visible on screen, error messages, or unexpected behaviors.
Example:
The template appears to apply, but nothing is shown in the checklist. No error is displayed.
Expected Result
Explain what the correct behavior should be under the same conditions.
Example:
The selected template should populate the checklist tab with its content.
3. Attachments and Environment Context
Good bug reports include relevant supporting evidence. Screenshots, Loom videos, or logs help developers see the issue in action, especially when the bug is visual or involves UI interactions. Videos are particularly helpful when the bug is intermittent or hard to describe.
We also include the environment in which the bug occurred – usually Staging, Production, or Development. If it’s not a dedicated Jira field, it should be included at the top of the Description section.
TitanApps tip:
Always indicate the environment and user conditions. Many of our regressions behave differently on Staging vs Production, especially with Forge apps.
4. Neutral, Precise Tone
The tone of a bug report should be factual, not emotional. Avoid phrases like:
- “This is completely broken”
- “It works terribly”
- “Seems fine to me”
Instead, stick to concrete observations:
- “The apply button is unresponsive after clicking”
- “There is no visual confirmation that the template applied”
- “Expected behavior: checklist should populate instantly”
Even if the bug is frustrating or causes a delay, the goal of the report is to support resolution.
5. Proper Use of Fields
As covered earlier, the bug should have all required fields filled in:
- Priority: “Must” for blockers, “Should” for minor bugs with workarounds
- Components: e.g., Smart Templates, Frontend, DC
- Labels: customer-report, release-blocker, Forge
- Assignee: Assigned based on component or via triage
- Linked Issues: Connected to the Epic or Story if the bug is tied to recent work
At TitanApps, we enforce this through a combination of:
- Custom required fields in the Bug issue type
- Smart Checklist for bug tickets to ensure description format
- Validators in the workflow to block transitions unless core fields are complete
6. Example Bug Report
Name of the issue: [Forge] Templates are not applied to the issue on issue creation when they are assigned to the issue types

Description:
STR:
- Open any issue
- Click on SC 3-dots menu > Manage templates
- Expand any template (project/global/linked) > assign to all issue types
- Expand another template (project/global/linked) > assign to specific issue type
- Create issue with this issue type
- Verify the checklist
Actual Result: Templates are not applied to the issue on issue creation
Expected Result: Templates should be applied based on the assignment on issue creation
Issue is reproduced on dev/staging envs. On production it is working as expected.
In developer logs:

Attachments:
– Video recording of the issue
Priority: Must
Component: Jira-checklist-Cloud
Labels: hot-fix-staging
Fix version: [SC][Forge] Release Sprint 95
Assignee: Maria Solovey
Linked Issue: TA-9428 ([Forge] Review and address typing errors in the logs)
A report like this takes only a few extra minutes to write properly, but it saves hours of follow-up and makes sure the bug moves quickly through the lifecycle.
Automation Rules for Bug Reporting in Jira
Jira’s native automation engine is a powerful tool for keeping your bug reporting process clean, consistent, and fast. At TitanApps, we use manually triggered and condition-based automation rules to streamline key steps like assigning bugs, applying labels, notifying stakeholders, and enforcing logic between fields.
Note: You need to be a Site Admin or Project Admin to configure these rules.
Automation is especially helpful when the QA team is reporting multiple issues in short cycles, or when bugs are created by non-technical users (like support agents or PMs). Instead of relying on everyone to fill in the same fields correctly, automation ensures consistency.
Here are some examples of how we’ve implemented this:
1. Auto-Assign Based on Component
Each of our Smart Tools, like Smart Templates, Smart Checklist, has a designated module owner or dev lead. When QA selects a specific Component, a rule triggers to assign the bug to that owner automatically.
Example rule logic:
If Component = “Smart Templates” – Assign to @developer_A
This removes the need for QA to remember ownership or ask around. Bugs land on the right person’s radar immediately.
2. Auto-Label Based on Issue Content
We use summary- and description-based triggers to apply common Labels. This makes it easier to search and filter bugs later.
Example rule logic:
If Summary contains “UI” or “alignment” – Add label frontend
If Description includes “reported by customer” – Add label customer-report
These labels help categorize issues at scale and support analytics during sprint retrospectives (e.g., how many frontend bugs were created last sprint?).
3. Notify Triage Owner on High-Priority Bugs
Some bugs require immediate visibility. When a new issue is created with a Must priority or marked as a release-blocker, we send manual notifications to a triage lead (via Slack or Jira mention).
Example rule logic:
If Priority = Must – Send Slack alert to #bug-triage
Or Mention @triage_lead in internal comment
This ensures that time-sensitive issues aren’t missed — especially those that surface late in the release cycle.
4. Append a Smart Checklist to Every Bug
For process consistency, we use Smart Checklist to auto-append a predefined checklist when a new bug is created. This includes required QA inputs and dev validation steps.
Example checklist structure:
QA Checklist:
- Description includes steps to reproduce
- Logs or screenshots attached
- Environment noted
- Linked to related Story or Epic
Dev Checklist:
- Bug reproduced locally
- Fix committed
- PR linked and reviewed
- Ready for QA testing
This can be applied using Smart Checklist’s Jira automation integration or manually inserted via templates.
5. Populate Fields Based on Custom Triggers
Advanced teams can go beyond default rules and build sequences based on custom triggers. For instance, filling in the Fix Version based on the current sprint or applying a default Component when left empty.
However, as of now, Smart Templates at TitanApps are not used for pre-filling bug issue modals automatically. While this is technically possible via other apps on the Atlassian Marketplace, we keep our setup lightweight and native to Jira to avoid overcomplication.
Example of Automation Use Cases from TitanApps Experience
Beyond individual bug-level automation, our team also uses broader workflow and release-level automation to reduce manual work and ensure consistency across the QA and release process.
Automatically Mark Releases as Completed
When all tickets in a release scope are done, regression is complete, and the new version is successfully published on the Atlassian Marketplace, we use an automation rule to mark the corresponding Fix Version in Jira as “Released.” At the same time, all issues associated with that version are transitioned to the Released status. This eliminates the need to manually update each issue and keeps the board clean during release weeks.
Auto-Assign Fix Version on Status Transition
To ensure every completed issue is correctly linked to a version, we also assign the Fix Version automatically when a ticket moves from In Review or In Progress to In QA or Done. This keeps our release notes and changelogs accurate, even if the developer forgets to fill in the version manually.
In-Box Automation vs External Tools
All of the above examples are configured using Jira’s built-in automation engine (accessible via Project Settings – Automation). No third-party apps or plugins are required. This keeps our setup clean, compliant, and easy to manage across multiple projects.
In more complex QA environments (e.g., enterprise-scale testing), teams might use tools like Xray for test case management, which come with their own automation logic. But for straightforward bug handling like ours, native Jira rules are more than enough.
Workflow Validators & Conditions in Jira
Even the best reporting standards fall apart if there’s no enforcement. At TitanApps, we use Jira workflow validators and conditions to make sure no incomplete bug reports sneak into development. This ensures devs don’t waste time pinging QA for missing info, especially during critical testing or pre-release phases.
Validators and conditions act like checkpoints between statuses in a workflow. For example, you can prevent a bug from moving from “To Do” to “In Progress” unless all core fields are filled. This removes ambiguity and encourages accountability across the team.
These settings are configured in the Workflow Editor (under Jira Project Settings). You need admin rights to change them.
How Validators Work
Validators are rules applied during transitions — they check that certain criteria are met before an issue is allowed to move to the next status.
In our bug workflow, we’ve added validators to several transitions:
- When moving from “To Do” to “In Progress”, we check that:
- The Description is not empty
- It includes Steps to Reproduce
- The Component is selected
- A Priority is set
- The Description is not empty
- When moving from “In Review” to “Ready for QA”, we verify that:
- The issue is linked to a pull request
- The Assignee field has changed from the developer to a QA lead
- The issue is linked to a pull request
These checks help formalize the handover process. A dev shouldn’t mark a bug “ready” if they haven’t linked a fix. Similarly, QA shouldn’t move a bug to “Ready for Dev” if the steps to reproduce are missing or vague.
How Conditions Work
Conditions determine who can perform a transition, or under what circumstances it becomes visible. While we use them less frequently than validators, they still help streamline sensitive transitions.
Example: Only QA team members can transition a bug to “Closed.” This ensures the fix has actually been tested — not just marked “done” by a developer.
In some cases, we also hide transitions like “In Progress” unless a required checklist is marked complete. For this, we sometimes combine conditions with Smart Checklist’s workflow integration.
Example: Blocking “Start Progress” if Steps Are Missing
One of our most effective validators prevents a bug from entering active development if the Steps to Reproduce field is missing or incomplete. You can add this kind of validator with “Regular Expression Check” validator option.
Here’s how it works:
- When a dev clicks “Start Progress,” a validator checks whether the Description field includes the required phrase “Steps to Reproduce”
- If not, the transition fails, and Jira shows an error (the validator error message couldn’t be customized):
“Field Description with actual value ‘checking validator’ does not match regular expression .Steps to Reproduce.”
This small rule drastically improves issue hygiene, especially when multiple teams are filing bugs in the same project.
Why This Matters
In fast-paced teams, it’s tempting to move tickets forward “just to unblock things.” But this often leads to half-baked bug reports and slows everything down.
Once you use validators and conditions:
- QA can’t forget required details
- Devs aren’t wasting time chasing context
- PMs get cleaner sprint reports
- Everyone knows what’s expected at each workflow stage
These rules create lightweight process guardrails. They don’t slow teams down, but they do prevent chaos.
Bug Lifecycle at TitanApps
At TitanApps, we follow a streamlined bug lifecycle that keeps our development process predictable and easy to manage without adding unnecessary complexity.
A typical bug moves through these statuses:
To do > In progress > In Review > In QA > Ready for Release > Released/Done
In some cases, the flow may include a “Reopened” status if a fix fails verification. However, many of our teams prefer to send reopened bugs back to “To Do” or “In Progress”, depending on the dev’s availability.
Here’s what each status means in our workflow:
- To Do: Bug has been triaged and prioritized; ready for dev pickup.
- In Progress: Assigned dev is actively working on the fix.
- In Review: Fix is complete and under code review.
- In QA: Code has passed review and is ready for verification.
- Done: QA has tested and verified the fix; bug is considered resolved.
We avoid overcomplicating this flow. For example, we don’t track “Blocked” or “Awaiting Info” statuses. Instead, we communicate blockers directly via Jira comments or Slack. The goal is to keep the board clean, make statuses meaningful, and avoid micromanaging edge cases.
Collaboration, Communication, and Best Practices
Smooth bug handling doesn’t stop at Jira. Its effectiveness depends much on how teams communicate and share responsibility, especially when bugs affect active sprints or production environments.
At TitanApps, collaboration between QA, developers, and product managers is fast and informal, but grounded in shared conventions. We don’t rely solely on issue statuses, we actually back them up with direct communication, clear summaries, and traceability.
Critical bugs, especially those marked as “Must” or flagged during release testing, are escalated outside of Jira. QA shares these directly in dedicated Slack channels tied to each release. This ensures they’re not buried under dozens of unrelated tasks and can be addressed quickly by the dev team or triage lead.
When a bug comes from the support team or customer report, QA is responsible for reproducing the issue. The support team typically provides initial context, and QA follows up to clarify steps, check logs, or test edge cases. These bugs are often high-priority, and accuracy is key. Support relies on clear summaries and consistent labels to reference issues across customer threads.
Internally, QA and devs share a common Jira board and work closely during daily standups. Ownership is clear thanks to auto-assignment rules, but handoffs are also tracked through transitions and comments. If QA reopens a bug, they always include a comment with steps that failed and any updates to reproduction instructions.
Our teams don’t track formal metrics like “bugs fixed per sprint” or “QA-to-dev ratio”. Instead, we focus on whether each bug is actionable, reproducible, and relevant. That’s where consistent structure and clear expectations matter most. Whether the issue is a minor visual glitch or a release-blocking regression, everyone involved knows what quality looks like and delivers it.
Using Smart Templates & Smart Checklist in Bug Reporting
While we don’t use Smart Templates for every bug report at TitanApps, they can be extremely helpful when you want to standardize structure, enforce quality, and speed up bug creation.
We recommend Smart Templates when:
- You want all bugs to follow the same description format
- You want to prompt users to fill in key fields (like summary or environment)
- You want to combine a filled-out description and a validation checklist
When paired with Smart Checklist, your templates help enforce the process: no escalation unless all required fields and attachments are complete.
Let’s walk through how to create a reusable bug report template using Smart Templates and Smart Checklist:Therefore, creating a bug template once, and reusing it every time when you need to log a bug into Jira is a much better option.
How to create a bug tracking report in Jira with Smart Templates?
Let’s go through the steps of creating a reusable jira bug template?
Step 1: Download Smart Templates from the Atlassian Marketplace
None of the steps I will describe in this article are rocket science, but this one is probably the easiest. You have to find the Smart Templates app on the Atlassian Marketplace and install it.
You need Jira Admin permissions to install apps from the marketplace. Ask your admin or PM for help during this step.
Step 2: Create a bug template from a work item in Jira.
- Open your Jira board and create a ticket.
- Select the bug work type.
- Copy and paste the following text into the description field:
Steps to reproduce
// Please add the steps that are necessary to reproduce a bug
1.
2.
…
Actual results
// Please explain what happens when the bug is reproduced
…
Expected results
// Please describe how the functionality is intended to work
Environment
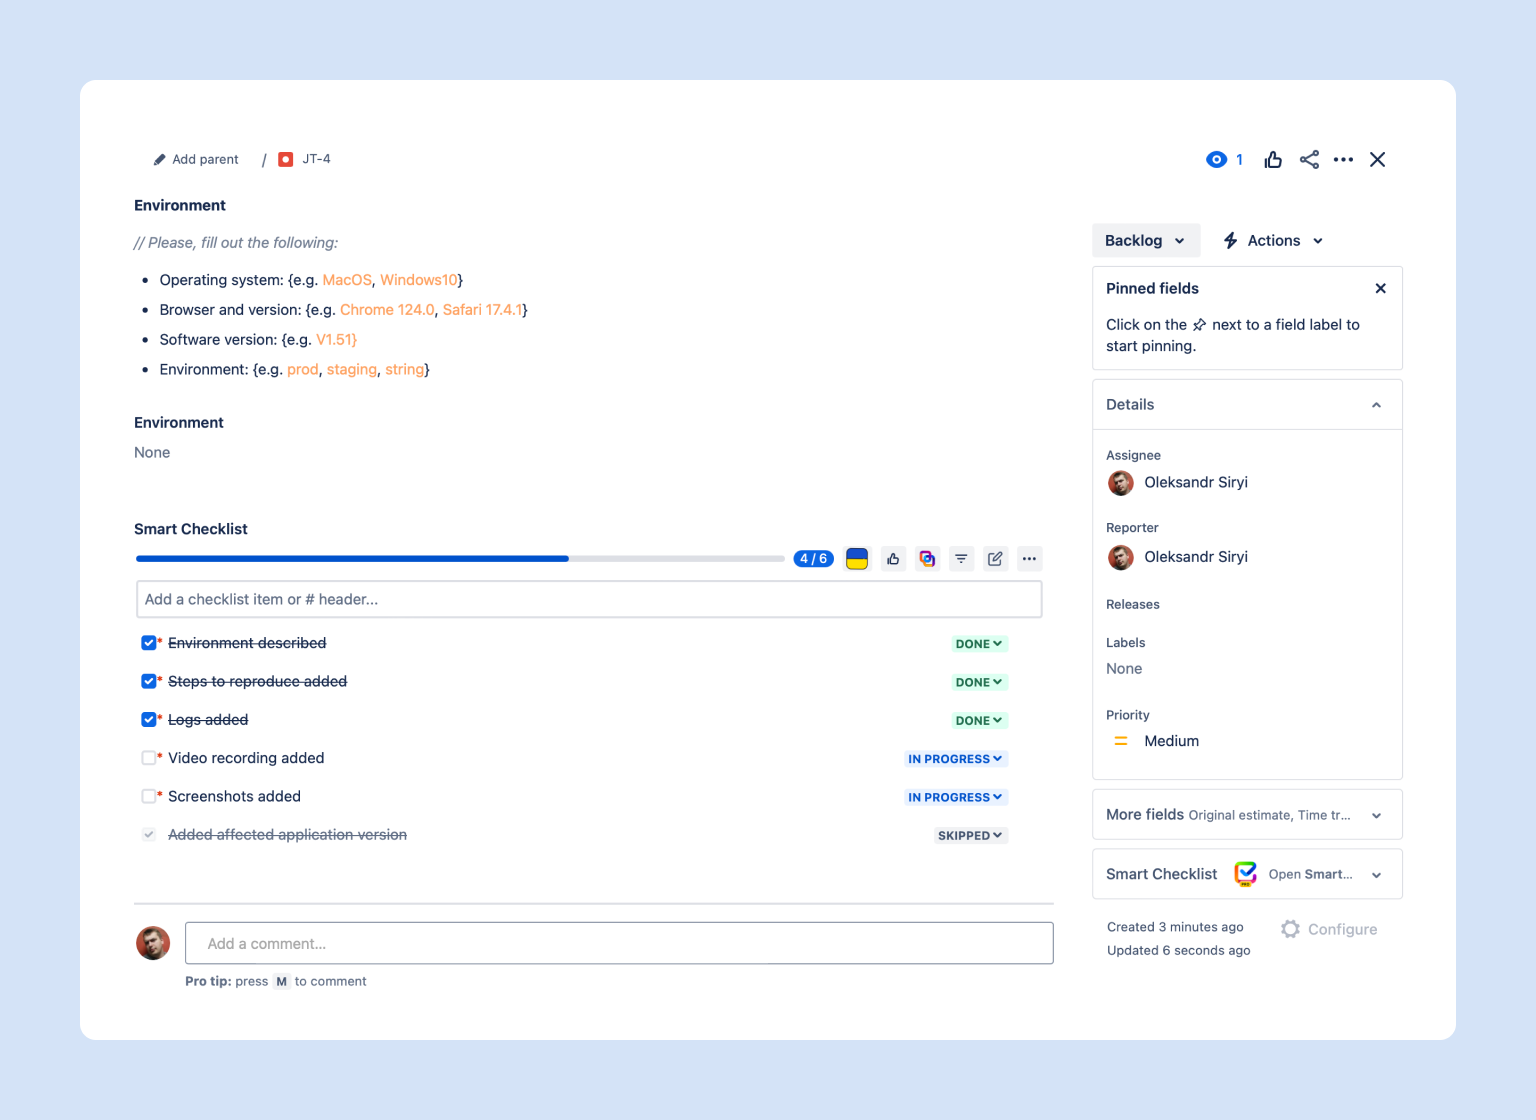
// Please fill out the following:
Operating system: {e.g. MacOS, Windows10}
Browser and version: {e.g. Chrome 124.0, Safari 17.4.1}
Software version: {e.g. V1.51}
Environment: {e.g. prod, staging, testing}

I prefer keeping everything in the description field for the sake of consistency. You can use the environment field in Jira to keep track of the details regarding app and browser versions, etc.
Step 3: Save your work item as a bug report template with Smart Templates
- Click on the Smart Templates button.
- Save the structure as a new template.
- Enter the name of your template. In our case, let’s call it a Bug Report Template. Then click OK.
- You will see a pop-up message stating that your template has been saved. Go to your template from the link in the pop-up.

Step 4: Add text variables to your template
Technically, we already have a nice bug report template you can apply in one click. Still, we can make it better with text variables.
While this step is optional, following through the guide till the end will make your templates much more user-friendly and easy to follow.
What are text variables? These variables let users enter a certain value before applying a template. The summary field will be a great example of text variables in use. A couple of simple edits now will ensure that your QA engineers (or whoever is reporting a bug) will include a descriptive work item summary.
- Open the Smart Templates app from the sidebar on your left.
- Click on the three dots next to the bug report template and select the Edit option.
- Select the variables tab and add a new variable. This will be our Bug Summary.
- Copy the variable’s name, go to the Work Items Tab, and paste it into the summary field. Make sure that the name is surrounded by two sets of rounded brackets like so {{DescriptiveBugSummary}}
- Click the Save button.
That’s it. Now, the users will be prompted to enter a descriptive summary every time they apply the template to create a bug in your Jira instance. You can create as many variables as you need. You can also use them in the description field.
For example, you can add a {{StepsToReproduce}} and a {{Environment}} variable. This way, users will need to complete these fields before they can create the bug work item.
Technically, you can complete every step of crafting a template from the Smart Templates view. Still, I prefer to start at the work item view because applying the text formatting options inside the description field is much easier. If you don’t care about the looks – the Smart Templates option is much faster.
Step 5: Establish and enforce a process with Smart Checklist
The next step in crafting a bug report template will involve a different app from our suite of Smart Tools. Like Smart Templates, you can install Smart Checklist from the Atlassian Marketplace.
Keep in mind that this step is 100% optional. Still, I’d advise you to give the app a shot, as it can help you create a reliable QA process.
We will be relying on Smart Checklist for creating a list of ToDo’s for the QA engineer to follow. You can enforce these ToDo’s by using the mandatory Items feature. This means that the tester will not be able to move the work item further through the workflow unless the checklist items you’ve specified are complete.
You can read more about the functionality of mandatory items here
For now, the only thing that you need to keep in mind is that every checklist item that is a #MUST needs to have an exclamation point after the dash.
More on Smart Checklist formatting options
- Open the Smart Templates app from the sidebar on your left.
- Click on the three dots next to the bug report template and select the Edit option.
- Select the Smart Checklist tab on your right, under the summary field.
- Copy and paste the following text into the window and save the changes:
-! Environment described
-! Steps to reproduce added
-! Actual and expected results added
-! Logs added
-! Video recording/Screenshots added
- Added affected application version
That’s it. Now, your bug template has a ToDo checklist. Furthermore, the QA engineer will not be able to escalate the ticket to the dev team unless they’ve added the necessary attachments and completed the required details
To summarize, we have just created a standardized, well-formatted Jira bug template with actionable ToDo’s in under five minutes. Nice!

FAQ: Bug Reporting in Jira
What makes a good bug report?
A good bug report includes a clear and descriptive title, step-by-step reproduction instructions, a detailed description, and all the additional information the development team needs to investigate. That includes screenshots, log files, browser version, and the actual vs expected result. The goal is to save time on debugging and make the issue reproducible for any tester or developer.
What fields should I fill out in a bug report?
At minimum, every bug report should include:
- Summary (title)
- Steps to reproduce
- Expected result
- Actual result
- Affected platform or operating system (e.g. macOS, Android)
- Environment (e.g. staging, production)
- Priority
- Screenshots or screen recordings
- Related story/feature
Using a consistent bug report template helps ensure these are never missed.
Should I always include screenshots or recordings?
Yes. Visuals help the team quickly understand how the bug occurs and how it affects the user experience. For UI or browser-specific issues, screenshots and screen recordings (e.g. from Chrome DevTools or your native screen recorder) are especially helpful.
What if the bug isn’t always reproducible?
Flag the issue as non-reproducible, but still log all relevant details like when and where it happened, what function was used, any error messages, and what steps you followed. Include logs, browser/OS details, and user role. This still helps with triage and future pattern recognition.
How can I prevent duplicate bug reports?
Use filters and searches in your bug tracker to check for similar or related issues. Labeling issues and keeping a well-structured project (with proper components and statuses) makes it easier for testers and PMs to avoid duplicates.
What tools help improve bug reporting?
In Jira, Smart Checklist and Smart Templates help you create and reuse structured bug templates, so no important step is missed. You can also automate part of the process — like assigning bugs or notifying stakeholders — to reduce manual effort.
Should end users report bugs too?
Absolutely. End users often uncover real-world problems missed during testing. Just make sure their reports are routed through support or PMs, who can clean them up and add them to the bug backlog using your internal template.
How do I know if a bug is related to a vulnerability?
If the bug involves data exposure, security bypass, or unauthorized actions, flag it as a potential vulnerability and escalate it immediately. These are handled differently in the bug lifecycle and often require urgent attention from senior engineers or security specialists. In containerized environments, using tools like a docker vulnerability scanner can also help identify security flaws in images and dependencies before they reach production, reducing the risk of exploitable vulnerabilities
Is it okay to report bugs in forums or Slack?
For visibility and tracking, always move any reported issue from Slack or forums into Jira using the proper workflow. Bug tracking outside of Jira often leads to missed fixes or no follow-up. You can use copy-paste templates or Slack ? Jira integrations to streamline this.
When should I notify the development team directly?
If a bug is blocking a release or breaks critical functionality, notify the team or triage lead directly. Otherwise, Jira should be your source of truth — the team can rely on automation, mentions, and dashboards to stay updated.