Jira
Jira monday.com


Connecting issues in Jira serves many purposes. For instance, it allows you to track dependencies between tasks, identify blockers, and visualize these blockers in a timeline view. As a result, you can better organize your team’s work, enhance planning, and improve collaboration.
In this blog post, I explain how to link issues in Jira using different methods. You can link issues automatically or manually from a Jira board or issue view. Additionally, we give you useful tips on how to make working with linked issues more convenient and efficient.
What You Should Know About Linking Issues in Jira
Jira allows you to link issues in various ways, helping you define the relationships between different issue types. By linking issues, you create a bi-directional connection between them, making navigating from one connected task to another easy.
This creates transparency and allows people to get the necessary context for their work. It also helps everyone on the team see how their task is related to their colleagues’ tasks.
Here are some facts to keep in mind:
- Issues can be linked within one project or between projects
- The maximum number of linked issues that can be added to another issue is 2000
- It’s possible to link an already existing issue or create a new one
- Issues can also be unlinked if the connection between them is not relevant anymore
- You can set up different link types if you have Jira administrator rights
Please note that users must have the Link Issues permission before they can use this feature. This permission is usually active by default.
Link Types to Choose From
You can select different types of links depending on the relationship between your issues. Here are the most common ones, which are available by default:
- Blocks / Is blocked by – use this link type when one task can’t be started or continued before another one is completed. This often happens when one task requires an asset that will be the outcome of another task.
- Clones / Is cloned by – this connection type is used when one issue is a copy of another one. Such copies can be created when you need to reuse the description or structure of an issue for another task. Another example is when an issue has to be processed in several projects.
- Duplicates / Is duplicated by – this one is helpful when you need to work with duplicated tasks that exist in parallel. For example, if you have two tickets for the same bug that were created at different times. This can also be when you have several bugs that can be tackled with the same fix.
- Implements / Is implemented by – this option is for cases when one issue contains the implementation, or practical realization, of the requirements or specifications outlined in another issue. An issue with feature specifications can be “implemented by” an issue containing a piece of code for that feature.
- Relates to – a universal link for cases when two tasks are not connected hierarchically, but still have a shared context.
Here are some other popular link types that are not offered out of the box and need to be configured separately:
- Added to idea / Is idea for – this link is needed for connecting an issue with an idea to another issue that uses or implements that idea. Linking them allows you to track and manage feature requests or the results of a brainstorming session.
- Merged into / Merged from – a link indicating that two issues were initially separate but later merged into one. This can occur when two issues are similar or simply have to be handled together.
- Reviews / Is reviewed by – this connection type is frequently used for documenting and tracking the review process. For example, when a task needs to be reviewed by a stakeholder who also has a separate task for reviewing it. In this case, the two issues will be connected with the Reviews / Is reviewed by link.
- Causes / Is caused by – often marks a cause-and-effect relationship between issues. For instance, when a specific problem was caused by a recent update, when releasing a new functionality creates potential legal risks, and so on.
If standard options are insufficient, Jira administrators can configure custom link types. An example of a custom link is Solution for, used when one issue contains a solution for the problem described in another issue (such as a feature fixing several bugs).
Sometimes, you need to link issues from different projects. In these cases, you create cross-project links. This can be, for instance, when a marketing team is preparing a campaign for a new app but their work is blocked by the delayed release. These two tasks belong to different projects but are connected.
For most companies, the best option is a combination of default links and custom ones adjusted to your team’s unique needs.
How to link issues in Jira Cloud
As Atlassian now recommends Jira Cloud as the primary choice for businesses, our guide is focused on this version of Jira. For linking issues in Jira Data Center, please refer to the official documentation.
Jira allows you to link issues directly from your board or from an issue page. Let’s explore both options.
Link Jira Tasks From the Issue Page
The most straightforward way to connect an issue to another one is by selecting this option from the issue view:
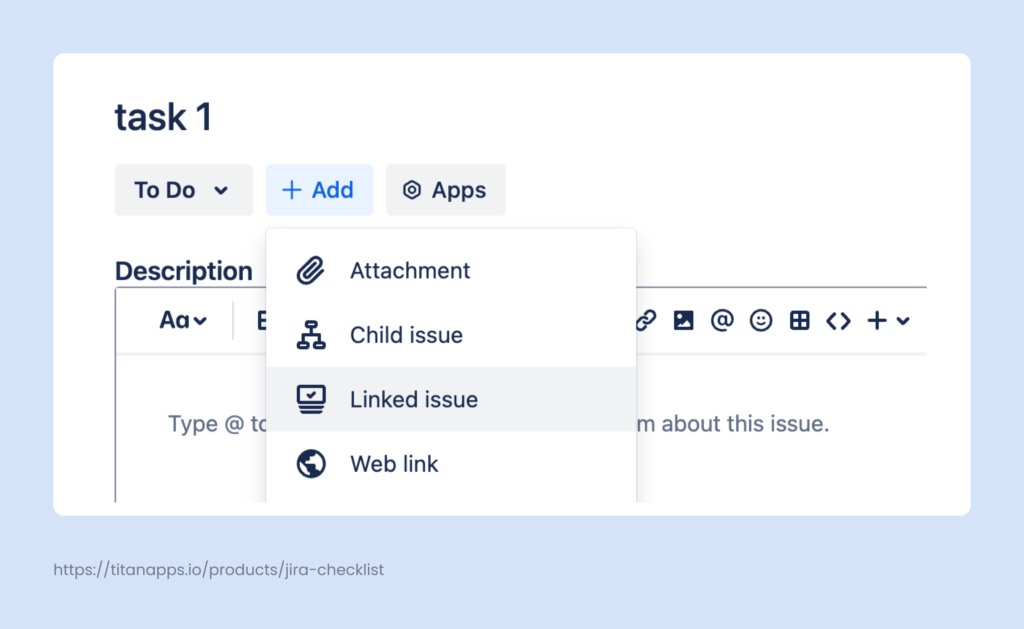
- Open the issue you need to link. In the upper left corner, under the issue title, select +Add -> Linked issue.
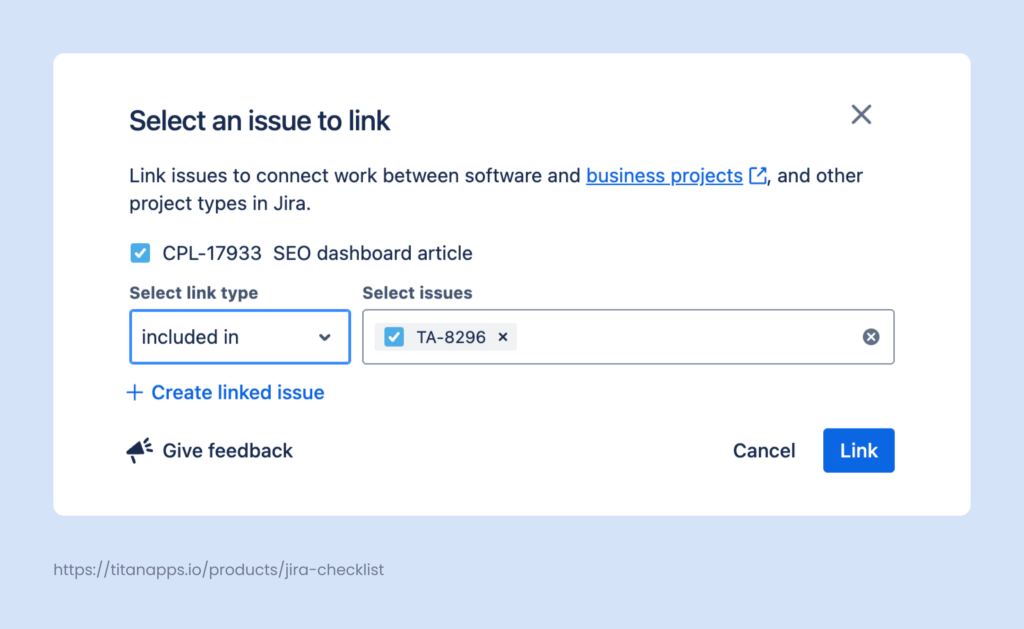
- In the dropdown menu that appears, find the issue you want to link to. If it doesn’t exist yet, select +Create linked issue to add a new issue.
- Choose the link type describing the relationship between the issues. Once ready, press Link.
If you need to link to an issue that is already done, you will need to search by the exact issue key. Otherwise, that issue may not be visible in the search.
Link Issues From Your Jira Board
For added convenience, you can also link issues directly from your Jira board. This is especially useful when you need to quickly connect tasks when discussing them in a meeting.
- Open your Jira board. Hover over the issue card and click the three dots in the upper right corner. Then, select Link issue.
- Choose the needed link type from the dropdown menu. Then, search for the issue you want to link to or create a new one.
- Once ready, click Link. That’s it! Your issues are linked.
How to link Jira Issues to Confluence Pages and External Websites
The most common use for the linking feature in Jira is when you need to connect two issues within the same project or in different projects. However, there are other possibilities as well:
- Connect a Jira issue and a Confluence page
- Link Jira issues to other Atlassian products
- Connect a task to an external webpage
In the latter case, an external website can be the support system where the initial request originated from, a website where a bug is manifested, a link to legislation connected to a task, and so on.
Here’s how to link issues in Jira to other resources:
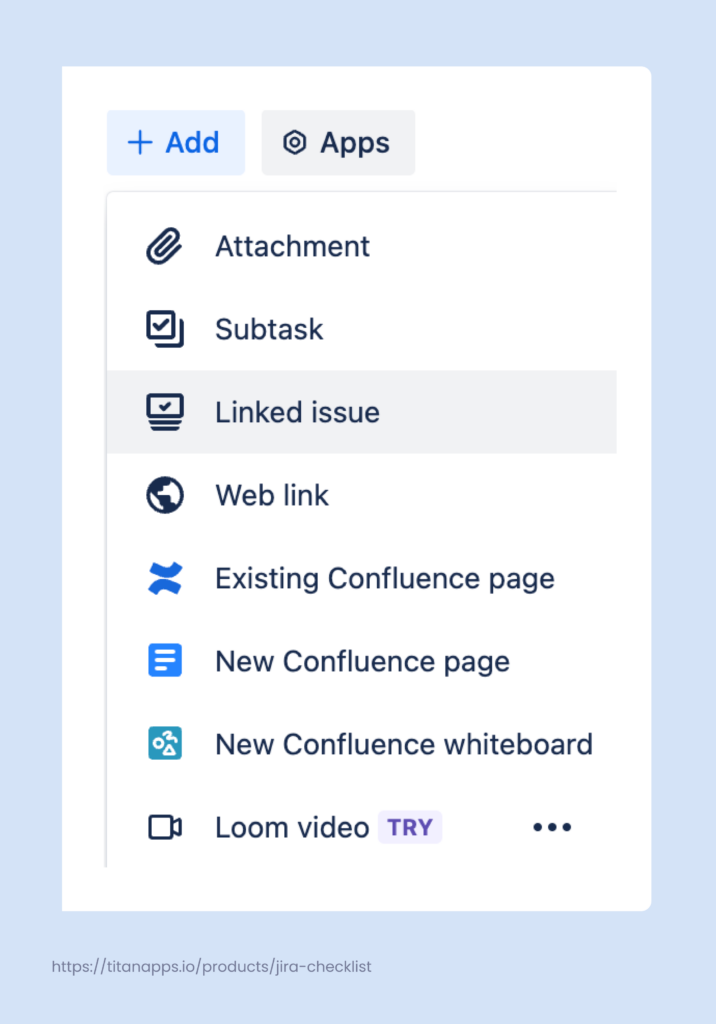
- Open the issue you want to link. Press +Add and select what to connect: Web link, Existing Confluence page, New Confluence page, and so on. If you don’t see an option you need, this means it’s not configured by your administrator.
- Next, select or create the page to connect or insert an external URL. Finally, click Link.
How to Link Issues in Jira Automatically
In some cases, it may be more convenient to link issues with the help of Jira automation. For instance, when transferring tickets from one project to another, linking issues based on shared fields, or linking and unlinking tasks in bulk. The If-Then logic allows you to create various rules tailored to your team’s processes and requirements.
Here are the steps to create a rule for linking Jira issues automatically:
- Open your project settings, go to Automation -> Create rule.
- Choose the rule trigger – the event that will set the automation in motion. For example, “Issue created”.
- Specify the conditions that need to be met to execute the rule. For example, the created issue has certain parameters.
- Choose the action to perform: “Link issues”. Select the link type: “Blocks,” “Duplicates,” “Relates to,” and so on.
- You may need to provide the issue key for the task you want to link to. Alternatively, you can use JQL (Jira Query Language) to dynamically determine the target issue based on various criteria.
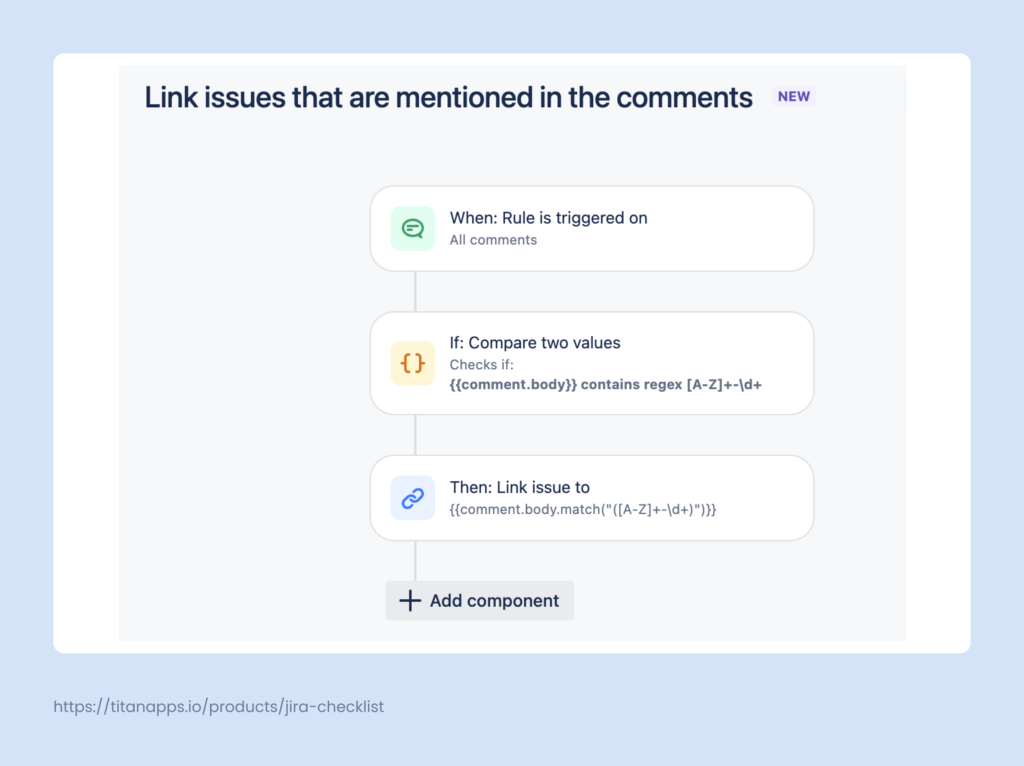
In the example below, there’s a rule scheme for automatically linking an issue to any issue mentioned in comments. The rule is triggered when someone adds a comment to an issue. The automation then checks whether the comment text contains an issue number. If it does, the initial issue where the comment is made is linked to the mentioned issue.
Here’s another example. Let’s say you have task A with multiple linked issues. You want to create task B and link it to task A, and to all the issues that are already linked to task A. With this automation rule, it will be enough to link issues A and B. Issue B will be linked to all the other issues automatically.
First, you need to open the task that is linked to several issues (in this case, with the “Related to” link type). Then, link it to a new issue, which would trigger the rule execution. After this, Jira automatically links the new issue to all the issues the initial task is connected to.
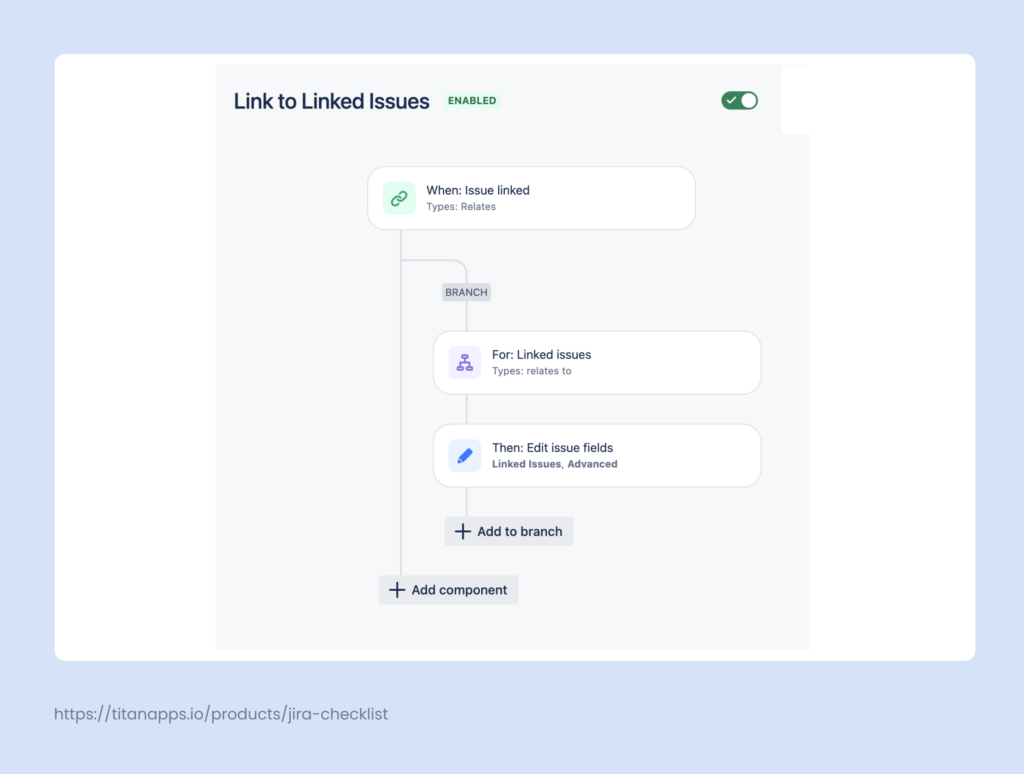
Here are the rule details:
- Trigger: Issue Linked;
- Branch: For Linked Issues;
- Action: Edit issue fields:
- Linked issues
- Relates to
- {{destinationIssue}}
For more information about this example, see Jira documentation.
Using these examples, you can set up your own automation rules for your specific case.
Optimize Your Processes Further
To make the collaboration on linked issues smoother and more efficient, consider using additional tools. We recommend you try out Smart Checklist for Jira and Smart Templates for Jira. They can help you automate recurring tasks and better organize linked issues.
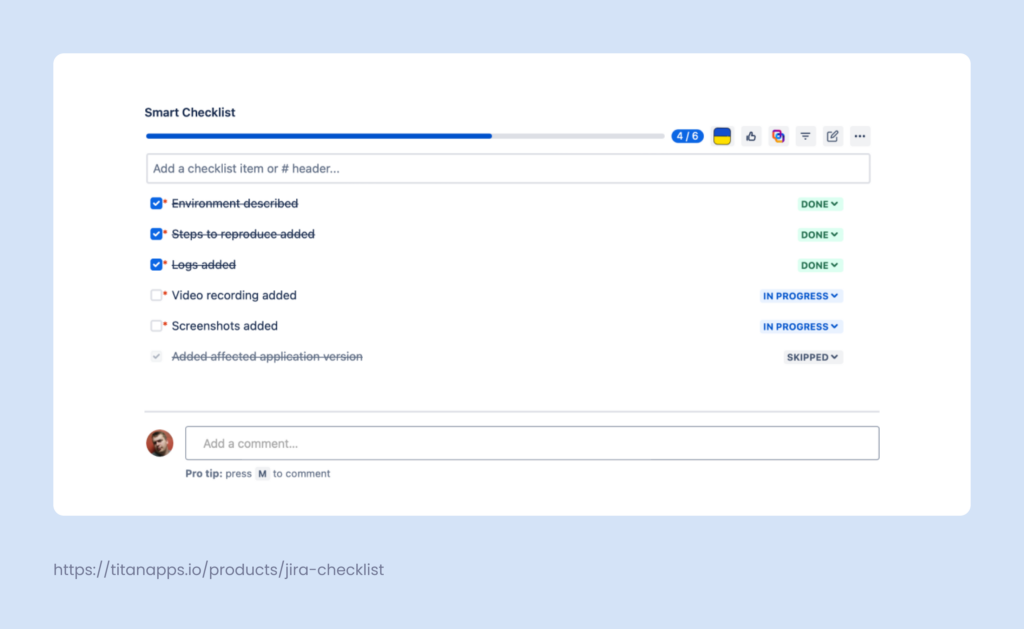
- Smart Checklist for Jira – this tool allows you to add reusable checklists to Jira tasks. You can set custom statuses and deadlines for each step, mention people who need to collaborate on the task, add headers, and more. When used with Jira automation, Smart Checklist can automatically add standardized checklists to linked issues. This helps ensure that similar tasks follow the same process without skipping essential steps.
- Smart Templates for Jira – this tool helps you create reusable templates for Jira tasks, saving time on setting up typical issues. In particular, it can prefill fields, predefine issue descriptions, or set a standard description structure. This is especially useful when you work with linked issues a lot.
Smart Templates allow you to add variables for dynamic parameters – as a result, one template can be applicable to the whole workflow. Another useful feature is scheduled issue creation, which enables you to add new issues automatically. The tool can also be easily integrated with Jira automation.
Here’s an example of a bug template for Jira created with the help of Smart Templates:
Environment
// Please fill out the following:
Operating system: {e.g. MacOS, Windows10}
Browser and version: {e.g. Chrome 124.0, Safari 17.4.1}
Software version: {e.g. V1.51}
Environment: {e.g. prod, staging, testing}
Steps to reproduce
// Please add the steps that are necessary to reproduce a bug
1.
2.
…
Actual Result
// Please explain what happens when the bug is reproduced
…
Expected Result
// Please describe how the functionality is intended to work
By incorporating these tools into your Jira setup, you can significantly improve the effectiveness of your issue-linking workflows.

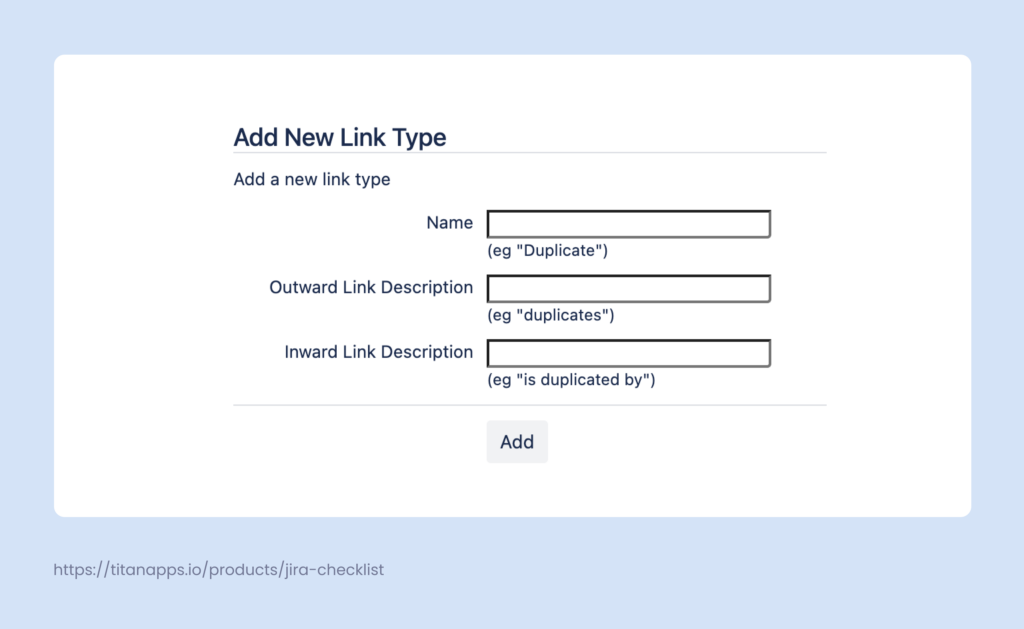
How to Add Custom Links in Jira (For Administrators Only)
If you have Jira admin rights, you can configure custom issue types, adding more flexibility for your team:
- Go to settings and select Issues -> Issue features -> Issue linking.
- If the issue linking is off, select Activate.
- Provide the name for the new link type, then specify the outward and inward link description. The outward description explains how an issue actively affects another issue. The inward description specifies how an issue is passively affected by another issue. Once ready, click Add to finish.
What You Should Remember When Linking Issues in Jira
In this blog post, we explored how to link issues in Jira manually and automatically and how to select the right link type. Here are some extra tips that will make your work with connected tasks more transparent and effective:
- Only add links if you intend to use them. Linked issues are supposed to provide context, additional information, and a better understanding of dependencies. However, adding too many unnecessary links that no one uses creates confusion.
- Keep links up-to-date and remove the links that are not relevant anymore. For example, if an issue is blocked by another one, this link should be removed once the issue is unblocked.
- Use clear naming. If you have custom link types, ensure everyone on the team understands their meaning and how to use them.
- Visualize blockers. Use timeline view to clearly see the blockers your team members encounter and actively unblock them.
We hope this Jira tutorial for linking issues has been useful to you. With the right automation approach and additional tools, such as Smart Checklist and Smart Templates, you can streamline handling linked issues in Jira. This, in turn, helps you create robust processes and implement best practices on all levels.