Jira
Jira monday.com


Building the wrong product is expensive, even if it is built well. Many startup teams rush into development with a strong idea, often without any evidence that their app actually solves a real problem. A product discovery template offers a more measured approach, allowing teams to conduct thorough discovery before committing resources to development.
In this article, I share a practical template to help you organize your discovery process and create products that your customers will love.
What Product Discovery and Validation Mean in Practice
Product discovery is the process that allows you to determine what product is worth building and why. It usually begins after you have defined the high-level goals, conducted competitor research, and prepared the Ideal Customer Profiles (ICPs).
At this point, you hold user interviews to learn more about customer needs and pain points. It’s also a great way to gain insight into their usage patterns, typical behaviors, underlying routines, and the context in which they operate.
To run a smooth discovery, you need to establish a clear process for collecting this information. With a structured approach, you can analyze the results and identify common patterns and recurring pain points. All this helps you crystallize your vision and refine the initial concept to make it more relevant.
Product validation starts once you have a clear idea of the solution you want to test. At this stage, the goal is to determine whether users actually understand the concept and would use the product in real life. This usually involves testing a very simple version, such as a clickable prototype, a short demo, or a basic flow description.
You ask users to complete realistic tasks and observe where they hesitate, become confused, or drop off. The results inform your decision on whether to proceed as planned, adjust the idea, or halt development before it begins.
When You Need a Product Discovery Template: Common Use Cases
Such a template is helpful whenever there is uncertainty about what to build or why it matters. Below are common situations where teams rely on it to bring structure and clarity.
- Starting a new product or app: When you are working with an idea rather than clear requirements, a product discovery template helps you define the problem, audience, and opportunity before moving forward.
- Planning a major feature: Significant feature additions often introduce new benefits or risks. Rerunning discovery helps check assumptions and understand how the change fits existing user needs.
- Entering a new market or user segment: Existing knowledge does not always transfer to new geographies. A structured discovery process helps teams learn how new users behave and what they actually value.
- Fixing poor adoption or engagement: If a feature is rarely used or misunderstood, discovery helps reveal where expectations and real behavior diverge.
- Revisiting direction after a strategic shift: Changes in strategy, positioning, or business goals often require reviewing earlier decisions rather than building on outdated assumptions.
Product discovery templates can take many forms, from a simple spreadsheet to a Miro board or even a fully equipped Jira project template. In this article, we share a product discovery template in the form of a checklist. It will guide you through the process step by step and help you organize your team during this crucial stage of product development.
5 Key Stages to Cover in this Template
Product discovery and validation can look different depending on the product, team, or industry. Still, most well-organized processes follow a similar structure. Here are the most crucial stages to include in your product discovery template:
- Defining the problem and opportunity: Start by stating what you are trying to improve and why it matters. Focus on a real problem people face, not a feature idea. For example, users want to spend less on transportation. That opens up different opportunities, such as creating a car-sharing service, a ride pooling app, and so on.
- Understanding your audience: Next, clarify who experiences the problem and in what situations. Write down what you already believe to be true, even if it seems obvious. For example, you may assume commuters care more about price than comfort or that they already use multiple ride apps. These assumptions influence your decisions whether you notice this or not. Writing them down makes it easier to reassess later.
- Preparing possible solutions: At this stage, you explore different ways to solve the problem with a new product. Keep ideas high-level, without designing screens or defining features yet. For example, to reduce ride costs, you might consider an app that compares prices across providers, suggests cheaper alternatives, or rewards users for off-peak usage. The goal is to review several product directions before selecting one to test.
- Running discovery sessions: This stage is about reality checks. You talk to users, look at data, or test simple concepts to see how people react. For example, you might ask users how they currently choose a ride or show them a rough concept and ask what they would do next. You look for repeated signals, not single opinions. Based on this, you can adjust or drop ideas that do not hold up.
- Validating the solution before development: Finally, you validate whether the chosen solution actually resonates with the audience. You test the riskiest parts first, using the simplest possible setup. For example, you can test a basic prototype or run a small pilot with a few users. You observe whether people can complete realistic tasks and understand the value. The result is a clear decision on what to build, change, or stop.
Together, these stages help teams reduce uncertainty before committing to development. When documented in a template, they create a shared understanding of why a product is being built and what has already been validated.
A Free Product Discovery Template – Step-by-Step Checklist
Below is a step-by-step product discovery checklist that you can use as a starting point for your own process. It was prepared with Smart Checklist for Jira and can be placed directly in your Jira work items.
You can use it as-is or adapt it by adding, removing, or adjusting steps to match your team’s workflow. This makes it easier to keep discovery structured and visible as the work moves forward.
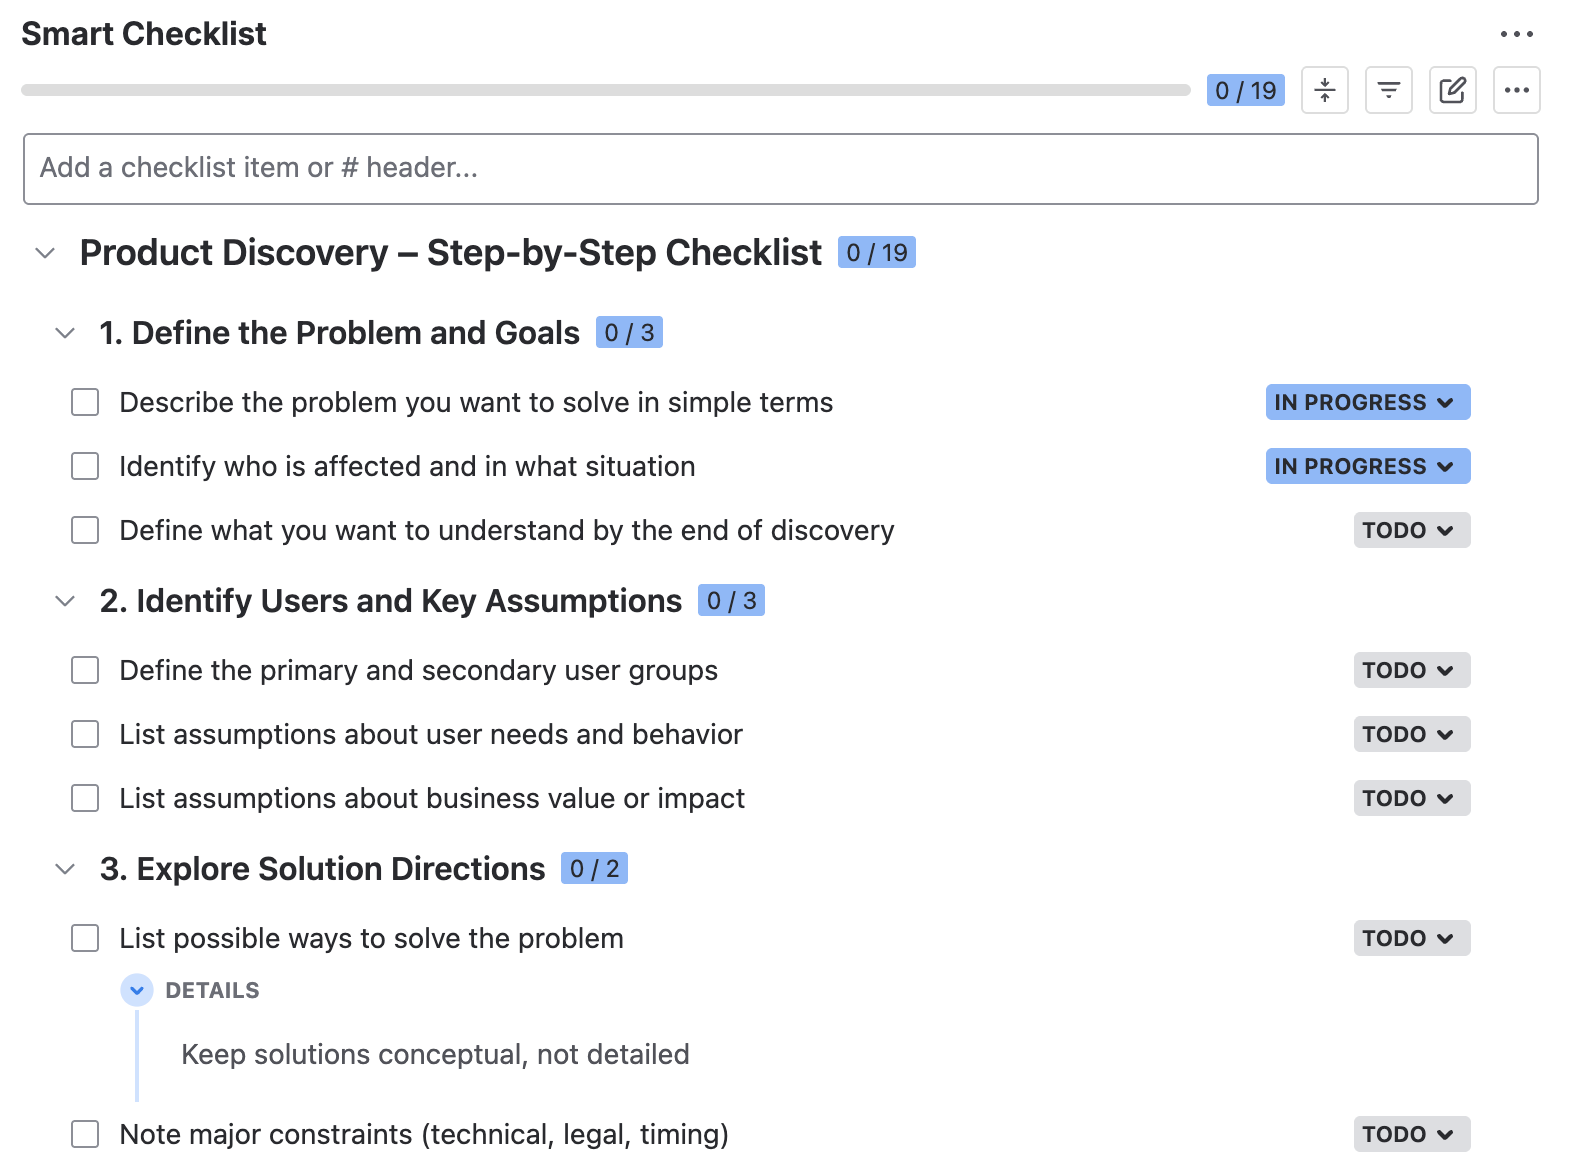
# Product Discovery – Step-by-Step Checklist
## 1. Define the Problem and Goals
- Describe the problem you want to solve in simple terms
- Identify who is affected and in what situation
- Define what you want to understand by the end of discovery
## 2. Identify Users and Key Assumptions
- Define the primary and secondary user groups
- List assumptions about user needs and behavior
- List assumptions about business value or impact
## 3. Explore Solution Directions
- List possible ways to solve the problem
> Keep solutions conceptual, not detailed
- Note major constraints (technical, legal, timing)
## 4. Run Discovery Activities and Gather Evidence
- Select discovery methods
> User interviews, desk research, data review, prototype feedback, etc.
- Prepare discussion guides, questions, or scenarios
- Run discovery sessions or research
- Analyze the results and adjust your solution based on your findings
- Define the next steps and owners
## 5. Validate your solution
- List the key risks and concerns
- Choose the validation method (prototype test, pilot, experiment)
- Create the simplest version of your product needed for testing
- Prepare realistic tasks users should complete
- Run validation sessions with the users and record results
- Analyze the outcomes and list required changes
How to Use These Checklist Templates in Jira
- Install Smart Checklist for Jira from the Atlassian Marketplace.
- Copy the product discovery template shared in the previous section and paste it into the Smart Checklist section of your Jira work item.
- Customize the checklist to fit the specific product or initiative. You can add or remove steps, include links to research documents and other materials, and add short notes in expandable sections for extra context.
Here’s how you can adjust our free product discovery template to your needs:
- Assign responsibility by tagging team members or stakeholders directly in checklist steps. This makes ownership clear and reduces the back-and-forth communication.
- Add due dates to individual steps to reflect real timelines and dependencies. Deadlines stay visible directly where the work happens.
- Use custom statuses to show progress beyond just ‘done’ or ‘not done’. This helps reflect how work actually moves forward.
- Group related steps under headers that mirror the discovery stages or phases. This keeps longer checklists easier to scan and manage.
- Mark critical steps as mandatory so they cannot be skipped. This is useful for reviews, validation steps, or required approvals.
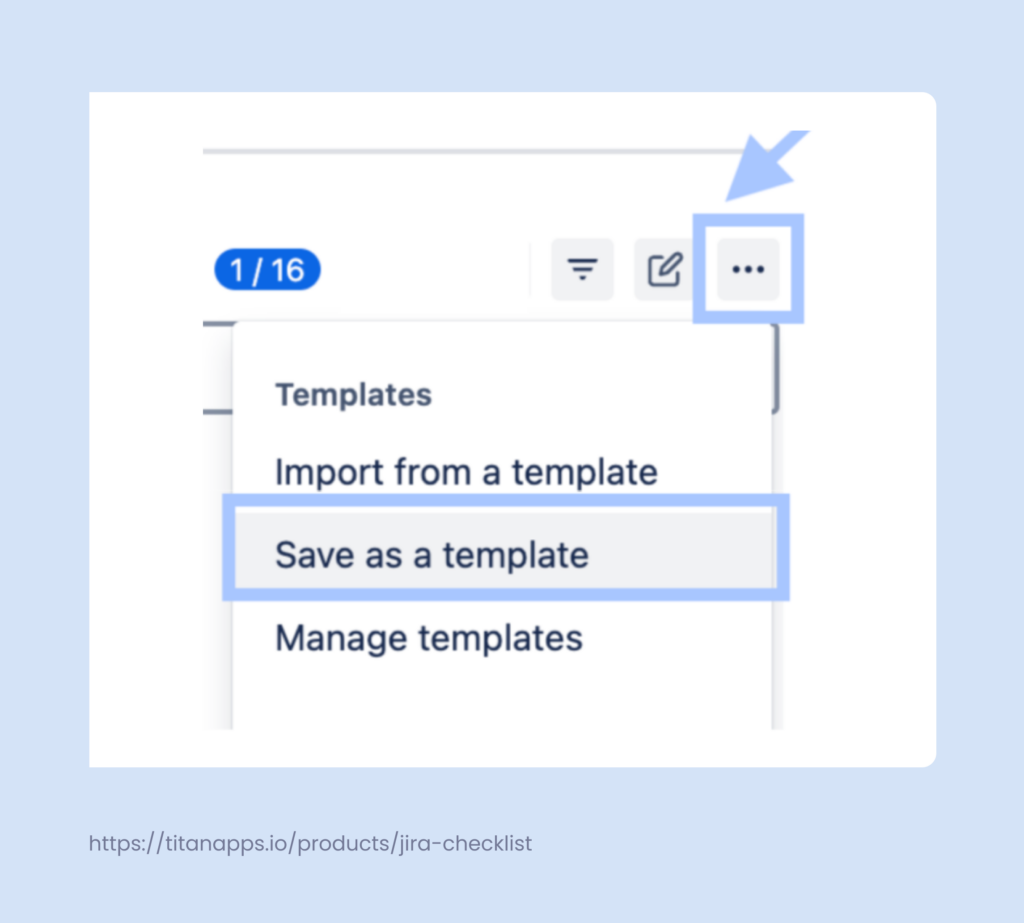
If your organization conducts discovery regularly, save the checklist as a template. This allows you to easily add it to new Jira work items with just a few clicks or apply it automatically based on your settings. Utilizing a saved template helps maintain a structured discovery process across teams while still allowing for customization when necessary.
To save the checklist, open the Smart Checklist menu, click the three dots, and select Save as a template.
Additionally, Smart Checklist has native automation features. It can assign checklists to work items automatically based on their type or other conditions.
What Your Team Gains from Using Smart Checklist During Discovery
- Turn discovery into clear actions: Break research and validation work into concrete steps inside a Jira work item.
- Follow progress in detail: Track discovery work at the level of individual steps, rather than just monitoring the work item status.
- Improve transparency across the team: Everyone can see what has been done, what is in progress, and what is next.
- Avoid subtask overhead: Capture all discovery steps in a single checklist instead of creating multiple subtasks. This keeps the ticket clean while still showing full progress and ownership.
- Reuse proven structures: Save a well-working checklist as a product discovery template and reuse it across your organization.
- Apply checklists automatically: Add the right checklist when a work item is created or reaches a certain stage.

What is the Native Product Discovery Template for Jira?
Jira offers an out-of-the-box template for the discovery process, but it functions differently from the step-by-step checklists shared earlier in this article. In Jira, “product discovery” usually refers to Jira Product Discovery (JPD), a built-in project type created specifically for early product work.
It provides a tailored space where teams collect ideas, describe problems, attach evidence, and compare opportunities before committing to development work. However, it does not guide you through discovery activities step by step. This setup is designed to help teams reason about ideas rather than execute tasks.
What the JPD project template includes:
- Custom work types, such as Ideas or Opportunities
- Fields for capturing a problem statement, expected impact, and confidence
- Prioritization and scoring fields to compare ideas
- Views like lists, boards, and timelines to review discovery items
- Integration between discovery items and delivery work in Jira Software
It’s worth noting that the two approaches are not mutually exclusive. The native Jira Product Discovery template works well for capturing and organizing ideas, while step-by-step discovery checklists help teams manage the actual discovery process. Used together, they give you both strategic visibility and practical execution inside Jira.
Practical Tips for Product Discovery and Validation From Our Product Team
- Focus on one risk at a time. In product management, the discovery process works best when you isolate the biggest unknown instead of trying to solve everything at once. This could be a risky assumption in your problem statement or a key part of the user experience. Narrowing the focus helps teams in startups and agile environments get clearer signals faster.
- Talk to the users earlier than comfortable. Early user research often feels awkward, especially when the product vision is still vague. Still, quick conversations during brainstorming or ideation reveal real user problems that desk research misses. This input is far more valuable than waiting for a polished concept.
- Observe behavior, not just opinions. What users say during interviews is often optimistic. By watching closely how they interact with early functionality, you can identify usability issues and gaps in the customer journey map. These observations lead to better products than relying solely on verbal feedback.
- Use product discovery frameworks to structure your work. There are many frameworks, methodologies, and approaches teams use for product discovery. Some of the most common ones include personas, empathy maps, jobs to be done, and the opportunity solution tree. They help clarify user problems, understand motivations and context, compare solution options, and decide what to explore first.
- Stop when patterns repeat. You do not need full certainty to move forward. Once the same signals appear across interviews or tests, it is time to decide and iterate. This keeps the development process moving and avoids endless research loops.
- Write decisions down and link them to evidence. Clear documentation supports better decision-making and prevents the same debates from resurfacing. Note what was decided, why, and how it affects the product roadmap or upcoming milestones. This is especially important in cross-team project management. Using product management tools can streamline this process, allowing teams to centralize decisions, attach supporting evidence, and track their impact on the roadmap.
- Treat validation as a real checkpoint. Validation should challenge assumptions, not confirm them. If the results are mixed, adjust your concept before the next sprint rather than pushing forward. Teams that revisit their approaches at this stage are more likely to build a successful product throughout the full development lifecycle.
Ship Better Solutions With a Product Discovery Template and… Keep Rediscovering
This process does not end once a template is filled in or a decision is made. As your product grows, new user insights emerge, and earlier assumptions may no longer hold. A product discovery template helps you document what you learn and revisit decisions without having to rebuild the process each time.
You may also need to run discovery again before shipping major new features or making significant changes to your product direction to ensure the work remains grounded in real user needs. Adhering to this principle helps keep your solution relevant and user-centered.