Jira
Jira monday.com


When you start working with a new client, it can be an exciting experience… or a chaotic mess that’s difficult to manage. How a new project begins depends on how well you organize the client onboarding process. Using a checklist is a great way to document the required steps and align the team around this plan. This makes the process more structured and helps you improve collaboration.
In this blog post, we share a practical client onboarding checklist for software development teams. It includes the most essential steps and can be customized according to your processes. Moreover, we also walk you through the onboarding stages and share best practices for organizing a smooth collaboration with a new client.
What is a Client Onboarding Checklist and Why Do You Need One?
In software development, starting work with a new client requires technical setup, alignment on communication, and workflow organization. A client onboarding checklist is a structured plan listing the main steps of this process.
Using such a checklist allows you to keep track of everything that needs to be done. You can prioritize the most important steps and decide the order in which they should be completed. As a result, onboarding goes more smoothly, enabling you to start working on the new project sooner.
A client onboarding checklist can be useful to:
- Teams that have only begun working together
- Remote teams collaborating from different locations
- Teams that want to adopt a new/changed onboarding process
- Consultancies that have multiple clients and need standardization
- Organizations that want to scale the client onboarding process
- Teams that want to adopt a more structured approach
For agile teams, it’s helpful to use the client onboarding checklist in Jira or another project management platform.
Overall, adopting a standard checklist helps you shape a positive onboarding experience for clients. This, in turn, creates a favorable first impression and allows you to build trust, fostering a productive client relationship. For this reason, effective onboarding is an essential factor of customer success.
What Should This Checklist Include?
In terms of content, it should include steps organized by preparation stage. The exact stages can vary depending on your workflow. Typically, a client onboarding checklist covers the following phases:
- Internal kickoff: This phase involves initial preparations, forming the project team, and holding an internal kickoff meeting
- Initial client setup: At this stage, you align with the client on how you will organize your work and communication
- Requirements and technical setup: Next, it’s time for a discovery session and gathering requirements. You can also configure the development, staging, and production environments
- Planning and roadmapping: At this stage, teams plan their long-term work and define the delivery timeline
- Post-onboarding review: Once the client onboarding is completed, it’s useful to hold an internal retrospective meeting and reflect on possible improvements to the process
Since Jira doesn’t offer native checklist management, you can use Smart Checklist by Titan Apps. Then, in terms of functionality, your client onboarding checklist will have such features as:
- Tagging responsible people
- Adding due dates
- Setting custom statuses for each step (ToDo, In Progress, etc.)
- Marking selected steps as mandatory
- Including links to documentation and external resources
- Saving the checklist as a template for repeated use
- Structuring checklist items with headers
- Adding checklists to Jira work items automatically based on conditions
Let’s see what such a checklist can look like.
A Free Client Onboarding Checklist by Titan Apps
Use this template as a basis and customize it according to the client type and project scope.
To add this checklist to a Jira work item, install Smart Checklist. This is a helpful solution that allows you to organize and automate processes with feature-rich checklists.
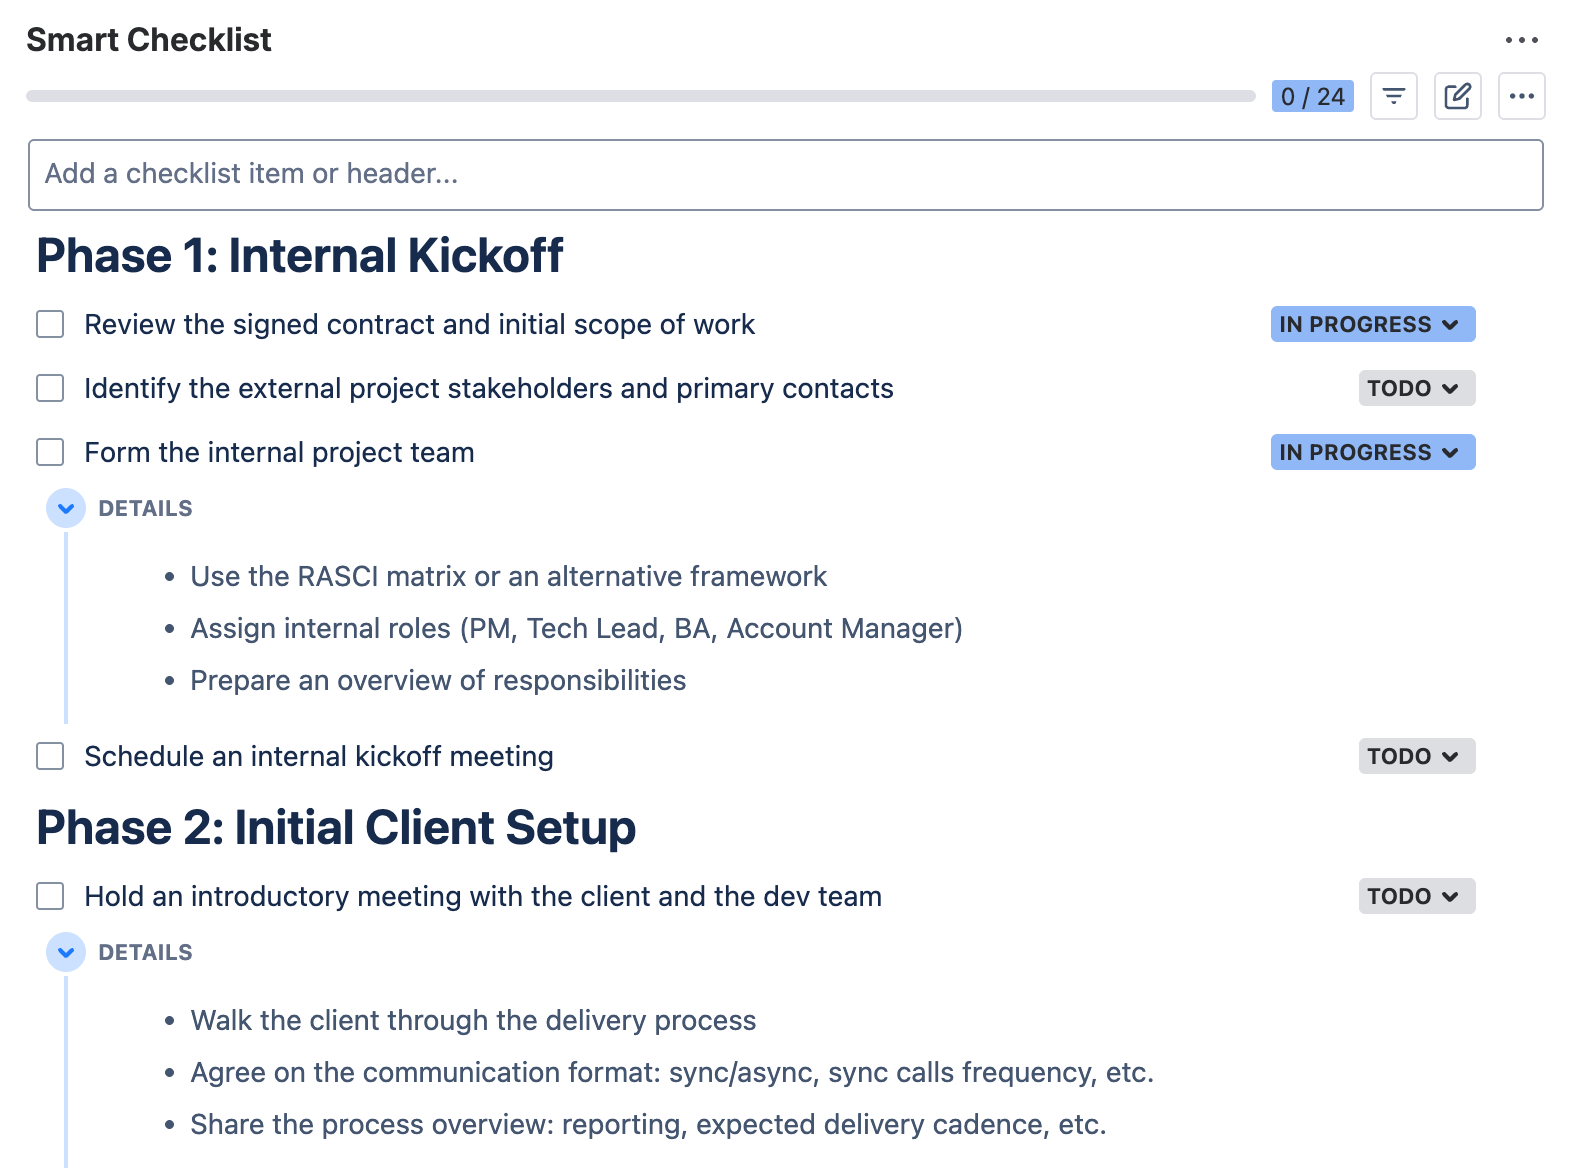
## Phase 1: Internal Kickoff
- Review the signed contract and initial scope of work
- Identify the external project stakeholders and primary contacts
- Form the internal project team
>* Use the RASCI matrix or an alternative framework
>* Assign internal roles (PM, Tech Lead, BA, Account Manager)
>* Prepare an overview of responsibilities
- Schedule an internal kickoff meeting
## Phase 2: Initial Client Setup
- Hold an introductory meeting with the client and the dev team
>* Walk the client through the delivery process
>* Agree on the communication format: synchronous or asynchronous, the frequency of calls, communication channels, etc.
>* Share the process overview: reporting, expected delivery cadence, etc.
- Create a Jira project and add team members (optional)
- Set up documentation space (optional)
> For example, Confluence or Google Drive
- Grant access to Jira, Slack, documentation, and other systems
## Phase 3: Requirements & Technical Setup
- Hold a discovery session
> Clarify goals, discuss pain points, and define the scope
> Use the BRIDGES framework or an alternative
- Gather or confirm business requirements
- Align on success metrics / KPIs and key deliverables
- Finalize the tech stack and integrations
- Set up development, staging, and production environments
- Confirm access to all tools and systems
## Phase 4: Planning & Roadmapping
- Align on the roadmap with the client’s team
- Break down the scope into epics and high-level tasks
- Create work item templates for recurring tasks and processes
>* Use Smart Templates by Titan Apps or an alternative
- Apply checklist templates to recurring tasks (e.g., sprint planning, QA)
>* Use Smart Checklist by Titan Apps or an alternative
- Align on the delivery timeline and milestones
## Phase 5: Post-Onboarding Review
- Conduct an internal retrospective on onboarding
- Review the checklist completion and blockers
- Capture the improvement ideas in Confluence
- Update the Jira templates if process changes occurred
- Mark onboarding as completed in Jira
Client Onboarding Checklist Split By Stage
For your convenience, here’s the checklist we provided above, split by onboarding phase.
Internal Kickoff
## Phase 1: Internal Kickoff
- Review the signed contract and initial scope of work
- Identify the external project stakeholders and primary contacts
- Form the internal project team
>* Use the RASCI matrix or an alternative framework
>* Assign internal roles (PM, Tech Lead, BA, Account Manager)
>* Prepare an overview of responsibilities
- Schedule an internal kickoff meeting
Initial Client Setup
## Phase 2: Initial Client Setup
- Hold an introductory meeting with the client and the dev team
>* Walk the client through the delivery process
>* Agree on the communication format: synchronous or asynchronous, the frequency of calls, communication channels, etc.
>* Share the process overview: reporting, expected delivery cadence, etc.
- Create a Jira project and add team members (optional)
- Set up documentation space (optional)
> For example, Confluence or Google Drive
- Grant access to Jira, Slack, documentation, and other systems
Requirements & Technical Setup
## Phase 3: Requirements & Technical Setup
- Hold a discovery session
> Clarify goals, discuss pain points, and define the scope
> Use the BRIDGES framework or an alternative
- Gather or confirm business requirements
- Align on success metrics / KPIs and key deliverables
- Finalize the tech stack and integrations
- Set up development, staging, and production environments
- Confirm access to all tools and systems
Planning & Roadmapping
## Phase 4: Planning & Roadmapping
- Align on the roadmap with the client’s team
- Break down the scope into epics and high-level tasks
- Create work item templates for recurring tasks and processes
>* Use Smart Templates by Titan Apps or an alternative
- Apply checklist templates to recurring tasks (e.g., sprint planning, QA)
>* Use Smart Checklist by Titan Apps or an alternative
- Align on the delivery timeline and milestones
Post-Onboarding Review
## Phase 5: Post-Onboarding Review
- Conduct an internal retrospective on onboarding
- Review the checklist completion and blockers
- Capture the improvement ideas in Confluence
- Update the Jira templates if process changes occurred
- Mark onboarding as completed in Jira
How to Add a Client Onboarding Checklist Template to Jira?
A well-prepared checklist can be reused multiple times. This helps you optimize time spent on recurring tasks and maintain consistency.
Smart Checklist allows you to turn your client onboarding checklist into a template. As a result, you will be able to add it to new Jira tasks in just a few clicks or even automatically.
In addition to client onboarding, this applies to other processes as well. For example, managing the Definition of Done, Acceptance Criteria, or Code Review process with the help of checklists.
Here are the step-by-step instructions:
- Install Smart Checklist for Jira from the Atlassian Marketplace.
- Copy the client onboarding checklist we shared earlier. Then, paste it into the Smart Checklist section of your work item.
- Adjust the template to fit your pipeline (optional). Add or remove steps, tag teammates and stakeholders, add due dates, and customize formatting using the Markdown editor.
- Save the checklist as a template. In the Smart Checklist menu, click the three dots (as shown in the screenshot below) and select Save as a template.
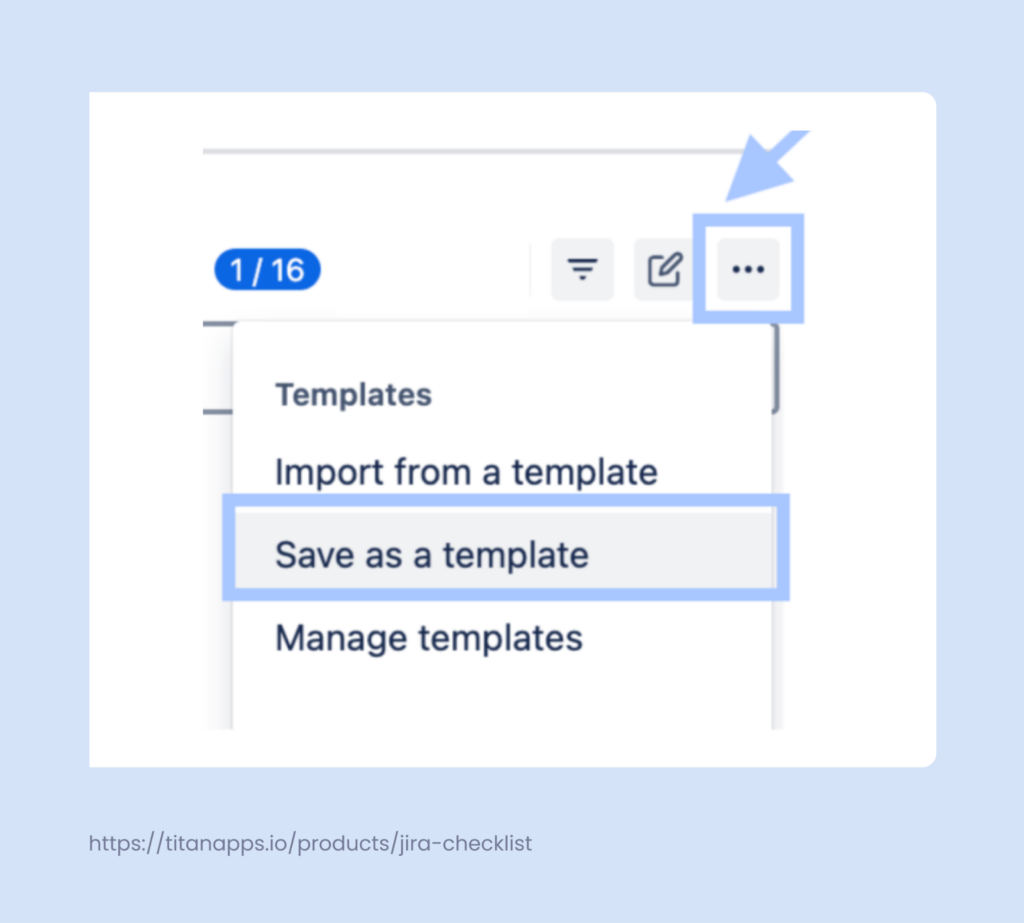
After this, you can easily import your checklist from the template you saved.
How to Automatically Add a Client Onboarding Checklist Template to Work Items?
If your organization works with dozens of clients, it can be useful to automatically add the onboarding checklist to your Jira tasks. Smart Checklist makes it easy to set up such automation. A saved checklist template can be auto-assigned to all work items of a specific type upon creation. Alternatively, this can be done based on various criteria.
For example, you can create a special label named “Client onboarding”. When this tag is added to a Jira work item, the client onboarding checklist will be automatically assigned to it.
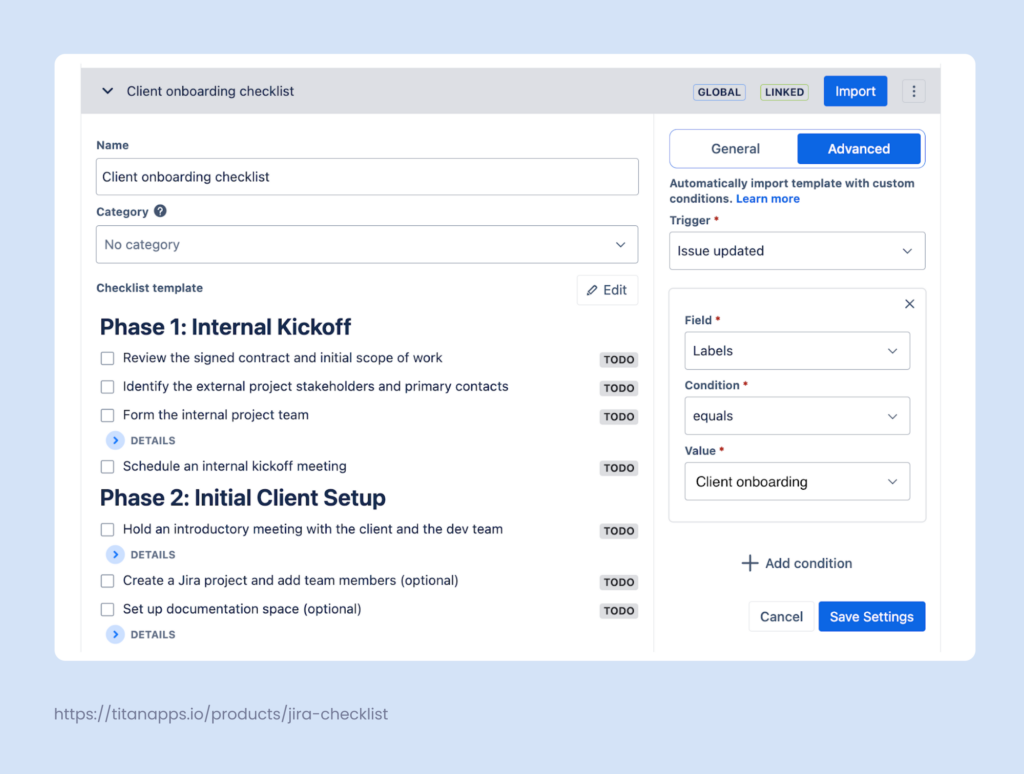
To configure this automation, open a work item with a smart checklist. Then, click the three-dot menu in the upper-right corner and select Manage Templates. Find your client onboarding checklist and expand it. In the Advanced Settings section, specify your conditions, then save the settings.
For more details, please see this Smart Checklist Automation guide in our knowledge base.
The Benefits of Setting Up a Client Onboarding Checklist With Smart Checklist
- Easy progress tracking. With custom workflow statuses for each step, it’s easy to see what is done, in progress, or planned. The statuses are visible to all team members and other stakeholders, which promotes transparency.
- Process standardization. The solution allows you to save your client onboarding checklist as a template and reuse it multiple times. As a result, the same process can be applied to all your clients, even by different teams. This improves scalability and ensures consistency.
- Enhanced customer retention. The client onboarding checklist helps you organize this process smoothly and create a positive collaboration experience from day one. This contributes to higher customer satisfaction and improved retention.
- Workflow automation. Smart Checklist helps you save time and optimize processes by automating tasks. Checklist templates can be auto-assigned to work items based on your custom conditions.

Beyond the Client Onboarding Checklist: More Tips for Smooth Collaboration With a New Client
Involve the right roles early
When you start working on the project, you may realize that it requires more team members than initially planned. In this case, it’s best to communicate this to the client and involve the people with additional roles as soon as possible. Sometimes, it may seem like a QA or even a Tech Lead can join in later, but that’s not an ideal situation. For a project to run smoothly, it’s crucial to have a complete team from the start. Then, you can move forward faster, set up processes correctly, and work on the project more effectively.
Example: A client brings ready designs created by a freelancer, but you quickly realize they don’t meet the requirements, so it’s better to prepare new ones. Discuss this with the client and suggest adding a designer to your team as early as possible.
Assign a clear owner for the onboarding process
New client onboarding can be run by people with different roles. Depending on the project, this can be a Product Manager or Product Lead, a Project Manager, a Delivery Manager, or a Tech Lead. It’s better to define in advance who will own this process and serve as the key decision-maker.
If this is not done, there can be ambiguity and conflicts of interest. For example, several people may think it’s their responsibility to decide on a specific step. Assigning a single owner to the process helps you avoid such situations and improve communication.
Discuss potential risks with the client
Every project has its risks. While some are hidden, others can be obvious from the start. Typically, it’s best to discuss them with the client early. You will need to align your approaches and decide on how you will act if such risks are already present or manifest themselves later.
For example, you need to improve an existing product but discover that it runs on outdated infrastructure, uses an outdated tech stack, or just isn’t scalable. If you built on this basis, you could only produce a compromise solution that wouldn’t last long.
In such a situation, it’s better to openly explain these risks to the client and suggest an alternative. For instance, they may prefer to invest in a more robust solution to update their systems and make them more future-proof.
Adopt Checklist Templates For Other Recurring Tasks
Client onboarding is not the only process that can benefit from implementing smart checklists. They are useful for a wide range of tasks that repeat periodically, as well as for listing standard criteria or requirements—for example, Acceptance Criteria.
Here are free templates for some common use cases:
- Definition of Done Template
- Definition of Ready Template
- Code Review Template
- Jira Feature Release Template
- Release Readiness Checklist
- Test plan template
Moreover, you can use Smart Checklist to create custom templates for various needs and streamline processes in your organization.