Jira
Jira monday.com


You know the drill: build a product roadmap in Jira, create your product backlog, review it, update the user stories, come up with a sprint goal before the meeting, and finally, review every story to decide which ones need to be completed this sprint.
Easier said than done, right?
Well-planned sprints are what make a great agile dev team even greater and more robust. The better you plan your work, the more likely you are to meet your goals and deliver results on time. In this article, we will explain how to make your sprint planning in Jira as agile as it gets.
But First, What Are Sprints and What Are Sprint Plannings For?
A sprint is a time-boxed period during which a “Done”, usable, and potentially releasable product increment is created. Typically, a sprint lasts between 2 and 4 weeks.
The next sprint starts immediately after the conclusion of the previous sprint. The goal of Jira sprint planning is to define what is crucial to shipping better software faster, minimizing the risk of unwanted surprises and ensuring code quality.
In practice, sprints also serve the purpose of aligning the development team with the PO (product owner). A sprint planning session creates a common ground for the team. This is where you can communicate the expectations and priorities, discuss concerns, and agree on next steps. How can you do this properly? To answer that question, let’s explore how to create a sprint in Jira in the first place.
How to Plan, Create, and Run a Really Agile Sprint in Jira Software?
Here’s a step-by-step guide, enhanced with pro tips, on how to create a truly agile Sprint that follows Jira best practices:
Jira Sprint Planning Meeting
Each upcoming Sprint needs to be filled with work items (Jira issues) that cover necessary stories and functionalities crucial to a successful release. That’s when the whole Agile Sprint planning process takes place.
The Scrum Team needs to meet and decide which tasks have to be completed during the sprint. It is important to plan your backlog according to your team’s velocity and capacity and target the workload to reach the Sprint Goal. Therefore, it’s necessary for the PO to refine the backlog before the Sprint Planning Meeting. Story Points in Jira work items (issues) will be of great help in this regard, as they allow you to evaluate the complexity of each story.
To streamline your work, we also recommend managing the Definition of Done in Jira. This acts like a contract between the Product Owner and the team. It clearly defines what the PO’s expectations are and what the team is supposed to deliver. You can even automate this process by applying the Definition of Done to stories automatically using a checklist template.
Additionally, remember to break work into smaller sub-tasks. Otherwise, instead of maintaining a steady pace on your burndown chart, you may observe huge drops in your sprint reports.
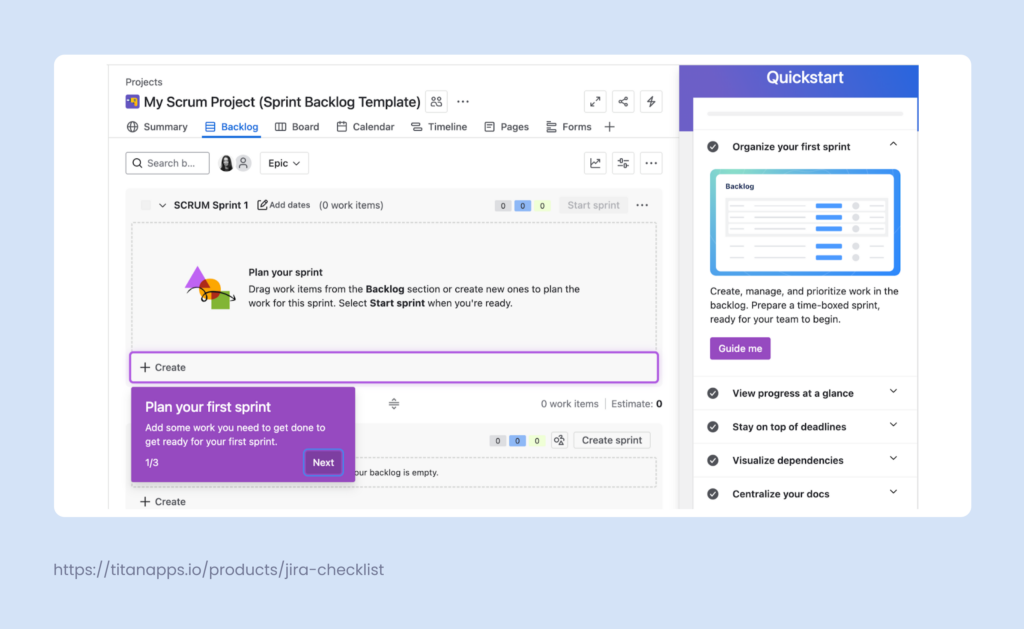
Create a Sprint in Jira
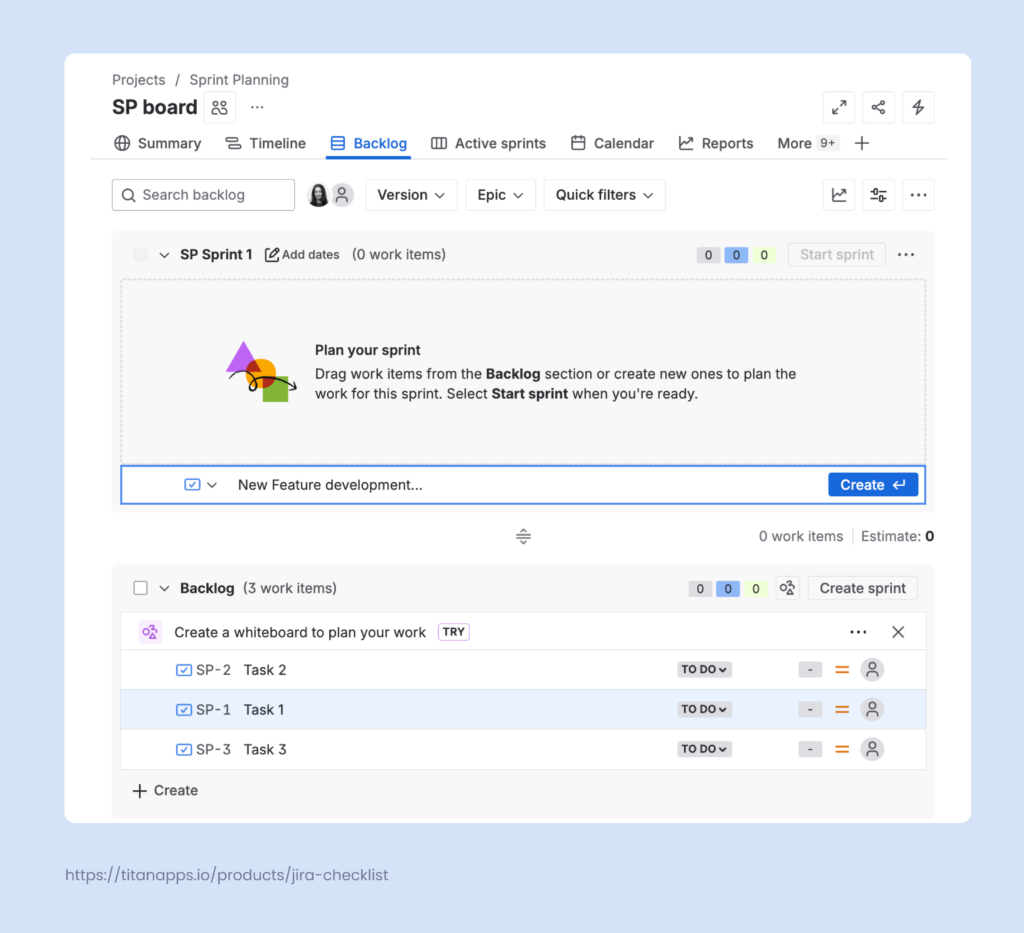
- In your scrum project in Jira, open the Backlog view. There, you will see a placeholder for your first sprint.
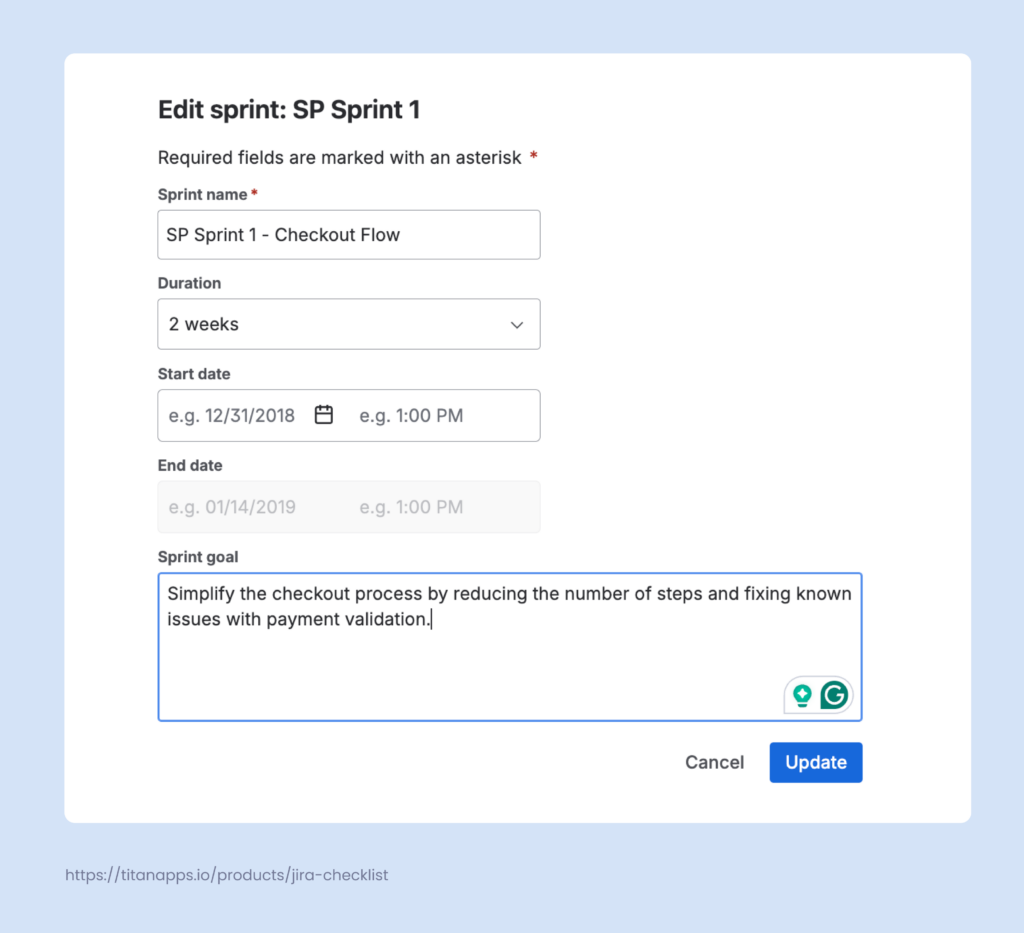
- Name your sprint and add the start date and the end date (optional).
- You can also select the sprint duration. This can be anywhere from 1 to 4 weeks or a custom duration.
- Add the sprint goal (optional). Here, you can briefly describe the primary focus of this sprint and what the end result should look like.
Add Work Items to Your New Sprint
This can be done from the Backlog view as well: simply drag and drop the backlog items you need into the sprint scope. You can add existing work items or create new ones and then include them in the current Sprint. Another option is to update the Sprint field directly on a work item view page.
Remember that one work item can’t be in more than one sprint at a time.
Unlike the Kanban board that supports a continuous flow of tasks, your Scrum board will only display the tickets from the active sprint. This setup helps the team to maintain focus and prioritize their work correctly.
Use Story Points to Make Your Jira Sprint Planning More Agile
Story points are used to estimate how much time a task will take. When estimating, the scrum team takes into account task difficulty, size, and complexity.
For example, “Publish 50 landing pages” isn’t a complex task, but as there are a lot of landing pages, the task is large and can require significant time. Conversely, a task like “Fix the checkout bug” may be small, but it’s complex, so it will also require significant time. By examining various aspects of each task, your team can determine how long it will take to complete it.
A task that requires less than two hours is a one-story-point task. Three story points correspond to 1-2 days, while 21 story points correspond to a full sprint. As an alternative to this system, some teams use the T-shirt size scale. The XS size corresponds to 1 story point, S – two, and so on. You can select the scale that your team feels most comfortable with.
Here is an estimation comparison table:
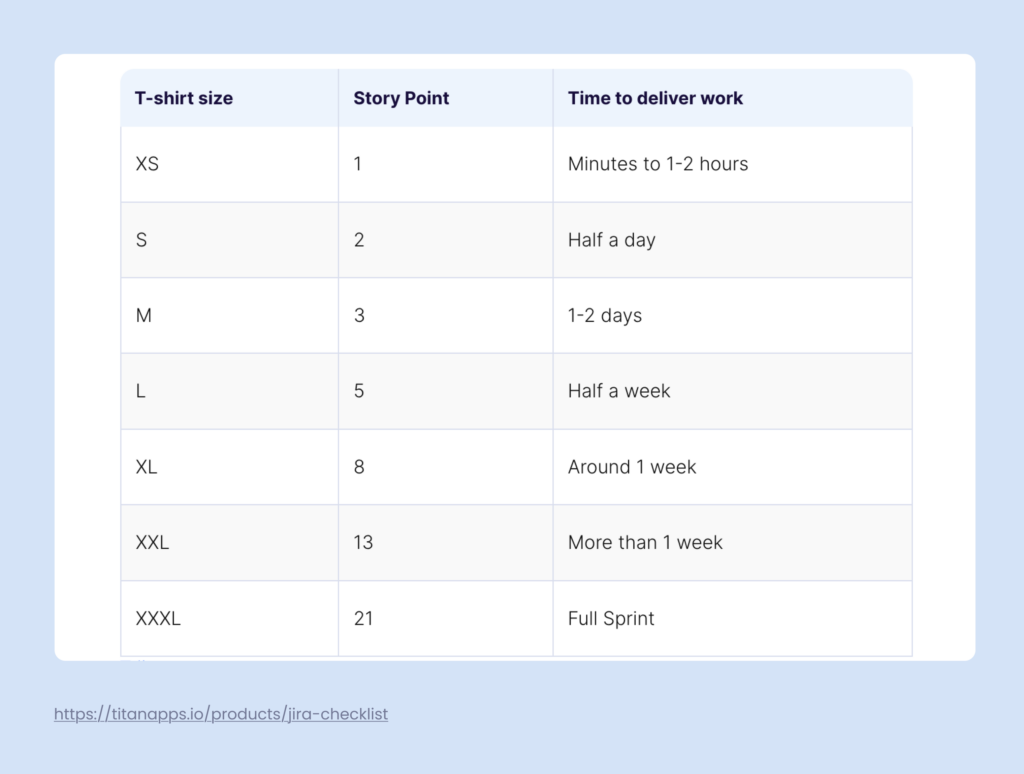
Jira work items have a special field, Story points, where you can enter this information. Using estimations allows you to plan work more effectively and set realistic goals for the sprint scope.
Set the Ticket Prioritization Levels
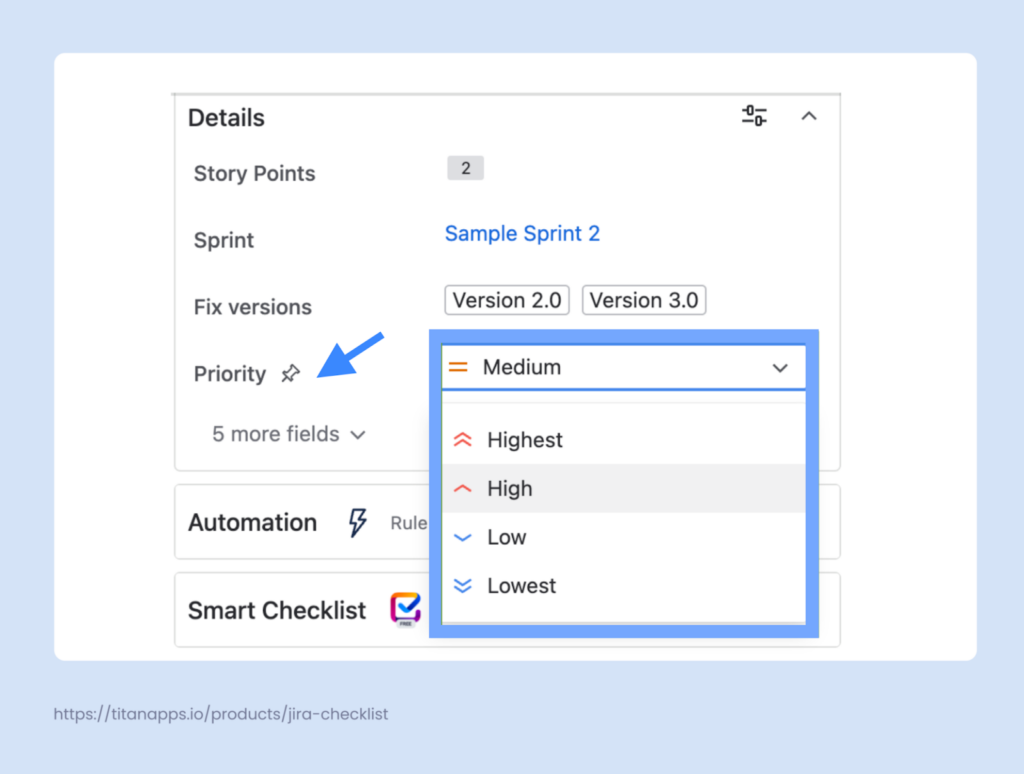
Another important element of Jira sprint planning is ticket prioritization. Jira’s default priority levels are: Highest, High, Medium, Low, and Lowest. You can set the priority in the work item view tab or on most other tabs that list work items, such as Backlog or Active Sprints.
Each level has a designated pictogram, enabling your team to quickly identify the most important tasks on your Jira board. Additionally, the board can be configured to display the highest-priority tickets first and the lowest-priority tickets last.
Jira doesn’t limit you to the default priority levels: you can use the same field for your custom priorities. For instance, consider the MoSCoW framework, which categorizes tasks as Must Have, Should Have, Could Have, and Won’t Have.
Task prioritization is an essential part of agile project management. It helps your team maintain focus and plan individual workloads according to the sprint goals.
Let the Sprint Begin
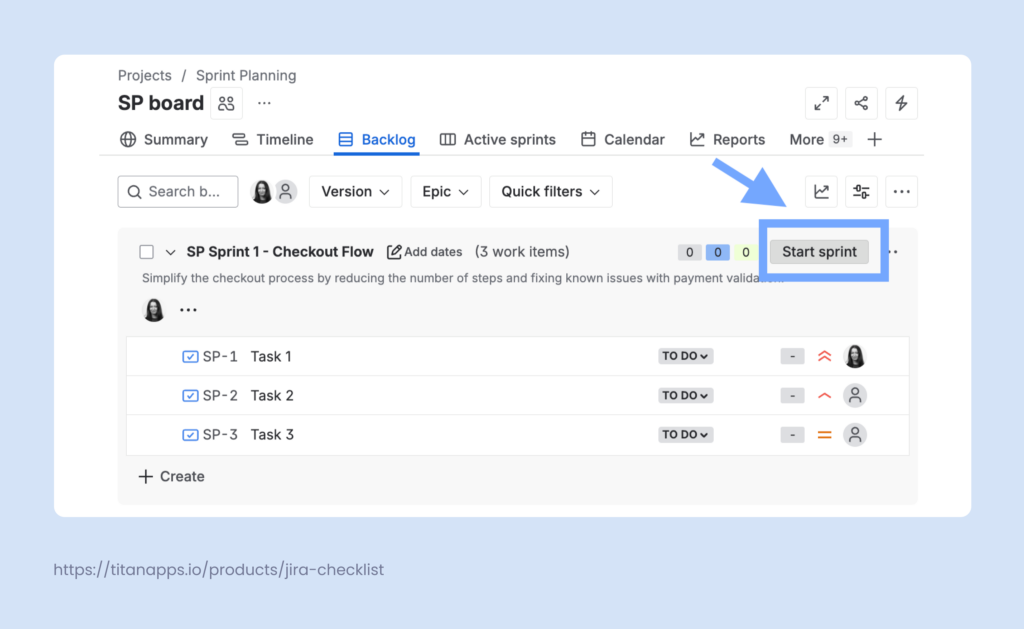
You can start your sprint as soon as everything is planned out and you’re done adding work for your team. Simply go to your Backlog in Jira, find your planned sprint, and click Start Sprint.
Keep Track of Your Team’s Progress
By all means, starting a sprint is not where your work ends. If you are a Scrum Master, Project Manager, or Product Owner, you will most likely want (and need) to track the progress of your team’s work.
The best way to monitor progress is to run daily scrum meetings – stand-ups. They will provide your team with a shared space for catching up, discussing next steps, and coordinating group effort. They also help resolve blockers and align dependencies, allowing the team to be proactive through communication.
You may also want to pay attention to how much time your team devotes to their tasks, whether they complete them too early, and whether they miss their deadlines.
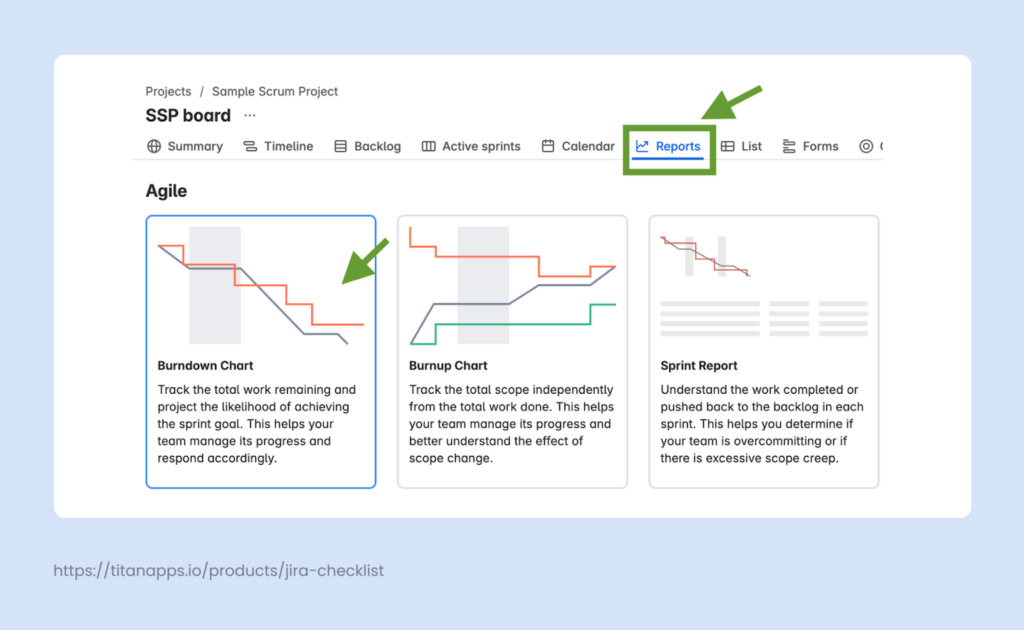
Check the Reports tab of your scrum project for detailed information about team velocity and sprint progress. There, you will find reports such as the Burndown chart, Burnup chart, Sprint report, and others.
In addition to Jira’s native reporting, you can set up a more insight-rich solution with the Smart Productivity & Team Activity Dashboard by Titan Apps. This tool gathers data not only from Jira but also from Confluence and GitHub, and visualizes it in a single view in near real-time. This allows you to track key productivity metrics and individual and team performance.
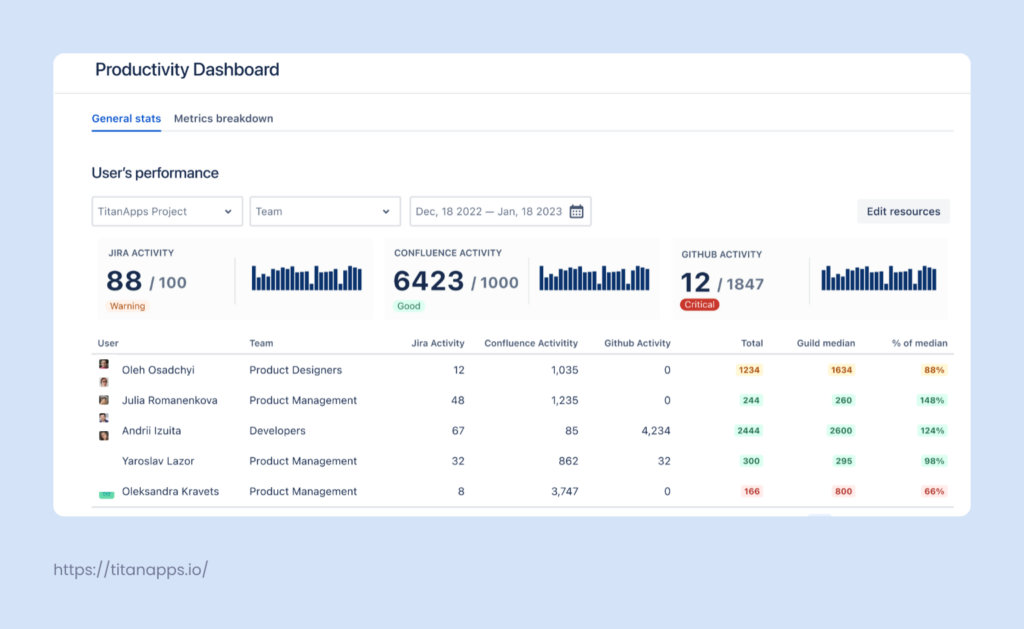
In this dashboard, you can find valuable information, such as:
- The number of work items created and closed by assignees
- The number of commits and pull request data
- Productivity medians by team
- Individual results by project, sprint, epic, and work item type
- The correlation between individual results and the median for the person’s role
All of this is crucial for better understanding team capacity and velocity and preventing bottlenecks.
Pro Tip: Add Smart Checklists to Your Tasks
It’s possible to track progress even more closely. If your team is working on a high-priority task involving multiple steps, you can use Smart Checklist for Jira. It allows you to create feature-rich checklists directly in your Jira work items. Then, you will be able to view progress step by step. This improves transparency and helps your team be more aligned.
With Smart Checklist, you can set custom workflow statuses for each step, tag responsible teammates, add deadlines, include links to useful resources, add extra details in expandable fields, use headers, and more.
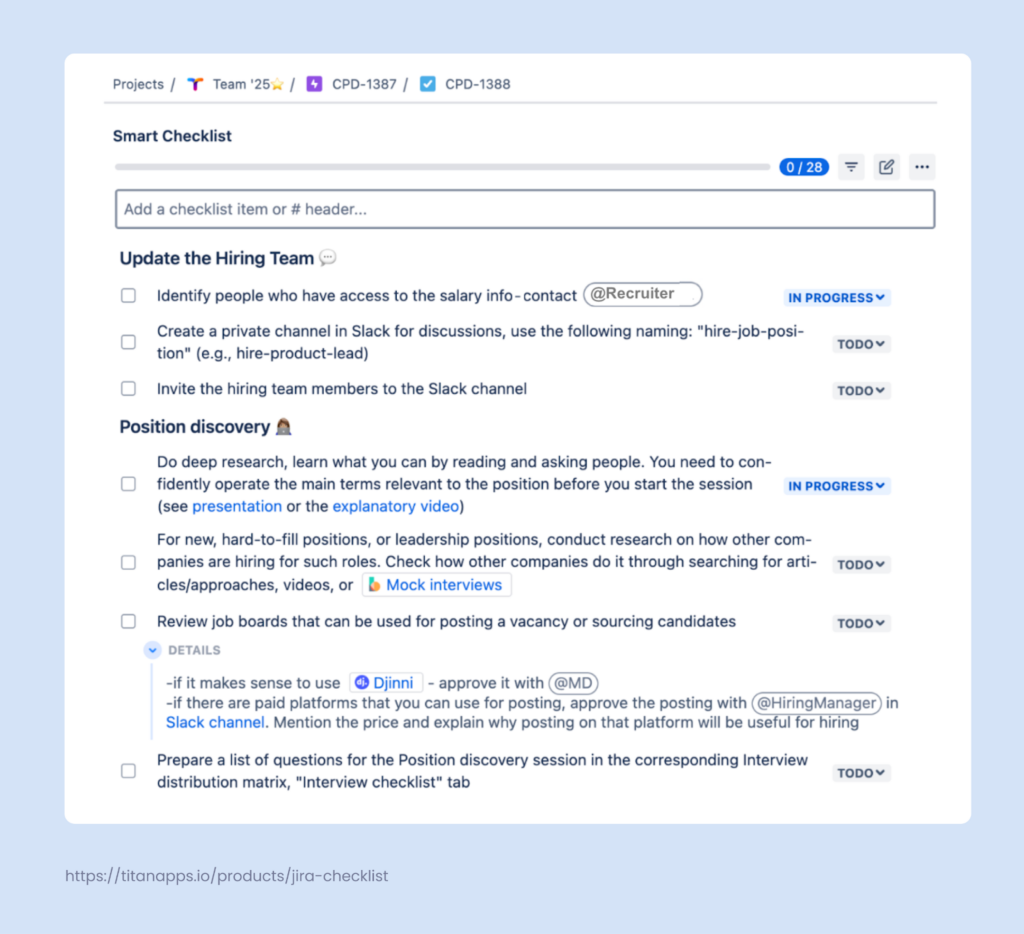
More importantly, Smart Checklist enables you to create reusable checklist templates. This is very helpful for recurring tasks and processes. You can describe the step-by-step flow once and then reuse it multiple times, saving time and promoting consistency.
Here’s an example of such a checklist template for the hiring process. It outlines the necessary steps in granular detail, with all the relevant links and additional information. When the organization needs to launch the hiring process for a new position, the hiring team can simply reuse this plan in a new work item.
Here’s another example: a pre-production readiness checklist. It covers the key steps that help you check if everything is ready for a release. Thanks to such a checklist template, you can be certain that nothing is missing.
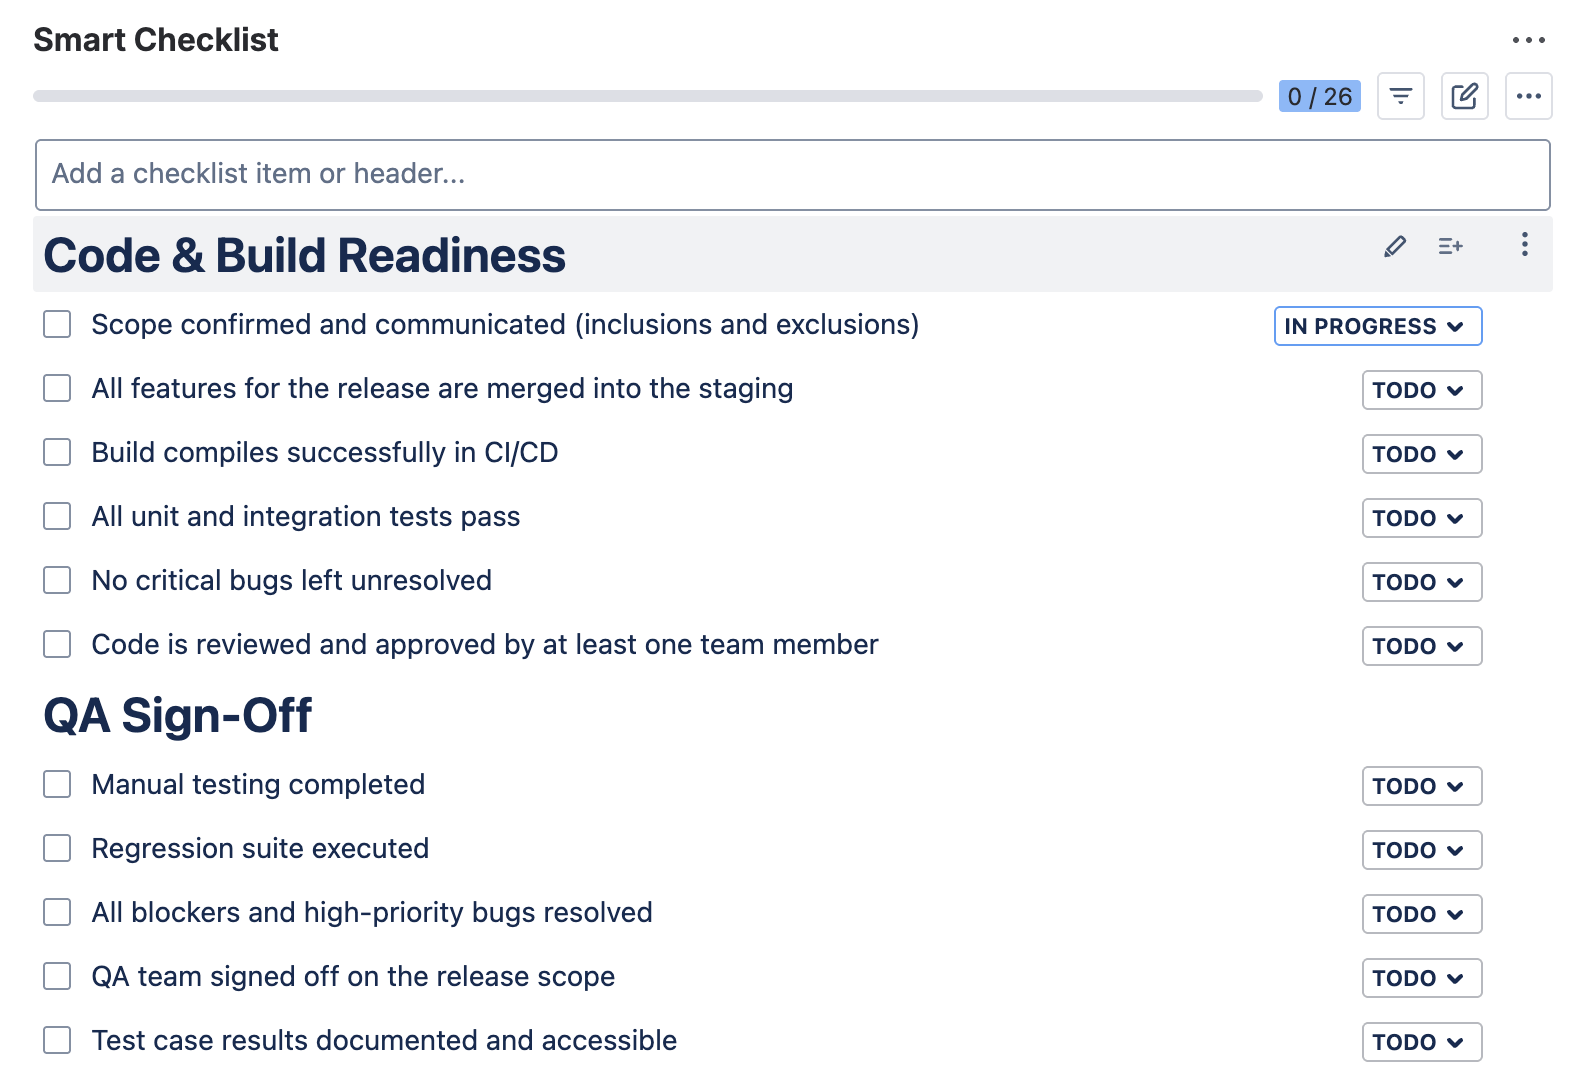
## Code & Build Readiness
- Scope confirmed and communicated (inclusions and exclusions)
- All features for the release are merged into the staging
- Build compiles successfully in CI/CD
- All unit and integration tests pass
- No critical bugs left unresolved
- Code is reviewed and approved by at least one team member
## QA Sign-Off
- Manual testing completed
- Regression suite executed
- All blockers and high-priority bugs resolved
- QA team signed off on the release scope
- Test case results documented and accessible
## Configuration & Dependencies
- Environment variables are configured correctly in the staging/production environment
- Database migrations prepared and reviewed
- Feature flags toggled as planned
- 3rd-party services and integrations tested
- Access credentials and API keys verified
## Documentation & Communication
- User documentation updated (if applicable)
- Release notes written and reviewed
- Support and customer-facing teams were informed and had a demo
- JIRA ticket links and relevant Confluence pages included in the release issue
## Rollout & Monitoring
- Rollback plan documented and accessible
- Monitoring and alerting set up for new features
- Logging reviewed for any changes in coverage
- Materials to notify the customers about the release are ready (for new features / major updates)
- Post-release validation tasks prepared
- On-call team notified of release timeline
Smart Checklist can be useful for many other agile processes and tasks that involve multiple steps or contain standard criteria. To start using checklist templates, install Smart Checklist for Jira from the Atlassian Marketplace.

Close a Completed Sprint
So, two weeks have passed, and you have reached the end of your Sprint. Now, it’s time to close it.
- Go to your Active sprints in your Jira Scrum board.
- If you have many active sprints, you will need to find the one you want to close.
- Select your sprint and click the Complete Sprint button.
- If there are any work items that are not done yet, they can be moved back to the Backlog or a new sprint.
After closing a sprint, run a sprint retrospective meeting with the team. Such meetings, also known as retros, are great opportunities for scrum teams to evaluate their work and create a plan for what to improve in future sprints.
Are There Any Templates for Jira Sprint Planning?
Getting ready for sprints can feel tricky at first. Therefore, it’s natural to seek tools that can assist you with this, such as checklists and Jira templates.
The native options range from a simple Confluence document to a whole pre-configured project setup. In addition, there are some third-party options. They can come in various forms and shapes, reflecting different approaches to the Jira sprint planning process. The examples vary from an Excel file listing the preparation steps to a Miro board that integrates with Jira.
You can also prepare a Jira Sprint Planning template with the help of Smart Checklist for Jira. It allows you to create a structured plan of all the things you need to check and arrange, and ensure that nothing is missing. This can be valuable if you are new to the process or haven’t worked with agile frameworks before.
Now, let’s have a closer look at the available native options. Strictly speaking, they don’t really help you plan the sprint itself. But they provide you with a structure for a sprint planning meeting and enable you to set up a Scrum project from scratch. Here’s what Jira offers you:
- A Confluence template for a Sprint planning meeting. This is a document containing several tables for you to fill out before and during the meeting. They include such blocks as Sprint team members, Previous sprint summary, Agenda, and so on.
- A Confluence template for a Sprint retrospective meeting is a simple half-page document. It offers you a table to fill out with suggestions for the Start doing, Stop doing, and Keep doing categories, as well as the Action items section.
- A Jira project template for a Sprint backlog. This is a version of a regular Scrum project template that differs only slightly from it. Once you set it up, it offers you a convenient walkthrough for the Jira sprint planning process.
What Other Templates Should an Agile Team Use?
Along with the Jira sprint planning template, it’s helpful to implement other checklist templates. For example, the Definition of Done and Definition of Ready templates are among the most useful ones for a software development team’s work. Consider adding them to your toolbox. They help you improve team collaboration, align expectations, and minimize back-and-forth.
Another handy template is a Code Review checklist. For more about using these and other templates offered by Smart Checklist, please see our article How You Can Implement Agile in Jira.
Definition of Done Template
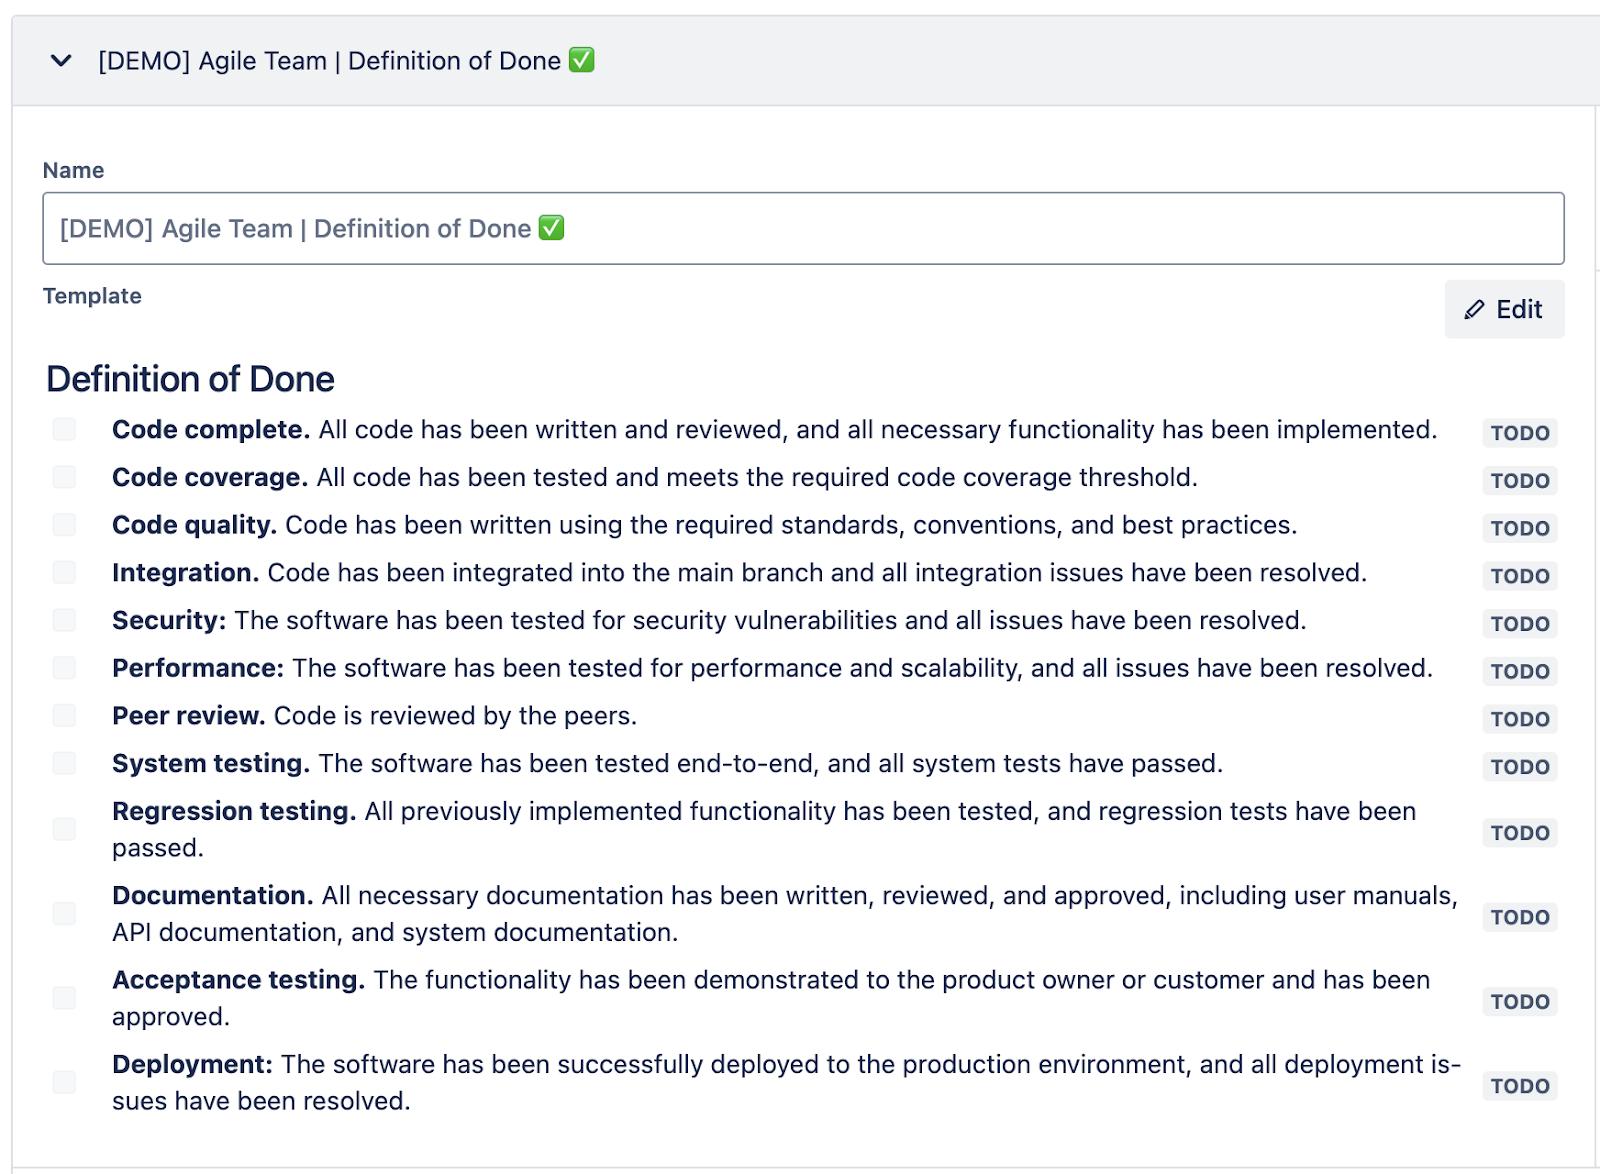
## Definition of Done
- **Code complete.** All code has been written and reviewed, and all necessary functionality has been implemented.
- **Code coverage.** All code has been tested and meets the required code coverage threshold.
- **Code quality.** Code has been written using the required standards, conventions, and best practices.
- **Integration.** Code has been integrated into the main branch, and all integration issues have been resolved.
- **Security:** The software has been tested for security vulnerabilities, and all issues have been resolved.
- **Performance:** The software has been tested for performance and scalability, and all issues have been resolved.
- **Peer review.** The code is reviewed by the peers.
- **System testing.** The software has been tested end-to-end, and all system tests have passed.
- **Regression testing.** All previously implemented functionality has been tested, and regression tests have been passed.
- **Documentation.** All necessary documentation has been written, reviewed, and approved, including user manuals, API documentation, and system documentation.
- **Acceptance testing.** The functionality has been demonstrated to the product owner or customer and has been approved.
- **Deployment:** The software has been successfully deployed to the production environment, and all deployment issues have been resolved.
Definition of Ready Template

## Definition of Ready
- **Clear description.** The work item has a well-defined goal, purpose, and expected outcome.
- **Acceptance criteria.** Clear and testable acceptance criteria have been defined and agreed upon.
- **Dependencies identified.** All external dependencies (technical, business, or cross-team) have been documented and addressed.
- **Design and scope.** Required mockups, wireframes, or business rules are attached or linked.
- **Feasibility check.** The team has confirmed the work item is feasible within the planned timeframe.
- **Estimation.** The effort has been estimated using the agreed method (e.g., story points).
- **No blockers.** No unresolved issues are preventing the team from starting work.
- **Stakeholder alignment.** All relevant stakeholders have reviewed and approved the item.
- **Priority set.** The item is prioritized appropriately in the backlog.
- **Linked items.** Related epics, tasks, or subtasks are linked for context.
- **Team understanding.** The team agrees on the scope and is confident they can start work.
Code Review Template
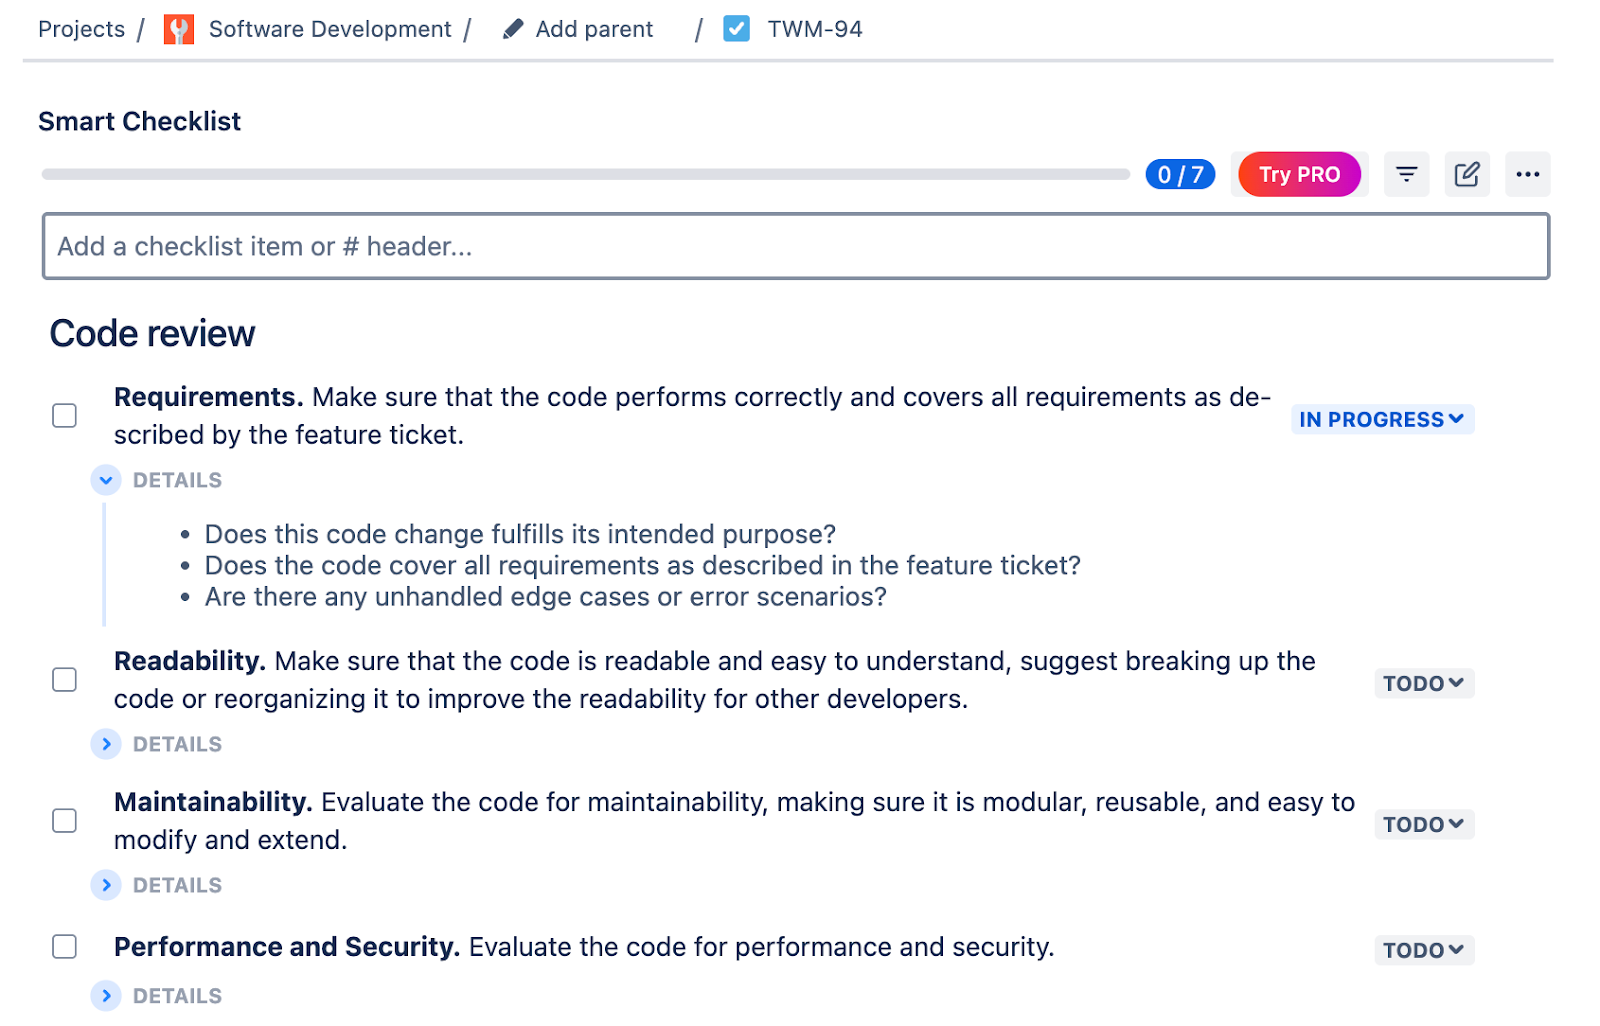
## Code review
- **Requirements.** Ensure that the code performs correctly and covers all requirements as described in the feature ticket.
> * Does this code change fulfill its intended purpose?
> * Does the code cover all requirements as described in the feature ticket?
> * Are there any unhandled edge cases or error scenarios?
- **Readability.** Make sure that the code is readable and easy to understand, suggest breaking up the code or reorganizing it to improve the readability for other developers.
> * Is the code easy to understand?
> * Are variable names and function names clear and descriptive?
- **Maintainability.** Evaluate the code for maintainability, making sure it is modular, reusable, and easy to modify and extend.
> * [DRY principle.](https://en.wikipedia.org/wiki/Don%27t_repeat_yourself) Are there any duplicated sections of code that could be consolidated into reusable functions or classes?
> * Will this change add undesirable compile-time or run-time dependencies?
> * Are there any best practices, design patterns, or language-specific patterns that could enhance the code significantly?
> * Does this code follow the single responsibility principle?
- **Performance and Security.** Evaluate the code for performance and security.
> * Will this code change negatively impact system performance?
> * Is there a way to significantly improve the code’s performance?
> * Are sensitive data such as user data and credit card information being securely handled and stored?
- **Testability.** Evaluate the code for testability, ensuring that it can be easily tested and that any necessary unit tests or integration tests have been written.
> * Is the code testable?
> * Do the existing tests reasonably cover the code change?
> * Are there any other essential unit, integration, or system tests that should be added?
- **Documentation.** Verify that the code includes appropriate documentation, ensuring that it is clear, concise, and up to date.
> * Does the code include appropriate documentation?
> * Is the documentation clear, concise, and up-to-date?
- **DevOps**. Verify that all the steps needed to be done after the PR deploy are described.
> * Are there any risks related to the deployment of this PR in terms of production operation?
To start using checklist templates, install Smart Checklist for Jira and save the copied checklist as a template.
The Benefits of Using Smart Checklist for Jira Sprint Planning and Beyond
Greater efficiency and consistency
Instead of reinventing the process each time, you follow a clear, thought-through, and agreed-upon structure.
No missed steps
With a reusable checklist, nothing falls through the cracks. From reviewing velocity to setting the sprint goal and confirming task readiness, everything proceeds according to plan.
Faster onboarding
New team members can easily join your sprint routines, and new product managers can adapt more quickly to your organization’s practices.
Easier continuous improvement
When the planning steps are documented, it’s easier to revisit and tweak the process based on retrospectives or team feedback.
Update Your Jira Sprint Planning Routine as Your Team Learns and Improves
As we mentioned at the beginning of this article, a well-planned sprint is the backbone of every Agile team, enabling it to function like a well-oiled machine. After all, delivering great products is also about being perfectly organized.
It’s important to note that continuous improvement is an essential part of all agile methodologies. The sprint planning process can also be iteratively enhanced. Review it periodically with your team to determine how to make it more effective.
What worked well this sprint becomes the default for the next one, and what can be improved is adjusted to your team’s evolving needs. As a result, you will be able to streamline this part of the project management process and make it more relevant to the current requirements.
We hope this article about Jira sprint planning has been useful to you!
For more on this topic, have a look at our article How to Plan a Product Release in Jira.