Jira
Jira monday.com
Project planning is a critical aspect of ensuring the success of a project. Jira is a powerful tool that can help project managers and teams define their goals, identify risks and dependencies, and create comprehensive roadmaps to keep their projects on track. In this article, we’ll explore how Jira’s roadmaps functionality can be leveraged to translate project plans into actionable tasks, prioritize work, and visualize the progress of a project.
We’ll cover the key steps involved in project planning in Jira, including defining the goals of a project, determining risks and dependencies, and creating a roadmap that accurately reflects the project plan.
Whether you’re new to Jira or an experienced user, this article will provide valuable insights into how to make the most of Jira’s project planning capabilities.
Project planning in Jira starts… outside of Jira?
The initial phase of any project usually involves gaining a comprehensive understanding of its purpose and objectives. This includes answering questions such as “What is the need for this project?” “What are the desired outcomes?” and “How will we measure the success of the project?”
Once the project objectives are clearly defined, the next step is to secure organizational support and bring together the team responsible for executing the project. Then the project’s requirements are gathered in detail, either through a formal specification process or by creating a product backlog.
While the methodologies for executing the project may vary, we’d suggest starting by clearly understanding the following:
- The stakeholders and the target audience
- What the project is hoping to accomplish as well as some metrics for success
- At least a general understanding of the architecture and tech stack
- What already exists, both in terms of existing work and in terms of competitors
These insights will help you identify your objectives, blockers, and risks. From here, it becomes easier to structure the solution in a way that addresses them all. Sometimes addressing them means developing a feature, sometimes it means a process or a workaround, and sometimes it can even mean the decision to live with the problem for the time being.
Prioritization and identification of risks using BRIDGeS
Here at Railsware, we use a methodology called the BRIDGeS framework. It is a solid approach for multi-context analysis that leads to a conclusive decision or solution.
The project planning process using BRIDGeS can take anywhere from 2 to 16 hours, depending on the complexity of the context. The four stages are:
- Problem Description: Conduct a brainstorming session to identify key subjects and their descriptors. Ensure that all team members have a thorough understanding of the context before moving forward.
- Prioritization Exercise: Prioritize benefits, risks, and issues to focus on the most important tasks during the Solution Stage. This will prevent time wastage on less critical tasks.
- Solution Variations: Generate potential high-level solutions that address the benefits, risks, and issues identified in the Problem Space.
- Solution Breakdown: Break down the high-level solution into smaller, manageable tasks, or “epics.” This will create a roadmap for implementation and make it easier to track progress.
What do we get as a result of a BRIDGeS session?
A complete roadmap for implementation that is comprised of ready-to-use Epics containing prioritized tasks.
Remember: Risks and blockers are a part of your backlog
It’s important to understand that blockers and risks are usually just backlog items, except they don’t know it yet ?. Levity aside, the goal in addressing blockers and risks is to convert them into scope that can then be prioritized, refined, and implemented (or even discarded). At the end of the day, we want to know how much time and attention we allocate to each.
If something blocks our project from being launched, we are interested in whether there is a different approach or workaround to address it. If not, then we can cancel the project, pack up and go home. But in my experience, that is rarely the case. Once the solution or workaround has been defined, it can be prioritized along with the rest of the scope. Of course, unlike some items in the scope, the items related to the bottleneck will be marked as “must” (as opposed to “should”, “could” or “won’t”).
Risks require a more nuanced approach. Firstly, we are interested in their likelihood, severity, and addressability. This helps with prioritization but also helps decide which risks to address. For each risk, there may be one or more mitigation strategies available (and for some there may be none). The choice of mitigation strategy and its priority in the backlog will depend on how likely the risk is to materialize, and what the consequences are if it does.
Mapping out a new project in Confluence
Atlassian offers a nice Project Plan Template for Confluence. It’s perfect for putting together the scope you’ve worked on, identifying key Jira users, and drafting a timeline that will later become the roadmap for project tasks in Jira.
The first step of filling this document helps with resource management and team composition planning as you will be mentioning the driver for the project, approvers, contributors or assignees, and stakeholders. You’ll also have the objective, key outcomes, and the status of the project visible at a glance.
The scope section is designed for identifying what needs to be done. You can also reference your lower priority tasks as well as some objectives that would be nice to complete but aren’t necessary to the project’s success. The prioritization excursive we did before with BRIDGeS should be of great help.
The next section of the Project Plan Template is the timeline for work management. It serves as a nice visual representation of the tasks and schedule of your software development team.
Lastly, you’ll need to break down your work into milestones. You can set due dates for each milestone and they can serve as a backbone for diving deeper into Sprint planning down the line.
Overall, this template is a great reference doc for keeping the project team and the stakeholders on the same page without necessarily forcing the latter to dig deep into the Jira project.
Why are these steps important before using Jira?
Jira is an excellent tool for structuring data and putting together an actionable implementation plan. That said, it is not a magic wand. It won’t function the way you wanted it to unless your input is good, hence the necessity for the abovementioned steps.
Migrating the work you’ve broken down into Jira
Note 1: Guide for working with roadmaps in Jira
We have a detailed guide to working with roadmaps in Jira on our blog. Feel free to check it out if you’d like to explore this subject deeper.
Note 2: Levels of hierarchy in Jira
Jira does not have any additional levels of hierarchy outside Epics and Issues out of the box. You can use Jira Themes and Initiatives to access them. However, this functionality is limited to Jira Premium or third-party add-ons from the Atlassian Marketplace. We will be focusing on Epics and Child Issues in this article.
Note 3: Jira settings for this example
From here on out, I will be using a company-managed, cloud-based Jira project as an example. The concept will not change if you are using a different Jira instance, however, the interface and certain navigation elements may differ.
For starters, we’ll need a new Jira project. Creating one isn’t particularly challenging, but there are two tricky choices you’ll need to think twice about. The very first thing Atlassian will ask is whether you’d like a Scrum board or a Kanban board for your project. You can also opt for alternative project templates but these two are the closest thing to the default options for Jira.
The choice between Scrum and Kanban is a bit tricky as neither is better than the other. Kanban emphasizes nimbleness and adaptability through a continuously improving workflow. Both boards represented work with cards and both have customizable columns for task management: “to do”, “In progress”, “Done” or any other variation that fits within your process. The movement of cards through these columns is known as a Jira workflow.
The key difference between Kanban and Scrum lies in the process of prioritization and selection of work that needs to be done. Kanban boards have a single backlog of tasks and you select which ones go to the board based on their priority. A Scrum board will have a Sprint backlog in addition to the “main” backlog. You’ll be selecting the work that needs to be done during a single Sprint out of the entire pool. Please take a look at this guide if you’d like to know more about creating and managing Sprints.
The second choice you’ll need to make is a between team-managed or a company-managed Jira project.
- Team-managed projects have simplified configuration. They are much faster to set up and are a better fit for an autonomous team as most things can be done by a Project Admin rather than the Jira Admin. The settings of a team-managed project do not affect other projects. You can also manage permissions more easily.
- Company-managed projects offer access to all of Jira’s functionality. They allow for issues from other projects to be shown at the board and open access to more comprehensive agile reporting. Company-managed projects also allow sharing of certain settings like workflows or automations across multiple projects.
Once you have chosen your preferred setup, you’ll be prompted to create a project. Give it a name, configure the remaining details, and you are all set.
Figuring out Jira’s project management software capabilities
Jira can seem overwhelming at first glance, but there are only three core elements you need to effectively transition your roadmap and project plan into the platform: Epics, Child Issues, and Dependencies. Luckily, we already have these figured out from the pre-Jira BRIDGeS session and written down in Confluence.
- Epic: An Epic is a significant body of work that can be broken down into smaller tasks. For instance, creating a landing page for an e-commerce platform would be considered an Epic. You probably have your own way of grouping up tasks, be it features, product areas, etc. Regardless, these clusters will become your Epics in Jira. Keep in mind that every Epic will be visualized as a separate bar on the roadmap.
- Child Issue: Child Issues or Jira issues are the smaller tasks that make up an Epic. These are the user stories that you need to cover to release a functional feature. Normally you’ll use the “story” issue type for them in Jira. Complex issues might have subtasks of their own or you can opt to break down the work through a checklist inside the issue.
- Dependency: Dependencies are used to visualize if some work is blocked and show the order you’ll need to follow in order to successfully deliver results. For example, you can’t implement a payment system without first choosing one, and you can’t add content until the layout of the page is finalized. These are direct dependencies where one Epic (or task) blocks the progress of another.
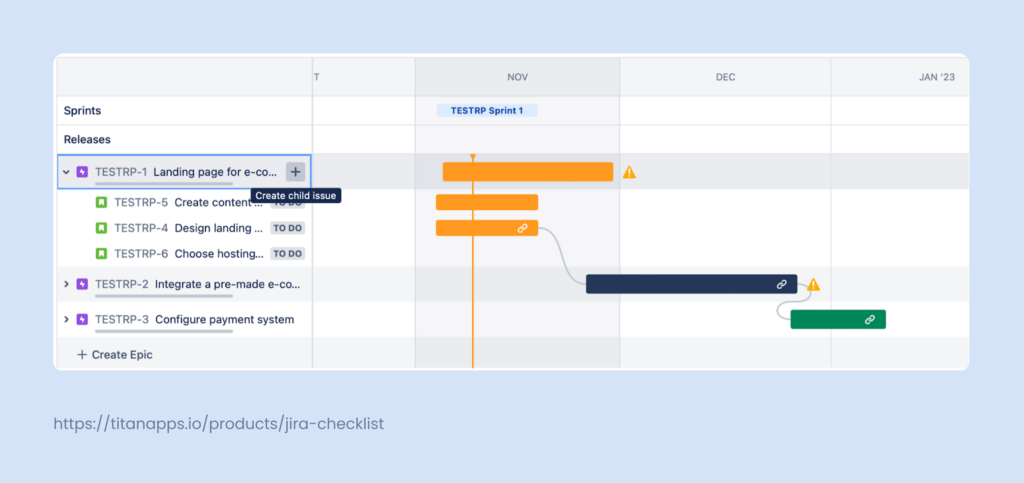
With a broken-down plan of activities at hand, and a good understanding of what goes where in terms of task hierarchy, you can start building up an actionable roadmap in Jira.
Open the Roadmaps interface from your Jira project.
From there, you will create your very first Epic. This shouldn’t be too complicated since you know what goes inside it as well as the associated Child issues. Simply select your Epic and click on the + icon to add them.
You can assign the start and end date to the Epics from within the Epic details or you can simply drag-and-drop the bars associated with the Epics.

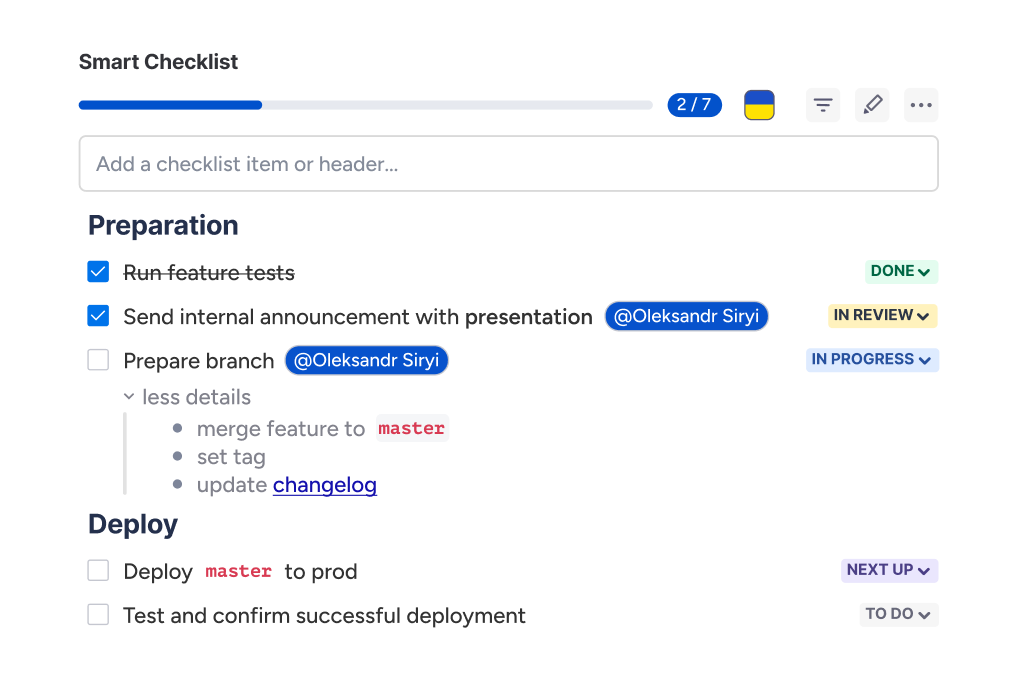
Pro tip: You can use Smart Checklist to refine your requirements through a more detailed decomposition of tasks. Checklists are also helpful when you have some research items as you will have a list of items that specifies the things you wanted to check.
Dependencies
The last thing that’s left is to visualize the dependencies. This functionality is used to show whether a task is blocked by a different task or not. Thanks to your efforts during the initial planning stage you already have a prioritized, refined scope and shouldn’t have any issues while visualizing dependencies.
You can set up your dependencies via drag-&-drop on the roadmap directly, or you can link your issues from within the issue view. You’ll need to open an issue and click on the button with two links. Then select the “link issue” option and link your issues.

Gantt charts VS roadmaps
Anyone familiar with a Gantt chart will immediately find the resemblance in the Jira roadmap. That being said, they have their differences.
A Gantt chart is essentially a much more detailed version of the roadmap. Building one will require more information input. For instance, you will need to account for:
- Estimates
- Team/resources
- Vacations
- Etc.
The payoff is a lot more data you can use in project planning. For instance, you will be able to manage resources and handle allocation planning much more simply.
A roadmap, on the other hand, is a high-level plan that is meant to be communicated as such. It is a less defined, less detailed version of a Gantt chart. It serves as a loose prediction and there’s no commitment to following it in detail.
I know that this statement sounds like Gantt charts are plain better than Roadmaps. We’ve all been told that putting in more effort will yield better results when we were kids after all. In this case, however, this statement is false.
Gantt charts were quite popular during the times when projects were built upon the waterfall model. Nowadays, when development and project management are much more lean and agile, the added complexity of a Gantt chart makes it less flexible when there’s a need to respond to change.
We can gain some insights by looking at the 4 principles of the Agile Manifesto
- Individuals and interactions over processes and tools – the more strictly-defined nature of Gantt chart activities means there is less communication, putting it at odds with the Agile approach.
- Working software over comprehensive documentation – While Gantt chart activities can have deliverables attached to them, that is not necessarily the case, making the Roadmap better suited for an Agile project.
- Customer collaboration over contract negotiation – The implicit flexibility of the high-level roadmap makes it a better choice according to this principle as well.
- Responding to change over following a plan – The Gantt chart implies significantly more effort put into creating a plan, affecting the team’s ability to respond to change.
Can you build a cross-project roadmap with third-party apps?
By default, Jira does not support more than one project per roadmap. While this is not the end of the world, this is a serious limitation for more complex projects that involve cooperation between different teams or entire departments.
There are several options for overcoming this challenge, but all come with an additional pricing tag.
- Jira Premium comes with Advanced Roadmaps functionality that allows for building a cross-project roadmap.
- Jira Align is also a Premium solution that offers even more flexibility, but at the same time, it is the most expensive option targeted at Enterprise organizations.
- Lastly, there’s the Atlassian Marketplace that offers access to a variety of Jira plugins that extend the basic functionality.
This little comparison chart can help you understand the differences better.
| Jira Align | Advanced Roadmaps | Add-ons from the Atlassian Marketplace | |
| Team size | Works best for large organizations (500+ users) | Works best for up to 20 agile teams working together (50-150 users at a time) | Can be fine-tuned to work with as many users as needed, however cross-instance work between various teams is challenging |
| Concurrent Jira instances supported | Across multiple instances | Per 1 instance | Per 1 instance |
| Dependencies | Cross-program Cross-project Cross-portfolio Cross-team | Cross-project | Optional per add-on |
Would you like to know more about agile project management?
This is a handy list of resources you may want to check out before planning your first project in Jira:
- Product roadmap in Jira
- Using projects as templates in Jira
- Best tools for test management in Jira
- How to create multiple subtasks in Jira
- How to manage the Definition of Done in Jira
- Overall Jira best practices