


 Jira
Jira monday.com


Be it a newer, shinier model of MacBook your devs and designers want to sink their teeth into; a safer, faster, more reliable server to withstand heavier loads; or a bunch of pens, paper, and office utensils – you’ll need to buy stuff sooner rather than later.
That said, a team that oversees the procurement process can’t afford to spend the company’s budget on a whim. They need to make sure that the right steps are followed and the correct questions are answered before reaching out for the checkbook.
Their questions may vary from case to case, but if we generalize, every procurement team follows similar steps and procedures.
For instance, they’ll always identify the need:
- Why is the new item needed?
- Are there any specific requirements for said item for it to fulfill the said need?
- Can one or more people share it without sacrificing efficiency?
- And what may be some of the other requirements if the item is indeed shared between departments?
Then there’s the sourcing process that also comes with its own set of steps:
- Who are the available suppliers?
- Are they an approved vendor?
- What factors affect the end price of the product?
- What would be considered an acceptable rationale for not going with the lowest bid?
- Are there ways of getting a better deal from buying at scale and/or becoming business partners?
- Is the service warranty a factor in the decision-making process?
After the sourcing is done, it’s time to draw up a contract:
- Are all the details in the contract included and correct?
- What happens if a shipment gets delayed?
- What about service warranties?
What about the process of actually paying for the item? The procurement team has to:
- Make sure they have received the correct invoice
- Check the details and the legal data in the invoice
- Pass the invoice to the finance department
- Make sure the payment was made on time and that the supplier has received the money
Now that the order is placed, the procurement team can have some breathing space, right? Well, not exactly. Receiving an item leads to more steps, like:
- Inspecting the product in order for the specs to meet on the receiving document, invoice, and purchase order.
- Documenting the purchase.
- Maintaining and keeping track of the item as part of the organization’s assets.
As you can see, there are a lot of steps to the procurement process. Fortunately for us, most of them are repeatable, and anything that’s repeatable with a predictable outcome can be automated. And the entirety of the process can be kept in a Jira ticket with a checklist to ensure everyone follows the procedure.
Using Jira for procurement
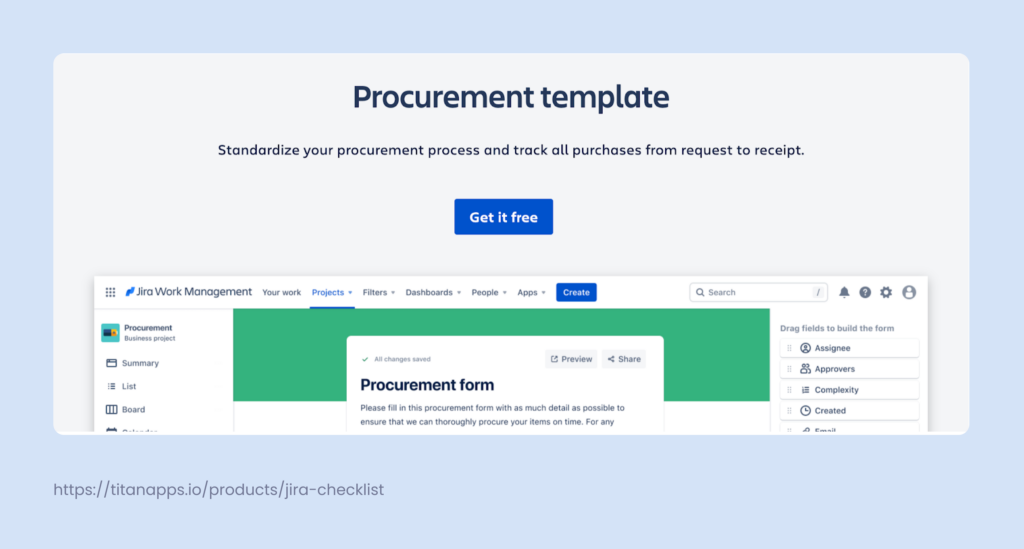
In the past fewyears, Jira has been trying to break its “designed for tech-team only” label by offering more functionality to business, marketing, and management teams. In fact, the procurement process plays so nicely into the platform’s main strength of tracking a process that they have released a separate purchasing template with a designed workflow as part of Jira Core.
The template is designed to help finance teams track internal purchases with a procurement template. In it you can:
- Create a purchase request: Jira lets you add orders for each purchase request to a board allowing for a clear view of where items are in the purchasing process. The workflow stages are customizable.
- Track important purchasing details: you can use labels, groups, filters, attach quotes and documents, or track orders or proposal revisions based on a set due date in Jira.
- Make data-driven decisions based on reports: The template comes with out-of-the-box reports designed to give insights into the efficiency of the procurement workflow.
Template setup
Jira has a variety of products, one of which is Jira Work Management. Using this product will allow you to add the procurement template.

If you wish to use the purchasing template in your Jira, here are the steps that describe the setup process. Note that if you follow these steps, you will create a new Jira project.
Step 1: Install the template via clicking on the ‘Get it free’ button.
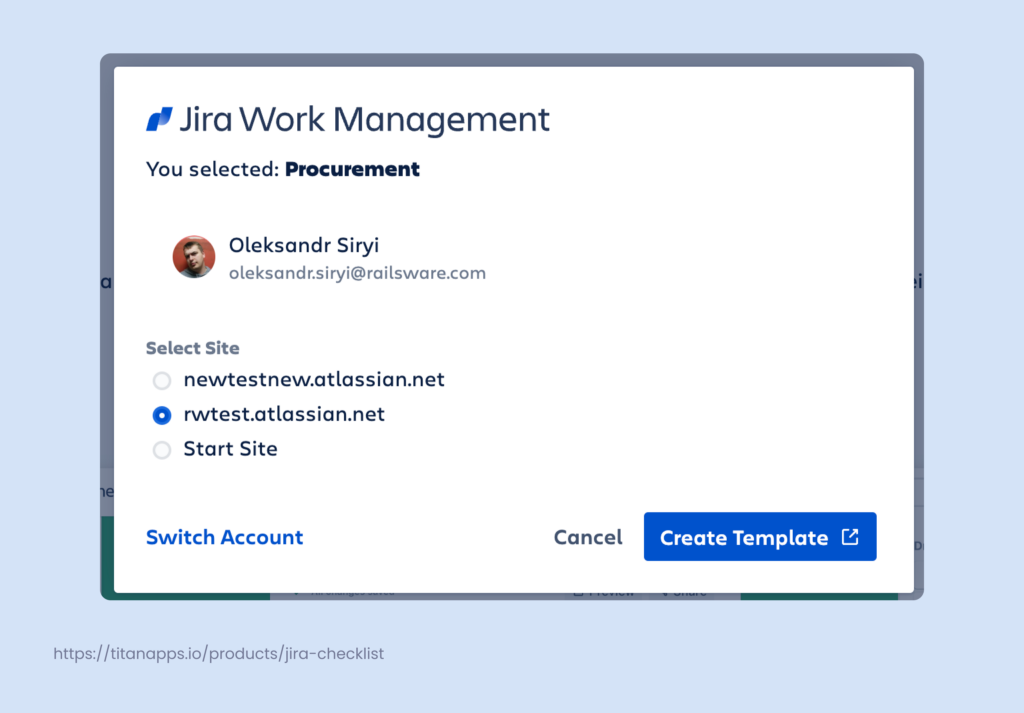
Step 2: Select your Jira account or start a new site. Then create your template. By creating a template you will start a new project.
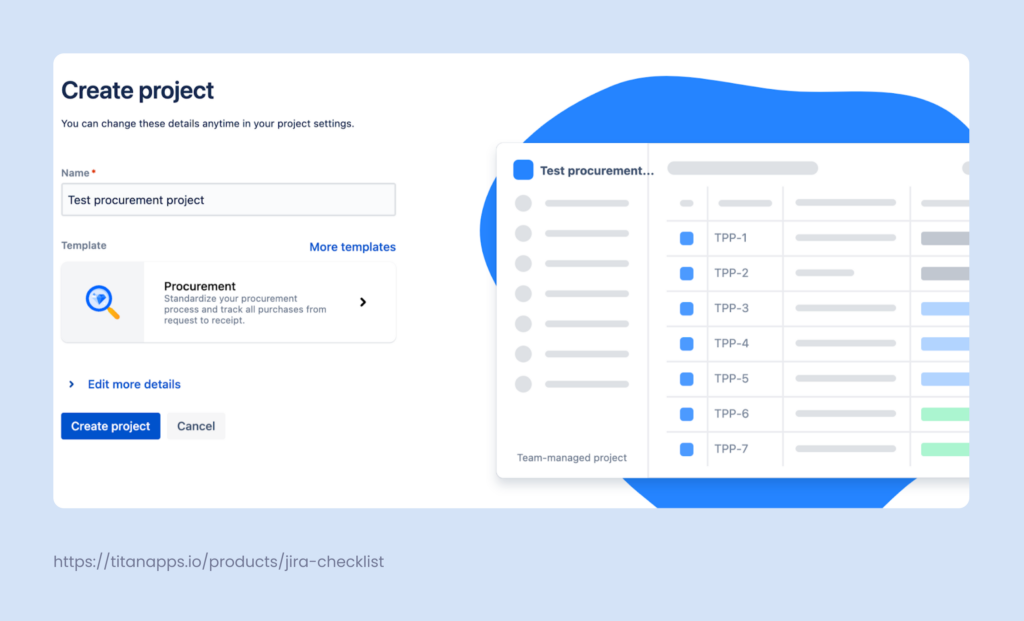
Step 3: Enter the name of your project and create it.
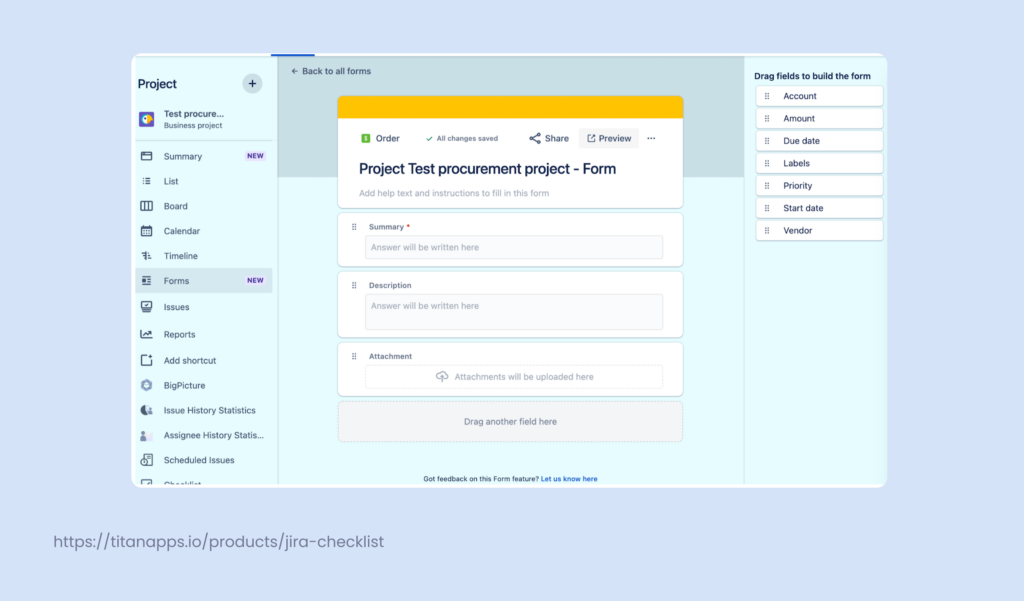
Step 4: Create your first procurement form by navigating to the forms tab in the menu. You can edit these forms with respect to your process and the data you need to gather in order for the procurement ticket to go through. These forms will already have the Order tag.
Having a separate ticket for every batch of pens, keyboards, or paperclips will become a huge mess sooner rather than later. That’s why you need more than a project template and workflow – you need to be efficient in maintaining the process, keeping it simple and avoiding cluttering your board by adding work items (issues) for every ToDo item.
Ways of collecting information from people who actually need the stuff, capturing loads of data from various vendors, and other various specific things fall into the category of heavy customization of Jira. This task is quite challenging and time-consuming.
Perhaps there’s a better way of optimizing Jira for your procurement process?
It’s all about the process, baby!
As we’ve mentioned more than once throughout this article, procurement is a process. And the ability to re-use the work you’ve already done is key to automating it with something as simple as a Smart Checklist (wink-wink;).
Let’s get into the nitty-gritty of how we handle our procurement process here at Railsware. Several juice examples are included.
Procurement process in Jira + Smart Checklist
Our team starts the procurement process by creating a ticket in Jira. This ticket needs to follow certain rules and criteria in order for the team – as well as individuals who are involved in various steps of the process – to function as a well-oiled machine.
This ticket includes details about the item, the seller, the recipient, and the information necessary for the financial team to process the purchase.
An example checklist for the ticket will look something like this:

This is an example of a checklist you can copy and paste into your Jira ticket. Feel free to edit and modify the text in order for it to meet your needs using this formatting guide.
# Procurement
- Are all the fields in GSheet completed and valid?
> name
> item
> price
- Is there a link to the item?
- Is the category of the item specified?
- Are there product specifications?
- Is the country where the recipient resides specified?
- Is the item available at our partner’s stores?
- Depending on the country, is the correct entity making the payment?
- Are all the fields filled in with regard to what we must have mentioned in the invoice?
- Is the data sent back to the recipient? @User_Name
- Is the deadline for the expected delivery set? 2022-07-09
- Did we get back the serial number from the recipient?
- Did we put the item into the corporate inventory?
- Is the invoice uploaded to the ticket?
The beauty of this checklist lies in its simplicity. The entire workflow is clear for people who are still new to the procurement team. It is beneficial to have expandable info where newbies can learn more. Smart Checklist allows you to add more instructions under each item. They are collapsable. This approach also works for everyone looking for information that is rarely used hence no one keeps it in their cortex. For example, you can explain what every GSheet field is used for or for links to items in the corporate inventory.
The individual items of the checklist become actionable items where you can tag people you need to connect with, set up a deadline for a process, or convert a point into a new Jira ticket.
Additionally, having a checklist like this helps remove repeating work in a lot of cases. For instance, having the wrong category for an item makes it harder for the financial team to track costs and expenses. The need to check this element off makes sure that simple mistakes are avoided from the get-go.
Lastly, having a status can help manage the procurement process in different situations. For instance, due to recent events, a lot of our team members from Ukraine were forced to relocate to a safer position (learn more about ways you can help Ukraine here). The ability to put certain steps or entire tickets on hold before railswarians can share their new address has proven itself to be quite handy.
Would you like to give Smart Checklist a try in your procurement process? Install the add-on from the Atlassian Marketplace.


