


 Jira
Jira monday.com


When your Jira work items (issues) are too big or too complex, you can break them into smaller pieces. By default, Jira solves this challenge with subtasks.
However, a Subtask isn’t always the best choice.
- Having a lot of Subtasks inevitably clutters your board.
- Closing the parent task requires completing all of the Subtasks.
- Ignoring Subtasks that have lost relevance will still affect your reporting.
- Moving Subtasks to a different work item (issue) is complex.
This doesn’t mean that Subtasks are inherently bad. They serve a specific function and offer a lot of flexibility. It’s just that, sometimes, it’s better to use a simple, lightweight checklist in a work item instead.
In this article, we give you a detailed comparison of Jira subtasks and checklists. You’ll learn about their pros and cons and the most common use cases. We’ll also talk about ways to use Jira Subtasks vs Checklists for your daily tasks. In addition, we’ll see some hands-on examples. Let’s start exploring!
Revisiting the Basics: What is a Jira Subtask?
A subtask is a part of a larger work item in Jira: a task, story, or bug. It can also be a part of a custom work type, if it’s located on the same hierarchy level as a task. This means you can’t add a subtask to another Jira subtask or an epic.
A parent work item can consist of multiple subtasks – a great way to divide work into smaller chunks. Each subtask can have its own description, assignee, reporter, deadline, and other fields. So it’s a common choice when you want to assign different parts of a task to different people.
Examples of a Jira Subtask
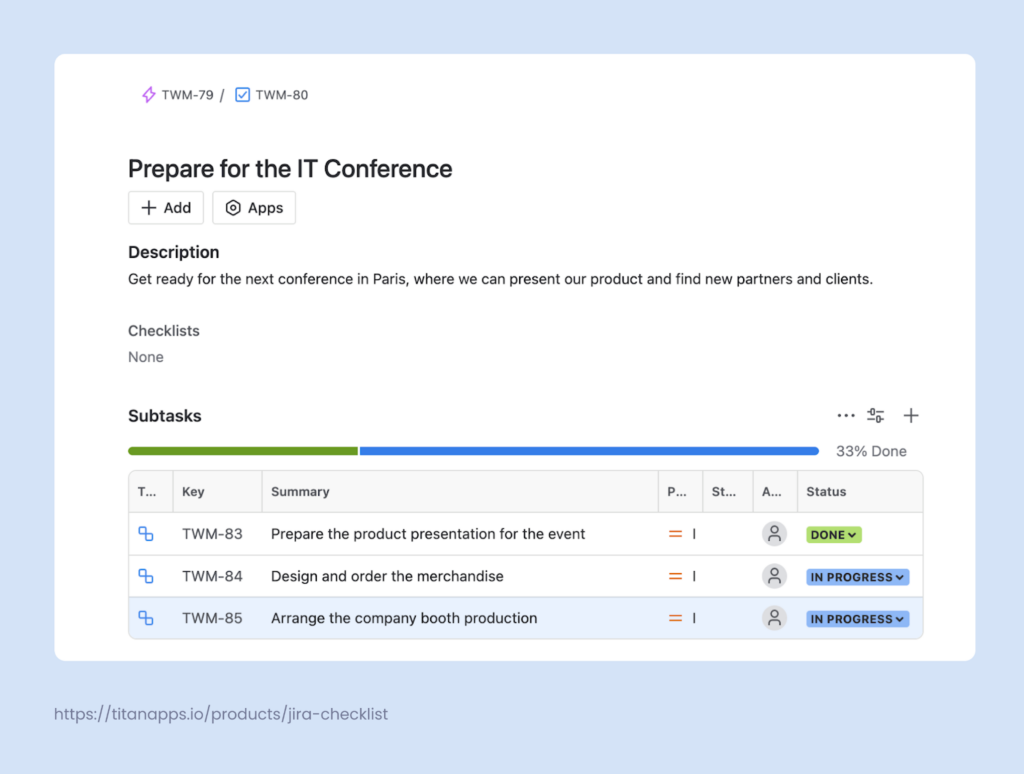
Example 1. Subtasks for an IT conference preparation task
Here’s what a typical Jira subtask looks like. In this case, the parent work item is a task, “Prepare for the IT conference”. The three subtasks address different things that should be done. Drafting the product presentation, ordering merchandize, and arranging booth production – these are all examples of Jira subtasks.
Example 2. Subtasks for the Landing Page preparation task
Here, we have a parent task for creating a set of landing pages. Each of the pages compares a brand to a different competitor. So, for each of them, there’s a separate subtask sitting within a larger task.
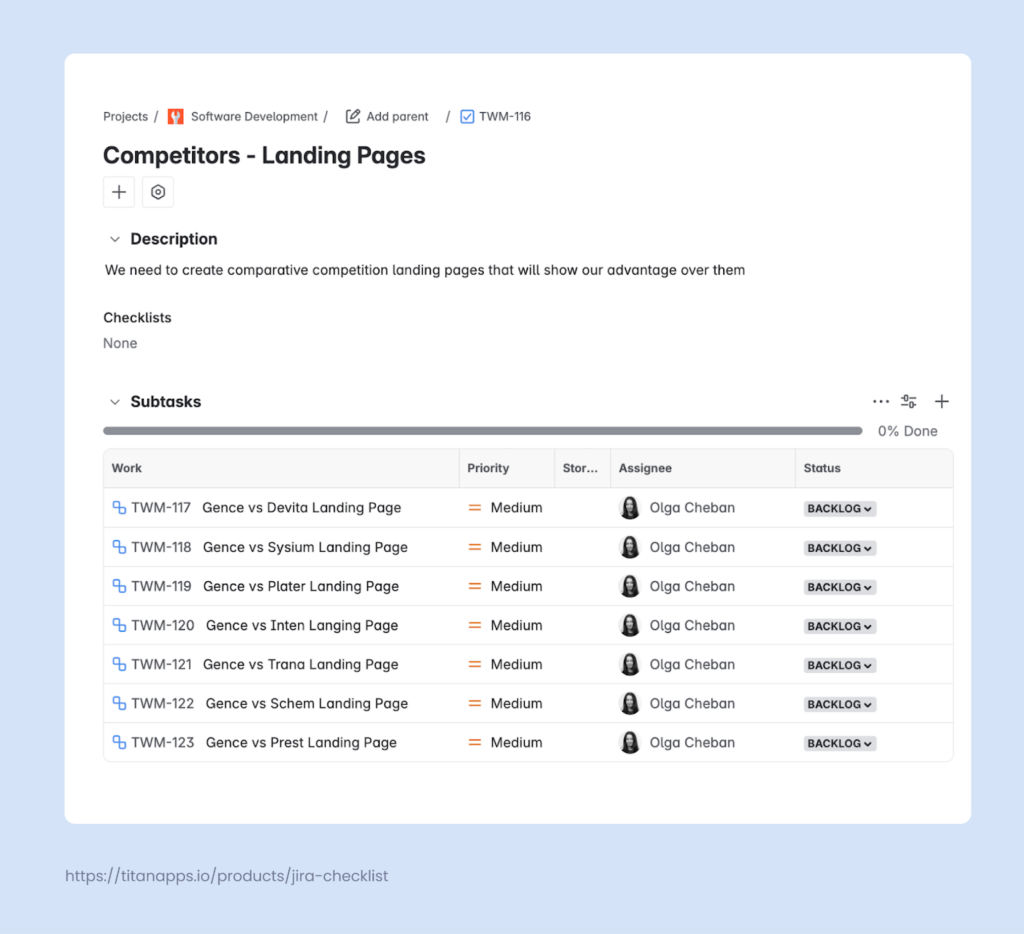
As you can see, subtasks are used for distinctive chunks of work. In this example, each of them has its own deliverable (a separate landing page). This is a common way to use subtasks.
If you compare Jira subtasks vs checklists, you’ll see that checklists have a slightly different purpose and features.
A Lesser-Known Element: What is a Jira Checklist?
In Jira, a checklist is a structured list of steps within a parent work item. A checklist can be a part of an epic, task, story, or any other work type. You can even add a checklist to a subtask. Although a checklist is not created as a standalone unit, you can convert it into a work item later, if needed.
A checklist can contain deadlines, tags for responsible teammates, external links, and more. You can also set custom statuses for each step/checklist item. This gives you all the elements you need in a lightweight structure – without extra overhead (such as issue fields, description, or history). One more benefit of checklists is that they can be saved as templates and then easily reused. That’s why they are a great choice for recurring tasks and multi-step processes.
Checklists can be added natively with the help of Jira action items, but their functionality is very limited. To add a simple checklist with the help of Jira action items, type [] – square brackets in any test field (such as work item description or comments). The brackets will be automatically turned into a checkbox.
To access more features, it’s better to use a checklist app from the Atlassian Marketplace.
Examples of a Jira Checklist
Example 1. A checklist for the recruitment process
Here’s a reusable template created by Smart Checklist for Jira. This checklist documents the standard steps for the recruitment process. It includes all the relevant details, links to helpful resources, and internal policies. You can also tag users, add deadlines, and write step descriptions in the expandable detail fields.
The responsible person can simply follow this pre-defined plan step by step, checking off completed items. When they need to recruit another employee, they can easily reuse the same Position Opening template – without the need to prepare a new Jira ticket from scratch.
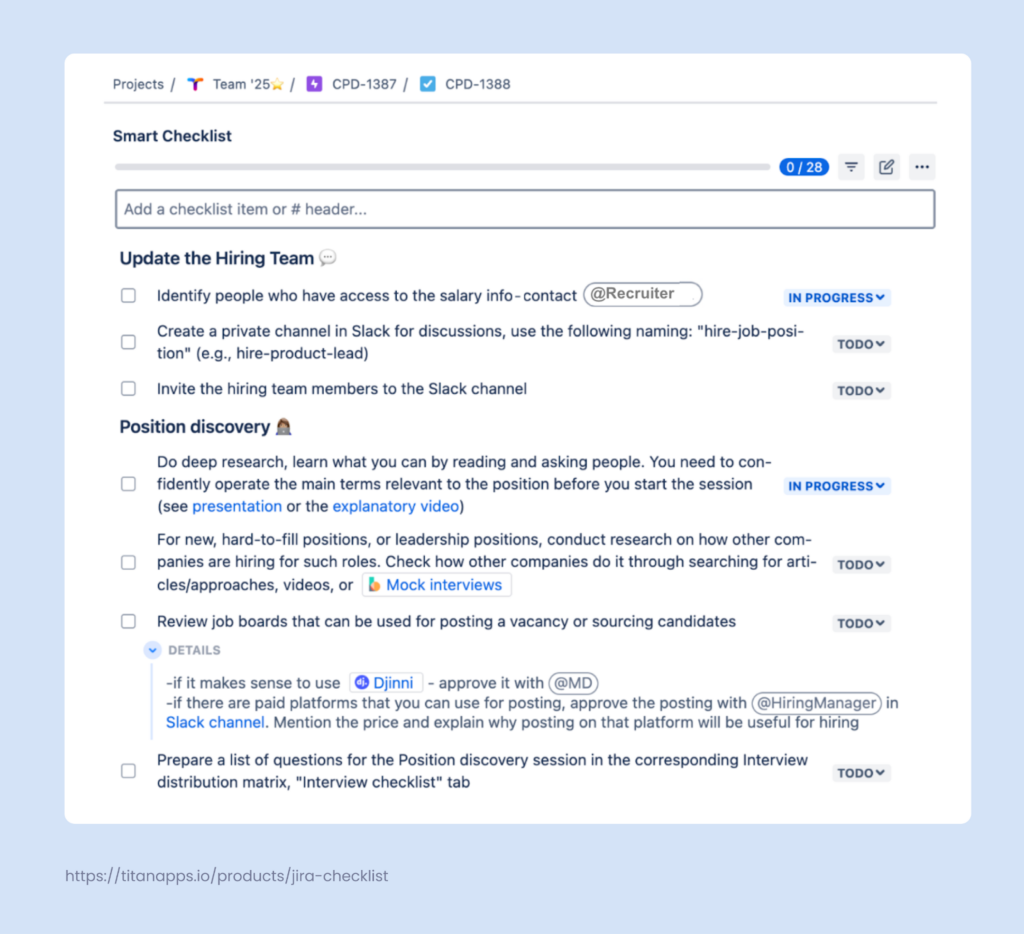
You can track progress on completing the checklist with the help of a special bar on the top. If it’s more convenient, view progress directly on your Jira board – it shows checklist statuses too.
As you can see, a checklist can contain anything you need. At the same time, you don’t have to fill out multiple issue fields for each step.
In this case, the Jira subtask vs Jira checklist battle is clearly won by the checklist. Since there are dozens of steps grouped under multiple sections, creating a separate subtask for each one wouldn’t be practical. Adding a multi-step checklist is much simpler, easier, and doesn’t require much time. This is a good example of how checklists make it easy to document complex processes in a clear, structured way.
However, checklists can also be simple and include only several items, depending on your needs and the specific task.
Example 2. A checklist for the Definition of Done
Here’s another common use case for Jira checklists: managing the Definition of Done in Jira. This is an important agile concept. It helps teams streamline processes and ensure a high quality of the work shipped.
When finishing a task, a developer needs to check their code against a list of criteria. This self-review helps to verify if the work is truly done according to the accepted standards. Implementing the Definition of Done in Jira reduces the need for potential rework and saves valuable time.
The Jira checklist below is a reusable template. It documents the Definition of Done criteria and helps the development team to conduct the review. This checklist can be integrated with Jira Automation. This means it can be added automatically to each dev task. Usually this happens when it transitions to the selected workflow status, such as “Ready for testing”.

Pros and Cons of Jira Subtasks vs Checklists
Jira Subtasks
Pros:
- Each subtask is a separate work item with its own assignee, due date, and status
- Can appear on Kanban / Scrum boards and be tracked independently
- Supports comments, attachments, and custom fields
- Good for parallel work handled by multiple people or teams
- Effective for cases where the main task has several distinctive parts with separate deliverables
Cons:
- Slower to create and manage, as each subtask is a separate work item
- Can clutter your backlog or board if overused
- Doesn’t fit for documenting processes or step-by-step instructions
- Not reusable, can’t be natively used as a template for recurring subtasks
Smart Checklists
When adding checklists with the help of Smart Checklist for Jira, you receive, among others, the following benefits:
Pros:
- Fast to set up, allows you to add multiple items in one go
- Enable you to document multi-step processes and handle complex tasks
- Can be saved as templates and reused for recurring tasks
- Checklist templates can be added to selected work types automatically
- Good for step-by-step instructions or conducting checks against numerous criteria
- Multiple checklists can be added to a single Jira issue (only for Jira Data Center)
Cons:
- Checklist items are not separate Jira issues (work items), and some fields don’t have a checklist equivalent
- Individual checklist items can’t be assigned, although you can tag responsible people
Jira Subtasks vs Checklists in Jira Work Item Hierarchy
When comparing Jira subtasks vs checklists, you’ll notice they have different places in the Jira work hierarchy. While a subtask is a separate work item, a checklist does not exist on its own. It’s always a part of a full-fledged work item (unless you turn a checklist into a standalone task).
With an epic being the top level of the out-of-the-box hierarchy, tasks, bugs, and stories are located below epics. Subtasks, in turn, can be a part of a task (most commonly), user story, bug. Subtasks can also be a part of custom issue types situated on the same level – that is, below an epic. Some people are wondering if it’s possible to add a subtask to a subtask, but Jira doesn’t make this possible in the default hierarchy.
A Jira checklist, on the other hand, is more flexible and can be added to any work item, regardless of its type or place in the hierarchy. And subtasks are not an exception – you can easily add checklists to your subtasks if you want to include more granular detail.
In general, checklists allow you to create more lightweight hierarchies and maintain good visibility. In contrast, overusing subtasks can make hierarchies confusing and hard to work with.
A Comparison Table For Jira Subtasks vs Checklists
In case you want a summary of the key differences, we’ve prepared this comparison table. It allows you to quickly estimate the usefulness of Jira subtasks vs checklists for your specific situation and requirements.
| Item type | Definition | Hierarchy Level | Purpose | When to Use |
| Subtask | A breakdown of a parent task into smaller pieces of work | Child of a Story, Task, or another work item below Epic | Manages smaller portions of work within a parent issue | – When a parent task has several distinct parts (typically up to 5-7), each representing a significant portion of work, especially with separate deliverables – When you want to assign different parts of a task to different people or departments – When the parent task doesn’t repeat and it’s a one-off occurrence |
| Checklist | A list of specific criteria, steps, or quality checks added within a work item | Under the work item it belongs to: Epic, Task, Story, Bug, Subtask, or any custom work type | Organizes multi-step tasks and processes, can document them in the form of reusable templates | – When you have a large number of steps related to the same work item (typically from 5-7 to dozens of checklist items) – When it’s a recurring task or process and the checklist can be reused as a template – for example, a Recruitment process template or a Definition of Done template – When you need to document multiple criteria that need to be checked – for example, a Code Review checklist |

When to Use Jira Subtasks vs Checklists
As with most things, there are some rules of thumb when it’s best to go with a subtask or a checklist for your Jira work item.
Subtask Use Cases
There are certain cases when it is helpful to divide work items into smaller pieces. For example, you may be working on a research item that has evolved in complexity to the point where it needs several individual subitems. Or, maybe a certain task requires a series of specific improvements. Or, a task has many similar but smaller tasks. For example, you need to replace a button, but it needs to be replaced on several pages.
If put simply, consider using a subtask when:
- The parent task is too large to track on its own
- Different parts of the work item have different deadlines
- You need to delegate work among several team members
- You need to use custom fields in subtasks – for example, to add estimates or log work
This little questionnaire should help you decide whether a Subtask is a good fit in your case:
- Is the task ambiguous, meaning you’ll likely be adding more to the scope?
- Will subtasks require more context and the possibility to add attachments or use comments?
- Would you like to estimate or track time working on the subtask specifically?
If you’ve answered yes to at least one of these questions, you probably need to use a subtask.
Checklist Use Cases
Checklists are an excellent way to communicate what needs to be done. Their applications vary from a simple to-do list to a detailed codification of multi-step processes. Checklists help people follow the flow step-by-step without skipping anything essential. This is especially valuable when you work with repetitive tasks that involve multiple ToDo items.
For example, when you need to organize a business trip for dozens of employees and submit their documents for visas. You can prepare one checklist for this process and use it for each of the employees. This way, you will be able to switch between these tasks quickly, and you won’t have to remember where you left off with each application. At the same time, this ensures that nothing is missing and every step is completed. The same goes for any other recurring task or process. In this regard, checklists undoubtedly win the Jira subtask vs Jira checklist battle.
Use checklists when:
- A task contains multiple steps to complete or criteria to check
- Different steps are rather pieces of the same process than separate mini-tasks
- This is a recurring process or repetitive task
- You need to save a checklist as a reusable template
- You want to add a checklist automatically to a certain work type
Some of the common use cases for Jira checklists include:
- Definition of Done Checklist
- Acceptance Criteria Checklist
- Code Review Checklist
- Migration Steps Checklist
These checklist templates allow teams to streamline processes while maintaining attention to detail and high quality. They also save significant time as you don’t have to start from scratch when working on a typical task. A checklist plan, once developed, can be easily used again whenever necessary.
How to Add a Jira Subtask to a Work Item?
To create a subtask, click the plus button below your work item’s title and select Create Subtask. Name your subtask and hit Enter.

What is important is that as long as subtasks are part of that parent work item, they are also standalone and independent pieces of work, so you can track them separately.
How to Add a Checklist to a Jira Work Item?
You can easily do it with the help of Smart Checklist for Jira – a solution that allows you to create feature-rich checklists, including reusable templates.
- Install Smart Checklist for Jira from the Atlassian Marketplace.
- Type or paste the list of steps for your checklist in the Smart Checklist section of your Jira work item. As an option, you can use one of our free Checklist templates for Agile teams.
- Adjust the checklist using the Markdown editor. For example, structure your checklist with headers of different levels, add bulleted lists to individual checklist items, tag team members, and specify deadlines. You can also set custom progress statuses, as shown in the example below.

When Choosing Between Jira Subtask vs Jira Checklist, Take Both
In project management, there are always some good reasons to use Subtasks or Smart Checklists in your Jira work items. Both ways are great, and there is no better or worse. It is rather a matter of following Jira best practices for what works best and when. That’s why our final conclusion and suggestion would be to simply try both and then decide which one is the most convenient for your team. In many cases, it’s not necessarily Jira Checklists vs Subtasks – you may need to use both to structure your work flexibly and effectively.


