Jira
Jira monday.com


Code reviews are a crucial step in any development workflow. Whether you’re building a customer-facing SaaS product, an internal tool, or contributing to open source, reviewing code helps maintain a high-quality codebase, reduce bugs, and align the entire team around shared standards.
In teams using Jira and other Atlassian products like Bitbucket or Confluence, code review becomes part of a larger workflow that connects work items (issues), pull requests, and automation rules. When properly integrated, this process not only improves code quality but also helps reduce bottlenecks, track review progress, and simplify onboarding for new team members.
In this guide, we’ll walk through the essential elements of a reliable code review process. You’ll learn how to:
- Structure a professional code review workflow in Jira
- Use checklists and templates to improve peer code reviews
- Automate repetitive steps in your code review process
Let’s start by looking at the core principles behind a successful peer review process.
Main Principles of a Code Review
A consistent and well-defined code review process improves collaboration, increases code quality, and reduces long-term maintenance risks. Below are key principles every team should follow, whether you’re using Jira Cloud, Git-based tools like GitHub or Bitbucket, or integrated developer tools in your workflow.
1. Ensure full context before reviewing
Effective peer review starts with understanding what the code is meant to do and how it fits into the larger feature or product. Every reviewer should have access to the related Jira work item (issue), design documentation (e.g. in Confluence), and the associated pull request. Lacking context leads to delays, rework, and misaligned expectations.
Tip: Use work item links and automation in Jira to ensure relevant context is always visible in the PR.
2. Give specific, constructive feedback
The best code reviews are clear, respectful, and actionable. Avoid vague statements like “this could be better.” Instead, point out why a specific approach may cause issues, or ask clarifying questions. One useful internal policy is to frame comments as questions—this encourages discussion and avoids defensiveness. Pair questions with a minimal command that reproduces the issue using your CLI tools so the author can quickly validate.
For example:
Instead of “This is wrong,” try:
“Can you explain why you chose this approach over using an enum?”
3. Define what “done” looks like
A clear definition of done helps reviewers know when code is ready to be merged. This includes test coverage, documentation updates, adherence to coding standards, and alignment with feature requirements.
To standardize this, many teams use a code review checklist. When built into the Jira workflow with tools like Smart Checklist, this becomes part of the work item lifecycle and ensures all criteria are met before merging.
Code Review Checklist
How deep your code review checklist goes depends on your product, team size, and company culture. But even lightweight checklists go a long way in ensuring consistency and avoiding mistakes across the codebase.
Using checklists inside Jira Cloud keeps your code review process transparent and repeatable across projects and team members. Here are the key elements we recommend every team include:
- Feature verification: Does the implementation meet the feature requirements? Is it aligned with user goals and business needs?
- Code readability: Can someone else on the team easily follow what the code is doing?
- Coding standards: Does the code follow team or framework best practices? Are naming conventions consistent?
- Duplication check: Is any logic repeated unnecessarily?
- Test coverage: Are there tests for all relevant paths? Are edge cases handled?
- Documentation: Is the code self-documenting, or are comments and technical documentation needed?
These points may seem basic, but they form the foundation of every good review. When applied consistently, they improve team collaboration, reduce technical debt, and lead to more quality code shipped to production.
Step-by-step: Creating a Checklist and Template in Jira with Smart Checklist
The easiest way to make your code review process repeatable and scalable is by using a dedicated Jira add-on like Smart Checklist. Here’s how to set up and templatize your checklist in just a few steps:
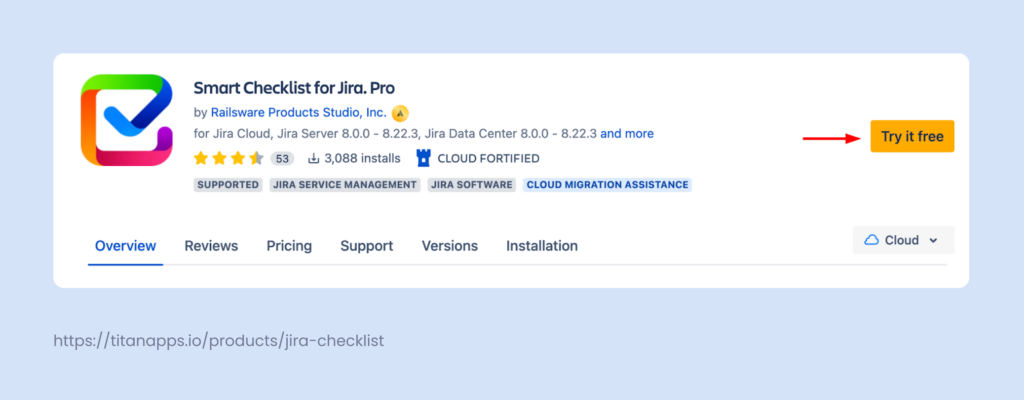
Step 1. Install Smart Checklist for Jira
Start by installing Smart Checklist from the Atlassian Marketplace. It works with Jira Cloud and helps teams manage checklists directly inside Jira work items. You can begin with the free version or upgrade to Pro for more features like templates, custom statuses, and advanced automation.
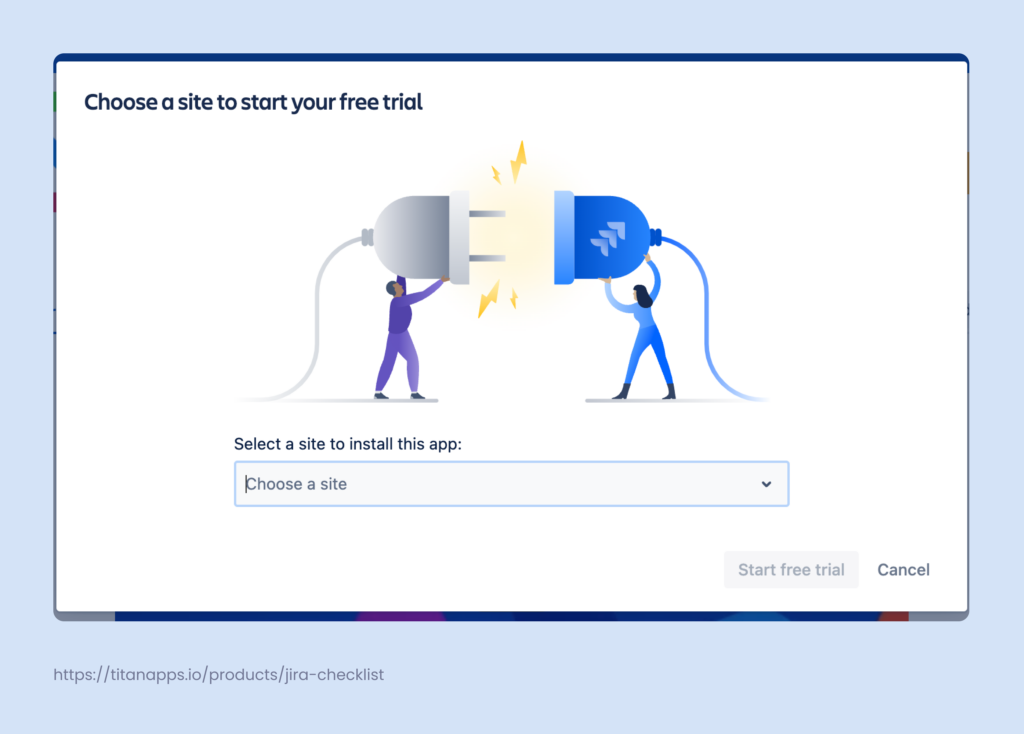
Step 2. Choose your site and follow instructions
To initiate the installation of the Smart Checklist add-on, you must first select the desired site where you intend to implement the tool. Note that you must be an administrator. Otherwise, you can request the installation of the Smart Checklist add-on by clicking the ‘Request app’ button.
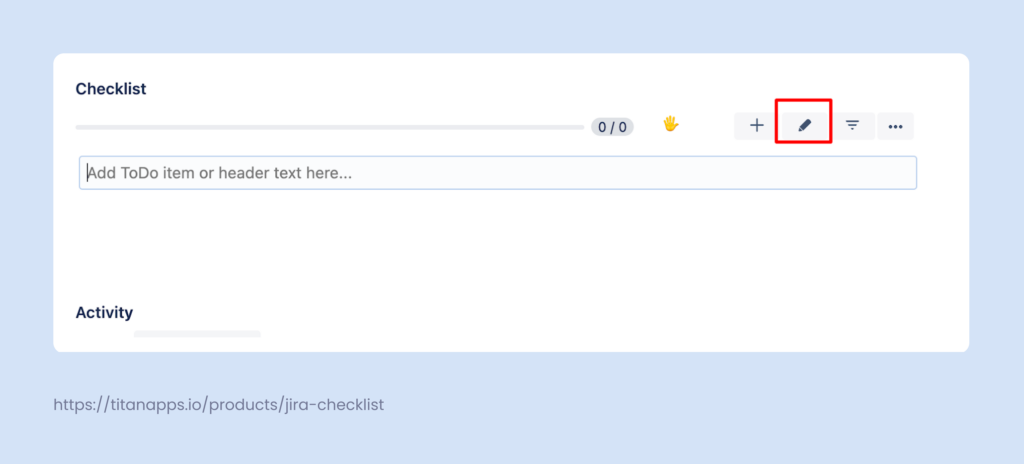
Step 3. Create your checklist
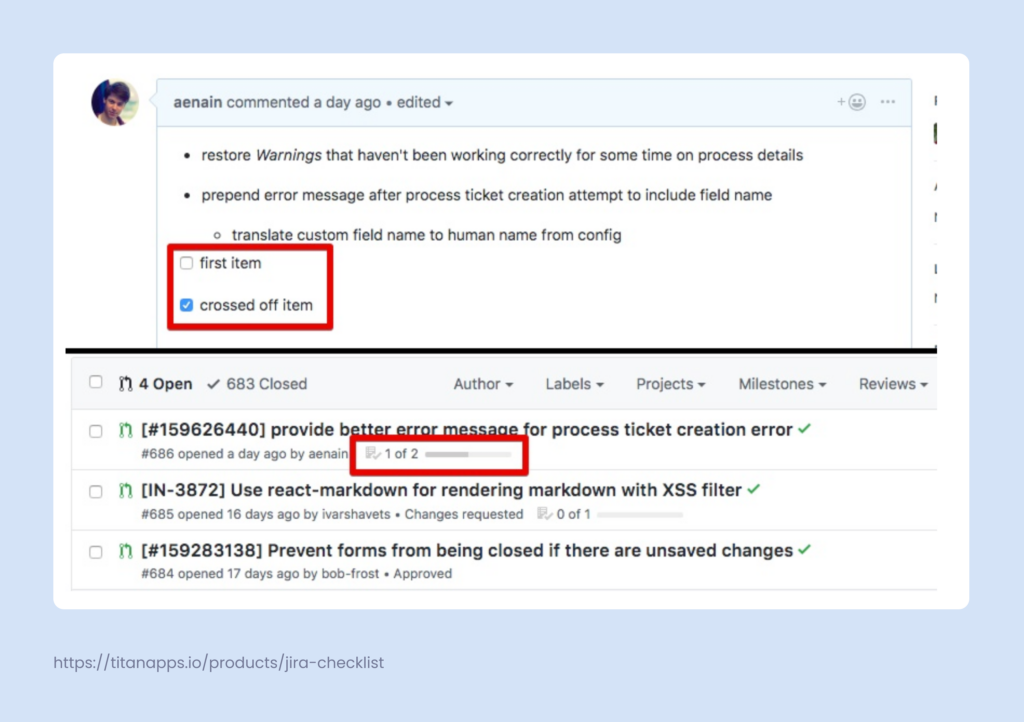
Open a Jira work item and locate the Smart Checklist panel. You can:
- Add items manually using the inline field
- Or open the Markup editor for quicker editing with markdown
Step 4. Paste your code review checklist into the Markup editor.
Here’s a sample checklist you can start with. Feel free to use this guide in order to make changes and edits.
# Code formatting check
- Are alignments, proper white space, and easily identifiable code block starting and ending points present?
- Has the developer followed correct naming conventions?
- Can the code fit on a standard laptop screen? You shouldn’t need to scroll diagonally on a 14’’ screen.
## Architecture check
- Is it split between presentation, business, and data layers?
- Is it split into files based on technology?
- Is it working with existing technologies and patterns?
## Coding best practices check
- Is the code using constants?
- Are similar values grouped under an enumeration?
- Are the comments informative and beneficial? Do they explain what is being done?
- Is there an excess of if/else blocks?
- Is the code relying on framework features wherever possible rather than relying on custom solutions?
## Maintainability check
- Is the code easily readable by a human being?
- Is the code easily tested?
- Can it be refactored into a separate function?
- Are there flow of control, parameter, and data exception details necessary for debugging?
- Are configurable files kept in place? There must not be a need to make changes if the data changes frequently.
## Reusability check
- Are the same principles not repeated more than once?
- Are reusable services and functions used when applicable?
## Security check
- Validation against SQL injections
- Validation against XSS
- Is sensitive data encrypted?
## Scalability check
- Is the code scalable?
## Useability check
- Is the solution usable from the user’s POV?
## Performance check
- Is the correct data type used?
- Lazy loading, asynchronous and parallel processing
- Caching and session/application data
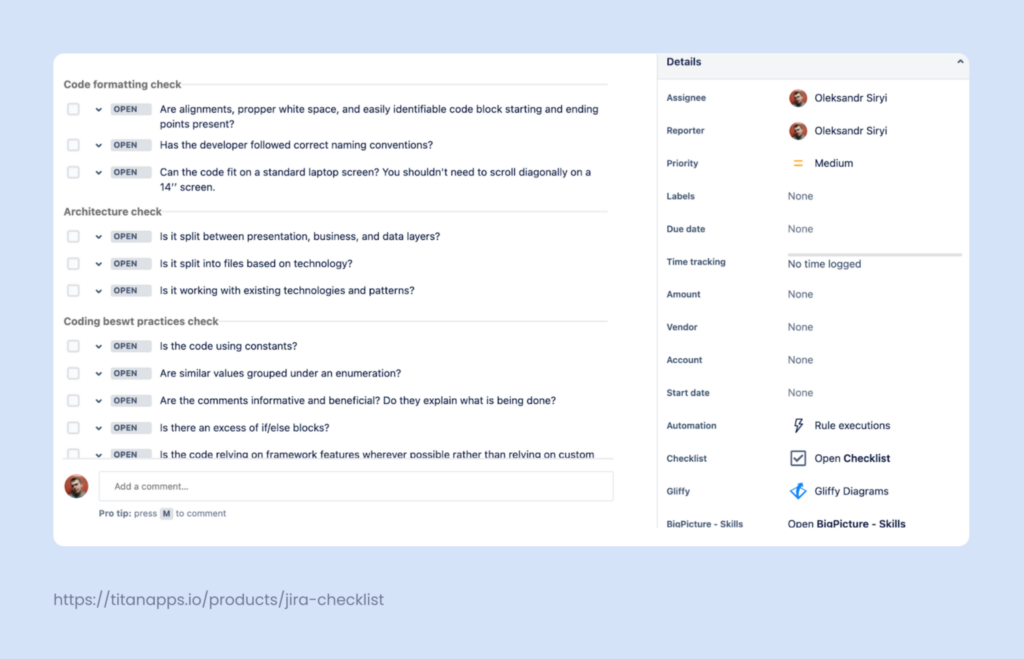
Once added, this checklist becomes part of your Jira work item and can be used by developers and reviewers as a structured peer review process.
Step 5. Save your checklist as a reusable template
Once your checklist is finalized, you can save it as a template:
- Click on the Smart Checklist menu inside the work item
- Select “Save as Template”
- Name the template (e.g. “Jira Code Review”)
- Set permissions, define visibility, and decide if it should be shared across projects or teams
You can now reuse this code review template in any Jira work item—no need to recreate it every time. This makes it easier to onboard new team members, maintain consistent review practices, and standardize workflows across your repos and development teams.
Optional: Automate template usage
With Smart Checklist Pro, you can go one step further and automate the application of this template:
- Trigger it automatically when a new work item is created under a specific type (e.g. Bug, Task, Code Review)
- Use Jira automation rules to insert the checklist based on labels, components, or workflow transitions
This saves time and ensures that your code review workflow is always structured and consistent with no manual steps required.
Why use a custom checklist?
Jira Cloud offers limited native checklist functionality, but with the right add-ons, you can build a much stronger and more scalable code review workflow.
Smart Checklist for Jira makes it easy to create, reuse, and manage detailed review processes. Whether you’re working on a single repo or coordinating across multiple projects, a structured checklist ensures that:
- Every developer knows what to look for during a peer code review
- Reviews follow a consistent format, reducing subjectivity and missed steps
- New team members can ramp up faster by following a documented process
- Product and project management teams can track progress more clearly
- Templates reduce overhead and ensure that even complex reviews are handled consistently
Smart Checklist supports:
- Custom statuses (e.g. Open, In Review, Blocked)
- Full-screen editing and markdown support
- Permission management by team or role
- Templates for Definition of Done, Acceptance Criteria, and Review Checklists
- Automation triggers that insert templates into a Jira work item based on type or status
These features make it much more than a simple ToDo list – it’s a lightweight but powerful code review tool that improves clarity, reduces friction, and integrates directly into your Atlassian products stack.
Code Review: Pro Tips & Internal Practices
The principles and checklist we shared above form the baseline of a high-quality code review process. But once you have that foundation in place, your team can improve speed, clarity, and reliability by building internal routines around git, pull requests, and connected Jira workflows.
Here are a few best practices we use at Railsware and recommend for any team working with Bitbucket, GitHub, or GitLab as part of a broader Atlassian or DevOps stack.
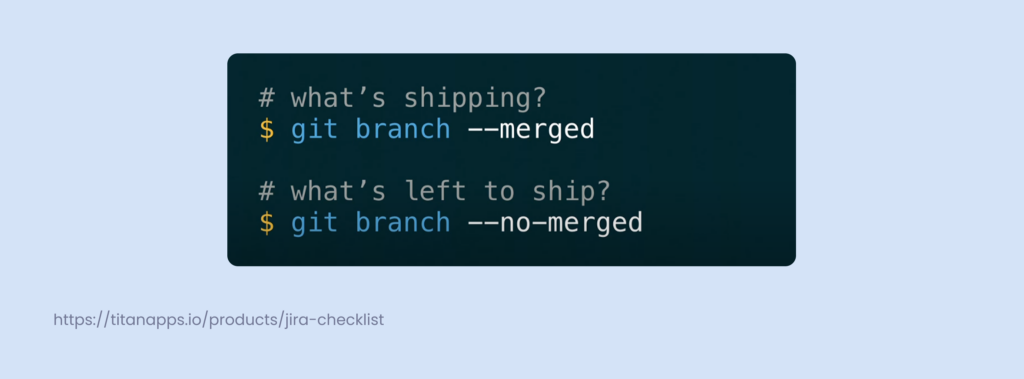
1 work item – 1 pull request
Keep your workflow clean and traceable. Each Jira work item should correspond to a single pull request. This way:
- Every commit has a clear purpose and context
- You can see exactly what is being shipped to production
- Features and branches are easy to map and manage across repos
Both Jira and Bitbucket support automation and triggers to help manage this structure. For example:
- Automatically transition an work item to “In Review” when a PR is opened
Use commit messages or branch names to link back to work items
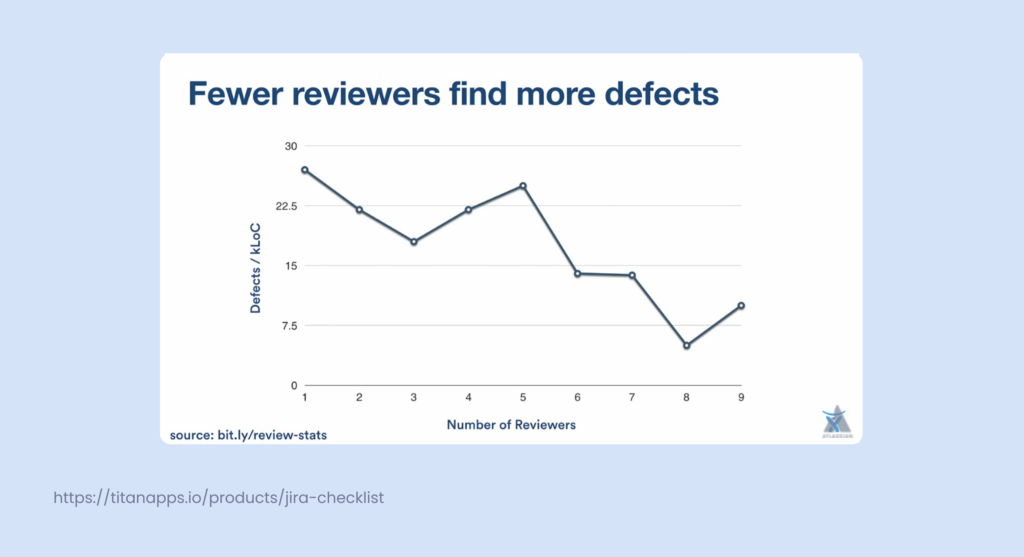
Follow minimum 2 approvals before merge
We’ve found that assigning too many reviewers often leads to lower code quality, as everyone assumes someone else will catch the problem. As a general rule:
- Require at least two reviewers to approve a PR
- Keep reviewer roles clear (e.g. code owner, product engineer)
- Make this part of your code review checklist or Jira workflow rules
This setup helps prevent single points of failure and keeps the Bus Factor low.
Manage work items stuck in review
Code review delays are one of the biggest bottlenecks in software development. To avoid this:
- Set aside a dedicated time daily for developers to handle reviews
- Use notifications and dashboards to flag PRs that are waiting too long
- Automate reminders using Jira rules or Slack integrations
When developer tools are properly integrated, you can surface these blockers without manual follow-ups.
Request reviews on your own
Don’t wait for reviewers to find your PR – request them manually. This extra step ensures the right people see it quickly.
In GitHub, use the Reviewers tab to add teammates. In Bitbucket, you can predefine default reviewers per branch or repo. For larger projects, 2–3 reviewers is usually enough depending on the complexity of the project.
Adding the review request step to your checklist makes it a habit, and helps reviewers receive proper context via the linked Jira work item, documentation in Confluence, and relevant lines of code.
This process is already well-described on the Railsware blog. Feel free to check it out if you are looking for more detailed steps or tips on using pull requests in your code review process.