


 Jira
Jira monday.com


In Jira, acceptance criteria describe the conditions a user story (or other issue types) must meet to be considered complete. Clear, testable criteria align the product owner, development team, testers, and stakeholders around the same expected functionality and user experience and help you validate outcomes against the Definition of Done (DoD).
Most teams record acceptance criteria directly in the description field; it’s quick and everyone can see it. If you need progress tracking and an easy way for QA to mark items as verified, a checklist works better because each item becomes actionable and visible during the development process.
In this guide, we’ll explain what acceptance criteria are, how they differ from the Definition of Done, and where to add acceptance criteria in Jira (description, custom field, or a checklist app). We’ll also show practical ways to write acceptance criteria from the user perspective (including Given–When–Then and checklist examples), and how to manage them with Smart Checklist for Jira to reduce rework and improve validation.
What is the Acceptance Criteria?
Acceptance criteria are the specific, testable conditions that a user story (or other Jira issue types) must meet before it’s considered done. Think of them as the shared checklist of expected functionality and user experience, written in a way that the product owner, development team, testers, and stakeholders can agree on what “good” looks like.
Unlike a User Story that focuses on the needs of the user, Acceptance Criteria should describe what needs to be done in order for the user to reach their goal.
A typical example of Acceptance Criteria in a User Story list would be:
User story: As a user, I want to sign up for a marketing newsletter to receive emails about the latest offers.
Acceptance criteria:
- The user can sign up for a newsletter in a few places: the homepage footer, the slide-in pop-up, and a modal on the product page when shopping.
- The user can only sign up with a valid email.
- There should be an Email Input on both the slide-in pop-up and modal so that users can leave their email addresses.
- After the user leaves their email, they will get a confirmation email.
So, to put it simply, the functionality can not be accepted if the user can’t leave a valid email in a designated field to sign up for a newsletter or if they can’t receive a confirmation email afterward.
Everything you need to know about writing Acceptance Criteria
In day-to-day Jira work, many teams start by writing AC in the description field, because it’s quick, visible, and easy to edit. When you also need to track progress and validation, a checklist works better: each item becomes actionable, QA can tick things off as they verify, and everyone can see where the story stands. Each criteria can have their own status (e.g. “QA passed”, “QA failed”)
When should you write Acceptance Criteria?
Backlog refinement sessions seem like a great opportunity to add Acceptance Criteria to your stories. In reality, this isn’t the best approach. Acceptance Criteria should be added to a story before the refinement session. This way, the team can discuss AC, refactor or add new ones, and make estimates.
Why?
- You always have up-to-date data
- A clear understanding of the goals for the Sprint
- A whole team of experts that can help write AC
- Time and room to discuss the stories and make the objectives as clear as possible
How should you write Acceptance Criteria?
There are two common ways to write acceptance criteria:
- Given–When–Then (GWT) for clear, behavior-focused scenarios from the user perspective (great for testers and automation later).
- Checklist items for concrete tasks and observable results (great for developers and QA to coordinate review and validation).
The goal is the same either way: create effective acceptance criteria that reduce rework, provide a testing baseline, and align teams around a single expected outcome. As a result, “done” in Jira means the same thing to everyone and plays nicely with your Definition of Done.
There’s no right or wrong when it comes to selecting an AC writing approach as long as you keep the dos and dont’s in mind. That said, writing Acceptance Criteria as a checklist is much more intuitive.
| Do Write | Don't Write |
|---|---|
| - When the team is ready to work on the story. - In a way that is clear for everyone on the team. - Binary. AC can either be met or not. - As specifically as possible. Mention constraints and limitations clearly. - Testable and verifiable. - With a focus on the outcome rather than the process of achieving it. | - Too early or too late in the development cycle. - Criteria that tell developers HOW to work. - Vague or ambiguous criteria. - Criteria that do not focus on the user. |
Acceptance Criteria vs. Definition of Done
Acceptance Criteria (AC) describe what a specific user story must do for an end user. Each story gets its own list. The items are testable, focused on functionality, and written from the user perspective. AC helps the product owner, development team, and testers agree on expected behavior before work starts.
Definition of Done (DoD) is a shared quality bar for the whole team. It applies to all issue types in the backlog. DoD usually includes code review, tests passing, documentation updated, and product owner approval. If you want to learn more about DoD, see Exploring the Definition of Done or dive into Definition of Done in Jira with Examples.
Key differences at a glance
- Scope
- AC: applies to one work item such as a user story or bug.
- DoD: applies to every story, task, and fix across the project.
- AC: applies to one work item such as a user story or bug.
- Purpose
- AC: define desired outcome and user experience.
- DoD: ensure overall quality and release readiness.
- AC: define desired outcome and user experience.
- Format
- AC: Given–When–Then scenarios or a concise checklist.
- DoD: a stable checklist the team reviews in acceptance testing.
- AC: Given–When–Then scenarios or a concise checklist.
- Where to keep them in Jira
- AC: many teams write them in the description field; checklists help track progress and make QA validation visible and actionable .
- DoD: often kept in the description field, but it can be also turned into an actionable checklist. Users often cover DoD as subtasks and for this purpose an actionable checklist will work best as a set of criteria that help you check if a task is truly done and whether it meets all the quality requirements. Please explore our definition of done guide to learn more.
- AC: many teams write them in the description field; checklists help track progress and make QA validation visible and actionable .
You might keep both close at hand: write clear AC for each story, keep the team’s Definition of Done visible, and validate both during reviews. This keeps agile teams aligned and reduces rework.
Examples of Acceptance Criteria for Common Jira Issue Types
Clear examples make it easier to write acceptance criteria that are testable and useful in Jira. Below are two formats your team uses in practice: Given–When–Then for behavior, and checklists when you want progress to be visible and verifiable by QA.
Feature (Login)
Given–When–Then
- Given a registered user on the Sign-in page
- When they submit a valid email and password
- Then they land on the dashboard and see a “Welcome back” toast
Checklist
- Invalid credentials return an inline error without page reload
- “Forgot password” link sends a reset email
- Session remains active after page refresh
- Audit event logged for sign-in
Feature (Wishlist)
Given–When–Then
- Given a logged-in user on a Product page
- When they click “Add to wishlist”
- Then the item appears in the wishlist and a success message is shown
Checklist
- “Add to wishlist” button visible to logged-in users only
- Item appears in wishlist list view
- Analytics event recorded for add-to-wishlist
- Unit and UI tests updated
Task (Tech)
Given–When–Then
- Given the new version of the app is deployed to staging
- When we roll out version 2.4
- Then all health checks pass
Checklist
- Config updated and committed
- Health checks green for 24h
- Documentation updated in Confluence
Many teams start in the description field. It’s easy, but it’s static. You don’t see progress. In Smart Checklist, each acceptance item is actionable and visible and traceable. Developers move items through work stages; QA checks them off during testing and everyone in the team sees what’s left without digging through comments.
You have two practical options for where to add acceptance criteria in Jira. Pick the one that fits your team’s visibility and validation needs.
Option 1: Use the Description field in Jira issues
This is the quickest way to start. Paste your AC (Given–When–Then or a short list) into the description field and refine during sprint planning. Good for simple stories and small teams.
Watch-outs: the description is static, so progress and QA sign-off aren’t visible without reading through comments.
Option 2: Use a checklist app for actionable criteria (recommended)
A checklist turns each criterion into an actionable item. With Smart Checklist for Jira, developers and QA can move items through statuses, mark mandatory checks, and automate transitions when everything is verified. You can use Smart Checklist’s custom field capability to surface checklist content the way your project needs it. Smart checklist also keeps the logs of changes in the checklist history, so you can easily see who did what and when.
How to add Acceptance Criteria in Jira?
As always, Atlassian offers a lot of flexibility when it comes to finetuning Jira to meet your needs. There are several ways you can add an Acceptance Criteria field to your Jira work items (issues). The simplest one is probably to just write your AC in the description field. However, this approach is a bit messy. Acceptance Criteria often get lost among the rest of the content in this field.
I would suggest trying something else. Just keep in mind that you will need Admin permissions to leverage the following options.
Adding a custom field for Acceptance Criteria in Jira
- Press the Gear icon in the top right corner to open Project Settings.
- Select Work Items.
- Select the Custom field menu on the lefthand side.
- Click the Create custom field button at the top right corner.
- The best fit here would be to scroll down and select the paragraph (supports rich text) option.

- Name the new custom field.
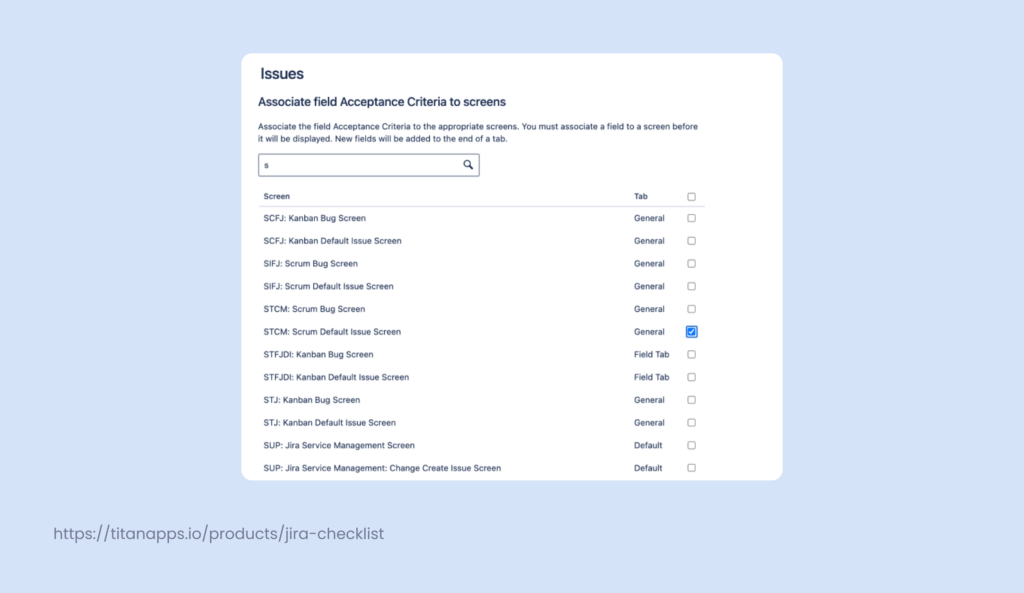
- After clicking Create, you will be forwarded to a settings screen where you can select where the new custom field appears. You can click update and associate the custom field to a specific screen later. For this example, I will be adding the field to the Scrum Default Work Item Screen.
- Now, whenever you click on the create button, your work items will have an Acceptance Criteria field.
So far, so good. You have a specific field in Jira you can use to add Acceptance Criteria. As is, this field is rather limiting. You can finetune it by going to the Field Configurations screen. Your newly created AC field should be under the Default Field Configuration unless you were making certain field configuration changes before.
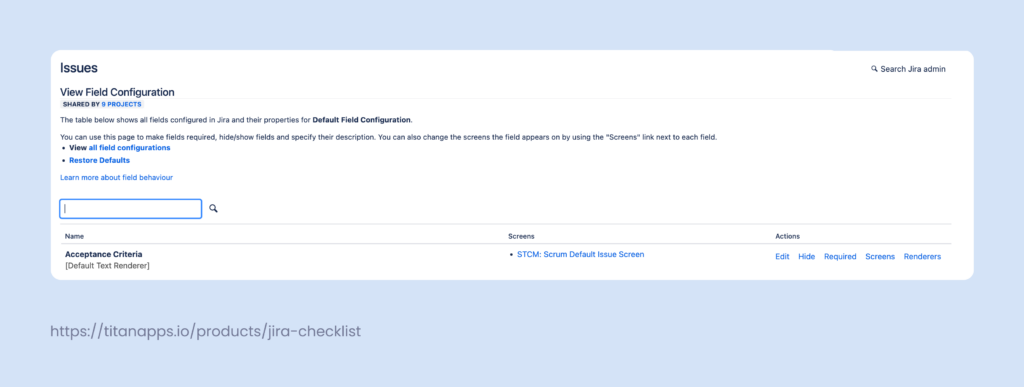
Find the Acceptance Criteria field and click on the Renders option on the right. Then, change the default style to the Wiki style.
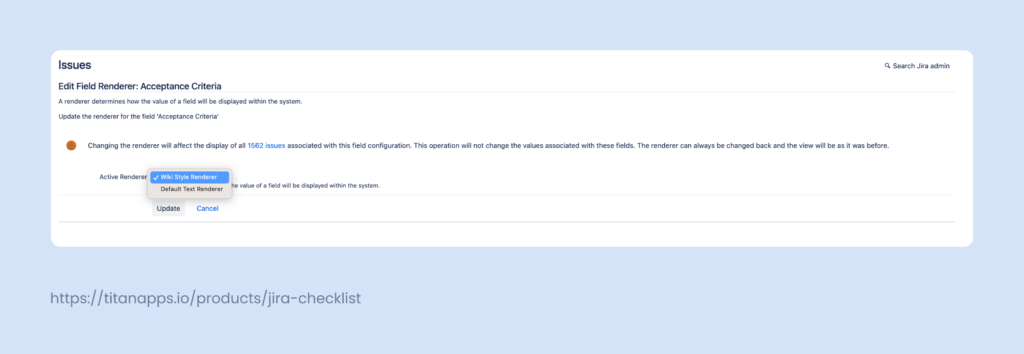
This way, your AC custom field will have the same formatting options as the description field.
This method still only offers you a custom field. The Acceptance Criteria there will not be intractable, and it will still be much harder to enforce them. Additionally, these kinds of fields often get lost among other fields in Jira work items.
Adding a checklist app for Acceptance Criteria in Jira
The Alternative option would be to add a checklist app from the marketplace. An app like Smart Checklist allows you to create customizable checklists, and integration with JMWE can help you set up your workflow validators in a way where a work item can’t transition to another status unless all of the checklists are marked as done.
What are the benefits of using a checklist app?
- Checklists are an intuitively fitting format for Acceptance Criteria.
- Checklists are interactive; the team can mark tasks as done.
- You can add templates to ensure your stories always have an Acceptance Criteria field upon work item creation.*
- You can enforce Acceptance Criteria by adding workflow validation.
How to manage Acceptance Criteria with Smart Checklist
Smart Checklist for Jira makes it so easy to manage Acceptance Criteria in Jira without the need to squeeze it inside the task’s description or a non-interacteable text field.
All it takes is just a few clicks to download and install Smart Checklist. You will then see the tab to the right side of each of your existing User Stories and every next Story that you create.
Adding Acceptance Criteria in Jira
Once installed, Click Open Smart Checklist to start adding the Acceptance Criteria list for the Story.

The great thing is that Smart Checklist gives you a little bit of flexibility – you can add items to the list one by one or open the Fullscreen Editor to edit the entire list at once. Click the Pen icon to open the Editor.
Smart Checklist custom statuses for devs and QA
You can tailor Smart Checklist items with custom statuses to reflect how work moves through the team. For example:
- Developed – the developer confirms the requirement is implemented. The item remains uncompleted because it still needs QA.
- QA passed” and “QA failed – the QA verifies behavior; the item becomes checked.

This keeps one list of acceptance criteria for both audiences: requirements for developers and a testing baseline for QA. It also avoids separate documents and side spreadsheets. Your team uses this pattern to show that an item is in progress without marking it done until testing is complete.
Tip: Teams often add brief details or screenshots in the checklist item’s description when behavior needs visual confirmation. Use sparingly to avoid clutter.

Mandatory items and automations
Some acceptance criteria are mandatory. Mark these items in a way that they must be completed before the story can move forward. Then add a simple automation:
- Rule: When all mandatory checklist items are in Tested (checked) state, transition the issue to Ready for release.
- Outcome: Less manual work for your team. If something is still “Developed” but not “Tested,” the issue stays put and teams know exactly what’s missing.
This pattern ties acceptance testing to your workflow in a way that is visible and audit-friendly. You get cleaner validation, fewer last-minute surprises, and a predictable handoff to release prep or block the issue transition if the checklist or specific items are not completed.
Key takeaways
Acceptance criteria defines clear, testable outcomes for each Jira user story and differs from the team-wide Definition of Done. You can keep AC in the issue description for simplicity, or manage them as actionable checklist items with Smart Checklist, which provides better visibility, QA sign-off, and fewer surprises. Smart Checklist supports custom statuses (e.g., “Developed” for devs, “Tested” for QA), mandatory items, and automation that moves issues to “Ready for release” when all critical checks pass.

Frequently Asked Questions about Acceptance Criteria in Jira
What are examples of acceptance criteria?
Clear, testable statements of expected behavior. You can write them in Given–When–Then or use a concise checklist (e.g., “Invalid credentials show an inline error,” “Session persists after refresh,” “Analytics event recorded”).
How do you add acceptance criteria to Jira?
You can write AC in the description field or track them with a checklist app like Smart Checklist. Choose based on how much progress visibility and QA sign-off you need.
What’s the difference between Acceptance Criteria and the Definition of Done?
AC apply to one story and define expected functionality and outcomes. DoD applies to all work and defines your quality bar. For a deeper dive, see Definition of Done in Jira with Examples.
Can acceptance criteria change during a sprint?
They can, but you might agree on a lightweight approval step with the product owner if scope changes. Keep the change visible in the issue and adjust tests accordingly.
What’s the best format for agile teams?
Use whatever your team will read and validate. Many teams mix Given–When–Then (for behavior) with checklist items (for QA and status clarity). Checklists are especially helpful when you want progress visible and easy to audit.
Can I automate based on acceptance criteria?
Yes. Mark key items as mandatory and add a rule: when all mandatory items are Tested, move the issue to Ready for release..


