Jira
Jira monday.com


The more you can automate, the more time you will have for the “H” part of HR—humans. In addition to freeing up time, automation brings you many other benefits. It allows you to build clear and transparent processes, create a smooth employee experience, and improve retention rates.
In this blog post, we explain how to set up various types of automation in Jira for HR management purposes.
From Recruiting to Offboarding: What Can You Automate?
Using automation in Jira can help you streamline a wide range of HR processes and recurring issues. This includes tasks in areas such as talent acquisition, human resource management, and people operations. For example:
- Organizing recruitment activities
- Pre-onboarding and onboarding
- Running feedback sessions and performance reviews
- Implementing individual development programs
- Handling vacation requests from employees
- Collecting feedback on processes
- Offboarding
Although not everything can be completely automated, even partial automation will have a noticeable effect. It allows you to build better-structured processes, organize cross-team work more efficiently, and save time and effort.
As a result, you can ensure that every phase of an employee experience is orchestrated in the best way possible. This also helps you transition smoothly between the recruitment, onboarding, and individual talent development stages. This increases employee satisfaction while optimizing your HR team’s resources.
Automation in Jira For HR Purposes: What Are Your Options?
As automation is a broad concept, you can utilize various instruments to put recurring tasks on autopilot. They range from using Jira’s standard automation rules to installing third-party tools or building advanced integrations with Jira’s API.
Here are some examples of different solutions that are available:
- Smart Checklists for typical issues. This works well for tasks involving multiple action points. For example, onboarding includes a long list of steps a new employee should complete: sign documents, receive equipment, and attend intro calls. You can use Smart Checklist for Jira to document this process and automatically add your checklist to every task with “onboarding” in its title.
- Smart Templates for recurring processes. Some processes, such as recruitment, require the creation of identical Jira epics with the same set of tasks. Smart Templates for Jira allow you to save such an epic as a reusable template. For regular processes, typical epics and their issues can be created automatically on a schedule.
- Automation for Jira to implement custom flows. Jira’s native automation functionality allows you to streamline a multitude of HR tasks and processes. It utilizes the trigger-action logic: once a specific event occurs, it triggers a pre-defined action or a sequence of steps. Jira offers you significant flexibility in choosing the conditions and shaping the rules to meet your needs. Some popular uses include setting up custom notifications and assigning tasks automatically.
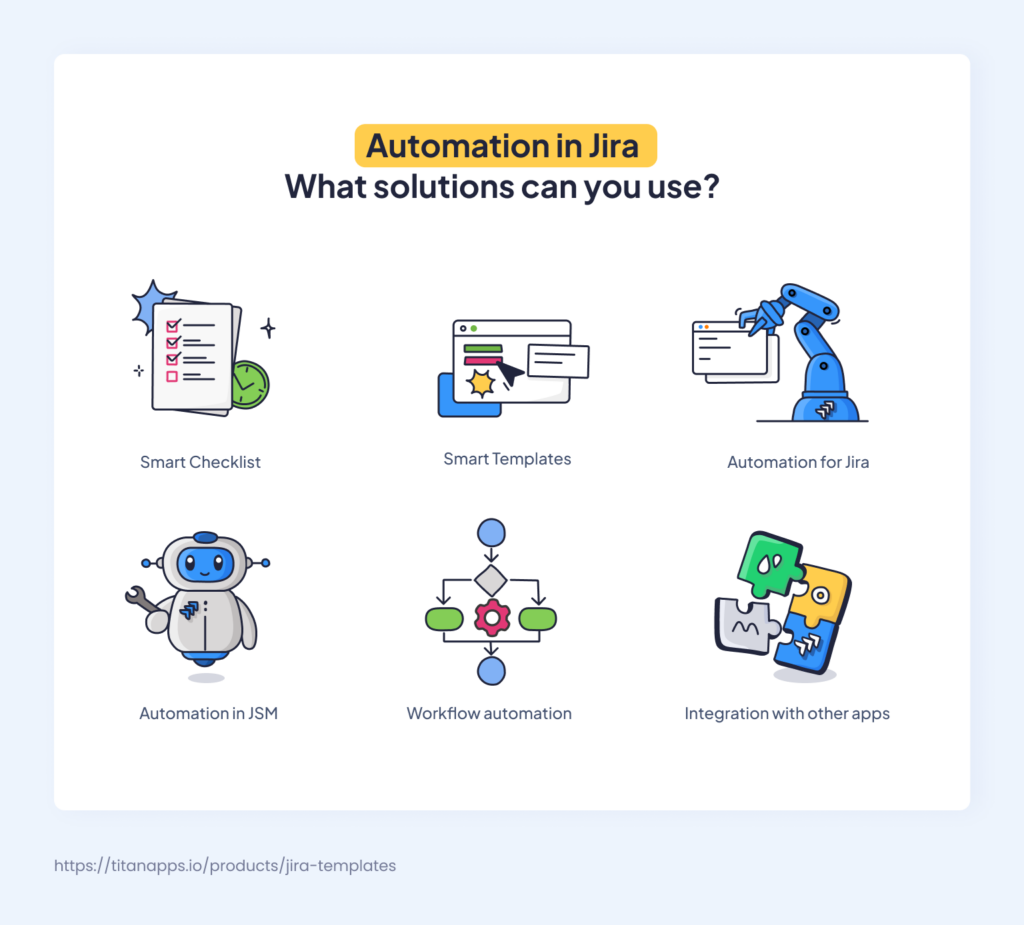
- Workflow automation for further optimization. A workflow in Jira describes a sequence of statuses an issue should go through, such as “To Do,” “In Progress,” or “Done”. You can use Jira’s Workflow Editor and other tools to incorporate automation into your workflows and make them more efficient. For example, you can block a vacation request from being moved to “Approved” unless it receives approval from the employee’s manager.
- Automation in Jira Service Management. Certain actions and processes in your JSM system can be streamlined as well. When employees submit purchase or refund requests, tickets can be automatically assigned to the responsible team members based on the request type. Another automation example is cloning a JSM ticket as an issue to a different project when a ticket requires the involvement of another department.
- Connecting Jira to external apps. Jira offers a variety of native connectors – for instance, it can be natively integrated with Slack. This allows you to receive notifications from Jira in a dedicated Slack channel. You can also integrate Jira with different apps by using third-party solutions. For example, tools like Zapier or Onward can connect Jira to BambooHR, ERP systems, and other HR apps (depending on the available integration list).
- Custom automation using the Jira API. With the help of a development team, HR processes can be automated further by integrating Jira with custom internal systems in your organization, as well as with various apps.
These solutions vary in complexity and require different levels of expertise to implement. For some cases, you will need to collaborate with a Jira administrator to set up the automation. However, you don’t have to start big to see a positive impact. Remember that even small changes can significantly enhance your work’s convenience and efficiency. Let’s explore some of the solutions in more detail to see how this can be achieved.
Set up Automated Checklists in Jira For Repetitive HR Tasks
HR specialists often manage processes that involve multiple steps or require the collaboration of different teams. It can be challenging to keep track of every detail and make sure everyone does their part on time.
Here’s how using checklists with automation can help with this:
For all repeated processes, we prepare a checklist describing the required steps from A to Z. Then, we save it as a template and use this templatized checklist together with Automation for Jira. So, anyone who works on a typical task has the same list of steps to follow. As a result, everyone has the same expectations and a clear understanding of what to do and in what order.

You can use Smart Checklist for Jira to automatically add structured checklists to your typical tasks. Here’s what it can look like:
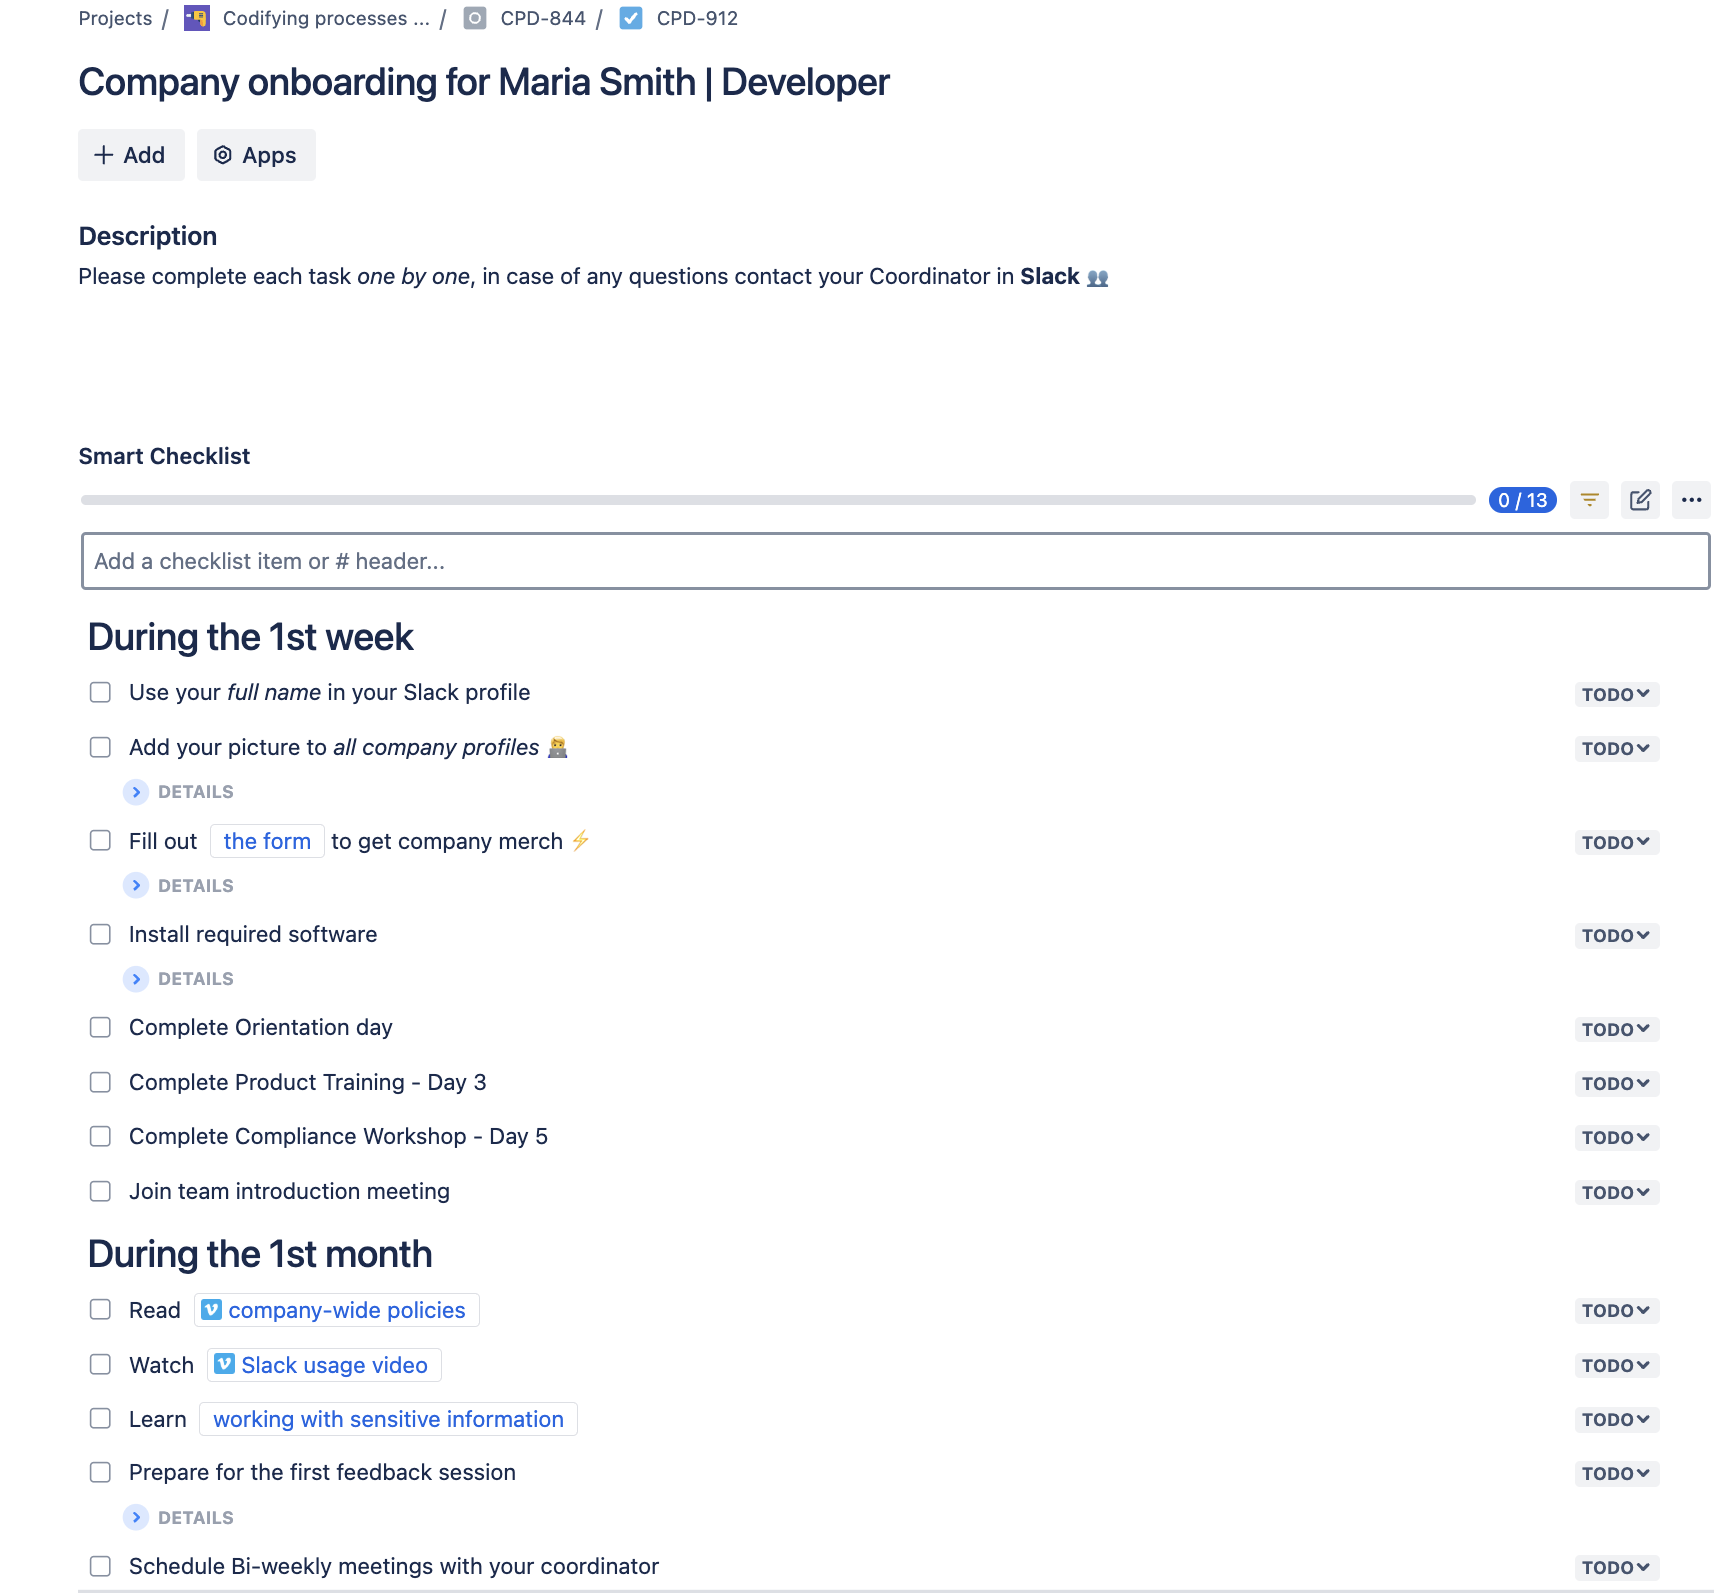
Company onboarding for Maria Smith | Developer
# During the 1st week
- Use your *full name* in your Slack profile
- Add your picture to _all company profiles_
> List of company profiles: Slack, Google account, Jira/Confluence, etc.
- Fill out [the form](http://rw.rw/vimeo.com) to get company merch
> Please state your current address
- Install required software
>VPN setup
>Antivirus installation
- Complete Orientation day
- Complete Product Training – Day 3
- Complete Compliance Workshop – Day 5
- Join team introduction meeting
# During the 1st month
- Read [company-wide policies](https://vimeo.com)
- Watch [Slack usage video](https://vimeo.com)
- Learn [working with sensitive information](https://www.atlassian.com/software/confluence)
- Prepare for the first feedback session
>Purpose: Assess your training progress and role adaptation.
- Schedule Bi-weekly meetings with your coordinator
>Purpose: Review progress on tasks, ask questions
This example is a checklist prepared for a new hire. It guides them through the process step by step, provides links to the necessary materials, and uses headers to set priority for different action points.
You can create separate checklists for the People, Legal, IT, Procurement, Security, and other teams involved in the new employee onboarding process. These checklists will be automatically added to every new onboarding task. As a result, the documented process can be easily replicated, ensuring that everyone follows your company’s best practices.
In particular, Smart Checklist allows you to:
- Mention collaborators in different steps so they know where to join in
- Include deadlines for each step to better organize your work
- Save checklists as templates for reuse
- Use different statuses for each action item (“To Do,” “In progress,” etc.)
- Include headers to better structure your action plan
- Add links so that all necessary resources are always at hand
- Mark steps as mandatory and prevent moving to the next step until completed
- Use the markdown editor to adjust the formatting
- Add details for each step in an expandable section
Creating an Automated Smart Checklist Step-by-step
- Install Smart Checklist for Jira by TitanApps. Write down the key stages of the required process in your organization (for example, onboarding). Alternatively, you can copy the draft structure for the onboarding plan from the example we provided above or from other ready-to-use Smart Checklist Onboarding templates.
- Open your Jira issue and insert the process description you prepared into the Smart Checklist in your Jira task.
- If necessary, you can use the markdown editor to adjust the onboarding plan further: add missing steps, remove the ones you don’t need, and so on.
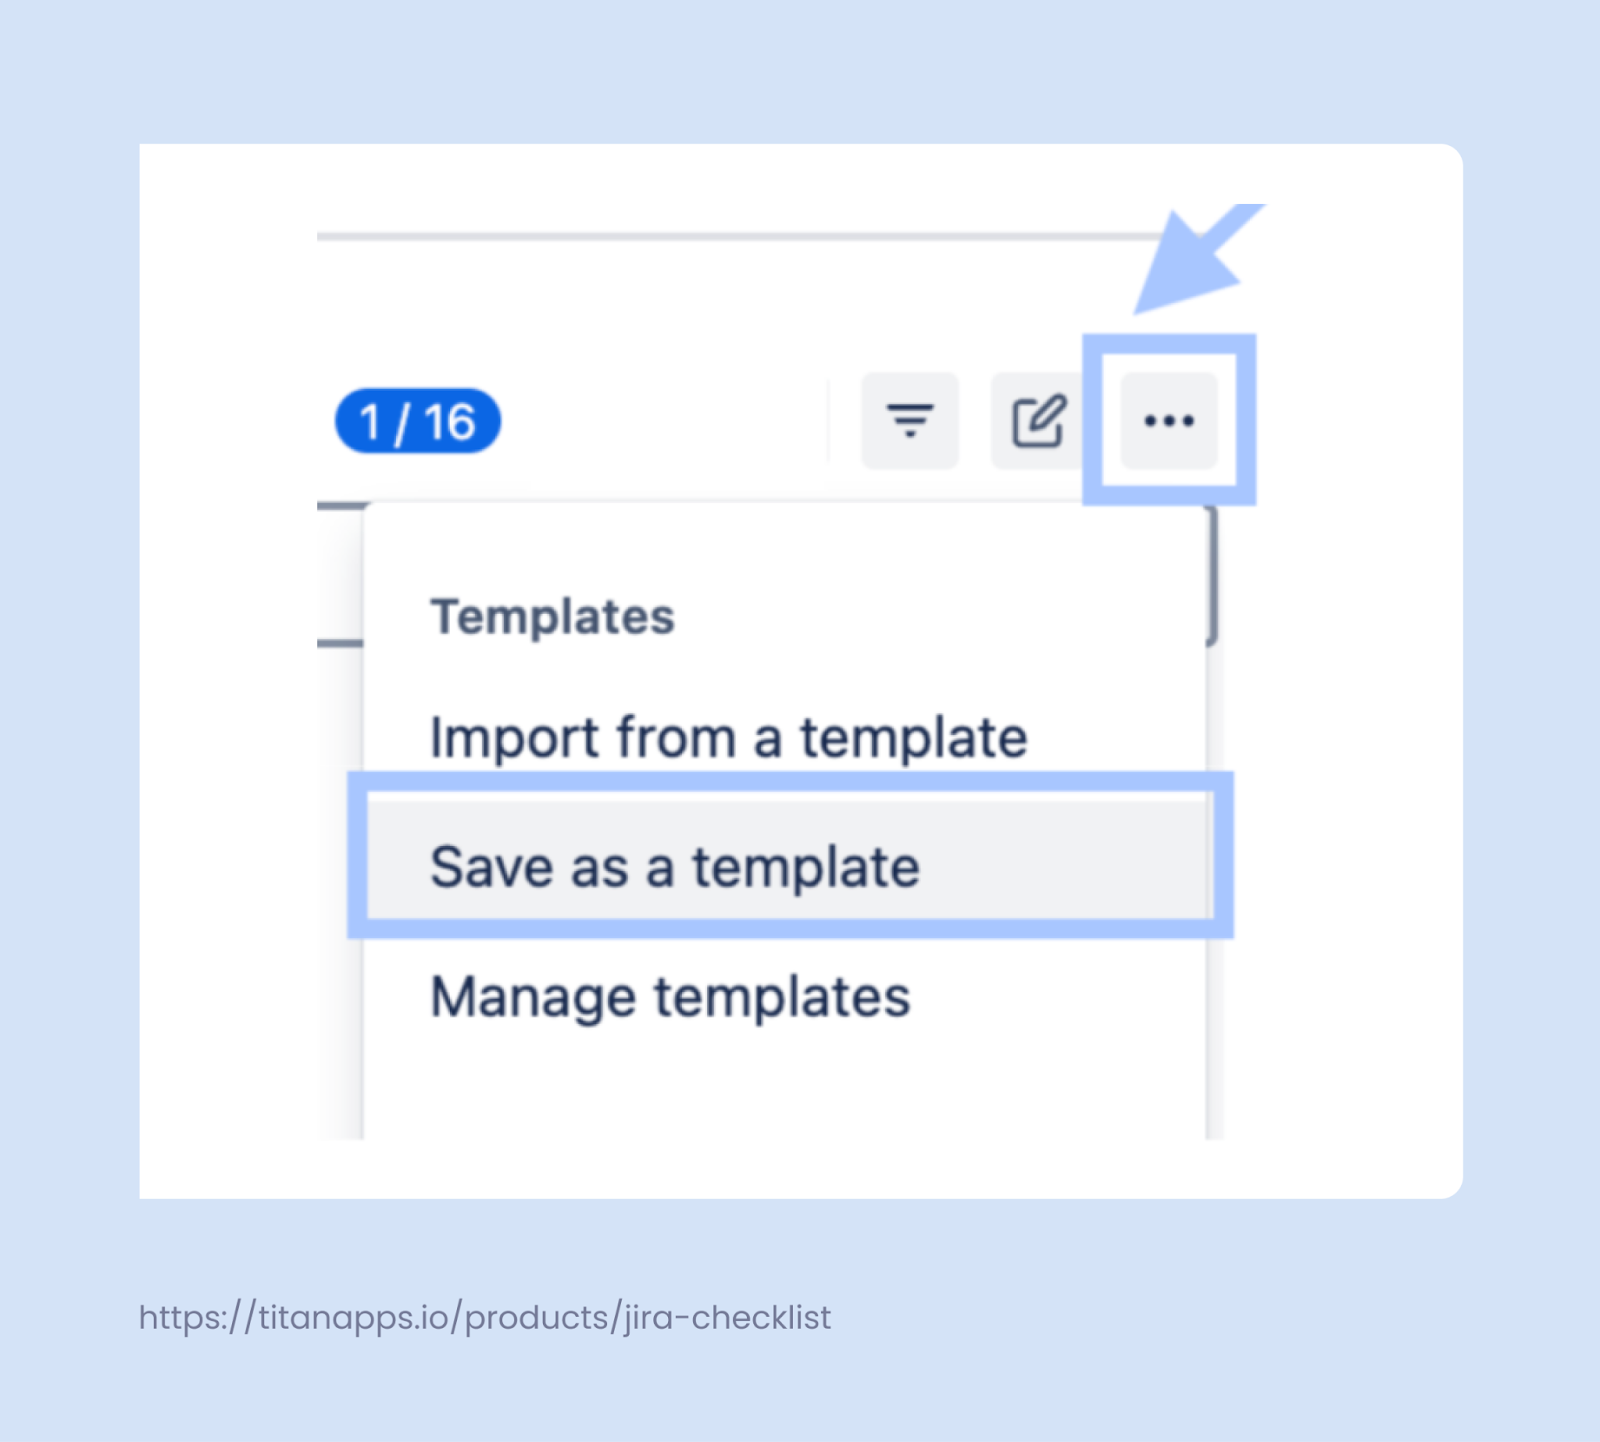
- Save the checklist as a template, as shown below.
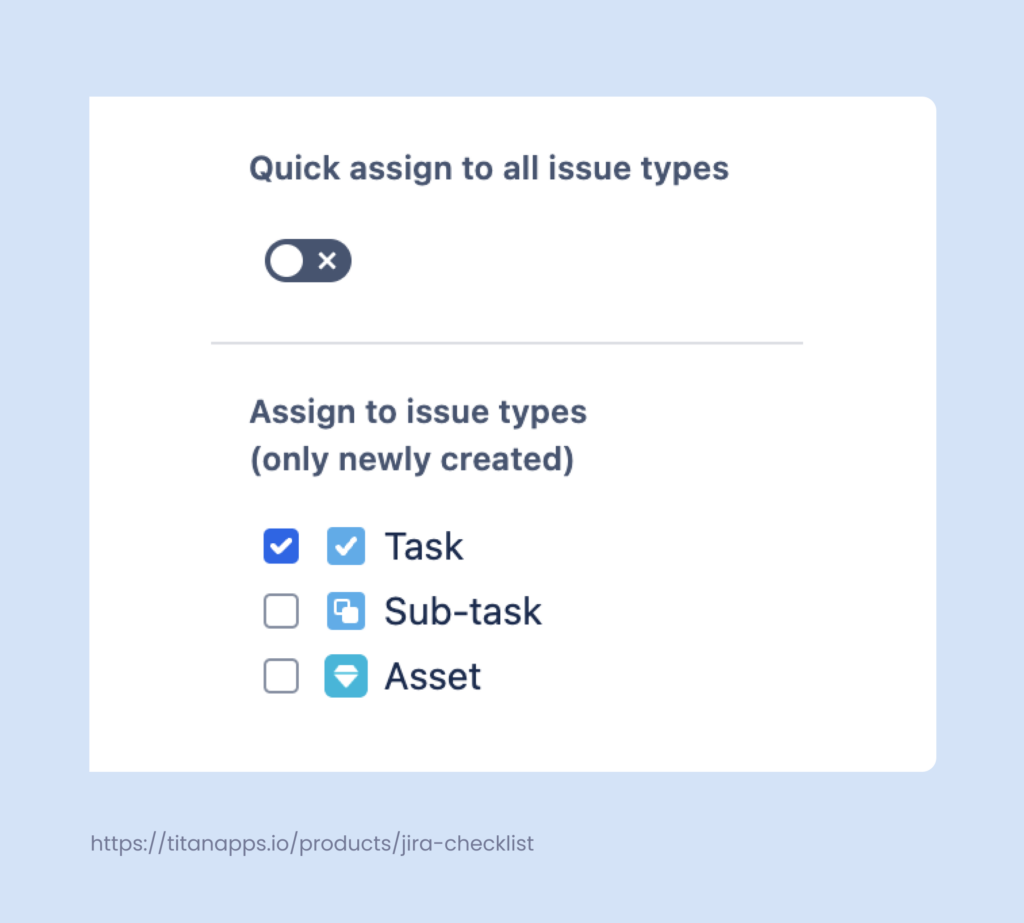
- Assign your checklist to a specific issue type using the Smart Checklist’s built-in functionality. Click the three dots as shown in the screenshot above, but, in this case, select Manage Templates. Click the template you need to expand its details. In the menu on the right, select the issue types you want to apply this template to. Your Smart Checklist template will be included in all new issues of the specified type for this project.
- Assign your checklist to a specific issue type using the Smart Checklist’s built-in functionality. Click the three dots as shown in the screenshot above, but, in this case, select Manage Templates. Click the template you need to expand its details. In the menu on the right, select the issue types you want to apply this template to. Your Smart Checklist template will be included in all new issues of the specified type for this project.
- If you want to integrate Smart Checklist templates into more complex scenarios, use Automation for Jira. Follow this Smart Checklist Guide and Checklist Template Guide to select the type of automation you need and set it up. For example, you can create a rule for adding a checklist template for each new subtask that meets your criteria. For instance, every “Install the required software” subtask in the “Onboarding” task can get a checklist with the tools an employee should install.
In general, using this tool with automation gives you a lot of flexibility. We will talk more about using Automation for Jira in one of the following sections.
Alternatively, if needed, you can add smart checklists manually from a saved template.

Use Automated Smart Templates For Recurring Processes
Many HR processes have a complex structure. They can be stretched in time and include multiple tasks with different assignees and checklists. Such processes can be organized with the help of Smart Templates. This tool lets you turn any task into a reusable template with a pre-defined structure.
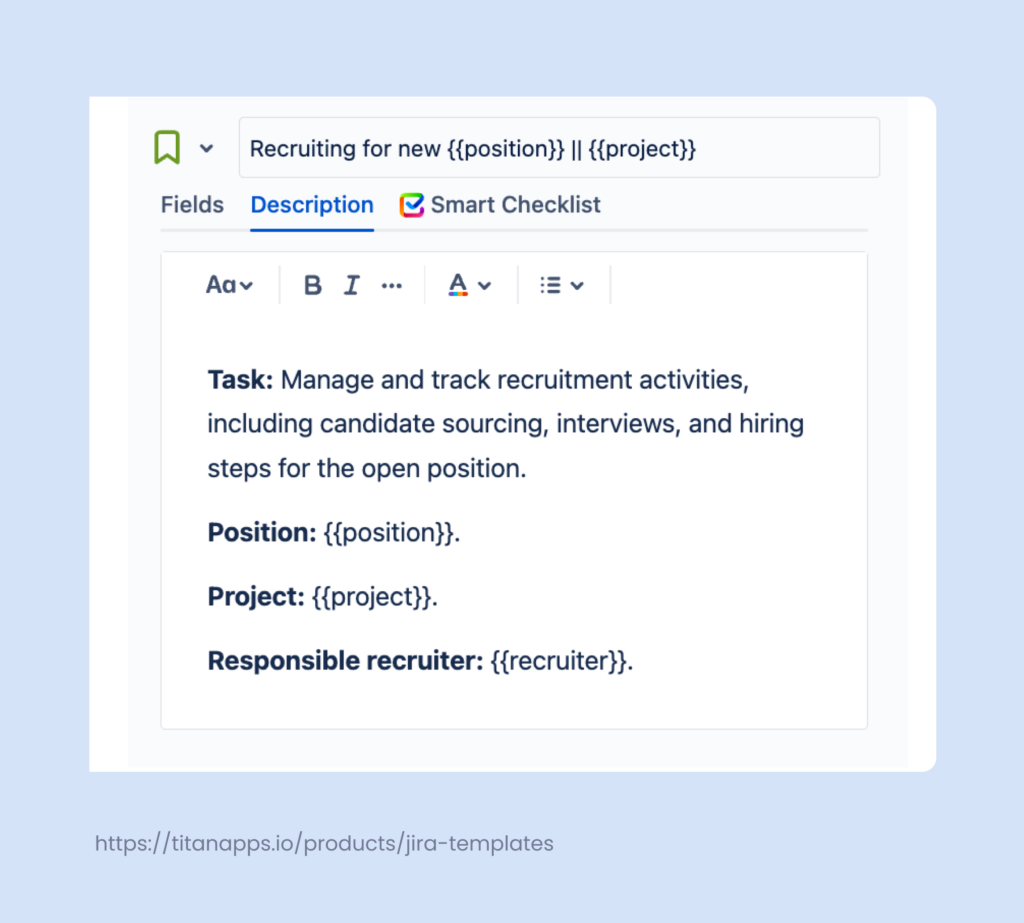
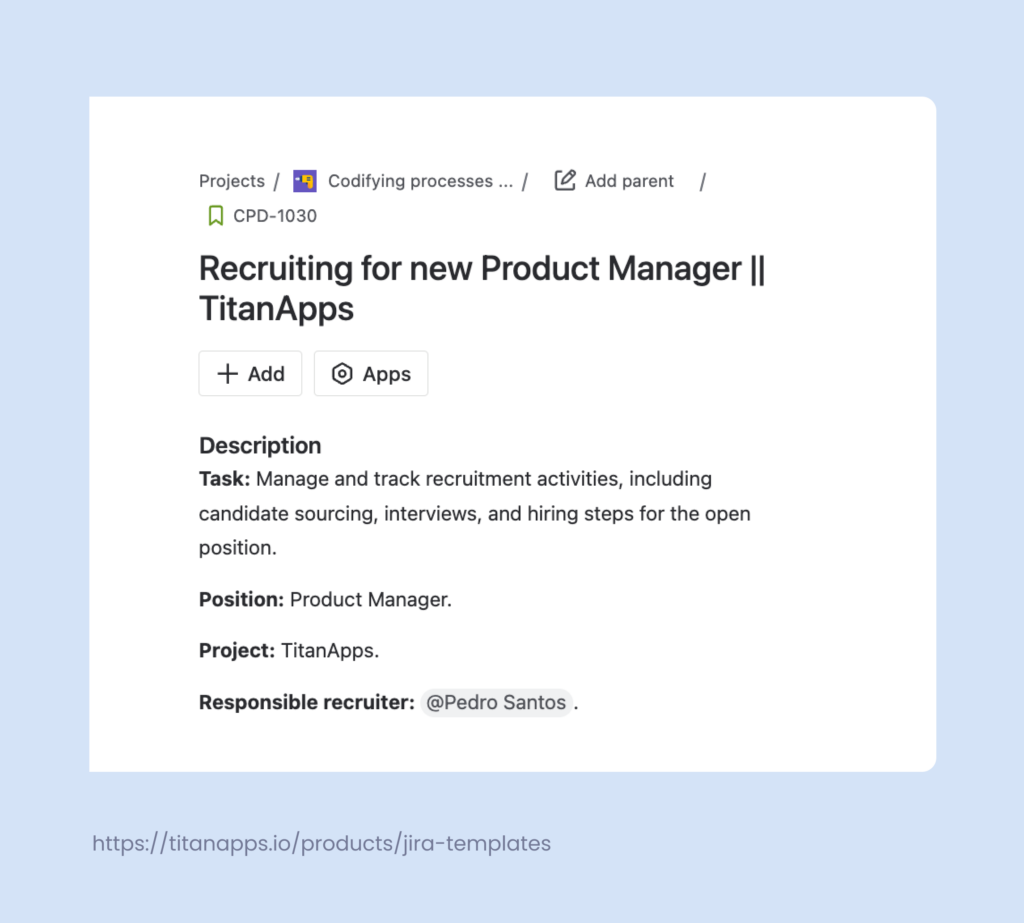
For example, below is a template for the recruitment process. When a new position opens, you can use this template to instantly create a new Jira epic with a standardized set of tasks, each including a checklist of To-Do items. As Smart Templates support variables, such as {{position}} and {{project}}, the same template can serve for multiple hiring campaigns.
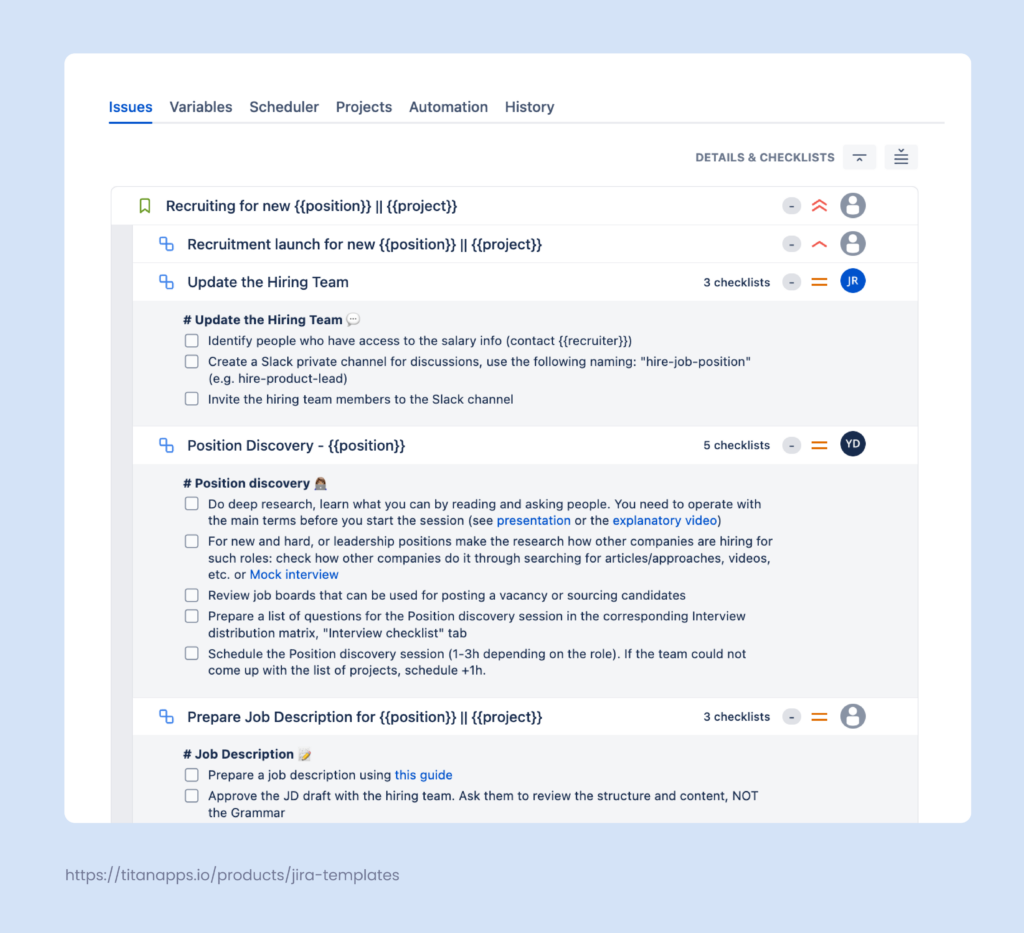
Apart from hierarchically organized issues, a smart template can have prefilled fields (Components, Epic Name, Priority, Labels, and Assignee). In addition, you can set up a reusable description structure.
The images below show a standardized task description in the template and its application in an actual task. The issue title and description variables were substituted with information specific to the task.
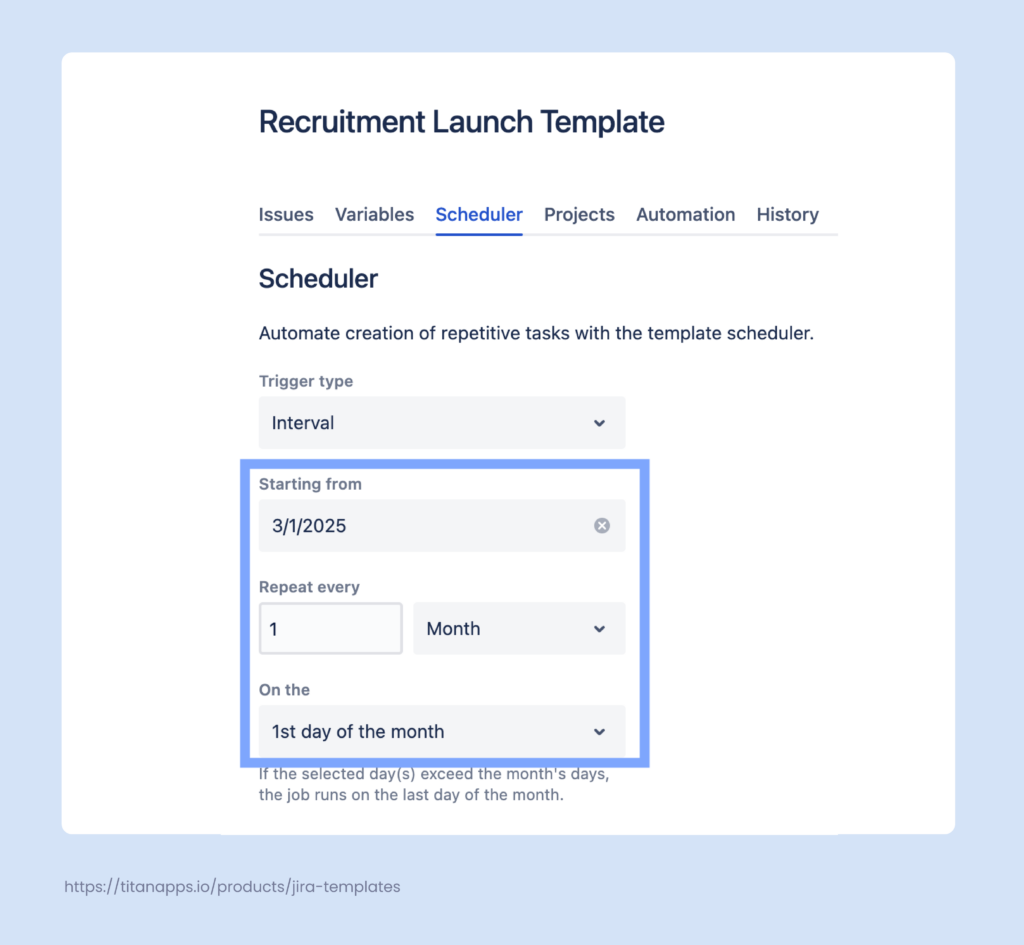
You can schedule automatic issue creation for recurring tasks according to your settings. This can be done with the help of the in-built Scheduler feature in Smart Templates:
To sum up, Smart Templates for Jira allow you to:
- Create templates from any existing epic or another issue
- Structure complex processes as a hierarchy of tasks
- Automatically create issues from the template via Automation for Jira
- Schedule issue creation with the built-in Scheduler feature
- Automatically assign tasks and mention people
- Use variables for dynamic parameters
- Calculate due dates for issues automatically
- Prefill issue fields, including custom ones
- Set issue description structure and reuse it
All this allows you to instantly launch HR processes by automatically creating epics with multiple subtasks and pre-set assignees, due dates, and more.
Step-by-Step Instructions For Creating a Smart Template With Automation
- Install Smart Templates for Jira.
- Open an existing issue that you want to turn into a template.
- In the Smart Templates section of your issue, click Save structure as template, name your template, and save it. Alternatively, you can create a template from scratch.
- Adjust the structure if needed before saving it as a template. Add and remove tasks or subtasks, specify assignees, use variables, include smart checklists, and so on. Once you’ve made the changes, save them.
- Use the built-in Scheduler feature to automatically create issues from your template.
- For more complex scenarios, follow this guide to integrate Smart Templates with Automation for Jira.

Benefits of Using Smart Tools in Jira For HR
Smart Checklist and Smart Templates can work separately, but you will gain more value if you use them together. They seamlessly integrate with each other and with Jira’s native automation functionality. Here are the benefits of utilizing these tools in Jira for HR tasks:
- Processes are well-structured, documented, and are run consistently.
- Everything in one place. For each everyday or recurring task, you get a single checklist featuring information that was previously scattered across multiple documents and policies.
- Complex processes are captured in the form of epics with multiple tasks and can be launched automatically on a schedule.
- More transparency – new recruiters and HR specialists can easily “plug” into the company processes without needing to spend months learning all the details. Smart Templates also allow you to see the list of all issues created from a specific template.
- Best practices take a practically applicable form and don’t just stay on paper.
- Better coordination between different departments, in particular for onboarding and other cross-team processes.
- Less repetitive manual work, more efficiency, and time optimization.
In general, Smart Tools for Jira by TitanApps are easy to use even if you don’t have any technical knowledge. This is something you can implement with little effort and quickly see the results. Over time, these improvements in process clarity and coordination have a measurable impact on your employee satisfaction rate.
Leverage Native Automation For Jira to Create Custom Rules And Scenarios
As mentioned earlier, you can use Automation for Jira with Smart Checklist and Smart Templates to integrate these tools into your processes. But, of course, this Jira functionality can be utilized in multiple other ways. It allows you to configure custom automation rules and shape your workflows in Jira according to your organization’s requirements.
Automation in Jira for HR is helpful for:
- Linking issues to automatically connect HR tasks that are related.
- Scheduling issue creation for tasks that repeat periodically, such as performance reviews.
- Adding checklists to issues when a specific type of HR issue is created, such as an offboarding task.
- Assigning issues automatically based on various conditions. For example, whether the task description contains “Employee satisfaction survey.”
- Triggering notifications and reminders. For example, sending automatic alerts for contract due dates, policy acknowledgments, or feedback sessions.
Here’s an example of a rule for automatically assigning tasks. When a new issue is created, the rule is triggered and checks whether the description contains the keyword and if the assignee is specified. If not, the issue containing the keyword is assigned automatically based on the parameters you chose. It can be assigned to the issue creator, a person responsible for this type of task, the epic assignee, and so on.
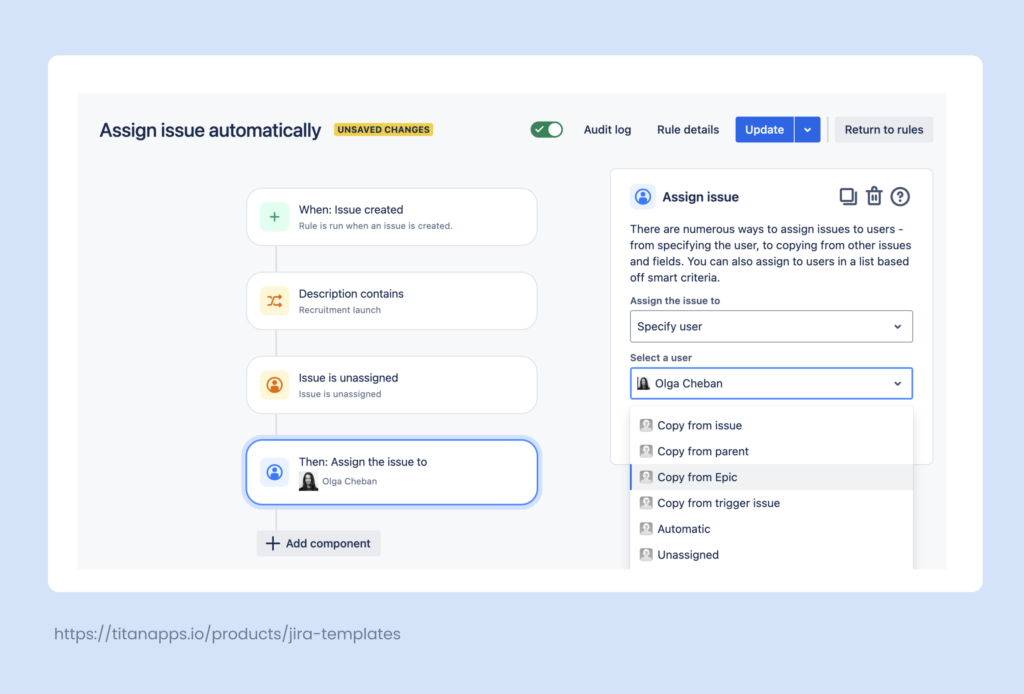
In this case, the rule checks for the phrase “recruitment launch” in the issue description. If it’s there and the issue is without an assignee, it can be assigned automatically to the person responsible for recruitment.
Keep in mind that these flows may be broken if the assignee mentioned in the rule loses access to the project or has their account suspended.
How to create an automation rule in Jira:
- Go to Project Settings -> Automation. Click Create Rule. To use this feature, you must have Administrator rights for your project.
- Specify the trigger for the rule – the event after which the rule should run, such as Issue created or Issue updated.
- Add conditions to your rule. In the example above, we select User condition and specify the required parameters (the assignee field is empty).
- Select the action that should be performed.
- Save and turn on your rule.
Use Automation With Your Jira Service Management Helpdesk
HR departments often use Jira Service Management (JSM) to set up a self-service portal or helpdesk software for employees. This is a great tool for processing requests, managing approvals, collecting employee feedback, and much more. Introducing automation can help you do this faster and with less effort, making HR service delivery more fast-paced.
The opportunities provided by Jira’s native automation functionality are nearly limitless. Here are some examples of what you can put on autopilot:
- HR request categorization. Once a ticket is created, the system can automatically detect the request type and assign the issue to the responsible person. For instance, a time off request is assigned to an HR manager.
- Facilitating approvals. Tickets that require approval or signing documents, such as job offers, can be automatically routed to the approvers once they are transferred to the Ready for Approval status.
- Automated notifications. People can receive notifications in Slack or other apps once certain activity occurs in the ticket (adding comments, uploading attachments, etc.). For instance, when an employee’s leave request is approved or denied, an automated notification is sent to the requester.
- Creating issues from Smart Templates. For example, when an employee’s contract end date is near, this can trigger an automated issue creation from a contract renewal task template. The HR team will be assigned a task to check whether the contract should be renewed or terminated.
- Adding Smart Checklists to user requests. For typical issues, you can automatically add step-by-step checklists and even make them visible to the person who submitted the ticket. They will be able to track progress on their request in the view-only mode. For example, an employee can submit a business travel request and then view the checklist of steps the HR team needs to complete to handle it. For more details, watch this short video about Codifying processes.
To set up automation for HR Service Management, go to Project Settings -> Automation. There, you can add a tailored rule for your specific case. Let’s examine some examples.
Below is a rule for cloning a JSM issue into another project. It’s triggered once the initial issue is moved to In Progress. This rule is useful when a ticket requires the involvement of a team working on a different project. For instance, when an employee submits a reimbursement request and once it’s marked as In Progress, the ticket is cloned to the financial team’s project in Jira.
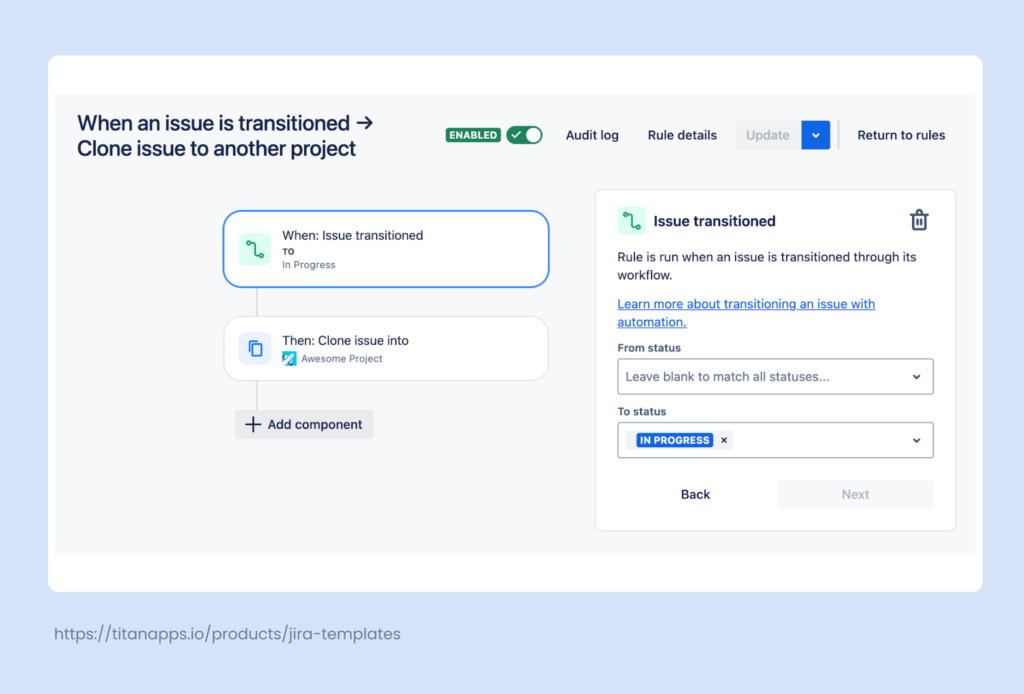
You can modify the rule to only apply to certain issue types if needed.
This automation works best if both projects have identical issue layouts. This means you should take into consideration the differences between the two projects and discuss this rule with your Jira Administrator before enabling it.
The next example is a rule that automatically adds a Smart Checklist to the selected type of JSM ticket. Let’s say an employee submits a ticket with the request type “Business Trip.” The rule below will add to this task a list of steps one should take while processing this request. As a result, the responsible person receives a ticket with a clear action plan.
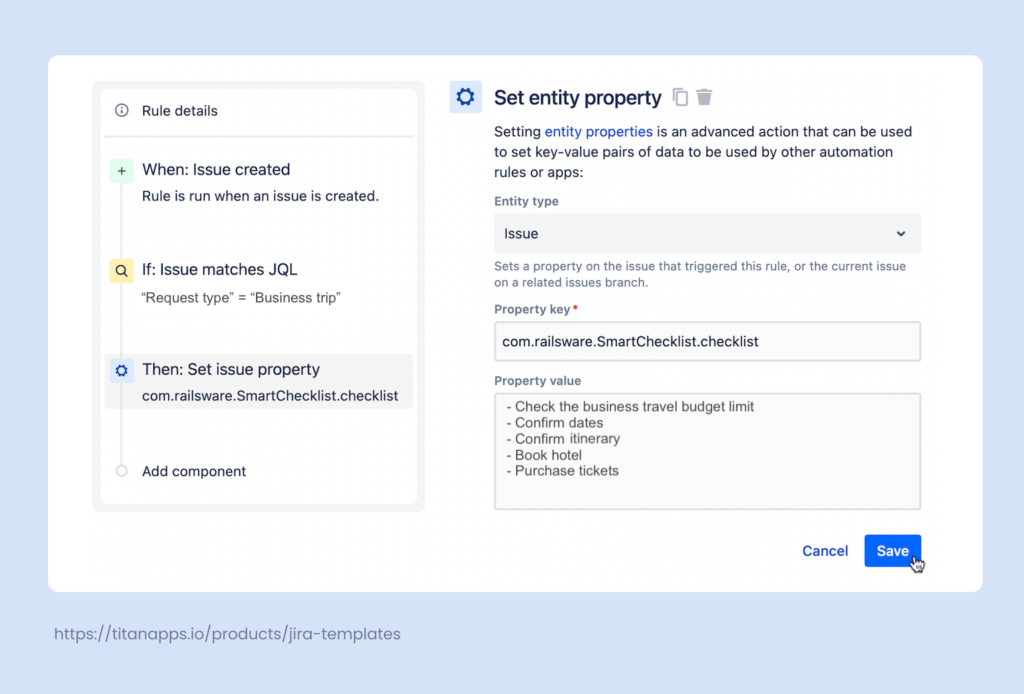
For more details on how to set up this automation, please see this Adding Checklist to JSM guide.
Using tailored automation rules and structured checklists will help you streamline HR service delivery and increase employee satisfaction rates.

Set Up Workflow Automation in Jira for HR Process Optimization
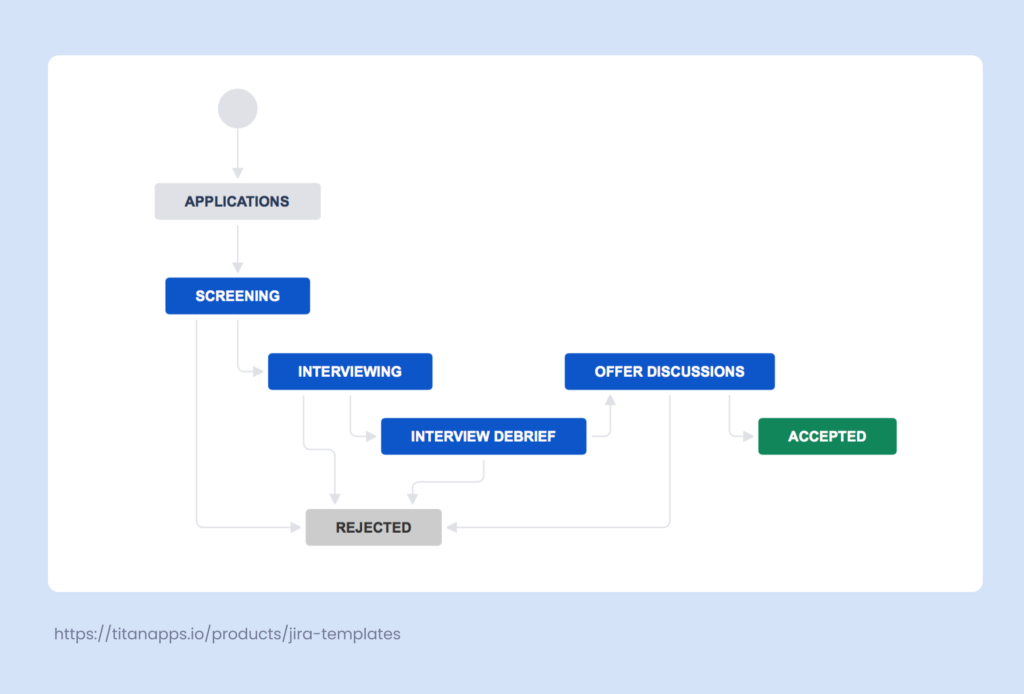
Workflows help you organize processes by clearly defining the key stages for typical or repetitive issues. For example, below you can see a simple recruitment workflow in Jira. It goes from Screening to Interviewing and further to Accepted while permitting the transition to Rejected from most of the other stages.
Jira allows you to integrate automation into your workflows. In particular, you can configure various actions that are triggered when an issue changes its status.
Here are some common examples of using workflow automation in Jira for HR processes:
- Strict rules for status changes. For example, moving an issue from Screening to Offer can be disabled if the Interviewing stage is skipped.
- Validating compliance. Add rules that will validate whether certain conditions are met. For instance, a rule can check whether an employee satisfaction survey form is attached before allowing you to proceed with the performance review.
- Auto-assigning reviewers. A workflow automation rule can change the assignee when an issue transitions to a specific stage. For example, when a business trip request is moved to “Approval Pending”, the issue can be auto-assigned to the employee’s manager.
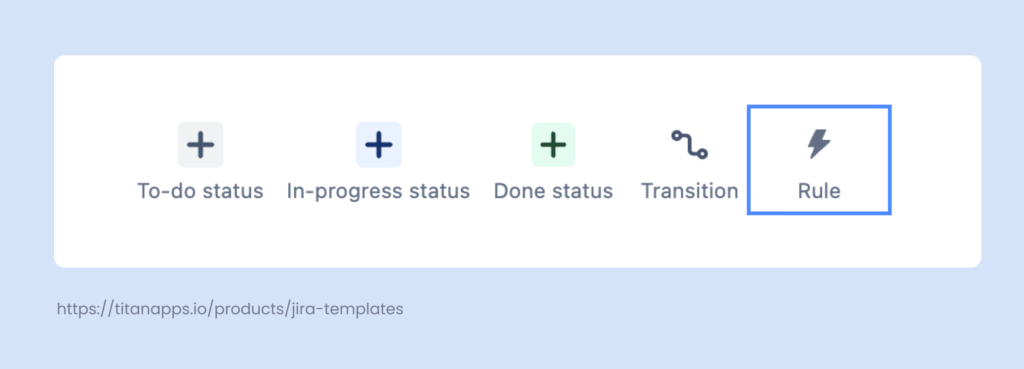
To add automation to your workflow, use Jira’s Workflow Editor. There, you can adjust your statuses and transitions and add various rules. They fall into three main categories: rules that restrict transitions, validate details, or perform certain actions.
To access this menu, open the workflow you want to change in the Workflow Editor and click Rule in the menu bar on the top:
There, you can see all the options and select what fits best for your case.
As an example, let’s add automation to the recruitment workflow that we showed above. Let’s say only the people who were present in the interview can make a decision about sending an offer to the candidate. In this example case, these people are also specified in the Approvers field of the issue. We can set up workflow automation that prevents anyone else from transferring an issue to the Offer Discussion status after the Interview Debrief stage.
From the list of the rules in the Workflow Editor, we select Restrict who can move an issue:

Next, we specify the transition to which the automation should be applied and select who can move the issue at this step: Restrict to -> Users in the custom field -> Approvers.
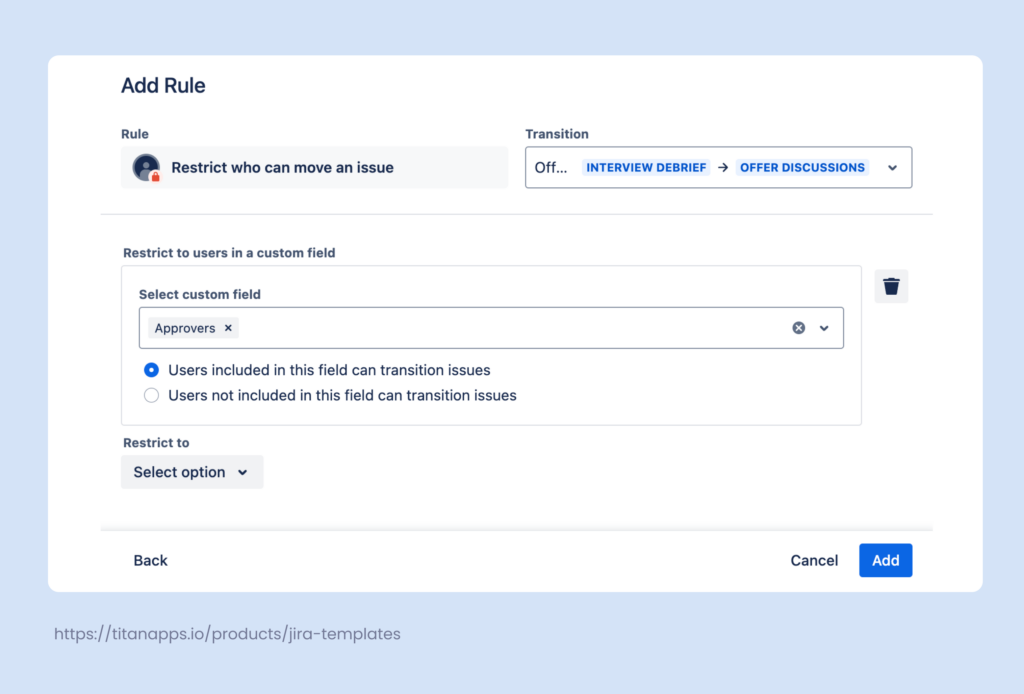
Once this is ready, we click Add. The automation is now active and will apply to all issues that follow this workflow.
Connect Jira to Third-Party Apps For Enhanced Automation
Most HR teams are not limited to Jira and also use many specialized HR management tools. These include apps such as BambooHR, Workday, Greenhouse, Rippling, HiBob, and many others. In addition, numerous business apps, such as Microsoft Teams, Miro, Google Sheets, and various ITSM solutions or project management tools also exist. Connecting Jira to these third-party applications can help you automate HR tasks.
Here are some of the options to consider:
- Native integrations. Jira offers native connectors for some widely used apps, such as Slack, Figma, Excel, Trello, Confluence, and more.
- Marketplace apps. In your Jira project, in the upper menu bar, click Apps -> Explore more apps to access the Atlassian marketplace. It features numerous third-party solutions with diverse functionality.
- Data integration solutions. For example, tools like Onward or Zapier can integrate Jira with BambooHR, and other HR apps and transfer data between them.
- Reporting automation apps. Platforms like Coupler.io can channel data from Jira to BI tools and help you build custom live dashboards.
- Trigger-based automation apps. Tools such as Zapier can also help you build complex workflows based on the trigger-action logic. Depending on your needs, these workflows can include Jira and multiple other apps.
Let’s say we want to automatically create an onboarding task in Jira once a new employee is added to BambooHR. This can be done with the help of a Zapier integration for BambooHR and Jira. Once you sign up for the tool and select the apps to connect, you will need to specify the trigger and action for the automation. In our example, the trigger is “New employee added” – an event that happens in BambooHR. The action is “Create issue,” which takes place in Jira.
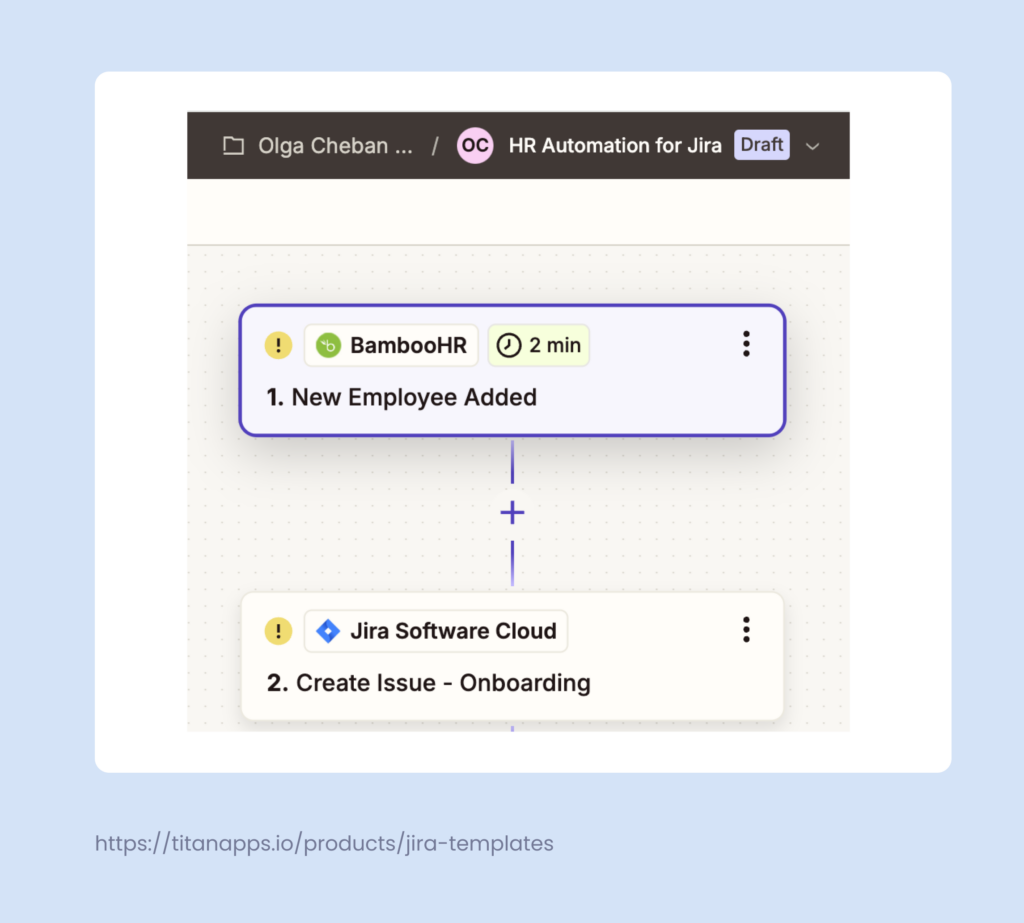
You will also need to connect your BambooHR and Jira accounts by providing your API credentials for these apps. After this, you will be able to fill in the necessary issue parametres, such as project, issue type, and any other required fields. Next, you will need to match fields from BambooHR to the corresponding fields in Jira so that the correct data is transferred between the apps, such as the employee’s name and position.
Once this is complete, you can test your integration and, if successful, turn it on. Zapier will check BambooHR for new data at specified intervals. If it registers a trigger event (e.g. a new employee added), it will run the automation and create a new onboarding issue in Jira according to the provided settings.
Going Beyond Jira For HR Task Management
From task-level automation to complex rules streamlining HRSM processes, Jira provides a wealth of tools for work optimization.. However, automation in Jira for HR purposes is just one of many things you can do to boost efficiency. To maximize your results, you may want to look beyond Jira and add other types of automation to your toolset.
For instance, when a new candidate applies, a Google Drive folder for this person can be created automatically on the company’s drive. There, you can keep their CV, portfolio, and position processing templates. Another example is setting up a Greenhouse data health monitor. It can give you weekly reports on whether any required data is missing from the applicants’ profiles. There can be countless other examples. I hope this tutorial has helped you discover new ideas for optimizing HR processes. Automation harbors immense power, and it’s worth remembering that even small changes can accumulate and lead to significant improvements.