Jira
Jira monday.com


What is a Definition of Done: When is it Done-Done?
A Definition of Done in Jira is a checklist of activities designed to remove all ambiguity from the “Done” status. This list needs to clearly describe the scope of work and expected results in a way that can’t be misinterpreted, allowing everyone involved peace of mind, knowing that completed work adds business value.
Achieving this goal is sometimes easier said than done. You will need clear, descriptive criteria the development team needs to meet if you want a definition rather than a declaration of done. You can think about some questions with a yes or no answer when designing your DoD:
- Has the code been checked, commented on, and run against the current version?
- Has the code been reviewed?
- Has the code been covered with unit tests?
- Has it passed Acceptance Testing?
A well-designed Definition of Done offers:
- A common reference point
- Clarity of both goals and expectations
- Better communication and reporting
- A baseline for quality
Along with the Definition of Ready, the Definition of Done is widely used by agile teams following such methodologies as Scrum and Kanban. It helps them streamline the product management process and ensure the high quality of their work.
DoD Example
A good Definition of Done should answer a deceptively simple question: can the delivered work be shipped (released) to customers? The answer to this question comes from the understanding of whether the work meets all of the requirements and quality criteria.
This can be an example of a DoD. However, your definition may (and probably will) differ:
- Code is officially done and works
- All bugs have been fixed
- Unit tests do not find any bugs
- The Quality Assurance team has resolved all work items (formerly Jira issues)
- The documentation has been updated
- The build has been pushed to the staging environment
- All tasks with the “To do” status have been finished
When preparing your Definition of Done in Jira, keep in mind these recommendations:
- Keep it achievable – to define what you want to deliver.
- Keep it measurable and not too broad – so that the dev team can plan and estimate the work.
- Avoid technical details – to keep things clear for everyone, use plain English. All in all, acceptance criteria should be expressed very clearly.
- Make the criteria testable – so that the QA team can verify that all the requirements are met.
A Reusable Definition of Done Template
We’ve prepared a free template for the Definition of Done in Jira. As you can see, it’s organized as a structured checklist. It lists the main criteria that a responsible person needs to check before marking a task as “Done”. Going through the list, your teammate will be able to double-check all the important details and ensure nothing is missing.
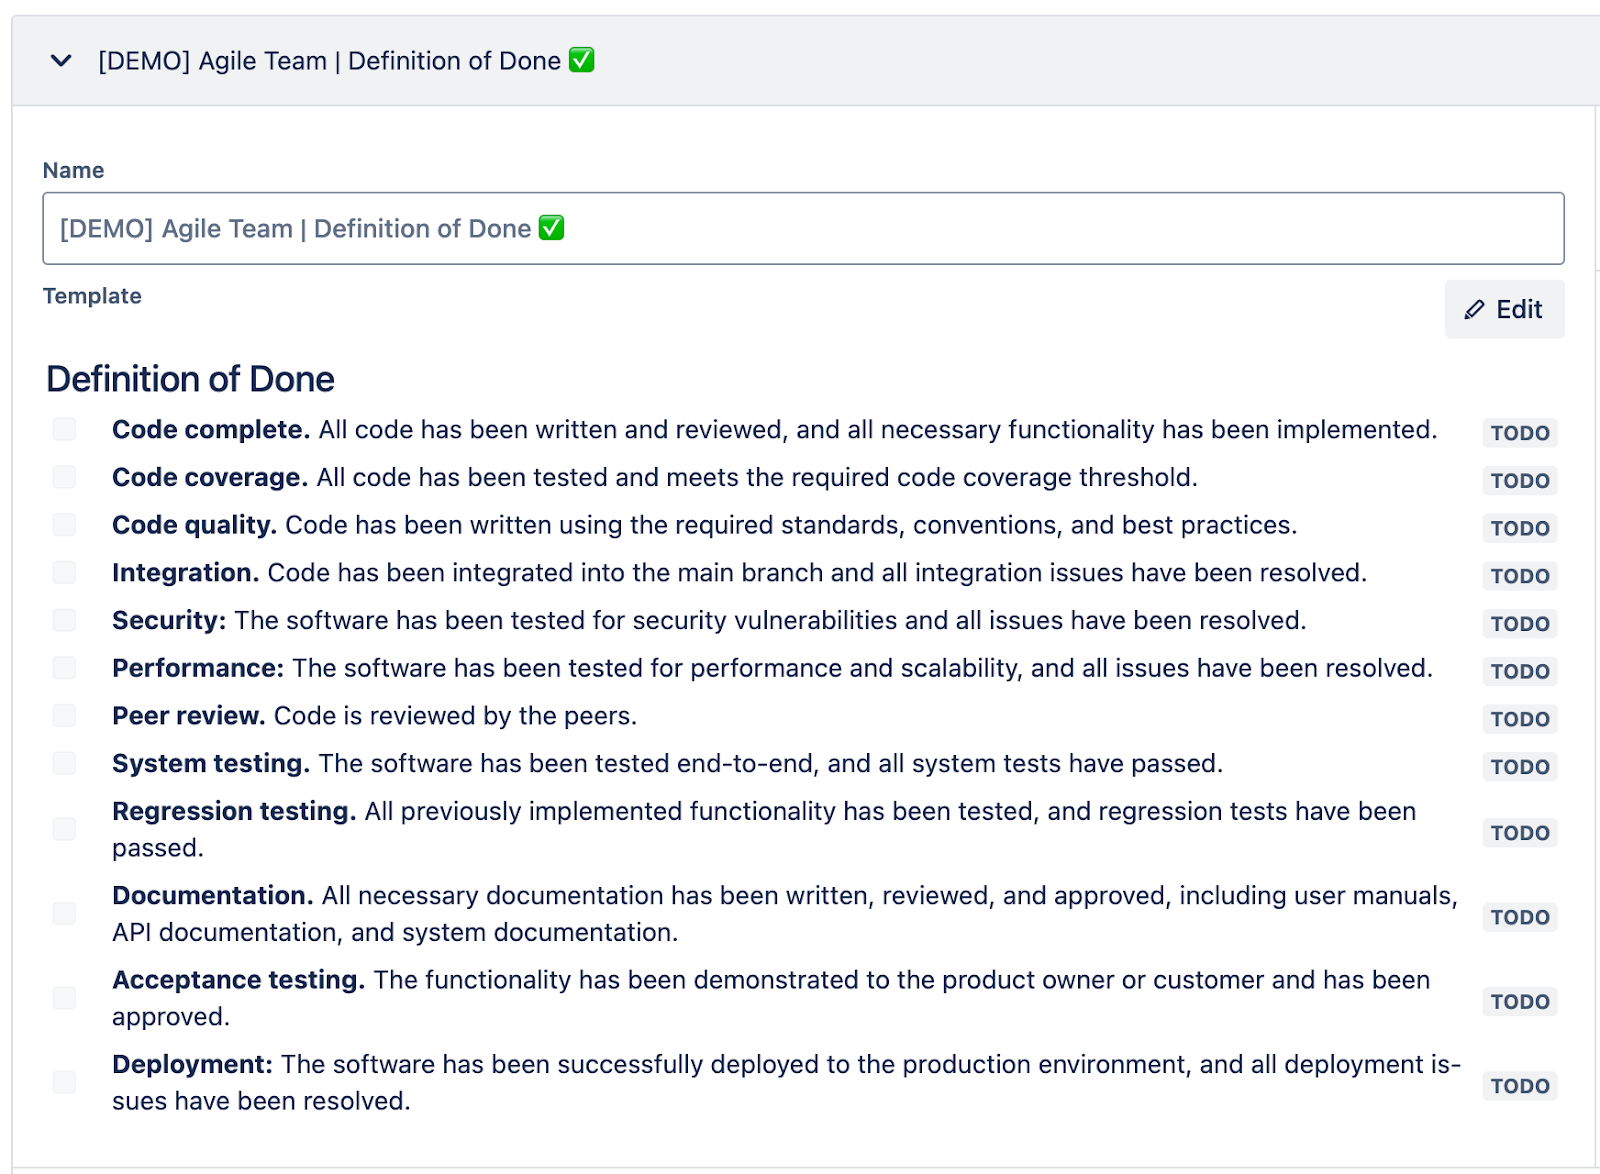
## Definition of Done
-**Code complete.** All code has been written and reviewed, and all necessary functionality has been implemented.
-**Code coverage.** All code has been tested and meets the required code coverage threshold.
-**Code quality.** Code has been written using the required standards, conventions, and best practices.
-**Integration.** Code has been integrated into the main branch, and all integration issues have been resolved.
-**Security:** The software has been tested for security vulnerabilitie,s and all issues have been resolved.
-**Performance:** The software has been tested for performance and scalability, and all issues have been resolved.
-**Peer review.** The code is reviewed by the peers.
-**System testing.** The software has been tested end-to-end, and all system tests have passed.
-**Regression testing.** All previously implemented functionality has been tested, and regression tests have been passed.
-**Documentation.** All necessary documentation has been written, reviewed, and approved, including user manuals, API documentation, and system documentation.
-**Acceptance testing.** The functionality has been demonstrated to the product owner or customer and has been approved.
-**Deployment:** The software has been successfully deployed to the production environment, and all deployment issues have been resolved.
This DoD template was created with the help of Smart Checklist for Jira. Once you have installed the app, you can simply copy and paste this template into your work item, and it will work as a checklist. It can also be saved as a checklist template and then applied to your tasks automatically. We’ll describe this in more detail in the next section.
Best Practices for Managing the Definition of Done in Jira
Unfortunately, simply having a DoD is not the same as enforcing it. Your Definition of Done needs to be clearly visible and actionable if you want your developers to keep to their end of the “contract” with the PO.
Having a Definition of Done in Jira rather than in a separate document that people might (and probably will) miss is a crucial step towards achieving this goal.
The simplest way of going around this is probably adding a dedicated custom field to your Jira work items (issues). However, this may not be the best option. None of the fields Atlassian offers are designed with a DoD in mind. A custom text field, for example, can quite easily hold your DoD. But it can’t make it actionable. And it probably won’t help that much with workflow validation.
Let’s explore the best practices that will help you make your DoD actionable and effective.
1. Use a checklist app
Given that the Definition of Done is, in essence, a checklist of tasks that need to be completed for the work to be considered done – many agile teams prefer using a checklist app. You can find many options for such a solution in the Atlassian Marketplace.
I recommend you try Smart Checklist for Jira by Titan Apps. This tool allows you to create structured checklists with rich formatting: headers, links, deadlines and mentions, custom statuses, expandable detail fields for each work item, mandatory items, and more. Moreover, it enables you to save checklists as reusable templates. This is very convenient as you can add the DoD to tasks automatically, share them with the team, and easily reuse the template as many times as you need.
Here’s how to create a reusable Definition of Done in Jira with Smart Checklist:
- Install Smart Checklist for Jira. Then, open a Jira work item and, in the Smart Checklist section of the issue view, write down the key steps of your DoD or insert a ready list.
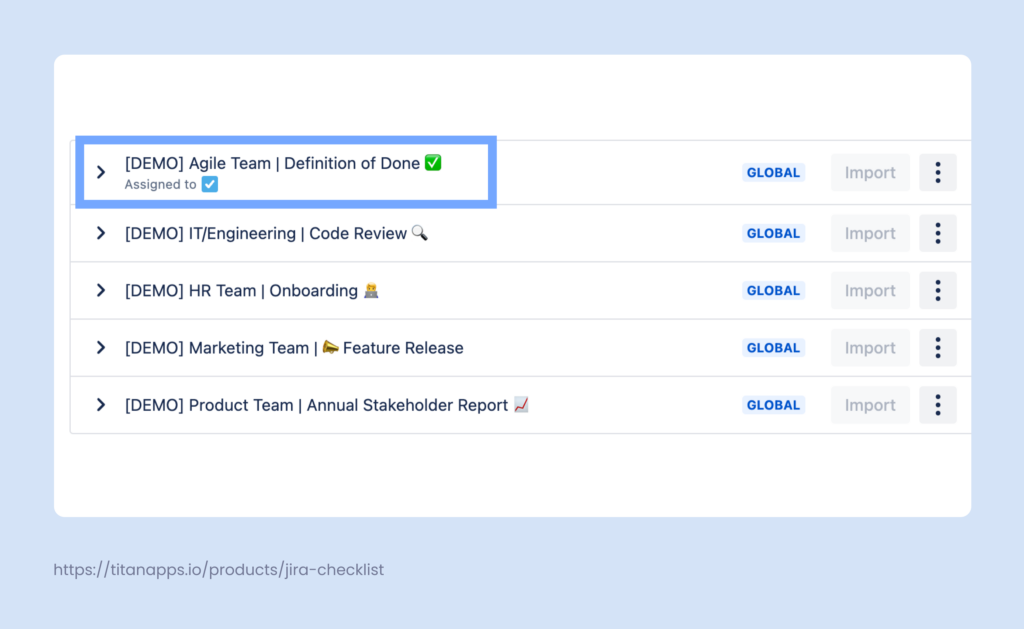
- Alternatively, you can use a Demo DoD template, which is available for free with Smart Checklist. To access it, click the three dots on the right of the Smart Checklist progress bar in your Jira work item and select Manage Templates. Then, choose the Definition of Done template from the list:
As another alternative, you can just copy the DoD checklist template from the Definition of Done Example section of this article. Then, you can paste it into the Smart Checklist section of your work item.
- If needed, use the markdown editor to further modify your Definition of Done in Jira. Add new steps, set custom statuses, and add deadlines.
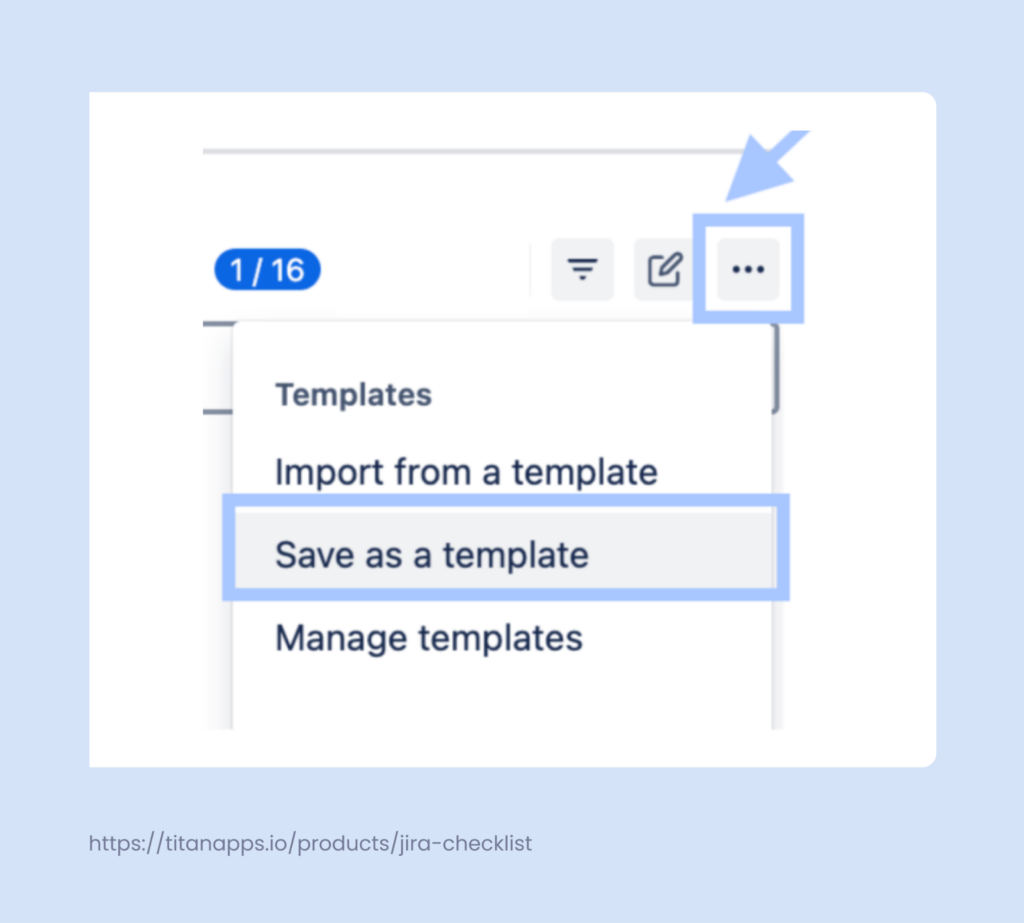
- If you are not using a ready-made demo template, you need to save your new DoD checklist as a template, as shown below.
Lastly, you can specify whether the Template you’ve created should be Project-specific or Global. You can select either option by clicking on the button with the three dots. In the table below, you’ll find a brief overview of how these two formats are different.
| Project Templates | Global Templates | |
|---|---|---|
| Visibility | Visible within the current project templates list | Visible across the whole Jira instance |
| Import/apply to the work item | Can be applied and imported to the Jira work items of this project only | Can be applied and imported to the Jira work items across all projects |
| Manage template | Users with an Admin Project role can edit the template content | Users with an Admin Project role can edit the template content |
| Default template option | Can only be set as a default per this project work type (formerly issue type) | When it is set as a default per Project’s work type, then it still applies within the scope of this project |
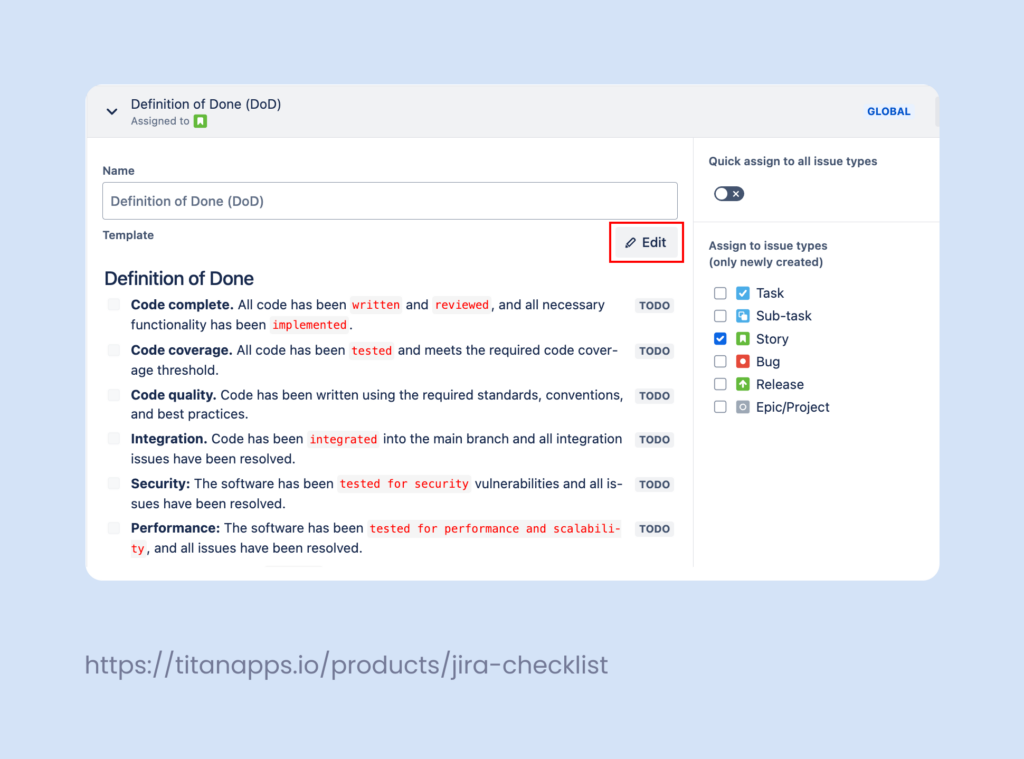
Smart Checklist allows you to assign your DoD template to a specific work type. Then, it will be added automatically to each new work item of this type. For example, it can be useful to add the Definition of Done checklist to all Stories. Here’s how to do this. In your work item view, click the three dots in the upper right corner of the Smart Checklist section. Then, select Manage Templates. Expand the Definition of Done template and tick the work types it should be applied to. In the example below, the template is assigned to Stories.

- Please note that these changes will only be applied to new work items. The tasks that your software development team already has in their backlog won’t be altered. However, you can still add the DoD checklist manually.
Typically, a team can have multiple DoDs for different work types: bugs, stories, and tasks. Smart Checklist allows you to create as many templates as you need to meet your requirements.
It’s also worth mentioning that Smart Checklist offers a variety of formatting options. They help your team focus on the details that matter most or require attention. In particular, you can:
- Add details to each list item, which is really great if you need to leave more information on how to do a specific task.
- Tag colleagues whose input is needed for a specific checklist item or who are responsible for its completion.
- Add deadlines and other dates.
- Mark the most important checklist items as mandatory.
- Structure the DoD checklist with headers of different levels.
- Set custom statuses for each checklist item, such “Next up”, “In testing”, etc.
You can find the details on using these and other formatting options in the Markdown guidelines. Apart from the parent work items (such as a task), smart checklists can also be added to sub-tasks. The solution works with Jira Cloud, as well as with Jira Data Center.
Last but not least, if you like to stay on top of things, you can also configure a Smart Checklist to show the progress of each item on your Agile Board.
2. Use the Definition of Done With Automation For Jira
Smart Checklist is integrated with Automation for Jira, meaning you can automatically apply templates based on a variety of triggers. For example, you can automatically add templates to work items based on work item field value or workflow transition.
As I explained earlier, Smart Checklist has native functionality that allows you to assign checklist templates to work items of a specific type. However, you may also need to add checklists based on more complex conditions. For this purpose, you can use Automation for Jira together with Smart Checklist.
For example, this can be a rule that checks whether the work item summary contains “New feature” and, if it does, adds the DoD checklist. Another popular option is to assign a checklist based on workflow transitions. For instance, the DoD checklist is added once a work item is transferred from “To Do” to “In Progress”.
Here’s how to set up an Automation for Jira rule that includes a smart template.
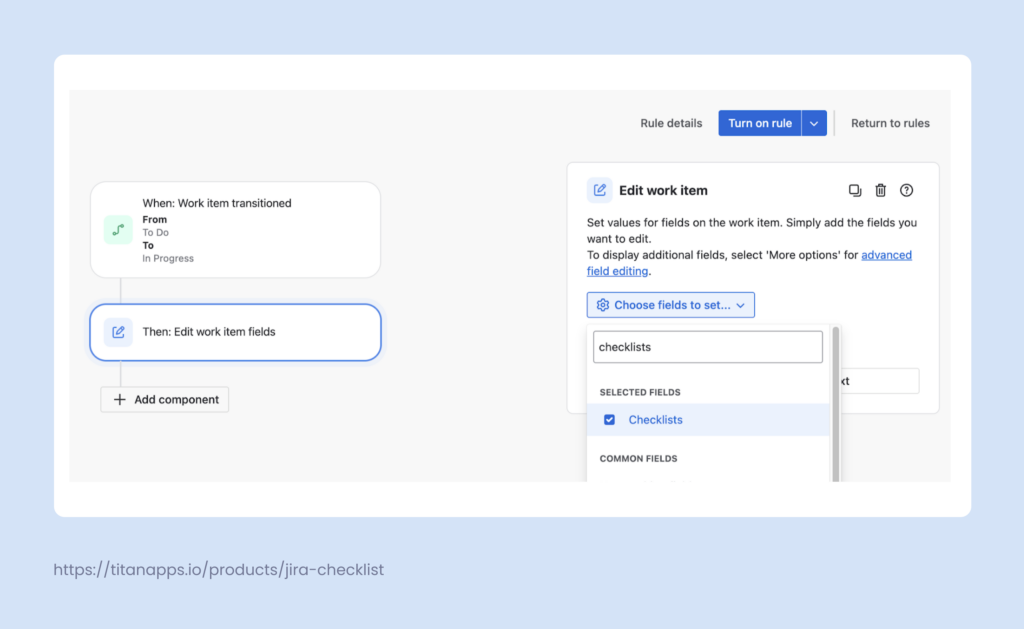
Navigate to Project Settings -> Automation -> Create Rule. Then, select a trigger. In our example, it’s Work item transitioned. After this, specify your conditions.
As an action, choose Edit work item fields and select Checklists:
Use the information from the table below to fill in the value field. Basically, those are instructions that tell the rule how to edit your work item checklists.
| Choose fields to set | Checklists |
|---|---|
| If you want to append the template to the Smart Checklist | {{issue.properties.”com.railsware.SmartChecklist.checklist”}} {{project.properties.”com.railsware.SmartChecklist.templateId. |
| If you want to replace the Smart Checklist with the template | {{project.properties.”com.railsware.SmartChecklist.templateId. |
Here’s what it looks like:
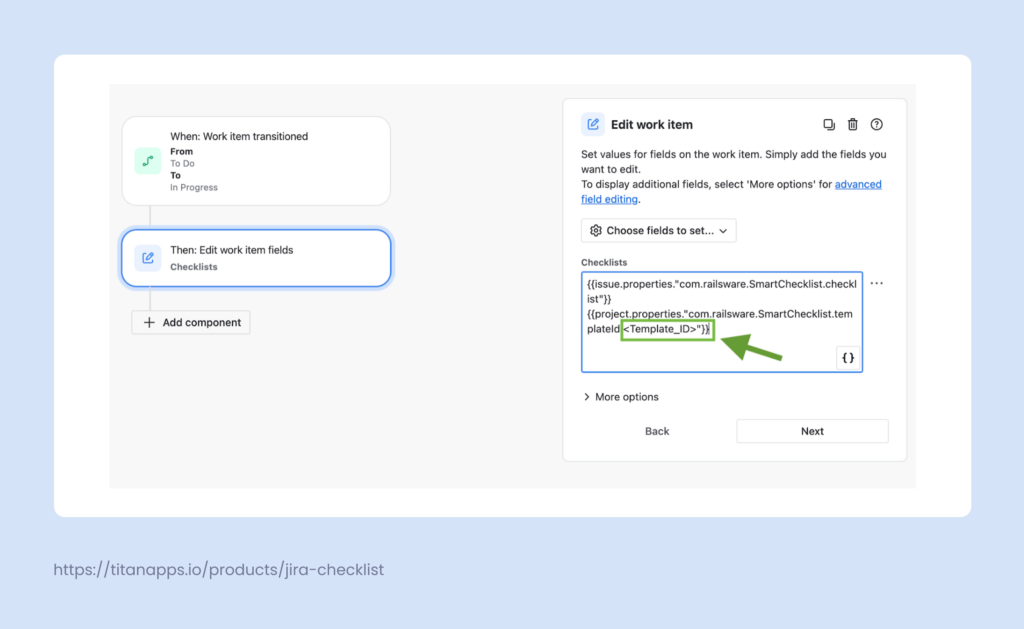
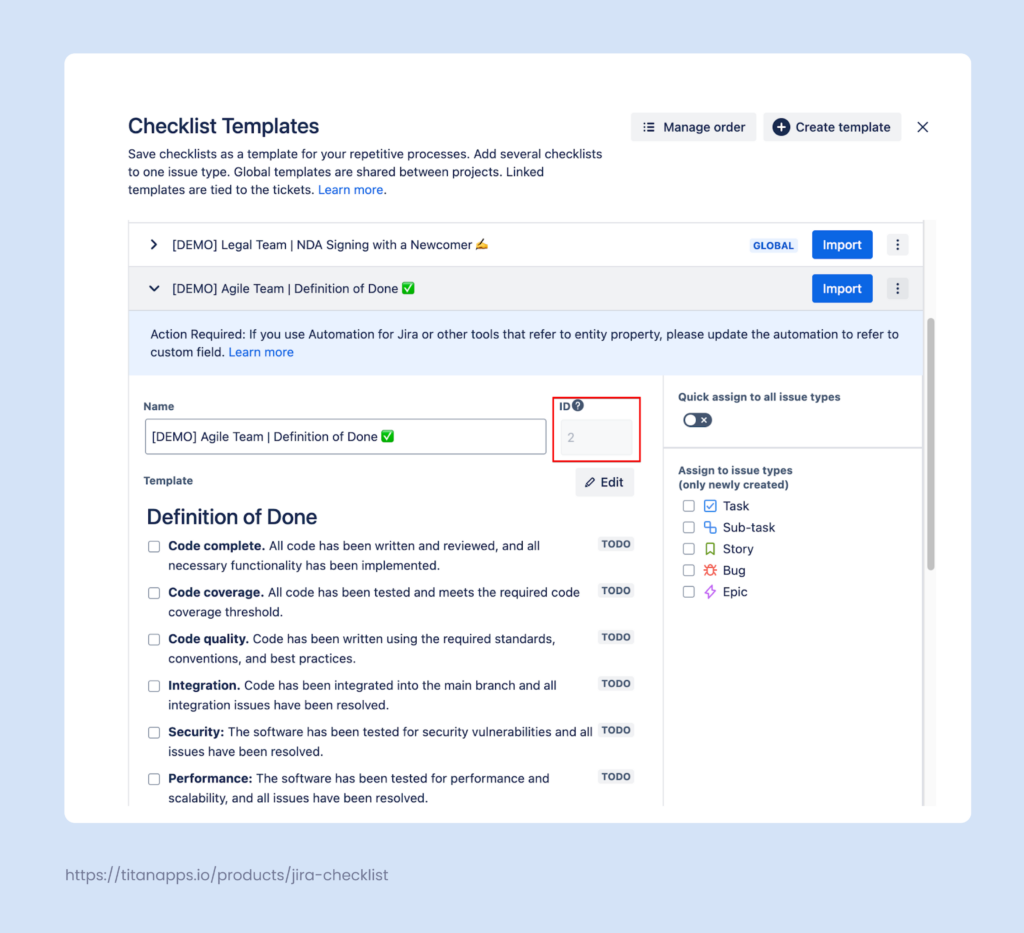
Now, you need to provide the actual Template ID instead of the placeholder in the description. To find the ID of your DoD template, open a work item and click the 3 dots menu of the Smart Checklist section. Then, select Manage Templates and expand the DoD template. You will find its Template ID to the right of the Name box:
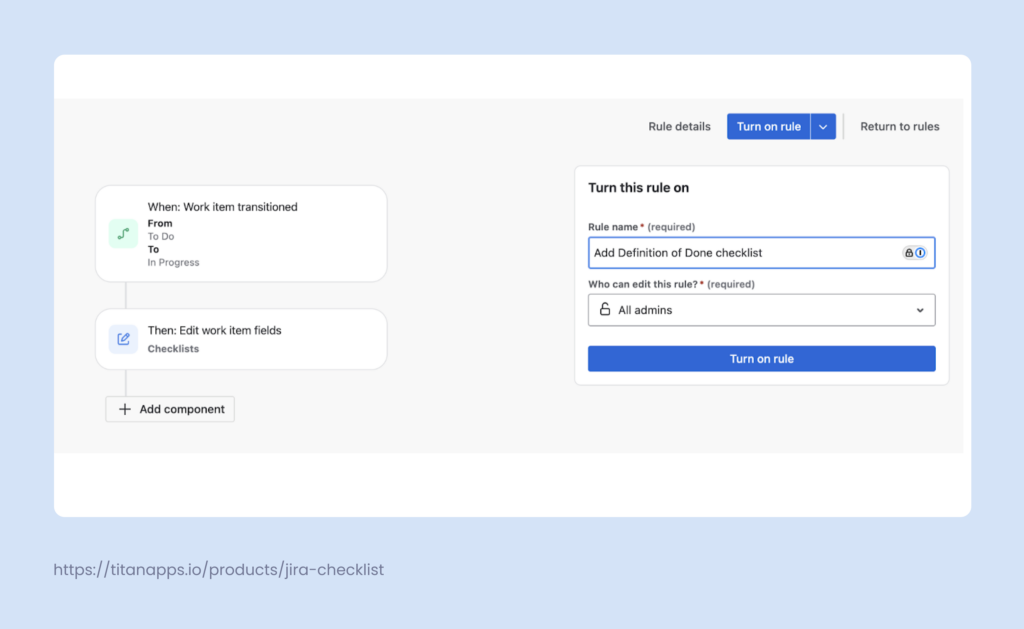
Paste the copied ID into the Checklists field of your automation rule, replacing the <Template_ID> placeholder. Once Done, name the rule and turn on the automation.
That’s it! Now your DoD checklist will be added automatically when the conditions you set in the rule are met. Please note that you can only use Project Templates with Automation for Jira, not Global Templates. I explained the difference between them earlier in the comparison table.
3. Add a workflow validator
Now that you have a well-designed and actionable DoD, let’s enforce it with a workflow validator.
This functionality is quite useful as it will prevent work items from transitioning into a new status unless all of the checklist items in your DoD are completed. In other words, a work item can’t be marked as Done until all steps in the DoD checklist are done. Additionally, it’s also possible to make certain checklist items mandatory and block moving to the next stage until the mandatory ones are completed. Let’s see how to do this.
How to prevent moving a task to “Done” until all items on the DoD checklist are “Done”
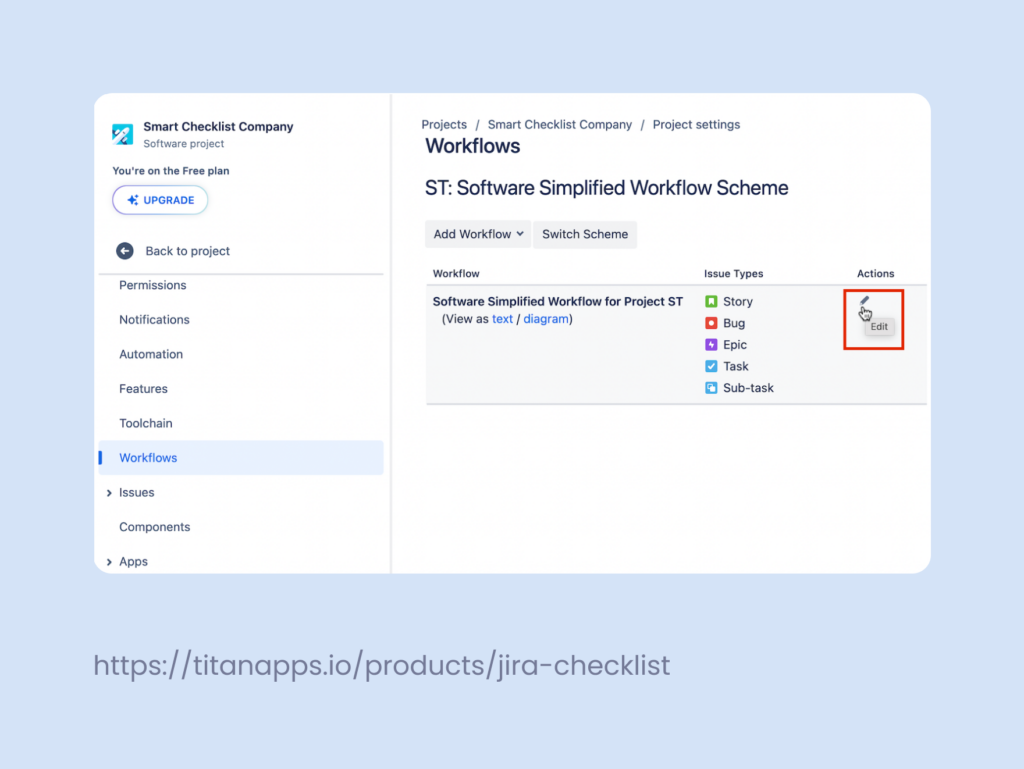
Go to Project Settings -> Workflows and choose the workflow you want to add validation to. Then, click Edit:
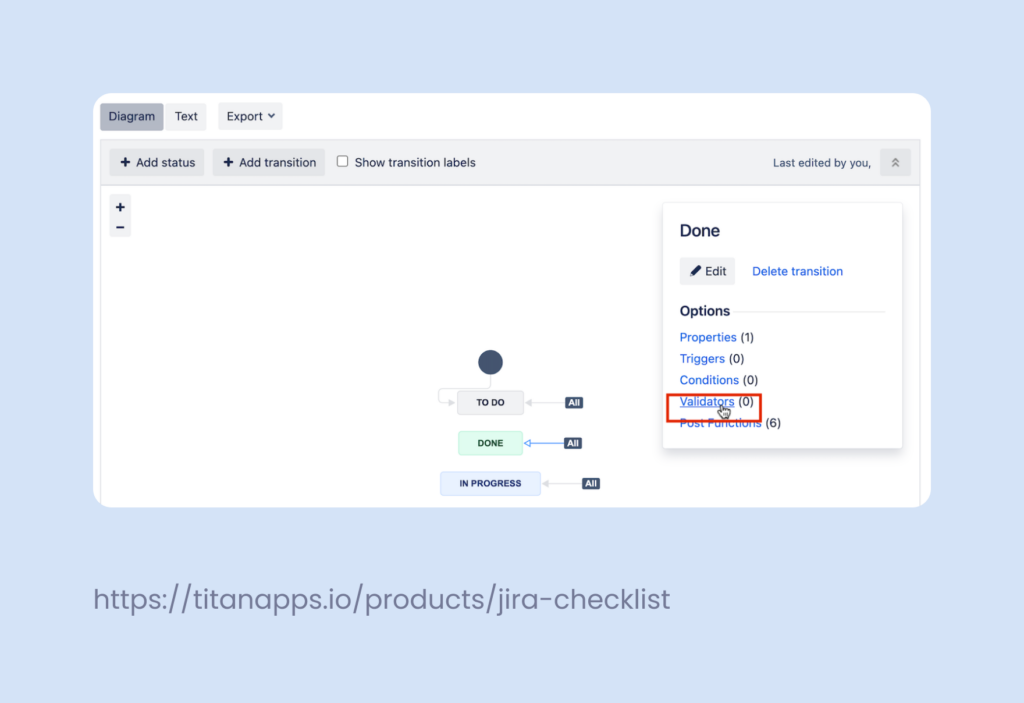
Choose the transition you need – such as from “In Progress” to “Done” or from “In Testing” to “Done” (depends on your workflow). Then, click on the Validators link:
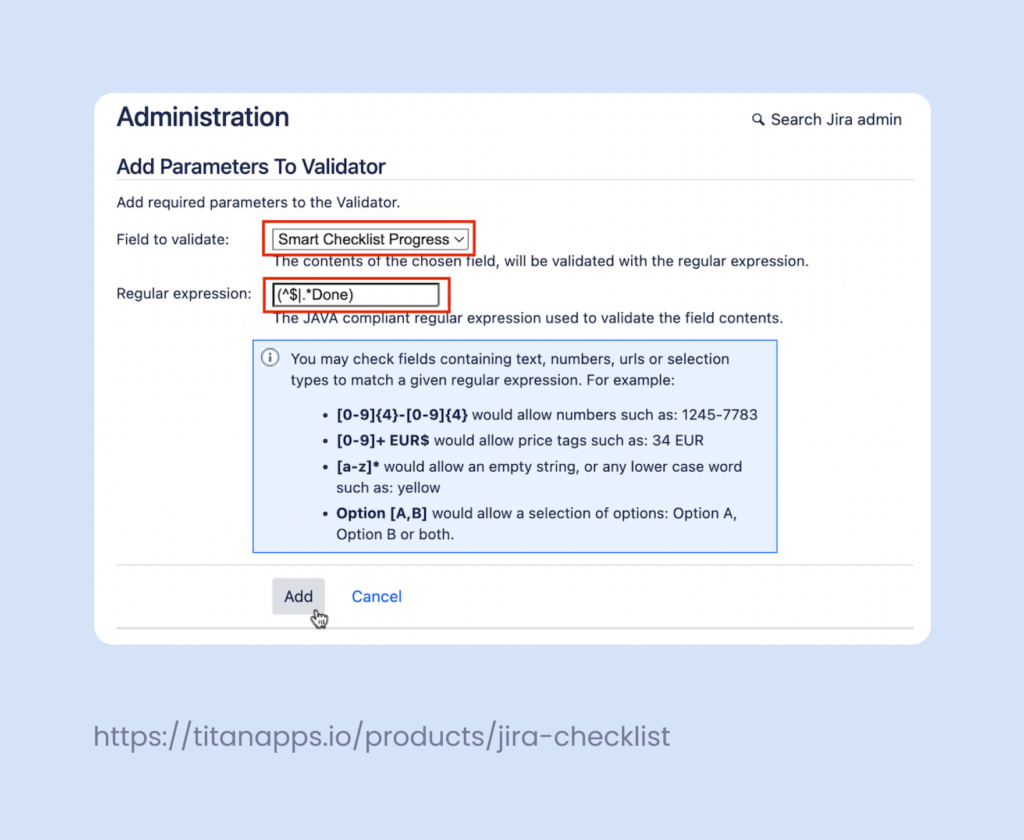
Click Add Validator -> Regular Expression Check -> Add.
Then, choose the “Smart Checklist Progress” field and set the Regular Expression value to: (^$|.*Done)
Once done, publish this changed workflow.
As a result, your users won’t be able to transfer a work item to “Done” before they mark all the steps in the DoD checklist as done. If they attempt to do so, they will see an error message.
How to prevent moving a task to “Done” until all mandatory checklist items are completed
In the previous example, we explained how to block the transition to “Done” until ALL DoD items are marked as “Done”. However, you may feel that not all steps on the checklist are so critical. In this case, you can limit this automation to only those steps that you make mandatory.
Here’s how to add mandatory items to your DoD smart checklist.
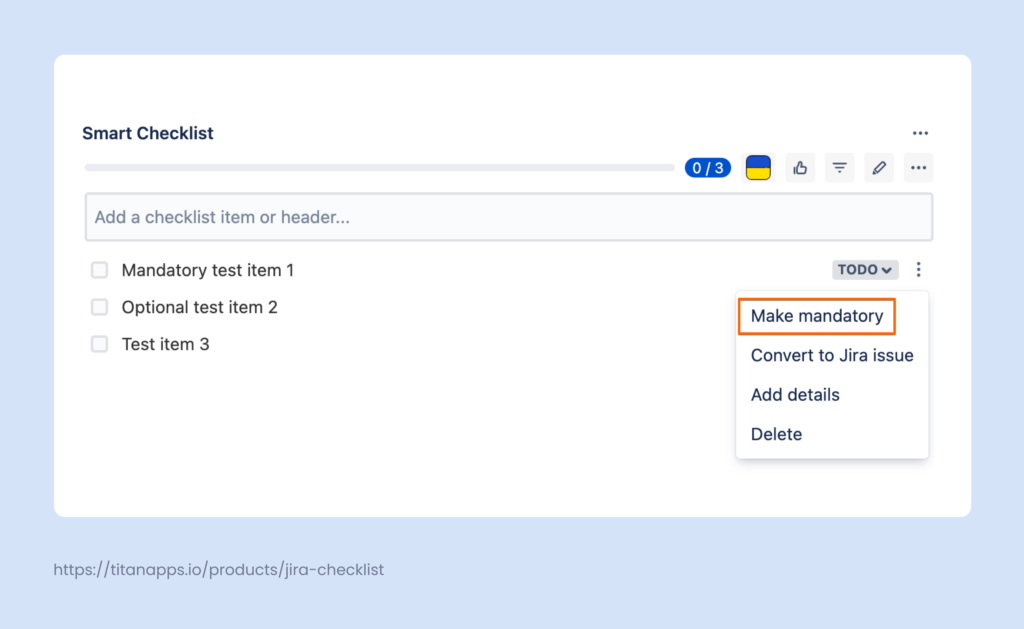
Open a Jira work item with the DoD checklist. Then, click on the 3 dots menu for the checklist item you need and select “Make mandatory”:
As a result, a red asterisk will be added to the upper right corner of the checkbox:
This helps your team see priorities and quickly understand which steps on the list are the most important ones. Please note that this feature is only available to the Smart Checklist Pro plan users.
Once you’ve marked all the items you need as mandatory, don’t forget to save the updated DoD checklist as a template so that you can reuse it later.
Now, let’s add a validator that will prevent a task from transitioning to “Done” until all mandatory items are completed.
The first part is the same as we described earlier in our previous example. Go to Project Settings -> “Workflows”. Choose the workflow you need and click Edit. Then, choose the transition to “Done” and click on the Validators link. Click Add validator.
Then, choose “Mandatory items completed (Smart Checklist)”:
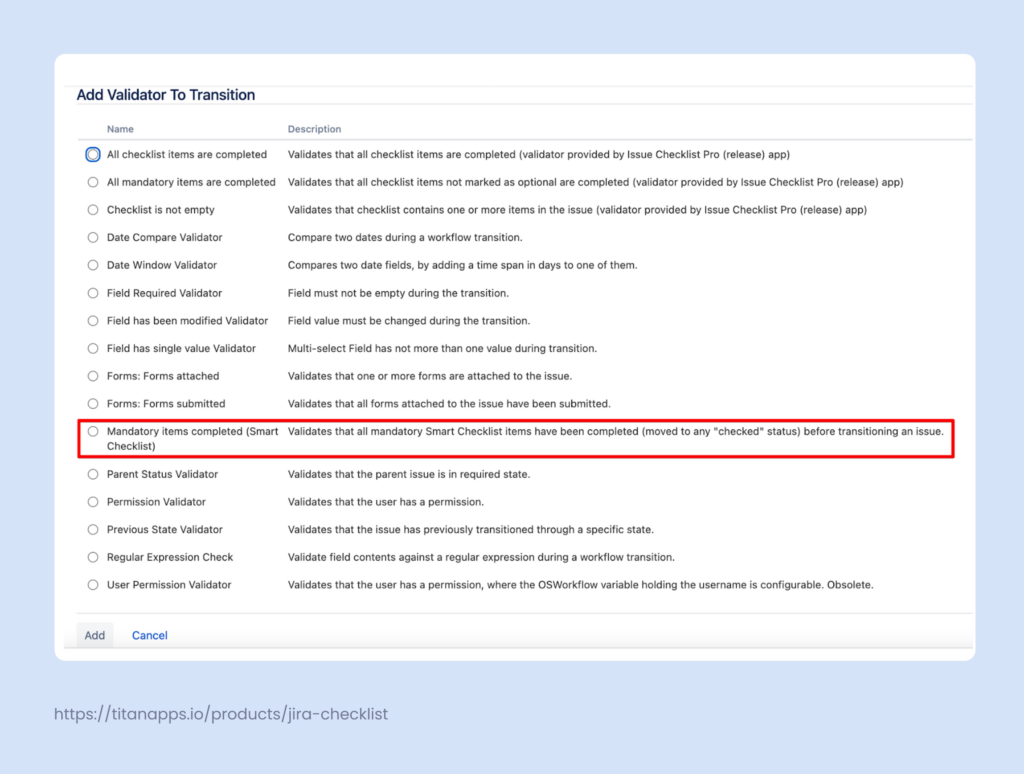
Once done, save and publish the altered workflow.
For more details, please see the Smart Checklist documentation.
4. Keep your DoD up-to-date
Your team grows and improves over time. Some requirements may change, and new processes are likely to be introduced. Review your DoD templates regularly and make edits, if necessary. This can easily be done from Smart Checklist’s “Manage templates“ view.
By keeping your Definition of Done in Jira up to date, you help your team stay focused and ship great work.
The Importance of Using The Definition of Done in Jira
Introducing the Definition of Done can have a lasting impact on the quality of work your team delivers. DoD removes ambiguity and gives everyone on the team a tool for understanding what is expected when the product is delivered.
To make this a success, remember to follow these best practices. When preparing your Definition of Done in Jira, make it:
- Clear: use plain language and avoid ambiguity. Your checklist items need to be yes or no questions.
- Testable: There needs to be a clear way to ensure that the goal behind every checklist item in the DoD has been reached.
- Realistic: Make sure that the goals are measurable and achievable. Don’t try to cram everything you can into the DoD. As tempting as it may be, too many items, paired with the lack of time to do everything at once, will still force your team to focus on the select few.
Using DoD in Jira is beneficial for all the stakeholders of your Agile team. It helps your product owner to ensure the high quality of the solution you work on. At the same time, it provides your team members with clear quality standards and a shared understanding of what “done” really means.
I hope this tutorial offered you the answers you were looking for and helped you use Jira more effectively.